window SKODA CITIGO 2012 1.G Owner's Manual
[x] Cancel search | Manufacturer: SKODA, Model Year: 2012, Model line: CITIGO, Model: SKODA CITIGO 2012 1.GPages: 157, PDF Size: 3.9 MB
Page 5 of 157
Table of Contents
Abbreviations
Using the system
Cockpit 7
Overview 6
Instruments and warning lights 8
Instrument cluster 8
Multifunction display (onboard computer) 11
Warning lights 14
Unlocking and locking 20
Vehicle key 20
Central locking system 21
Remote control 23
Luggage compartment lid 25
Electrical power windows 26
Rear windows 27
Power panoramic sliding/sliding tilting roof 27
Lights and visibility 29
Lights 29
Interior light 32
Visibility 33
Windscreen wipers and washers 33
Rear window 35
Seats and Stowage 38
Front seats 38
Head restraints 40
Rear seats 40
Luggage compartment 41
Roof rack system 44
Cup holder 45
Ash tray 45Cigarette lighter, 12-volt power socket 46
Storage compartments 47
Clothes hooks 50
Parking ticket holder 50
Heating and air conditioning system 51
Heating and air conditioning system 51
Air outlet vents 52
Heating 52
Air conditioning system 53
Starting-off and Driving 56
Starting and stopping the engine 56
Brakes and brake assist systems 58
Shifting (manual gearbox) 61
pedals 62
Parking aid 62
Visual parking system 63
Cruise control system (CCS) 63
START/STOP 65
City Safe Drive 66
Automatic gearbox 69
Automatic gearbox AGB 69
Communication 72
Mobile phones and two-way radio systems 72
Multifunction device Move & Fun 72
Safety
Passive Safety 74
General information 74
Correct seated position 75
Seat belts 78
Seat belts 78
Airbag system 82
Description of the airbag system 82
Front airbags 83Side airbags Head-Thorax 84
Switching off the airbags 85
Transporting children safely 87
Child seat 87
Driving Tips
Driving and the Environment 91
The first 1 500 km 91
Catalytic converter 91
Economical and environmentally friendly
driving 92
Environmental compatibility 94
Driving abroad 95
Avoiding damage to your vehicle 95
Driving through water on the street 96
General Maintenance
Taking care of and cleaning the vehicle 97
Taking care of your vehicle 97
Inspecting and replenishing 104
Fuel 104
Vehicle running on CNG (compressed natural
gas) 106
Engine compartment 108
Vehicle battery 115
Wheels and Tyres 119
Tyres 119
Accessories, changes and replacement of parts 125
Introductory information 125
Changes and impairments of the airbag
system 125
Towing a trailer 126
3
Table of Contents
Page 9 of 157
Using the system
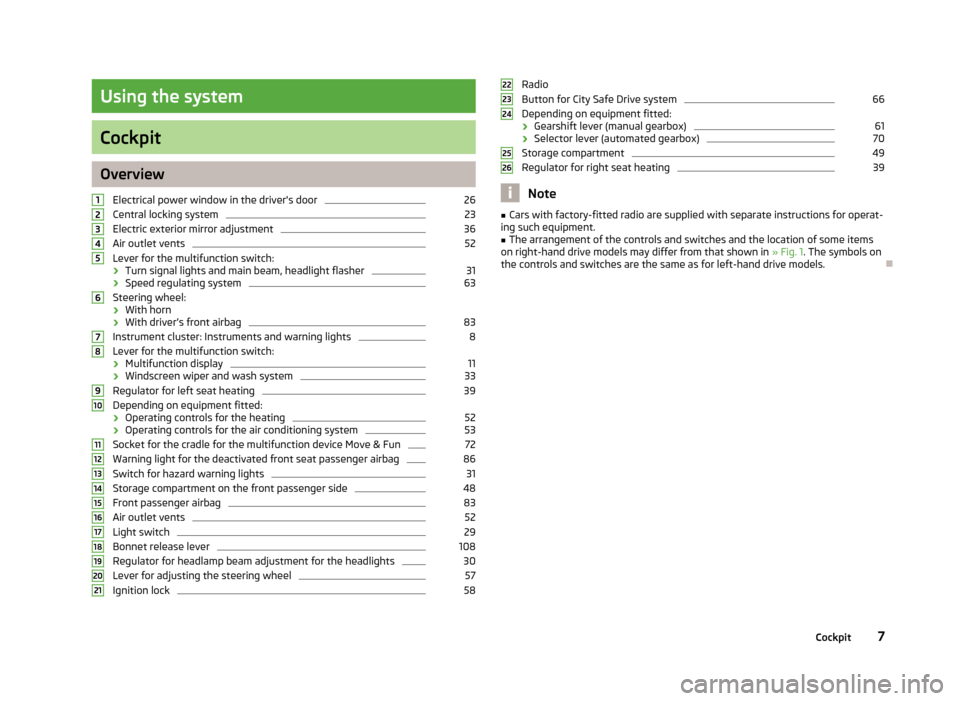
Cockpit
Overview
Electrical power window in the driver's door 26
Central locking system 23
Electric exterior mirror adjustment 36
Air outlet vents 52
Lever for the multifunction switch:
› Turn signal lights and main beam, headlight flasher 31
› Speed regulating system 63
Steering wheel:
› With horn
› With driver’s front airbag 83
Instrument cluster: Instruments and warning lights 8
Lever for the multifunction switch:
› Multifunction display 11
› Windscreen wiper and wash system 33
Regulator for left seat heating 39
Depending on equipment fitted:
› Operating controls for the heating 52
› Operating controls for the air conditioning system 53
Socket for the cradle for the multifunction device Move & Fun 72
Warning light for the deactivated front seat passenger airbag 86
Switch for hazard warning lights 31
Storage compartment on the front passenger side 48
Front passenger airbag 83
Air outlet vents 52
Light switch 29
Bonnet release lever 108
Regulator for headlamp beam adjustment for the headlights 30
Lever for adjusting the steering wheel 57
Ignition lock 581
2
3
4
5
6
7
8
9
10
11
12
13
14
15
16
17
18
19
20
21 Radio
Button for
City Safe Drive system 66
Depending on equipment fitted:
› Gearshift lever (manual gearbox) 61
› Selector lever (automated gearbox) 70
Storage compartment 49
Regulator for right seat heating 39
Note
■ Cars with factory-fitted radio are supplied with separate instructions for operat-
ing such equipment. ■ The arrangement of the controls and switches and the location of some items
on right-hand drive models may differ from that shown in » Fig. 1. The symbols on
the controls and switches are the same as for left-hand drive models. Ð 22
23
24
25
26
7
Cockpit
Page 22 of 157
Unlocking and locking
Vehicle key
Introductory information
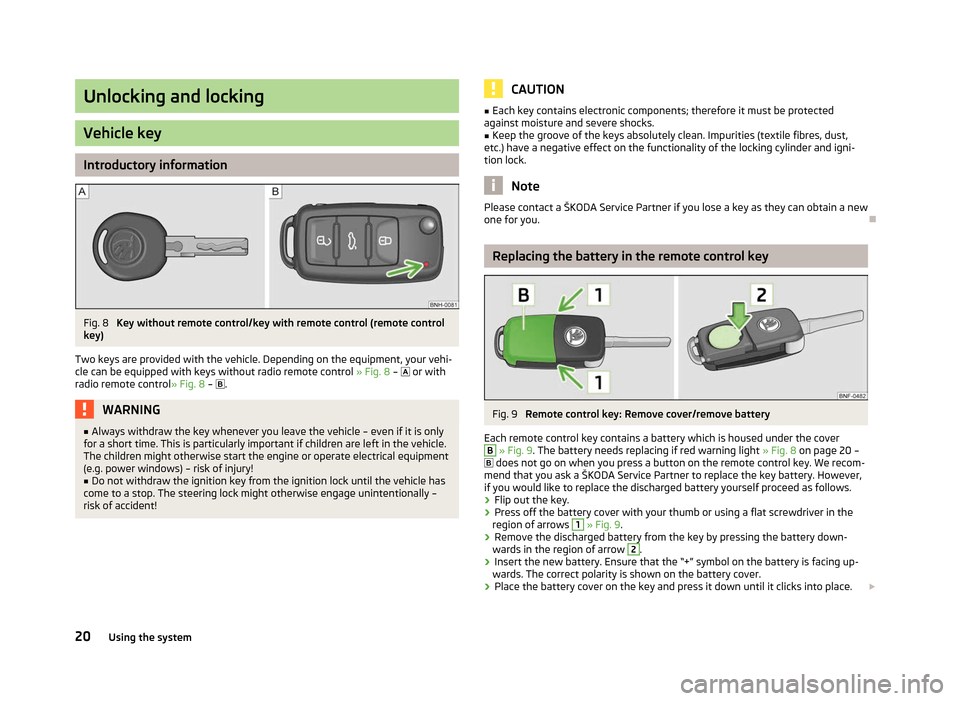
Fig. 8
Key without remote control/key with remote control (remote control
key)
Two keys are provided with the vehicle. Depending on the equipment, your vehi-
cle can be equipped with keys without radio remote control » Fig. 8 – or with
radio remote control»
Fig. 8 – . WARNING
■ Always withdraw the key whenever you leave the vehicle – even if it is only
for a short time. This is particularly important if children are left in the vehicle.
The children might otherwise start the engine or operate electrical equipment
(e.g. power windows) – risk of injury!
■ Do not withdraw the ignition key from the ignition lock until the vehicle has
come to a stop. The steering lock might otherwise engage unintentionally –
risk of accident! CAUTION
■ Each key contains electronic components; therefore it must be protected
against moisture and severe shocks.
■ Keep the groove of the keys absolutely clean. Impurities (textile fibres, dust,
etc.) have a negative effect on the functionality of the locking cylinder and igni-
tion lock. Note
Please contact a ŠKODA Service Partner if you lose a key as they can obtain a new
one for you. Ð Replacing the battery in the remote control key
Fig. 9
Remote control key: Remove cover/remove battery
Each remote control key contains a battery which is housed under the cover B
» Fig. 9. The battery needs replacing if red warning light
» Fig. 8 on page 20 –
does not go on when you press a button on the remote control key. We recom-
mend that you ask a ŠKODA
Service Partner to replace the key battery. However,
if you would like to replace the discharged battery yourself proceed as follows.
› Flip out the key.
› Press off the battery cover with your thumb or using a flat screwdriver in the
region of arrows 1
» Fig. 9.
› Remove the discharged battery from the key by pressing the battery down-
wards in the region of arrow 2
.
› Insert the new battery. Ensure that the “+” symbol on the battery is facing up-
wards. The correct polarity is shown on the battery cover.
› Place the battery cover on the key and press it down until it clicks into place.
£
20 Using the system
Page 24 of 157
Safe securing system
The central locking system is equipped with a safe securing system. The door
locks are blocked automatically if the vehicle is locked from the outside. The
warning light flashes for around 2 seconds in quick succession, afterwards it be-
gins to flash evenly at longer intervals. It is not possible to open the doors with
the door handle either from the inside or from the outside. This acts as an effec-
tive deterrent against attempts to break into your vehicle.
The safe securing system can be deactivated within 2
seconds by double locking
the vehicle.
If the safe securing system is not operating, the warning light in the driver door
flashes for about 2 seconds fast, goes out and starts to flash evenly at longer in-
tervals after about 30 seconds.
The safe securing system is activated again the next time the vehicle is unlocked
and locked.
If the vehicle is locked and the safe securing system is deactivated, the door can
be opened from the inside by a single pull on opening lever of the respective
door. WARNING
If the vehicle is locked from the outside and the safe securing system is acti-
vated, there must not be any person in the vehicle as it is then no longer pos-
sible to open either a door or a window from the inside. The locked doors
make it more difficult for rescuers to get into the vehicle in an emergency –
hazard! ÐUnlocking the vehicle using the key
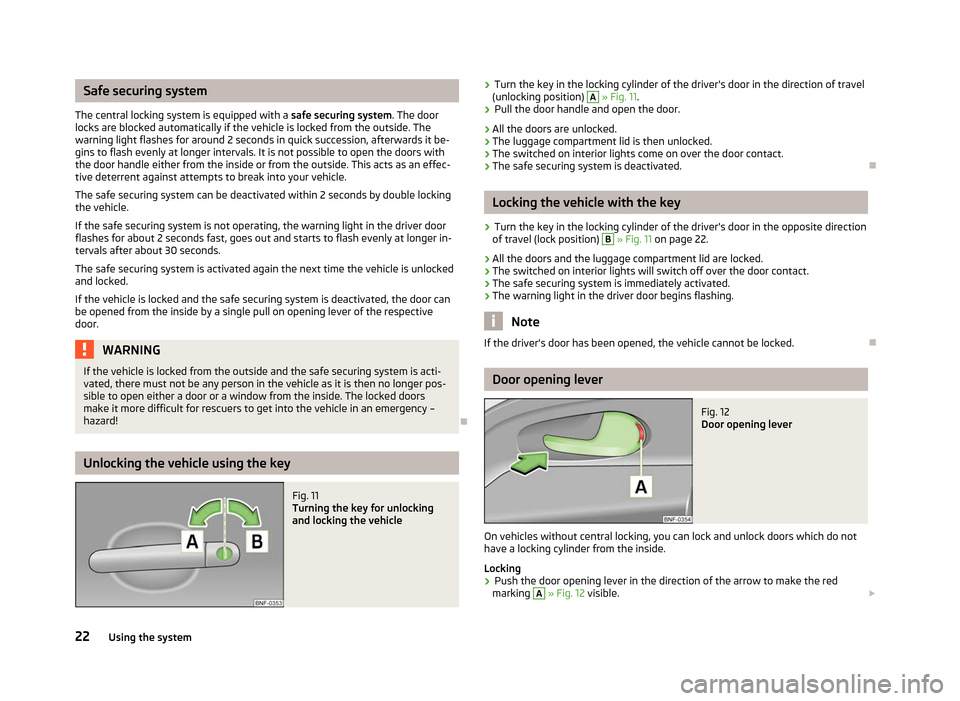
Fig. 11
Turning the key for unlocking
and locking the vehicle ›
Turn the key in the locking cylinder of the driver's door in the direction of travel
(unlocking position) A
» Fig. 11.
› Pull the door handle and open the door.
› All the doors are unlocked.
› The luggage compartment lid is then unlocked.
› The switched on interior lights come on over the door contact.
› The safe securing system is deactivated. Ð Locking the vehicle with the key
› Turn the key in the locking cylinder of the driver's door in the opposite direction
of travel (lock position) B
»
Fig. 11
on page 22.
› All the doors and the luggage compartment lid are locked.
› The switched on interior lights will switch off over the door contact.
› The safe securing system is immediately activated.
› The warning light in the driver door begins flashing. Note
If the driver's door has been opened, the vehicle cannot be locked. Ð Door opening lever
Fig. 12
Door opening lever
On vehicles without central locking, you can lock and unlock doors which do not
have a locking cylinder from the inside.
Locking
› Push the door opening lever in the direction of the arrow to make the red
marking A
»
Fig. 12
visible. £
22 Using the system
Page 26 of 157
■
The battery must be replaced if the central locking or anti-theft alarm system
does react to the remote control at less than 3
metres away » page 20.
■ If the driver door is open, the vehicle cannot be locked using the remote control
key. ÐUnlocking/locking
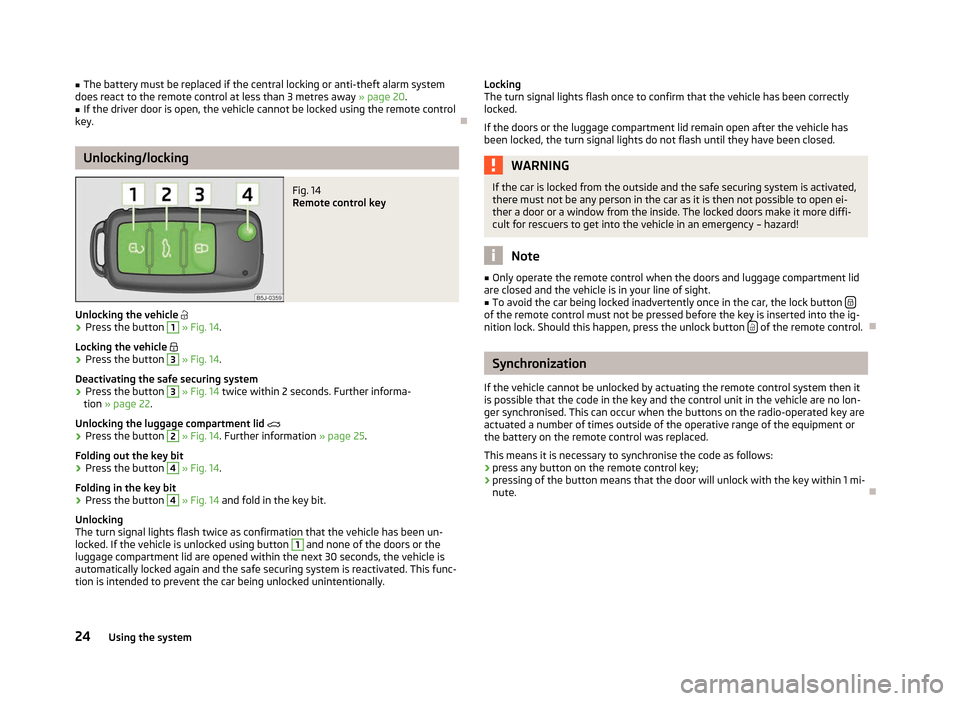
Fig. 14
Remote control key
Unlocking the vehicle
› Press the button 1
» Fig. 14.
Locking the vehicle
› Press the button 3
» Fig. 14.
Deactivating the safe securing system
› Press the button 3
» Fig. 14 twice within 2
seconds. Further informa-
tion » page 22.
Unlocking the luggage compartment lid
› Press the button 2
» Fig. 14. Further information
» page 25.
Folding out the key bit
› Press the button 4
» Fig. 14.
Folding in the key bit
› Press the button 4
» Fig. 14 and fold in the key bit.
Unlocking
The turn signal lights flash twice as confirmation that the vehicle has been un-
locked. If the vehicle is unlocked using button 1
and none of the doors or the
luggage compartment lid are opened within the next 30 seconds, the vehicle is
automatically locked again and the safe securing system is reactivated. This func-
tion is intended to prevent the car being unlocked unintentionally. Locking
The turn signal lights flash once to confirm that the vehicle has been correctly
locked.
If the doors or the luggage compartment lid remain open after the vehicle has
been locked, the turn signal lights do not flash until they have been closed.
WARNING
If the car is locked from the outside and the safe securing system is activated,
there must not be any person in the car as it is then not possible to open ei-
ther a door or a window from the inside. The locked doors make it more diffi-
cult for rescuers to get into the vehicle in an emergency – hazard! Note
■ Only operate the remote control when the doors and luggage compartment lid
are closed and the vehicle is in your line of sight. ■ To avoid the car being locked inadvertently once in the car, the lock button of the remote control must not be pressed before the key is inserted into the ig-
nition lock. Should this happen, press the unlock button
of the remote control.
Ð Synchronization
If the vehicle cannot be unlocked by actuating the remote control system then it
is possible that the code in the key and the control unit in the vehicle are no lon-
ger synchronised. This can occur when the buttons on the radio-operated key are
actuated a number of times outside of the operative range of the equipment or
the battery on the remote control was replaced.
This means it is necessary to synchronise the code as follows:
› press any button on the remote control key;
› pressing of the button means that the door will unlock with the key within 1 mi-
nute. Ð
24 Using the system
Page 27 of 157
Emergency locking of the doors
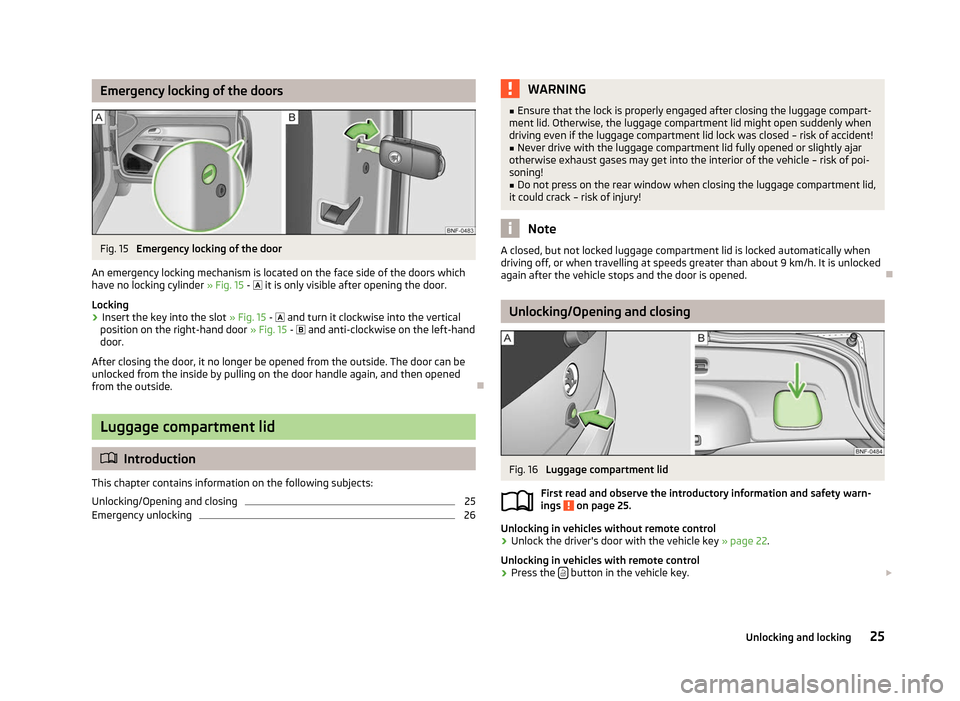
Fig. 15
Emergency locking of the door
An emergency locking mechanism is located on the face side of the doors which
have no locking cylinder » Fig. 15 - it is only visible after opening the door.
Locking › Insert the key into the slot
» Fig. 15 - and turn it clockwise into the vertical
position on the right-hand door » Fig. 15 - and anti-clockwise on the left-hand
door.
After closing the door, it no longer be opened from the outside. The door can be
unlocked from the inside by pulling on the door handle again, and then opened
from the outside. ÐLuggage compartment lid
ä
Introduction
This chapter contains information on the following subjects:
Unlocking/Opening and closing 25
Emergency unlocking 26 WARNING
■ Ensure that the lock is properly engaged after closing the luggage compart-
ment lid. Otherwise, the luggage compartment lid might open suddenly when
driving even if the luggage compartment lid lock was closed – risk of accident!
■ Never drive with the luggage compartment lid fully opened or slightly ajar
otherwise exhaust gases may get into the interior of the vehicle – risk of poi-
soning! ■ Do not press on the rear window when closing the luggage compartment lid,
it could crack – risk of injury! Note
A closed, but not locked luggage compartment lid is locked automatically when
driving off, or when travelling at speeds greater than about 9 km/h. It is unlocked
again after the vehicle stops and the door is opened. Ð Unlocking/Opening and closing
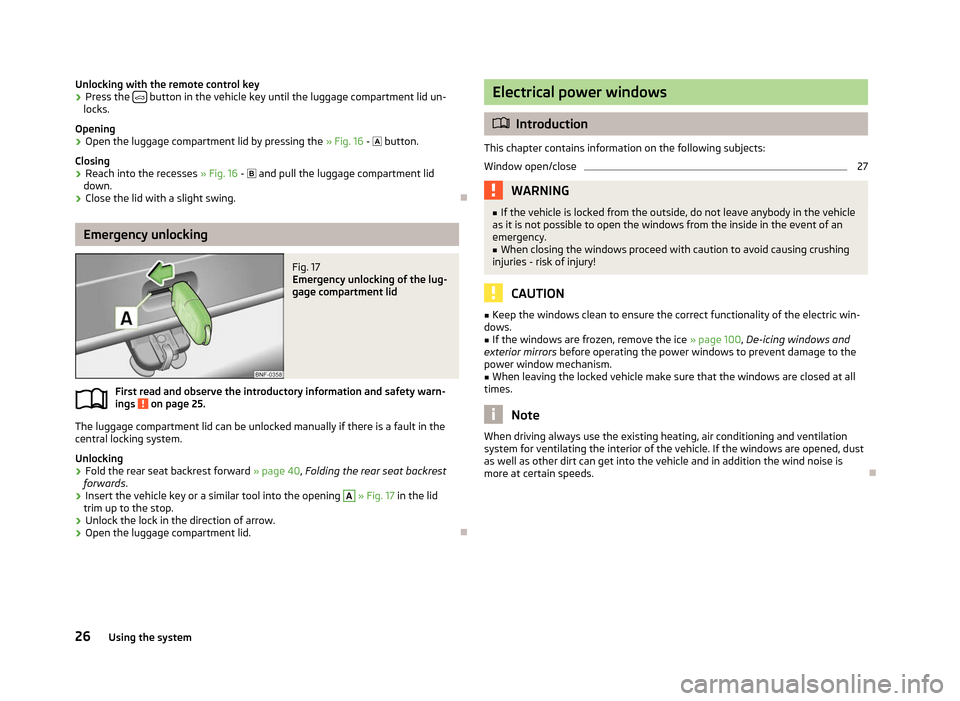
Fig. 16
Luggage compartment lid
First read and observe the introductory information and safety warn-
ings on page 25.
Unlocking in vehicles without remote control
›
Unlock the driver's door with the vehicle key
» page 22.
Unlocking in vehicles with remote control
› Press the
button in the vehicle key.
£
ä
25
Unlocking and locking
Page 28 of 157
Unlocking with the remote control key
›
Press the
button in the vehicle key until the luggage compartment lid un-
locks.
Opening
› Open the luggage compartment lid by pressing the
» Fig. 16 - button.
Closing
› Reach into the recesses
» Fig. 16 - and pull the luggage compartment lid
down.
› Close the lid with a slight swing. ÐEmergency unlocking
Fig. 17
Emergency unlocking of the lug-
gage compartment lid
First read and observe the introductory information and safety warn-
ings on page 25.
The luggage compartment lid can be unlocked manually if there is a fault in the
central locking system.
Unlocking
›
Fold the rear seat backrest forward
» page 40, Folding the rear seat backrest
forwards.
› Insert the vehicle key or a similar tool into the opening A
»
Fig. 17 in the lid
trim up to the stop.
› Unlock the lock in the direction of arrow.
› Open the luggage compartment lid. Ð
ä Electrical power windows
ä
Introduction
This chapter contains information on the following subjects:
Window open/close 27
WARNING
■ If the vehicle is locked from the outside, do not leave anybody in the vehicle
as it is not possible to open the windows from the inside in the event of an
emergency.
■ When closing the windows proceed with caution to avoid causing crushing
injuries - risk of injury! CAUTION
■ Keep the windows clean to ensure the correct functionality of the electric win-
dows. ■ If the windows are frozen, remove the ice » page 100, De-icing windows and
exterior mirrors before operating the power windows to prevent damage to the
power window mechanism.
■ When leaving the locked vehicle make sure that the windows are closed at all
times. Note
When driving always use the existing heating, air conditioning and ventilation
system for ventilating the interior of the vehicle. If the windows are opened, dust
as well as other dirt can get into the vehicle and in addition the wind noise is
more at certain speeds. Ð
26 Using the system
Page 29 of 157
Window open/close
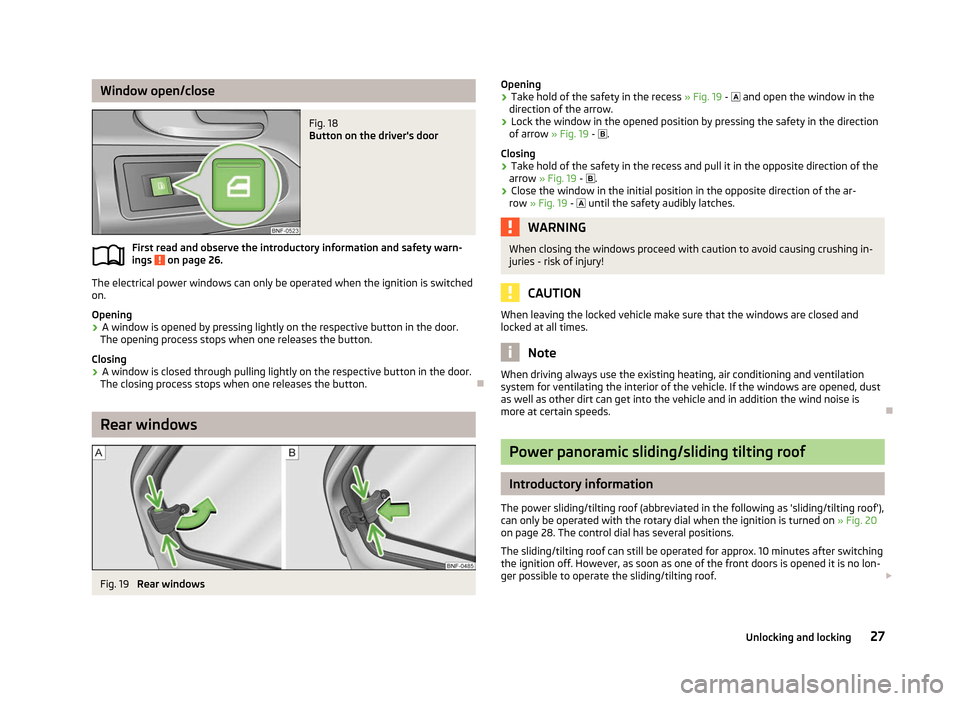
Fig. 18
Button on the driver's door
First read and observe the introductory information and safety warn-
ings on page 26.
The electrical power windows can only be operated when the ignition is switched
on.
Opening
›
A window is opened by pressing lightly on the respective button in the door.
The opening process stops when one releases the button.
Closing
› A window is closed through pulling lightly on the respective button in the door.
The closing process stops when one releases the button. ÐRear windows
Fig. 19
Rear windows
ä
Opening
› Take hold of the safety in the recess
» Fig. 19 - and open the window in the
direction of the arrow.
› Lock the window in the opened position by pressing the safety in the direction
of arrow » Fig. 19 - .
Closing
› Take hold of the safety in the recess and pull it in the opposite direction of the
arrow » Fig. 19 - .
› Close the window in the initial position in the opposite direction of the ar-
row » Fig. 19 - until the safety audibly latches. WARNING
When closing the windows proceed with caution to avoid causing crushing in-
juries - risk of injury! CAUTION
When leaving the locked vehicle make sure that the windows are closed and
locked at all times. Note
When driving always use the existing heating, air conditioning and ventilation
system for ventilating the interior of the vehicle. If the windows are opened, dust
as well as other dirt can get into the vehicle and in addition the wind noise is
more at certain speeds. Ð Power panoramic sliding/sliding tilting roof
Introductory information
The power sliding/tilting roof (abbreviated in the following as 'sliding/tilting roof'),
can only be operated with the rotary dial when the ignition is turned on »
Fig. 20
on page 28. The control dial has several positions.
The sliding/tilting roof can still be operated for approx. 10 minutes after switching
the ignition off. However, as soon as one of the front doors is opened it is no lon-
ger possible to operate the sliding/tilting roof. £
27
Unlocking and locking
Page 35 of 157
Visibility
Rear window heater
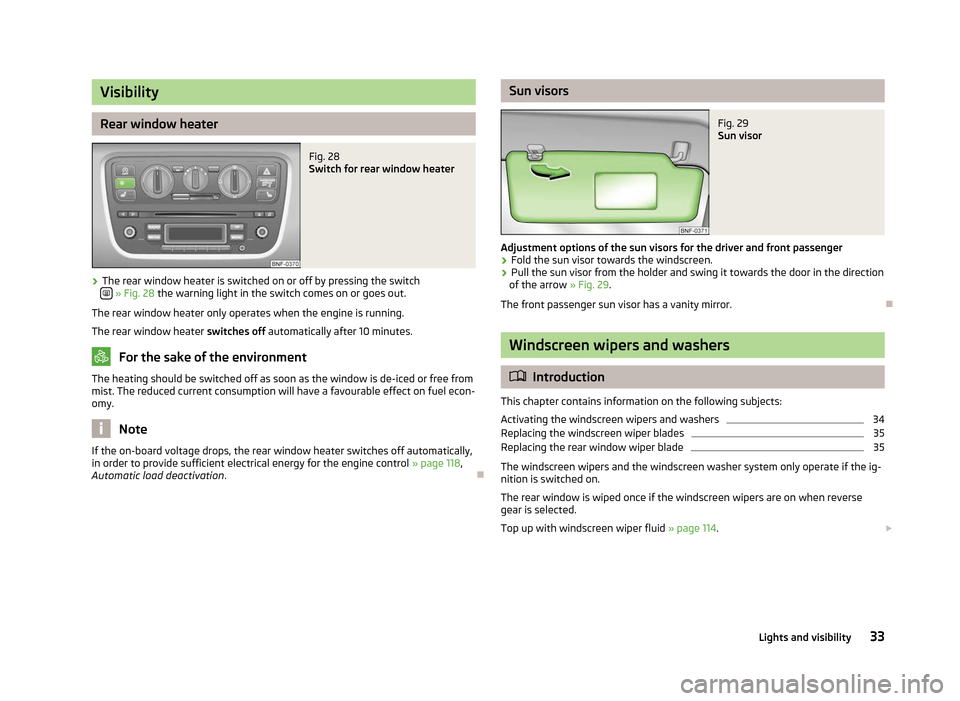
Fig. 28
Switch for rear window heater
› The rear window heater is switched on or off by pressing the switch
» Fig. 28
the warning light in the switch comes on or goes out.
The rear window heater only operates when the engine is running.
The rear window heater switches off automatically after 10 minutes. For the sake of the environment
The heating should be switched off as soon as the window is de-iced or free from
mist. The reduced current consumption will have a favourable effect on fuel econ-
omy. Note
If the on-board voltage drops, the rear window heater switches off automatically,
in order to provide sufficient electrical energy for the engine control »
page 118,
Automatic load deactivation . Ð Sun visors
Fig. 29
Sun visor
Adjustment options of the sun visors for the driver and front passenger
› Fold the sun visor towards the windscreen.
› Pull the sun visor from the holder and swing it towards the door in the direction
of the arrow » Fig. 29.
The front passenger sun visor has a vanity mirror. Ð Windscreen wipers and washers
ä
Introduction
This chapter contains information on the following subjects:
Activating the windscreen wipers and washers 34
Replacing the windscreen wiper blades 35
Replacing the rear window wiper blade 35
The windscreen wipers and the windscreen washer system only operate if the ig-
nition is switched on.
The rear window is wiped once if the windscreen wipers are on when reverse
gear is selected.
Top up with windscreen wiper fluid » page 114. £
33
Lights and visibility
Page 36 of 157
WARNING
■ Properly maintained windscreen wiper blades are essential for clear visibility
and safe driving » page 35.
■ Do not use the windscreen washer system at low temperatures, without
heating the windscreen beforehand. Otherwise the window cleaner could
freeze on the windscreen and restrict the view to the front. CAUTION
■ In cold temperatures and during the winter, check before the journey or before
switching on the ignition that the wiper blades are not frozen to the windscreen.
If the windscreen wipers are switched on when the blades are frozen to the
windscreen, this may damage both the blades and windscreen wiper motor!
■ If the ignition is switched off while the windscreen wipers are switched on, the
windscreen wipers will continue wiping in the same mode after the ignition is
turned back on. The windscreen wipers could freeze up in cold temperatures be-
tween the time the ignition was turned off and when it was turned back on again.
■ Carefully detach frozen wiper blades from the front or rear window.
■ Remove snow and ice from the windscreen wipers before driving.
■ If the windscreen wipers are handled carelessly, there is a risk of damage to the
windscreen.
■ Replace the windscreen wiper blades once or twice a year for safety reasons.
These can be purchased from a ŠKODA Service Partner.
■ The ignition must not be switched on if the front windscreen wiper arms are fol-
ded out. The wiper blades would move back into their rest position and while do-
ing so damage the paintwork of the bonnet. Note
■ Periodic wiping is dependent on the driving speed. The faster the driver is go-
ing, the more frequent the wiper action. ■ If there is an obstacle on the windscreen, the wiper will try to push away the
obstacle. If the wiper is blocked by an obstruction, the wiper will remain station-
ary. Remove the the obstacle and switch the wiper on again. ■ The capacity of the windscreen washer fluid reservoir is approximately 3 litres.
■ The wiper blades should be cleaned on a regular basis with a windscreen clean-
er to avoid any smears. The wiper blades should be cleaned with a sponge or
cloth if they are heavily soiled by insect residues, for example. Ð Activating the windscreen wipers and washers
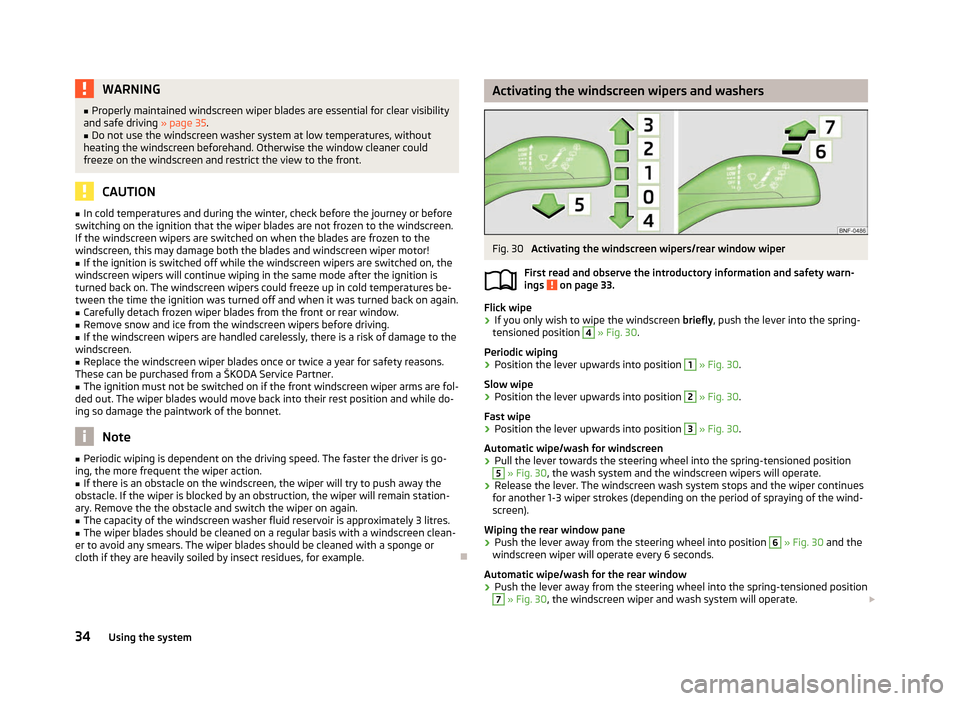
Fig. 30
Activating the windscreen wipers/rear window wiper
First read and observe the introductory information and safety warn-
ings on page 33.
Flick wipe
›
If you only wish to wipe the windscreen
briefly, push the lever into the spring-
tensioned position 4
» Fig. 30.
Periodic wiping
› Position the lever upwards into position 1
» Fig. 30.
Slow wipe
› Position the lever upwards into position 2
» Fig. 30.
Fast wipe
› Position the lever upwards into position 3
» Fig. 30.
Automatic wipe/wash for windscreen
› Pull the lever towards the steering wheel into the spring-tensioned position 5
» Fig. 30, the wash system and the windscreen wipers will operate.
› Release the lever. The windscreen wash system stops and the wiper continues
for another 1-3 wiper strokes (depending on the period of spraying of the wind-
screen).
Wiping the rear window pane
› Push the lever away from the steering wheel into position 6
» Fig. 30 and the
windscreen wiper will operate every 6
seconds.
Automatic wipe/wash for the rear window
› Push the lever away from the steering wheel into the spring-tensioned position 7
» Fig. 30, the windscreen wiper and wash system will operate.
£
ä
34 Using the system