tyre pressure SKODA CITIGO 2013 1.G Owner's Manual
[x] Cancel search | Manufacturer: SKODA, Model Year: 2013, Model line: CITIGO, Model: SKODA CITIGO 2013 1.GPages: 176, PDF Size: 10.54 MB
Page 50 of 176
WARNING (Continued)■Under no circumstances should the permissible axle loads and the permissi-
ble total vehicle weight be exceeded – risk of accident!■
Never transport people in the luggage compartment!
CAUTION
Please ensure that the heating elements for the rear window heater are not dam-
aged as a result of abrasive objects.
Note
The tyre pressure must be adjusted to the load .
Class N1 vehicles
First read and observe the introductory information and safety warn-
ings
on page 46.
For safe vehicle operation, the proper functioning of the electrical installation is
essential. It is important to ensure that it is not damaged in adaptation as well as
the loading and unloading of the cargo space.
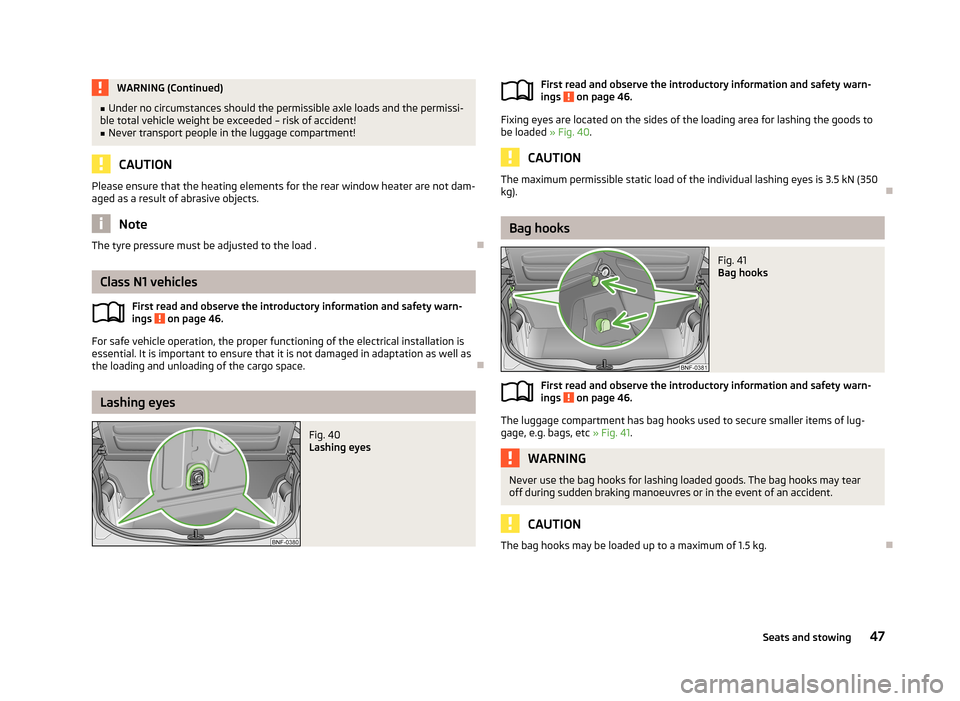
Lashing eyes
Fig. 40
Lashing eyesFirst read and observe the introductory information and safety warn- ings on page 46.
Fixing eyes are located on the sides of the loading area for lashing the goods to
be loaded » Fig. 40.
CAUTION
The maximum permissible static load of the individual lashing eyes is 3.5 kN (350
kg).
Bag hooks
Fig. 41
Bag hooks
First read and observe the introductory information and safety warn-
ings on page 46.
The luggage compartment has bag hooks used to secure smaller items of lug-
gage, e.g. bags, etc » Fig. 41.
WARNINGNever use the bag hooks for lashing loaded goods. The bag hooks may tear
off during sudden braking manoeuvres or in the event of an accident.
CAUTION
The bag hooks may be loaded up to a maximum of 1.5 kg.
47Seats and stowing
Page 77 of 176
With vehicles with a manual gearbox, do not drive at unnecessarily low engine
speeds. Shift down a gear when the engine is no longer running smoothly. Ob-
serve the recommended gear » page 12, Recommended gear .
CAUTION
■
The engine is not protected from excessive engine revs caused by shifting
down at the wrong time. This can result in a sudden increase in revs beyond the
permissible maximum rpm, thereby causing engine damage.■
Never rev up a cold engine when the vehicle is stationary or when driving in in-
dividual gears.
For the sake of the environment
Do not drive at unnecessarily high engine speeds. Shifting up sooner helps save
fuel, reduces engine noise and protects the environment.
New tyres
First read and observe the introductory information given on page 73.
New tyres must firstly be “run in” since they do not offer optimal grip at first.
Therefore, drive especially carefully for the first 500 km or so.
New brake pads
First read and observe the introductory information given on page 73.
New brake pads do not initially provide optimal braking performance. They firstneed to be “run in”. Therefore, drive especially carefully for the first 200 km or so.
Economical driving and environmental sustainability
Introduction
This chapter contains information on the following subjects:
Looking ahead
75
Economical gear changing
75
Avoiding full throttle
75
Reducing idling
75
Avoiding short distances
76
Checking tyre inflation pressure
76
Avoiding unnecessary ballast
76
Regular maintenance
76
Saving electrical energy
77
Environmental compatibility
77
The technical requirements for low fuel usage and economic efficiency of the ve-
hicle have already been built into the vehicle at the works. ŠKODA places a partic-
ular emphasis on minimising negative effects on the environment.
It is necessary to take note of the guidelines given in this chapter in order tomake best use of these characteristics and to maintain their effectiveness.
Fuel consumption, environmental pollution and the wear to the engine, brakes
and tyres depend essentially on the following three factors:
› your personal driving style
› operating conditions
› technical requirements
The fuel economy by can be improved by 10 -15 % by always looking ahead and
driving in an economical way.
Fuel consumption is also be influenced by external factors which are beyond the
driver's control. Consumption increases during the winter or under difficult condi-
tions, on poor roads, etc.
Fuel consumption can vary considerably from the manufacturer's data, as a result
of outside temperatures, weather and driving style.
Such an engine speed should be adhered to when accelerating, in order to avoid a
high fuel consumption and resonance of the vehicle.
74Driving
Page 79 of 176
In vehicles not equipped with the START-STOP system, turn off the engine when
in a traffic jam, at a level crossing or traffic lights with longer wait times.
Even after just 30 – 40 seconds you will have saved more fuel than that is needed
when you start the engine up again.
If an engine is only idling it takes much longer for it to reach its normal operating
temperature. Wear-and-tear and pollutant emissions, though, are particularly
high in the warming-up phase. Therefore, start driving as soon as the engine has
started, High engine speeds should however be avoided.
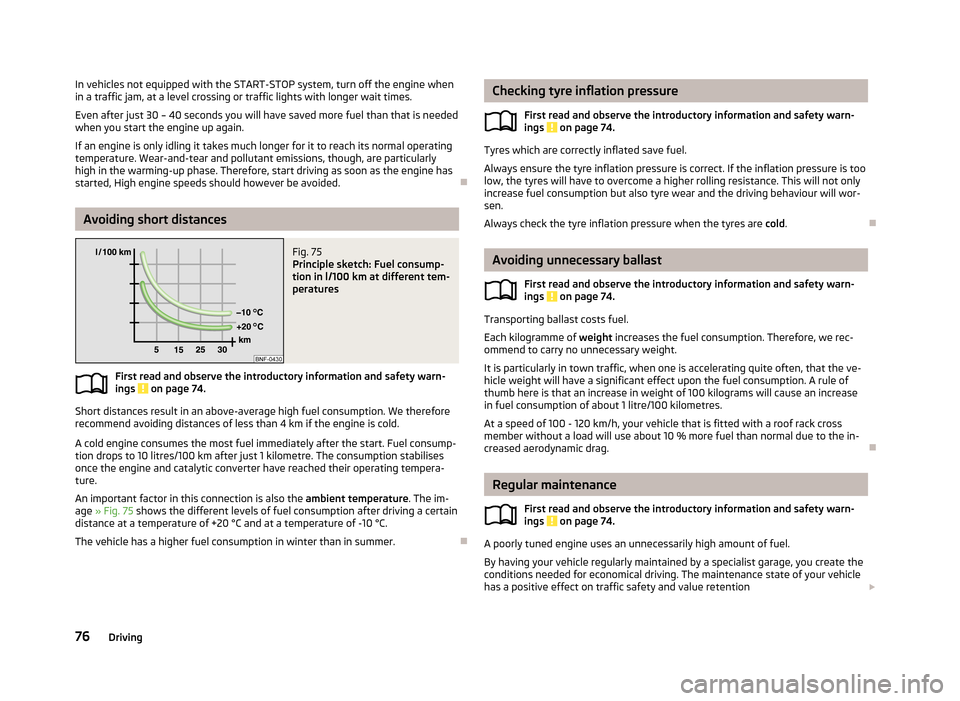
Avoiding short distances
Fig. 75
Principle sketch: Fuel consump-
tion in l/100 km at different tem-
peratures
First read and observe the introductory information and safety warn-
ings on page 74.
Short distances result in an above-average high fuel consumption. We therefore
recommend avoiding distances of less than 4 km if the engine is cold.
A cold engine consumes the most fuel immediately after the start. Fuel consump-tion drops to 10 litres/100 km after just 1 kilometre. The consumption stabilises
once the engine and catalytic converter have reached their operating tempera- ture.
An important factor in this connection is also the ambient temperature. The im-
age » Fig. 75 shows the different levels of fuel consumption after driving a certain
distance at a temperature of +20 °C and at a temperature of -10 °C.
The vehicle has a higher fuel consumption in winter than in summer.
Checking tyre inflation pressure
First read and observe the introductory information and safety warn-ings
on page 74.
Tyres which are correctly inflated save fuel.
Always ensure the tyre inflation pressure is correct. If the inflation pressure is too
low, the tyres will have to overcome a higher rolling resistance. This will not only increase fuel consumption but also tyre wear and the driving behaviour will wor-
sen.
Always check the tyre inflation pressure when the tyres are cold.
Avoiding unnecessary ballast
First read and observe the introductory information and safety warn-
ings
on page 74.
Transporting ballast costs fuel.
Each kilogramme of weight increases the fuel consumption. Therefore, we rec-
ommend to carry no unnecessary weight.
It is particularly in town traffic, when one is accelerating quite often, that the ve-
hicle weight will have a significant effect upon the fuel consumption. A rule of
thumb here is that an increase in weight of 100 kilograms will cause an increase in fuel consumption of about 1 litre/100 kilometres.
At a speed of 100 - 120 km/h, your vehicle that is fitted with a roof rack crossmember without a load will use about 10 % more fuel than normal due to the in-
creased aerodynamic drag.
Regular maintenance
First read and observe the introductory information and safety warn-
ings
on page 74.
A poorly tuned engine uses an unnecessarily high amount of fuel.
By having your vehicle regularly maintained by a specialist garage, you create the conditions needed for economical driving. The maintenance state of your vehicle has a positive effect on traffic safety and value retention
76Driving
Page 83 of 176
Assist systems
Brake assist systems
Introduction
This chapter contains information on the following subjects:
Electronic Stability Control (ESC)
80
Antilock Braking System (ABS)
81
Traction Control System (TCS)
81
Electronic Differential Lock (EDL)
81WARNING■ A lack of fuel can cause irregular engine running or cause the engine to shut
down. The brake assist systems would then fail to function – risk of accident!■
Adjust the speed and driving style to the current visibility, weather, road and
traffic conditions. The increased safety provided by the brake assist systems
must not tempt you to take safety risks – risk of accident!
■
In the event of an ABS fault, visit a specialist garage immediately. Adjust
your style of driving according to the damage to the ABS, as you will not know
the exact extent of the damage or the extent to which this is limiting the
braking efficiency.
CAUTION
■ All four wheels must be fitted with the same tyres approved by the manufactur-
er to ensure the brake assist systems operate correctly.■
Changes to the vehicle (e.g. to the engine, brakes, chassis) can influence the
functionality of the brake assist systems » page 110, Modifications, adjustments
and technical alterations .
■
If a fault occurs in the ABS system, the ESC, ASR and EDL will also fail to work.
An ABS fault is indicated with the warning light » page 19 .
Electronic Stability Control (ESC)
First read and observe the introductory information and safety warn-
ings
on page 80.
The ESC system helps improve control of the vehicle in situations where it is be-
ing operated at its dynamic limits, such as a sudden change to the direction of
travel. Depending on the conditions of the road surface, the risk of skidding is re-
duced, thereby improving the vehicle's driving stability .
The ESC system is automatically activated each time the ignition is switched on.The direction which the driver wishes to take is determined based on the steering angle and the speed of the vehicle and is constantly compared with the actualbehaviour of the vehicle. In the event of deviations, such as the car beginning to
skid, the ESC system will automatically brake the appropriate wheel.
During an intervention of the system, the warning light
flashes in the instru-
ment cluster.
The following systems are integrated into the electronic stabilisation control
(ESC) :
› Antilock brake system (ABS),
› Traction control (TCS);
› Electronic Differential Lock (EDL)
› Hydraulic Brake Assist (HBA)
› Hill Hold Control (HHC).
In the event of an ESC fault, the ESC warning light
illuminates in the instru-
ment cluster » page 18.
Hydraulic Brake Assist (HBA)
HBA increases the braking effect and helps to shorten the braking distance.
The HBA is activated by very quick operation of the brake pedal. In order to ach-
ieve the shortest possible braking distance, the brake pedal must be applied firm-
ly until the vehicle has come to a standstill.
The HBA function is automatically switched off when the brake pedal is released. The ABS is activated faster and more effectively with the intervention of the HBA.
Hill Hold Control (HHC)
When driving on slopes, HHC allows you to move your foot from the brake pedal to the accelerator pedal without having to use the handbrake.
The system holds the brake pressure produced by the activation of the brakepedal for approx. 2 seconds after the brake pedal is released.
80Driving
Page 93 of 176
Safety
Passive Safety
General information
Introduction
This chapter contains information on the following subjects:
Safety equipment
90
Before setting off
90
What influences the driving safety?
91
In this section you will find important information, tips and notes on the subject
of passive safety in your vehicle.
We have combined everything here which you should be familiar with, for exam- ple, regarding seat belts, airbags, child seats and safety of children.
WARNING■ This chapter contains important information on how to use the vehicle for
the driver and his occupants.■
You can find further information on safety concerning you and those travel-
ling with you in the following chapters of this owner's manual.
■
The complete on-board literature should always be in the vehicle. This ap-
plies in particular, if you rent out or sell the vehicle.
Safety equipment
First read and observe the introductory information and safety warn-ings
on page 90.
The following list contains only part of the safety equipment in your vehicle.
› Three-point seat belts for all the seats.
› Belt force limiters for the front seats.
› Belt tensioners for the front seats.
› Front airbag for the driver and the front passenger.
›
Head, thorax, driver and front seat passenger side airbag with head restraint
function;
› Anchoring points for child seats using the ISOFIX system.
› Anchoring points for child seats using the TOP TETHER system.
› Height-adjustable rear head restraints;
› Height-adjustable steering column.
The specified safety equipment works together, in order to optimally protect you
and those travelling with you in accident situations.
The safety equipment does not protect you or the people travelling with you, if
you or your occupants adopt an incorrect seated position or the equipment is not correctly adjusted or used.
If the seat belt is not fastened properly, this may result in injuries if an airbag is activated in the event of an accident.
Before setting off
First read and observe the introductory information and safety warn-
ings
on page 90.
For your own safety and the safety of the people travelling with you, please pay
attention to the following points before setting off.
› Ensure that the lighting and the turn signal system are functioning properly.
› Check the tyre inflation pressure.
› Ensure that all of the windows offer good visibility to the outside.
› Secure all items of luggage
» page 46, Luggage compartment .
› Ensure that no objects can obstruct the pedals.
› Adjust the rear mirror and the front seat to your body size.
› Advise your passengers on the back seats to adjust the head restraints to their
body size.
› Protect children in suitable child seats with correctly fastened seat
belts » page 103 , Transporting children safely .
› Adopt the correct seated position
» page 91, Correct seated position . Tell your
passengers to assume the correct seated position.
› Correctly fasten the seat belt. Also inform passengers to fasten the seat belt
correctly » page 96 , Fastening and unfastening seat belts .
90Safety
Page 141 of 176
Wheels
Tyres and wheel rims
Introduction
This chapter contains information on the following subjects:
Service life of tyres
139
New tyres
140
Unidirectional tyres
141
Spare wheel
141
Full wheel trim
142
Wheel bolts
142
Wheel bolts
143WARNING■ The national legal regulations must be observed for the use of tyres.■Observe the national legal regulations relating to the use of snow chains
and the maximum vehicle speed with snow chains.WARNINGThe following instructions for the use of tyres must be observed.■For the first 500 km, new tyres do not yet provide optimum grip, and appro-
priate care should therefore be taken when driving – risk of accident!■
Only use radial tyres of the same type, size (rolling circumference) and tread
pattern on all four wheels.
■
For reasons of driving safety, do not replace tyres individually.
■
Never exceed the maximum permissible load bearing capacity for fitted
tyres – risk of accident!
■
Never exceed the maximum permissible speed for fitted tyres – risk of acci-
dent!
■
Incorrect wheel alignment at the front or rear impairs handling – risk of acci-
dent!
WARNING (Continued)■ Unusual vibrations or pulling of the vehicle to one side could be a sign of
tyre damage. If there is any doubt that a wheel is damaged, immediately re-
duce your speed and stop! If no external damage is evident, drive slowly and
carefully to the nearest specialist garage to have the vehicle checked.■
Only use tyres or wheel rims that have been approved by ŠKODA for your
model of vehicle. Failure to observe this instruction may impair the road safety
of your vehicle – risk of accident!
WARNINGObserve the following information regarding tyre damage and wear.■Never use tyres if you do not know anything about the condition and age.■
Never drive with damaged tyres – risk of accident!
■
Immediately replace damaged wheel rims or tyres.
■
You must have your tyres replaced with new ones at the latest when the
wear indicators have been worn down.
■
Worn tyres impair necessary adhesion to the road surface, particularly at
high speeds on wet roads. This could lead to “aquaplaning” (uncontrolled ve- hicle movement – “swimming” on a wet road surface).
WARNINGObserve the following information regarding the tyre inflation pressure.■The tyre control display does not absolve the driver of the responsibility to
ensure the correct tyre inflation pressure. Check the tyre inflation pressure at
regular intervals.■
Insufficient or excessive inflation pressure impairs handling – risk of acci-
dent!
■
If the inflation pressure is too low, the tyre will have to overcome a higher
rolling resistance. This will cause a significant increase in the temperature of
the tyre, especially at higher speeds. This can result in tread separation and a
tyre blowout.
138General Maintenance
Page 142 of 176
WARNINGObserve the following information regarding the wheel bolts.■The wheel bolts must be clean and must turn easily. Never apply grease or
oil.■
The prescribed tightening torque for the wheel bolts is 110 Nm for steel and
light alloy wheel rims.
■
If the wheel bolts are tightened to an insufficient tightening torque, the
rims may come loose when the car is moving – risk of accident! A tightening
torque which is too high can damage the bolts and threads and this can result
in permanent deformation of the contact surfaces on the rim.
■
If the wheel bolts are handled incorrectly, the wheel may come loose when
the car is moving – risk of accident!
WARNINGObserve the following information regarding the spare wheel.■Only use the spare wheel for as long as is necessary.■
Never drive with more than one spare wheel attached.
■
The snow chains cannot be used on the spare wheel.
CAUTION
■ If a spare wheel is used that is not identical to the fitted tyres, the following
must be observed » page 141, Spare wheel .■
Protect the tyres from contact with oil, grease and fuel.
■
Replace lost valve caps.
■
If, in the event of a puncture, it is necessary to fit a spare wheel with a tyre
without a dedicated running direction or with the opposite direction of rotation, drive carefully as the optimal characteristics of the tyre are no longer applicable in
this situation.
For the sake of the environment
Tyres that are insufficiently inflated increase your fuel consumption.
Note
■ We recommend that any work on the wheels or tyres be carried out by a spe-
cialist garage.■
We recommend that you use wheel rims, tyres, full wheel trims and snow chains
from ŠKODA Original Accessories.
Service life of tyresFig. 111
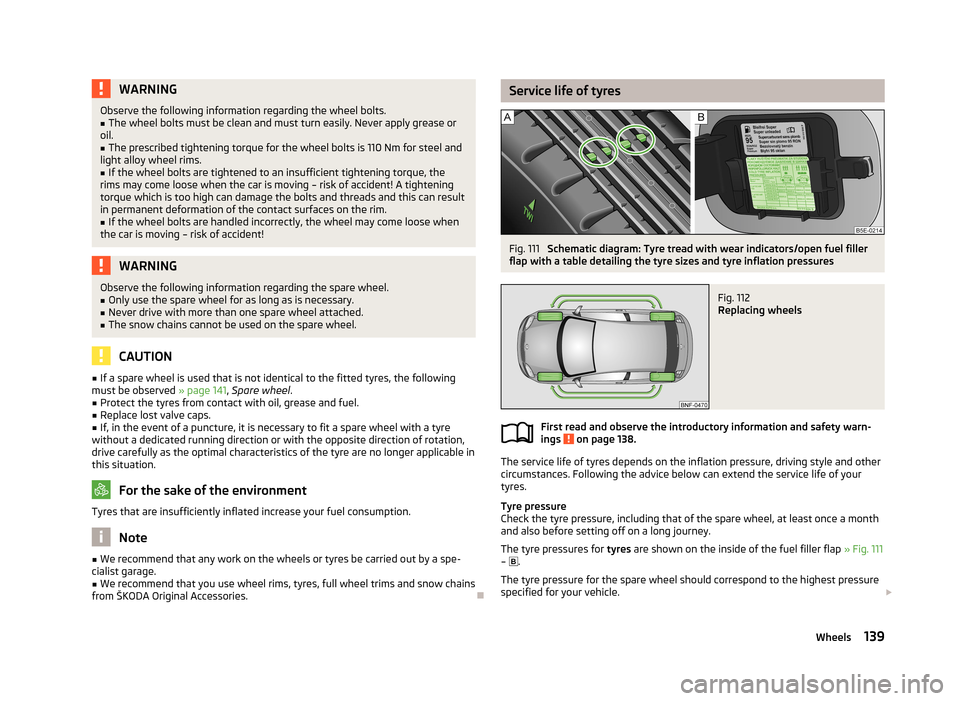
Schematic diagram: Tyre tread with wear indicators/open fuel filler
flap with a table detailing the tyre sizes and tyre inflation pressures
Fig. 112
Replacing wheels
First read and observe the introductory information and safety warn-
ings on page 138.
The service life of tyres depends on the inflation pressure, driving style and other
circumstances. Following the advice below can extend the service life of your
tyres.
Tyre pressure
Check the tyre pressure, including that of the spare wheel, at least once a month and also before setting off on a long journey.
The tyre pressures for tyres are shown on the inside of the fuel filler flap » Fig. 111
– .
The tyre pressure for the spare wheel should correspond to the highest pressure
specified for your vehicle.
139Wheels
Page 143 of 176
Always check the inflation pressure when the tyres are cold. Do not reduce the
higher pressure of warm tyres.
With greater additional load, adjust the tyre inflation pressure accordingly.
Driving style
Fast cornering, sharp acceleration and braking increase the wear of your tyres.
Balancing wheels
The wheels of a new vehicle are balanced. When driving, however, there are a
range of factors that may result in an imbalance. This may become apparent by a
“vibration” in the steering.
Have the wheels rebalanced after replacing the tyres.
Wheel alignment errors
Incorrect wheel alignment at the front or rear leads to excess wear of the tyres.
Tyre damage
Drive over kerbs and other such obstacles slowly and at right angles wherever
possible in order to avoid damage to tyres and wheel trims.
We recommend checking your tyres and wheel rims for damage (punctures, cuts,
splits and bulges, etc.) on a regular basis. Remove foreign bodies (e.g. small
stones) from the tyre tread immediately.
Replacing wheels
If significantly greater wear is present on the front tyres, we recommend replac-
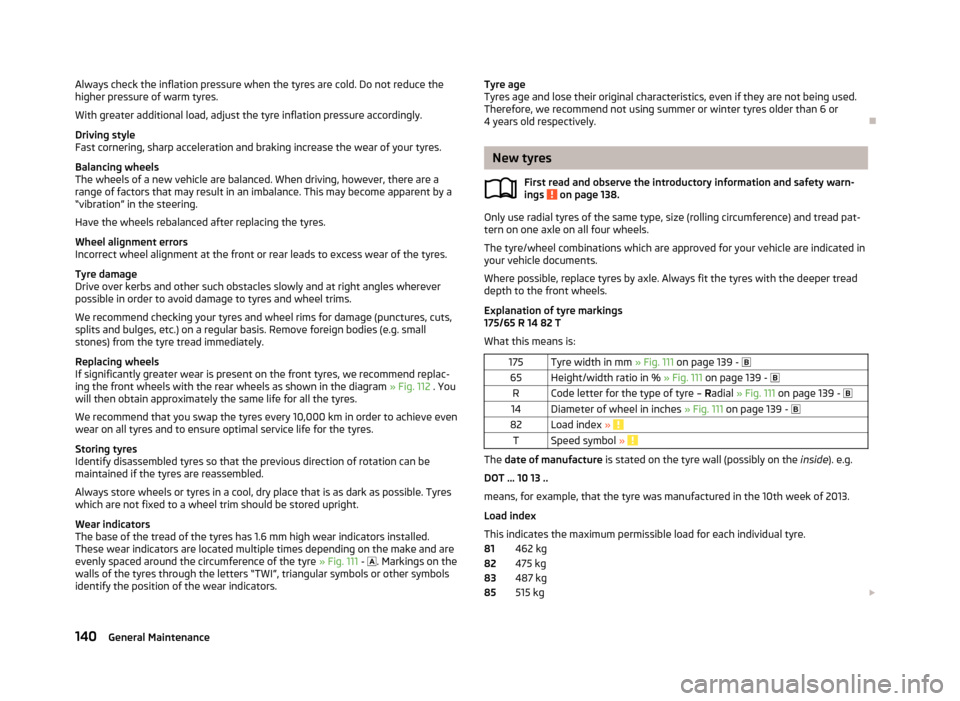
ing the front wheels with the rear wheels as shown in the diagram » Fig. 112 . You
will then obtain approximately the same life for all the tyres.
We recommend that you swap the tyres every 10,000 km in order to achieve even
wear on all tyres and to ensure optimal service life for the tyres.
Storing tyres
Identify disassembled tyres so that the previous direction of rotation can be
maintained if the tyres are reassembled.
Always store wheels or tyres in a cool, dry place that is as dark as possible. Tyres
which are not fixed to a wheel trim should be stored upright.
Wear indicators
The base of the tread of the tyres has 1.6 mm high wear indicators installed. These wear indicators are located multiple times depending on the make and are evenly spaced around the circumference of the tyre » Fig. 111 -
. Markings on the
walls of the tyres through the letters “TWI”, triangular symbols or other symbols identify the position of the wear indicators.Tyre age
Tyres age and lose their original characteristics, even if they are not being used.
Therefore, we recommend not using summer or winter tyres older than 6 or 4 years old respectively.
New tyres
First read and observe the introductory information and safety warn-
ings
on page 138.
Only use radial tyres of the same type, size (rolling circumference) and tread pat-
tern on one axle on all four wheels.
The tyre/wheel combinations which are approved for your vehicle are indicated in
your vehicle documents.
Where possible, replace tyres by axle. Always fit the tyres with the deeper tread
depth to the front wheels.
Explanation of tyre markings
175/65 R 14 82 T
What this means is:
175Tyre width in mm » Fig. 111 on page 139 - 65Height/width ratio in % » Fig. 111 on page 139 - RCode letter for the type of tyre – Radial » Fig. 111 on page 139 - 14Diameter of wheel in inches » Fig. 111 on page 139 - 82Load index » TSpeed symbol »
The date of manufacture is stated on the tyre wall (possibly on the inside). e.g.
DOT ... 10 13 ..
means, for example, that the tyre was manufactured in the 10th week of 2013.
Load index
This indicates the maximum permissible load for each individual tyre. 462 kg
475 kg
487 kg
515 kg
81828385140General Maintenance
Page 145 of 176
Please note the following if you intend to use the temporary spare wheel.› The warning label must not be covered after installing the wheel.
› Be particularly observant when driving.
› The inflation pressure for the temporary spare wheel is identical to the maxi-
mum inflation pressure for the standard tyres.
› Only use this temporary spare wheel to reach the nearest specialist garage, as it
is not intended for long-term use.WARNING■ Never use the temporary spare wheel if it is damaged.■If the dimensions or design of the temporary spare wheel differ from the fit-
ted tyres, never drive faster than 80 km/h (or 50 mph).■
Avoid accelerating at full throttle, sharp braking and fast cornering.
CAUTION
Observe the instructions on the warning sign of the temporary spare wheel.
Full wheel trim
First read and observe the introductory information and safety warn-
ings
on page 138.
Pulling off
›
Hook the clamp found in the vehicle tool kit into the reinforced edge of the wheel trim.
›
Push the wheel wrench through the clamp, support on the tyre and pull off the
wheel trim.
Installing
›
Press the wheel trim onto the wheel rim at the designated valve opening.
›
Then press the trim into the wheel rim until its entire circumference locks cor- rectly in place.
CAUTION■ Use the pressure of your hand only, do not strike the full wheel trim. Avoid
heavy impacts when the trim has not yet been inserted into the wheel rim. This
could cause damage to the guide and centring elements of the trim.■
When using the anti-theft wheel bolt, ensure that it is in the hole in the valve
area » page 148 , Securing wheels against theft .
■
If wheel trims are retrofitted it must be ensured that an adequate flow of air is
assured to cool the brake system.
Wheel bolts
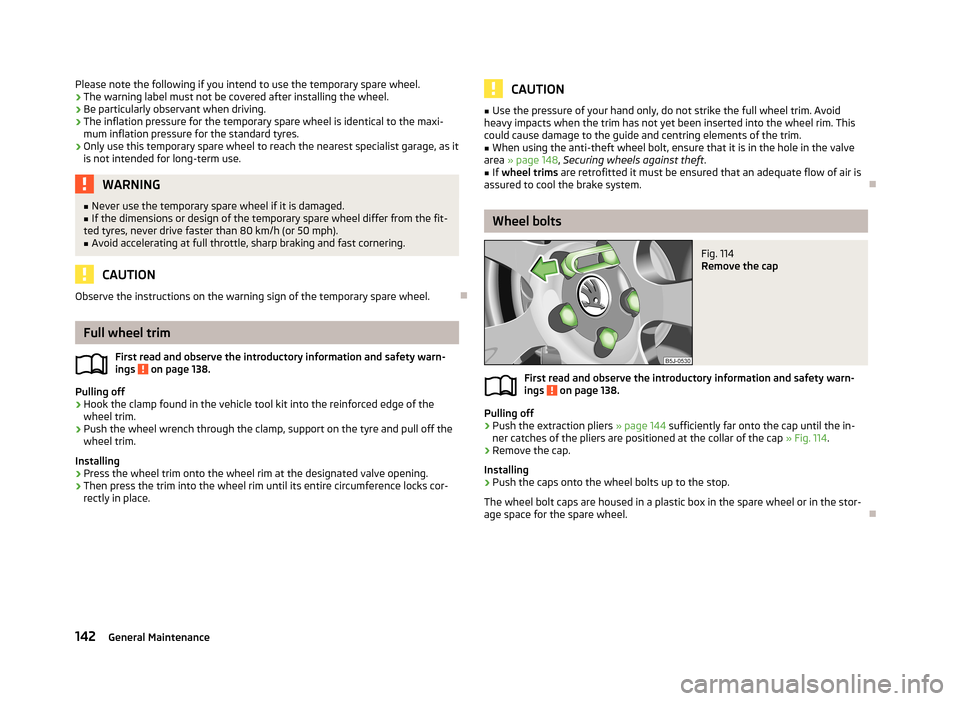
Fig. 114
Remove the cap
First read and observe the introductory information and safety warn-
ings on page 138.
Pulling off
›
Push the extraction pliers » page 144 sufficiently far onto the cap until the in-
ner catches of the pliers are positioned at the collar of the cap » Fig. 114.
›
Remove the cap.
Installing
›
Push the caps onto the wheel bolts up to the stop.
The wheel bolt caps are housed in a plastic box in the spare wheel or in the stor-
age space for the spare wheel.
142General Maintenance
Page 149 of 176
›Switch off the engine.›Move the gearshift lever into
Neutral or, for an automatic gearbox, move the
selector lever into position N.›
Firmly apply the handbrake.
›
Remove the vehicle tool kit » page 144 and the spare wheel » page 141 from
the boot.
Changing a wheel
First read and observe the introductory information and safety warn-
ings
on page 145.
›
Remove the full wheel trim » page 142 or caps » page 142 .
›
First of all slacken the anti-theft wheel bolt and then the other wheel
bolts » page 146 .
›
Jack up the vehicle until the wheel that needs changing is clear of the
ground » page 147 .
›
Unscrew the wheel bolts and place them on a clean surface (cloth, paper, etc.).
›
Remove the wheel carefully.
›
Attach the spare wheel and slightly screw on the wheel bolts.
›
Lower the vehicle.
›
Alternately tighten wheel bolts opposite (diagonally) with the wheel wrench.
Tighten the anti-theft wheel bolt last » page 146.
›
Replace the wheel trim or the caps.
Note
■
All bolts must be clean and must turn easily.■Under no circumstances grease or oil the wheel bolts!■
When fitting unidirectional tyres, ensure that the direction of rotation is cor-
rect » page 138 .
Follow-up work
First read and observe the introductory information and safety warn-
ings
on page 145.
The following steps must also be performed after changing the wheel.
› Stow and attach the replaced wheel in the spare wheel well using a special
bolt » page 141 .›
Stow the tool kit in the space provided and secure using the band.
›
Check the tyre pressure on the installed spare wheel as soon as possible.
›
Have the tightening torque of the wheel bolts checked with a torque wrench
as soon as possible.
›
Replace the damaged wheel or consult a specialist garage about repair options.
Note
■ If it is determined that the wheel bolts are corroded and difficult to turn when
changing the wheel, the bolts must be replaced before checking the tightening
torque.■
Drive cautiously and only at a moderate speed until the tightening torque has
been checked.
Loosening/tightening wheel bolts
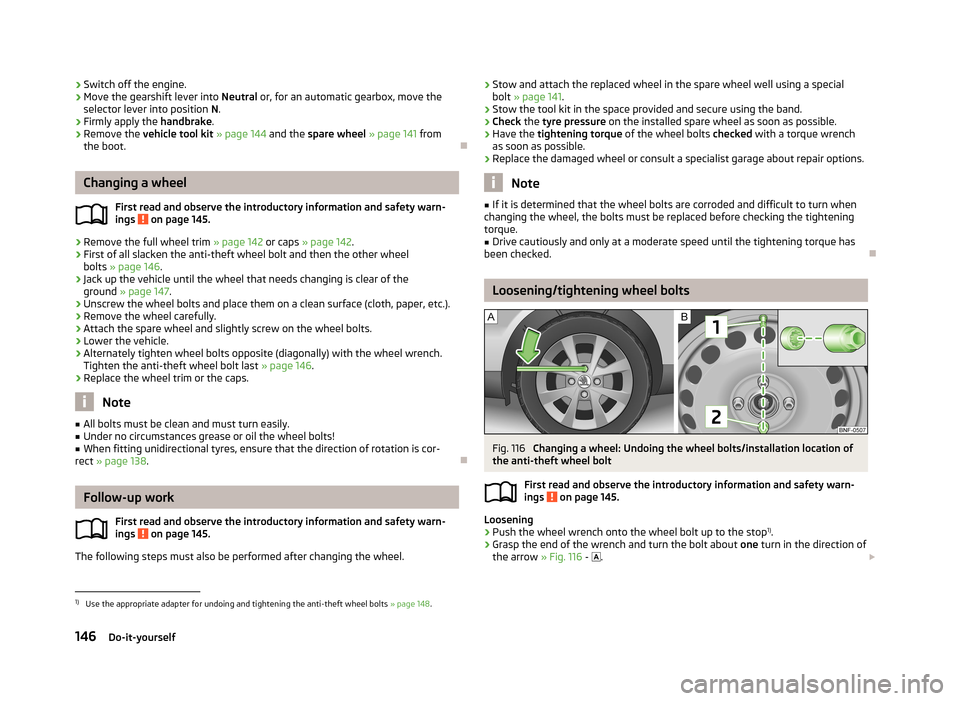
Fig. 116
Changing a wheel: Undoing the wheel bolts/installation location of
the anti-theft wheel bolt
First read and observe the introductory information and safety warn-
ings
on page 145.
Loosening
›
Push the wheel wrench onto the wheel bolt up to the stop 1)
.
›
Grasp the end of the wrench and turn the bolt about one turn in the direction of
the arrow » Fig. 116 -
.
1)
Use the appropriate adapter for undoing and tightening the anti-theft wheel bolts
» page 148.
146Do-it-yourself