radiator SKODA CITIGO 2014 1.G Owner's Manual
[x] Cancel search | Manufacturer: SKODA, Model Year: 2014, Model line: CITIGO, Model: SKODA CITIGO 2014 1.GPages: 164, PDF Size: 12.08 MB
Page 38 of 164
CAUTIONIf in addition to the symbol the symbol » page 35 illuminates while driv-
ing, stop driving - risk of engine damage! Switch off the engine and seek as-
sistance from a specialist garage.
Engine oil
Read and observe
on page 34 first.
When the warning light is
illuminated or is flashing , the engine oil pressure
is too low.
An audible signal sounds as a warning.
›
Stop the vehicle and switch the engine off if the warning light does not ex-
tinguish or if it begins to flash while you are driving.
›
Check the oil level and top up with engine oil if necessary
» page 110, Check-
ing the oil level .
If the oil level is within the specified range and the warning light illuminates
or blinks again after the engine is started, do not continue driving! Switch
off the engine and seek assistance from a specialist garage.
CAUTION
■ The red oil pressure light is not an oil level indicator! One should there-
fore check the oil level at regular intervals, preferably after every refuelling
stop.■
Stop driving if for some reason it is not possible to top up the engine oil
under the current conditions. Switch off the engine and seek assistance from a
specialist garage.
Coolant
Read and observe
on page 34 first.
If the warning light
illuminates or flashes , either the coolant temperature is
too high or the coolant level is too low.
An audible signal sounds as a warning tone.
›
Stop the vehicle, switch off the engine, and check the coolant lev-
el » page 112 , Checking the coolant level .
›
If the coolant level is too low, add coolant to the reservoir » page 112.
Do not continue if for some reason it is not possible to fill with coolant under
the current circumstances! This can cause serious engine damage. Therefore,
switch the engine off and seek help from a specialist garage.
If the coolant is within the specified range, the increased temperature may be
caused by an operating problem at the radiator fan.›
Switch off the ignition.
›
Check the fuse for the radiator fan, replace if necessary » page 137, Fuses in
the engine compartment .
If the coolant level and fan fuse are OK and the warning light
illuminates
again after switching on the ignition,
stop driving!
Seek help from a specialist garage.
WARNING■ Carefully open the coolant expansion bottle. If the engine is hot, the cool-
ing system is pressurized – risk of scalding! It is therefore best to allow the
engine to cool down before removing the cap.■
Do not touch the radiator fan. The radiator fan may switch itself on auto-
matically even if the ignition is off - a danger of injury is present!
CAUTION
■ Additional headlights and other attached components in front of the air inlet
impair the cooling efficiency of the coolant.■
Never cover the radiator - there is a risk of the engine overheating.
Automated transmission
Read and observe
on page 34 first.
Warning light
If the warning light
illuminates and a beep sounds, then there is a fault to
the automated transmission.
Do not drive the vehicle! Switch off the engine
and seek assistance from a specialist garage.
Warning light
If the warning light
illuminates and no gear change is possible, there may
be technical reasons for why the functionality of the automatic transmission is
limited.
›
Stop the car, turn the ignition off and on again.
35Instruments and control lights
Page 80 of 164
›Turn the steering wheel to the left or right until the steering lock clicks into
place.
Unlocking›
Insert the key into the ignition lock.
›
Switch on the ignition » page 77.
The steering lock is unlocked.
If the ignition switch can not be turned on, then turn the steering wheel back and forth slightly and thereby unlock the steering lock.
Ignition on / off and start the engine
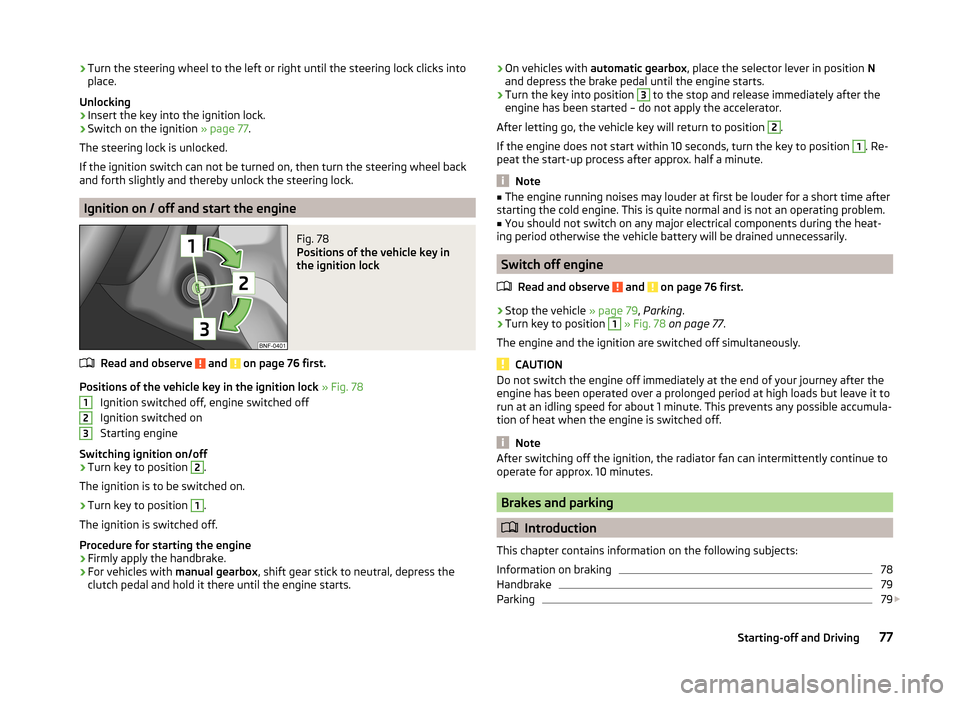
Fig. 78
Positions of the vehicle key in
the ignition lock
Read and observe and on page 76 first.
Positions of the vehicle key in the ignition lock » Fig. 78
Ignition switched off, engine switched off
Ignition switched on
Starting engine
Switching ignition on/off
›
Turn key to position
2
.
The ignition is to be switched on.
›
Turn key to position
1
.
The ignition is switched off.
Procedure for starting the engine
›
Firmly apply the handbrake.
›
For vehicles with manual gearbox, shift gear stick to neutral, depress the
clutch pedal and hold it there until the engine starts.
123› On vehicles with
automatic gearbox , place the selector lever in position N
and depress the brake pedal until the engine starts.›
Turn the key into position
3
to the stop and release immediately after the
engine has been started – do not apply the accelerator.
After letting go, the vehicle key will return to position
2
.
If the engine does not start within 10 seconds, turn the key to position
1
. Re-
peat the start-up process after approx. half a minute.
Note
■ The engine running noises may louder at first be louder for a short time after
starting the cold engine. This is quite normal and is not an operating problem.■
You should not switch on any major electrical components during the heat-
ing period otherwise the vehicle battery will be drained unnecessarily.
Switch off engine
Read and observe
and on page 76 first.
›
Stop the vehicle » page 79, Parking .
›
Turn key to position
1
» Fig. 78 on page 77 .
The engine and the ignition are switched off simultaneously.
CAUTION
Do not switch the engine off immediately at the end of your journey after the
engine has been operated over a prolonged period at high loads but leave it to
run at an idling speed for about 1 minute. This prevents any possible accumula-
tion of heat when the engine is switched off.
Note
After switching off the ignition, the radiator fan can intermittently continue to
operate for approx. 10 minutes.
Brakes and parking
Introduction
This chapter contains information on the following subjects:
Information on braking
78
Handbrake
79
Parking
79
77Starting-off and Driving
Page 110 of 164
Automatically switching over from natural gas mode to petrol mode
The vehicle automatically switches from natural gas to petrol, for example, if one of the following cases occurs.
› With an empty gas tank or not enough pressure in the tank.
› After refuelling with natural gas.
› At very low surrounding temperatures.
Gas smell
If you smell gas proceed as follows.
› Stop the vehicle.
› Put out cigarettes.
› Switch off the ignition.
› Open doors and the boot lid to ventilate the vehicle sufficiently.
› Remove any spark producing or incendiary items from the car and immedi-
ately switch off.
› Do not continue if the odour persists.
Seek help from a specialist garage to correct the gas system fault.
Regular gas system checks must be carried out in a specialist workshop on
natural gas-powered vehicles.WARNINGWhen operating a CNG-powered vehicle, the national legal requirements
must be observed.WARNINGDo not underestimate the smell of gas in the car or when refuelling - it may
result in fire, explosion and injury.
Engine compartment
Introduction
This chapter contains information on the following subjects:
Opening and closing the bonnet
108
Engine compartment overview
109
Radiator fan
109
Windscreen washer system
109WARNINGInjuries or scolding or risks of accident or fire may occur when working in
the engine compartment. For this reason, it is essential to comply with the
warning instructions outlined below and with the general applicable safety
rules. The engine compartment of your car is a hazardous area!WARNINGInstructions before beginning work in the engine compartment■Turn off the engine and withdraw the ignition key.■
Firmly apply the handbrake.
■
For vehicles with manual transmission the lever into the neutral position.
■
For vehicles with automated manual transmission, shift the lever to posi-
tion N.
■
Allow the engine to cool.
■
Never open the bonnet if you can see steam or coolant escaping from the
engine compartment – risk of scalding! Wait until no more steam or coolant
is escaping.
WARNINGInformation for working in the engine compartment■Keep all people, especially children, away from the engine compartment.■
Never touch the radiator fan while the engine is still warm. The fan might
suddenly start running!
■
Do not touch any hot engine parts – risk of burns!
WARNINGInformation for working in the engine compartment with the engine run-
ning■
Pay particular attention to moving engine parts, e.g. V-ribbed belt, gener-
ator, radiator fan - danger to life!
■
Never touch the electric wiring on the ignition system.
■
Avoid short circuits in the electrical system – particularly on the vehicle's
battery.
■
Always make sure that no jewellery, loose clothing or long hair can get
caught in rotating engine parts – risk to life! Always remove any jewellery,
tie back long hair and wear tight fitting clothing before completing any
work.
107Inspecting and replenishing
Page 112 of 164
›Secure the open flap by inserting the end of the post into opening 4.
Close the flap›
Lift the bonnet.
›
Decouple the bonnet support and press into the holder designed to hold it.
›
Let the bonnet drop into the lock carrier lock from a height of around 20 cm – do not push it in .
WARNING■
Check that the bonnet is closed properly.■If you notice that the lock is not properly engaged while driving, stop the
vehicle immediately and close the bonnet – risk of accident!■
Make sure that when closing the bonnet, no body parts are crushed -
there is danger of injury!
CAUTION
Never open the bonnet by the locking lever » Fig. 96.
Engine compartment overview
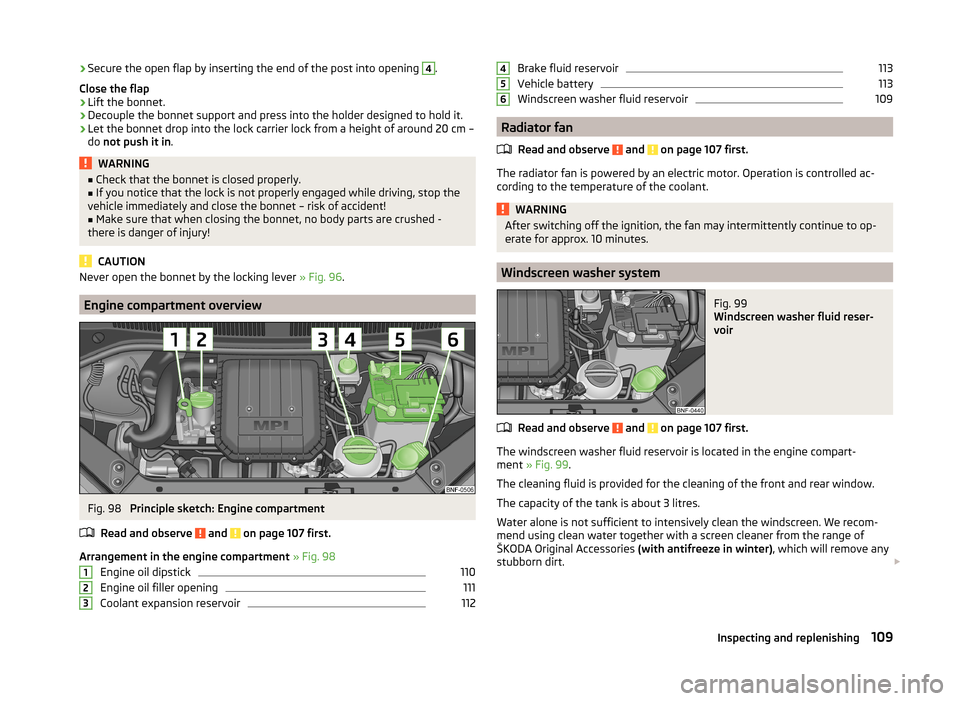
Fig. 98
Principle sketch: Engine compartment
Read and observe
and on page 107 first.
Arrangement in the engine compartment » Fig. 98
Engine oil dipstick
110
Engine oil filler opening
111
Coolant expansion reservoir
112123Brake fluid reservoir113
Vehicle battery
113
Windscreen washer fluid reservoir
109
Radiator fan
Read and observe
and on page 107 first.
The radiator fan is powered by an electric motor. Operation is controlled ac-
cording to the temperature of the coolant.
WARNINGAfter switching off the ignition, the fan may intermittently continue to op-
erate for approx. 10 minutes.
Windscreen washer system
Fig. 99
Windscreen washer fluid reser-
voir
Read and observe and on page 107 first.
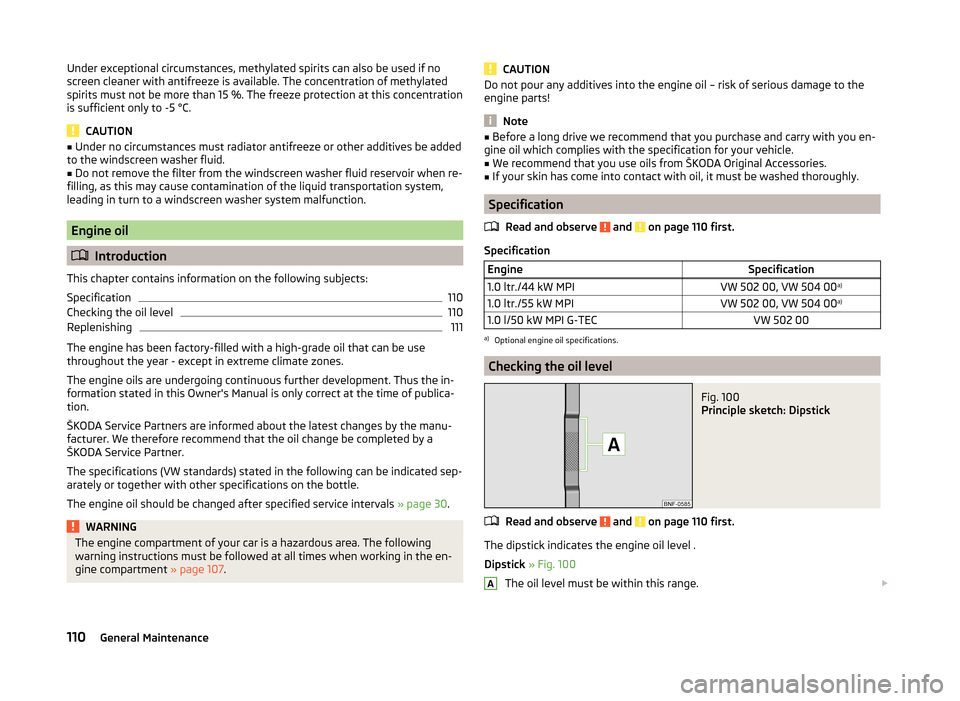
The windscreen washer fluid reservoir is located in the engine compart-
ment » Fig. 99 .
The cleaning fluid is provided for the cleaning of the front and rear window.
The capacity of the tank is about 3 litres.
Water alone is not sufficient to intensively clean the windscreen. We recom- mend using clean water together with a screen cleaner from the range of
ŠKODA Original Accessories (with antifreeze in winter), which will remove any
stubborn dirt.
456109Inspecting and replenishing
Page 113 of 164
Under exceptional circumstances, methylated spirits can also be used if no
screen cleaner with antifreeze is available. The concentration of methylated
spirits must not be more than 15 %. The freeze protection at this concentration
is sufficient only to -5 °C.
CAUTION
■ Under no circumstances must radiator antifreeze or other additives be added
to the windscreen washer fluid.■
Do not remove the filter from the windscreen washer fluid reservoir when re-
filling, as this may cause contamination of the liquid transportation system,
leading in turn to a windscreen washer system malfunction.
Engine oil
Introduction
This chapter contains information on the following subjects:
Specification
110
Checking the oil level
110
Replenishing
111
The engine has been factory-filled with a high-grade oil that can be use
throughout the year - except in extreme climate zones.
The engine oils are undergoing continuous further development. Thus the in- formation stated in this Owner's Manual is only correct at the time of publica-
tion.
ŠKODA Service Partners are informed about the latest changes by the manu-
facturer. We therefore recommend that the oil change be completed by a
ŠKODA Service Partner.
The specifications (VW standards) stated in the following can be indicated sep-
arately or together with other specifications on the bottle.
The engine oil should be changed after specified service intervals » page 30.
WARNINGThe engine compartment of your car is a hazardous area. The following
warning instructions must be followed at all times when working in the en-
gine compartment » page 107.CAUTIONDo not pour any additives into the engine oil – risk of serious damage to the
engine parts!
Note
■ Before a long drive we recommend that you purchase and carry with you en-
gine oil which complies with the specification for your vehicle.■
We recommend that you use oils from ŠKODA Original Accessories.
■
If your skin has come into contact with oil, it must be washed thoroughly.
Specification
Read and observe
and on page 110 first.
Specification
EngineSpecification1.0 ltr./44 kW MPIVW 502 00, VW 504 00 a)1.0 ltr./55 kW MPIVW 502 00, VW 504 00a)1.0 l/50 kW MPI G-TECVW 502 00a)
Optional engine oil specifications.
Checking the oil level
Fig. 100
Principle sketch: Dipstick
Read and observe and on page 110 first.
The dipstick indicates the engine oil level .
Dipstick » Fig. 100
The oil level must be within this range.
A110General Maintenance
Page 115 of 164
CAUTION■ Do not continue if for some reason it is not possible to fill with coolant un-
der the current circumstances! Switch off the engine and seek assistance from
a specialist garage.■
If the expansion tank is empty, do not top up with coolant. The system could
fill with air - risk of engine damage,
stop driving! Switch off the engine and
seek assistance from a specialist garage.
■
The concentration of coolant additive in the coolant must never be under
40%.
■
Over 60% of coolant additive in the coolant reduces the antifreeze protec-
tion and cooling effect.
■
A coolant additive that does not comply with the correct specification can
significantly reduce the corrosion protection of the cooling system.
■
Any faults resulting from corrosion may cause a loss of coolant and can con-
sequently result in major engine damage!
■
Do not fill the coolant above the mark
» Fig. 101 on page 112 .
■
If an error occurs, leading to the engine overheating, the help of a professio-
nal garage is to be sought - there is a risk of serious engine damage occurring.
■
Additional headlights and other attached components in front of the air inlet
impair the cooling efficiency of the coolant.
■
Never cover the radiator - there is a risk of the engine overheating.
Checking the coolant level
Fig. 101
Coolant expansion reservoir
Read and observe and on page 111 first.
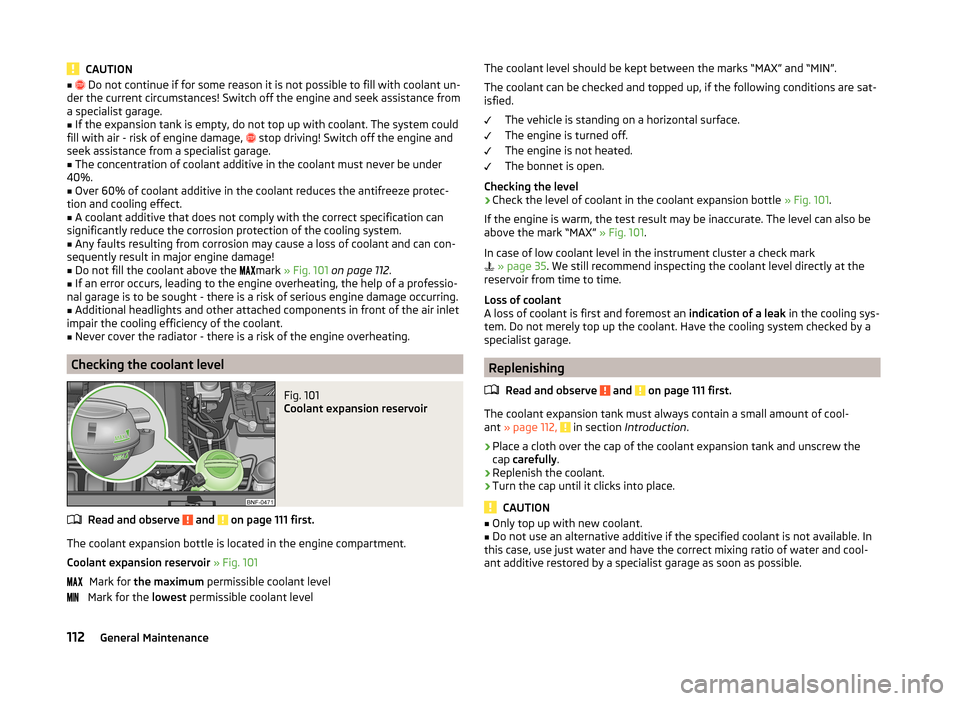
The coolant expansion bottle is located in the engine compartment.
Coolant expansion reservoir » Fig. 101
Mark for the maximum permissible coolant level
Mark for the lowest permissible coolant level
The coolant level should be kept between the marks “MAX” and “MIN”.
The coolant can be checked and topped up, if the following conditions are sat-isfied.
The vehicle is standing on a horizontal surface.
The engine is turned off.
The engine is not heated.
The bonnet is open.
Checking the level›
Check the level of coolant in the coolant expansion bottle » Fig. 101.
If the engine is warm, the test result may be inaccurate. The level can also be
above the mark “MAX” » Fig. 101.
In case of low coolant level in the instrument cluster a check mark
» page 35 . We still recommend inspecting the coolant level directly at the
reservoir from time to time.
Loss of coolant
A loss of coolant is first and foremost an indication of a leak in the cooling sys-
tem. Do not merely top up the coolant. Have the cooling system checked by a
specialist garage.
Replenishing
Read and observe
and on page 111 first.
The coolant expansion tank must always contain a small amount of cool-
ant » page 112, in section Introduction .
›
Place a cloth over the cap of the coolant expansion tank and unscrew the
cap carefully .
›
Replenish the coolant.
›
Turn the cap until it clicks into place.
CAUTION
■
Only top up with new coolant.■Do not use an alternative additive if the specified coolant is not available. In
this case, use just water and have the correct mixing ratio of water and cool-
ant additive restored by a specialist garage as soon as possible.112General Maintenance
Page 139 of 164
CAUTION■“Never repair” fuses and also do not replace them with a fuse of a higher am-
perage – risk of fire! This may also cause damage at another part of the electri-
cal system.■
A blown fuses is recognisable by the molten metal strip. Replace the faulty
fuse with a new one of the same amperage.
■
If a newly inserted fuse burns through again, then a specialist should be con-
sulted immediately.
Note
■ We recommend always carrying replacement fuses in the vehicle. A box of
replacement fuses can be purchased from ŠKODA Original Accessories.■
There can be several power consuming devices for one fuse.
■
Multiple fuses may exist for a single power consuming device.
Fuses on the underside of the dash panel
Fig. 124
Fuse Box / Fuses
Read and observe
and on page 135 first.
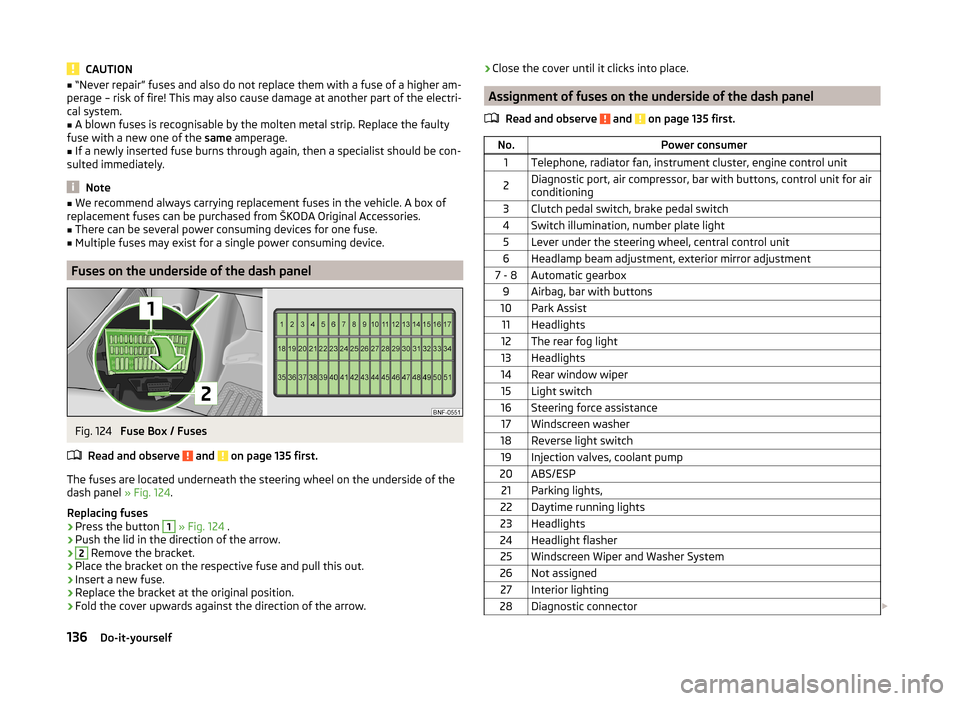
The fuses are located underneath the steering wheel on the underside of the
dash panel » Fig. 124.
Replacing fuses
›
Press the button
1
» Fig. 124 .
›
Push the lid in the direction of the arrow.
›2
Remove the bracket.
›
Place the bracket on the respective fuse and pull this out.
›
Insert a new fuse.
›
Replace the bracket at the original position.
›
Fold the cover upwards against the direction of the arrow.
›Close the cover until it clicks into place.
Assignment of fuses on the underside of the dash panel
Read and observe
and on page 135 first.
No.Power consumer1Telephone, radiator fan, instrument cluster, engine control unit2Diagnostic port, air compressor, bar with buttons, control unit for air
conditioning3Clutch pedal switch, brake pedal switch4Switch illumination, number plate light5Lever under the steering wheel, central control unit6Headlamp beam adjustment, exterior mirror adjustment7 - 8Automatic gearbox9Airbag, bar with buttons10Park Assist11Headlights12The rear fog light13Headlights14Rear window wiper15Light switch16Steering force assistance17Windscreen washer18Reverse light switch19Injection valves, coolant pump20ABS/ESP21Parking lights,22Daytime running lights23Headlights24Headlight flasher25Windscreen Wiper and Washer System26Not assigned27Interior lighting28Diagnostic connector 136Do-it-yourself
Page 140 of 164
No.Power consumer29Central control unit30Exterior mirror heater31Radiator fan, lambda probe32Blinking light, brake light, daytime running lights, rear light33Main beam34Main beam35Fuel pump36Cigarette lighter, 12-volt power socket37Air blower for heating and air conditioning38Radio39Panoramic sliding roof, horn40Engine control unit41Central locking system42Ignition module43Seat heaters44Fuel pump45Light switch46Rear window heater47Power windows48Horn49Windscreen wipers50Fog lights, headlight51Power windowsFuses in the engine compartmentFig. 125
Distribution board cover/fuses
Read and observe
and on page 135 first.
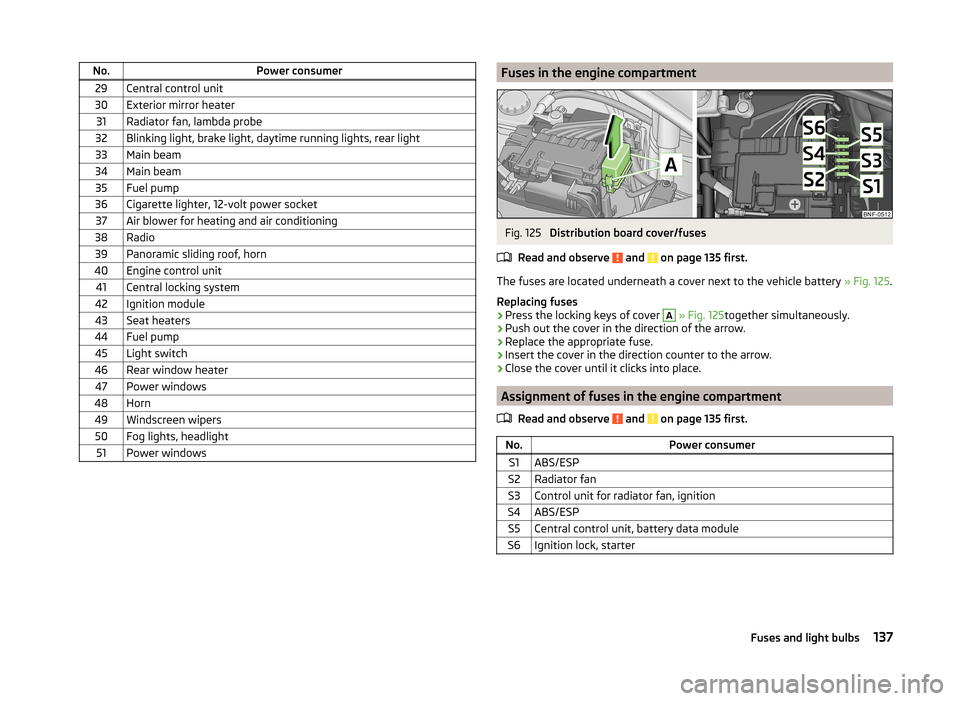
The fuses are located underneath a cover next to the vehicle battery » Fig. 125.
Replacing fuses
›
Press the locking keys of cover
A
» Fig. 125 together simultaneously.
›
Push out the cover in the direction of the arrow.
›
Replace the appropriate fuse.
›
Insert the cover in the direction counter to the arrow.
›
Close the cover until it clicks into place.
Assignment of fuses in the engine compartment
Read and observe
and on page 135 first.
No.Power consumerS1ABS/ESPS2Radiator fanS3Control unit for radiator fan, ignitionS4ABS/ESPS5Central control unit, battery data moduleS6Ignition lock, starter137Fuses and light bulbs
Page 156 of 164
Puncture repair kit127
R
Radiator fan
109
Radio4
Raising the vehicle126
Rear-view mirror Exterior mirrors
54
Rear fog light50
Warning light37
Rear mirror54
Interior mirror54
Rear window heating52
Rear windows Closing
45
Opening45
Recirculation72
Refuelling104
Fuel104
Fuel - natural gas105
Regulation Lighting range
48
Remote control Locking
41
Replacing the battery133
Synchronisation process133
Unlocking41
Remote control key Replacing the battery
133
Repairs and technical alterations93
Replace vehicle battery
116
Replace vehicle battery
116
Replacing Bulb for daytime running lights and parkinglights
139
Bulb for the fog light140
Bulb for the licence plate light141
Bulb for the side turn signal lights140
Bulbs138
Fuses135
Fuses in the dash panel138
Fuses in the engine compartment137
window wiper blade135
windscreen wiper blades134
Replenishing Coolant
112
Engine oil111
Windscreen washer fluid109
Roof Load
69
Roof rack68
mounting points69
Roof load69
Rubber seals98
Running in and economical driving82
S
SAFE See Safe securing system
42
SAFELOCK See Safe securing system
42
Safe securing system42
Safety8
Child safety19
Child safety seats19
Correct seated position9
Head restraints56
ISOFIX22
TOP TETHER23
Safety belt Warning symbol
38
Save electrical energy82
Save fuel82
Seals Vehicle care
98
Seat Adjusting
56
Seat belts11
Belt tensioners14
fastening and unfastening13
Inertia reels14
The physical principle of a frontal collision13
Warning light34
Seat features57
Seats Folding front passenger seat
58
Head restraints56
Heating57
Seat backrests59
Seats and head restraint55
Service94
Service display30
Setting33
seats and head restraints55
Setting the33
Shift Gear recommendation
30
Information on the gear changed30
Side airbag17
Sidelights48
Sliding/tilting roof Closing
46
Opening and tilting46
Operation46
Snow chains121
spare123
spare wheel123
instructions123
Spare wheel Change
123
Speedometer28
Speed symbol See Wheels
120
Spoiler95
Staring engine Jump-starting
130
153Index