warning light SKODA FABIA 2000 1.G / 6Y Workshop Manual
[x] Cancel search | Manufacturer: SKODA, Model Year: 2000, Model line: FABIA, Model: SKODA FABIA 2000 1.G / 6YPages: 86, PDF Size: 3.58 MB
Page 32 of 86
Downloaded from www.Manualslib.com manuals search engine FABIA 2000➤Inspection and Maintenance
EnginesEdition 09.04
S00.5301.14.2002-3 page 12 02
–Perform a test drive and again check the coolant anti-
freeze protection.
Inspecting coolant level (volume)
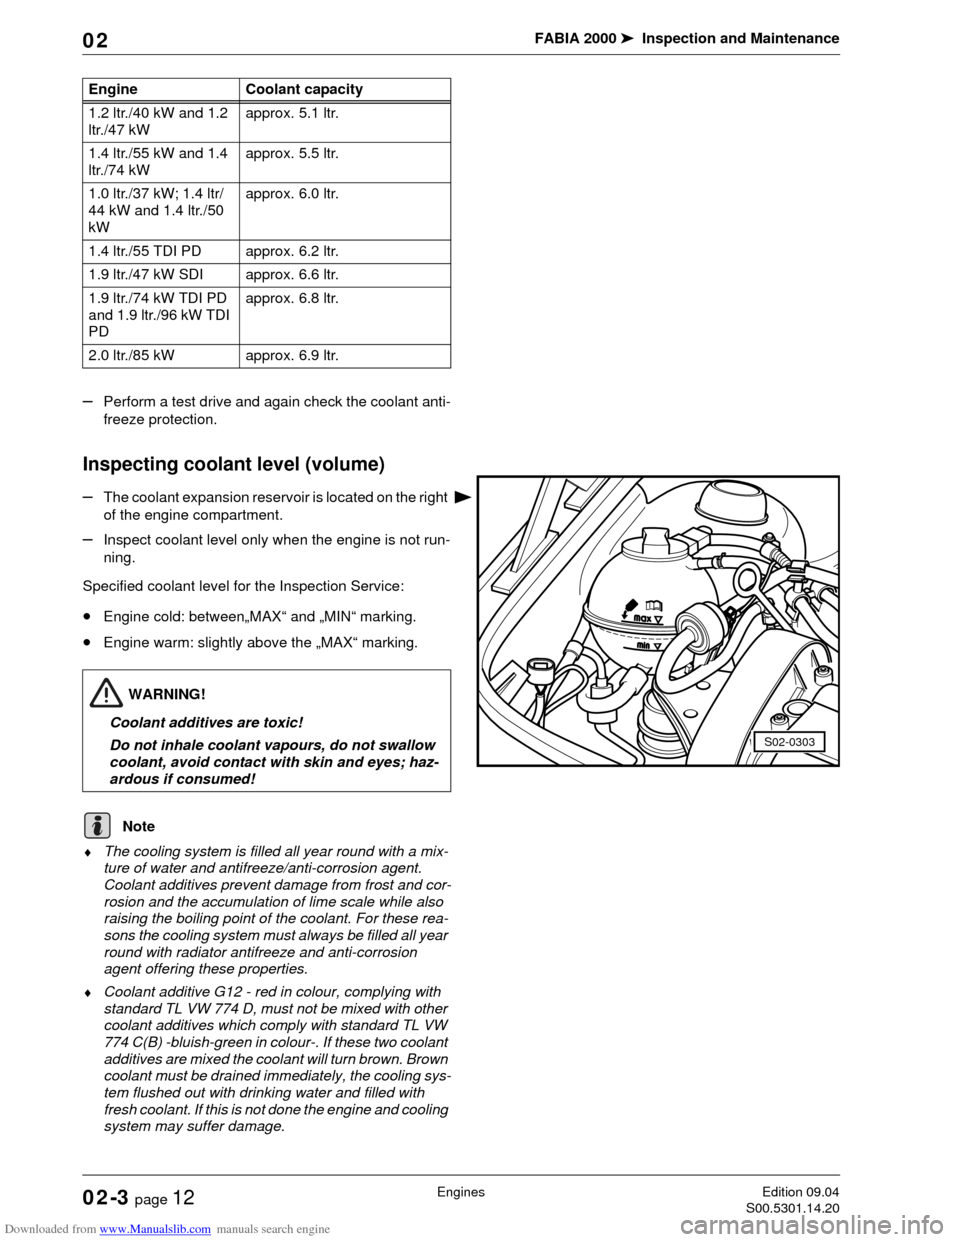
–The coolant expansion reservoir is located on the right
of the engine compartment.
–Inspect coolant level only when the engine is not run-
ning.
Specified coolant level for the Inspection Service:
•Engine cold: between„MAX“ and „MIN“ marking.
•Engine warm: slightly above the „MAX“ marking.
♦The cooling system is filled all year round with a mix-
ture of water and antifreeze/anti-corrosion agent.
Coolant additives prevent damage from frost and cor-
rosion and the accumulation of lime scale while also
raising the boiling point of the coolant. For these rea-
sons the cooling system must always be filled all year
round with radiator antifreeze and anti-corrosion
agent offering these properties.
♦Coolant additive G12 - red in colour, complying with
standard TL VW 774 D, must not be mixed with other
coolant additives which comply with standard TL VW
774 C(B) -bluish-green in colour-. If these two coolant
additives are mixed the coolant will turn brown. Brown
coolant must be drained immediately, the cooling sys-
tem flushed out with drinking water and filled with
fresh coolant. If this is not done the engine and cooling
system may suffer damage. Engine Coolant capacity
1.2 ltr./40 kW and 1.2
ltr./47 kWapprox. 5.1 ltr.
1.4 ltr./55 kW and 1.4
ltr./74 kWapprox. 5.5 ltr.
1.0 ltr./37 kW; 1.4 ltr/
44 kW and 1.4 ltr./50
kWapprox. 6.0 ltr.
1.4 ltr./55 TDI PD approx. 6.2 ltr.
1.9 ltr./47 kW SDI approx. 6.6 ltr.
1.9 ltr./74 kW TDI PD
and 1.9 ltr./96 kW TDI
PDapprox. 6.8 ltr.
2.0 ltr./85 kW approx. 6.9 ltr.
S02-0303
WARNING!
Coolant additives are toxic!
Do not inhale coolant vapours, do not swallow
coolant, avoid contact with skin and eyes; haz-
ardous if consumed!
Note
Page 50 of 86
Downloaded from www.Manualslib.com manuals search engine FABIA 2000➤Inspection and Maintenance
ChassisEdition 02.04
S00.5301.13.2002-5 page 4 02
–Repeat the procedure for all wheels in the following
sequence: rear left, front right and front left.
1)
–Insert strainer in the brake fluid reservoir and fill with
brake fluid up to the specified level.
–Inspect pedal position and idle travel at brake pedal.
Idle travel: max. 1/3 of pedal travel.
Vehicles with ABS or ABS/EDL:
A road test on such models must be carried out after
bleeding the brake system. While doing so perform at
least one ABS adjustment!
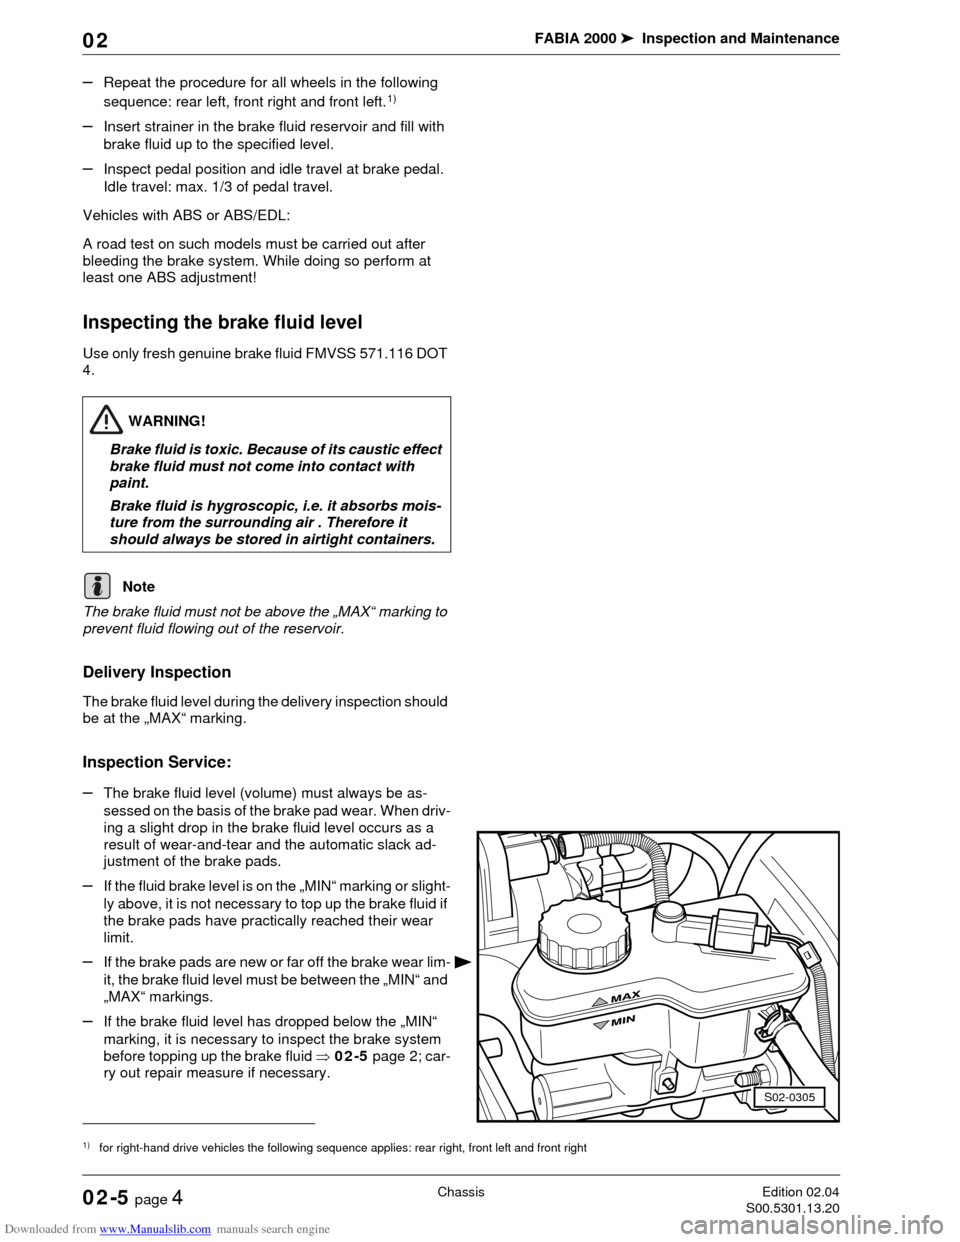
Inspecting the brake fluid level
Use only fresh genuine brake fluid FMVSS 571.116 DOT
4.
The brake fluid must not be above the „MAX“ marking to
prevent fluid flowing out of the reservoir.
Delivery Inspection
The brake fluid level during the delivery inspection should
be at the „MAX“ marking.
Inspection Service:
–The brake fluid level (volume) must always be as-
sessed on the basis of the brake pad wear. When driv-
ing a slight drop in the brake fluid level occurs as a
result of wear-and-tear and the automatic slack ad-
justment of the brake pads.
–If the fluid brake level is on the „MIN“ marking or slight-
ly above, it is not necessary to top up the brake fluid if
the brake pads have practically reached their wear
limit.
–If the brake pads are new or far off the brake wear lim-
it, the brake fluid level must be between the „MIN“ and
„MAX“ markings.
–If the brake fluid level has dropped below the „MIN“
marking, it is necessary to inspect the brake system
before topping up the brake fluid ⇒02-5 page 2; car-
ry out repair measure if necessary.
1)for right-hand drive vehicles the following sequence applies: rear right, front left and front right
WARNING!
Brake fluid is toxic. Because of its caustic effect
brake fluid must not come into contact with
paint.
Brake fluid is hygroscopic, i.e. it absorbs mois-
ture from the surrounding air . Therefore it
should always be stored in airtight containers.
Note
S02-0305
Page 55 of 86

Downloaded from www.Manualslib.com manuals search engine FABIA 2000➤Inspection and Maintenance
Electrical SystemEdition 09.04
S00.5301.14.2002-6 page 1 02
02-6 Electrical System
Power windows: Inspecting positioning
If the battery is diconnected the power windows forget
their current position.
Test conditions:
•All car doors closed
The inspection procedure is carried out from the outside
Close window with the car key using the convenience
closing system.
–Turn car key into close position and hold until all the
windows are closed.
–After closing the windows hold the key in the close po-
sition for approximately another 3 seconds.
Electrical components: Check for proper
operation
–Inspect lighting, main headlights, headlight beam con-
trol, fog lights, turn signal lights, hazard warning light
system, tail lights, rear fog lights, reversing lights,
brake lights, parking light control for brightness and
proper operation.
–Inspect interior lights, illuminated storage compart-
ment, illuminated ashtray for proper operation.
–Airbag warning lamps: Check operation ⇒Chapter
02-7.
–Inspect warning buzzer, onboard computer, all switch-
es in centre console as well as on the dash panel and
horn for proper operation.
–Inspect power windows, exterior mirrors (heated and
electrically adjustable), central locking system, infra-
red remote control and convenience closing system
for proper operation
–Inspect heating of front seats for proper operation.
–Inspect radio for proper reception and absence of in-
terference, also inspect speakers ⇒02-6 page 2.
Battery: Testing no-load voltage
Special tools, test and measuring equipment and
auxiliary items required
♦Multimeter (e.g. -V.A.G 1526 A-)
Prior to the measurement the vehicle must have been in
the no-load state for at least two hours (no engine starts,
no charging or discharging of battery).
The following procedure applies to measuring the battery
voltage in the no-load state (after at least two hours):
–With the battery installed measure the voltage be-
tween the terminals (ignition switched off).
Page 69 of 86
Downloaded from www.Manualslib.com manuals search engine FABIA 2000➤Inspection and Maintenance
BodyEdition 09.04
S00.5301.14.2002-7 page 1 02
02-7 Body
Airbag units: Visual inspection
Inspecting operation of airbag unit
When the ignition is switched on the airbag warning lamp
K75 lights up for approximately 4 seconds. Should the
warning lamp flash again for a further 12 seconds this is
an indication that the front passenger airbag or the side
airbag unit on the front passenger is electronically locked
(valid for vehicles which do not have an airbag switch-off
function).
The warning lamp will go out after 4 seconds for vehicles
which are fitted with an airbag switch-off function and
switching off of the front passenger airbag will be sig-
nalled by the warning lamp „AIRBAG OFF“ in the middle
of the dash panel.
♦If warning lamp K75 does not go out after 4 seconds
and lights up continously there is a fault.
♦If the warning lamp goes out and then lights up again
the control unit is not coded, the wrong control unit has
been fitted or there is a fault.
♦If the airbag warning light K75 flashes constantly, it is
then necessary to replace the airbag control unit J234.
If the warning light indicates a fault, the fault must be
rectified (repair measure) Body Work; Rep. Gr. 01.
Inspecting airbag for external damage
Driver and front passenger airbag units
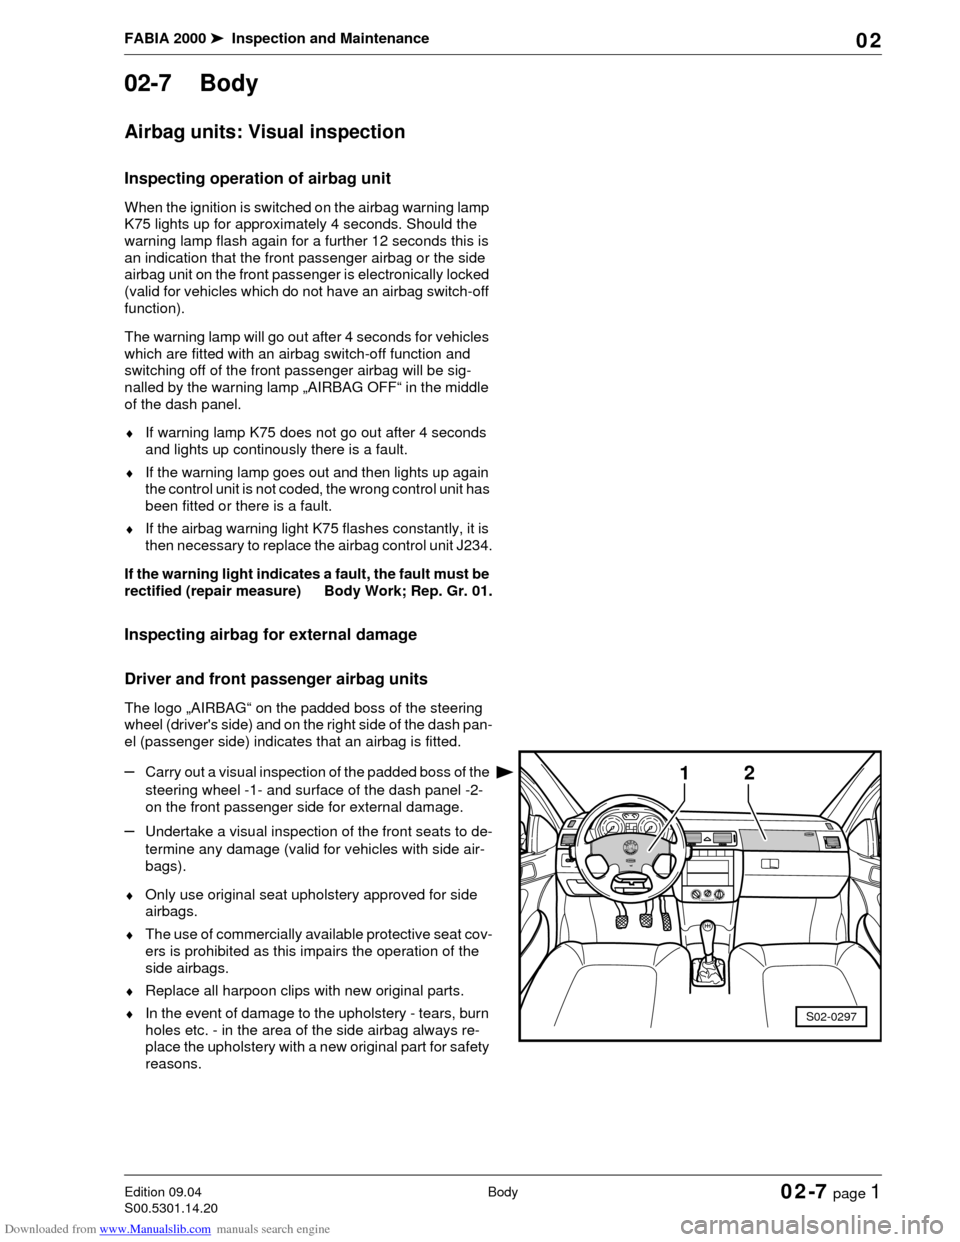
The logo „AIRBAG“ on the padded boss of the steering
wheel (driver's side) and on the right side of the dash pan-
el (passenger side) indicates that an airbag is fitted.
–Carry out a visual inspection of the padded boss of the
steering wheel -1- and surface of the dash panel -2-
on the front passenger side for external damage.
–Undertake a visual inspection of the front seats to de-
termine any damage (valid for vehicles with side air-
bags).
♦Only use original seat upholstery approved for side
airbags.
♦The use of commercially available protective seat cov-
ers is prohibited as this impairs the operation of the
side airbags.
♦Replace all harpoon clips with new original parts.
♦In the event of damage to the upholstery - tears, burn
holes etc. - in the area of the side airbag always re-
place the upholstery with a new original part for safety
reasons.
1
S02-0297
2
Page 70 of 86
Downloaded from www.Manualslib.com manuals search engine FABIA 2000➤Inspection and Maintenance
BodyEdition 09.04
S00.5301.14.2002-7 page 2 02
Do not affix any stickers or cover over the padded boss of
the steering wheel -1- and the foam-lined surface of the
airbag unit on the front passenger side -2- or do not carry
out any modifications to these parts. These parts must
only be cleaned with a dry and slightly moistened cloth.
Inspect key switch for deactivation of
front passenger airbag
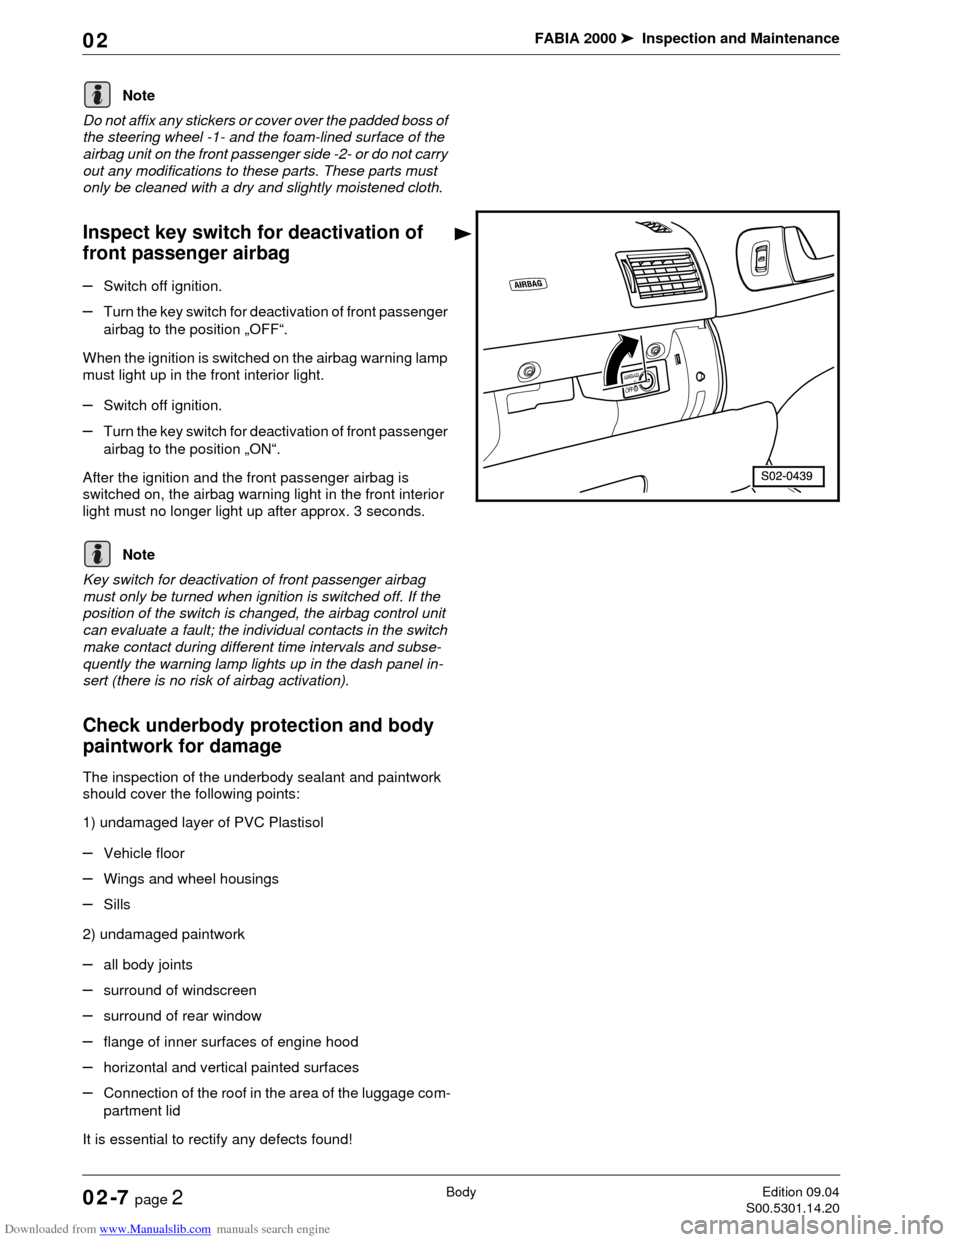
–Switch off ignition.
–Turn the key switch for deactivation of front passenger
airbag to the position „OFF“.
When the ignition is switched on the airbag warning lamp
must light up in the front interior light.
–Switch off ignition.
–Turn the key switch for deactivation of front passenger
airbag to the position „ON“.
After the ignition and the front passenger airbag is
switched on, the airbag warning light in the front interior
light must no longer light up after approx. 3 seconds.
Key switch for deactivation of front passenger airbag
must only be turned when ignition is switched off. If the
position of the switch is changed, the airbag control unit
can evaluate a fault; the individual contacts in the switch
make contact during different time intervals and subse-
quently the warning lamp lights up in the dash panel in-
sert (there is no risk of airbag activation).
Check underbody protection and body
paintwork for damage
The inspection of the underbody sealant and paintwork
should cover the following points:
1) undamaged layer of PVC Plastisol
–Vehicle floor
–Wings and wheel housings
–Sills
2) undamaged paintwork
–all body joints
–surround of windscreen
–surround of rear window
–flange of inner surfaces of engine hood
–horizontal and vertical painted surfaces
–Connection of the roof in the area of the luggage com-
partment lid
It is essential to rectify any defects found!
Note
Note
Page 84 of 86
Downloaded from www.Manualslib.com manuals search engine FABIA 2000➤Inspection and Maintenance
MiscellaneousEdition 06.01
S00.5301.06.2002-9 page 2 02
–As soon as the engine starts, press clutch and remove
gear to avoid driving into the towing vehicle.
Do not start the engine of vehicles fitted with an exhaust
catalyst by towing over a long distance as unburnt fuel
may get into the catalyst and burn there. This may result
in overheating and hence in the destruction of the cata-
lyst.
Perform a test drive
The following must be assessed within the scope of a test
drive according to the vehicle equipment and the availa-
ble possibilities (city/country, weather)
–Inspect engine for performance, misfiring, idling be-
haviour and acceleration.
–Foot and handbrake: Functional test (jerking, squeak-
ing, pulling to one side) ABS operation. Brake pedal-
idle travel: max.
1/3 of the idle travel.
–Inspect the lever position and smooth operation of the
gearshifts.
–Inspect the driving behaviour of the clutch as well as
the pedal force and smell.
–Inspect automatic gearbox: Selector lever position,
selector lever lock, shifting behaviour, display indica-
tion in dash panel insert.
–Inspect steering clearance of the vehicle standing on
its wheels, with engine running by turning the steering
wheel one way and then the other (wheels straight
ahead). There must be no play on the steering.
–Inspecting the sun roof operation.
–Pay attention to pulling and to the straigt ahead posi-
tion of the steering wheel during driving.
–Inspect the imbalance of the wheels, drive shafts and
propshafts.
–Inspecting functions: Heating, air conditioning, venti-
lation, instruments and warning lights, mirror adjust-
ment.
–Inspect engine, gearbox, axles, steering, brakes,
clutch, bodywork for abnormal noises
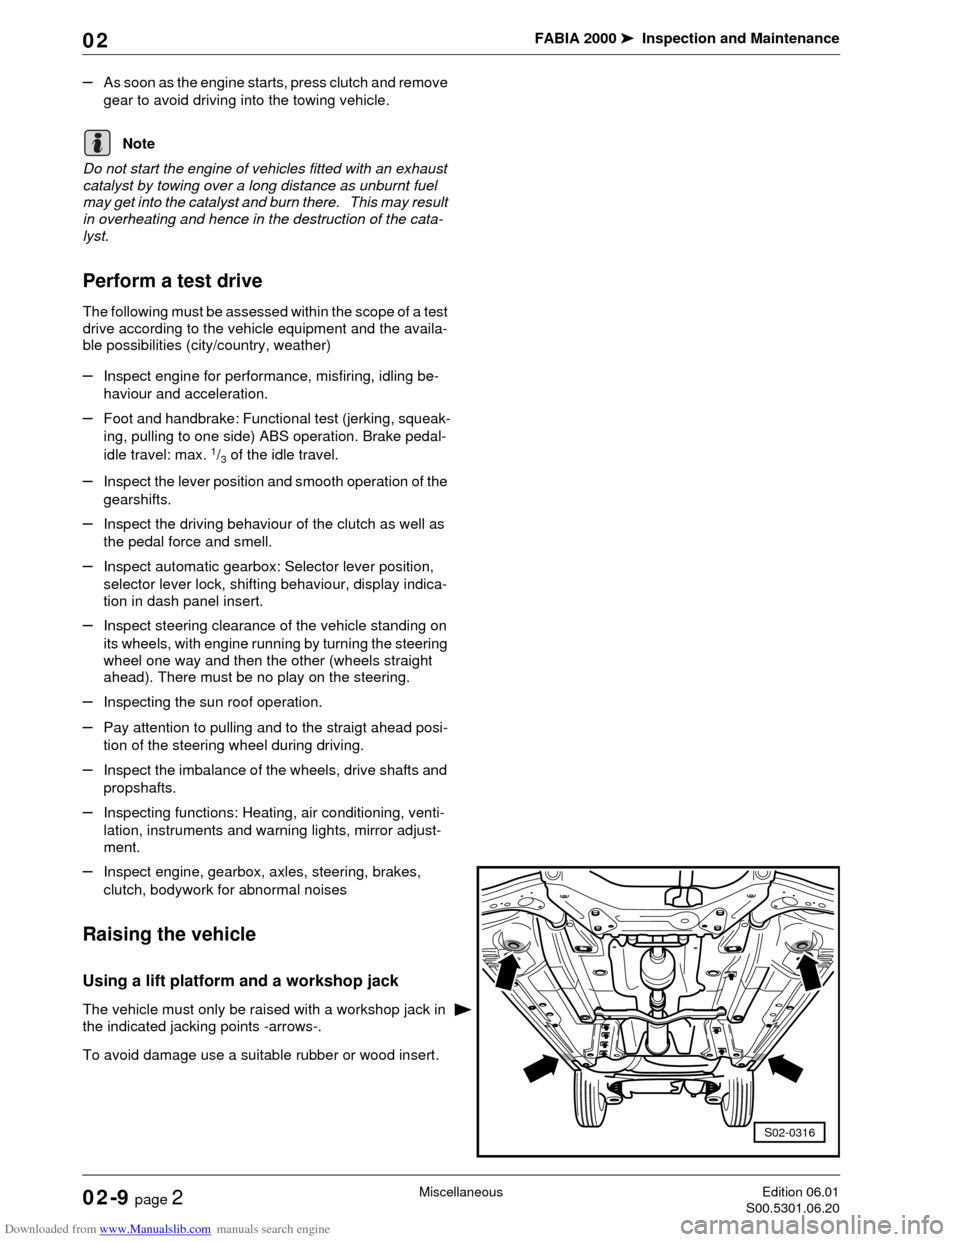
Raising the vehicle
Using a lift platform and a workshop jack
The vehicle must only be raised with a workshop jack in
the indicated jacking points -arrows-.
To avoid damage use a suitable rubber or wood insert.
Note
S02-0316