key SKODA FABIA 2004 1.G / 6Y Owner's Guide
[x] Cancel search | Manufacturer: SKODA, Model Year: 2004, Model line: FABIA, Model: SKODA FABIA 2004 1.G / 6YPages: 247
Page 85 of 247
Seats and Stowage
84
Cigarette lighter* and power socket*
Cigarette lighter
You can also use the socket on the cigarette lighter for
other electrical appliances.
Using the cigarette lighter
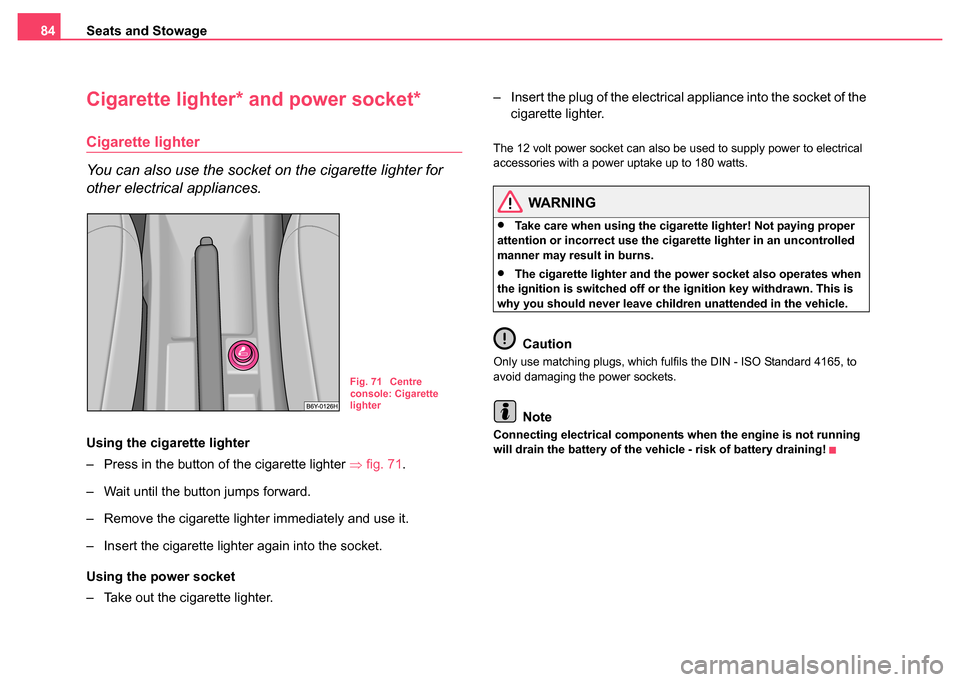
– Press in the button of the cigarette lighter ⇒fig. 71.
– Wait until the button jumps forward.
– Remove the cigarette lighter immediately and use it.
– Insert the cigarette lighter again into the socket.
Using the power socket
– Take out the cigarette lighter. – Insert the plug of the electrical appliance into the socket of the
cigarette lighter.
The 12 volt power socket can also be used to supply power to electrical
accessories with a power uptake up to 180 watts.
WARNING
•Take care when using the cigarette lighter! Not paying proper
attention or incorrect use the cigarette lighter in an uncontrolled
manner may result in burns.
•The cigarette lighter and the power socket also operates when
the ignition is switched off or the ignition key withdrawn. This is
why you should never leave children unattended in the vehicle.
Caution
Only use matching plugs, which fulfils the DIN - ISO Standard 4165, to
avoid damaging the power sockets.
Note
Connecting electrical components when the engine is not running
will drain the battery of the vehicle - risk of battery draining!
Fig. 71 Centre
console: Cigarette
lighter
Page 102 of 247
Starting-off and Driving101
Using the systemSafetyDriving TipsGeneral MaintenanceBreakdown assistanceTechnical Data
the steering wheel firmly in the 12 o'clock position or in another
way (e.g. in the middle of the steering wheel or at the inner steering
wheel edge). In such cases, injuries to the arms, the hands and the
head can occur when the driver airbag is deployed.
Ignition lock
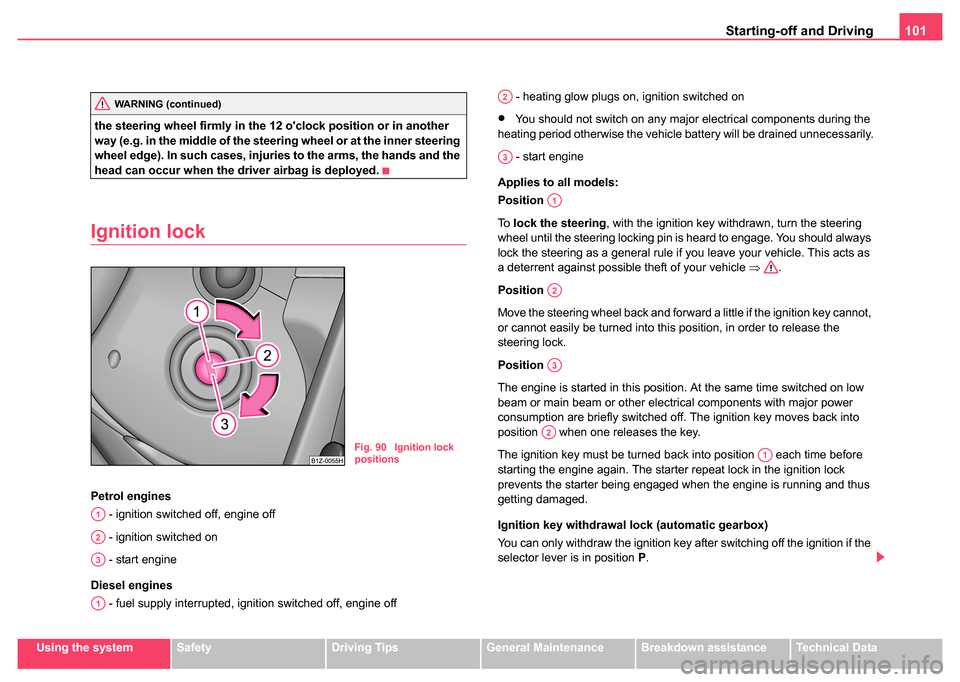
Petrol engines
- ignition switched off, engine off
- ignition switched on
- start engine
Diesel engines - fuel supply interrupted, ignition switched off, engine off - heating glow plugs on, ignition switched on
•You should not switch on any major electrical components during the
heating period otherwise the vehicle battery will be drained unnecessarily.
- start engine
Applies to all models:
Position
To lock the steering , with the ignition key withdrawn, turn the steering
wheel until the steering locking pin is heard to engage. You should always
lock the steering as a general rule if you leave your vehicle. This acts as
a deterrent against possible theft of your vehicle ⇒.
Position
Move the steering wheel back and forward a little if the ignition key cannot,
or cannot easily be turned into this position, in order to release the
steering lock.
Position
The engine is started in this position. At the same time switched on low
beam or main beam or other electrical components with major power
consumption are briefly switched off. The ignition key moves back into
position when one releases the key.
The ignition key must be turned back into position each time before
starting the engine again. The starter repeat lock in the ignition lock
prevents the starter being engaged when the engine is running and thus
getting damaged.
Ignition key withdrawal lock (automatic gearbox)
You can only withdraw the ignition key after switching off the ignition if the
selector lever is in position P.WARNING (continued)
Fig. 90 Ignition lock
positions
A1
A2
A3
A1
A2
A3
A1
A2
A3
A2
A1
Page 103 of 247
Starting-off and Driving
102
WARNING
•When driving, the ignition key must always be in the position
(ignition switched on) without the engine running. This position is
indicated by the warning lights coming on. If this is not the case, it
could result in unexpected locking of the steering wheel - risk of
accident!
•Only remove the ignition key fr om the ignition lock when the
vehicle has come to a standstill (put on the handbrake or select the
selector lever position P). The steering lock might otherwise
engage unintentionally - risk of accident!
•Always withdraw the ignition key if you are going to leave the
vehicle, even for a short time. This is particularly important if chil-
dren are left in the vehicle. The children might otherwise start the
engine or operate electrical equi pment (e.g. power windows) - risk
of injury!
Starting engine
General
You can only start the engine only using an original ignition
key.
•Place the gearshift lever into neutral (or place the selector lever to the
position P or N in the case of an automatic gearbox) and put on the hand-
brake firmly before starting the engine.
•The clutch pedal should be fully depressed when starting the engine
which means that the starter only has to crank the engine.
•Let go of the key as soon as the engine starts otherwise there may be
damage to the starter. The engine running noises may louder at first be louder for a short time
after starting the cold engine until oil pressure can be built up in the
hydraulic valve clearance compensation. This is quite normal and is not
an operating problem.
If the engine does not start ...
You can use the battery of another vehicle as a jump-start aid
⇒
page 218.
It is only possible to tow-start vehicles fitted with a manual gearbox. The
tow-starting distance must not be more than 50 metres ⇒page 222.
WARNING
•Never run the engine in non ventilated or enclosed areas. The
exhaust gases of the engine contain besides the odorless and
colourless carbon monoxide a poisonous gas - hazard! Carbon
monoxide can cause unconsciousness and death.
•Never leave your vehicle unattended with the engine running.
Caution
•The starter may only be operated (ignition key position ), if the
engine is not running. If the starter is immediately operated after switching
off the engine, the starter or the engine can be damaged.
•Avoid high engine revolutions, full throttle and high engine loads as
long as the engine has not yet reached its normal operating temperature
- risk of damaging the engine!
•Vehicles which are fitted with an exhaust gas catalytic converter
should not be tow-started over a distance of more than 50 metres.
A2
A3
Page 104 of 247
Starting-off and Driving103
Using the systemSafetyDriving TipsGeneral MaintenanceBreakdown assistanceTechnical Data
For the sake of the environment
Never warm up the engine when the vehicle is standing. Drive off right
away. Through this the engine reaches its operating temperature more
rapidly and the pollutant emissions are lower.
Petrol engines
These engines are fitted with a starter system which selects the correct
fuel/air mixture for every external air temperature.
•Do not operate accelerator before and when starting engine.
•Interrupt the attempt at starting after 10 seconds if the engine does not
start right awayand wait for about 30 seconds before repeating the
attempt.
•It is possible that the fuse on the electrical fuel pump is defect if the
engine still does not start. Check the fuse and replace it if necessary
⇒ page 224.
•Contact the nearest Škoda dealer to obtain professional assistance.
It may be necessary, if the engine is very hot, to slightly depress the
accelerator after the engine has started.
Diesel engines
Glow plug system
Diesel engines are equipped with a glow plug system, the preglow period
being controlled automatically in line with the coolant temperature and
outside temperature.
The preglow indicator light
comes on after the ignition has been
switched on. You should not switch on any major electrical components during
the heating period otherwise the vehicle battery will be drained
unnecessarily.
•You should start the engine immediately after the glow plug warning
light has gone out.
•The glow plug warning light will come on for about one second if the
engine is at a normal operating temperature or if the outside temperature
is above +5°C. This means that you can start the engine right away.
•Interrupt the attempt at starting after 10 seconds if the engine does not
start right awayand wait for about 30 seconds before repeating the
attempt.
•It is possible that the fuse on the diesel preglow system is defect if the
engine still does not start. Check the fuse and replace it if necessary
⇒ page 224.
•Contact the nearest Škoda dealer to obtain professional assistance.
Starting the engine after fuel tank has run dry
It may take longer than normal to start the engine after refuelling if the fuel
tank has run completely dry - up to one minute. This is because the fuel
system must first of all be filled while the attempting to start the engine.
Switching the engine off
– The engine can be switched off by turning the ignition key from position ⇒page 101, fig. 90 into position .
WARNING
•Never switch off the engine before the vehicle is stationary - risk
of accident!
A1
Page 116 of 247

Communication115
Using the systemSafetyDriving TipsGeneral MaintenanceBreakdown assistanceTechnical Data
Communication
Universal telephone connection*
A telephone mount is factory-fitted. The mount is attached to the
centre console. Adapter “Cullmann” and mobile phone are not
factory-fitted by Škoda Auto.
Initialisation
– Withdraw the ignition key.
– First insert the adapter without the mobile phone into the
mount in the direction of arrow ⇒fig. 97 until the
adapter is touching the stop. Press the adapter slightly in the
direction of arrow until it locks into position. – Plug the adapter cable into the mobile phone socket. The
power socket is located under the front passenger storage
compartment.
– Switch on the ignition.
– Wait for approximately 15 seconds, switch off ignition.
– Insert the mobile phone into the adapter (as specified in manufacturer's instructions) and switch on the ignition.
Removing the mobile phone and adapter
– Press the button and remove the mobile telephone.
An initialisation must be carried out:
•after the first connection of the adapter
•after reconnecting the battery
•after pulling out the adapter cable from the power socket for the mobile
phone
This enables you to make full use of the advantages of a normal carphone
(“handsfree system” using a microphone integrated in the vehicle, optimal
transmission of signals using an external aerial etc.). The battery of the
mobile phone is also constantly charged.
Please contact your Škoda dealer If there are any points which are not
clear.
Please also refer to the additional instructions ⇒page 116, “Mobile
phones and two-way radio systems”.
Fig. 97 Universal tele-
phone connection
ABA1
A2
AA
AC
Page 126 of 247

Seat belts125
Using the systemSafetyDriving TipsGeneral MaintenanceBreakdown assistanceTechnical Data
Important safety information regarding
the use of seat belts
The correct use of the seat belts considerably reduces the
risk of injury!
WARNING
•The belt webbing must not be jammed in-between at any point
or twisted, or chafe against any sharp edges.
•It is important that the belt webb ing is properly routed if the seat
belts are to offer their maximum protection ⇒page 126, “How are
seat belts correctly fastened?”.
•No two persons (also not children) should ever use a single seat
belt together.
•The maximum protection which seat belts can offer is only
achieved if you are correctly seated ⇒page 119, “Correct seated
position”.
•The belt webbing must not run across solid or fragile objects
(e.g. spectacles, ball-point pens, keys etc.) as this may be a cause
of injuries.
•Bulky, loose clothing (e.g. a winter coat over a jacket) does not
allow you to be correctly seated and impairs proper operation of
the seat belts.
•It is prohibited to use clamps or other objects to adjust seat
belts (e.g. for shortening the belts for smaller persons).
•The lock tongue should only be inserted into the lock which is
the correct one for your seat. Wrong use of the safety belt will
reduce its capacity to protect and the risk of injury increases.
•The backrests of the front seats must not be tilted too far to the
rear otherwise the seatbelts can lose their effectiveness.
•The belt webbing must always be kept clean. Soiled belt
webbing may impair proper operation of the inertia reel
⇒ page 176, “Seat belts”.
•The slot of the belt tongue must not be blocked by paper or
similar objects otherwise the belt tongue will not lock in place prop-
erly.
•Inspect the seat belts regularly to ensure they are in good condi-
tion. If you find seat belts which have damage to the seat belt
webbing, seat belt connections, to the inertia reels or to the lock,
the relevant safety belt must be replaced by a Škoda dealer.
•Damaged seat belts which have been subjected to stress in an
accident and were therefore stretched, must be replaced - this is
best done by a Škoda dealer. The anchorage points of the belts
must also be inspected. The anchorage points for the belts should
also be checked.
•In certain countries it is possible to use seat belts which differ
in terms of their operation from the seat belts which are described
on the pages which follow.
WARNING (continued)
Page 139 of 247

Airbag system
138
Switch for the front seat passenger airbags*
The front passenger airbag as well as the side passenger airbag
(if the vehicle is fitted with a side airbag) are switched off using
the switch. Deactivating airbags
– Switch off the ignition.
– Turn the slot of the airbag switch using the ignition key in the
direction of the arrow to the position OFF ⇒ page 138,
fig. 115 . The slot of the airbag switch must be located in the
vertical position.
– Check whether the airbag indicator light
in the
middle of the dash panel lights up ⇒page 138, fig. 116 when
the ignition is turned on.
Switching on airbags
– Switch off the ignition.
– Turn the slot of the airbag switch using the ignition key in the direction of the arrow to the position ON ⇒ page 138, fig. 115 .
The slot of the airbag switch must be located in the horizontal
position.
– Check whether the airbag indicator light
in the
middle of the dash panel lights up ⇒page 138, fig. 116 when
the ignition is turned on.
The airbags should only be switched off under exceptional circumstances
⇒ page 137.
Indicator light
(airbag switched off)
The airbag indicator light is located in the middle of the dash panel
⇒ page 138, fig. 116 .
If the front passenger airbag is switched on , the airbag warning light
comes on for a few seconds each time the ignition is switched on.
Fig. 115 Storage
compartment: Switch
for the front seat
passenger airbags
Fig. 116 Indicator light
for a switched off front
seat passenger airbag
Page 181 of 247
Fuel
180
Prewarming fuel
The vehicle is fitted with a fuel filter prewarming system. This secures
operation of a vehicle using diesel fuel down to an environmental temper-
ature of -25°C.
Biofuel
We recommend refuelling with diesel fuel at temperatures below -10°C.
Caution
It is not permitted to add the various fuel additives on the market, including
petrol, to diesel fuel in order to improve its flow properties.
RefuellingOpening the fuel filler cap
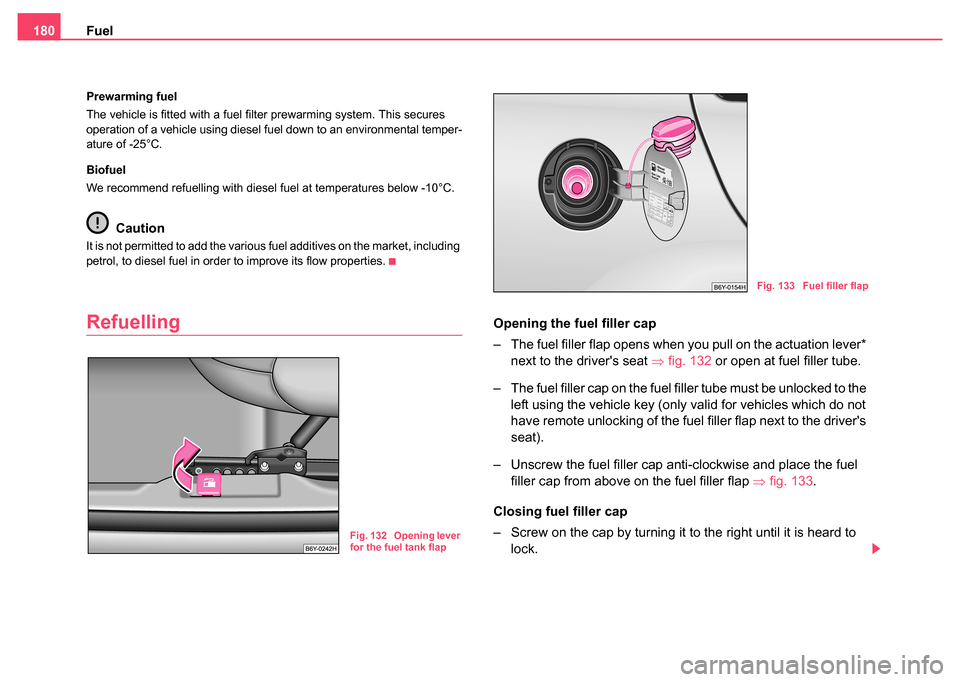
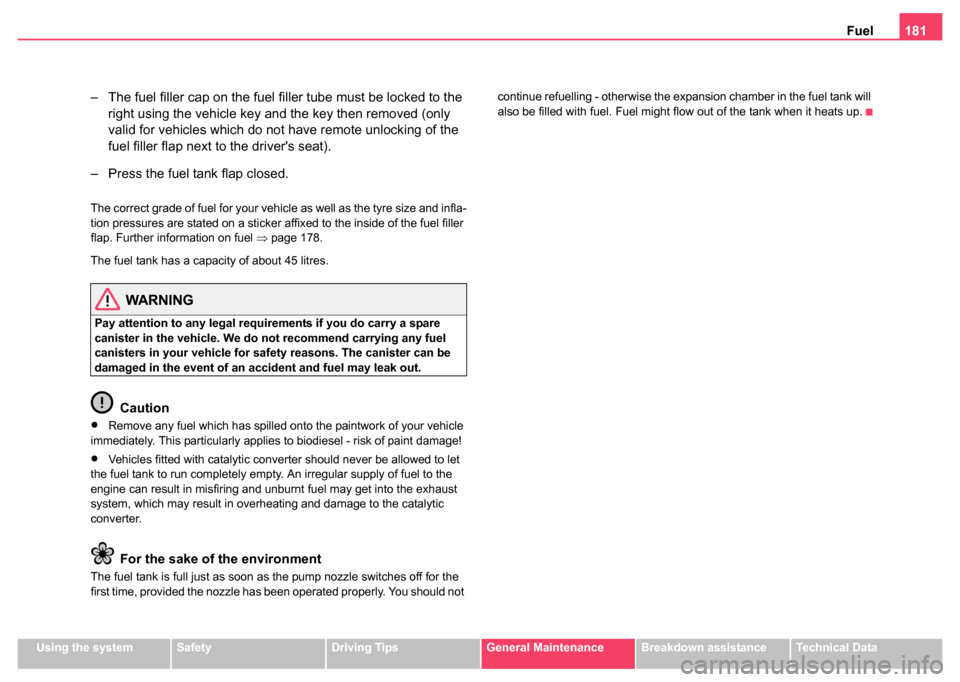
– The fuel filler flap opens when you pull on the actuation lever*
next to the driver's seat ⇒fig. 132 or open at fuel filler tube.
– The fuel filler cap on the fuel filler tube must be unlocked to the left using the vehicle key (only valid for vehicles which do not
have remote unlocking of the fuel filler flap next to the driver's
seat).
– Unscrew the fuel filler cap anti-clockwise and place the fuel filler cap from above on the fuel filler flap ⇒fig. 133.
Closing fuel filler cap
– Screw on the cap by turning it to the right until it is heard to lock.
Fig. 132 Opening lever
for the fuel tank flap
Fig. 133 Fuel filler flap
Page 182 of 247
Fuel181
Using the systemSafetyDriving TipsGeneral MaintenanceBreakdown assistanceTechnical Data
– The fuel filler cap on the fuel filler tube must be locked to the
right using the vehicle key and the key then removed (only
valid for vehicles which do not have remote unlocking of the
fuel filler flap next to the driver's seat).
– Press the fuel tank flap closed.
The correct grade of fuel for your vehicle as well as the tyre size and infla-
tion pressures are stated on a sticker affixed to the inside of the fuel filler
flap. Further information on fuel ⇒page 178.
The fuel tank has a capacity of about 45 litres.
WARNING
Pay attention to any legal requirements if you do carry a spare
canister in the vehicle. We do not recommend carrying any fuel
canisters in your vehicle for safety reasons. The canister can be
damaged in the event of an accident and fuel may leak out.
Caution
•Remove any fuel which has spilled onto the paintwork of your vehicle
immediately. This particularly applies to biodiesel - risk of paint damage!
•Vehicles fitted with catalytic converter should never be allowed to let
the fuel tank to run completely empty. An irregular supply of fuel to the
engine can result in misfiring and unburnt fuel may get into the exhaust
system, which may result in overheating and damage to the catalytic
converter.
For the sake of the environment
The fuel tank is full just as soon as the pump nozzle switches off for the
first time, provided the nozzle has been operated properly. You should not continue refuelling - otherwise the expansion chamber in the fuel tank will
also be filled with fuel. Fuel might flow out of the tank when it heats up.
Page 184 of 247
Inspecting and Replenishing183
Using the systemSafetyDriving TipsGeneral MaintenanceBreakdown assistanceTechnical Data
Opening the bonnet
– Unlock the bonnet ⇒page 182, fig. 134.
– Ensure that the arms of the windscreen wipers are correctly in place against the windscreen before opening the bonnet
otherwise damage could occur to the paintwork.
– Pulling on the handle ⇒page 182, fig. 135 will lock the bonnet
fully.
– Grip with the hand under the radiator grille and lift up the bonnet.
– Take the bonnet support out of its holder and set it in the opening designed for it ⇒page 182, fig. 136.
Closing the bonnet
– Lift the bonnet slightly and unhook the bonnet support. Press the bonnet support into the holder designed to hold it.
– Allow the bonnet to drop from a height of about 30 cm into the lock - bonnet do not press down on it!
WARNING
•Never open the bonnet if you see that steam or coolant is
flowing out of the engine compartmen t - risk of scalding! Wait long
enough until the steam or coolant has stopped escaping.
•For safety reasons, the bonnet must always be properly closed
when driving. One should therefore check that the lock has in fact
engaged properly after closing the bonnet.
•Stop your vehicle immediately wh ile driving if you notice that
the lock is not properly engaged and close the bonnet properly -
risk of an accident!
Caution
•Never open the bonnet using the handle - danger of causing damage.
•Before opening the bonnet, ensure that the arms of the windscreen
wipers are correctly in place against the windscreen. Otherwise, there is
a risk of damage to the paintwork.
Working in the engine compartment
Particular care is required when carrying out any work in
the engine compartment!
There is a risk of injuries, scalding, accidents and fire when working
in the engine compartment, e.g. inspecting and replenishing oil and
other fluids. For this reason, it is essential to comply with the
warning instructions stated below and with the general applicable
rules of safety. The engine compartment of your car is a hazardous
area ⇒ .
WARNING
•Never open the bonnet if you see that steam or coolant is
flowing out of the engine compartment - risk of scalding! Wait long
enough until the steam or coolant has stopped escaping.
•Switch off the engine and pull out the ignition key.
•Apply the handbrake firmly.
WARNING (continued)