lock SKODA FABIA 2004 1.G / 6Y Owner's Guide
[x] Cancel search | Manufacturer: SKODA, Model Year: 2004, Model line: FABIA, Model: SKODA FABIA 2004 1.G / 6YPages: 247
Page 68 of 247
Seats and Stowage67
Using the systemSafetyDriving TipsGeneral MaintenanceBreakdown assistanceTechnical Data
Adjusting the front seats
Adjusting a seat in a forward/back direction
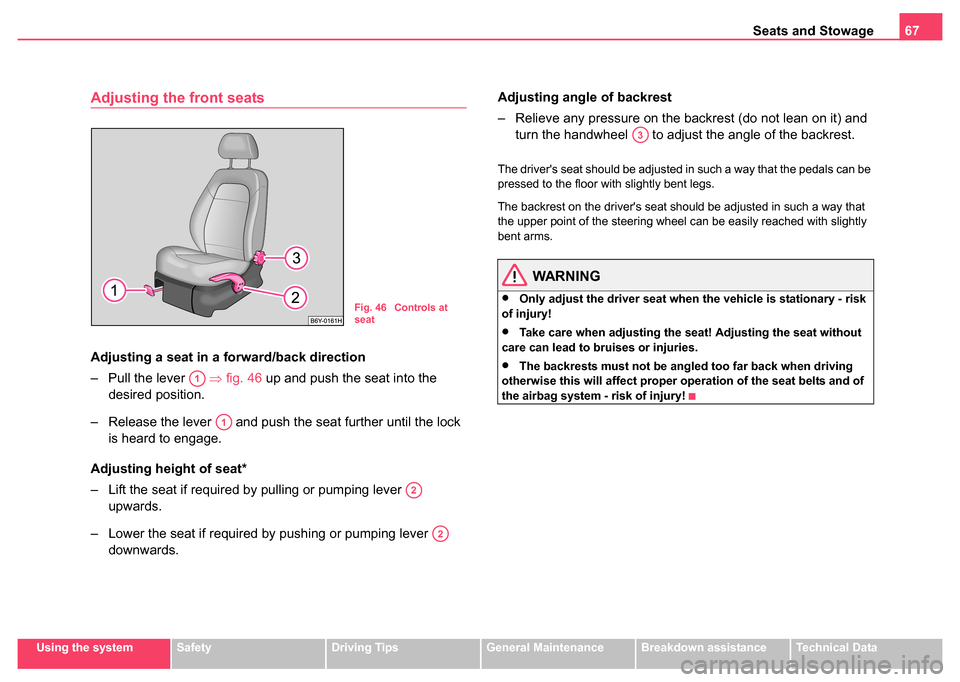
– Pull the lever ⇒fig. 46 up and push the seat into the
desired position.
– Release the lever and push the seat further until the lock is heard to engage.
Adjusting height of seat*
– Lift the seat if required by pulling or pumping lever upwards.
– Lower the seat if required by pushing or pumping lever downwards. Adjusting angl
e of backrest
– Relieve any pressure on the backrest (do not lean on it) and turn the handwheel to adjust the angle of the backrest.
The driver's seat should be adjusted in such a way that the pedals can be
pressed to the floor with slightly bent legs.
The backrest on the driver's seat should be adjusted in such a way that
the upper point of the steering wheel can be easily reached with slightly
bent arms.
WARNING
•Only adjust the driver seat when the vehicle is stationary - risk
of injury!
•Take care when adjusting the seat! Adjusting the seat without
care can lead to bruises or injuries.
•The backrests must not be angled too far back when driving
otherwise this will affect proper operation of the seat belts and of
the airbag system - risk of injury!
Fig. 46 Controls at
seat
A1
A1
A2
A2
A3
Page 69 of 247
Seats and Stowage
68
Head restraintsAdjusting the height of a head restraint
– Grasp the side of the head restraint with both hands and push
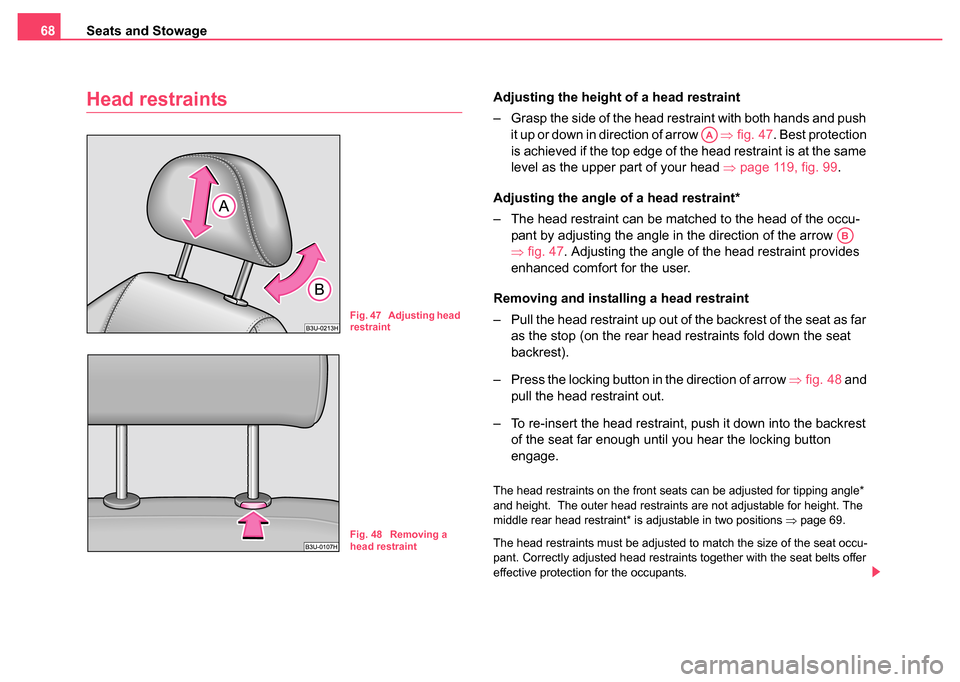
it up or down in direction of arrow ⇒fig. 47 . Best protection
is achieved if the top edge of the head restraint is at the same
level as the upper part of your head ⇒page 119, fig. 99 .
Adjusting the angle of a head restraint*
– The head restraint can be matched to the head of the occu- pant by adjusting the angle in the direction of the arrow
⇒fig. 47. Adjusting the angle of the head restraint provides
enhanced comfort for the user.
Removing and installing a head restraint
– Pull the head restraint up out of the backrest of the seat as far as the stop (on the rear head restraints fold down the seat
backrest).
– Press the locking button in the direction of arrow ⇒fig. 48 and
pull the head restraint out.
– To re-insert the head restraint, push it down into the backrest of the seat far enough until you hear the locking button
engage.
The head restraints on the front seats can be adjusted for tipping angle*
and height. The outer head restraints are not adjustable for height. The
middle rear head restraint* is adjustable in two positions ⇒page 69.
The head restraints must be adjusted to match the size of the seat occu-
pant. Correctly adjusted head restraints together with the seat belts offer
effective protection for the occupants.
Fig. 47 Adjusting head
restraint
Fig. 48 Removing a
head restraint
AA
AB
Page 70 of 247

Seats and Stowage69
Using the systemSafetyDriving TipsGeneral MaintenanceBreakdown assistanceTechnical Data
WARNING
•The head restraints must be correctly adjusted in order to offer
effective protection for the occupants in the event of an accident.
•Do not drive under any circumstance with removed head
restraints - risk of injury!
Middle rear head restraint*
The middle head restraints can be adjusted to two settings, the upper one
and the lower one. The upper setting is interlocked into place.
You must always press the securing button ⇒fig. 49 when removing the
head restraint and when pushing it out of the upper setting into the lower
setting.
WARNING
The head restraint on the middle rear seat must always be in the
upper locked position when someone is sitting there.
Heating the front seats*
The seating and leaning surfaces of the front seats can be heated
when the ignition is switched on.
Front seats
– Heating on the driver's ⇒fig. 50 and front pasenger's seat
can be switched on and regulated by turning the control dial
as required.
Fig. 49 Rear seats: the
position of the middle
head restraints
Fig. 50 Dash panel:
Control dial for heating
the front seats
Page 71 of 247
Seats and Stowage
70
– The system is switched off by turning the control dial to the home position “0”.
Caution
•You should not kneel on the seats or otherwise apply pressure at
specific points in order to avoid damaging the heating elements of the seat
heaters.
•Do not clean the seats moist ⇒page 175.
Note
The seat heating should only be switched on when the engine is running.
This has a significant effect of saving on the battery capacity.
Rear seats
Folding the rear seats forwards
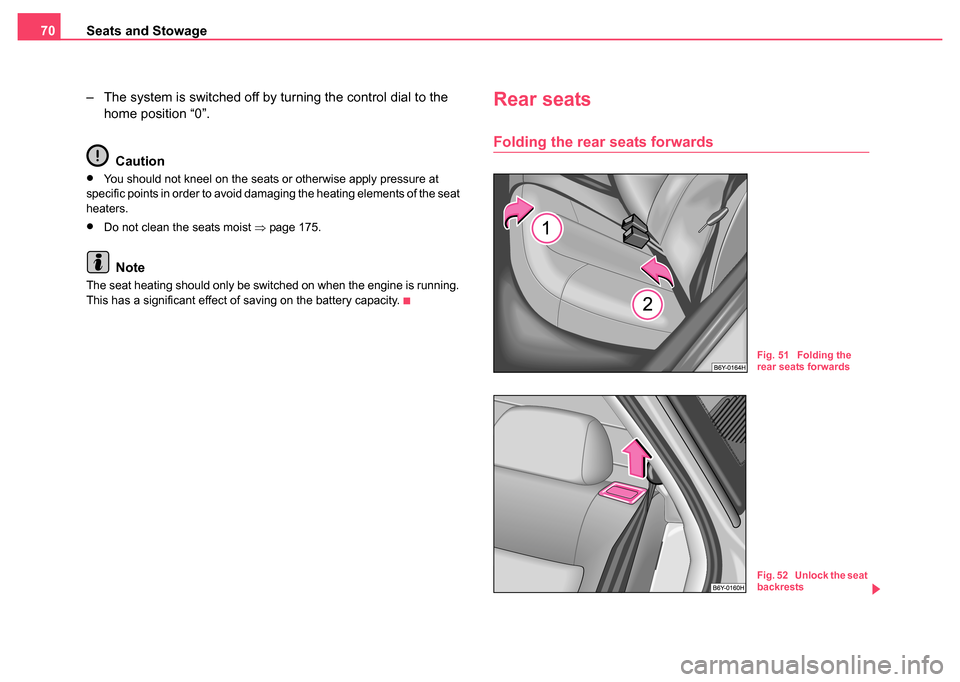
Fig. 51 Folding the
rear seats forwards
Fig. 52 Unlock the seat
backrests
Page 72 of 247

Seats and Stowage71
Using the systemSafetyDriving TipsGeneral MaintenanceBreakdown assistanceTechnical Data
The rear seats and the seat ba ckrest can be folded forwards to
increase the volume of the luggage compartment ⇒page 72.
Both parts of the bank can be folded forward individually on vehi-
cles with a divided rear seat*.
Folding the rear seat forwards
– In order to avoid causing any damage when folding the rear seat forward it is important to adjust the front seats so that no
damage can occur when this is done.
– Pull up the rear seats in the direction of arrow ⇒page 70,
fig. 51 and fold forwards in direction of arrow .
– Pull up the unlocking knob on the seat backrest and fold the seat backrest forwards ⇒page 70, fig. 52.
– Pull the head restraints out of the seat backrest.
– The head restraints can be inserted into the relevant holes of the folded forwards rear seats ⇒fig. 53 .
– Fold the seat backrest forwards completely.
Folding the rear seat back into position
– Install the head restraints in the partially lifted rear seat back- rest.
– Then push the seat backrest back into the upright position until it clicks into place - check by pulling on it.
– Fold the rear seats back into its original position. WARNING
•The belt lock and pelvic belt must be in their original position
after folding back the rear seats and seat backrest - they must be
ready to use.
•The seat backrests must be securely interlocked in position so
that no objects in the luggage compartment can slide forward if
there is sudden braking - risk of injury.
•Ensure that the seat backrest on the rear seats is securely inter-
locked in position when the vehicle is fitted with three-point safety
belts for the middle rear seat. It is only then that the three-point seat
belt can reliably fulfil its function.
Inserting a head restraint in the rear seats
– The rear head restraints can be inserted into the relevant holes of the folded forwards rear seats.
A1
A2
Fig. 53 Rear seats:
Head restraint in rear
seats
Page 79 of 247

Seats and Stowage
78
Unrolling
– Fold down the rear seat backrests slightly forwards ⇒page 70, which makes it possible to clear the access for
unrolling the net partition.
– Pull the net partition at the bracket out of the housing in direction of the holders ⇒page 77, fig. 61.
– Insert the cross rod into one of the mounts and push the cross rod forward.
– In the same way, fix the cross rod to the other side of the vehicle, mount .
– Then push the seat backrest back into the upright position until it clicks into place - check by pulling on it ⇒.
Rolling up
– Pull the cross rod back slightly, first on the one side then on the other side and take the cross rod out of the mount
⇒page 77, fig. 62 .
– Hold the cross rod in such a way that the net partition can roll
up slowily and without damage into housing .
If you wish to use the entire luggage compartment, you can remove the
luggage compartment cover ⇒page 76, fig. 60 .
WARNING
•Ensure that the seat backrest on the rear seats is securely inter-
locked in position when the vehicle is fitted with three-point safety
belts for the middle rear seat. It is only then that the three-point seat
belt can reliably fulfil its function.
•First check for yourself that the cross road is inserted into the
mounts in the front position!
AAAB
AC
AC
AC
AC
AB
WARNING (continued)
AC
Page 88 of 247
Seats and Stowage87
Using the systemSafetyDriving TipsGeneral MaintenanceBreakdown assistanceTechnical Data
Cooling of storage compar tment on front passenger
side*
The storage compartment is for vehicles fitted with an air-
conditioning system with a closable inlet for cooled air.
– You can switch the cooling system on or off using the control
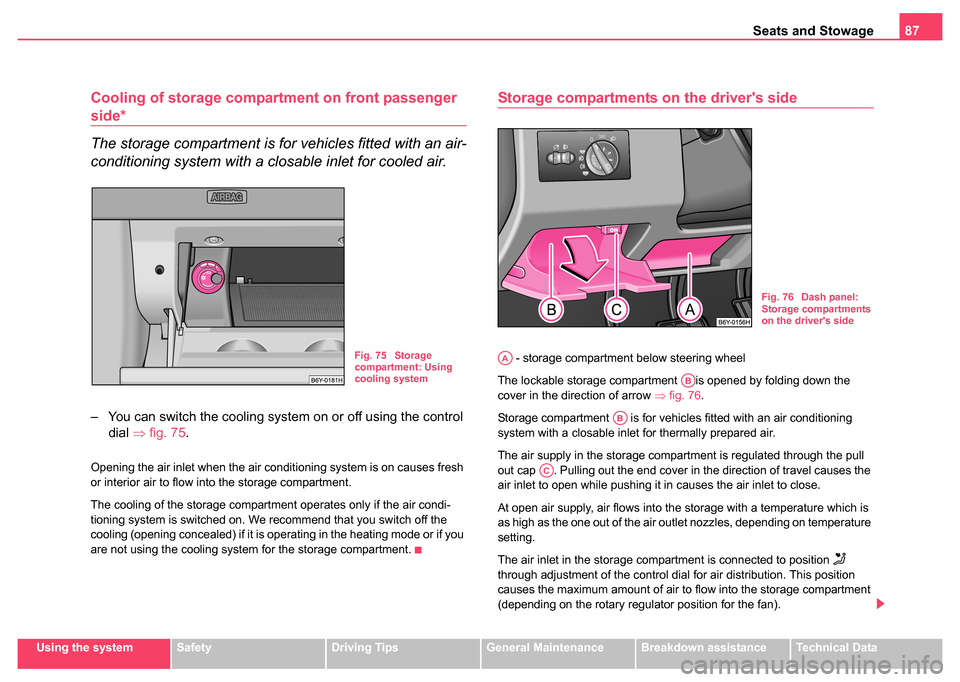
dial ⇒fig. 75.
Opening the air inlet when the air conditioning system is on causes fresh
or interior air to flow into the storage compartment.
The cooling of the storage compartment operates only if the air condi-
tioning system is switched on. We recommend that you switch off the
cooling (opening concealed) if it is operating in the heating mode or if you
are not using the cooling system for the storage compartment.
Storage compartments on the driver's side
- storage compartment below steering wheel
The lockable storage compartment is opened by folding down the
cover in the direction of arrow ⇒fig. 76.
Storage compartment is for vehicles fitted with an air conditioning
system with a closable inlet for thermally prepared air.
The air supply in the storage compartment is regulated through the pull
out cap . Pulling out the end cover in the direction of travel causes the
air inlet to open while pushing it in causes the air inlet to close.
At open air supply, air flows into the storage with a temperature which is
as high as the one out of the air outlet nozzles, depending on temperature
setting.
The air inlet in the storage compartment is connected to position
through adjustment of the control dial for air distribution. This position
causes the maximum amount of air to flow into the storage compartment
(depending on the rotary regulator position for the fan).
Fig. 75 Storage
compartment: Using
cooling system
Fig. 76 Dash panel:
Storage compartments
on the driver's side
AA
AB
AB
AC
Page 89 of 247
Seats and Stowage
88
You can use the storage compartment, for example, to temper drinks
cans, etc.
If you do not use the air inlet in the storage compartment, the end
cover should always be kept closed.
There is a holder for a pen on the outside of the storage compartment
.
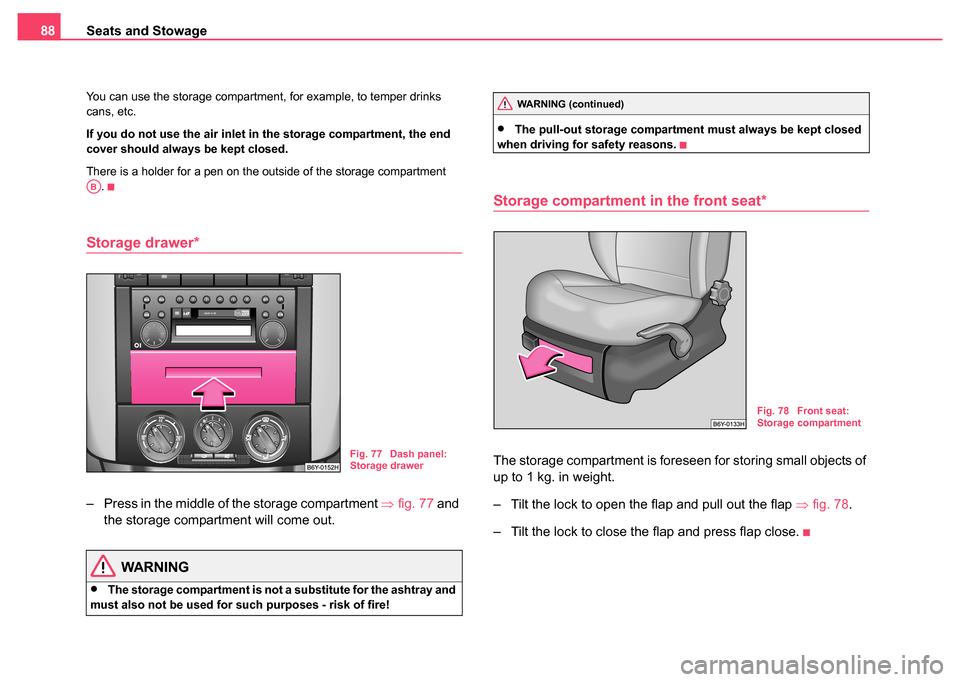
Storage drawer*
– Press in the middle of the storage compartment ⇒fig. 77 and
the storage compartment will come out.
WARNING
•The storage compartment is not a substitute for the ashtray and
must also not be used for such purposes - risk of fire!
•The pull-out storage compartment must always be kept closed
when driving for safety reasons.
Storage compartment in the front seat*
The storage compartment is foreseen for storing small objects of
up to 1 kg. in weight.
– Tilt the lock to open the flap and pull out the flap ⇒fig. 78 .
– Tilt the lock to close the flap and press flap close.
AB
Fig. 77 Dash panel:
Storage drawer
WARNING (continued)
Fig. 78 Front seat:
Storage compartment
Page 90 of 247

Seats and Stowage89
Using the systemSafetyDriving TipsGeneral MaintenanceBreakdown assistanceTechnical Data
Storage compartment in the front doors
WARNING
Use the stowage compartments in the door panels only for small
items which do not project out of the compartment in order to avoid
any interference with the proper operation of the side airbags.
Storage compartment in the luggage compartment
(Estate car)*
There are storage compartments situated on the right and the left
in the luggage compartment.
– You can open the compartment by turning the locks in the
direction of arrow ⇒fig. 80.
Fig. 79 Stowage
compartment in door
panel
Fig. 80 Luggage
compartment: Storage
compartments
Page 101 of 247
Starting-off and Driving
100
Starting-off and Driving
Setting steering wheel position*You can set the height and the forward/back position of the
steering wheel to the desired position.
– Adjust the driver seat ⇒page 66.
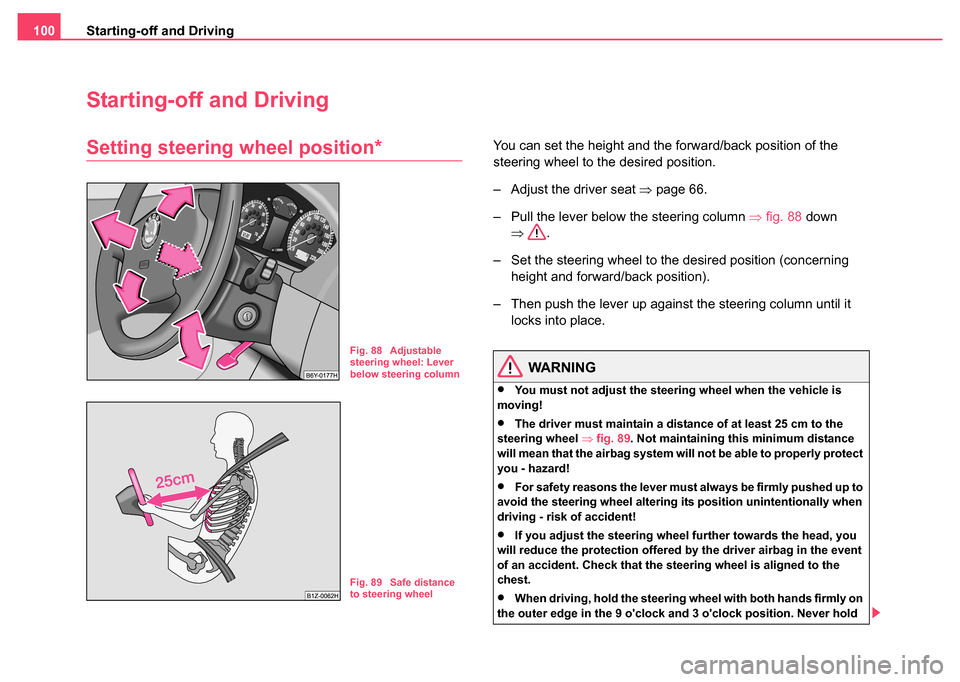
– Pull the lever below the steering column ⇒fig. 88 down
⇒ .
– Set the steering wheel to the desired position (concerning height and forward/back position).
– Then push the lever up against the steering column until it locks into place.
WARNING
•You must not adjust the steering wheel when the vehicle is
moving!
•The driver must maintain a distance of at least 25 cm to the
steering wheel ⇒fig. 89 . Not maintaining this minimum distance
will mean that the airbag system will not be able to properly protect
you - hazard!
•For safety reasons the lever must always be firmly pushed up to
avoid the steering wheel altering its position unintentionally when
driving - risk of accident!
•If you adjust the steering wheel further towards the head, you
will reduce the protection offered by the driver airbag in the event
of an accident. Check that the steering wheel is aligned to the
chest.
•When driving, hold the steering wheel with both hands firmly on
the outer edge in the 9 o'clock and 3 o'clock position. Never hold
Fig. 88 Adjustable
steering wheel: Lever
below steering column
Fig. 89 Safe distance
to steering wheel