lock SKODA FABIA 2004 1.G / 6Y Repair Manual
[x] Cancel search | Manufacturer: SKODA, Model Year: 2004, Model line: FABIA, Model: SKODA FABIA 2004 1.G / 6YPages: 247
Page 167 of 247
Towing a trailer
166
Distribution of the load
Distribute the load in the trailer in such a way that any heavy items are
located as close as possible to the axle. Secure the items to prevent them
slipping.
Tyre pressure
Correct the tyre inflation pressure on your vehicle for that of “fully laden”,
⇒ page 200. The inflation pressure of the tyres fitted to the trailer adjust
in accordance with the manufacturer's recommendation.
Exterior mirrors
You have to have additional exterior mirrors fitted if you are not able to see
the traffic behind the trailer with the standard rear-view mirrors. Both exte-
rior mirrors should be attached to folding arms. Adjust the mirrors so that
they provide you with an adequate field of view to the rear.
Headlights
Before starting off with a hitched trailer, also check the setting of the head-
lights. Alter the setting as necessary with the aid of the headlight beam
adjuster ⇒page 56.
Detachable ball head
The ball rod is detachable on vehicles which feature a factory-fitted towing
device. It is stowed together with separate fitting instructions in the spare
wheel well in the luggage compartment of the vehicle.
Further information on the towing device ⇒page 167.
Note
•We recommend that you also have your vehicle inspected between
service intervals if you tow a trailer frequently.
•The handbrake on the towing vehicle must be put on when coupling
and decoupling the trailer.
Driving Tips
Particular caution is required when towing a trailer.
– Do not, as far as possible, drive with your vehicle unladen and the trailer laden.
– Do not make full use of the legal maximum speeds. This applies in particular to downhill sections.
– Apply the brakes in good time.
– Keep a check on the coolant temperature gauge if the outside temperature is high.
Distribution of weight
The distribution of the weight is very poor if your vehicle is unladen and
the trailer is laden. Maintain a particularly low speed if you cannot avoid
driving with this combination.
Driving speed
Do not drive faster than 80 km/hour for safety reasons. This also applies
for countries in which higher speeds are allowed.
The fact that the driving stability of the vehicle + trailer combination
reduces with increasing speed means that the legally allowed speed
should not be used when there are unfavourable road, weather or wind
conditions, particularly near accident black spots.
You must always reduce your speed immediately as soon as you detect
even just the slightest swaying of the trailer. On no account attempt to
stop the trailer from “swaying” by accelerating.
Apply the brakes in good time! If the trailer is fitted with a trailer brake,
apply the brakes gently at first, then brake firmly. This will avoid brake jolts
resulting from the trailer wheels locking. Shift down gears in good time
Page 168 of 247
Towing a trailer167
Using the systemSafetyDriving TipsGeneral MaintenanceBreakdown assistanceTechnical Data
before negotiating a downhill section to allow the engine to also act as a
brake.
Engine overheating
Please keep a check on the coolant temperature gauge if you have to
negotiate a lengthy slope in a low gear at a high engine speed when the
outside temperature is very high
⇒page 13.
If the needle of the coolant temperature gauge moves into the right-hand
area or even the red area of the scale, reduce your speed immediately.
Stop and switch off the engine if the warning light
in the instrument
cluster begins flashing. Wait a few minutes and check the level of coolant
in the coolant expansion bottle ⇒page 189, “Inspecting the coolant level”.
Please refer to the following guidelines ⇒page 31, “Coolant tempera-
ture/coolant level ”.
The coolant temperature can be reduced by switching on the heating.
Any increase in the cooling effect of the coolant fan through shifting down
a gear and increasing the engine speed is not possible since the fan
speed is independent of the engine speed. One should also not drop a
gear for this reason when towing a trailer as long as the engine can
manage the slope without any drop in speed.
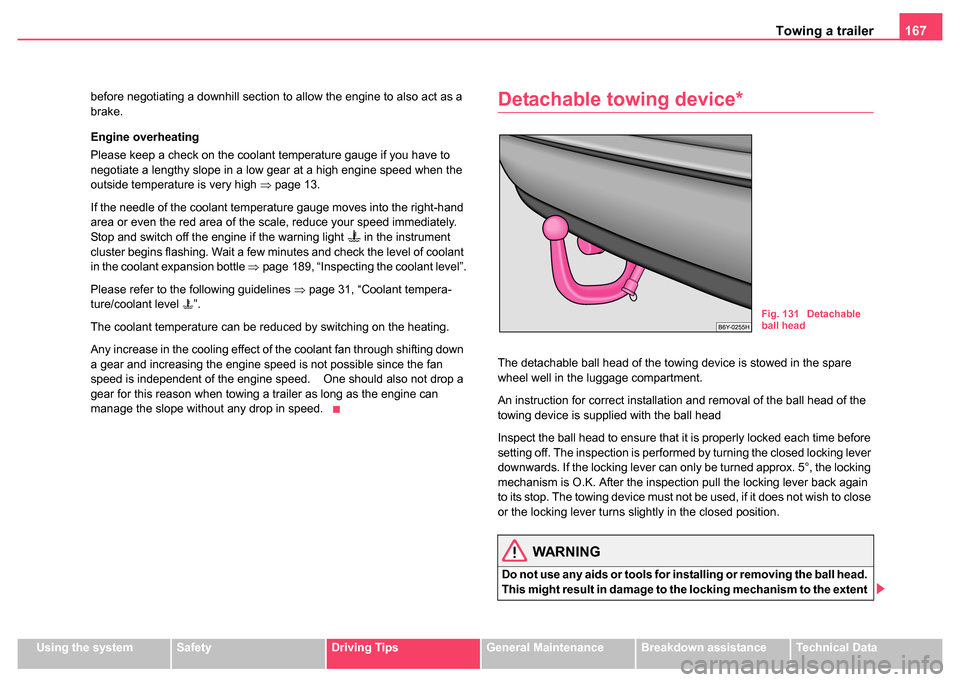
Detachable towing device*
The detachable ball head of the towing device is stowed in the spare
wheel well in the luggage compartment.
An instruction for correct installation and removal of the ball head of the
towing device is supplied with the ball head
Inspect the ball head to ensure that it is properly locked each time before
setting off. The inspection is performed by turning the closed locking lever
downwards. If the locking lever can only be turned approx. 5°, the locking
mechanism is O.K. After the inspection pull the locking lever back again
to its stop. The towing device must not be used, if it does not wish to close
or the locking lever turns slightly in the closed position.
WARNING
Do not use any aids or tools for installing or removing the ball head.
This might result in damage to the locking mechanism to the extent
Fig. 131 Detachable
ball head
Page 169 of 247

Towing a trailer
168
that the safety of the towing device is no longer assured - risk of an
accident.
Note
•Do not carry out any modifications or repairs to the ball head or to any
other components on the towing device.
•Contact a Škoda dealer if you encounter any problems using the
device.
•Never unlock the ball head with a trailer coupled to it.
•You should take off the ball head if you drive without towing a trailer.
Inspect whether the end cover properly seals off the mounting shaft.
•Remove the ball head beforehand if you wish to clean your vehicle
using a steam jet. Ensure that the end cover properly seals the mounting
shaft.
•It is recommended to wear gloves when installing and removing.
WARNING (continued)
Page 171 of 247
Care and cleaning
170
WARNING
When washing your vehicle in the winter: Water and ice in the brake
system can affect the braking efficiency - risk of accident.
Automatic vehicle wash systems
The paintwork of the vehicle is sufficiently resistant that the vehicle can be
washed normally in automatic vehicle wash plants without any problem.
The actual stress to which the paintwork is subjected, however, depends
greatly on the design of the vehicle wash system, the filtering of the water
and the type of washing and care products used. If the paintwork of your
vehicle appears mat after being washed or even has scratches, point this
out to the operator of the vehicle wash plant. Use a different vehicle wash
plant, if necessary.
There are no particular points to note before washing your vehicle in such
a plant other than the usual precautionary measures (closing windows
and sliding/tilting roof, moving any factory-fitted aerials down flat against
the bodywork, etc.).
If you have any particular attached parts fitted to your car - such as spoiler,
roof rack system, two-way radio aerial - it is best to first of all consult the
operator of the car wash plant.
It is important to degrease the lips of the windscreen wiper rubbers after
passing through the automatic vehicle wash system.
Caution
Do not screw the swivelling down roof aerial tight before washing the
vehicle in an automatic vehicle wash system - risk of damage!
Washing vehicle by hand
It is important to first soften the dirt with plenty of water and rinse it off as
thoroughly as possible before washing your vehicle by hand.
One should then clean the vehicle using a soft washing sponge,
washing glove or a washing brush and only slight pressure. Work from
the top to the bottom - beginning with the roof. Only place slight pressure
on the vehicle paintwork during cleaning Only use a shampoo for stub-
born dirt.
Wash out the sponge or washing glove thoroughly at short intervals.
Clean wheels, door sills and similar parts last. Use a second sponge for
such areas.
Rinse off the vehicle well after giving it a wash and dry it off using a
chamois leather.
WARNING
•The ignition should always be switched off when you wash your
vehicle - risk of accident!
•Protect your hands and arms from sharp-edged metal parts
when you are cleaning the underfloor, the inside of the wheel hous-
ings or the wheel trims - risk of cuts.
Caution
•Do not wash your vehicle in bright sunlight - risk of paint damage.
•Ensure that the jet of water is not aimed directly at the locks or at the
door and panel joints if you spray your vehicle in winter down with a hose
- risk of freezing.
•Do not use any insect sponges, rough kitchen sponges or similar
cleaning products - risk of damage to the surface of paintwork.
Page 174 of 247
Care and cleaning173
Using the systemSafetyDriving TipsGeneral MaintenanceBreakdown assistanceTechnical Data
Caution
Never remove snow or ice from the windows with warm or hot water - risk
of formation of cracks in the glass!
The headlight lenses
Please do not use any aggressive cleaning or chemical solvent products
- risk of damage to the plastic lenses Please use soap and clean warm
water.
Caution
Never wipe the headlights dry and do not use any sharp objects for
cleaning the plastic lenses, this may result in damage to the protective
paintwork and consequently in formation of cracks on the headlight
lenses, e.g through effect of chemical products.
Door and window seals
The rubber seals on the doors, boot lid, bonnet, sliding roof and windows
remain supple and last longer if you treat them from time to time with a
rubber care product (e.g. silicone spray). You also avoid premature wear
of the seals and prevent leakages in this way. It is also easier to open the
doors. Rubber seals which are well cared for also do not stick together in
cold winter weather.
Locks
We recommend that you use the spray from Škoda original accessories
with regreasing and anticorrosive effect for de-icing locks.
Note
When washing your vehicle, ensure that as little water as possible gets
into the locks.
Wheels
Steel wheels
You should also thoroughly wash the wheels and wheel trims when giving
your vehicle its regular wash. This prevents any brake dust, dirt and road
salt from sticking to the wheel hubs. You can remove stubborn brake abra-
sion adhering to the wheels with an industrial cleaner. Touch up any
damage to the paintwork on the wheels before rust is able to form.
Light alloy wheels
Regular care of light alloy wheels is necessary in order to retain their deco-
rative appearance over long periods. It is particularly important to remove
any road salt and brake abrasion from light alloy wheels every two weeks,
otherwise the surface will suffer. Wash thoroughly and then treat the
wheels with a protective product for light alloy wheels which does not
contain any acidic components. You should provide the wheel hubs with a
hard wax layer every three months. You must not use any products which
cause abrasion when treating the wheel hubs. Any damage to the paint
layer on the wheel hubs must be touched up immediately.
We recommend using a preservative from Škoda genuine accessories
offered by your Škoda dealer.
Page 177 of 247
Care and cleaning
176
– Remove fresh stains which are oil based (e.g. butter, mayon-
naise, chocolate etc.) with an absorbent cloth or household
cleaning paper or with the cleaner from the care set if the stain
has not yet penetrated into the surface.
– Use a grease dissolver for grease stains which have dried
in .
–Eliminate special stains (e.g. ball-point pens, felt pen, nail
varnish, dispersion paint, shoe cream etc.) with a special stain
remover suitable for leather.
Leather care
– Treat the leather every six months with the leather care product available from Škoda dealers.
– Apply only a small amount of the care product.
– Dry the leather off with a soft cloth
It is best to consult your Škoda dealer if you have any questions regarding
cleaning and care of the leather interior.
Caution
•You must on no account treat the leather with solvents (e.g. gasoline,
turpentine), floor wax, shoe cream or such like.
•Avoid leaving your vehicle for lengthy periods in bright sunlight in order
to avoid bleaching the leather. If you leave your vehicle parked in the open
for lengthy periods, protect the leather from the direct rays of the sun by
covering it over.
•Sharp-edged objects on items of clothing such as zip fasteners, rivets,
sharp-edged belts may leave permanent scratches or signs of rubbing on
the surface.
Note
•Use a care cream with light blocker and impregnation effect regularly
and each time after cleaning the leather. The cream nourishes the leather,
allows it to breathe and keeps it supple and also provides moisture. It also
creates surface protection.
•Clean the leather every 2 to 3 months, remove fresh soiling each time
this occurs.
•Remove fresh stains such as those from ball-point pens, ink, lipstick,
shoe cream etc., as quickly as possible.
•Care also for the leather dye. Refreshen areas which have lost their
colour with a special coloured leather cream as required.
Seat belts
– Keep the seat belts clean!
– Wash seat belts which have become soiled using a mild soapy solution.
– Inspect the seat belts regularly to ensure they are in good condition.
Belt webbing which has become severely soiled may prevent the inertia
reel from reeling up the belt properly.
WARNING
•The seat belts must not be removed for cleaning.
•Never clean the seat belts chemically as dry cleaning may
destroy the fabric. The seat belts must also not be allowed to come
into contact with corrosive liquids (such as acids etc.).
Page 178 of 247

Care and cleaning177
Using the systemSafetyDriving TipsGeneral MaintenanceBreakdown assistanceTechnical Data
•Seat belts which have damage to the webbing, the connections,
the inertia reel or the lock should be replaced by a Škoda dealer.
•Inertia reel belts must be completely dried before being reeled
up.
WARNING (continued)
Page 181 of 247
Fuel
180
Prewarming fuel
The vehicle is fitted with a fuel filter prewarming system. This secures
operation of a vehicle using diesel fuel down to an environmental temper-
ature of -25°C.
Biofuel
We recommend refuelling with diesel fuel at temperatures below -10°C.
Caution
It is not permitted to add the various fuel additives on the market, including
petrol, to diesel fuel in order to improve its flow properties.
RefuellingOpening the fuel filler cap
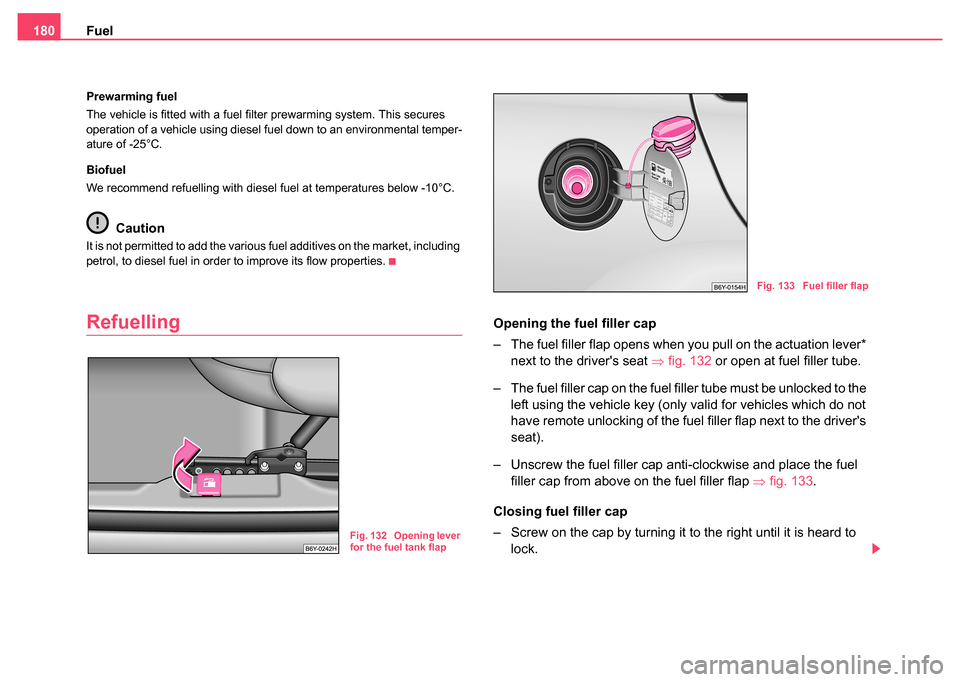
– The fuel filler flap opens when you pull on the actuation lever*
next to the driver's seat ⇒fig. 132 or open at fuel filler tube.
– The fuel filler cap on the fuel filler tube must be unlocked to the left using the vehicle key (only valid for vehicles which do not
have remote unlocking of the fuel filler flap next to the driver's
seat).
– Unscrew the fuel filler cap anti-clockwise and place the fuel filler cap from above on the fuel filler flap ⇒fig. 133.
Closing fuel filler cap
– Screw on the cap by turning it to the right until it is heard to lock.
Fig. 132 Opening lever
for the fuel tank flap
Fig. 133 Fuel filler flap
Page 182 of 247
Fuel181
Using the systemSafetyDriving TipsGeneral MaintenanceBreakdown assistanceTechnical Data
– The fuel filler cap on the fuel filler tube must be locked to the
right using the vehicle key and the key then removed (only
valid for vehicles which do not have remote unlocking of the
fuel filler flap next to the driver's seat).
– Press the fuel tank flap closed.
The correct grade of fuel for your vehicle as well as the tyre size and infla-
tion pressures are stated on a sticker affixed to the inside of the fuel filler
flap. Further information on fuel ⇒page 178.
The fuel tank has a capacity of about 45 litres.
WARNING
Pay attention to any legal requirements if you do carry a spare
canister in the vehicle. We do not recommend carrying any fuel
canisters in your vehicle for safety reasons. The canister can be
damaged in the event of an accident and fuel may leak out.
Caution
•Remove any fuel which has spilled onto the paintwork of your vehicle
immediately. This particularly applies to biodiesel - risk of paint damage!
•Vehicles fitted with catalytic converter should never be allowed to let
the fuel tank to run completely empty. An irregular supply of fuel to the
engine can result in misfiring and unburnt fuel may get into the exhaust
system, which may result in overheating and damage to the catalytic
converter.
For the sake of the environment
The fuel tank is full just as soon as the pump nozzle switches off for the
first time, provided the nozzle has been operated properly. You should not continue refuelling - otherwise the expansion chamber in the fuel tank will
also be filled with fuel. Fuel might flow out of the tank when it heats up.
Page 183 of 247
Inspecting and Replenishing
182
Inspecting and Replenishing
Engine compartment
Bonnet remote release
Bonnet remote release
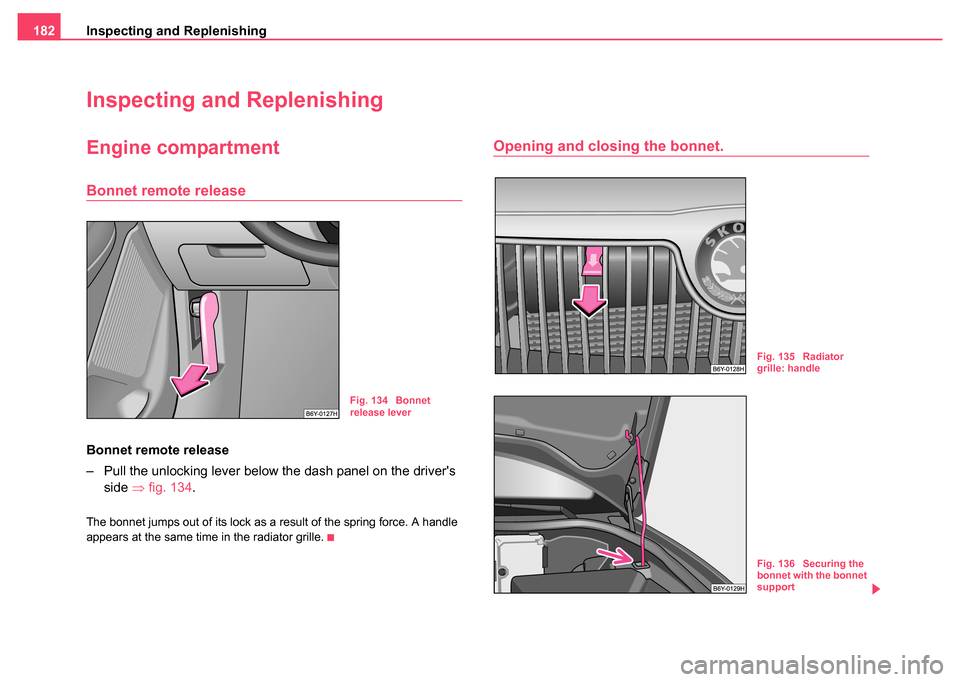
– Pull the unlocking lever below the dash panel on the driver's
side ⇒fig. 134.
The bonnet jumps out of its lock as a result of the spring force. A handle
appears at the same time in the radiator grille.
Opening and closing the bonnet.
Fig. 134 Bonnet
release lever
Fig. 135 Radiator
grille: handle
Fig. 136 Securing the
bonnet with the bonnet
support