remove seats SKODA FABIA 2005 1.G / 6Y Owner's Manual
[x] Cancel search | Manufacturer: SKODA, Model Year: 2005, Model line: FABIA, Model: SKODA FABIA 2005 1.G / 6YPages: 260
Page 71 of 260

Seats and Stowage
70
You must always press the securing button ⇒page 69, fig. 48 when
pushing the tilting head restraints* out of the upper setting into the lower
setting.
WARNING
•The head restraints must be correctly adjusted in order to offer
effective protection for the occupants in the event of an accident.
•Do not drive under any circumstance with removed head
restraints - risk of injury!
Middle rear head restraint*
The middle head restraints can be adjusted to two settings, the upper one
and the lower one. The upper setting is interlocked into place. You must always press the securing button
⇒fig. 49 when removing the
head restraint and when pushing it out of the upper setting into the lower
setting.
WARNING
The head restraint on the middle re ar seat must always be in the
upper locked position when someone is sitting there.
Heating the front seats*
The seating and leaning surfaces of the front seats can be heated
when the ignition is switched on.
Fig. 49 Rear seats: the
position of the middle
head restraints
Fig. 50 Dash panel:
Control dial for heating
the front seats
sqc.1.book Seite 70 Mittwoch, 13. April 2005 1:09 13
Page 74 of 260

Seats and Stowage73
Using the systemSafetyDriving TipsGeneral MaintenanceBreakdown assist-
anceTechnical DataFabia Praktik
Inserting head restraints in the rear seats
– The rear head restraints can be inserted into the relevant
holes of the folded forwards rear seats.
Remove the rear seats
The luggage compartment can be increased in size by removing
the rear seats
Removing
– Fold the rear seats forwards completely
– Press the wire clamps in the direction of the arrow ⇒fig. 54
and remove the rear seats from its holder.
Installing
– Press the wire clamp in the direction of the arrow and place the seat upholstery in its holder.
– Fold the rear seats back into its original position.
Fig. 53 Rear seats:
Head restraints in rear
seatsFig. 54 Remove the
rear seats
sqc.1.book Seite 73 Mittwoch, 13. April 2005 1:09 13
Page 78 of 260

Seats and Stowage77
Using the systemSafetyDriving TipsGeneral MaintenanceBreakdown assist-
anceTechnical DataFabia Praktik
Luggage net*
The luggage net is designed for the tranportation of lighter objects.
WARNING
•In the luggage net you must only store objects (up to a weight
of 1.5 kg). Heavy objects are not secured sufficiently - risk of injury!
•No objects with sharp edges should be stored in the luggage
net, because they can damage the luggage net.
The luggage compartment cover*
You can use the luggage compartment cover behind the
head restraints for storing light and soft items.
The luggage compartment cover can be removed as required if
one must transport bulky goods.
– Unhook the support straps on the tailgate.
– Place the cover on the side supports.
– Pull the cover horizontally to the rear out of the front holders ⇒fig. 59 .
– Install again by pushing it forwards into the holders and hanging the support straps on the tailgate.
Fig. 58 Luggage
compartment: Luggage
net
Fig. 59 Removing the
luggage compartment
cover
sqc.1.book Seite 77 Mittwoch, 13. April 2005 1:09 13
Page 79 of 260
Seats and Stowage
78
WARNING
No objects should be placed on the luggage compartment cover,
the vehicle occupants could be endangered if there is sudden
braking or the vehicle collides with something.
Caution
Please ensure that the heating elements of the rear window heater are not
damaged as a result of objects placed in this area.
Note
When opening the boot lid, lift the luggage compartment cover - risk that
objects placed in this area can slip forward!
Luggage compartment cover (estate car)
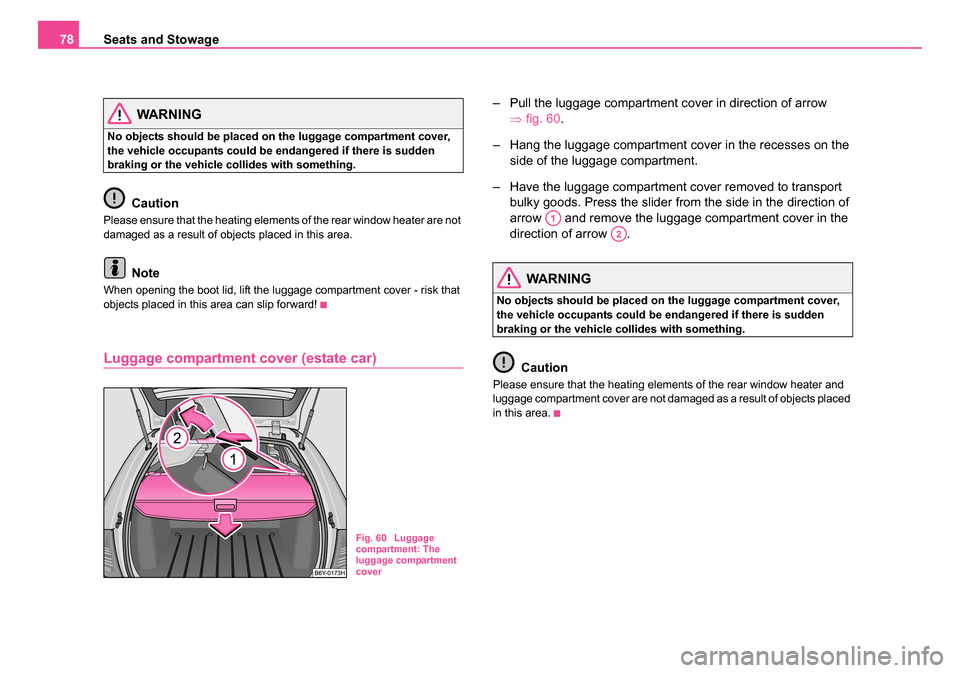
– Pull the luggage compartment cover in direction of arrow
⇒fig. 60.
– Hang the luggage compartment cover in the recesses on the side of the luggage compartment.
– Have the luggage compartment cover removed to transport bulky goods. Press the slider from the side in the direction of
arrow and remove the luggage compartment cover in the
direction of arrow .
WARNING
No objects should be placed on the luggage compartment cover,
the vehicle occupants could be endangered if there is sudden
braking or the vehicle collides with something.
Caution
Please ensure that the heating elements of the rear window heater and
luggage compartment cover are not damaged as a result of objects placed
in this area.
Fig. 60 Luggage
compartment: The
luggage compartment
cover
A1
A2
sqc.1.book Seite 78 Mittwoch, 13. April 2005 1:09 13
Page 80 of 260
Seats and Stowage79
Using the systemSafetyDriving TipsGeneral MaintenanceBreakdown assist-
anceTechnical DataFabia Praktik
Net partition (Estate)*
Use behind the rear seats
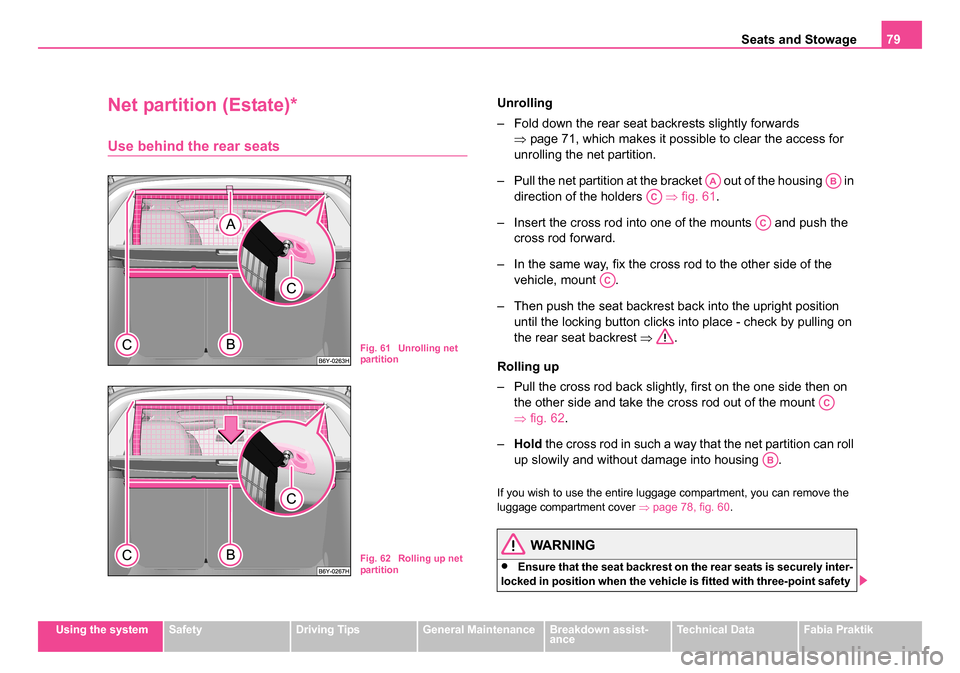
Unrolling
– Fold down the rear seat backrests slightly forwards
⇒page 71, which makes it possible to clear the access for
unrolling the net partition.
– Pull the net partition at the bracket out of the housing in direction of the holders ⇒fig. 61.
– Insert the cross rod into one of the mounts and push the cross rod forward.
– In the same way, fix the cross rod to the other side of the vehicle, mount .
– Then push the seat backrest back into the upright position until the locking button clicks into place - check by pulling on
the rear seat backrest ⇒.
Rolling up
– Pull the cross rod back slightly, first on the one side then on the other side and take the cross rod out of the mount
⇒fig. 62 .
– Hold the cross rod in such a way that the net partition can roll
up slowily and without damage into housing .
If you wish to use the entire luggage compartment, you can remove the
luggage compartment cover ⇒page 78, fig. 60 .
WARNING
•Ensure that the seat backrest on the rear seats is securely inter-
locked in position when the vehicle is fitted with three-point safety
Fig. 61 Unrolling net
partition
Fig. 62 Rolling up net
partition
AAAB
AC
AC
AC
AC
AB
sqc.1.book Seite 79 Mittwoch, 13. April 2005 1:09 13
Page 83 of 260

Seats and Stowage
82
warranty agreements. It is therefore essential to pay attention to the fitting
instructions supplied with the roof luggage rack system.
•On models fitted with a power sliding/tilting roof, ensure that the
opened sliding/tilting roof does not strike any items of luggage transported
on the roof.
•Ensure that the opened tailgate does not collide with the roof load.
For the sake of the environment
The increased aerodynamic drag results in a higher fuel consumption.
One should therefore take off the roof bar system after use.
Note
A roof rail is obtainable from a Skoda dealer if hasn't been fitted onto an
estate car at the works.
Attachment points
Fitting
– Remove the plastic caps ⇒fig. 66 carefully using a thin
screwdriver and while doing so do not damage the paintwork.
– The feet are inserted into the openings of the roof bars. Assembly is described by the manufacturer of the roof
luggage rack system.
Note
•The figure is not valid for an estate car.
•If you have any questions, please contact a Škoda dealer.
Roof load
Distribute weight evenly over the roof luggage rack system. The maximum
permissible roof load (including roof rack system) of 75 kg and the
maximum permissible total weight of the vehicle should not be exceeded.
You cannot make full use of the permissible roof load if you use a roof
luggage rack system with a lower load carrying capacity. The load trans-
ported on the roof luggage rack system must not exceed the weight limit
which is stated in the fitting instructions.
WARNING
•The items which you transport on the roof bar system must be
reliably attached - risk of accident!
•You must on no account exceed the permissible roof load, the
permissible axle loads and the pe rmissible gross weight of your
vehicle - risk of accident!
Fig. 66 Attachment
points for roof bars
sqc.1.book Seite 82 Mittwoch, 13. April 2005 1:09 13
Page 85 of 260

Seats and Stowage
84
WARNING
•Do not place any hot beverages into the cup holder. If the
vehicle moves, the hot beverages may spill - risk of scalding!
•Do not use any cups or beakers which are made of brittle mate-
rial (e.g. glass, porcelain). You might be injured by them in the
event of an accident.
Note holder
The note holder is designed for attaching a car park ticket in parking
areas.
The attached note must always be removed before starting off in order
not to restrict the driver's vision.
Ashtray at the front*
Removing the ashtray insert
– Fold out the ashtray cover and pull out the ashtray insert in the direction of arrow ⇒fig. 70.
Replacing the ashtray insert
– Insert the ashtray insert in the guide, insert and slide in and fold down the ashtray cover.
WARNING
Never lay flammable objects in the ashtray basin - risk of fire!
Fig. 69 Windscreen:
Note holder
Fig. 70 Centre
console: Ashtray at the
front
sqc.1.book Seite 84 Mittwoch, 13. April 2005 1:09 13
Page 86 of 260

Seats and Stowage85
Using the systemSafetyDriving TipsGeneral MaintenanceBreakdown assist-
anceTechnical DataFabia Praktik
Ashtray at the rear*
Removing the ashtray insert
– Fold out the ashtray cover and pull out the ashtray insert in the
direction of arrow ⇒fig. 71 .
Replacing the ashtray insert
– Insert the ashtray insert in the guide, insert and slide in and fold down the ashtray cover.
WARNING
Never lay flammable objects in the ashtray basin - risk of fire!
Cigarette lighter* and power socket*
Cigarette lighter
You can also use the socket on the cigarette lighter for
other electrical appliances.
Using the cigarette lighter
– Press in the button of the cigarette lighter ⇒ fig. 72.
– Wait until the button jumps forward.
– Remove the cigarette lighter immediately and use it.
– Insert the cigarette lighter again into the socket.
Using the power socket
– Take out the cigarette lighter.
Fig. 71 Centre
console: Ashtray at the
rear
Fig. 72 Centre
console: Cigarette
lighter
sqc.1.book Seite 85 Mittwoch, 13. April 2005 1:09 13
Page 132 of 260

Seat belts131
Using the systemSafetyDriving TipsGeneral MaintenanceBreakdown assist-
anceTechnical DataFabia Praktik
Important safety information regarding
the use of seat belts
The correct use of the seat belts considerably reduces the
risk of injury!
WARNING
•The belt webbing must not be jammed in-between at any point
or twisted, or chafe against any sharp edges.
•It is important that the belt webb ing is properly routed if the seat
belts are to offer their maximum protection ⇒page 132, “How are
seat belts correctly fastened?”.
•No two persons (also not children) should ever use a single seat
belt together.
•The maximum protection which seat belts can offer is only
achieved if you are correctly seated ⇒page 125, “Correct seated
position”.
•The belt webbing must not run across solid or fragile objects
(e.g. spectacles, ball-point pens, keys etc.) as this may be a cause
of injuries.
•Bulky, loose clothing (e.g. a winter coat over a jacket) does not
allow you to be correctly seated and impairs proper operation of
the seat belts.
•It is prohibited to use clamps or other objects to adjust seat
belts (e.g. for shortening the belts for smaller persons).
•The lock tongue should only be inserted into the lock which is
the correct one for your seat. Wrong use of the safety belt will
reduce its capacity to protect and the risk of injury increases.
•The backrests of the front seats must not be tilted too far to the
rear otherwise the seatbelts can lose their effectiveness.
•The belt webbing must always be kept clean. Soiled belt
webbing may impair proper operation of the inertia reel
⇒ page 184, “Seat belts”.
•The slot of the belt tongue must not be blocked by paper or
similar objects otherwise the belt tongue will not lock in place prop-
erly.
•Inspect the seat belts regularly to ensure they are in good condi-
tion. If you find seat belts which have damage to the seat belt
webbing, seat belt connections, to the inertia reels or to the lock,
the relevant safety belt must be replaced by a specialist garage.
•The seat belts must not be removed or changed in any way. Do
not make an attempt to repair the seat belts yourself.
•Damaged seat belts which have been subjected to stress in an
accident and were therefore stretched, must be replaced - this is
best done by a specialist garage. The anchorage points of the belts
must also be inspected. The anchorage points for the belts should
also be checked.
•In certain countries it is possible to use seat belts which differ
in terms of their operation from the seat belts which are described
on the pages which follow.
WARNING (continued)
sqc.1.book Seite 131 Mittwoch, 13. April 2005 1:09 13
Page 184 of 260

Care and cleaning183
Using the systemSafetyDriving TipsGeneral MaintenanceBreakdown assist-
anceTechnical DataFabia Praktik
Caution
•Engine cleaning may be only be undertaken when the ignition is off.
•It is recommended to cover the generator before washing the engine
compartment.
For the sake of the environment
The dirty water produced by washing the engine has washed away petrol,
and residues of grease and oil and should therefore be cleaned by an oil
separator. This is why engine washing should only be undertaken in a
garage or at a fueling station (when these are fitted with the required
equipment).
Care of the interior of vehicle
Plastic parts, artificial leather and cloths
You can clean plastic parts and artificial leather with a moist cloth. You
should only treat such parts with special solvent-free plastic cleaning
and care products it does prove to be adequate.
Upholstery cloth and cloth trim on the doors, luggage compartment cover,
headliner etc. are best treated with special cleaning products, using if
necessary a dry foam and a soft sponge or brush.
We recommend using a cleaning product from Škoda genuine accesso-
ries offered by your Škoda dealer.
Caution
Solvent-free cleaners attack the material and can damage it.
Fabric covers of electrically heated seats
Do not clean the seat covers wet as this may result in damage to the seat
heating system.
Clean such covers using special agents, for example dry foam.
Natural leather
Natural leather requires quite particular care and attention.
Leather should be treated from time to time according the
following guidelines depending on how much it is used.
Normal cleaning
– Clean soiled areas of the leather with slightly moistened cotton or woollen cloth.
Severe soiling
– Clean severely soiled areas with a cloth dipped in a mild soapy solution (2 spoonfuls of natural soap to 1 litre of water).
– Ensure that the leather is not soaked through at any point and that no water gets into the stitching of the seams.
– Dry off the leather with a soft, dry cloth.
Removing stains
– Remove fresh stains which are water-based (e.g. coffee, tea,
juices, blood etc.) with an absorbent cloth or household paper
or use the cleaner from the care set for a stain which has
already dried in.
sqc.1.book Seite 183 Mittwoch, 13. April 2005 1:09 13