gearbox SKODA FABIA 2008 2.G / 5J Owner's Guide
[x] Cancel search | Manufacturer: SKODA, Model Year: 2008, Model line: FABIA, Model: SKODA FABIA 2008 2.G / 5JPages: 252, PDF Size: 40.88 MB
Page 204 of 252
Breakdown assistance203
Using the systemSafetyDriving TipsGeneral MaintenanceBreakdown assistanceTechnical Data
•The spare wheel provided with a car fitted with unidirectional tyres has different dimensions. The wheel is provided with a warning sticker.
•After fitting on the wheel, the warning sticker must not be concealed (e.g. by the wheel trim).
•Do not drive with this spare wheel at more than 80 km/h - risk of accident. Avoid accelerating at full throttle, sharp braking and fast cornering.
•The inflation pressure for this spare wheel is identical to the inflation pressure of the standard tyres.
•Use this spare wheel only to reach the nearest specialist garage as it is not intended for continuous use.
Changing a wheel
Preliminary work
The following steps should be carried out before actually changing the
wheel.
– If it is necessary to change a wheel, park the vehicle as far away as
possible from the traffic flow. The place you choose should be level.
– Have all the occupants get out. While changing a wheel, the occu-
pants of the vehicle should not stand on the road (e.g. behind a crash
barrier).
– Apply the handbrake firmly.
–Engage 1st gear or if your vehicle is fitted with an automatic gearbox,
position the selector lever into position P.
– If a trailer is coupled, uncouple it.
– Take the vehicle tool kit and the spare wheel ⇒page 202 out of the
luggage compartment.
WARNING
•If you find yourself in flowing traffic switch on the hazard warning lights system and place the warning triangle on the side of the road at the prescribed distance from your vehicle while observing all national legal provisions. In this way you are protecting not only yourself but also other road users.
•Never start the engine with the vehicle sitting on the raised jack - danger of suffering injury!
Caution
If you have to change a wheel on a slope first block the opposite wheel with a stone or similar object in order to secure the vehicle from unexpectedly rolling away.
Note
Comply with the national legal regulations.
Changing a wheel
Always change a wheel on a level surface as far as possible.
– Take off the full wheel trim* ⇒page 204 or the caps ⇒page 205.
– In the case of light alloy wheels remove the wheel trim cap
⇒page 205.
– Slacken the wheel bolts ⇒page 206.
– Jack up the vehicle until the wheel to be changed is clear of the ground
⇒page 206.
– Unscrew the wheel bolts and place them on a clean surface (cloth,
paper etc.).
– Take off the wheel.
NKO A05F 20.book Page 203 Wednesday, April 2, 2008 1:02 PM
Page 210 of 252
Breakdown assistance209
Using the systemSafetyDriving TipsGeneral MaintenanceBreakdown assistanceTechnical Data
Starting engine
– Start the engine of the vehicle providing current and run the engine at
idling speed.
– Now start the engine of the vehicle with the discharged battery.
– Interrupt the attempt at starting an engine after 10 seconds if it does
not start right away and wait for about 30 seconds before repeating
the attempt.
– Disconnect the cables on the engine in exactly the reverse order they
were connected up.
WARNING
•The non-insulated parts of the terminal clamps must never make contact with each other. Furthermore, the cable connected to the positive terminal of the battery must not come into contact with electrically conducting parts of the vehicle - risk of a short circuit!
•Do not affix the jump starting cables to the negative terminal of the discharged battery. There is the risk of detonating gas seeping out the battery being ignited by the strong spark which results from the engine being started.
•Do not affix the cable end to parts of the fuel and brake system.
•Run the jump-start cables so that they cannot be caught by any rotating parts in the engine compartment.
•Do not bend over the batteries - risk of caustic burns!
•The vent screws of the battery cells must be tightened firmly.
•Keep any sources of ignition (naked flame, smouldering cigarettes etc.) away from the battery - risk of an explosion!
Tow-starting and towing vehicle
General
Please pay attention to the following instructions if you are going to use a
tow rope:
Driver of the towing vehicle
– Do not drive off until the tow rope is taught.
– Release the clutch particularly gently when starting off.
Driver of the towed vehicle
– Switch the ignition on so that the steering wheel is not blocked and
you can also operate the turn signal lights, the headlight flasher, the
windscreen wipers and windscreen washer system.
– Take the vehicle out of gear or move the selector lever into position N
if your vehicle is fitted with an automatic gearbox.
– Note that the brake servo unit and power steering only operate if the
engine is running. You will require significantly greater physical force
to depress the brake pedal and to steer the vehicle if the engine is not
running.
– Ensure that the tow rope is always kept taught.
Tow rope or tow bar
A tow bar is safest way of towing a vehicle and also minimizes any shocks. You can use a tow rope only if a suitable tow bar is not available.
The tow rope must be elastic to protect the vehicle. Thus one should only use plastic fibre rope or a rope made out of a similarly elastic material.
Attach the tow rope or the tow bar only to the towing eyes provided for this purpose ⇒page 210, “Front towing eye” and ⇒page 211, “Rear towing eye”.
A4
NKO A05F 20.book Page 209 Wednesday, April 2, 2008 1:02 PM
Page 211 of 252
Breakdown assistance210
Driving style
Towing another vehicle requires a certain amount of practice. Both drivers should be familiar with the particular points about towing a vehicle. Unskilled drivers should not attempt to tow in another vehicle or to be towed in.
One should be constantly vigilant not to allow impermissibly high towing forces or jerky loadings. There is always a risk of excessive stresses and damage resulting at the points to which you attach the tow rope or tow bar when you attempt to tow a vehicle which is not standing on a paved road.
Caution
If the gearbox of your vehicle no longer contains any oil because of a defect, your vehicle must only be towed in with the driven wheels raised clear of the ground, or on a special vehicle transporter or trailer.
Note
•Please comply with any legal requirements particularly regarding the switched on signal systems, when towing in or tow-starting another vehicle.
•The tow rope must not be twisted as it may in certain circumstances result in the front towing eye being unscrewed out of your vehicle.
Front towing eye
The towing eye is stored in the box for the vehicle tool kit.
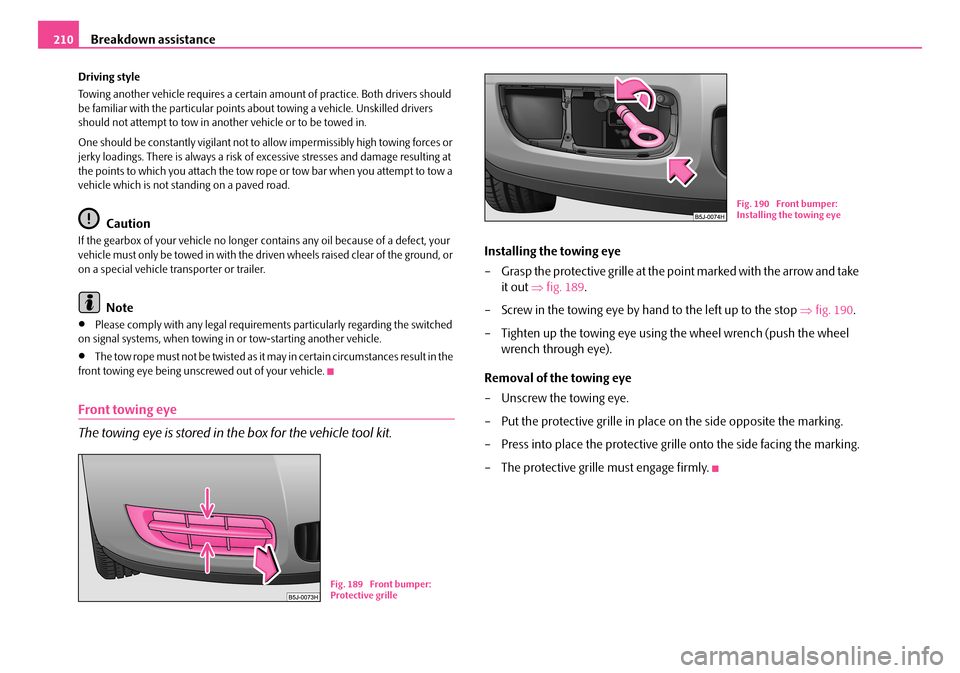
Installing the towing eye
– Grasp the protective grille at the point marked with the arrow and take
it out ⇒fig. 189.
– Screw in the towing eye by hand to the left up to the stop ⇒fig. 190.
– Tighten up the towing eye using the wheel wrench (push the wheel
wrench through eye).
Removal of the towing eye
– Unscrew the towing eye.
– Put the protective grille in place on the side opposite the marking.
– Press into place the protective grille onto the side facing the marking.
– The protective grille must engage firmly.
Fig. 189 Front bumper: Protective grille
Fig. 190 Front bumper: Installing the towing eye
NKO A05F 20.book Page 210 Wednesday, April 2, 2008 1:02 PM
Page 212 of 252

Breakdown assistance211
Using the systemSafetyDriving TipsGeneral MaintenanceBreakdown assistanceTechnical Data
Rear towing eye
The rear towing eye is located below the rear bumper on the right ⇒fig. 191.
Tow-starting a vehicle
If the engine does not start, we generally do not recommend to tow-start
your vehicle. One should attempt to start the engine using jump start
cables ⇒page 208 or call on the services of the SERVICE mobile.
If your vehicle has to be towed:
– Engage 2nd or 3rd gear with the vehicle stationary.
– Depress the clutch pedal fully and keep it depressed.
– Switch on the ignition.
– Wait until both vehicles are moving then release the clutch pedal
slowly.
– Depress the clutch pedal fully when the engine fires and take the
vehicle out of gear.
WARNING
There is high risk of having an accident when tow-starting a vehicle, when for example the towed vehicle runs into the towing vehicle.
Caution
Vehicles which are fitted with a catalytic converter should not be tow-started over a distance of more than 50 metres. Unburnt fuel may get into the catalytic converter and damage it.
Towing in a vehicle fitted with a manual gearbox
Please refer to the notes ⇒page 209.
The car can be towed in with a tow bar or a tow rope or with the front or rear wheels raised. The maximum towing speed is 50 km/h.
Towing of a vehicle with an automatic gearbox
Please refer to the notes ⇒page 209.
The car can be towed in with a tow bar or a tow rope. Refer at the same time to the following guidelines:
•Move selector lever into N.
•The maximum towing speed is 50 km/h.
•The maximum permissible towing distance is 50 km. The gear oil pump does not operate when the engine is not running; the gearbox would not be adequately lubricated at higher speeds and over longer towing distance.
Caution
If the vehicle is towed in by a recovery vehicle, it should only be towed in with the front wheels raised. If the vehicle is raised at rear, the automatic gearbox is damaged!
Fig. 191 Rear towing eye
NKO A05F 20.book Page 211 Wednesday, April 2, 2008 1:02 PM
Page 215 of 252
Fuses and light bulbs214
Note
We recommend that you have these fuses replaced by a specialist garage.
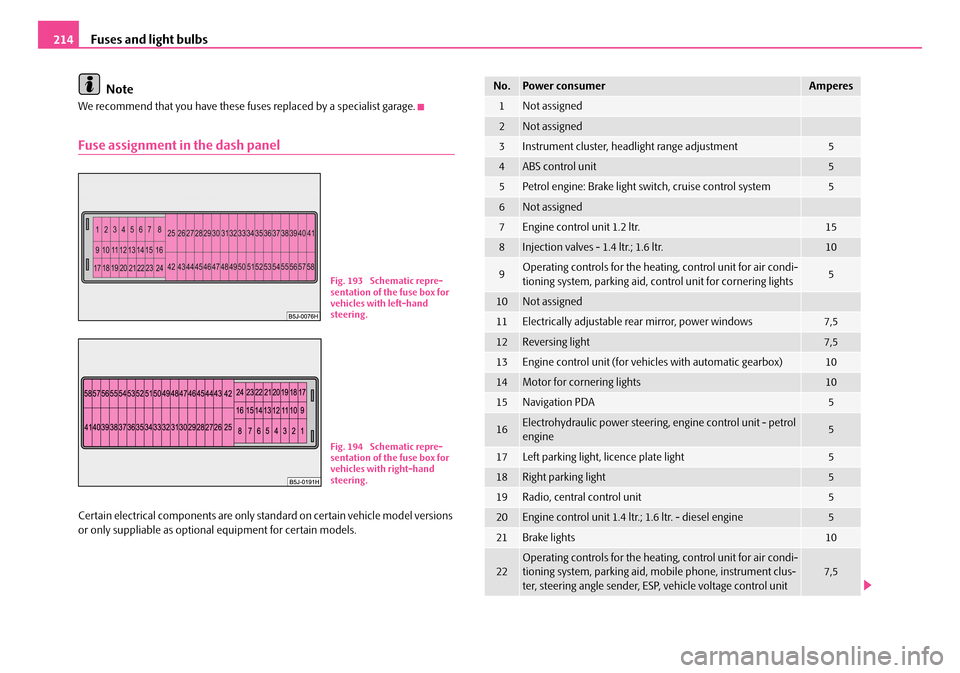
Fuse assignment in the dash panel
Certain electrical components are only standard on certain vehicle model versions or only suppliable as optional equipment for certain models.
Fig. 193 Schematic repre-sentation of the fuse box for vehicles with left-hand steering.
Fig. 194 Schematic repre-sentation of the fuse box for vehicles with right-hand steering.
No.Power consumerAmperes
1Not assigned
2Not assigned
3Instrument cluster, headlight range adjustment5
4ABS control unit5
5Petrol engine: Brake light switch, cruise control system5
6Not assigned
7Engine control unit 1.2 ltr.15
8Injection valves - 1.4 ltr.; 1.6 ltr.10
9Operating controls for the heating, control unit for air condi-tioning system, parking aid, control unit for cornering lights5
10Not assigned
11Electrically adjustable rear mirror, power windows7,5
12Reversing light7,5
13Engine control unit (for vehicles with automatic gearbox)10
14Motor for cornering lights10
15Navigation PDA5
16Electrohydraulic power steering, engine control unit - petrol engine5
17Left parking light, licence plate light5
18Right parking light5
19Radio, central control unit5
20Engine control unit 1.4 ltr.; 1.6 ltr. - diesel engine5
21Brake lights10
22Operating controls for the heating, control unit for air condi-tioning system, parking aid, mobile phone, instrument clus-ter, steering angle sender, ESP, vehicle voltage control unit7,5
NKO A05F 20.book Page 214 Wednesday, April 2, 2008 1:02 PM
Page 218 of 252
Fuses and light bulbs217
Using the systemSafetyDriving TipsGeneral MaintenanceBreakdown assistanceTechnical Data
Bulbs
Replacing bulbs
The relevant lamp must always be switched off before a light bulb is replaced.
Do not take hold of the glass bulb with naked fingers (even the smallest amount of dirt reduces the working life of the light bulb). Use a clean cloth, serviette or some-thing similar.
Defect light bulbs should only be replaced with light bulbs of the same type. The designation is located on the light socket or the glass bulb.
Changing certain bulbs is not something which you can do yourself, but requires to be done by a specialist. Other parts of the vehicle must be removed in order to change the light bulbs. This applies, in particular, to bulbs which can only be reached from the engine compartment.
We therefore recommend that you have any bulbs changed by a Škoda Service Partner or, in exceptional cases, by calling on other professional assistance.
Please note that the engine compartment is a hazardous area ⇒page 181, “Working in the engine compartment”.
We recommend that you carry the set of light bulbs with you which was delivered in your vehicle. Replacement light bulbs 9) are available at a Škoda Service Partner.
The set of light bulbs can be stowed in the locable box in the spare wheel.
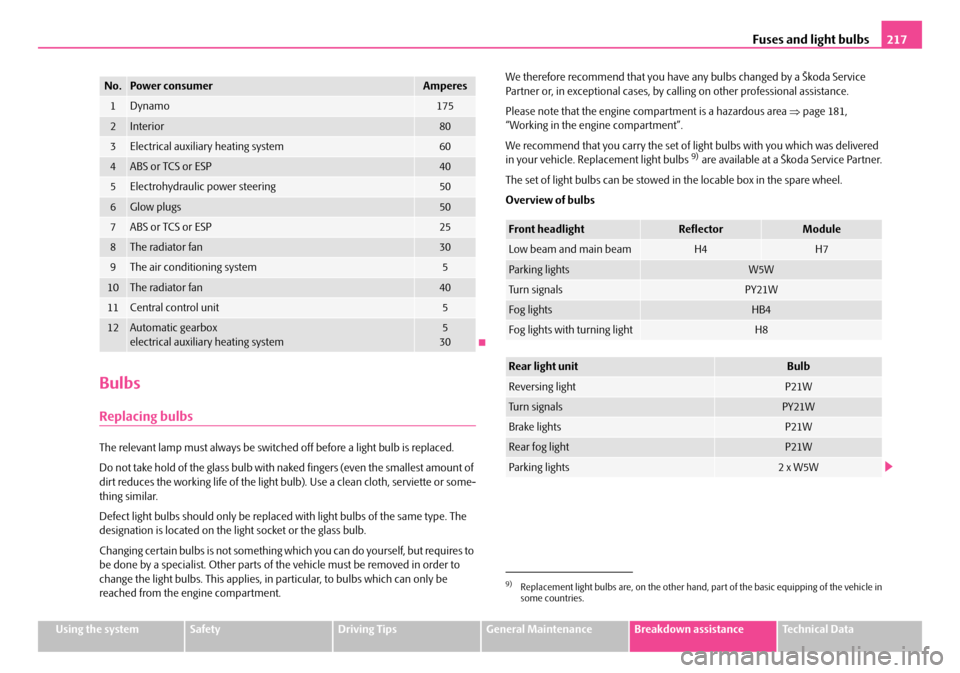
Overview of bulbs
No.Power consumerAmperes
1Dynamo175
2Interior80
3Electrical auxiliary heating system60
4ABS or TCS or ESP40
5Electrohydraulic power steering50
6Glow plugs50
7ABS or TCS or ESP25
8The radiator fan30
9The air conditioning system5
10The radiator fan40
11Central control unit5
12Automatic gearboxelectrical auxiliary heating system530
9)Replacement light bulbs are, on the other hand, part of the basic equipping of the vehicle insome countries.
Front headlightReflectorModule
Low beam and main beamH4H7
Parking lightsW5W
Tu r n s i g n a l sPY21W
Fog lightsHB4
Fog lights with turning lightH8
Rear light unitBulb
Reversing lightP21W
Tu r n s i g n a l sPY21W
Brake lightsP21W
Rear fog lightP21W
Parking lights2 x W5W
NKO A05F 20.book Page 217 Wednesday, April 2, 2008 1:02 PM
Page 224 of 252
Technical Data223
Using the systemSafetyDriving TipsGeneral MaintenanceBreakdown assistanceTechnical Data
Technical Data
Technical Data
General information
The details given in the official vehicle registration documents always take prece-dence over the details in the Owner's Manual. Please refer to the official vehicle registration documents or consult your Škoda Service Partner concerning the engine with which your vehicle is equipped.
Used abbreviations
Performances
The listed performance values were determined without performance-reducing equipment, e.g. air conditioning system.
Weight
The loading capacity is reduced in line with the range of the special equipment. The unloaden weight contains a fuel tank topped up to 90%. A driver with a weight of 75 kg is also included in the value.
Identification details
Vehicle data sticker
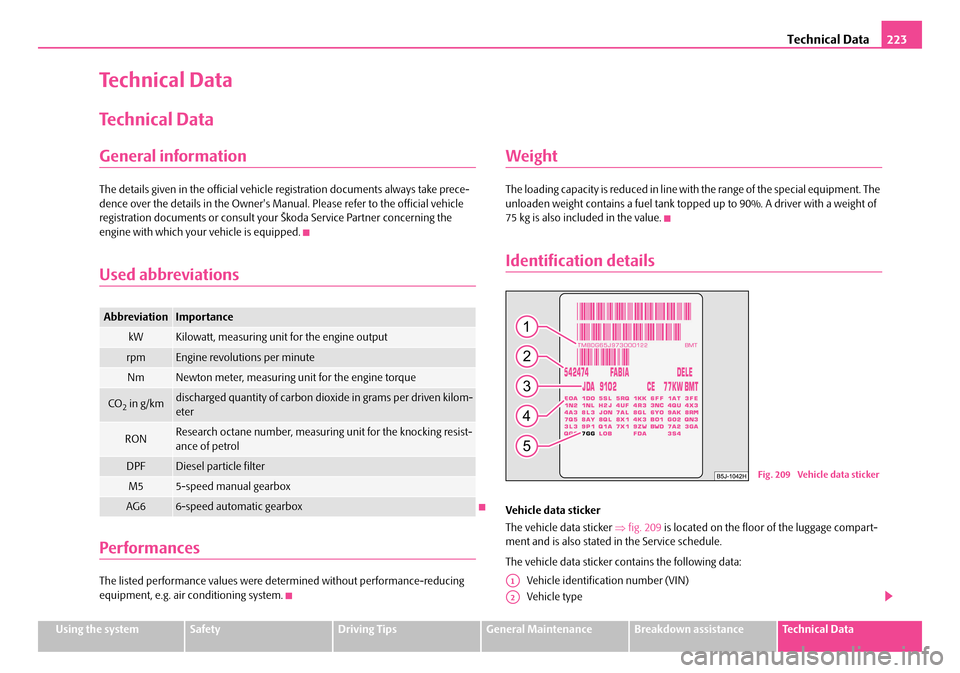
The vehicle data sticker ⇒fig. 209 is located on the floor of the luggage compart-ment and is also stated in the Service schedule.
The vehicle data sticker contains the following data:
Vehicle identification number (VIN)
Vehicle type
AbbreviationImportance
kWKilowatt, measuring unit for the engine output
rpmEngine revolutions per minute
NmNewton meter, measuring unit for the engine torque
CO2 in g/kmdischarged quantity of carbon dioxide in grams per driven kilom-eter
RONResearch octane number, measuring unit for the knocking resist-ance of petrol
DPFDiesel particle filter
M55-speed manual gearbox
AG66-speed automatic gearbox
Fig. 209 Vehicle data sticker
A1
A2
NKO A05F 20.book Page 223 Wednesday, April 2, 2008 1:02 PM
Page 225 of 252
Technical Data224
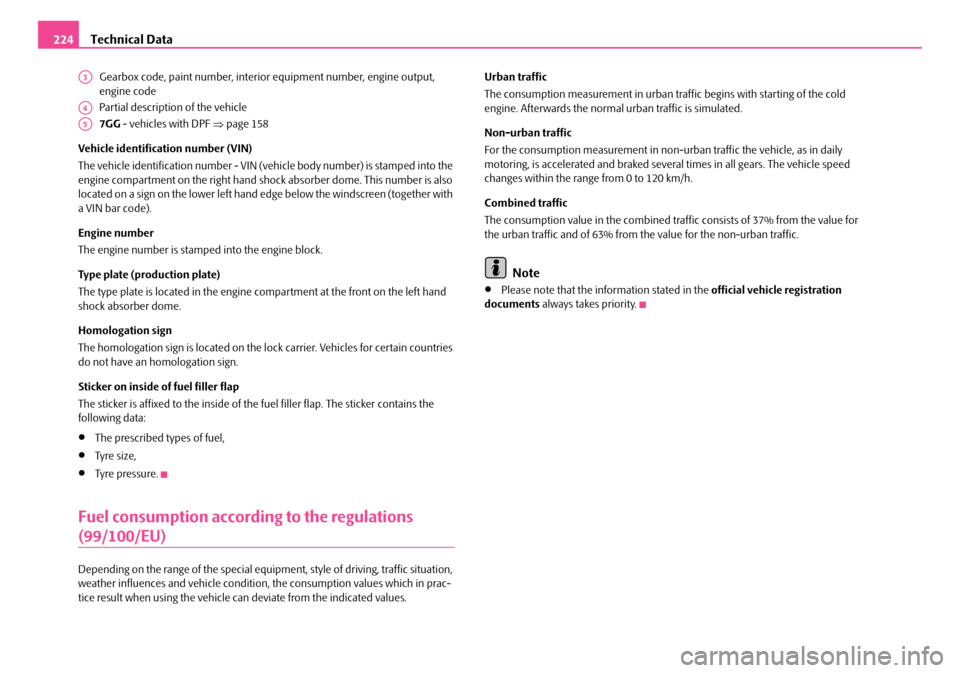
Gearbox code, paint number, interior equipment number, engine output, engine code
Partial description of the vehicle
7GG - vehicles with DPF ⇒page 158
Vehicle identification number (VIN)
The vehicle identification number - VIN (vehicle body number) is stamped into the engine compartment on the right hand shock absorber dome. This number is also located on a sign on the lower left hand edge below the windscreen (together with a VIN bar code).
Engine number
The engine number is stamped into the engine block.
Type plate (production plate)
The type plate is located in the engine compartment at the front on the left hand shock absorber dome.
Homologation sign
The homologation sign is located on the lock carrier. Vehicles for certain countries do not have an homologation sign.
Sticker on inside of fuel filler flap
The sticker is affixed to the inside of the fuel filler flap. The sticker contains the following data:
•The prescribed types of fuel,
•Tyre si z e,
•Tyre pressure.
Fuel consumption according to the regulations
(99/100/EU)
Depending on the range of the special equipment, style of driving, traffic situation, weather influences and vehicle condition, the consumption values which in prac-tice result when using the vehicle can deviate from the indicated values.
Urban traffic
The consumption measurement in urban traffic begins with starting of the cold engine. Afterwards the normal urban traffic is simulated.
Non-urban traffic
For the consumption measurement in non-urban traffic the vehicle, as in daily motoring, is accelerated and braked several times in all gears. The vehicle speed changes within the range from 0 to 120 km/h.
Combined traffic
The consumption value in the combined traffic consists of 37% from the value for the urban traffic and of 63% from the value for the non-urban traffic.
Note
•Please note that the information stated in the official vehicle registration documents always takes priority.
A3
A4
A5
NKO A05F 20.book Page 224 Wednesday, April 2, 2008 1:02 PM
Page 241 of 252
Technical Data240
Vehicles of the group Fabia N1
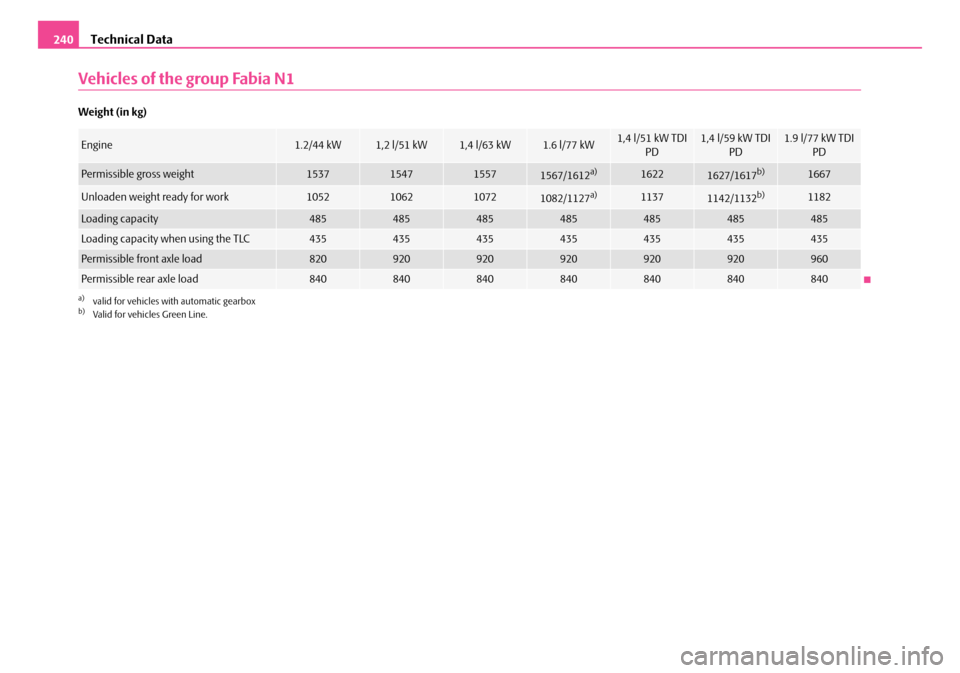
Weight (in kg)
Engine1.2/44 kW1,2 l/51 kW1,4 l/63 kW1.6 l/77 kW1,4 l/51 kW TDI PD1,4 l/59 kW TDI PD1.9 l/77 kW TDI PD
Permissible gross weight1537154715571567/1612a)
a)valid for vehicles with automatic gearbox
16221627/1617b)
b)Valid for vehicles Green Line.
1667
Unloaden weight ready for work1052106210721082/1127a)11371142/1132b)1182
Loading capacity485485485485485485485
Loading capacity when using the TLC435435435435435435435
Permissible front axle load820920920920920920960
Permissible rear axle load840840840840840840840
NKO A05F 20.book Page 240 Wednesday, April 2, 2008 1:02 PM
Page 242 of 252
Technical Data241
Using the systemSafetyDriving TipsGeneral MaintenanceBreakdown assistanceTechnical Data
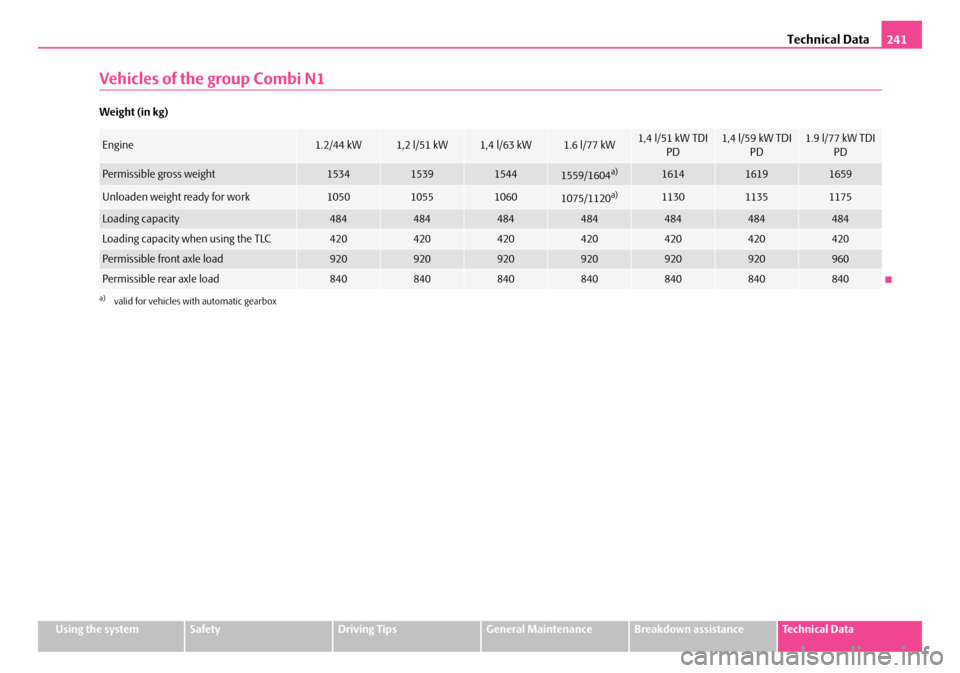
Vehicles of the group Combi N1
Weight (in kg)
Engine1.2/44 kW1,2 l/51 kW1,4 l/63 kW1.6 l/77 kW1,4 l/51 kW TDI PD1,4 l/59 kW TDI PD1.9 l/77 kW TDI PD
Permissible gross weight1534153915441559/1604a)
a)valid for vehicles with automatic gearbox
161416191659
Unloaden weight ready for work1050105510601075/1120a)113011351175
Loading capacity484484484484484484484
Loading capacity when using the TLC420420420420420420420
Permissible front axle load920920920920920920960
Permissible rear axle load840840840840840840840
NKO A05F 20.book Page 241 Wednesday, April 2, 2008 1:02 PM