height SKODA FABIA 2010 2.G / 5J User Guide
[x] Cancel search | Manufacturer: SKODA, Model Year: 2010, Model line: FABIA, Model: SKODA FABIA 2010 2.G / 5JPages: 244, PDF Size: 29.53 MB
Page 135 of 244

Transporting children safely
134
Child seats in which the child is facing with its back towards the direction of travel should not be used on the
front passenger seat when th
e vehicle is fitted with a
front passenger airbag
page 131, “Use of child safety seats on the front passenger
seat”.
WARNING
It is essential to always switch off the front passenger airbag at a specialist
garage or with the switch for front pass
enger airbag* when attaching in excep-
tional circumstances a child safety seat on the front passenger seat where the child is seated with its back facing in direction of travel
page 129.
Please comply with any differing nati
onal legal regulations regarding the
use of child safety seats.
If this is not done, a child seated on
the front passenger seat may suffer
severe or even fatal injuries if the
front passenger airbag or airbags are
deployed.
You should have the front passenger airb
ag (or airbags) re
activated just as
soon as you no longer use a child safe
ty seat on the front passenger seat.
Child safety seats in Group 2For children up to about 7 years of age weighing between 15 and 25 kg the optimal solution is a child safety seat in comb
ination with the three-point seat belt
fig. 126
.
WARNING
When transporting a child on the fron
t passenger seat, please comply with
the appropriate national regulations rega
rding the use of child safety seats.
Switch off the front passenger airbag if
necessary at a specialist garage or
switch it off with the switch for front passenger airbag*
page 129.
The shoulder part of the seat belt mu
st run approximatel
y across the middle
of the shoulder and fit snugly against the chest. It must on no account run across the neck. The lap part of the seat belt must run across the pelvis and fits snugly; it must not run over the belly. Tighten the belt webbing over your hip if necessary.
Please comply with any differing nati
onal legal regulations regarding the
use of child safety seats.Child safety seats in Group 3For children of about 7 years of age weighing between 22 and 36 kg and of a height of less than 150 cm, the optimal solution is a
child safety seat (seat bolster) in combina-
tion with the three-point seat belt
fig. 127
.
Children who are more than 1.50 m in heig
ht or who weigh more than 36 kg can use
the normal seat belts
without a seat bolster.
WARNING
When transporting a child on the fron
t passenger seat, please comply with
the appropriate national regulations rega
rding the use of child safety seats.
Fig. 126 Child seat in Group 2 installed on the rear seat facing the direction of travel
Fig. 127 Child seat in Group 3 installed on the rear seat facing the direction of travel
s3j8.a.book Page 134 Tuesday, April 20, 2010 1:10 PM
Page 153 of 244
Towing a trailer
152
Towing a trailerTo w i n g a t r a i l e rTechnical requirements The towing device must satisfy certain technical requirements.Your vehicle is designed primarily for tr
ansporting persons and luggage. It can,
however, also be used for towing a traile
r - provided certain technical equipment is
fitted. If your vehicle has been eq
uipped with a towing device
from Škoda Original Accesso-
ries, then the towing device satisfies all technical and legal requirements. Your vehicle is fitted with a 13-pin power so
cket for the electrical connection between
the vehicle and trailer. If the tr
ailer which you wish to tow has a
7-pin connector
, you
can use a suitable adapter
12) from Škoda original accessories.
This work must be carried out in accordance
with the manufacturer's specifications if
a towing device is retrofitted. Specialist garages are familiar with details re
lating to retrofitting a towing device and
for any necessary modifications to the cooling system.
WARNING
We recommend that you have the towing device from Škoda original accesso-ries installed by a specialist garage. He
is familiar with all the relevant details
relating to retrofitting such equipment. There is a risk of an accident if the towing device is not properly fitted!General Maintenance There are a number of points to pay attention to when towing a trailer.Trailer load The permissible trailer load must
on no account be exceeded.
You can negotiate appropriately steeper inclin
es and descents if you do not make full
use of the permissible trailer load. The trailer loads specified only apply for
altitudes
up to 1 000 metres above mean sea
level. On petrol engines without forced indu
ction, the engine power output drops with
increasing height due to a lowering of air pr
essure and thus the ability to climb, this
means that the trailer load must be reduced by 10% for every further increase of 1 000 metres in height above sea le
vel. The towed weight is the weight of the (laden) vehicle
and the (laden) trailer together. One should ta
ke this into account before driving up to
higher altitudes. Petrol engines with forced induction use an air pressure correction method, so that their power output does
not depend on the he
ight above sea level.
The trailer and drawbar load information on the type plate of the towing device are merely test data for the towing device
The data relating to your vehicle, which
is often less than this test data, can be found in your vehicle registration docu- ments. Distribution of the load Distribute the load in the trailer in such a
way that any heavy items are located as close
as possible to the axle. Secure th
e items to preven
t them slipping.
Tyre pressure Correct the tyre inflation pressure on yo
ur vehicle for that of “fully laden”,
page 178.
The inflation pressure of the tyres fitted to
the trailer adjust in accordance with the
manufacturer's recommendation. Exterior mirrors You have to have additional ex
terior mirrors fitted if you are not able to see the traffic
behind the trailer with the standard rear-view mirrors. Both exterior mirrors should be attached to folding arms. Adjust the mirrors so that they provide you with an adequate field of view to the rear. Headlights Before starting off with a hitched trailer, al
so check the setting of the headlights. Alter
the setting as necessary with the aid of the headlight beam adjuster
page 51.
12)In some countries the adapter is supplied with the towing device.s3j8.a.book Page 152 Tuesday, April 20, 2010 1:10 PM
Page 166 of 244
Inspecting and replenishing
165
Using the system
Safety
Driving Tips
General Maintenance
Breakdown assistance
Technical Data
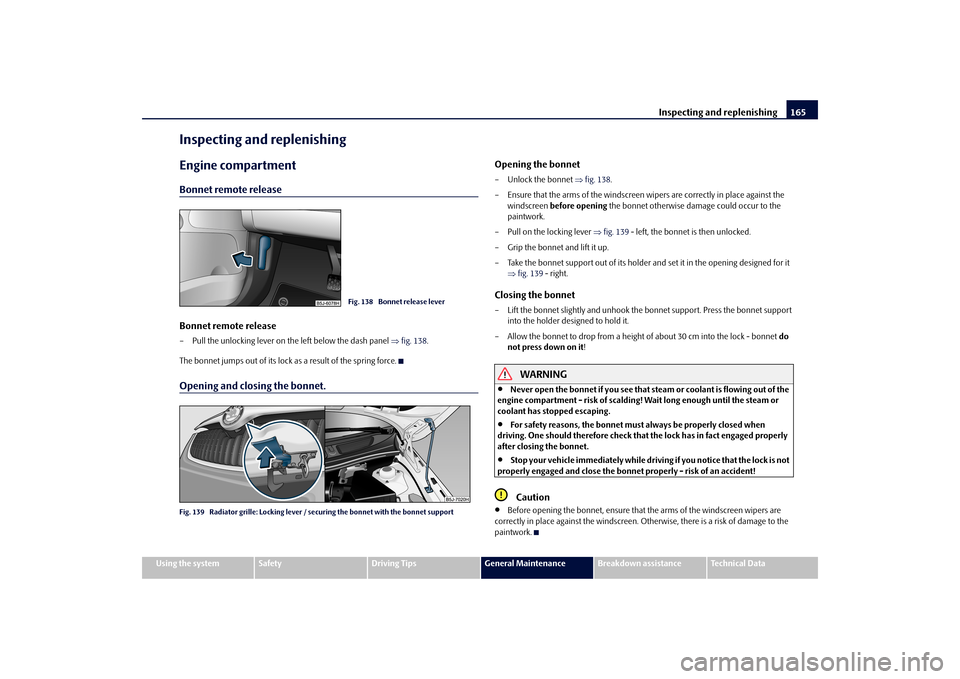
Inspecting and replenishingEngine compartmentBonnet remote releaseBonnet remote release– Pull the unlocking lever on the left below the dash panel
fig. 138
.
The bonnet jumps out of its lock as a result of the spring force.Opening and closing the bonnet.Fig. 139 Radiator grille: Locking lever / se
curing the bonnet with the bonnet support
Opening the bonnet– Unlock the bonnet
fig. 138
.
– Ensure that the arms of the windscreen wipers are correctly in place against the
windscreen
before opening
the bonnet otherwise damage could occur to the
paintwork.
– Pull on the locking lever
fig. 139
- left, the bonnet is then unlocked.
– Grip the bonnet and lift it up.– Take the bonnet support out of its holder and set it in the opening designed for it
fig. 139
- right.
Closing the bonnet– Lift the bonnet slightly and unhook the bonnet support. Press the bonnet support
into the holder designed to hold it.
– Allow the bonnet to drop from a height
of about 30 cm into the lock - bonnet
do
not press down on it
!
WARNING
Never open the bonnet if you see that steam or coolant is flowing out of the
engine compartment - risk of scalding!
Wait long enough until the steam or
coolant has stopped escaping.
For safety reasons, the bonnet must always be properly closed when
driving. One should therefore check that
the lock has in fact engaged properly
after closing the bonnet.
Stop your vehicle immediately while driving if you notice that the lock is not
properly engaged and close the bonnet
properly - risk of an accident!
Caution
Before opening the bonnet, ensure that the arms of the windscreen wipers are
correctly in place against the windscreen. Othe
rwise, there is a risk of damage to the
paintwork.
Fig. 138 Bonnet release lever
s3j8.a.book Page 165 Tuesday, April 20, 2010 1:10 PM
Page 181 of 244

Wheels and Tyres
180
fig. 148
. Markings on the walls of the tyres
through the letters “TWI”, triangular
symbols or other symbols identify the position of the wear indicators. A remaining tread of just 1.6 mm, measured in the grooves of the tread next to the wear indicators, means that your tyres have
reached their legally permissible minimum
tread depth.
WARNING
You must have your tyres replaced with new ones at the latest when the
wear indicators have been worn down
. The legally permissible minimum tread
depth should be observed.
Worn tyres do not provide the necessary adhesion to the road surface at
high speeds on wet roads. One could e
xperience “aquaplaning” (uncontrolled
movements of the vehicle - “swimming” on a wet road surface).Changing wheels aroundIf significantly greater wear is present on the front tyres, we recommend changing the front wheels around with the rear wheels. You will then obtain approximately the same life for all the tyres. It may be advantageous to swap the tyres ov
er “crosswise” when certain types of wear
characteristic arise on the running surface of
the tyres (but not in the case of unidirec-
tional tyres). Specialist garages are familiar with details. We recommend that you change the wheels around every 10 000 km in order to achieve even wear on all wheels and to obtain optimal tyre life.New tyres and wheelsTyres and wheel rims are important design elements. One should therefore use the tyres and wheel rims which have been releas
ed for use by Škoda Auto. They are exactly
matched to the vehicle type and therefore
contribute significantly to good road
holding and safe driving characteristics
.
Only fit radial tyres of the same type on all 4 wheels, size (rolling circumference) and, if possible, the same tread pattern on one axle.
The specialist garages have access to the most current information about which tyres we have released for
use on your vehicle.
We recommend that you have any work relati
ng to tyres or wheels carried out by a
specialist garage
. Your dealer has all of the necessary special tools and replacement
parts available plus the required specialist knowledge and is also in a position to prop-erly dispose of the old tyres. A large number
of specialist garages also have an attrac-
tive range of tyres and wheels available. The tyre/wheel combinations which are appr
oved for your vehicle are indicated in
your vehicle documents. Approval and licens
ing may differ according to the legislation
prevailing in indi
vidual countries.
Proper knowledge of the tyre data makes it ea
sier for you to select the correct type of
tyre. Tyres do, for example, have the following
inscription
on their walls:
185 / 65 R 14 86 T
What this means is: The following
speed restrictions
apply to tyres.
185
Tyre wi dt h i n mm
65
Height/width ratio in %
R
Code letter for the type of tyre -
R adial
14
Diameter of wheel in inches
86
Load index
T
Speed symbol
Speed symbol
Permissible maximum speed
Q
160 km/h
R
170 km/h
S
180 km/h
T
190 km/h
U
200 km/h
s3j8.a.book Page 180 Tuesday, April 20, 2010 1:10 PM
Page 210 of 244

Technical Data
209
Using the system
Safety
Driving Tips
General Maintenance
Breakdown assistance
Technical Data
DimensionsDimensions (mm)
FA B I A
FA B I A S CO U T
FA B I A R S
COMBI
COMBI GreenLine
COMBI SCOUT
CO M B I R S
Length
4000
4032
4029
4247
4247
4275
4276
Width
1642
1658
1642
1642
1642
1658
1642
Width including exterior mirror
1886
1886
1886
1886
1886
1886
1886
Height
1498/1513
a)/1484
b)
a)The value corresponds to the status with rough road package.b)The value corresponds to the status with sport chassis.
1498/1513
a)/1484
b)
1492
1498/1513
a)/1484
b)
1484
1498/1513
a)/1484
b)
1494
Clearance
134/149
a)/119
b)
134
129
135/149
a)/119
b)
119
135
129
Wheel base
2465
2465
2464
2465
2465
2465
2464
Track gauge front / rear
1433/1426
1433/1426
1423/1415
1433/1426
1417/1410
1433/1426
1423/1415
s3j8.a.book Page 209 Tuesday, April 20, 2010 1:10 PM
Page 240 of 244

Index239
Using the system
Safety
Driving Tips
General Maintenance
Breakdown assistance
Technical Data Recommendation for changing gears . . . . . . . . . . . 18
Refuelling . . . . . . . . . . . . . . . . . . . . . . . . . . . . . . . . . . . 163
Remote control . . . . . . . . . . . . . . . . . . . . . . . . . . . . . . . 41
Synchronisation process . . . . . . . . . . . . . . . . . . . 42
Replacing bulbs . . . . . . . . . . . . . . . . . . . . . . . . . . . . . . 200
Replacing fuses . . . . . . . . . . . . . . . . . . . . . . . . . . . . . . 195
Replacing the wiper blades . . . . . . . . . . . . . . . . . . . . 56
Roof aerial . . . . . . . . . . . . . . . . . . . . . . . . . . . . . . . . . . 155
Running in the car . . . . . . . . . . . . . . . . . . . . . . . . . . . 145
SSafe securing . . . . . . . . . . . . . . . . . . . . . . . . . . . . . . . . . 38
Safety . . . . . . . . . . . . . . . . . . . . . . . . . . . . . . . . . . . . . . . 113
Safety information
Engine compartment . . . . . . . . . . . . . . . . . . . . . 166
Saving electrical energy . . . . . . . . . . . . . . . . . . . . . . 146
Seat belt height adjuster . . . . . . . . . . . . . . . . . . . . . . 119
Seat belt warning light . . . . . . . . . . . . . . . . . . . . . . . . 119
Seat belts . . . . . . . . . . . . . . . . . . . . . . . . . . . . . . . . . . . . 117
Cleaning . . . . . . . . . . . . . . . . . . . . . . . . . . . . . . . . . 161
fastening . . . . . . . . . . . . . . . . . . . . . . . . . . . . . . . . 119
Height adjustment . . . . . . . . . . . . . . . . . . . . . . . . 119
Safety information . . . . . . . . . . . . . . . . . . . . . . . . 118
taking off . . . . . . . . . . . . . . . . . . . . . . . . . . . . . . . . 120
Warning light . . . . . . . . . . . . . . . . . . . . . . . . . . . . . 34
Seats . . . . . . . . . . . . . . . . . . . . . . . . . . . . . . . . . . . . . . . . . 59
Heating . . . . . . . . . . . . . . . . . . . . . . . . . . . . . . . . . . . 61
Selector lever . . . . . . . . . . . . . . . . . . . . . . . . . . . . . . . . . 99
Selector lever positions . . . . . . . . . . . . . . . . . . . . . . . . 99
Selector lever-emergency unlocking . . . . . . . . . . . 103
Service Display . . . . . . . . . . . . . . . . . . . . . . . . . . . . . . . 17
Service Interval Display . . . . . . . . . . . . . . . . . . . . . . . . 17Setting temperature
Air conditioning system . . . . . . . . . . . . . . . . . . . . 84
Heating . . . . . . . . . . . . . . . . . . . . . . . . . . . . . . . . . . . 81
Setting the clock . . . . . . . . . . . . . . . . . . . . . . . . . . . . . . 18
Shifting . . . . . . . . . . . . . . . . . . . . . . . . . . . . . . . . . . . . . . . 92
Side airbag . . . . . . . . . . . . . . . . . . . . . . . . . . . . . . . . . . 125
Side lights . . . . . . . . . . . . . . . . . . . . . . . . . . . . . . . . . . . . 48
Snow chains . . . . . . . . . . . . . . . . . . . . . . . . . . . . . . . . . 182
Spare wheel . . . . . . . . . . . . . . . . . . . . . . . . . . . . . . . . . 186
Speedometer . . . . . . . . . . . . . . . . . . . . . . . . . . . . . . . . . 16
Stability programme (ESP) . . . . . . . . . . . . . . . . . . . . 137
Starting the engine . . . . . . . . . . . . . . . . . . . . . . . . . . . . 90
Diesel engines . . . . . . . . . . . . . . . . . . . . . . . . . . . . . 91
Petrol engines . . . . . . . . . . . . . . . . . . . . . . . . . . . . . 91
Start-stop . . . . . . . . . . . . . . . . . . . . . . . . . . . . . . . . . . . . 95
Steering force assistance . . . . . . . . . . . . . . . . . . . . . . 141
Storage compartments . . . . . . . . . . . . . . . . . . . . . . . . 75
Storage facilities . . . . . . . . . . . . . . . . . . . . . . . . . . . . . . 75
Stowage compartment
Lighting . . . . . . . . . . . . . . . . . . . . . . . . . . . . . . . . . . . 53
Sun visors . . . . . . . . . . . . . . . . . . . . . . . . . . . . . . . . . . . . 54
Switching lights on and off . . . . . . . . . . . . . . . . . . . . . 48
Switching off the engine . . . . . . . . . . . . . . . . . . . . . . . 91
Systems
Start-stop . . . . . . . . . . . . . . . . . . . . . . . . . . . . . . . . . 95
TTaking care of your vehicle . . . . . . . . . . . . . . . . . . . . 155
TCS . . . . . . . . . . . . . . . . . . . . . . . . . . . . . . . . . . . . . . . . . 138
Warning light . . . . . . . . . . . . . . . . . . . . . . . . . . . . . . 31
Telephone . . . . . . . . . . . . . . . . . . . . . . . . . . . . . . . . . . . 105Temperature
outside . . . . . . . . . . . . . . . . . . . . . . . . . . . . . . . . . . . 20
the first 1 500 kilometres . . . . . . . . . . . . . . . . . . . . . 145
The roof luggage rack system . . . . . . . . . . . . . . . . . . . 72
Tilting roof . . . . . . . . . . . . . . . . . . . . . . . . . . . . . . . . . . . . 46
Tiptronic . . . . . . . . . . . . . . . . . . . . . . . . . . . . . . . . . . . . . 98
Tool . . . . . . . . . . . . . . . . . . . . . . . . . . . . . . . . . . . . . . . . 185
Tourist light . . . . . . . . . . . . . . . . . . . . . . . . . . . . . . . . . . . 49
Towing a trailer . . . . . . . . . . . . . . . . . . . . . . . . . . . . . 152
Towing eye
front . . . . . . . . . . . . . . . . . . . . . . . . . . . . . . . . . . . . 193
rear . . . . . . . . . . . . . . . . . . . . . . . . . . . . . . . . . . . . . 193
Towing protection monitoring . . . . . . . . . . . . . . . . . . 43
towing vehicle . . . . . . . . . . . . . . . . . . . . . . . . . . . . . . 192
Tow-starting . . . . . . . . . . . . . . . . . . . . . . . . . . . . . . . . 192
Tow-starting and towing vehicle
Automatic gearbox . . . . . . . . . . . . . . . . . . . . . . . 103
Traction control system (TCS) . . . . . . . . . . . . . . . . 138
Warning light . . . . . . . . . . . . . . . . . . . . . . . . . . . . . . 31
Trailer . . . . . . . . . . . . . . . . . . . . . . . . . . . . . . . . . . . . . . 152
General Maintenance . . . . . . . . . . . . . . . . . . . . 152
Transporting children . . . . . . . . . . . . . . . . . . . . . . . . 130
Tread depth . . . . . . . . . . . . . . . . . . . . . . . . . . . . . . . . 179
Turn signal light . . . . . . . . . . . . . . . . . . . . . . . . . . . . . 202
Turn signal lights . . . . . . . . . . . . . . . . . . . . . . . . . . . . . . 52
Warning light . . . . . . . . . . . . . . . . . . . . . . . . . . . . . . 27
Two-way radio systems . . . . . . . . . . . . . . . . . . . . . . 105
Tyre . . . . . . . . . . . . . . . . . . . . . . . . . . . . . . . . . . . . . . . . 178
Tyre inflation pressure
Warning light . . . . . . . . . . . . . . . . . . . . . . . . . . . . . . 31
Tyre pressure monitoring system . . . . . . . . . . . . . 142
Tyre repair kit . . . . . . . . . . . . . . . . . . . . . . . . . . . . . . . 186
s3j8.a.book Page 239 Tuesday, April 20, 2010 1:10 PM