technical data SKODA FABIA 2011 2.G / 5J User Guide
[x] Cancel search | Manufacturer: SKODA, Model Year: 2011, Model line: FABIA, Model: SKODA FABIA 2011 2.G / 5JPages: 220, PDF Size: 3.37 MB
Page 21 of 220
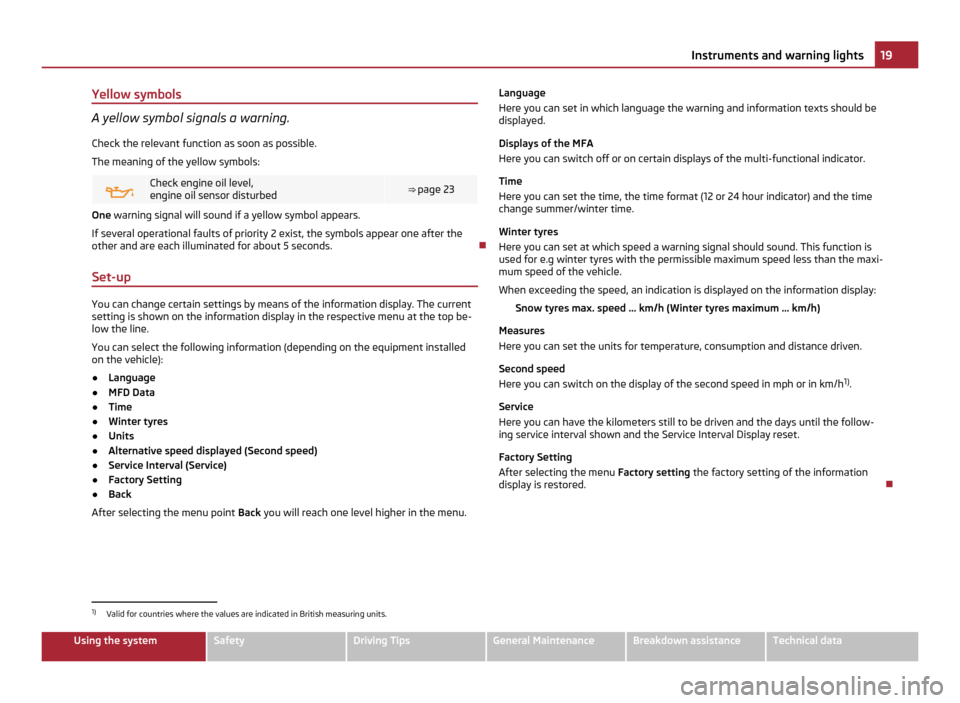
Yellow symbols
A yellow symbol signals a warning.
Check the relevant function as soon as possible.
The meaning of the yellow symbols: Check engine oil level,
engine oil sensor disturbed
⇒
page 23 One warning signal will sound if a yellow symbol appears.
If several operational faults of priority 2 exist, the symbols appear one after the
other and are each illuminated for about 5 seconds.
Set-up You can change certain settings by means of the information display. The current
setting is shown on the information display in the respective menu at the top be-
low the line.
You can select the following information (depending on the equipment installed
on the vehicle):
●
Language
● MFD Data
● Time
● Winter tyres
● Units
● Alternative speed displayed (Second speed)
● Service Interval (Service)
● Factory Setting
● Back
After selecting the menu point Back you will reach one level higher in the menu. Language
Here you can set in which language the warning and information texts should be
displayed.
Displays of the MFA
Here you can switch off or on certain displays of the multi-functional indicator.
Time
Here you can set the time, the time format (12 or 24 hour indicator) and the time
change summer/winter time.
Winter tyres
Here you can set at which speed a warning signal should sound. This function is
used for e.g winter tyres with the permissible maximum speed less than the maxi-
mum speed of the vehicle.
When exceeding the speed, an indication is displayed on the information display:
Snow tyres max. speed ... km/h (Winter tyres maximum ... km/h)
Measures
Here you can set the units for temperature, consumption and distance driven.
Second speed
Here you can switch on the display of the second speed in mph or in km/h 1)
.
Service
Here you can have the kilometers still to be driven and the days until the follow-
ing service interval shown and the Service Interval Display reset.
Factory Setting
After selecting the menu Factory setting the factory setting of the information
display is restored. 1)
Valid for countries where the values are indicated in British measuring units. 19
Instruments and warning lights Using the system Safety Driving Tips General Maintenance Breakdown assistance Technical data
Page 23 of 220
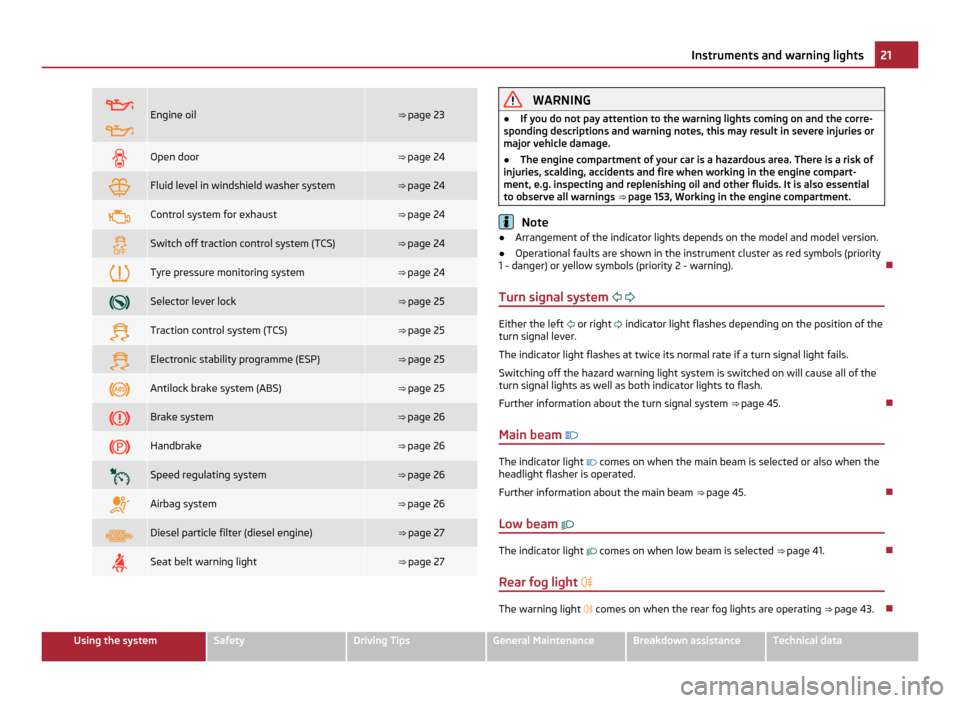
Engine oil ⇒
page 23 Open door ⇒ page 24
Fluid level in windshield washer system ⇒ page 24
Control system for exhaust ⇒ page 24
Switch off traction control system (TCS) ⇒ page 24
Tyre pressure monitoring system ⇒ page 24
Selector lever lock ⇒
page 25 Traction control system (TCS) ⇒
page 25 Electronic stability programme (ESP) ⇒
page 25 Antilock brake system (ABS) ⇒
page 25 Brake system ⇒
page 26 Handbrake ⇒
page 26 Speed regulating system ⇒
page 26 Airbag system ⇒
page 26 Diesel particle filter (diesel engine) ⇒ page 27
Seat belt warning light ⇒ page 27 WARNING
● If you do not pay attention to the warning lights coming on and the corre-
sponding descriptions and warning notes, this may result in severe injuries or
major vehicle damage.
● The engine compartment of your car is a hazardous area. There is a risk of
injuries, scalding, accidents and fire when working in the engine compart-
ment, e.g. inspecting and replenishing oil and other fluids. It is also essential
to observe all warnings ⇒ page
153, Working in the engine compartment. Note
● Arrangement of the indicator lights depends on the model and model version.
● Operational faults are shown in the instrument cluster as red symbols (priority
1 - danger) or yellow symbols (priority 2 - warning).
Turn signal system Either the left
or right
indicator light flashes depending on the position of the
turn signal lever.
The indicator light flashes at twice its normal rate if a turn signal light fails.
Switching off the hazard warning light system is switched on will cause all of the
turn signal lights as well as both indicator lights to flash.
Further information about the turn signal system ⇒ page 45.
Main beam The indicator light
comes on when the main beam is selected or also when the
headlight flasher is operated.
Further information about the main beam ⇒ page 45.
Low beam The indicator light
comes on when low beam is selected
⇒ page 41.
Rear fog light The warning light
comes on when the rear fog lights are operating
⇒ page 43. 21
Instruments and warning lights Using the system Safety Driving Tips General Maintenance Breakdown assistance Technical data
Page 25 of 220
If the
warning light begins to flash while driving, a fault exists in the engine
control. The engine management system selects an emergency programme which
enables you to drive to the nearest specialist garage by adopting a gentle style of
driving.
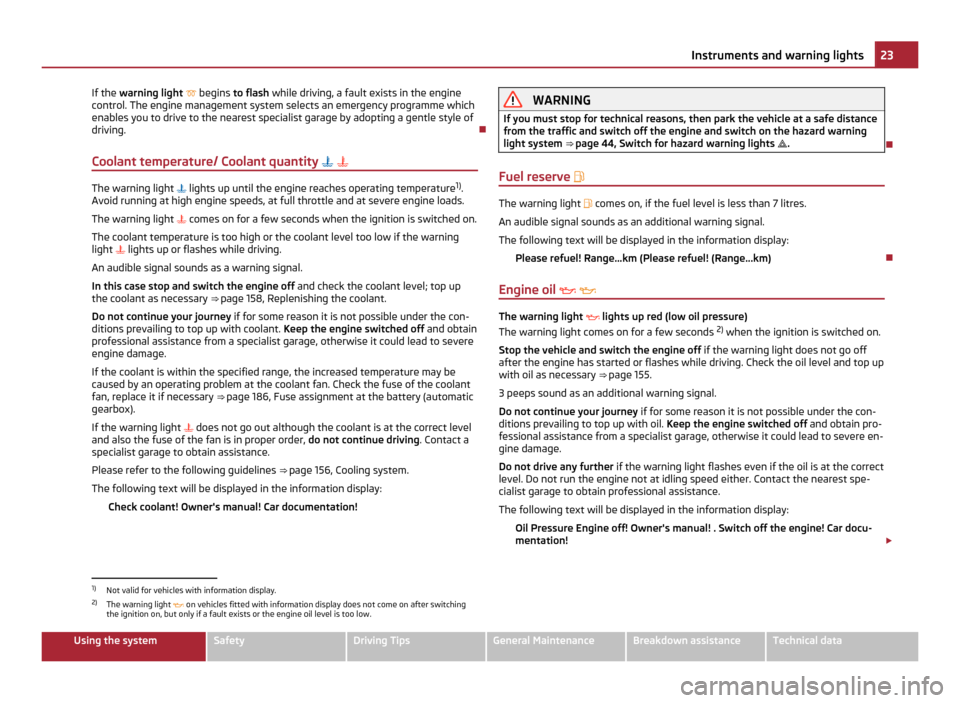
Coolant temperature/ Coolant quantity The warning light
lights up until the engine reaches operating temperature 1)
.
Avoid running at high engine speeds, at full throttle and at severe engine loads.
The warning light comes on for a few seconds when the ignition is switched on.
The coolant temperature is too high or the coolant level too low if the warning
light lights up or flashes while driving.
An audible signal sounds as a warning signal.
In this case stop and switch the engine off and check the coolant level; top up
the coolant as necessary ⇒ page 158, Replenishing the coolant .
Do not continue your journey if for some reason it is not possible under the con-
ditions prevailing to top up with coolant. Keep the engine switched off
and obtain
professional assistance from a specialist garage, otherwise it could lead to severe
engine damage.
If the coolant is within the specified range, the increased temperature may be
caused by an operating problem at the coolant fan. Check the fuse of the coolant
fan, replace it if necessary ⇒ page 186, Fuse assignment at the battery (automatic
gearbox).
If the warning light does not go out although the coolant is at the correct level
and also the fuse of the fan is in proper order, do not continue driving. Contact a
specialist garage to obtain assistance.
Please refer to the following guidelines ⇒ page 156, Cooling system.
The following text will be displayed in the information display: Check coolant! Owner's manual! Car documentation! WARNING
If you must stop for technical reasons, then park the vehicle at a safe distance
from the traffic and switch off the engine and switch on the hazard warning
light system ⇒ page 44, Switch for hazard warning lights
.
Fuel reserve The warning light
comes on, if the fuel level is less than 7 litres.
An audible signal sounds as an additional warning signal.
The following text will be displayed in the information display: Please refuel! Range...km (Please refuel! (Range...km)
Engine oil The warning light
lights up red (low oil pressure)
The warning light comes on for a few seconds 2)
when the ignition is switched on.
Stop the vehicle and switch the engine off if the warning light does not go off
after the engine has started or flashes while driving. Check the oil level and top up
with oil as necessary ⇒ page 155
.
3 peeps sound as an additional warning signal.
Do not continue your journey if for some reason it is not possible under the con-
ditions prevailing to top up with oil. Keep the engine switched off and obtain pro-
fessional assistance from a specialist garage, otherwise it could lead to severe en-
gine damage.
Do not drive any further if the warning light flashes even if the oil is at the correct
level. Do not run the engine not at idling speed either. Contact the nearest spe-
cialist garage to obtain professional assistance.
The following text will be displayed in the information display:
Oil Pressure Engine off! Owner's manual! . Switch off the engine! Car docu-
mentation! £1)
Not valid for vehicles with information display.
2) The warning light on vehicles fitted with information display does not come on after switching
the ignition on, but only if a fault exists or the engine oil level is too low. 23
Instruments and warning lights Using the system Safety Driving Tips General Maintenance Breakdown assistance Technical data
Page 27 of 220
WARNING
● When the warning light lights up, immediately reduce the speed and
avoid sudden steering and brake manoeuvres. Please stop the vehicle without
delay at the nearest possible stop and inspect the tyres and their inflation
pressures.
● Under certain circumstances (e.g. sporty style of driving, wintry or unpaved
roads) the warning light can be delayed or does not light up at all.Note
If the battery has been disconnected, the warning light comes on after switch-
ing on the ignition. The warning light must go out after driving a short distance.
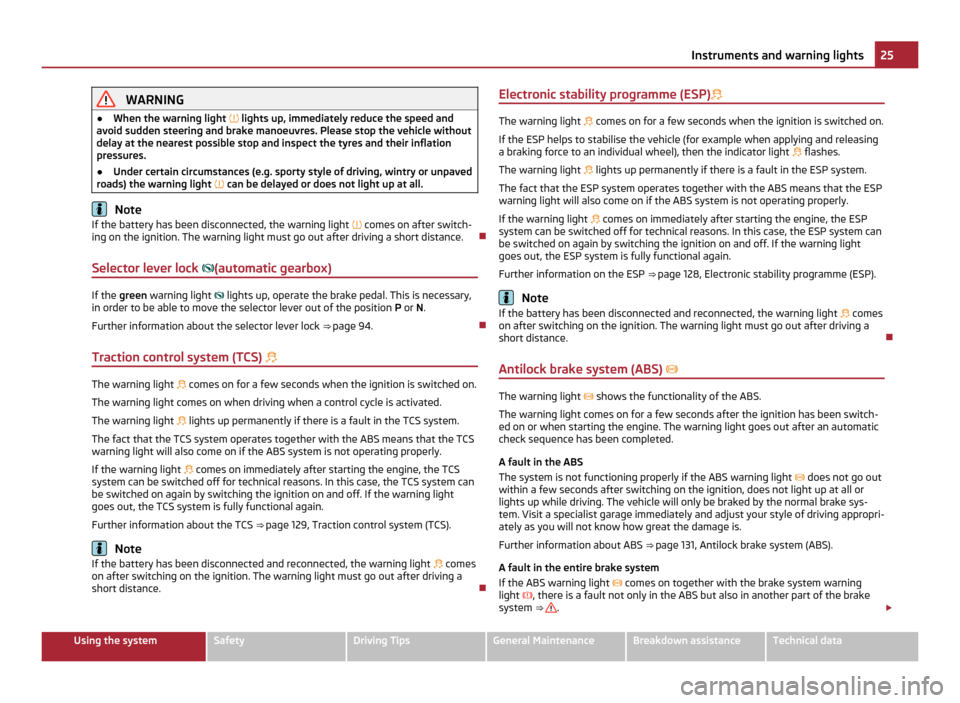
Selector lever lock (automatic gearbox)If the
green warning light
lights up, operate the brake pedal. This is necessary,
in order to be able to move the selector lever out of the position P or N.
Further information about the selector lever lock ⇒ page 94.
Traction control system (TCS) The warning light
comes on for a few seconds when the ignition is switched on.
The warning light comes on when driving when a control cycle is activated.
The warning light lights up permanently if there is a fault in the TCS system.
The fact that the TCS system operates together with the ABS means that the TCS
warning light will also come on if the ABS system is not operating properly.
If the warning light comes on immediately after starting the engine, the TCS
system can be switched off for technical reasons. In this case, the TCS system can
be switched on again by switching the ignition on and off. If the warning light
goes out, the TCS system is fully functional again.
Further information about the TCS ⇒ page 129, Traction control system (TCS)
.Note
If the battery has been disconnected and reconnected, the warning light comes
on after switching on the ignition. The warning light must go out after driving a
short distance. Electronic stability programme (ESP)
The warning light
comes on for a few seconds when the ignition is switched on.
If the ESP helps to stabilise the vehicle (for example when applying and releasing
a braking force to an individual wheel), then the indicator light flashes.
The warning light lights up permanently if there is a fault in the ESP system.
The fact that the ESP system operates together with the ABS means that the ESP
warning light will also come on if the ABS system is not operating properly.
If the warning light comes on immediately after starting the engine, the ESP
system can be switched off for technical reasons. In this case, the ESP system can
be switched on again by switching the ignition on and off. If the warning light
goes out, the ESP system is fully functional again.
Further information on the ESP ⇒ page 128,
Electronic stability programme (ESP). Note
If the battery has been disconnected and reconnected, the warning light comes
on after switching on the ignition. The warning light must go out after driving a
short distance.
Antilock brake system (ABS) The warning light
shows the functionality of the ABS.
The warning light comes on for a few seconds after the ignition has been switch-
ed on or when starting the engine. The warning light goes out after an automatic
check sequence has been completed.
A fault in the ABS
The system is not functioning properly if the ABS warning light does not go out
within a few seconds after switching on the ignition, does not light up at all or
lights up while driving. The vehicle will only be braked by the normal brake sys-
tem. Visit a specialist garage immediately and adjust your style of driving appropri-
ately as you will not know how great the damage is.
Further information about ABS ⇒ page 131, Antilock brake system (ABS) .
A fault in the entire brake system
If the ABS warning light comes on together with the brake system warning
light , there is a fault not only in the ABS but also in another part of the brake
system ⇒
.
£ 25
Instruments and warning lights Using the system Safety Driving Tips General Maintenance Breakdown assistance Technical data
Page 29 of 220

The following situation applies if the front, side and head airbags or belt ten-
sioner have been switched off using the vehicle system tester:
●
The warning light lights up for 3 seconds after switching on the ignition and
then flashes for 12 seconds afterwards in 2 second intervals.
The following text will be displayed in the information display:
Airbag/belt tensioner deactivated! .
If the passenger front airbag has been switched off using the switch (for switch-
ing off airbags) in the end face of the dash panel on the front passenger side:
● the warning light comes on for 4 seconds after the ignition has been
switched on;
● switching off the airbag is indicated in the middle of the dash panel by the
lighting up of the yellow indicator light in display
⇒ page 120. WARNING
Have the airbag system checked immediately by a specialist garage if a fault
exists. Otherwise, there is a risk of the airbag not being activated in the event
of an accident. Note
Further information about switching off airbags ⇒ page 119,
Deactivating airbags.
Diesel particle filter (diesel engine) If the warning light
comes on, this means that soot has accumulated in the
diesel particle filter because of the frequent short distances.
In order to clean the diesel particlulate filter, the vehicle should be driven at an
even speed of at least 60 km/h at engine speeds of 1 800 - 2 500 rpm for at least
15 minutes or until the warning light goes out with the 4th or 5th gear engaged
(automatic gearbox: position
S) when the traffic situation permits it. This increa-
ses the exhaust temperature and the soot deposited in the diesel particle filter is
burnt.
Always pay attention to the valid speed limits ⇒ .
The warning light
goes out after the successful cleaning of the diesel particle
filter. If the filter is not properly cleaned, the warning light
does not go out and the
warning light begins to flash. In the information display Diesel-particle filter
owner's manual appears. Afterwards the engine control unit shifts the engine in-
to the emergency mode, which only has a reduced power output. After switching
the ignition off and on again the warning light comes on.
Have the vehicle inspected without delay by your specialist garage. WARNING
● If you do not pay attention to the warning light coming on and the corre-
sponding descriptions and warning notes, this may result in injuries or major
vehicle damage.
● Always adjust your speed to suit weather, road, region and traffic condi-
tions. The route indicated by the warning light must not tempt you to disre-
gard the national regulations for road traffic. CAUTION
As long as the warning light lights up, one must take into account an increased
fuel consumption and in certain circumstances a power reduction of the engine. Note
Further information about diesel particle filter ⇒ page 134
, Diesel particle filter
(diesel engine).
Seat belt warning light The warning light
comes on after the ignition is switched on as a reminder for
the driver and front passenger to fasten the seat belt. The warning light only goes
out if the driver or front passenger has fastened his seat belt.
If the seat belt has not been fastened by the driver or front passenger, a perma-
nent warning signal sounds at vehicle speeds greater than 20 km/h and simulta-
neously the warning light flashes.
If the seat belt is not fastened by the driver or front passenger during the next 90
seconds, the warning signal is deactivated and the warning light lights up per-
manently.
In case of a load on the front passenger seat e.g. a bag (this is not recommended
for safety reasons) the warning light indicates that the seat belt is not fastened.
For further information on the seat belts ⇒ page 109, Why seat belts?. 27
Instruments and warning lights Using the system Safety Driving Tips General Maintenance Breakdown assistance Technical data
Page 31 of 220
For the sake of the environment
Dispose of a used battery in accordance with environmental regulations. Note
● Pay attention to the correct polarity when changing the battery.
● The replacement battery must have the same specification as the original bat-
tery.
● If it is still not be possible to unlock or lock the vehicle with the remote control
key even after replacing the battery, this means that the system has to be
synchronised ⇒ page 35.
Electronic immobiliser The electronic immobiliser prevents the vehicle being operated by
an unauthorised person.
An electronic chip is integrated in the head of the key. The immobiliser is deactiva-
ted with the aid of this chip when the key is inserted in the ignition lock. The elec-
tronic immobiliser is automatically activated when you withdraw the ignition key
from the lock. Note
It is only possible to start the engine of your car with a Genuine ŠKODA key with
the matching code.
Locking/Unlocking Valid for vehicles without a central locking system:
Locking from outside
The securing knob will move upwards or downwards in the door when unlocking
or locking. Locking from inside
All closed vehicle doors are locked by pressing the securing knobs from the inside.
The doors cannot be opened from the outside when the securing knobs have
been pressed. The vehicle doors can be opened from the inside as follows:
●
the door is unlocked by actuating the door-opening lever;
● The door opens upon actuating the door-opening lever again. Note
● The opened door cannot be locked with the securing knob. This prevents the
possibility of forgetting the key in the locked vehicle.
● The opened doors at the rear and the front passenger door are locked by
pressing the securing knob and slamming the door closed.
● Please refer to the safety guidelines ⇒ in Description on page 30.
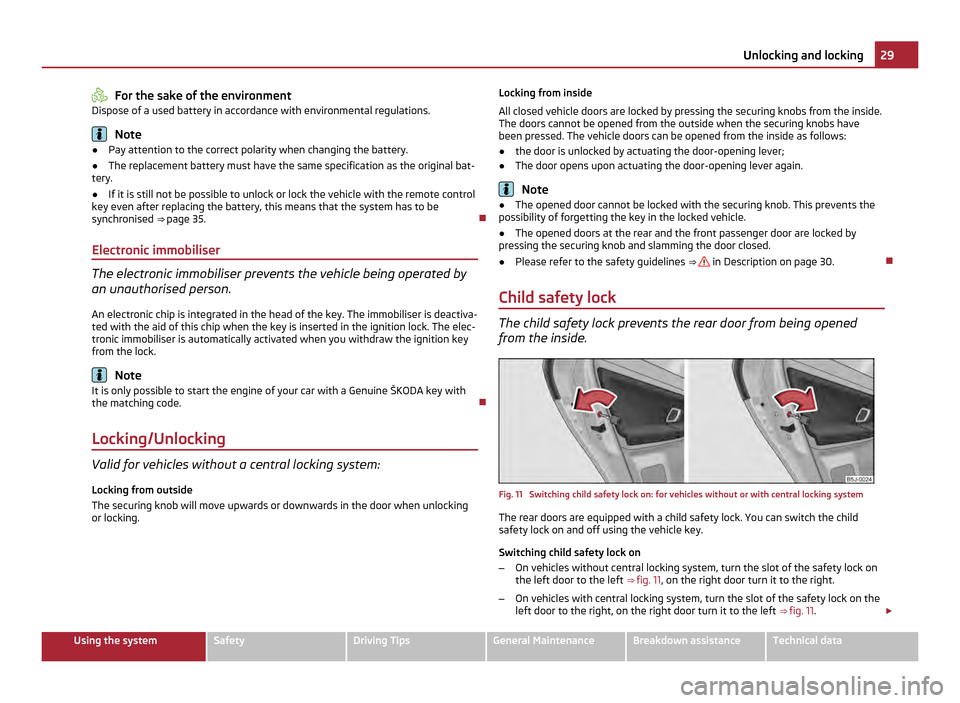
Child safety lock The child safety lock prevents the rear door from being opened
from the inside.
Fig. 11 Switching child safety lock on: for vehicles without or with central locking system
The rear doors are equipped with a child safety lock. You can switch the child
safety lock on and off using the vehicle key.
Switching child safety lock on
–
On vehicles without central locking system, turn the slot of the safety lock on
the left door to the left ⇒ fig. 11, on the right door turn it to the right.
– On vehicles with central locking system, turn the slot of the safety lock on the
left door to the right, on the right door turn it to the left ⇒
fig. 11
.£ 29
Unlocking and locking Using the system Safety Driving Tips General Maintenance Breakdown assistance Technical data
Page 33 of 220
You can deactivate the safe securing system by locking twice within 2 seconds.
If the safe securing system is not operating, the warning light in the driver door
flashes for about 2
seconds fast, goes out and starts to flash evenly at longer in-
tervals after about 30°seconds.
The safe securing system is again activated the next time the vehicle is unlocked
and locked again.
If the vehicle is locked and the safe securing system is deactivated, you can open
the vehicle from the inside by pulling on the door opening lever. The door is un-
locked and opened at the same time. WARNING
If the vehicle is locked from the outside and the safe securing system is acti-
vated, there must not be any person and animals in the vehicle as it is then
not possible to open either a door or a window from the inside. The locked
doors make it more difficult for rescuers to get into the vehicle in an emergen-
cy - hazard! Note
● The anti-theft alarm system is also activated with the deactivated safe secur-
ing system when locking the vehicle. The interior monitor is however not activa-
ted.
● When activating the Safelock function after you lock the vehicle, the message
CHECK DEADLOCK will appear to inform you about this. In vehicles equipped with
an information display, the message Check deadlock! appears Owner's manual!
(CHECK DEADLOCK appears.
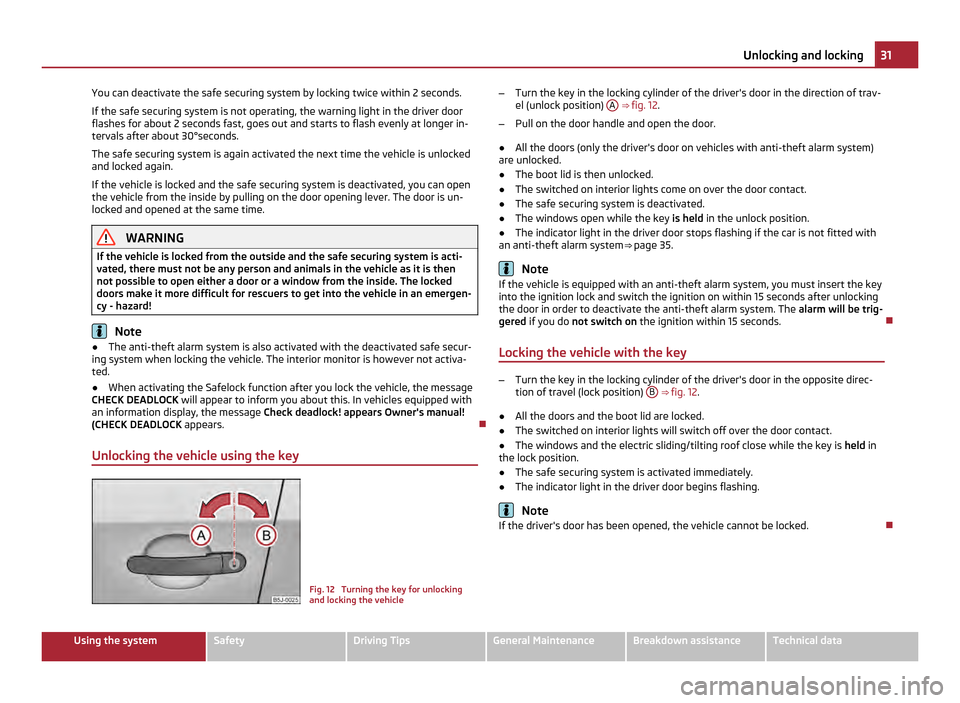
Unlocking the vehicle using the key Fig. 12 Turning the key for unlocking
and locking the vehicle–
Turn the key in the locking cylinder of the driver's door in the direction of trav-
el (unlock position) A ⇒ fig. 12
.
– Pull on the door handle and open the door.
● All the doors (only the driver's door on vehicles with anti-theft alarm system)
are unlocked.
● The boot lid is then unlocked.
● The switched on interior lights come on over the door contact.
● The safe securing system is deactivated.
● The windows open while the key is held in the unlock position.
● The indicator light in the driver door stops flashing if the car is not fitted with
an anti-theft alarm system ⇒ page 35. Note
If the vehicle is equipped with an anti-theft alarm system, you must insert the key
into the ignition lock and switch the ignition on within 15 seconds after unlocking
the door in order to deactivate the anti-theft alarm system. The alarm will be trig-
gered if you do not switch on the ignition within 15 seconds.
Locking the vehicle with the key –
Turn the key in the locking cylinder of the driver's door in the opposite direc-
tion of travel (lock position) B ⇒
fig. 12 .
● All the doors and the boot lid are locked.
● The switched on interior lights will switch off over the door contact.
● The windows and the electric sliding/tilting roof close while the key is held in
the lock position.
● The safe securing system is activated immediately.
● The indicator light in the driver door begins flashing. Note
If the driver's door has been opened, the vehicle cannot be locked. 31
Unlocking and locking Using the system Safety Driving Tips General Maintenance Breakdown assistance Technical data
Page 35 of 220
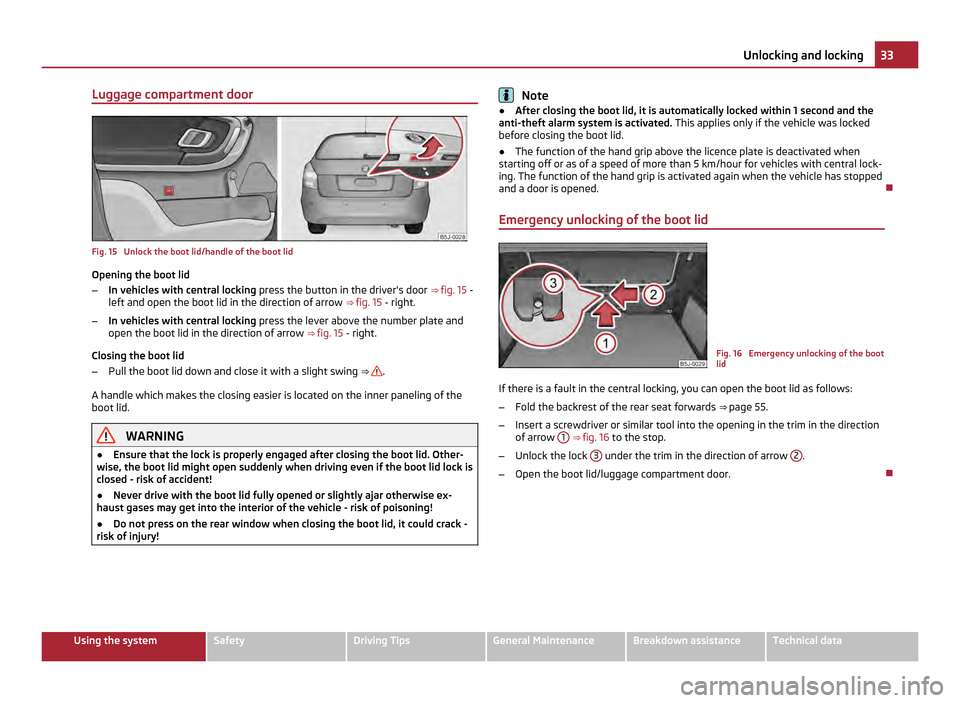
Luggage compartment door
Fig. 15 Unlock the boot lid/handle of the boot lid
Opening the boot lid
– In vehicles with central locking press the button in the driver's door ⇒
fig. 15 -
left and open the boot lid in the direction of arrow ⇒ fig. 15 - right.
– In vehicles with central locking press the lever above the number plate and
open the boot lid in the direction of arrow ⇒ fig. 15
- right.
Closing the boot lid
– Pull the boot lid down and close it with a slight swing ⇒ .
A handle which makes the closing easier is located on the inner paneling of the
boot lid. WARNING
● Ensure that the lock is properly engaged after closing the boot lid. Other-
wise, the boot lid might open suddenly when driving even if the boot lid lock is
closed - risk of accident!
● Never drive with the boot lid fully opened or slightly ajar otherwise ex-
haust gases may get into the interior of the vehicle - risk of poisoning!
● Do not press on the rear window when closing the boot lid, it could crack -
risk of injury! Note
● After closing the boot lid, it is automatically locked within 1 second and the
anti-theft alarm system is activated. This applies only if the vehicle was locked
before closing the boot lid.
● The function of the hand grip above the licence plate is deactivated when
starting off or as of a speed of more than 5 km/hour for vehicles with central lock-
ing. The function of the hand grip is activated again when the vehicle has stopped
and a door is opened.
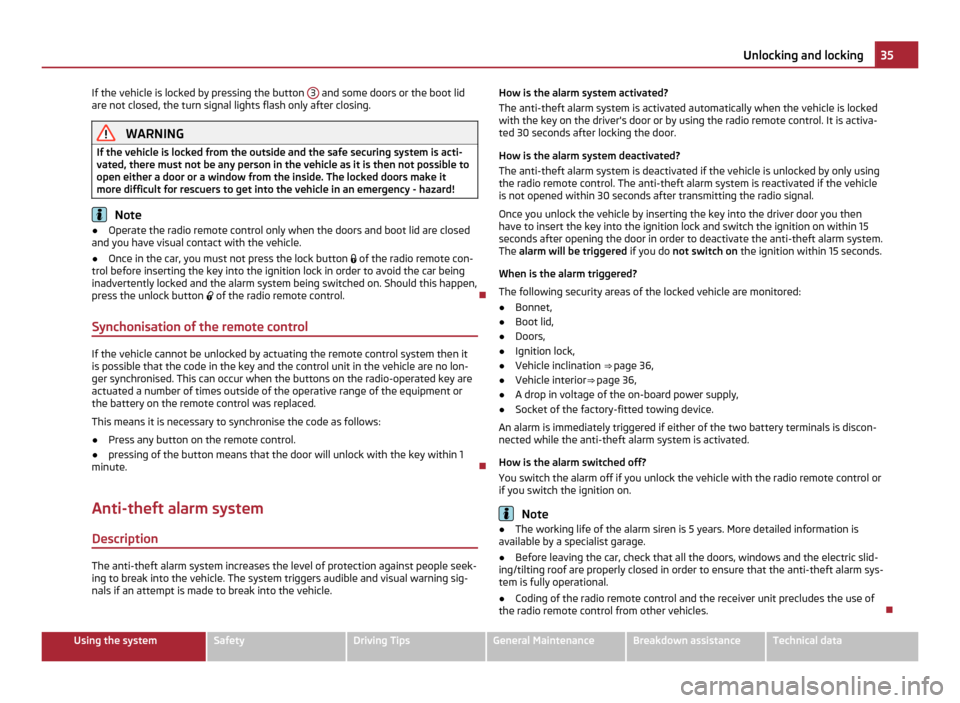
Emergency unlocking of the boot lid Fig. 16 Emergency unlocking of the boot
lid
If there is a fault in the central locking, you can open the boot lid as follows:
– Fold the backrest of the rear seat forwards ⇒ page 55.
– Insert a screwdriver or similar tool into the opening in the trim in the direction
of arrow 1 ⇒ fig. 16
to the stop.
– Unlock the lock 3 under the trim in the direction of arrow
2 .
– Open the boot lid/luggage compartment door. 33
Unlocking and locking Using the system Safety Driving Tips General Maintenance Breakdown assistance Technical data
Page 37 of 220
If the vehicle is locked by pressing the button
3 and some doors or the boot lid
are not closed, the turn signal lights flash only after closing. WARNING
If the vehicle is locked from the outside and the safe securing system is acti-
vated, there must not be any person in the vehicle as it is then not possible to
open either a door or a window from the inside. The locked doors make it
more difficult for rescuers to get into the vehicle in an emergency - hazard! Note
● Operate the radio remote control only when the doors and boot lid are closed
and you have visual contact with the vehicle.
● Once in the car, you must not press the lock button of the radio remote con-
trol before inserting the key into the ignition lock in order to avoid the car being
inadvertently locked and the alarm system being switched on. Should this happen,
press the unlock button of the radio remote control.
Synchonisation of the remote control If the vehicle cannot be unlocked by actuating the remote control system then it
is possible that the code in the key and the control unit in the vehicle are no lon-
ger synchronised. This can occur when the buttons on the radio-operated key are
actuated a number of times outside of the operative range of the equipment or
the battery on the remote control was replaced.
This means it is necessary to synchronise the code as follows:
●
Press any button on the remote control.
● pressing of the button means that the door will unlock with the key within 1
minute.
Anti-theft alarm system
Description The anti-theft alarm system increases the level of protection against people seek-
ing to break into the vehicle. The system triggers audible and visual warning sig-
nals if an attempt is made to break into the vehicle. How is the alarm system activated?
The anti-theft alarm system is activated automatically when the vehicle is locked
with the key on the driver's door or by using the radio remote control. It is activa-
ted 30 seconds after locking the door.
How is the alarm system deactivated?
The anti-theft alarm system is deactivated if the vehicle is unlocked by only using
the radio remote control. The anti-theft alarm system is reactivated if the vehicle
is not opened within 30 seconds after transmitting the radio signal.
Once you unlock the vehicle by inserting the key into the driver door you then
have to insert the key into the ignition lock and switch the ignition on within 15
seconds after opening the door in order to deactivate the anti-theft alarm system.
The alarm will be triggered
if you do not switch on the ignition within 15 seconds.
When is the alarm triggered?
The following security areas of the locked vehicle are monitored:
● Bonnet,
● Boot lid,
● Doors,
● Ignition lock,
● Vehicle inclination ⇒ page 36,
● Vehicle interior ⇒ page 36,
● A drop in voltage of the on-board power supply,
● Socket of the factory-fitted towing device.
An alarm is immediately triggered if either of the two battery terminals is discon-
nected while the anti-theft alarm system is activated.
How is the alarm switched off?
You switch the alarm off if you unlock the vehicle with the radio remote control or
if you switch the ignition on. Note
● The working life of the alarm siren is 5 years. More detailed information is
available by a specialist garage.
● Before leaving the car, check that all the doors, windows and the electric slid-
ing/tilting roof are properly closed in order to ensure that the anti-theft alarm sys-
tem is fully operational.
● Coding of the radio remote control and the receiver unit precludes the use of
the radio remote control from other vehicles. 35
Unlocking and locking Using the system Safety Driving Tips General Maintenance Breakdown assistance Technical data
Page 39 of 220
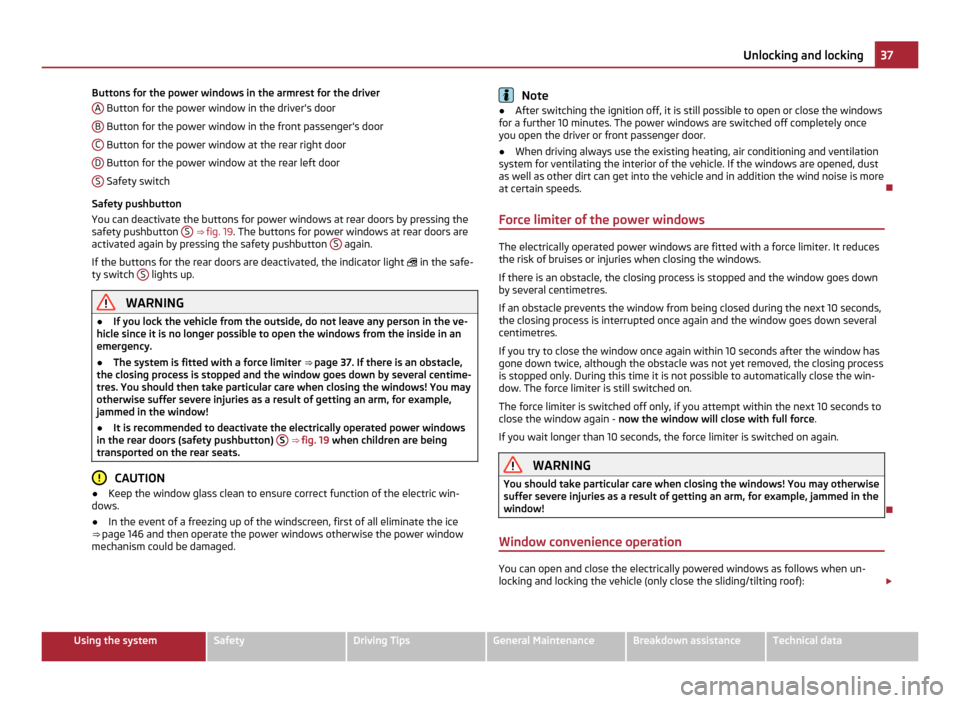
Buttons for the power windows in the armrest for the driver
A Button for the power window in the driver's door
B Button for the power window in the front passenger's door
C Button for the power window at the rear right door
D Button for the power window at the rear left door
S Safety switch
Safety pushbutton
You can deactivate the buttons for power windows at rear doors by pressing the
safety pushbutton S ⇒ fig. 19
. The buttons for power windows at rear doors are
activated again by pressing the safety pushbutton S again.
If the buttons for the rear doors are deactivated, the indicator light in the safe-
ty switch S lights up.
WARNING
● If you lock the vehicle from the outside, do not leave any person in the ve-
hicle since it is no longer possible to open the windows from the inside in an
emergency.
● The system is fitted with a force limiter ⇒ page 37. If there is an obstacle,
the closing process is stopped and the window goes down by several centime-
tres. You should then take particular care when closing the windows! You may
otherwise suffer severe injuries as a result of getting an arm, for example,
jammed in the window!
● It is recommended to deactivate the electrically operated power windows
in the rear doors (safety pushbutton) S ⇒
fig. 19 when children are being
transported on the rear seats. CAUTION
● Keep the window glass clean to ensure correct function of the electric win-
dows.
● In the event of a freezing up of the windscreen, first of all eliminate the ice
⇒ page 146 and then operate the power windows otherwise the power window
mechanism could be damaged. Note
● After switching the ignition off, it is still possible to open or close the windows
for a further 10 minutes. The power windows are switched off completely once
you open the driver or front passenger door.
● When driving always use the existing heating, air conditioning and ventilation
system for ventilating the interior of the vehicle. If the windows are opened, dust
as well as other dirt can get into the vehicle and in addition the wind noise is more
at certain speeds.
Force limiter of the power windows The electrically operated power windows are fitted with a force limiter. It reduces
the risk of bruises or injuries when closing the windows.
If there is an obstacle, the closing process is stopped and the window goes down
by several centimetres.
If an obstacle prevents the window from being closed during the next 10 seconds,
the closing process is interrupted once again and the window goes down several
centimetres.
If you try to close the window once again within 10 seconds after the window has
gone down twice, although the obstacle was not yet removed, the closing process
is stopped only. During this time it is not possible to automatically close the win-
dow. The force limiter is still switched on.
The force limiter is switched off only, if you attempt within the next 10 seconds to
close the window again -
now the window will close with full force .
If you wait longer than 10 seconds, the force limiter is switched on again. WARNING
You should take particular care when closing the windows! You may otherwise
suffer severe injuries as a result of getting an arm, for example, jammed in the
window!
Window convenience operation You can open and close the electrically powered windows as follows when un-
locking and locking the vehicle (only close the sliding/tilting roof):
£ 37
Unlocking and locking Using the system Safety Driving Tips General Maintenance Breakdown assistance Technical data