brakes SKODA FABIA 2011 2.G / 5J Owner's Manual
[x] Cancel search | Manufacturer: SKODA, Model Year: 2011, Model line: FABIA, Model: SKODA FABIA 2011 2.G / 5JPages: 220, PDF Size: 3.37 MB
Page 6 of 220
Driving Tips
. . . . . . . . . . . . . . . . . . . . . . . . . . . . . . . . . . . 128
Intelligent Technology . . . . . . . . . . . . . . . . . . . . . . . . . . . . 128
Electronic stability programme (ESP) . . . . . . . . . . . . . . . . 128
Brakes . . . . . . . . . . . . . . . . . . . . . . . . . . . . . . . . . . . . . . . . . . . . 130
Brake booster . . . . . . . . . . . . . . . . . . . . . . . . . . . . . . . . . . . . . 131
Antilock brake system (ABS) . . . . . . . . . . . . . . . . . . . . . . . . 131
Brake Assist . . . . . . . . . . . . . . . . . . . . . . . . . . . . . . . . . . . . . . . 132
Uphill Start Assist . . . . . . . . . . . . . . . . . . . . . . . . . . . . . . . . . 132
Electrohydraulic power steering . . . . . . . . . . . . . . . . . . . . 133
Tyre pressure monitoring system . . . . . . . . . . . . . . . . . . . 133
Diesel particle filter (diesel engine) . . . . . . . . . . . . . . . . . 134
Driving and the Environment . . . . . . . . . . . . . . . . . . . . . 135
The first 1 500 kilometres and afterwards . . . . . . . . . . . 135
Catalytic converter . . . . . . . . . . . . . . . . . . . . . . . . . . . . . . . . . 135
Driving in an economical and environmentally
conscious manner . . . . . . . . . . . . . . . . . . . . . . . . . . . . . . . . . 136
Environmental compatibility
. . . . . . . . . . . . . . . . . . . . . . . . 139
Motoring abroad . . . . . . . . . . . . . . . . . . . . . . . . . . . . . . . . . . . 140
Avoiding damage to your vehicle . . . . . . . . . . . . . . . . . . . 140
Driving through bodies of water on roads . . . . . . . . . . . 141
Towing a trailer . . . . . . . . . . . . . . . . . . . . . . . . . . . . . . . . . . . . 142
Towing a trailer . . . . . . . . . . . . . . . . . . . . . . . . . . . . . . . . . . . 142
General Maintenance . . . . . . . . . . . . . . . . . . . . . 144
Taking care of your vehicle and cleaning the
vehicle . . . . . . . . . . . . . . . . . . . . . . . . . . . . . . . . . . . . . . . . . . . . . . 144
General . . . . . . . . . . . . . . . . . . . . . . . . . . . . . . . . . . . . . . . . . . . 144
Care of the exterior of vehicle . . . . . . . . . . . . . . . . . . . . . . 144
Care of the interior of vehicle . . . . . . . . . . . . . . . . . . . . . . . 148
Fuel . . . . . . . . . . . . . . . . . . . . . . . . . . . . . . . . . . . . . . . . . . . . . . . . . 150
Petrol . . . . . . . . . . . . . . . . . . . . . . . . . . . . . . . . . . . . . . . . . . . . . 150
Diesel . . . . . . . . . . . . . . . . . . . . . . . . . . . . . . . . . . . . . . . . . . . . . 151
Refuelling . . . . . . . . . . . . . . . . . . . . . . . . . . . . . . . . . . . . . . . . . 151
Inspecting and Replenishing . . . . . . . . . . . . . . . . . . . . . . 153
Engine compartment . . . . . . . . . . . . . . . . . . . . . . . . . . . . . . 153
Engine oil . . . . . . . . . . . . . . . . . . . . . . . . . . . . . . . . . . . . . . . . . 155
Cooling system . . . . . . . . . . . . . . . . . . . . . . . . . . . . . . . . . . . . 156
Brake fluid . . . . . . . . . . . . . . . . . . . . . . . . . . . . . . . . . . . . . . . . 159 Battery . . . . . . . . . . . . . . . . . . . . . . . . . . . . . . . . . . . . . . . . . . . 159
Windshield washer system . . . . . . . . . . . . . . . . . . . . . . . . . 163
Wheels and Tyres . . . . . . . . . . . . . . . . . . . . . . . . . . . . . . . . . . 164
Wheels . . . . . . . . . . . . . . . . . . . . . . . . . . . . . . . . . . . . . . . . . . . 164
Accessories, changes and replacement of parts . 169
General . . . . . . . . . . . . . . . . . . . . . . . . . . . . . . . . . . . . . . . . . . . 169
Breakdown assistance . . . . . . . . . . . . . . . . . . . 170
Breakdown assistance . . . . . . . . . . . . . . . . . . . . . . . . . . . . 170
First-aid box and warning triangle . . . . . . . . . . . . . . . . . . 170
Fire extinguisher . . . . . . . . . . . . . . . . . . . . . . . . . . . . . . . . . . 170
Vehicle tool kit . . . . . . . . . . . . . . . . . . . . . . . . . . . . . . . . . . . . 170
Spare wheel . . . . . . . . . . . . . . . . . . . . . . . . . . . . . . . . . . . . . . . 171
Changing a wheel . . . . . . . . . . . . . . . . . . . . . . . . . . . . . . . . . 171
Tyre repair kit . . . . . . . . . . . . . . . . . . . . . . . . . . . . . . . . . . . . . 175
Jump-starting . . . . . . . . . . . . . . . . . . . . . . . . . . . . . . . . . . . . . 178
The vehicle . . . . . . . . . . . . . . . . . . . . . . . . . . . . . . . . . . . . . . . . 179
Fuses and light bulbs . . . . . . . . . . . . . . . . . . . . . . . . . . . . . . 182
Electric fuses . . . . . . . . . . . . . . . . . . . . . . . . . . . . . . . . . . . . . . 182
Bulbs . . . . . . . . . . . . . . . . . . . . . . . . . . . . . . . . . . . . . . . . . . . . . 186
Technical data . . . . . . . . . . . . . . . . . . . . . . . . . . . . . . . 192
Technical data . . . . . . . . . . . . . . . . . . . . . . . . . . . . . . . . . . . . . 192
General information . . . . . . . . . . . . . . . . . . . . . . . . . . . . . . . 192
Used abbreviations . . . . . . . . . . . . . . . . . . . . . . . . . . . . . . . . 192
Performances . . . . . . . . . . . . . . . . . . . . . . . . . . . . . . . . . . . . . 192
Weight . . . . . . . . . . . . . . . . . . . . . . . . . . . . . . . . . . . . . . . . . . . . 192
Identification details . . . . . . . . . . . . . . . . . . . . . . . . . . . . . . . 193
Fuel consumption according to the ECE standards and
EU guidelines . . . . . . . . . . . . . . . . . . . . . . . . . . . . . . . . . . . . . 193
Dimensions
. . . . . . . . . . . . . . . . . . . . . . . . . . . . . . . . . . . . . . . 194
Engine oil specifications . . . . . . . . . . . . . . . . . . . . . . . . . . . 195
Engine 1.2 l/44 kW - EU5 . . . . . . . . . . . . . . . . . . . . . . . . . . . 197
Engine 1.2 l/51 kW - EU5/EU2 DDK . . . . . . . . . . . . . . . . . . 198
Engine 1.2 l/63 kW TSI - EU5 . . . . . . . . . . . . . . . . . . . . . . . . 199
Engine 1.2 l/77 kW TSI - EU5 . . . . . . . . . . . . . . . . . . . . . . . . 200
Engine 1.4 l/63 kW - EU5 . . . . . . . . . . . . . . . . . . . . . . . . . . . 201
Engine 1.6 l/77 kW - EU4, EU2 DDK . . . . . . . . . . . . . . . . . . 202
Engine 1.4 l/132 kW TSI - EU5 . . . . . . . . . . . . . . . . . . . . . . . 203 Engine 1.2 l/55 kW TDI CR DPF - EU5 . . . . . . . . . . . . . . . . 204
Engine 1.6 l/55 kW TDI CR - EU5 . . . . . . . . . . . . . . . . . . . . 205
Engine 1.6 l/66 kW TDI CR - EU5 . . . . . . . . . . . . . . . . . . . . 206
Engine 1.6 l/77 kW TDI CR - EU5 . . . . . . . . . . . . . . . . . . . . . 207
Index . . . . . . . . . . . . . . . . . . . . . . . . . . . . . . . . . . . . . . . . . . . . . 2084
Table of Contents
Page 28 of 220
WARNING
● If the brake system warning light comes on together with the ABS
warning light stop the vehicle immediately and check the brake fluid level
in the reservoir ⇒ page 159 ,
Brake fluid. If the fluid level has dropped below
the MIN marking, do not drive any further - risk of accident! Contact a Škoda
dealer to obtain professional assistance.
● Pay attention to the following instructions ⇒ page 153, Working in the en-
gine compartment
before checking the brake fluid level and opening the bon-
net.
● If the brake fluid is at the correct level, the ABS control function has failed.
The rear wheels may then block very rapidly when braking. In certain circum-
stances, this can result in the rear end of the car breaking away - risk of skid-
ding! Drive carefully to the nearest specialist garage and have the fault recti-
fied.
Brake system The warning light
lights up when the brake fluid level is too low or there is a
fault in the ABS.
if the warning light flashes and an audible signal sounds three times,
stop and
check the brake fluid level ⇒ .
The following text will be displayed in the information display: Brake fluid Owner's manual .
If there is a fault in the ABS which also influences the function of the brake sys-
tem (e.g. distribution of brake pressure), the ABS warning light comes on and at
the same time the brake system warning light starts flashing . Be aware that
not only the ABS but also another part of th brake system is defective ⇒ .
An audible signal sounds three times as an additional warning signal.
One should get used to high pedal forces, an extended free play of the brake ped-
al and long braking distances when carefully driving to the specialist garage.
For further information on the brake system ⇒ page 130, Brakes. WARNING
● Pay attention to the following instructions before checking the brake fluid
level and opening the bonnet ⇒ page 153, Working in the engine compart-
ment.
● If the brake system warning light does not go out a few seconds after
switching on the ignition or comes on when driving, stop immediately and
check the brake fluid in the reservoir ⇒ page 159, Brake fluid
. If the fluid level
has dropped below the MIN marking, do not drive any further - risk of acci-
dent! Contact a Škoda dealer to obtain professional assistance.
Handbrake The warning light
comes on if the handbrake is applied. An audible warning is
also given if you drive the vehicle for at least 3 seconds at a speed of more than 6
km/h.
The following text will be displayed in the information display:
Release parking brake! (Release parking brake!)
Cruise control The warning light
lights up, when operating the speed regulating system.
Airbag system Monitoring the airbag system
The warning light
comes on for a few seconds when the ignition is switched on.
There is a fault in the system if the warning light does not go out or comes on or
flashes while driving ⇒ . This also applies if the warning light does not come on
after the ignition is switched on.
The following text will be displayed in the information display:
Error: Airbag (Error: Airbag)
The functionality of the airbag system is also monitored electronically when one
airbag has been switched off. £26
Instruments and warning lights
Page 58 of 220
–
The rear head restraints can be inserted into the relevant holes of the folded
forward seat cushions.
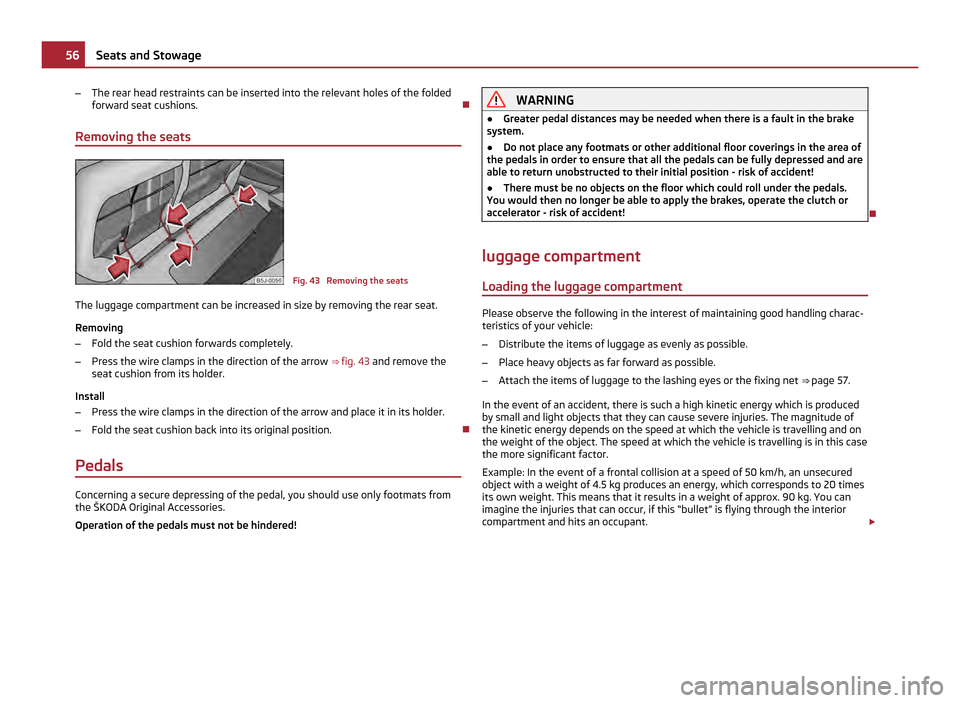
Removing the seats Fig. 43 Removing the seats
The luggage compartment can be increased in size by removing the rear seat.
Removing
– Fold the seat cushion forwards completely.
– Press the wire clamps in the direction of the arrow ⇒ fig. 43 and remove the
seat cushion from its holder.
Install
– Press the wire clamps in the direction of the arrow and place it in its holder.
– Fold the seat cushion back into its original position.
Pedals Concerning a secure depressing of the pedal, you should use only footmats from
the
ŠKODA Original Accessories.
Operation of the pedals must not be hindered! WARNING
● Greater pedal distances may be needed when there is a fault in the brake
system.
● Do not place any footmats or other additional floor coverings in the area of
the pedals in order to ensure that all the pedals can be fully depressed and are
able to return unobstructed to their initial position - risk of accident!
● There must be no objects on the floor which could roll under the pedals.
You would then no longer be able to apply the brakes, operate the clutch or
accelerator - risk of accident!
luggage compartment
Loading the luggage compartment Please observe the following in the interest of maintaining good handling charac-
teristics of your vehicle:
–
Distribute the items of luggage as evenly as possible.
– Place heavy objects as far forward as possible.
– Attach the items of luggage to the lashing eyes or the fixing net
⇒ page 57.
In the event of an accident, there is such a high kinetic energy which is produced
by small and light objects that they can cause severe injuries. The magnitude of
the kinetic energy depends on the speed at which the vehicle is travelling and on
the weight of the object. The speed at which the vehicle is travelling is in this case
the more significant factor.
Example: In the event of a frontal collision at a speed of 50 km/h, an unsecured
object with a weight of 4.5 kg produces an energy, which corresponds to 20 times
its own weight. This means that it results in a weight of approx. 90 kg. You can
imagine the injuries that can occur, if this
“bullet” is flying through the interior
compartment and hits an occupant. £56
Seats and Stowage
Page 71 of 220

Storage compartments on the front passenger side ⇒
page 69 Storage compartment on the driver's side ⇒ page 70
Stowage compartment for spectacles ⇒ page 70
Stowage compartment in centre console ⇒ page 70
Storage compartment in the front seat ⇒ page 70
Front seat armrest with stowage compartment ⇒ page 71
Storage compartment in the front doors ⇒ page 71
Storage compartments in the luggage compartment ⇒ page 71
Flexible storage compartment ⇒ page 72
Clothes hooks ⇒ page 72
WARNING
● Please do not place anything on top of the dash panel. Such objects might
slide or fall down when driving (when accelerating or cornering) and may dis-
tract you from concentrating on the traffic situation - risk of accident!
● Ensure that when driving no objects from the centre console of from other
storage possibilities may get into the footwell of the driver. You would then
no longer be able to apply the brakes, operate the clutch or accelerator - risk
of accident!
Storage compartments on the front passenger side Fig. 67 Dash panel: Storage compart-
ments on the front passenger side
On some vehicles, the storage compartments are not equipped with lids.
Opening and closing the storage compartments on the front passenger side
– Pull the handle of the lid in direction of arrow ⇒
fig. 67 and fold it open.–
Swivel the flap until it is heard to lock.
A pin holder is located inside the lower flap. WARNING
The storage compartments must always be closed when driving for safety rea-
sons.
Cooling of storage compartment on front passenger side Fig. 68 Storage compartment: Using
cooling system
– You can switch the cooling system on or off using the control dial ⇒ fig. 68.
Opening the air inlet when the air conditioning system is on causes fresh or interi-
or air to flow into the storage compartment.
We recommend that you switch off the cooling if it is operating in the heating
mode or if you are not using the cooling system for the storage compartment. 69
Seats and Stowage Using the system Safety Driving Tips General Maintenance Breakdown assistance Technical data
Page 88 of 220
The handbrake warning light
lights up when the handbrake is applied, provided
the ignition is on.
A warning signal sounds and the following text appears in the Information display
if you have inadvertently driven off with the handbrake applied:
Release parking brake! (Release parking brake!)
The handbrake warning is activated if you drive at a speed of more than 6 km/h
for more than 3 seconds. WARNING
● Please note that the handbrake must be fully released. A handbrake which
is only partially released can result in the rear brakes overheating which will
have a negative effect on the operation of the brake system - risk of accident!
In addition this can result in premature wear of the rear brake pads.
● Never leave children unattended in the vehicle. The children might, for ex-
ample, release the handbrake or take the vehicle out of gear. The vehicle
might then move off - risk of accident! CAUTION
After the car has come to a stop, always first of all apply the handbrake firmly be-
fore then additionally engaging a gear (manual gearbox) or moving the selector
lever into position P (automatic gearbox).
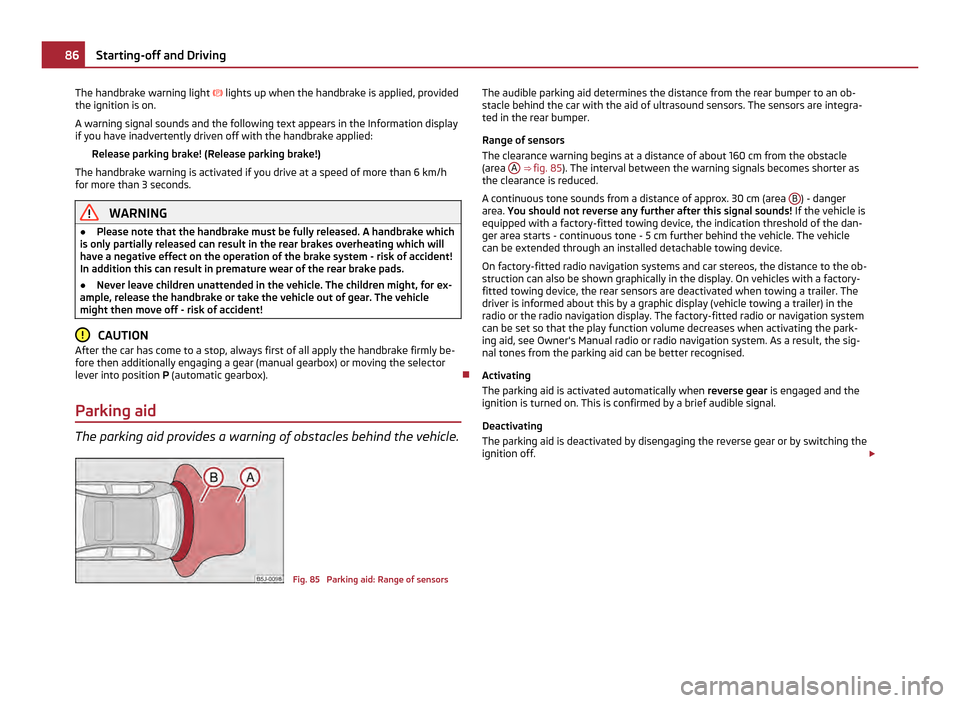
Parking aid The parking aid provides a warning of obstacles behind the vehicle.
Fig. 85 Parking aid: Range of sensorsThe audible parking aid determines the distance from the rear bumper to an ob-
stacle behind the car with the aid of ultrasound sensors. The sensors are integra-
ted in the rear bumper.
Range of sensors
The clearance warning begins at a distance of about 160 cm from the obstacle
(area
A ⇒
fig. 85 ). The interval between the warning signals becomes shorter as
the clearance is reduced.
A continuous tone sounds from a distance of approx. 30 cm (area B ) - danger
area. You should not reverse any further after this signal sounds! If the vehicle is
equipped with a factory-fitted towing device, the indication threshold of the dan-
ger area starts - continuous tone
- 5 cm further behind the vehicle. The vehicle
can be extended through an installed detachable towing device.
On factory-fitted radio navigation systems and car stereos, the distance to the ob-
struction can also be shown graphically in the display. On vehicles with a factory-
fitted towing device, the rear sensors are deactivated when towing a trailer. The
driver is informed about this by a graphic display (vehicle towing a trailer) in the
radio or the radio navigation display. The factory-fitted radio or navigation system
can be set so that the play function volume decreases when activating the park-
ing aid, see Owner's Manual radio or radio navigation system. As a result, the sig-
nal tones from the parking aid can be better recognised.
Activating
The parking aid is activated automatically when reverse gear is engaged and the
ignition is turned on. This is confirmed by a brief audible signal.
Deactivating
The parking aid is deactivated by disengaging the reverse gear or by switching the
ignition off. £86
Starting-off and Driving
Page 113 of 220
How are seat belts correctly fastened?
Fastening three-point seat belts Fasten your seat belt before starting!
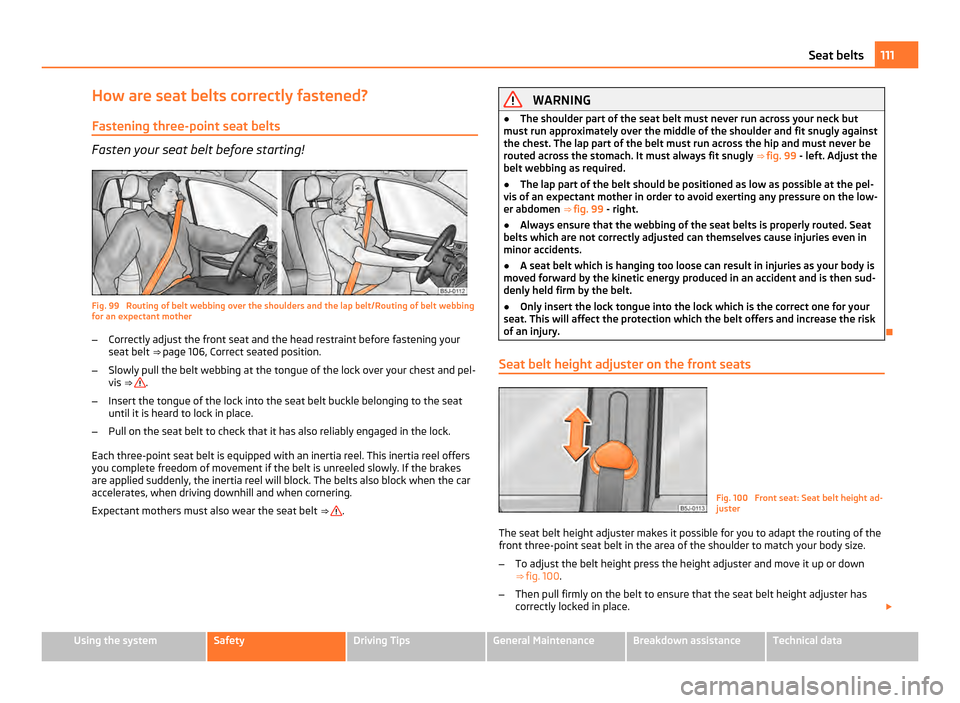
Fig. 99 Routing of belt webbing over the shoulders and the lap belt/Routing of belt webbing
for an expectant mother
–
Correctly adjust the front seat and the head restraint before fastening your
seat belt ⇒
page 106, Correct seated position
.
– Slowly pull the belt webbing at the tongue of the lock over your chest and pel-
vis ⇒ .
– Insert the tongue of the lock into the seat belt buckle belonging to the seat
until it is heard to lock in place.
– Pull on the seat belt to check that it has also reliably engaged in the lock.
Each three-point seat belt is equipped with an inertia reel. This inertia reel offers
you complete freedom of movement if the belt is unreeled slowly. If the brakes
are applied suddenly, the inertia reel will block. The belts also block when the car
accelerates, when driving downhill and when cornering.
Expectant mothers must also wear the seat belt ⇒ . WARNING
● The shoulder part of the seat belt must never run across your neck but
must run approximately over the middle of the shoulder and fit snugly against
the chest. The lap part of the belt must run across the hip and must never be
routed across the stomach. It must always fit snugly ⇒ fig. 99
- left. Adjust the
belt webbing as required.
● The lap part of the belt should be positioned as low as possible at the pel-
vis of an expectant mother in order to avoid exerting any pressure on the low-
er abdomen ⇒ fig. 99 - right.
● Always ensure that the webbing of the seat belts is properly routed. Seat
belts which are not correctly adjusted can themselves cause injuries even in
minor accidents.
● A seat belt which is hanging too loose can result in injuries as your body is
moved forward by the kinetic energy produced in an accident and is then sud-
denly held firm by the belt.
● Only insert the lock tongue into the lock which is the correct one for your
seat. This will affect the protection which the belt offers and increase the risk
of an injury.
Seat belt height adjuster on the front seats Fig. 100 Front seat: Seat belt height ad-
juster
The seat belt height adjuster makes it possible for you to adapt the routing of the
front three-point seat belt in the area of the shoulder to match your body size.
– To adjust the belt height press the height adjuster and move it up or down
⇒ fig. 100 .
– Then pull firmly on the belt to ensure that the seat belt height adjuster has
correctly locked in place. £ 111
Seat belts Using the system Safety Driving Tips General Maintenance Breakdown assistance Technical data
Page 130 of 220
Driving Tips
Intelligent Technology Electronic stability programme (ESP)
General General
The ESP aids you in maintaining control of your vehicle in situations in which the
vehicle is driving at its dynamic limits, such as entering a curve fast. The risk of
skidding is reduced and your car thus offers greater driving stability depending on
the conditions of the road surface. The system operates at all speeds.
The following systems are integrated into the electronic stability programme:
●
Electronic Differential Lock (EDL),
● Traction control system (TCS),
● Antilock brake system (ABS),
● Brake Assist,
● Uphill Start Assist.
Operating principle
The ESP switches on automatically when the engine is started and then conducts
a self-test. The ESP control unit processes data from the individual systems. It al-
so processes additional measurement data which are supplied by highly sensitive
sensors: the rotational velocity of the vehicle about its vertical axis, the lateral ac-
celeration of the vehicle, the braking pressure and the steering angle.
The direction which the driver wishes to take is determined based on the steering
angle and the speed of the vehicle and is constantly compared with the actual be-
haviour of the vehicle. If differences exist, such as the car beginning to skid, the
ESP will automatically brake the appropriate wheel.
The car is stabilised again by the forces which take effect when the wheel is
braked. Intervention into the brake system takes place primarily on the outer front
wheel of a vehicle which tends to oversteer (tendency for the rear of the vehicle
to break away) while occurs this is on the inner rear wheel of a vehicle which
tends to understeer (tendency to shift out of the curve). This braking control cycle
is accompanied by noises. During an intervention of the system, the warning light
flashes quickly in the
instrument cluster.
The ESP system cannot be switched off, only the TCS system can be switched off
by pressing the button ⇒ fig. 118 . The warning light
⇒ page 24 lights up if the
TCS system is switched off.
The warning light lights up permanently if there is a fault in the ESP system.
The fact that the ESP system operates together with the ABS means that the ESP
warning light will also come on if the ABS system is not operating properly.
If the warning light comes on immediately after starting the engine, the ESP
system can be switched off for technical reasons. In this case, the ESP system can
be switched on again by switching the ignition on and off. If the warning light
goes out, the ESP system is fully functional again. WARNING
It is also not possible for the ESP to overcome the physical limits of the vehi-
cle. Even if a vehicle fitted with ESP you should still always adapt your style of
driving to the condition of the road surface and the traffic situation. This par-
ticularly applies when driving on slippery and wet roads. The increased safety
offered must not tempt you to take greater risks than otherwise - risk of an
accident! Note
● All four wheels must be fitted with the same tyres in order to achieve prob-
lem-free operation of the ESP. Differing rolling circumferences of the tyres can
lead to an undesirable reduction in the engine output.
● Changes to vehicle (e.g. on engine, on the brakes, on chassis or another combi-
nation of tyres and wheels) can influence the function of the ESP ⇒ page 169,
Accessories, changes and replacement of parts
.128
Intelligent Technology
Page 131 of 220
Electronic Differential Lock (EDL and XDL)
The electronic differential lock prevents an individual wheel from
slipping.
Models fitted with ESP are equipped with electronic differential lock (EDL).
General
The EDL makes it much easier, and sometimes at all possible, to start off, acceler-
ate and climb a steep hill when the conditions of the road surface are unfavoura-
ble.
Operating principle
The EDL is activated automatically, that is without any action on the part of the
driver. It monitors the speeds of the driven wheels with the aid of the ABS sen-
sors. Should only
one drive wheel begin spinning on a slippery surface there will
be an appreciable difference in the speed of the driven wheels. The EDL function
brakes the slipping wheel and the differential transmits a greater driving force to
the other driven wheel. This control process is also accompanied by noises.
Overheating of the brakes
The EDL switches off automatically if unusually severe stresses exist in order to
avoid excessive heat generation in the disc brake on the wheel which is being
braked. The vehicle can continue to be driven and has the same characteristics as
a vehicle not fitted with EDL.
The EDL switches on again automatically as soon as the brake has cooled down.
XDL function (Fabia RS and Fabia Combi RS only)
The XDL function is an extension to the electronic differential lock. The XDL func-
tion does not respond to traction, but to the relief of the inner front wheel during
fast cornering. An active brake intervention on the brake of the inner wheel pre-
vents it from spinning. Thus, the traction is improved and the vehicle continues to
follow the desired track. WARNING
● Depress the accelerator carefully when accelerating on uniformly slippery
road surfaces, such as ice and snow. The driven wheels might still spin despite
the EDL and affect the stability of the vehicle - risk of an accident!
● You should always adapt your style of driving to the condition of road sur-
face and to the traffic situation even when your vehicle is fitted with EDL. The
increased safety offered must not tempt you to take greater risks than other-
wise - risk of an accident! Note
● If the ABS or ASR or, where applicable, ESP indicator light lights up, the EDl
may have a fault. Have the vehicle inspected by your specialist garage as soon as
you can.
● Changes to vehicle (e.g. on engine, on the brakes, on chassis or another combi-
nation of tyres and wheels) can influence the function of the EDL ⇒
page 169
,
Accessories, changes and replacement of parts.
Traction control system (TCS) The traction control system prevents the driven wheels from spin-
ning when accelerating.
Fig. 118 TCS switch
General
The TCS makes it much easier, and sometimes at all possible, to start off, acceler-
ate and climb a steep hill when the conditions of the road surface are unfavoura-
ble. £ 129
Intelligent Technology Using the system Safety Driving Tips General Maintenance Breakdown assistance Technical data
Page 132 of 220
Operating principle
The TCS switches on automatically when the engine is started and then conducts
a self-test. The system monitors the speeds of the driven wheels with the aid of
the ABS sensors. If the wheels are spinning, the force transmitted to the road sur-
face is automatically adapted by reducing the engine speed. The system operates
at all speeds.
The TCS operates in combination with the ABS
⇒ page 131, Antilock brake system
(ABS)
. The TCS will not function if a fault exists in the ABS system.
The TCS warning light lights up in the instrument cluster when there is a fault on
the TCS ⇒ page 24.
During an intervention of the system, the TCS warning light flashes in the in-
strument cluster ⇒ page 25.
Switching off
You can switch the TCS off and on again as you wish by pressing the button
⇒ fig. 118 . The TCS warning light lights up in the instrument cluster when the TCS
is switched off ⇒ page 24.
The TCS should normally always be switched on. It may be good practice in certain
exceptional cases, such as when you wish to have wheel slip, to switch off the
system.
Examples:
● when driving with snow chains,
● when driving in deep snow or on a loose surface,
● when it is necessary to rock a car free when it has become stuck.
then you should switch on the TCS again. WARNING
You should always adjust your style of driving to the conditions of the road
surface and the traffic situation. The increased safety offered must not tempt
you to take greater risks than otherwise - risk of an accident! Note
● All four wheels must be fitted with the same tyres in order to achieve prob-
lem-free operation of the TCS. Differing rolling circumferences of the tyres can
lead to an undesirable reduction in the engine output.
● Changes to vehicle (e.g. on engine, on the brakes, on chassis or another combi-
nation of tyres and wheels) can influence the function of the TCS ⇒ page 169
,
Accessories, changes and replacement of parts.
Brakes What has a negative effect on braking efficiency?
Wear-and-tear
Wear-and-tear to the brake pads is greatly dependent on the operating conditions
of the vehicle and your style of driving. Particularly if you drive a great deal in
towns and over short distances or if you adopt a sporty style of driving, it may be
necessary to have the thickness of the brake pads inspected at a specialist garage
between the service inspections.
Wet roads or road salt
There may be a certain delay before the brakes take full effect under certain con-
ditions such as when driving through water, during heavy rain showers or after
the vehicle has been washed in an automatic vehicle wash, since the brake discs
and brake pads may be moist or even have a coating of ice on them in winter. You
should dry the brakes as soon as possible by applying and releasing the brakes
several times.
There also may be a certain delay before the full braking efficiency is available
when driving on roads which have been treated with road salt if you have not
used the brakes for some considerable time beforehand. The layer of salt on the
brake discs and brake pads must first be rubbed off when you apply the brakes.
Corrosion
Corrosion on the brake discs and dirt on the bake pads occur if the vehicle has
been parked for a long period and if you do not make much use of the braking sys-
tem.
We recommend cleaning the brake discs by firmly applying the brakes at a fairly
high speed if you do not make much use of the braking system or if surface corro-
sion is present ⇒ .
£130
Intelligent Technology
Page 133 of 220
Faults in the brake surface
If you notice that the braking distance has suddenly become longer and that the
brake pedal can be depressed further, it is possible that a brake circuit of the dual-
circuit brake system has failed. Drive, in such cases, to the nearest specialist ga-
rage without delay in order to have the problem rectified. Drive at a reduced
speed while on your way to the dealer and adapt your style of driving to the high-
er brake pedal pressure required.
Low brake fluid level
An insufficient level of brake fluid may result in problems in the brake system. The
level of the brake fluid is monitored electronically
⇒ page 26, Brake system .WARNING
● Only apply the brakes for the purpose of drying and cleaning the brake
discs if the traffic conditions permit this. Do not place any other road users in
jeopardy.
● When retrospectively mounting a front spoiler, solid wheel hubs etc. one
must ensure that the air supply to the front wheel brakes is not reduced oth-
erwise the braking system could run too hot.
● Allow for the fact that new brake pads do not achieve their full braking ef-
ficiency until approximately 200 kilometres. New brake pads must be first
“run in ”
before they develop their optimal friction force. You can, however,
compensate for this slightly reduced braking force by increasing the pressure
on the brake pedal. This guideline also applies to any new brake pads installed
at a future date. CAUTION
● Never allow the brakes to rub by applying slight pressure if you do not wish to
brake the vehicle. This causes the brakes to overheat and can also result in a lon-
ger braking distance and excessive wear.
● Before negotiating a steep downhill section, please reduce your speed, shift
down into the next lower gear (manual gearbox) or select a lower driving stage
(automatic gearbox). This enables you to make full use of the braking power of
the vehicle and reduces the strain on the brakes. Any additional braking should be
done intermittently, not continuously. Note
The brake light flashes automatically in case of an emergency braking at speeds
greater than 60 km/h or with the intervention of the ABS, which lasts longer than
1.5 seconds. After the speed was reduced below 10 km/h or the vehicle was stop-
ped, the brake light stops flashing and the hazard warning light system switches
on. The hazard warning light system is switched off automatically after accelerat-
ing or driving off again.
Brake booster The brake booster boosts the pressure which you generate with the brake pedal.
The necessary pressure is only generated when the engine is running.
WARNING
● Never switch off the engine before the vehicle is stationary.
● The brake booster only operates when the engine is running. Greater
physical effort for braking is required when engine is switched off. Because if
you do not stop as normal, this can cause an accident and severe injuries.
● While stopping or braking with a vehicle with a petrol engine and manual
transmission in the low rev range, press down on the clutch pedal. If you fail
to do so, the result may be an impairment of the function of the power brake.
You will apply a greater force to the brake pedal which you are usde to - dan-
ger of accident!
Antilock brake system (ABS) ABS prevents the wheels locking when braking.
General
The ABS contributes significantly to enhancing the active safety of your vehicle.
Compared to a car not fitted with the ABS brake system, you are able to retain op-
timal steering ability even during a full brake application on a slippery road surface
because the wheels do not lock up.
You must not expect, however, that the braking distance will be shorter under all
circumstances as a result of the ABS. The braking distance for example on gravel
and fresh snow, when you should anyway be driving slowly and cautiously, will be
longer. £ 131
Intelligent Technology Using the system Safety Driving Tips General Maintenance Breakdown assistance Technical data