key SKODA FABIA 2014 2.G / 5J Owner's Guide
[x] Cancel search | Manufacturer: SKODA, Model Year: 2014, Model line: FABIA, Model: SKODA FABIA 2014 2.G / 5JPages: 197, PDF Size: 13.56 MB
Page 125 of 197

The key is removed.
The cap 3
is on the lock of the operating lever.
The ball head does not come out of the mounting recess even after heavy
“shaking”.WARNINGDo not use the towing equipment unless the ball head was properly locked.
Removing the ball head
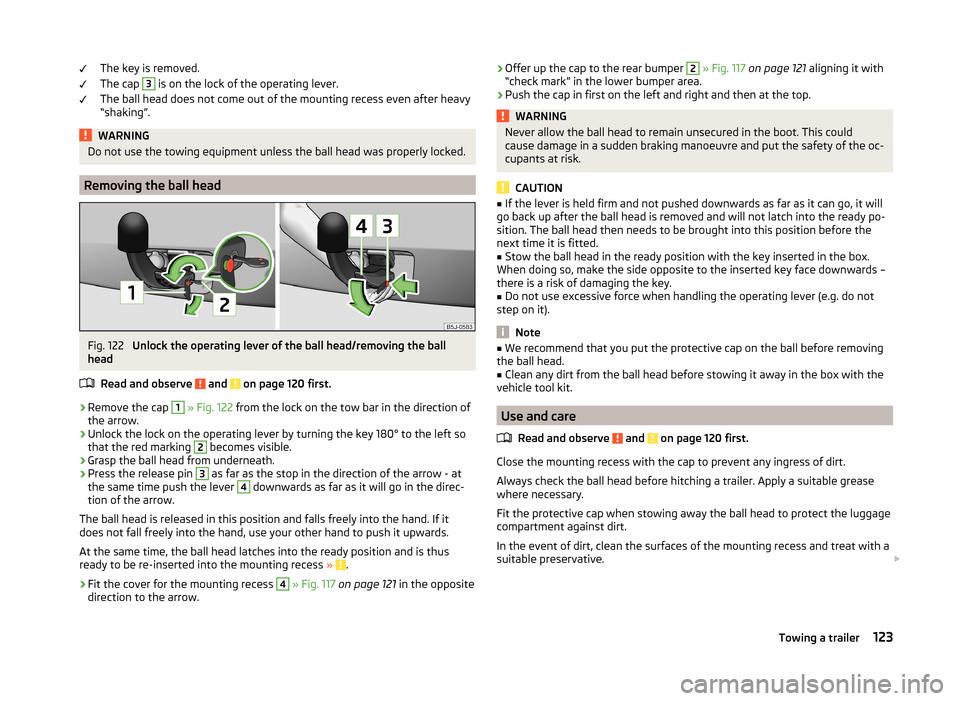
Fig. 122
Unlock the operating lever of the ball head/removing the ball
head
Read and observe
and on page 120 first.
›
Remove the cap
1
» Fig. 122 from the lock on the tow bar in the direction of
the arrow.
›
Unlock the lock on the operating lever by turning the key 180° to the left so
that the red marking
2
becomes visible.
›
Grasp the ball head from underneath.
›
Press the release pin
3
as far as the stop in the direction of the arrow - at
the same time push the lever
4
downwards as far as it will go in the direc-
tion of the arrow.
The ball head is released in this position and falls freely into the hand. If it
does not fall freely into the hand, use your other hand to push it upwards.
At the same time, the ball head latches into the ready position and is thus
ready to be re-inserted into the mounting recess »
.
›
Fit the cover for the mounting recess
4
» Fig. 117 on page 121 in the opposite
direction to the arrow.
›
Offer up the cap to the rear bumper 2
» Fig. 117 on page 121 aligning it with
“check mark” in the lower bumper area.›
Push the cap in first on the left and right and then at the top.
WARNINGNever allow the ball head to remain unsecured in the boot. This could
cause damage in a sudden braking manoeuvre and put the safety of the oc- cupants at risk.
CAUTION
■ If the lever is held firm and not pushed downwards as far as it can go, it will
go back up after the ball head is removed and will not latch into the ready po-
sition. The ball head then needs to be brought into this position before the
next time it is fitted.■
Stow the ball head in the ready position with the key inserted in the box.
When doing so, make the side opposite to the inserted key face downwards –
there is a risk of damaging the key.
■
Do not use excessive force when handling the operating lever (e.g. do not
step on it).
Note
■ We recommend that you put the protective cap on the ball before removing
the ball head.■
Clean any dirt from the ball head before stowing it away in the box with the
vehicle tool kit.
Use and care
Read and observe
and on page 120 first.
Close the mounting recess with the cap to prevent any ingress of dirt.
Always check the ball head before hitching a trailer. Apply a suitable grease where necessary.
Fit the protective cap when stowing away the ball head to protect the luggage
compartment against dirt.
In the event of dirt, clean the surfaces of the mounting recess and treat with a
suitable preservative.
123Towing a trailer
Page 127 of 197

On downhill sections shift down a gear in good time to also use the engine as
a brake.
Engine overheating
The speed must be reduced immediately if the needle for the coolant tempera-
ture gauge moves into the right-hand area or the red area of the scale.
Stop and switch off the engine if the warning light
in the instrument cluster
starts to flash. Wait a few minutes and check the level of coolant » page 144,
Checking the coolant level .
The following guidelines must be observed » page 37,
Coolant .
The coolant temperature can be reduced by switching on the heating.WARNING■ Adapt your speed to the conditions of the road surface and to the traffic
situation.■
Improper or incorrectly connected electric cables can energise the trailer
and cause functional faults to the vehicle's entire electrical system as well
as accidents and severe injuries.
■
Work on the electrical system must only be carried out by specialist ga-
rages.
■
Never directly connect the trailer's electrical system with the electrical
connections for the tail lights or other current sources.
Note
■ After coupling the trailer and connecting up the power socket, check the rear
lights on the trailer to ensure they work.■
If there is an error in the trailer lighting system, check the fuses in the fuse
box in the dashboard » page 168.
■
If you tow a trailer frequently, you should also have your car inspected be-
tween service intervals.
■
The handbrake on the towing vehicle must be applied when coupling and un-
coupling the trailer.
Anti-theft alarm system
Read and observe
on page 124 first.
When the vehicle is locked, the alarm is activated as soon as the electrical con-
nection to the trailer is interrupted.
Always switch off the anti-theft alarm system before a trailer is coupled or un-
coupled » page 49 .
Conditions for including a trailer in the anti-theft alarm system. The vehicle is factory-fitted with an anti-theft alarm system and towing
equipment.
The trailer is electrically connected to the towing vehicle by means of the
trailer socket.
The electrical system of the vehicle and trailer is functional.
The vehicle is locked with the vehicle key and the anti-theft alarm system is activated.
Note
For technical reasons, trailers with rear LED lights cannot be connected to the
anti-theft alarm system.125Towing a trailer
Page 138 of 197

RefuellingFig. 123
Open tank lid / tank cap
Read and observe
and on page 135 first.
Open fuel filler flap
›
Open the fuel filler flap with one hand » Fig. 123 -
.
›
Hold the fuel filler cap on the fuel filler tube with one hand and unlock it by
moving it to the left with the vehicle key.
›
Unscrew the filler cap by turning it anticlockwise and clip the cap on the top
of the fuel filler flap » Fig. 123 -
.
Closing the filler cap
›
Turn the filler cap to the right until it clicks into place.
›
Hold the fuel filler cap on the fuel filler tube with one hand and lock it by
turning the vehicle key to the right and remove the key.
›
Close the filler cap.
CAUTION
■ Before refuelling it is necessary to switch off the auxiliary heating system
(auxiliary heating and ventilation).■
The fuel tank is full just as soon as the pump nozzle switches off for the first
time, provided the nozzle has been operated properly. Do not continue filling
the fuel tank otherwise the expansion volume is filled up.
Note
The fuel tank has a capacity of about 45 litres, including a reserve of approx.
7 litres .Unleaded petrol
Read and observe
and on page 135 first.
The vehicle can only be operated with unleaded petrol in compliance with the
EN 228 1)
standard.
All petrol engines can be operated using petrol with a maximum of 10% bioe-
thanol (E10).
Specified fuel - unleaded petrol 95/91 or 92 or 93 RON
Use unleaded fuel with an octane rating of 95 RON. Unleaded petrol with the
octane ratings 91, 92 or 93 RON can also be used, but may result in a slight
loss in performance.
Prescribed fuel - unleaded petrol min. 95 RON
Use unleaded fuel with an octane rating of 95 RON or higher.
In an emergency, if unleaded petrol with an octane rating of 95 RON is not
available, you may refuel with petrol with an octane rating of 91, 92 or 93
RON »
.
Prescribed fuel - unleaded petrol 98/(95) RON
Use unleaded fuel with an octane rating of 98 RON or higher. Unleaded petrol
95 RON can also be used but results in a slight loss in performance.
In an emergency, if unleaded petrol with an octane rating of 98 RON or 95 RON
is not available, you may refuel with petrol with an octane rating of 91 or 92 or
93 RON »
.
Fuel additives
Unleaded petrol complying with EN 228 1)
meets all the conditions for a
smooth-running engine. We therefore recommend that no fuel additives are
used. This can result in considerable damage to parts of the engine or the ex-
haust system.
1)
In Germany also DIN 51626-1 or E10 for unleaded petrol with octane rating 95 or 91 or DIN 51626-2 or E5
for unleaded petrol with octane rating 95 or 98.
136General Maintenance
Page 140 of 197

CAUTION■The vehicle cannot be operated with biofuel RME, therefore this fuel must
not be filled in the tank and used for driving the vehicle. The use of biofuel
RME can cause considerable damage to parts of the engine or fuel system.■
Do not mix any fuel additives, so-called “flow improvers” (petrol and similar
agents), into the diesel. This can result in considerable damage to parts of the
engine or the exhaust system!
Engine compartment
Introduction
This chapter contains information on the following subjects:
Opening and closing the bonnet
139
Engine compartment overview
140
Radiator fan
140
Windscreen washer system
140WARNINGWhen working in the engine compartment, injuries, scalding, accident or
fire hazards may arise. For this reason, it is essential to comply with the
warning instructions stated below and with the generally applicable rules
of safety. The engine compartment of your car is a hazardous area.WARNINGInstructions before beginning work in the engine compartment■Turn off the engine and withdraw the ignition key.■
Firmly apply the handbrake.
■
If the vehicle is fitted with a manual gearbox, move the gearshift lever in-
to Neutral, or if the vehicle is fitted with an automatic gearbox, move the
selector lever into position P.
■
Allow the engine to cool.
■
Never open the bonnet if you can see steam or coolant flowing out of the
engine compartment – there is a risk of scalding. Wait until the steam or
coolant has stopped escaping.
WARNINGInformation for working in the engine room■Keep all people, especially children, away from the engine compartment.■
Never touch the radiator fan while the engine is still warm. The fan might
suddenly start running!
■
Do not touch any hot engine parts – there is a risk of burns.
■
The coolant is harmful to health.
■
Avoid contact with the coolant.
■
Coolant vapours are harmful to health.
■
Never open the end cover of the coolant expansion reservoir while the
engine is still warm. The cooling system is pressurized!
■
When opening the end cover of the coolant expansion reservoir, cover it
with a cloth to protect your face, hands and arms from hot steam or hot
coolant.
■
If any coolant splashes into your eyes, immediately rinse out your eyes
with clear water and contact a doctor as soon as possible.
■
Always keep the coolant in the original container safe from people who
are not completely independent, especially children - there is a danger of
poisoning!
■
Consult a doctor immediately if coolant is swallowed.
■
Do not leave any items (e.g. cleaning cloths or tools) in the engine com-
partment. There is a fire hazard and the risk of engine damage.
■
Never spill fluids on the hot engine. Such fluids (e.g. the antifreeze con-
tained in the coolant) may ignite!
WARNINGInformation for working in the engine compartment with the engine run-
ning■
Pay particular attention to moving engine parts (e.g. V-ribbed belt, alter-
nator, radiator fan) and the high-voltage ignition unit – there is a risk of
death.
■
Never touch the electric wiring on the ignition system.
■
Avoid short circuits in the electrical system - particularly on the vehicle's
battery.
■
Always make sure that no jewellery, loose clothing or long hair can get
caught in rotating engine parts – there is a risk of death. Always remove
any jewellery, tie back long hair and wear tight fitting clothing before com-
pleting any work.
138General Maintenance
Page 191 of 197

Maximum speed179
MDI99
Mirror Exterior mirrors
64
Manually dimmed rear-view mirror64
Vanity61
Mobile phone92
Connecting to the hands-free system95
Modes of the automatic transmission105
Modifications126
Multifunction display Functions
29
Memory29
Operation30
Multimedia98
N
N1
69
nameplate176
Net partition73
Behind the front seats74
Behind the rear seats73
Removing and refitting the housing74
O
Oil see Engine oil
142
Oil pressure Display messages
36
Onboard computer see Multifunction display
29
Operating weight176
Operation in winter Diesel fuel
137
Vehicle battery147
Outside temperature30
Overview Engine compartment
140
warning lights35
P
Paintwork See Caring for paintwork
130
Parking Parking aid
116
Parking lights56
Part replacement126
Passive safety Before every journey
6
Driving safety6
Safety equipment6
Passive Safety6
Payload176
Pedals104
Footmats104
Petrol refer to Fuel
136
Polishing the paintwork See Vehicle care
130
Power window force limiter53
R
Radiator fan
140
Radio reception See windows
131
Raise vehicle161
Rear-view mirror Exterior mirrors
64
Manually dimmed rear-view mirror64
Rear fog light58
Rear window - Heating61
Recirculated air mode Manual air conditioning
89
Recommended gear28
Refuelling136
Fuel136
Remote control48
Synchronisation process49
Remote control key Replacing the battery43
Repairs and technical alterations126
Replacing Vehicle battery
148
Windscreen wiper blades63
Replenishing Coolant
144
Engine oil143
Windscreen washer fluid140
Rims149
Roof luggage rack Attachment points
77
Roof rack system76
Roof load77
Running-in the first 1500 km
108
Running in Brake pads
109
Engine108
Tyres109
S
SAFE see Safe securing
46
SAFELOCK see Safe securing
46
Safe securing46
Safety6
Child safety19
Child safety seats19
Correct seated position7
Head restraints68
ISOFIX22
TOP TETHER23
Save electricity109
Seals Vehicle care
130
189Index
Page 193 of 197

TransportBoot68
Roof rack system76
Transporting children safely19
Turn signals57
Two-way radio systems92
Tyre load-bearing capacity see Wheels
152
Tyre pressure monitor Setting
154
Tyre repair Check pressure
164
Preparations163
Sealing and inflating the tyre164
Tyres149
Pressure151
Sizes151
Wear indicator151
U
Underbody protection
132
Underbody waxing132
Unleaded petrol113
unlock Central locking system
47
Unlocking Remote control
48
without central locking45
Unlocking and locking42
USB99
Useful equipment77
12-volt power outlet79
Ashtray78
Car park ticket holder80
Cigarette lighter79
Clothes hood80
Cupholders78
Using the selector lever105
V
Variable loading floor
72
Dividing the luggage compartment72
Removing and refitting72
Vehicle battery Automatic load deactivation
149
Charging148
Checking the battery electrolyte level147
Cover147
Disconnecting and reconnecting148
Operation in winter147
Replacing148
Safety instructions145
Vehicle care Alcantara
134
Care of the interior132
Decorative films131
Fabrics134
Polishing130
Rubber seals130
Seat covers134
Synthetic leather134
Underbody waxing132
Vehicle exterior care129
Waxing130
Vehicle data sticker176
Vehicle dimensions178
Vehicle Identification Number (VIN)176
Vehicle key42
Vehicle status see Auto Check Control
34
Vehicle tool kit159
Visors61
W
Warning lights
35
Warning symbols see warning lights
35
Warning triangle158
Washing126
Automatic car wash system129
by hand128
Chrome parts130
High-pressure cleaner129
Water Driving through
112
Waxing See Vehicle care
130
Wheel bolts Anti-theft wheel bolt
162
Caps156
Loosening and tightening161
Wheels Back-up wheel
155
Bolts156
Changing159
Full trim156
General information149
Load index152
Snow chains157
Spare wheel155
Speed symbol152
Storing wheels151
Swapping wheels around151
Tire size152
Tyre pressure151
Tyre service life151
Tyre wear indicator151
Unidirectional tyres154
Wheel sizes151
Winter tyres156
Window convenience operation53
Windows131
Deicing131
See Electrical power windows51
Window wipers Replacing the rear window wiper blade
63
Windscreen Deicing
131
191Index