lock SKODA FABIA 2014 2.G / 5J Manual PDF
[x] Cancel search | Manufacturer: SKODA, Model Year: 2014, Model line: FABIA, Model: SKODA FABIA 2014 2.G / 5JPages: 197, PDF Size: 13.56 MB
Page 168 of 197
Negative cable - colour coding in the majority of cases is black.
Jump-starting in vehicles with the START-STOP system
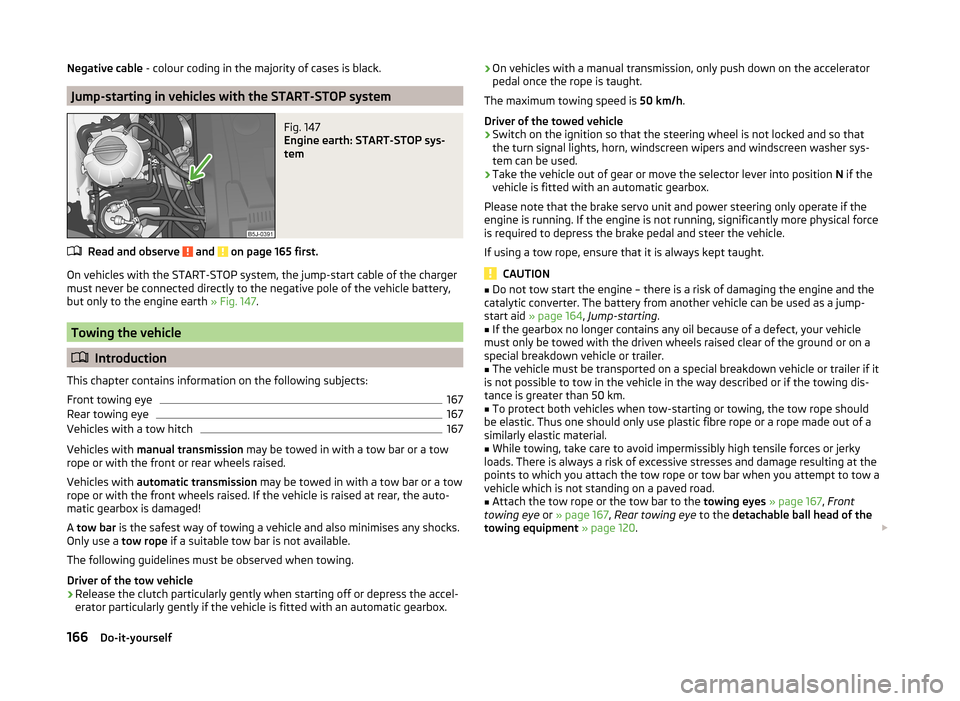
Fig. 147
Engine earth: START-STOP sys-
tem
Read and observe and on page 165 first.
On vehicles with the START-STOP system, the jump-start cable of the charger
must never be connected directly to the negative pole of the vehicle battery,
but only to the engine earth » Fig. 147.
Towing the vehicle
Introduction
This chapter contains information on the following subjects:
Front towing eye
167
Rear towing eye
167
Vehicles with a tow hitch
167
Vehicles with manual transmission may be towed in with a tow bar or a tow
rope or with the front or rear wheels raised.
Vehicles with automatic transmission may be towed in with a tow bar or a tow
rope or with the front wheels raised. If the vehicle is raised at rear, the auto-
matic gearbox is damaged!
A tow bar is the safest way of towing a vehicle and also minimises any shocks.
Only use a tow rope if a suitable tow bar is not available.
The following guidelines must be observed when towing.
Driver of the tow vehicle
›
Release the clutch particularly gently when starting off or depress the accel-
erator particularly gently if the vehicle is fitted with an automatic gearbox.
› On vehicles with a manual transmission, only push down on the accelerator
pedal once the rope is taught.
The maximum towing speed is 50 km/h.
Driver of the towed vehicle›
Switch on the ignition so that the steering wheel is not locked and so that
the turn signal lights, horn, windscreen wipers and windscreen washer sys-
tem can be used.
›
Take the vehicle out of gear or move the selector lever into position N if the
vehicle is fitted with an automatic gearbox.
Please note that the brake servo unit and power steering only operate if the
engine is running. If the engine is not running, significantly more physical force
is required to depress the brake pedal and steer the vehicle.
If using a tow rope, ensure that it is always kept taught.
CAUTION
■ Do not tow start the engine – there is a risk of damaging the engine and the
catalytic converter. The battery from another vehicle can be used as a jump-
start aid » page 164 , Jump-starting .■
If the gearbox no longer contains any oil because of a defect, your vehicle
must only be towed with the driven wheels raised clear of the ground or on a
special breakdown vehicle or trailer.
■
The vehicle must be transported on a special breakdown vehicle or trailer if it
is not possible to tow in the vehicle in the way described or if the towing dis-
tance is greater than 50 km.
■
To protect both vehicles when tow-starting or towing, the tow rope should
be elastic. Thus one should only use plastic fibre rope or a rope made out of a
similarly elastic material.
■
While towing, take care to avoid impermissibly high tensile forces or jerky
loads. There is always a risk of excessive stresses and damage resulting at the
points to which you attach the tow rope or tow bar when you attempt to tow a
vehicle which is not standing on a paved road.
■
Attach the tow rope or the tow bar to the towing eyes » page 167 , Front
towing eye or » page 167 , Rear towing eye to the detachable ball head of the
towing equipment » page 120 .
166Do-it-yourself
Page 169 of 197
Note■We recommend using a tow rope from ŠKODA Original Accessories available
from a ŠKODA Partner.■
Towing another vehicle requires a certain amount of practice. Both drivers
should be familiar with the particular points about towing a vehicle. Unskilled
drivers should not attempt to tow in another vehicle or to be towed in.
■
When towing, respect the national legal provisions, especially those which
relate to the identification of the towing vehicle and the vehicle being towed.
■
The tow rope must not be twisted as it may in certain circumstances result in
the front towing eye being unscrewed out of your vehicle.
Front towing eye
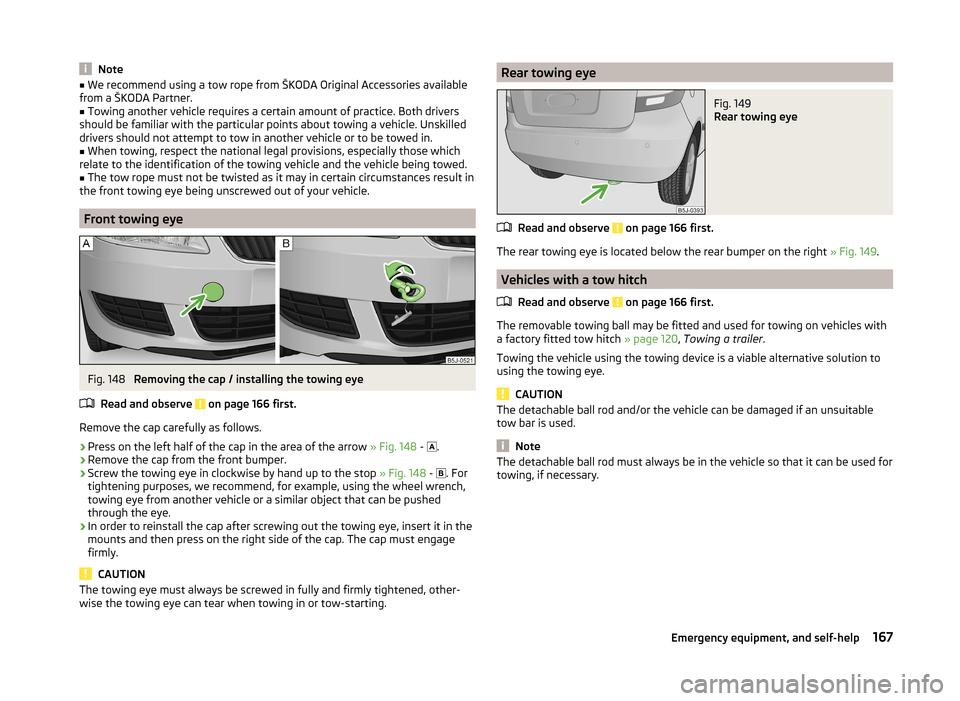
Fig. 148
Removing the cap / installing the towing eye
Read and observe
on page 166 first.
Remove the cap carefully as follows.
›
Press on the left half of the cap in the area of the arrow » Fig. 148 -
.
›
Remove the cap from the front bumper.
›
Screw the towing eye in clockwise by hand up to the stop
» Fig. 148 -
. For
tightening purposes, we recommend, for example, using the wheel wrench,
towing eye from another vehicle or a similar object that can be pushed
through the eye.
›
In order to reinstall the cap after screwing out the towing eye, insert it in the
mounts and then press on the right side of the cap. The cap must engage
firmly.
CAUTION
The towing eye must always be screwed in fully and firmly tightened, other-
wise the towing eye can tear when towing in or tow-starting.Rear towing eyeFig. 149
Rear towing eye
Read and observe on page 166 first.
The rear towing eye is located below the rear bumper on the right » Fig. 149.
Vehicles with a tow hitch
Read and observe
on page 166 first.
The removable towing ball may be fitted and used for towing on vehicles with
a factory fitted tow hitch » page 120, Towing a trailer .
Towing the vehicle using the towing device is a viable alternative solution to
using the towing eye.
CAUTION
The detachable ball rod and/or the vehicle can be damaged if an unsuitable
tow bar is used.
Note
The detachable ball rod must always be in the vehicle so that it can be used for
towing, if necessary.167Emergency equipment, and self-help
Page 174 of 197
›Remove the connector from the bulb, unlock the securing clip and remove
the bulb » Fig. 155 .›
Insert a new light bulb in such a way that the fixing lugs of the bulb socket fit
in the recesses of the reflector.
›
Lock the circlip and insert the connector in the bulb.
›
Fit the rubber cover
A
.
Changing the low beam and high beam bulb (halogen projector
headlights)
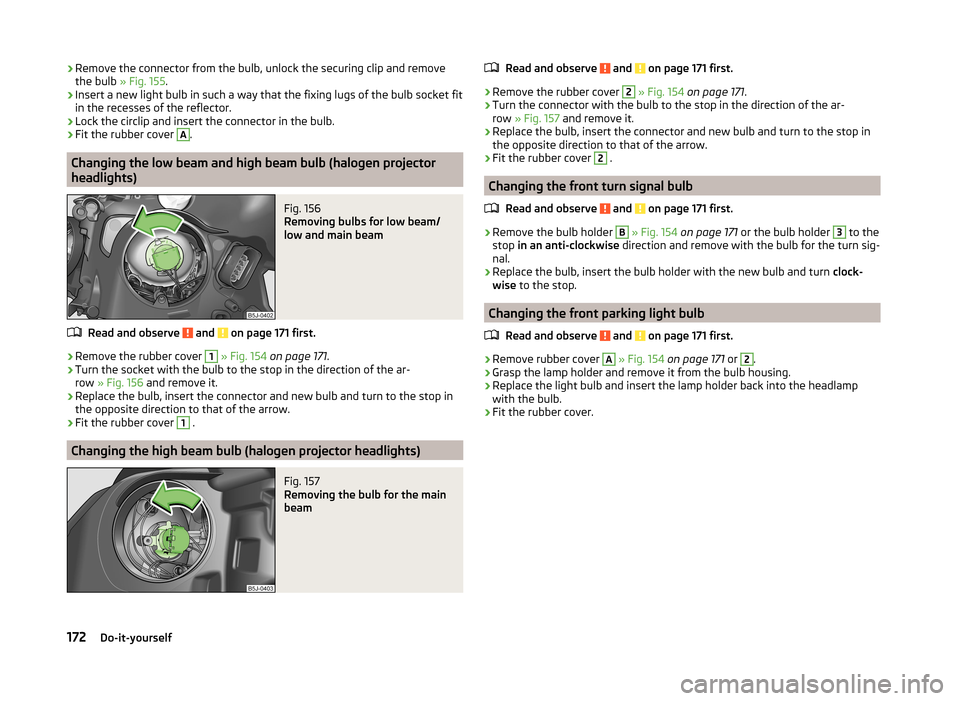
Fig. 156
Removing bulbs for low beam/
low and main beam
Read and observe and on page 171 first.
›
Remove the rubber cover
1
» Fig. 154 on page 171 .
›
Turn the socket with the bulb to the stop in the direction of the ar-
row » Fig. 156 and remove it.
›
Replace the bulb, insert the connector and new bulb and turn to the stop in
the opposite direction to that of the arrow.
›
Fit the rubber cover
1
.
Changing the high beam bulb (halogen projector headlights)
Fig. 157
Removing the bulb for the main
beam
Read and observe and on page 171 first.›
Remove the rubber cover
2
» Fig. 154 on page 171 .
›
Turn the connector with the bulb to the stop in the direction of the ar-
row » Fig. 157 and remove it.
›
Replace the bulb, insert the connector and new bulb and turn to the stop in
the opposite direction to that of the arrow.
›
Fit the rubber cover
2
.
Changing the front turn signal bulb
Read and observe
and on page 171 first.
›
Remove the bulb holder
B
» Fig. 154 on page 171 or the bulb holder
3
to the
stop in an anti-clockwise direction and remove with the bulb for the turn sig-
nal.
›
Replace the bulb, insert the bulb holder with the new bulb and turn clock-
wise to the stop.
Changing the front parking light bulb
Read and observe
and on page 171 first.
›
Remove rubber cover
A
» Fig. 154 on page 171 or
2
.
›
Grasp the lamp holder and remove it from the bulb housing.
›
Replace the light bulb and insert the lamp holder back into the headlamp
with the bulb.
›
Fit the rubber cover.
172Do-it-yourself
Page 175 of 197
Foglights and daytime running lightsFig. 158
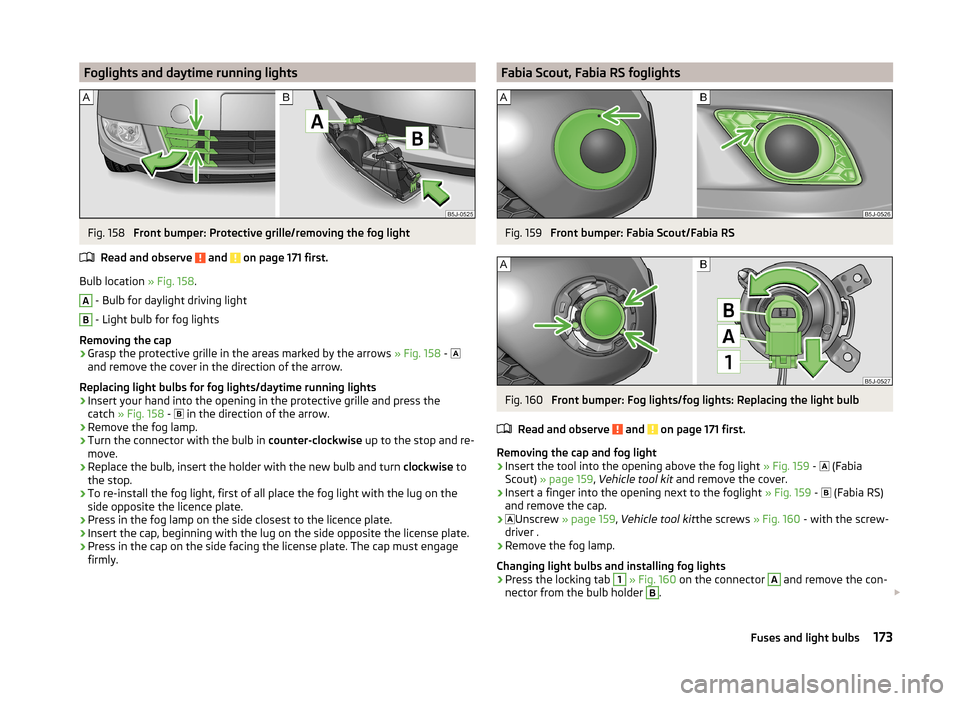
Front bumper: Protective grille/removing the fog light
Read and observe
and on page 171 first.
Bulb location » Fig. 158.
A
- Bulb for daylight driving light
B
- Light bulb for fog lights
Removing the cap
›
Grasp the protective grille in the areas marked by the arrows » Fig. 158 -
and remove the cover in the direction of the arrow.
Replacing light bulbs for fog lights/daytime running lights
›
Insert your hand into the opening in the protective grille and press the
catch » Fig. 158 -
in the direction of the arrow.
›
Remove the fog lamp.
›
Turn the connector with the bulb in
counter-clockwise up to the stop and re-
move.
›
Replace the bulb, insert the holder with the new bulb and turn clockwise to
the stop.
›
To re-install the fog light, first of all place the fog light with the lug on the
side opposite the licence plate.
›
Press in the fog lamp on the side closest to the licence plate.
›
Insert the cap, beginning with the lug on the side opposite the license plate.
›
Press in the cap on the side facing the license plate. The cap must engage
firmly.
Fabia Scout, Fabia RS foglightsFig. 159
Front bumper: Fabia Scout/Fabia RS
Fig. 160
Front bumper: Fog lights/fog lights: Replacing the light bulb
Read and observe
and on page 171 first.
Removing the cap and fog light
›
Insert the tool into the opening above the fog light » Fig. 159 -
(Fabia
Scout) » page 159 , Vehicle tool kit and remove the cover.
›
Insert a finger into the opening next to the foglight » Fig. 159 -
(Fabia RS)
and remove the cap.
›
Unscrew
» page 159 , Vehicle tool kit the screws » Fig. 160 - with the screw-
driver .
›
Remove the fog lamp.
Changing light bulbs and installing fog lights
›
Press the locking tab
1
» Fig. 160 on the connector
A
and remove the con-
nector from the bulb holder
B
.
173Fuses and light bulbs
Page 177 of 197

›To refit the rear light assembly, first insert screw A into the opening in the
bodywork » Fig. 162.›
Carefully press the tail light assembly into the bodywork so that the bolts
B
latch with the mounts in the body.
›
Hold the rear light assembly still with one hand and attach and tighten the
nuts » Fig. 162 -
with the other hand.
Replacing the bulbs in the tail lamp assembly
›
To replace the bulb, turn the bulb holder anti-clockwise to the stop and re-
move it from the housing » Fig. 163.
›
Replace the bulb, insert the holder with the bulb into the housing and turn in
a clockwise direction to the the stop.
Note
For slackening and tightening the plastic nut use a coin or similar object.175Fuses and light bulbs
Page 178 of 197
Technical data
Technical data
Vehicle data
Introduction
This chapter contains information on the following subjects:
Vehicle identification data
176
Operating weight and payload
176
measurement of fuel consumption and CO 2 emissions according to ECE
Regulations and EU Directives
177
Dimensions
178
Vehicle-specific details according to engine type
179
The details given in the vehicle's technical documentation always take prece-
dence over the details in the Owner's Manual.
The listed performance values were determined without performance-reduc- ing equipment, e.g. air conditioning system.
Vehicle identification data
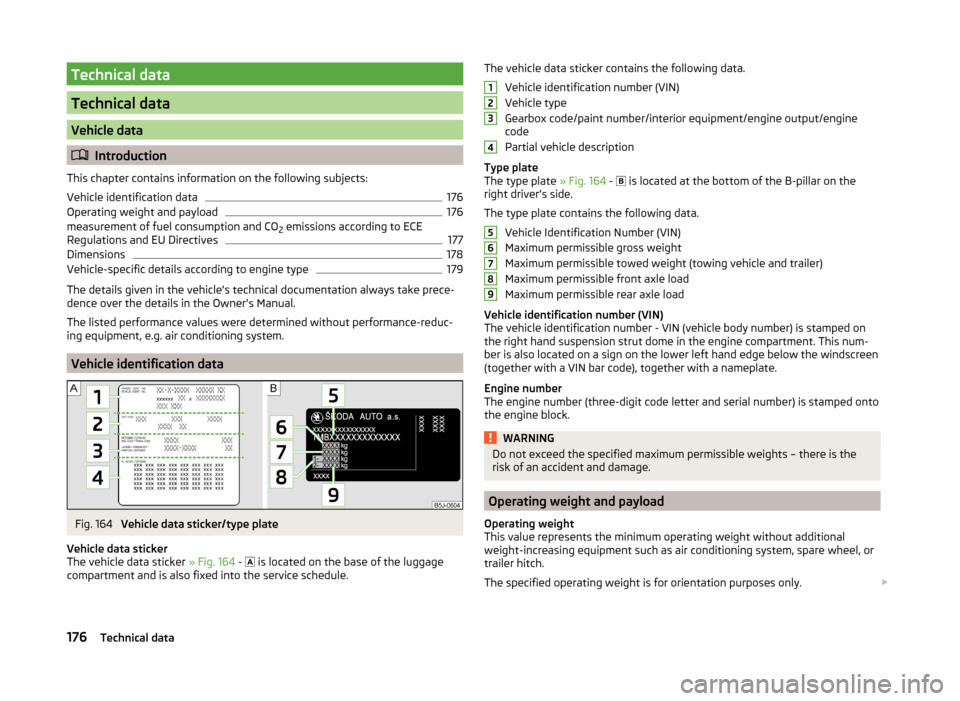
Fig. 164
Vehicle data sticker/type plate
Vehicle data sticker
The vehicle data sticker » Fig. 164 -
is located on the base of the luggage
compartment and is also fixed into the service schedule.
The vehicle data sticker contains the following data.
Vehicle identification number (VIN)
Vehicle type
Gearbox code/paint number/interior equipment/engine output/engine
code
Partial vehicle description
Type plate
The type plate » Fig. 164 -
is located at the bottom of the B-pillar on the
right driver's side.
The type plate contains the following data. Vehicle Identification Number (VIN)
Maximum permissible gross weight
Maximum permissible towed weight (towing vehicle and trailer)
Maximum permissible front axle load
Maximum permissible rear axle load
Vehicle identification number (VIN)
The vehicle identification number - VIN (vehicle body number) is stamped on
the right hand suspension strut dome in the engine compartment. This num-
ber is also located on a sign on the lower left hand edge below the windscreen
(together with a VIN bar code), together with a nameplate.
Engine number
The engine number (three-digit code letter and serial number) is stamped onto
the engine block.WARNINGDo not exceed the specified maximum permissible weights – there is the
risk of an accident and damage.
Operating weight and payload
Operating weight
This value represents the minimum operating weight without additional
weight-increasing equipment such as air conditioning system, spare wheel, or
trailer hitch.
The specified operating weight is for orientation purposes only.
123456789176Technical data
Page 187 of 197
Index
A
Abroad Driving abroad
113
Unleaded petrol113
ABS115
warning light38
Accessories126
Adjusting Belt height
13
Exterior mirrors64
Head restraints68
Steering wheel8
Adjusting the seats7
Adjustment Headlight beam
56
Seats65
Adjustments and technical changes Spoiler
127
Adjustments and technical modifications Airbags
127
Aerial129
See windows131
Airbag14
Adjustments and impairment of the airbag sys- tem
127
Deactivating18
Deployment14
Front airbag15
Head airbag17
Side airbag16
Switching off the front passenger airbag18
Airbag system14
Air conditioning Operation
88
Air conditioning system Air outlets85
Climatronic90
Manual air conditioning system87
Air outlets85
Alarm49
Anti-theft alarm system49
Operation49
Trailer125
Antilock Braking System115
Armrest83
Ashtray78
ASR115
warning light38
Assist systems ABS
38, 115
ASR38, 115
Cruise control system117
EDS and XDS115
ESC38, 114
Parking aid116
START-STOP118
Auto Check Control34
Automatic gearbox Selector lever-emergency unlocking
108
Starting-off and driving107
Tiptronic106
Automatic load deactivation149
Automatic transmission105
Kickdown107
Malfunction107
Selector lever lock106
Using the selector lever105
AUX99
Avoiding damage to the vehicle Driving through water
112
Avoiding damage to your vehicle112
B
Back-up wheel
155
Ball head Check fitting
122
Fitting122
Ready position121
Removing123
Belts10
Belt tensioners13
Bicycle carrier75
Bonnet Closing
139
Opening139
Boot Cover
70
Emergency unlocking51
Fastening elements69
Fixing nets70
Folding hooks70
see Boot lid50
Unlocking the boot lid51
Boot lid50
automatic locking51
Brake assist114
Brake booster103
Brake fluid145
Changing145
Checking145
Display messages36
Brakes Brake booster
103
Brake fluid145
Handbrake104
Indicator light36
Running in109
Braking Information for braking
103
Breakdown kit163
185Index
Page 188 of 197

BulbsChanging170
In the rear light174
Button in the driver's door Electrical power windows
51
C
Car care
126
Jack132
Washing128
Car computer see Multifunction display
29
Caring for paintwork130
Car park ticket holder80
Carrier76
Central locking button47
Central locking system45
lock47
unlock47
Changing Brake fluid
145
Bulbs170
Bulbs in the rear light174
Engine oil143
Foglight bulb (Scout, RS)173
Foglights and daytime running lights bulbs173
Front parking light bulb172
Front turn signal bulb172
Fuses168
Fuses in the dash panel168
Fuses in the engine compartment170
High beam bulb - halogen projector headlights 172
Licence plate light bulb
174
Low beam and high beam bulb - halogen head- lights
171
Low beam and high beam bulb - halogen pro- jector headlights
172
Wheels159
Changing a wheel Preparation160
Removing and fitting a wheel160
Subsequent steps160
Charging a vehicle battery148
Check Fit ball head properly
122
Checking Battery electrolyte level
147
Brake fluid145
Coolant level144
Engine oil142
Oil level142
Windscreen washer fluid140
Children and safety19
Child safety Side airbag
21
Child safety lock44
Child safety seat Use of child safety seats
21
Child seat Classification
21
ISOFIX22
on the front passenger seat20
TOP TETHER23
Use of ISOFIX child seats22
Chrome parts refer to Taking care of your vehicle
130
Cigarette lighter79
Cleaning126
Alcantara134
Covers on electrically heated seats134
Fabrics134
Headlight lenses131
Natural leather133
Plastic parts130
Synthetic leather134
Wheels132
Climatronic90
Automatic mode91
Control elements90
Controlling the blower91
Defrosting windscreen92
Recirculated air mode91
Setting the temperature91
Clock28
Clothes hook80
Cockpit 12-volt power outlet
79
Ashtray78
Cigarette lighter79
General view25
Lighting59
Storage compartments80
Compartments80
Computer see Multifunction display
29
Convenience turn signal57
Coolant143
Checking144
Display messages37
Replenishing144
Warning light37
Coolant temperature gauge display
27
Correct seated position7
Driver7
Front passenger8
Notes9
Rear seats9
Counter for distance driven28
Cruise control system117
Cupholders78
D
DAY LIGHT see Daylight running lights
56
Daylight running lights56
186Index
Page 189 of 197
De-icing rear window61
Deactivating airbags18
Decorative films131
Delayed locking of the boot lid see boot lid
51
Diesel refer to Fuel
137
Diesel fuel Operation in winter
137
Diesel particulate filter39
display messages39
Digital clock28
Dipstick142
Display Service interval
32
Distance driven28
Door Child safety lock
44
Closing44
Indicator light for an open door36
Opening44
Doors Emergency locking
45
driving emissions
177
fuel consumption177
Driving Abroad
113
Driving through water on streets112
Maximum speed179
Driving economically Economical gear changing
109
Driving through water112
E
Economical and environmentally friendly driv- ing
109
Economical driving Anticipation in driving109
Ballast111
Driving at full throttle110
Idling110
Regular maintenance111
Saving energy111
Short distances110
Tyre pressure110
EDS115
Electrical power windows Button in the driver's door
51, 52
Button in the rear door52
Central locking system53
Electric power windows Operational faults
53
Electric sliding/tilting roof53
Electronic Differential Lock115
Electronic immobilizer101
Emergency Changing a wheel
159
Hazard warning light system59
Jump-starting164, 165
locking of the doors45
Selector lever-unlocking108
Sliding/tilting roof55
Towing the vehicle166
Towing the vehicle using the tow hitch167
Tyre repair162
Unlocking the boot lid51
Emergency equipment Fire extinguisher
158
First aid kit158
Jack159
Vehicle tool kit159
Warning triangle158
Emissions177
Engine Running in
108
Starting and stopping the engine101
Starting the engine102
Switching off the engine102
Engine compartment138
Brake fluid145
Coolant144
Overview140
Vehicle battery145
Engine number176
Engine oil141
Capacity141
Changing143
Checking142
Replenishing143
Specifications141
Warning light36
Engine revolutions counter27
Environment109
Environmental compatibility111
Environmentally friendly driving109
ESC Function
114
warning light38
F
Films
131
Fire extinguisher158
First aid kit158
Flashers57
Fog lights58
Footmats104
see Footmats104
Front airbag15
Front seats65
Fuel135
Diesel137
Fuel gauge27
gauge27
refer to Fuel135
187Index
Page 190 of 197
Refuelling136
Unleaded petrol136
fuel consumption177
Fuel consumption109
Fuses Assignment
168
Changing168
Colour coding168
G
Gear Recommended gear
28
Gearbox Display messages
34
Gear changing Gear stick
104
General view Cockpit
25
Glow plug system Warning light
39
GSM92
H
Handbrake
104
Hazard warning light system59
Head airbag17
Headlight cleaning system Headlight cleaning system
63
Headlights171
Driving abroad113
Headlight cleaning system63
Head restraint68
Storing in the seat squabs68
Heating Deicing the windows
87
Exterior mirrors64
Operating86
Operation86
Rear window61
Recirculated air mode87
Seats66
Heating and air conditioning84
Hill hold control114
Horn25
I
Ignition
102
Ignition lock102
Immobilizer101
Individual settings locking
46
unlocking46
Inertia reel13
Instrument cluster26
Overview26
see instrument cluster26
Interior monitor50
ISOFIX22
J
Jack
159
Maintenance132
Jacking points Raise vehicle
161
Jump-starting164, 165
L
Light Beam adjustment
56
Cockpit59
Headlight flash57
Lights55
Cockpit60
Daylight running56
Fog lights58
Foglights with the CORNER function58
Halogen projector headlights with cornering light function
57
Hazard warning light system59
Low beam lights56
Main beam lights57
Parking lights56, 59
Rear fog light58
Replacing bulbs170
Switching on and off56
Tourist lights58
Turn signals57
warning lights35
Lock Central locking system
47
Locking Emergency locking
45
Remote control48
without central locking45
Locking and unlocking from the inside47
Low beam lights56
Luggage compartment Class N1 vehicles
69
Lighting61
Retractable luggage compartment cover (Fabia Estate)
71
Variable loading floor72
M
Main beam
57
Maintenance111
Decorative films131
Manual air conditioning Recirculated air mode
89
Manual gear changing see Gear changing
104
MAXI DOT Main menu
33
see MAXI DOT display33
Settings34
MAXI DOT display33
maximum allowable weights
176
188Index