lock SKODA FABIA 2014 2.G / 5J Repair Manual
[x] Cancel search | Manufacturer: SKODA, Model Year: 2014, Model line: FABIA, Model: SKODA FABIA 2014 2.G / 5JPages: 197, PDF Size: 13.56 MB
Page 135 of 197
WARNING■Care products may be harmful to your health if not used according to the
instructions.■
Always keep the automobile care products safe from people who are not
completely independent, e.g. children - there is a danger of poisoning!
CAUTION
■ Be sure to check clothing for colourfastness to avoid any damage or visible
stains on the material (leather), panels and textiles.■
Remove fresh stains such as those from ball-point pens, ink, lipstick, shoe
polish, etc., from the material (leather), panels and textiles as quickly as possi-
ble.
■
Air fresheners and scents can be hazardous to heath when the temperature
inside the vehicle is high.
■
Do not attach scents and air fresheners to the dashboard – risk of damage to
the dash panel.
■
Do not stick any stickers on the inside of the rear windows, the rear side win-
dows and in the vicinity of the heating elements on the windscreen or near the
window aerial. These may get damaged.
■
Do not clean the headlining with a brush – risk of damage to the lining sur-
face.
■
Cleaners containing solvents can damage the material being cleaned.
■
Apply only a small amount of the cleaning and care product.
For the sake of the environment
Used cans of vehicle care product represent hazardous waste that is harmful
to the environment. These must be disposed of in accordance with national
legislation.
Note
Because of the special tools and knowledge required, and to avoid any poten-
tial problems with the cleaning and care of the interior of your vehicle, we rec-
ommend that cleaning and care of the interior of your vehicle be carried out by
a ŠKODA Service Partner.
Natural leather
Read and observe
and on page 133 first.
Leather is a natural material with specific properties and requires regular
cleaning and maintenance.
The leather should be cleaned on a regular basis depending on the amount of
wear-and-tear.
Dust and dirt in pores and creases act as abrasives. This leads to severe abra-
sion and the premature embrittlement of the leather surface.
We recommend that you remove dust at regular short intervals with a cloth or
vacuum cleaner.
Clean soiled leather surfaces with a cotton or woollen cloth lightly moistened
with water and then dry with a clean dry cloth »
.
Clean more severely soiled areas with a cloth soaked in a mild soap solution (2
tablespoons of natural soap to 1 litre of water).
Use a cleaning agent specially developed for the purpose to remove stains.
Treat the leather with a suitable leather care product at suitable regular inter-
vals.
CAUTION
■ Ensure that the leather is not soaked through at any point during cleaning
and that no water gets into the stitching of the seams. The leather would then
become brittle and cracked.■
Avoid leaving the vehicle for lengthy periods in bright sunlight to avoid the
leather from bleaching. If the vehicle is parked in the open for lengthy periods,
protect the leather from direct sunlight by covering it.
■
Sharp-edged objects on items of clothing such as zip fasteners, rivets, sharp-
edged belts, jewellery and pendants may leave permanent scratches or signs
of rubbing on the surface. Damage of this nature cannot later be recognized as
a justified complaint.
■
The use of a mechanical steering wheel lock may damage the leather surface
of the steering wheel.
■
Use a care cream with light blocker and impregnation effect on a regular ba-
sis and each time after cleaning. The cream nourishes the leather, allows it to
breathe and keeps it supple and also provides moisture. It also creates surface
protection.
■
Some clothing materials, such as dark denim, do not have sufficient colour
fastness. This can cause damage or clearly visible discolouration to seat covers
even when treated correctly. This is particularly true for light-coloured uphols-
tery. This is not a defect in the seat cover, but poor colour fastness of the
clothing textiles.
133Car care
Page 138 of 197

RefuellingFig. 123
Open tank lid / tank cap
Read and observe
and on page 135 first.
Open fuel filler flap
›
Open the fuel filler flap with one hand » Fig. 123 -
.
›
Hold the fuel filler cap on the fuel filler tube with one hand and unlock it by
moving it to the left with the vehicle key.
›
Unscrew the filler cap by turning it anticlockwise and clip the cap on the top
of the fuel filler flap » Fig. 123 -
.
Closing the filler cap
›
Turn the filler cap to the right until it clicks into place.
›
Hold the fuel filler cap on the fuel filler tube with one hand and lock it by
turning the vehicle key to the right and remove the key.
›
Close the filler cap.
CAUTION
■ Before refuelling it is necessary to switch off the auxiliary heating system
(auxiliary heating and ventilation).■
The fuel tank is full just as soon as the pump nozzle switches off for the first
time, provided the nozzle has been operated properly. Do not continue filling
the fuel tank otherwise the expansion volume is filled up.
Note
The fuel tank has a capacity of about 45 litres, including a reserve of approx.
7 litres .Unleaded petrol
Read and observe
and on page 135 first.
The vehicle can only be operated with unleaded petrol in compliance with the
EN 228 1)
standard.
All petrol engines can be operated using petrol with a maximum of 10% bioe-
thanol (E10).
Specified fuel - unleaded petrol 95/91 or 92 or 93 RON
Use unleaded fuel with an octane rating of 95 RON. Unleaded petrol with the
octane ratings 91, 92 or 93 RON can also be used, but may result in a slight
loss in performance.
Prescribed fuel - unleaded petrol min. 95 RON
Use unleaded fuel with an octane rating of 95 RON or higher.
In an emergency, if unleaded petrol with an octane rating of 95 RON is not
available, you may refuel with petrol with an octane rating of 91, 92 or 93
RON »
.
Prescribed fuel - unleaded petrol 98/(95) RON
Use unleaded fuel with an octane rating of 98 RON or higher. Unleaded petrol
95 RON can also be used but results in a slight loss in performance.
In an emergency, if unleaded petrol with an octane rating of 98 RON or 95 RON
is not available, you may refuel with petrol with an octane rating of 91 or 92 or
93 RON »
.
Fuel additives
Unleaded petrol complying with EN 228 1)
meets all the conditions for a
smooth-running engine. We therefore recommend that no fuel additives are
used. This can result in considerable damage to parts of the engine or the ex-
haust system.
1)
In Germany also DIN 51626-1 or E10 for unleaded petrol with octane rating 95 or 91 or DIN 51626-2 or E5
for unleaded petrol with octane rating 95 or 98.
136General Maintenance
Page 141 of 197
WARNINGInformation for working on the fuel system or the electrical system■Always disconnect the vehicle battery from the electrical system.■
Do not smoke.
■
Never work near open flames.
■
Always have a functioning fire extinguisher nearby.
WARNING■Read the information and warning instructions on the fluid containers.■Keep the working fluids in sealed original containers and safe from peo-
ple who are not completely independent, e.g. children.■
If you wish to work under the vehicle, you must secure the vehicle against
rolling away and support it with suitable axle stands: the car jack is not suf-
ficient for this – there is a risk of injury.
■
Never cover the engine with additional insulation material (e.g. with a
blanket) – there is a risk of fire.
■
The bonnet must always be properly closed when driving. This is why af-
ter closing the bonnet, the lock must always be checked to ensure it has
engaged properly.
■
If you notice that the lock is not properly engaged while driving, stop the
vehicle immediately and close the bonnet – there is the risk of an accident.
CAUTION
Always top up using the correct specification of fluids. This may result in major
operating problems and also vehicle damage!
For the sake of the environment
In view of the requirements for the environmentally friendly disposal of fluids and the special tools and knowledge required for such work, we recommend
that fluids be changed by a specialist garage.
Note
■ If there is anything you are not sure about concerning fluids, please consult a
specialist garage.■
Fluids with the proper specifications can be purchased from the ŠKODA Origi-
nal Accessories or from the ŠKODA Genuine Parts ranges.
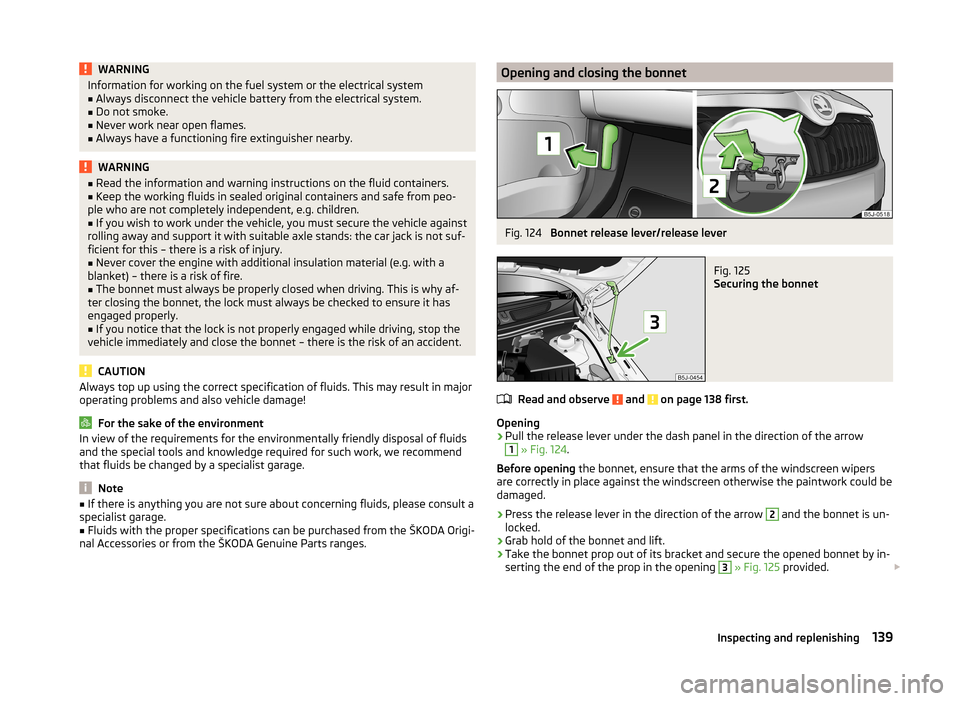
Opening and closing the bonnetFig. 124
Bonnet release lever/release lever
Fig. 125
Securing the bonnet
Read and observe and on page 138 first.
Opening
›
Pull the release lever under the dash panel in the direction of the arrow
1
» Fig. 124 .
Before opening the bonnet, ensure that the arms of the windscreen wipers
are correctly in place against the windscreen otherwise the paintwork could be
damaged.
›
Press the release lever in the direction of the arrow
2
and the bonnet is un-
locked.
›
Grab hold of the bonnet and lift.
›
Take the bonnet prop out of its bracket and secure the opened bonnet by in-
serting the end of the prop in the opening
3
» Fig. 125 provided.
139Inspecting and replenishing
Page 142 of 197

Closing›Lift the bonnet slightly and unhook the bonnet support. Press the bonnet
prop into the bracket provided.›
Let the bonnet drop into the lock carrier lock from a height of around 20 cm –
do not push it in .
WARNINGCheck that the bonnet is closed properly.
CAUTION
Never open the bonnet by the locking lever » Fig. 124.
Engine compartment overview
Fig. 126
Principle sketch: Engine compartment
Read and observe
and on page 138 first.
Explanation of graphic » Fig. 126
Coolant expansion reservoir
144
Windscreen washer fluid reservoir
140
Engine oil filler opening
143
Engine oil dipstick
142
Brake fluid reservoir
145
Vehicle battery
145123456NoteThe location of the inspection points in the engine compartment of petrol and
diesel engines is practically identical.
Radiator fan
Read and observe
and on page 138 first.
The radiator fan is powered by an electric motor. Operation is controlled ac-
cording to the temperature of the coolant.
WARNINGThe fan can intermittently continue to run for approximately 10 minutes af-
ter the ignition is switched off.
Windscreen washer system
Fig. 127
Engine compartment: Wind-
screen washer fluid reservoir
Read and observe and on page 138 first.
The windscreen washer fluid reservoir is located in the engine compart-
ment » Fig. 127 .
This contains the cleaning fluid for the windscreen or rear window and for the
headlight cleaning system.
The capacity of the reservoir is about 3.5 litres or about 5.4 litres on vehicles
that have a headlight cleaning system 1)
.
1)
In some countries, 5.4 ltr. applies for both variants.
140General Maintenance
Page 150 of 197
We therefore recommend that you have the battery checked and, if necessary,
recharged by a specialist garage before the start of the winter.
CAUTION
For technical reasons, on vehicles with the description “AGM”, the electrolyte
level cannot be checked.
Note
The battery electrolyte level is also periodically checked by a specialist garage
as part of the Inspection Service.
Charging
Read and observe
and on page 146 first.
A properly charged vehicle battery is essential for reliably starting the engine.
›
Switch off the ignition and all of the electrical components.
›
Only when performing a “quick-charge”, disconnect both battery cables (first
“negative”, then “positive”).
›
Attach the terminal clamps of the charger to the battery terminals (red =
“positive”, black = “negative”).
›
Plug the mains cable of the charger into the power socket and switch the
charger on.
›
Once charging is complete: Switch off the charger and remove the mains ca-
ble from the power socket.
›
Only then disconnect the charger's terminal clamps.
›
Reconnect the cables to the battery (first “positive”, then “negative”).
It is not necessary to disconnect the battery cables if you are recharging the
vehicle battery using low amperages (for example from a mini-charger). Refer
to the charger manufacturer's instructions .
A charging current of 0.1 multiple of the total vehicle battery capacity (or low-
er) must be used until full charging is achieved.
Both cables must be disconnected before charging the battery with high
amperages, known as “ rapid charging”.
The vent plugs of the vehicle battery should not be opened for charging.
WARNING“Quick-charging” the vehicle battery is dangerous and requires a special
charger and specialist knowledge.CAUTIONOn vehicles with the START/STOP system, the pole terminal of the charger
must not be connected directly to the negative terminal of the vehicle battery,
but only to the engine earth » page 166, Jump-starting in vehicles with the
START-STOP system .
Note
We therefore recommend that vehicle batteries be rapid charged by a special-
ist garage.
Replacing
Read and observe
and on page 146 first.
The new vehicle battery must have the same capacity, voltage, current and thesame size as the original battery. Suitable vehicle battery types can be pur-
chased from a specialist garage.
We recommend that the battery is replaced by a specialist garage, where the
new vehicle battery will be installed properly and the original battery will be
disposed of in accordance with national regulations.
Disconnecting or reconnecting
Read and observe
and on page 146 first.
The following functions are initially deactivated or are no longer able to oper-
ate faultlessly after the vehicle battery has been disconnected and reconnec-
ted.
OperationOperating measureElectrical power window (operational faults)» page 53Enter the radio/navigation system code
number» User manual of the radio
or » user manual of the naviga-
tion systemSetting the clock» page 28Data in the multifunction display are de-
leted.» page 29
Note
We recommend having the vehicle checked by a specialist garage to ensure
the full functionality of all electrical systems.148General Maintenance
Page 157 of 197
WARNING■When the warning light illuminates, immediately reduce the speed and
avoid sudden steering and brake manoeuvres. Stop the vehicle as soon as
possible and inspect the tyres and their inflation pressure.■
Under certain circumstances (e.g. sporty style of driving, wintry or un-
paved roads) the warning light
can be delayed or does not light up at all.
CAUTION
■
The system cannot warn in case of very rapid loss of tyre pressure, e.g. in the
event of a sudden puncture. In this case carefully bring the vehicle to a stand-
still without sudden steering movements or sharp braking.■
The basic setting must be repeated every 10,000 km or once a year to ensure
proper functioning of the tyre pressure monitor.
■
The tyre pressure monitor does not replace the need to check tyre pressure
regularly.
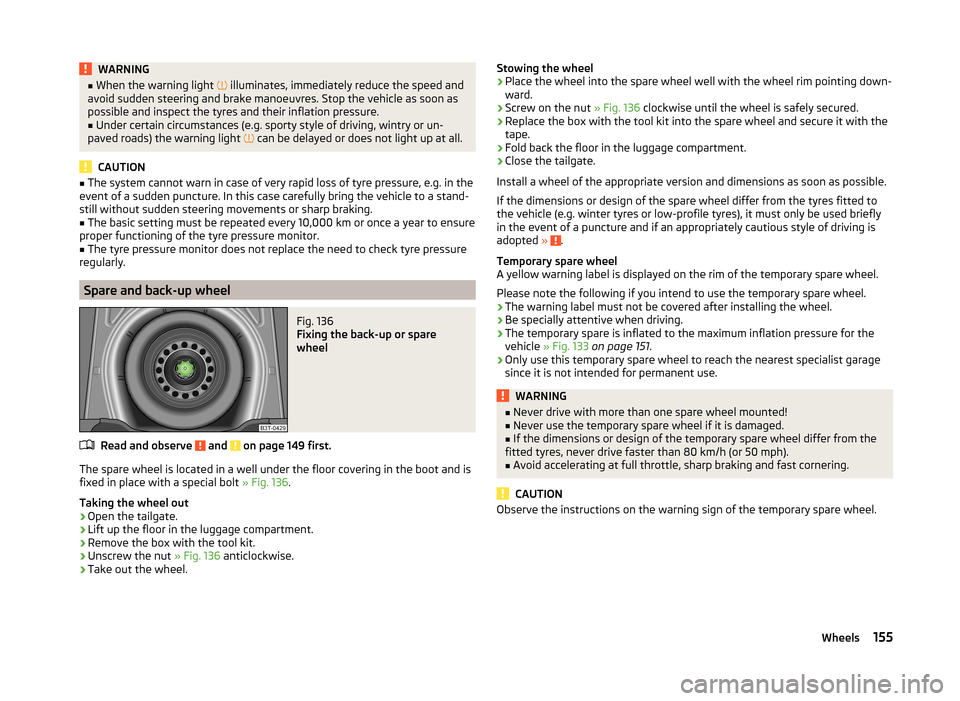
Spare and back-up wheel
Fig. 136
Fixing the back-up or spare
wheel
Read and observe and on page 149 first.
The spare wheel is located in a well under the floor covering in the boot and is fixed in place with a special bolt » Fig. 136.
Taking the wheel out
›
Open the tailgate.
›
Lift up the floor in the luggage compartment.
›
Remove the box with the tool kit.
›
Unscrew the nut » Fig. 136 anticlockwise.
›
Take out the wheel.
Stowing the wheel›Place the wheel into the spare wheel well with the wheel rim pointing down-
ward.›
Screw on the nut » Fig. 136 clockwise until the wheel is safely secured.
›
Replace the box with the tool kit into the spare wheel and secure it with the
tape.
›
Fold back the floor in the luggage compartment.
›
Close the tailgate.
Install a wheel of the appropriate version and dimensions as soon as possible.
If the dimensions or design of the spare wheel differ from the tyres fitted to
the vehicle (e.g. winter tyres or low-profile tyres), it must only be used briefly
in the event of a puncture and if an appropriately cautious style of driving is
adopted »
.
Temporary spare wheel
A yellow warning label is displayed on the rim of the temporary spare wheel.
Please note the following if you intend to use the temporary spare wheel. › The warning label must not be covered after installing the wheel.
› Be specially attentive when driving.
› The temporary spare is inflated to the maximum inflation pressure for the
vehicle » Fig. 133 on page 151 .
› Only use this temporary spare wheel to reach the nearest specialist garage
since it is not intended for permanent use.
WARNING■ Never drive with more than one spare wheel mounted!■Never use the temporary spare wheel if it is damaged.■
If the dimensions or design of the temporary spare wheel differ from the
fitted tyres, never drive faster than 80 km/h (or 50 mph).
■
Avoid accelerating at full throttle, sharp braking and fast cornering.
CAUTION
Observe the instructions on the warning sign of the temporary spare wheel.155Wheels
Page 159 of 197
For the sake of the environmentRe-fit the summer tyres at an appropriate time as they provide better handling
properties, a shorter braking distance, less tyre noise, and reduced tyre wear
on roads which are free of snow and ice as well as at temperatures above 7 °C.
The fuel consumption is also lower.
Snow chains
When driving on wintry roads, snow chains improve not only traction, but also
the braking performance.
Snow chains must only be mounted on the front wheels.
For technical reasons, it is only permissible to fit snow chains with the follow-
ing wheel/tyre combinations.
Wheel sizeDepth DTyre size5J x 1435 mm165/70 R146J x 1437 mm185/60 R146J x 1543 mm185/55 R15
Only fit snow chains with links and locks not larger than 12 mm.
CAUTION
■
The chains must be removed when driving on roads which are free of snow.
They adversely affect the handling of your vehicle, damage the tyres and are
rapidly destroyed.■
Remove the full wheel trims » page 156 before installing the snow chains.
157Wheels
Page 161 of 197
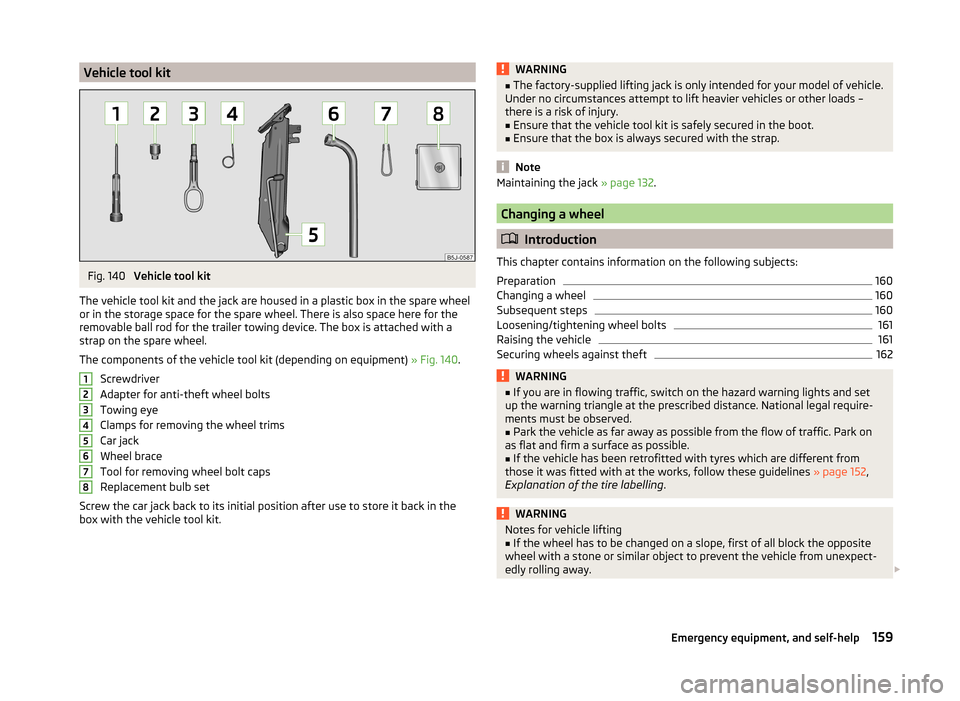
Vehicle tool kitFig. 140
Vehicle tool kit
The vehicle tool kit and the jack are housed in a plastic box in the spare wheel
or in the storage space for the spare wheel. There is also space here for the
removable ball rod for the trailer towing device. The box is attached with a
strap on the spare wheel.
The components of the vehicle tool kit (depending on equipment) » Fig. 140.
Screwdriver
Adapter for anti-theft wheel bolts
Towing eye
Clamps for removing the wheel trims
Car jack
Wheel brace
Tool for removing wheel bolt caps
Replacement bulb set
Screw the car jack back to its initial position after use to store it back in the
box with the vehicle tool kit.
12345678WARNING■ The factory-supplied lifting jack is only intended for your model of vehicle.
Under no circumstances attempt to lift heavier vehicles or other loads –
there is a risk of injury.■
Ensure that the vehicle tool kit is safely secured in the boot.
■
Ensure that the box is always secured with the strap.
Note
Maintaining the jack » page 132.
Changing a wheel
Introduction
This chapter contains information on the following subjects:
Preparation
160
Changing a wheel
160
Subsequent steps
160
Loosening/tightening wheel bolts
161
Raising the vehicle
161
Securing wheels against theft
162WARNING■ If you are in flowing traffic, switch on the hazard warning lights and set
up the warning triangle at the prescribed distance. National legal require-
ments must be observed.■
Park the vehicle as far away as possible from the flow of traffic. Park on
as flat and firm a surface as possible.
■
If the vehicle has been retrofitted with tyres which are different from
those it was fitted with at the works, follow these guidelines » page 152,
Explanation of the tire labelling .
WARNINGNotes for vehicle lifting■If the wheel has to be changed on a slope, first of all block the opposite
wheel with a stone or similar object to prevent the vehicle from unexpect-
edly rolling away. 159Emergency equipment, and self-help
Page 166 of 197
›Do not remove the foreign body, e.g. screw or nail, from the tyre.›Unscrew the valve cap.›
Use the valve remover
1
to unscrew the valve core and place it on a clean
surface (rag, paper, etc.).
Sealing and inflating the tyre
Read and observe
on page 163 first.
Sealing
›
Shake the tyre inflator bottle
10
» Fig. 145 on page 163 vigorously several
times.
›
Firmly screw the inflation hose
3
onto the tyre inflator bottle
10
in a clock-
wise direction. The film on the cap is pierced automatically.
›
Remove the plug from the inflation hose
3
and plug the open end fully onto
the tyre valve.
›
Hold the bottle
10
with the bottom facing upwards and fill all of the sealing
agent from the tyre inflator bottle into the tyre.
›
Remove the empty tyre inflator bottle from the valve.
›
Screw the valve core back into the tyre valve using the valve remover
1
.
Inflating
›
Screw the air compressor tyre inflation hose
5
» Fig. 145 on page 163 firmly
onto the tyre valve.
›
Check that the air release valve
7
is closed.
›
Start the engine and run it in idle.
›
Plug the connector
9
into 12 Volt socket » page 79, 12-volt power outlet .
›
Switch on the air compressor with the ON and OFF switch
8
.
›
Allow the air compressor to run until a pressure of 2.0 - 2.5 bar is achieved.
Maximum run time of 8 minutes » .
›
Switch off the air compressor.
›
If you cannot reach an air pressure of 2.0 – 2.5 bar, unscrew the tyre inflation
hose
5
from the tyre valve.
›
Drive the vehicle 10 metres forwards or backwards to allow the sealing agent
to “distribute” in the tyre.
›
Firmly screw the tyre inflation hose
5
back onto the tyre valve and repeat
the inflation process.
›
If you cannot reach the required tyre inflation pressure here either, this
means the tyre has sustained too much damage. You cannot seal with tyre with the breakdown kit »
.
›
Switch off the air compressor.
›
Remove the tyre inflation hose
5
from the tyre valve.
Once a tyre pressure of 2.0 – 2.5 bar is reached, the journey may be continued
at a maximum speed of 80 km/h (50 mph).
Check the tyre inflation pressure after driving for 10 minutes » page 164.WARNING■
The tyre inflation hose and air compressor may get hot as the tyre is be-
ing inflated – there is a risk of injury.■
Do not place the hot tyre inflation hose or hot air compressor on flamma-
ble materials – there is a risk of fire.
■
If you cannot inflate the tyre to at least 2.0 bar, this means the damage
sustained was too serious. The sealing agent cannot be used to seal the
tyre.
Do not drive the vehicle. Seek help from a specialist garage.
CAUTION
Switch off the air compressor after running 8 minutes at the latest – there is a
risk of overheating. Allow the air compressor to cool a few minutes before
switching it on again.
Check after 10 minutes' driving
Read and observe
on page 163 first.
Check the tyre inflation pressure after driving for 10 minutes!
If the tyre pressure is 1.3 bar or less
›
Do not drive the vehicle. You cannot properly seal with tyre with the
breakdown kit.
If the tyre pressure is 1.3 bar or more
›
Adjust the tyre pressure to the correct value again (see inside of fuel filler
cap).
›
Continue driving carefully to the nearest specialist garage at a maximum speed of 80 km/h (50 mph).
Jump-starting
Introduction
This chapter contains information on the following subjects:
Jump-starting using the battery from another vehicle
165
Jump-starting in vehicles with the START-STOP system
166
164Do-it-yourself
Page 167 of 197
WARNING■A discharged vehicle battery may already freeze at temperatures just be-
low 0 °C. If the battery is frozen, do not jump start with the battery of an-
other vehicle – there is a risk of explosion.■
Pay attention to the warning instructions relating to working in the en-
gine compartment » page 138.
■
The non-insulated parts of the terminal clamps must never touch each
other – there is a risk of short circuit.
■
The jump-start cable connected to the positive terminal of the battery
must not come into contact with electrically conducting parts of the vehicle
– there is a risk of short circuit.
■
Do not clamp the jump-start cable to the negative terminal of the dis-
charged battery. There is the risk of detonating gas seeping out the battery being ignited by the strong spark which results from the engine being star-
ted.
■
Route the jump-start cables so that they cannot be caught by any rotat-
ing parts in the engine compartment.
■
Do not bend over the battery – there is a risk of caustic burns.
■
The vent screws of the battery cells must be tightened firmly.
■
Keep any sources of ignition (naked flame, smouldering cigarettes, etc.)
away from the battery – risk of explosion!
■
Never jump-start vehicle batteries with an electrolyte level that is too low
– risk of explosion and caustic burns.
CAUTION
■ There must not be any contact between the two vehicles otherwise current
may flow as soon as the negative terminals are connected.■
The discharged battery must be properly connected to the system of the ve-
hicle.
■
We recommend you buy jump-start cables from a car battery specialist.
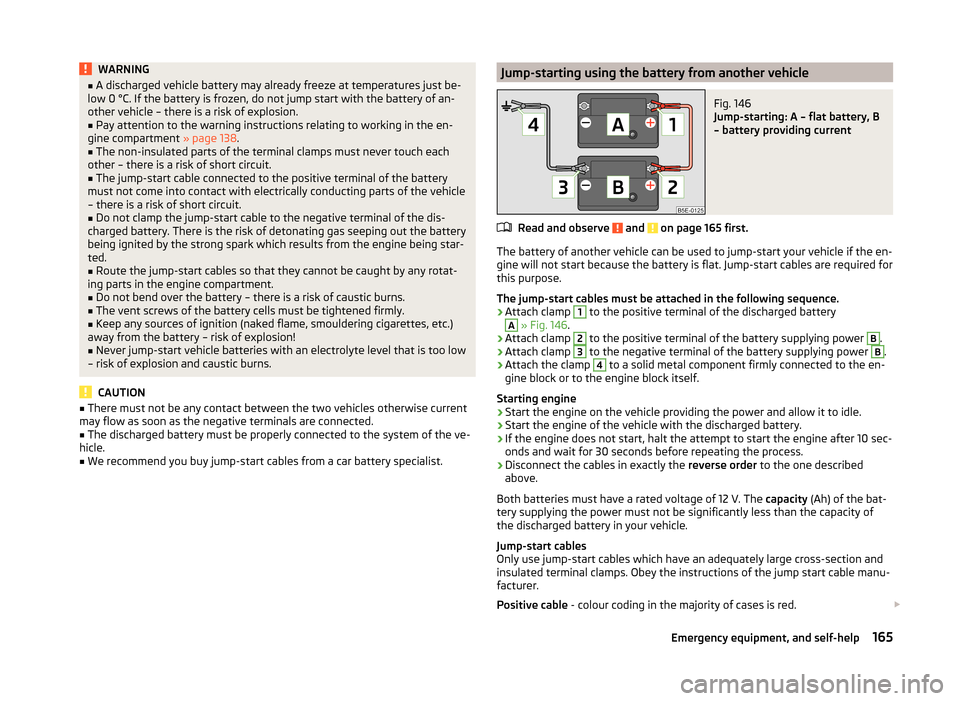
Jump-starting using the battery from another vehicleFig. 146
Jump-starting: A – flat battery, B
– battery providing current
Read and observe and on page 165 first.
The battery of another vehicle can be used to jump-start your vehicle if the en-
gine will not start because the battery is flat. Jump-start cables are required for
this purpose.
The jump-start cables must be attached in the following sequence.
›
Attach clamp
1
to the positive terminal of the discharged battery
A
» Fig. 146 .
›
Attach clamp
2
to the positive terminal of the battery supplying power
B
.
›
Attach clamp
3
to the negative terminal of the battery supplying power
B
.
›
Attach the clamp
4
to a solid metal component firmly connected to the en-
gine block or to the engine block itself.
Starting engine
›
Start the engine on the vehicle providing the power and allow it to idle.
›
Start the engine of the vehicle with the discharged battery.
›
If the engine does not start, halt the attempt to start the engine after 10 sec-
onds and wait for 30 seconds before repeating the process.
›
Disconnect the cables in exactly the reverse order to the one described
above.
Both batteries must have a rated voltage of 12 V. The capacity (Ah) of the bat-
tery supplying the power must not be significantly less than the capacity of
the discharged battery in your vehicle.
Jump-start cables
Only use jump-start cables which have an adequately large cross-section and
insulated terminal clamps. Obey the instructions of the jump start cable manu-
facturer.
Positive cable - colour coding in the majority of cases is red.
165Emergency equipment, and self-help