coolant temperature SKODA FABIA 2014 2.G / 5J Owner's Manual
[x] Cancel search | Manufacturer: SKODA, Model Year: 2014, Model line: FABIA, Model: SKODA FABIA 2014 2.G / 5JPages: 197, PDF Size: 13.56 MB
Page 28 of 197

Instruments and Indicator Lights
Instrument cluster
Introduction
This chapter contains information on the following subjects:
Overview
26
Engine revolutions counter
27
Speedometer
27
Coolant temperature gauge display
27
Fuel gauge
27
Counter for distance driven
28
Digital clock
28
Display of the second speed
28
Recommended gear
28
Fault display
The Error message will appear in the display if there is a fault in the instru-
ment cluster. Ensure that the fault is rectified as soon as possible by a special-
ist workshop.
WARNING■ Concentrate fully at all times on your driving! As the driver you are fully
responsible for road safety.■
Never operate the controls in the instrument cluster while driving, only
when the vehicle is stationary!
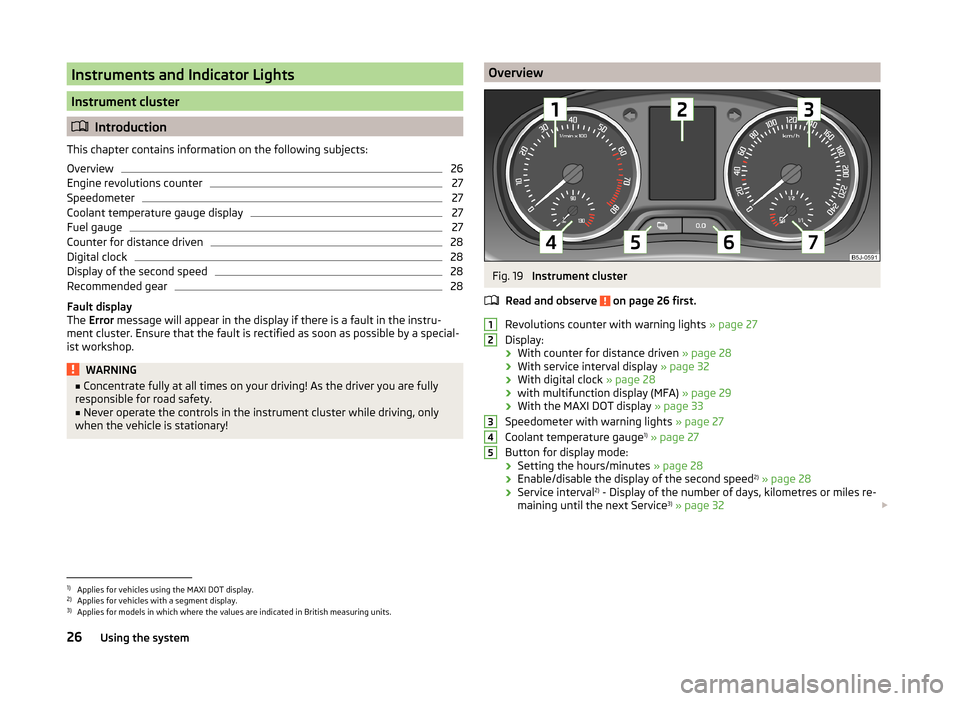
OverviewFig. 19
Instrument cluster
Read and observe
on page 26 first.
Revolutions counter with warning lights » page 27
Display:
› With counter for distance driven
» page 28
› With service interval display
» page 32
› With digital clock
» page 28
› with multifunction display (MFA)
» page 29
› With the MAXI DOT display
» page 33
Speedometer with warning lights » page 27
Coolant temperature gauge 1)
» page 27
Button for display mode:
› Setting the hours/minutes
» page 28
› Enable/disable the display of the second speed 2)
» page 28
› Service interval 2)
- Display of the number of days, kilometres or miles re-
maining until the next Service 3)
» page 32
123451)
Applies for vehicles using the MAXI DOT display.
2)
Applies for vehicles with a segment display.
3)
Applies for models in which where the values are indicated in British measuring units.
26Using the system
Page 29 of 197

Button for:› Reset trip meter
» page 28
› Set hours/minutes
› Enable/disable the mode selected by means of button 5
Fuel gauge 1)
» page 27
Engine revolutions counter
Read and observe
on page 26 first.
The red scale of the rev counter
1
» Fig. 19 on page 26 indicates the range in
which the engine control unit begins to limit the engine speed. The engine
control unit restricts the engine speed to a steady limit.
You should shift into the next higher gear before the red scale of the revolu- tion counter is reached, or move the selector lever into position D if your car is
fitted with an automatic gearbox.
To maintain the optimum motor speed, observe the gearshift indica-
tor » page 28 .
For the sake of the environment
Shifting up in good time has the following benefits.■It helps to reduce fuel consumption.■
It reduces engine noise.
■
It protects the environment.
■
It benefits the service life and reliability of the engine.
Speedometer
Read and observe
on page 26 first.
Warning against speeding
An audible warning signal will sound when the vehicle speed exceeds 120 km/
h 2)
. The audible warning is switched off once the vehicle speed falls below
120 km/h.
67Coolant temperature gauge display
Read and observe
on page 26 first.
The coolant temperature gauge
4
» Fig. 19 on page 26 operates only when
the ignition is switched on.
In vehicles with a segment display, the coolant temperature is indicated only
by one of the warning lights » page 37,
Coolant coming on or going off.
Cold range
The pointer in the left of the scale indicates that the engine has not yet
reached its operating temperature. Avoid high speeds, full throttle and high engine loads. This prevents possible damage to the engine.
The operating range
The engine has reached its operating temperature as soon as the pointer
moves into the middle of the scale. At very high ambient temperatures or un-
der heavy engine loads, the pointer may move even further to the right.
High temperature range
The coolant temperature is too high if the pointer reaches the red area of the
scale. Further information » page 37.
CAUTION
■
Additional headlights and other attached components in front of the air inlet
impair the cooling efficiency of the coolant.■
Never cover the radiator - there is a risk of the engine overheating.
Fuel gauge
Read and observe
on page 26 first.
The fuel gauge
7
» Fig. 19 on page 26 only works when the ignition is switch-
ed on.
The fuel remaining is displayed in the segment display on vehicles with the
segment display.
The fuel tank has a capacity of about 45 litres. The warning light lights up
when the fuel level reaches the reserve range
» page 40 .
1)
Applies for vehicles using the MAXI DOT display.
2)
This function is only enabled in certain countries.
27Instruments and Indicator Lights
Page 39 of 197

The warning light comes on for a few seconds when the ignition is switch-
ed on 1)
.
Stop the vehicle, switch off the engine, and check the engine oil lev-
el » page 142 .
Even if the oil level is correct,
do not drive any further if the warning light is
flashing. Also do not leave the engine running at an idling speed.
Seek help from a specialist garage.
The warning light
lights up yellow (oil quantity too low)
The following message is shown in the MAXI DOT display.
Check oil level!
Stop the vehicle, switch off the engine, and check the engine oil lev-
el » page 142 .
An audible signal sounds as a warning signal.
The warning light will go out if the bonnet is left open for more than 30 sec-
onds. If no engine oil has been replenished, the warning light will come on
again after driving about 100 km.
The warning light flashes yellow (engine oil level sensor faulty)
The following message is shown in the MAXI DOT display.
Oil sensor workshop!
If the engine oil level sensor is faulty, the warning light flashes several
times and an audible signal sounds when the ignition is turned on.
Seek help from a specialist garage.WARNINGIf you have to stop for technical reasons, park the vehicle at a safe distance
from the traffic, switch off the engine and switch on the hazard warning
lights system » page 59.
CAUTION
The red oil pressure light is not an oil level indicator! One should therefore
check the oil level at regular intervals, preferably after every refuelling stop. Coolant
Read and observe
on page 35 first.
The indicator light
lights up until the engine reaches operating tempera-
ture 2)
. Avoid high speeds, full throttle and high engine loads.
If the warning light
lights up or flashes, either the coolant temperature is
too high or the coolant level is too low.
An audible signal sounds as a warning tone.
The following message is shown in the MAXI DOT display. ENGINE COOLANT PLEASE CHECK Log book!
Stop the vehicle, switch off the engine, check the level of the cool-
ant » page 144 , and refill the coolant if necessary » page 144.
If the coolant is within the specified range, the increased temperature may be
caused by an operating problem at the radiator fan. Check the fuse for the ra-
diator fan, replace if necessary » page 170, Fuses in the engine compartment .
Do not continue driving if the warning light
does not go off even though
the coolant level is correct and the fuse for the fan is in working order!
Seek help from a specialist garage.
WARNING■ If you have to stop for technical reasons, park the vehicle at a safe dis-
tance from the traffic, switch off the engine and activate the hazard warn-
ing light system » page 59.■
Carefully open the coolant expansion bottle. If the engine is hot, the cool-
ing system is pressurized - risk of scalding! It is therefore best to allow the
engine to cool down before removing the cap.
■
Do not touch the radiator fan. The radiator fan may switch itself on auto-
matically even if the ignition is off.
CAUTION
■ Additional headlights and other attached components in front of the air inlet
impair the cooling efficiency of the coolant.■
Never cover the radiator - there is a risk of the engine overheating.
1)
The warning light does not light up in vehicles fitted with the MAXI DOT display when the ignition is
switched on, but only if there is a fault or the engine oil level is too low.
2)
Not on vehicles with the MAXI DOT display.
37Instruments and Indicator Lights
Page 86 of 197

Flexible storage compartmentFig. 93
Flexible storage compartment
Read and observe on page 80 first.
The flexible storage compartment » Fig. 93 can be fitted to the right-hand side
of the luggage compartment.
Fitting
›
Insert both ends of the flexible storage compartment into the openings of
the right side trim panel of the boot and push it downwards until it locks.
Removing
›
Grasp the flexible storage compartment on the two upper corners.
›
Press the upper corners inwards and release the storage compartment by
pulling upwards.
›
Remove by pulling towards you.
CAUTION
The storage compartment is designed for storing small objects with a maxi-
mum total weight of 8 kg.
Note
If the variable loading floor » page 72 is installed in the luggage compartment,
no flexible storage compartment can be installed.Heating and air conditioning
Heating, ventilation, cooling
Introduction
This chapter contains information on the following subjects:
Air outlets
85
Using the air conditioning system economically
85
Operational problems
85
The heating effect is dependent upon the coolant temperature, thus full heat
output only occurs when the engine has reached its operating temperature.
If the cooling system is switched on, the temperature and air humidity drops in
the vehicle. The cooling system prevents the windows from misting up when
outside temperatures are particularly low.
It is possible to briefly activate recirculated air mode to enhance the cooling
effect.
Please refer to the information regarding recirculated air mode for the air-con-
ditioning system » page 89 or for Climatronic » page 91.
WARNINGFor your own safety and that of other road users, ensure that all the win-
dows are free of ice, snow and misting. Please familiarize yourself about
how to correctly operate the heating and ventilation systems, how to de-
mist and defrost the windows, as well as with the cooling mode.
CAUTION
■ The air inlet in front of the windscreen must be free (e.g. of ice, snow or
leaves) to ensure that the heating and cooling system operates properly.■
After switching on the cooling Condensation from the evaporator of the air
conditioning may drip down and form a puddle below the vehicle. This is not a
leak.
84Using the system
Page 87 of 197

Note■The exhaust air streams out through vents at the rear of the luggage com-
partment.■
We recommend that you do not smoke in the vehicle when the recirculating
air mode is operating since the smoke which is drawn at the evaporator from
the interior of the vehicle forms deposits in the evaporator of the air condition-
ing system. This produces a permanent odour when the air conditioning sys-
tem is operating which can only be eliminated through considerable effort and
expense (replacement of compressor).
Air outlets
Fig. 94
Air outlet vents
Read and observe
and on page 84 first.
Warmed, not warmed fresh or cooled air will flow out of the opened air outlet
vents according to the setting of the control and the outside atmospheric con-
ditions.
The direction of airflow can be adjusted using the air outlet vents 3 and
4 » Fig. 94 and the outlets can also be opened and closed individually.
Open the air outlet vents 3 and 4
›
Turn the vertical wheel (air vents 3) » Fig. 94 or the horizontal wheel (air out-
let nozzles 4) to the
position.
Close air outlet vents 3 and 4›Turn the vertical wheel (air vents
3) » Fig. 94 or the horizontal wheel (air out-
let nozzles 4) to the 0 position.
Change air flow of air outlet vents 3 and 4›
In order to change the strength of the air flow, swivel the horizontal lamellas
with the aid of the moveable adjuster » Fig. 94.
›
In order to change the lateral direction of the air flow, swivel the vertical la-
mellas with the aid of the moveable adjuster.
Set the air supply to the individual vents with the air distribution control
C
» Fig. 95 on page 86 .
Note
Do not cover the air outlet vents with objects of any kind.
Using the air conditioning system economically
Read and observe
and on page 84 first.
The air conditioning system compressor uses power from the engine when in
cooling mode, which will affect the fuel consumption.
It recommended to open the windows or the doors of a vehicle for which the
interior has been strongly heated through the effect of direct sunlight in order
to allow the heated air to escape.
The cooling system should not be switched on if the windows are open.
For the sake of the environment
Pollutant emissions are also lower when fuel is being saved » page 109.
Operational problems
Read and observe
and on page 84 first.
If the cooling system does not operate at outside temperatures higher than +5
°C, there is a problem in the system. The reasons for this may be.
› One of the fuses has blown. Check the fuse and replace if necessa-
ry » page 168 .
› The cooling system has switched off automatically for a short time because
the coolant temperature of the engine is too hot » page 27.
85Heating and air conditioning
Page 90 of 197

The cooling system operates only if the following conditions are met.The cooling system is switched on » page 88.
The engine is running.
The outside temperature is above approximately +2 °C.
The blower switch is switched on (positions 1-4).
If the desired interior temperature can also be achieved without activating the
cooling system, fresh air mode should be selected.
If the coolant temperature is too high, the cooling system is switched off to
ensure that the engine cools down.
CAUTION
■ Under certain circumstances, air at a temperature of about 5 °C can flow out
of the vents when the cooling system is switched on.■
Lengthy and uneven distribution of the air flow out of the vents (especially
around the feet) and large differences in temperature, for example, when get-
ting out of the vehicle, can cause susceptible individuals to catch a cold.
Note
■ We recommend that you have the air conditioning system cleaned by a spe-
cialist garage once every year.■
During operation of the air conditioning, under certain circumstances an in-
crease in engine idle speed may occur in order to ensure sufficient heating
comfort.
OperationFig. 96
The air conditioning system: Control elements
Read and observe
on page 88 first.
Functions of the individual controls » Fig. 96 :
Set the temperature (turn to the left: to reduce the temperature, turn to
the right: to increase the temperature)
Set the blower level (level 0: blowers off, level 4: the highest blower
speed)
Set the direction of the air outlet » page 85
Switch recirculation on/off » page 89
Switch the cooling system on/off
Note
The warning light in the symbol button lights after activation, even if not all
of the conditions for the function of the cooling system are met » page 87. The
operational readiness of the cooling system is indicated by the indicator light
in the button lighting up.ABC88Using the system
Page 92 of 197

Climatronic (automatic air conditioning system)
Introduction
This chapter contains information on the following subjects:
Control elements
90
Automatic mode
91
Setting the temperature
91
Recirculated air mode
91
Controlling the blower
91
Defrosting windscreen
92
Climatronic in automatic mode ensures the best-possible setting of the tem-
perature of the outflowing air, the blower stage and air distribution.
The system also takes sunlight into account, which eliminates the need to al-
ter the settings manually.
The cooling system operates only if the following conditions are met. The cooling system is switched on » page 90.
The engine is running.
The outside temperature is above approximately +2 °C.
If the coolant temperature is too high, the cooling system is switched off to
ensure that the engine cools down.
Note
■ We recommend that you have Climatronic cleaned by a specialist garage
once every year.■
During operation of the Climatronic, under certain circumstances an increase
in engine idle speed can occur in order to ensure adequate heating comfort.
Control elementsFig. 97
Climatronic: Control elements
The buttons/control dial Setting the interior temperature » page 91
Display Display of selected interior temperature
Degrees Celsius or Fahrenheit, change the displayed temperature
units » page 91
Automatic operation of the air conditioning system
Ventilation or defrosting of the windscreen activated
Direction of air flow
Recirculated air mode activated
Cooling system activated
Blower speed set
The buttons/control dial Adjust the blower speed » page 91
Interior temperature sensor Automatic mode » page 91
De-mist or de-ice the windscreen » page 92
Air flow to the windows
Air flow to the upper body
Air flow in the footwell
123456789101190Using the system
Page 127 of 197

On downhill sections shift down a gear in good time to also use the engine as
a brake.
Engine overheating
The speed must be reduced immediately if the needle for the coolant tempera-
ture gauge moves into the right-hand area or the red area of the scale.
Stop and switch off the engine if the warning light
in the instrument cluster
starts to flash. Wait a few minutes and check the level of coolant » page 144,
Checking the coolant level .
The following guidelines must be observed » page 37,
Coolant .
The coolant temperature can be reduced by switching on the heating.WARNING■ Adapt your speed to the conditions of the road surface and to the traffic
situation.■
Improper or incorrectly connected electric cables can energise the trailer
and cause functional faults to the vehicle's entire electrical system as well
as accidents and severe injuries.
■
Work on the electrical system must only be carried out by specialist ga-
rages.
■
Never directly connect the trailer's electrical system with the electrical
connections for the tail lights or other current sources.
Note
■ After coupling the trailer and connecting up the power socket, check the rear
lights on the trailer to ensure they work.■
If there is an error in the trailer lighting system, check the fuses in the fuse
box in the dashboard » page 168.
■
If you tow a trailer frequently, you should also have your car inspected be-
tween service intervals.
■
The handbrake on the towing vehicle must be applied when coupling and un-
coupling the trailer.
Anti-theft alarm system
Read and observe
on page 124 first.
When the vehicle is locked, the alarm is activated as soon as the electrical con-
nection to the trailer is interrupted.
Always switch off the anti-theft alarm system before a trailer is coupled or un-
coupled » page 49 .
Conditions for including a trailer in the anti-theft alarm system. The vehicle is factory-fitted with an anti-theft alarm system and towing
equipment.
The trailer is electrically connected to the towing vehicle by means of the
trailer socket.
The electrical system of the vehicle and trailer is functional.
The vehicle is locked with the vehicle key and the anti-theft alarm system is activated.
Note
For technical reasons, trailers with rear LED lights cannot be connected to the
anti-theft alarm system.125Towing a trailer
Page 142 of 197

Closing›Lift the bonnet slightly and unhook the bonnet support. Press the bonnet
prop into the bracket provided.›
Let the bonnet drop into the lock carrier lock from a height of around 20 cm –
do not push it in .
WARNINGCheck that the bonnet is closed properly.
CAUTION
Never open the bonnet by the locking lever » Fig. 124.
Engine compartment overview
Fig. 126
Principle sketch: Engine compartment
Read and observe
and on page 138 first.
Explanation of graphic » Fig. 126
Coolant expansion reservoir
144
Windscreen washer fluid reservoir
140
Engine oil filler opening
143
Engine oil dipstick
142
Brake fluid reservoir
145
Vehicle battery
145123456NoteThe location of the inspection points in the engine compartment of petrol and
diesel engines is practically identical.
Radiator fan
Read and observe
and on page 138 first.
The radiator fan is powered by an electric motor. Operation is controlled ac-
cording to the temperature of the coolant.
WARNINGThe fan can intermittently continue to run for approximately 10 minutes af-
ter the ignition is switched off.
Windscreen washer system
Fig. 127
Engine compartment: Wind-
screen washer fluid reservoir
Read and observe and on page 138 first.
The windscreen washer fluid reservoir is located in the engine compart-
ment » Fig. 127 .
This contains the cleaning fluid for the windscreen or rear window and for the
headlight cleaning system.
The capacity of the reservoir is about 3.5 litres or about 5.4 litres on vehicles
that have a headlight cleaning system 1)
.
1)
In some countries, 5.4 ltr. applies for both variants.
140General Maintenance
Page 188 of 197

BulbsChanging170
In the rear light174
Button in the driver's door Electrical power windows
51
C
Car care
126
Jack132
Washing128
Car computer see Multifunction display
29
Caring for paintwork130
Car park ticket holder80
Carrier76
Central locking button47
Central locking system45
lock47
unlock47
Changing Brake fluid
145
Bulbs170
Bulbs in the rear light174
Engine oil143
Foglight bulb (Scout, RS)173
Foglights and daytime running lights bulbs173
Front parking light bulb172
Front turn signal bulb172
Fuses168
Fuses in the dash panel168
Fuses in the engine compartment170
High beam bulb - halogen projector headlights 172
Licence plate light bulb
174
Low beam and high beam bulb - halogen head- lights
171
Low beam and high beam bulb - halogen pro- jector headlights
172
Wheels159
Changing a wheel Preparation160
Removing and fitting a wheel160
Subsequent steps160
Charging a vehicle battery148
Check Fit ball head properly
122
Checking Battery electrolyte level
147
Brake fluid145
Coolant level144
Engine oil142
Oil level142
Windscreen washer fluid140
Children and safety19
Child safety Side airbag
21
Child safety lock44
Child safety seat Use of child safety seats
21
Child seat Classification
21
ISOFIX22
on the front passenger seat20
TOP TETHER23
Use of ISOFIX child seats22
Chrome parts refer to Taking care of your vehicle
130
Cigarette lighter79
Cleaning126
Alcantara134
Covers on electrically heated seats134
Fabrics134
Headlight lenses131
Natural leather133
Plastic parts130
Synthetic leather134
Wheels132
Climatronic90
Automatic mode91
Control elements90
Controlling the blower91
Defrosting windscreen92
Recirculated air mode91
Setting the temperature91
Clock28
Clothes hook80
Cockpit 12-volt power outlet
79
Ashtray78
Cigarette lighter79
General view25
Lighting59
Storage compartments80
Compartments80
Computer see Multifunction display
29
Convenience turn signal57
Coolant143
Checking144
Display messages37
Replenishing144
Warning light37
Coolant temperature gauge display
27
Correct seated position7
Driver7
Front passenger8
Notes9
Rear seats9
Counter for distance driven28
Cruise control system117
Cupholders78
D
DAY LIGHT see Daylight running lights
56
Daylight running lights56
186Index