fuel pressure SKODA FABIA 2014 2.G / 5J Owner's Manual
[x] Cancel search | Manufacturer: SKODA, Model Year: 2014, Model line: FABIA, Model: SKODA FABIA 2014 2.G / 5JPages: 197, PDF Size: 13.56 MB
Page 37 of 197
The following message is shown in the MAXI DOT display.Gearbox overheated. Stop. Log book!
Stop the vehicle, switch off the engine, and wait until the
icon goes out –
there is a risk of gearbox damage. You can continue your journey as soon as
the icon disappears.WARNINGIf you have to stop for technical reasons, park the vehicle at a safe distance
from the traffic, switch off the engine and activate the hazard warning light
system » page 59 .
Note
■
Warning messages shown in the MAXI DOT display must be confirmed with
button B » Fig. 24 on page 33 to call up the main menu.■
As long as the operational faults are not rectified, the symbols are always in-
dicated again. After they are displayed for the first time, the symbols continue
to be indicated without any extra messages for the driver.
Warning lights
Introduction
This chapter contains information on the following subjects:
Handbrake
35
Brake system
36
Seat belt warning light
36
Generator
36
OPen door
36
Engine oil
36
Coolant
37
Power steering
38
Electronic Stability Control (ESC)
38
Traction Control System (ASR)
38
Antilock brake system (ABS)
38
The rear fog light
39
Bulb failure
39
Exhaust inspection system
39
Glow plug system (diesel engine)
39 EPC fault light (petrol engine)39 Diesel particulate filter (diesel engine)39
Fuel reserve
40
Airbag system
40
Tyre pressure
41
Windscreen washer fluid level
41
Traction control (TCS) switched off
41
Turn signal system
41
Low beam
41
Fog lights
41
Cruise control system
41
Selector lever lock
42
Main beam
42
The warning lights show certain functions/faults and may be accompanied by
audible signals.
WARNING■ If illuminated warning lights and the corresponding descriptions and
warning notes are not observed, this may result in severe injuries or major
vehicle damage.■
The engine compartment of your car is a hazardous area. There is a risk of
injuries, scalding, accidents and fire when working in the engine compart-
ment, e.g. inspecting and replenishing oil and other fluids. It is essential to
observe safety notes » page 138, Engine compartment .
Handbrake
Read and observe
on page 35 first.
The warning light comes on if the handbrake is applied. An audible warning
is also given if you drive the vehicle for at least 3 seconds at a speed of more
than 6 km/h.
The following message is shown in the MAXI DOT display. Release parking brake!
35Instruments and Indicator Lights
Page 39 of 197
The warning light comes on for a few seconds when the ignition is switch-
ed on 1)
.
Stop the vehicle, switch off the engine, and check the engine oil lev-
el » page 142 .
Even if the oil level is correct,
do not drive any further if the warning light is
flashing. Also do not leave the engine running at an idling speed.
Seek help from a specialist garage.
The warning light
lights up yellow (oil quantity too low)
The following message is shown in the MAXI DOT display.
Check oil level!
Stop the vehicle, switch off the engine, and check the engine oil lev-
el » page 142 .
An audible signal sounds as a warning signal.
The warning light will go out if the bonnet is left open for more than 30 sec-
onds. If no engine oil has been replenished, the warning light will come on
again after driving about 100 km.
The warning light flashes yellow (engine oil level sensor faulty)
The following message is shown in the MAXI DOT display.
Oil sensor workshop!
If the engine oil level sensor is faulty, the warning light flashes several
times and an audible signal sounds when the ignition is turned on.
Seek help from a specialist garage.WARNINGIf you have to stop for technical reasons, park the vehicle at a safe distance
from the traffic, switch off the engine and switch on the hazard warning
lights system » page 59.
CAUTION
The red oil pressure light is not an oil level indicator! One should therefore
check the oil level at regular intervals, preferably after every refuelling stop. Coolant
Read and observe
on page 35 first.
The indicator light
lights up until the engine reaches operating tempera-
ture 2)
. Avoid high speeds, full throttle and high engine loads.
If the warning light
lights up or flashes, either the coolant temperature is
too high or the coolant level is too low.
An audible signal sounds as a warning tone.
The following message is shown in the MAXI DOT display. ENGINE COOLANT PLEASE CHECK Log book!
Stop the vehicle, switch off the engine, check the level of the cool-
ant » page 144 , and refill the coolant if necessary » page 144.
If the coolant is within the specified range, the increased temperature may be
caused by an operating problem at the radiator fan. Check the fuse for the ra-
diator fan, replace if necessary » page 170, Fuses in the engine compartment .
Do not continue driving if the warning light
does not go off even though
the coolant level is correct and the fuse for the fan is in working order!
Seek help from a specialist garage.
WARNING■ If you have to stop for technical reasons, park the vehicle at a safe dis-
tance from the traffic, switch off the engine and activate the hazard warn-
ing light system » page 59.■
Carefully open the coolant expansion bottle. If the engine is hot, the cool-
ing system is pressurized - risk of scalding! It is therefore best to allow the
engine to cool down before removing the cap.
■
Do not touch the radiator fan. The radiator fan may switch itself on auto-
matically even if the ignition is off.
CAUTION
■ Additional headlights and other attached components in front of the air inlet
impair the cooling efficiency of the coolant.■
Never cover the radiator - there is a risk of the engine overheating.
1)
The warning light does not light up in vehicles fitted with the MAXI DOT display when the ignition is
switched on, but only if there is a fault or the engine oil level is too low.
2)
Not on vehicles with the MAXI DOT display.
37Instruments and Indicator Lights
Page 111 of 197
New tyres
New tyres have to be “run in” since they do not offer optimal grip at first. Drive
especially carefully for the first 500 km or so.
New brake pads
New brake pads initially do not provide optimal braking performance. They first
need to be “run in”. Drive especially carefully for the first 200 km or so.
Economical driving and respect the environment
Introduction
This chapter contains information on the following subjects:
Driving with anticipation
109
Economical gear changing.
109
Avoiding full throttle
110
Reducing idling
110
Avoiding short distances
110
Checking tyre pressure
110
Avoiding unnecessary ballast
111
Regular maintenance
111
Saving electrical energy
111
Environmental compatibility
111
The technical requirements for low fuel usage and economic efficiency of the
vehicle have already been built into the vehicle at the works. ŠKODA places a
particular emphasis on minimising negative effects on the environment.
It is necessary to take note of the guidelines given in this chapter in order to make best use of these characteristics and to maintain their effectiveness.
Fuel consumption, environmental pollution and the wear to the engine, brakes
and tyres depend essentially on the following three factors.
› Your personal driving style
› Operating conditions
› Technical requirements
The fuel economy by can be improved by 10 -15 % by always looking ahead and
driving in an economical way.
Fuel consumption is also be influenced by external factors which are beyond
the driver's control. Consumption increases during the winter or under difficult
conditions, on poor roads, etc.
Fuel consumption can vary considerably from the manufacturer's data, as a re-
sult of outside temperatures, the weather and driving style.
The optimal engine speed should be maintained when accelerating, to avoid a high fuel consumption and resonance of the vehicle.
CAUTION
All the speed and engine revolution figures apply only when the engine is at
its normal operating temperature.
Driving with anticipation
Read and observe
on page 109 first.
A vehicle's highest fuel consumption occurs when accelerating, therefore un-necessary accelerating and braking should be avoided. If looking ahead when
driving, less braking and consequently less accelerating are required.
If possible, let your vehicle coast to a stop, or use the engine brake, if you can see that the next set of traffic lights is on red, for example.
Economical gear changing.
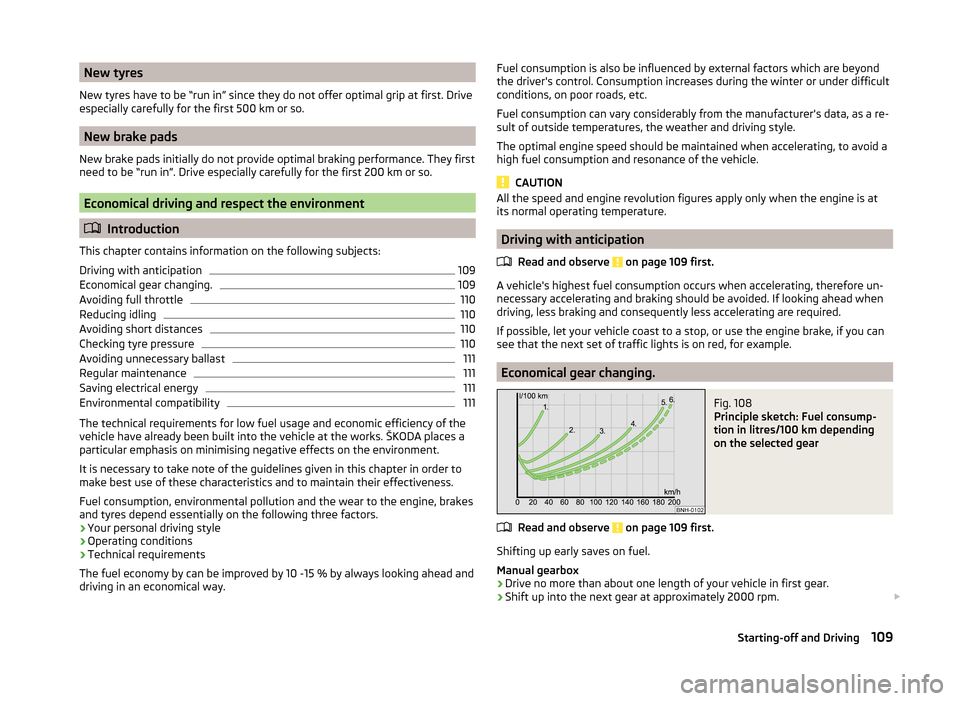
Fig. 108
Principle sketch: Fuel consump-
tion in litres/100 km depending
on the selected gear
Read and observe on page 109 first.
Shifting up early saves on fuel.
Manual gearbox › Drive no more than about one length of your vehicle in first gear.
› Shift up into the next gear at approximately 2000 rpm.
109Starting-off and Driving
Page 112 of 197
An effective way of achieving good fuel economy is to shift up early. Observe
the recommended gear » page 28, Recommended gear .
A suitably selected gear can have an effect on fuel consumption » Fig. 108.
Automatic gearbox
› Depress the accelerator pedal
slowly. However, do not depress it as far as
the kickdown position » page 107.
› An economic driving programme is automatically selected if the accelerator
pedal is only depressed slowly.
Avoiding full throttle
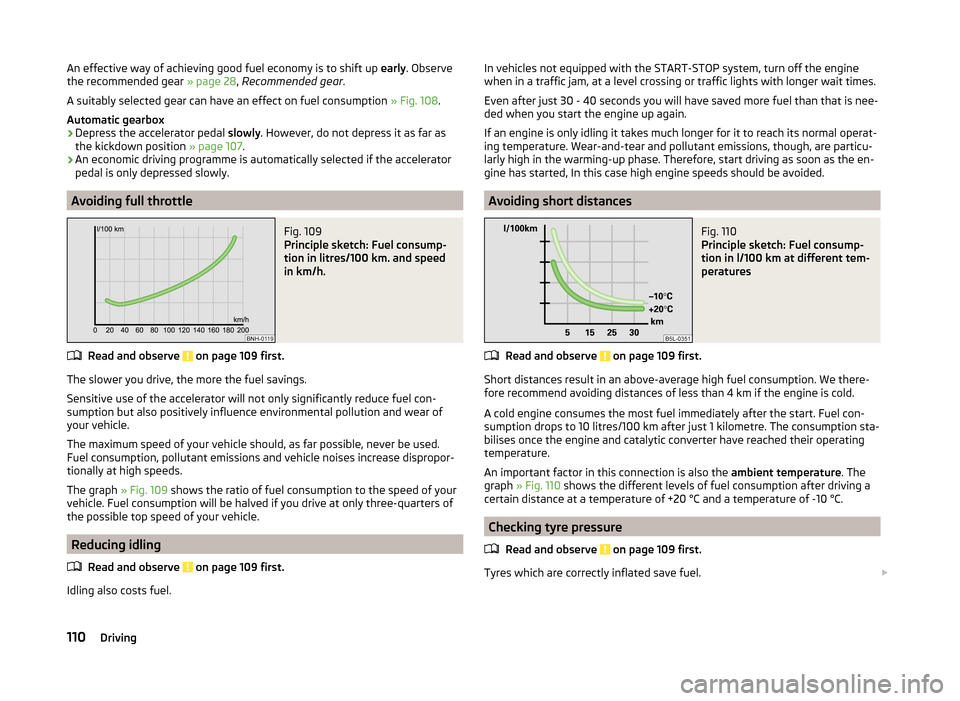
Fig. 109
Principle sketch: Fuel consump-
tion in litres/100 km. and speed
in km/h.
Read and observe on page 109 first.
The slower you drive, the more the fuel savings.
Sensitive use of the accelerator will not only significantly reduce fuel con-
sumption but also positively influence environmental pollution and wear of
your vehicle.
The maximum speed of your vehicle should, as far possible, never be used.
Fuel consumption, pollutant emissions and vehicle noises increase dispropor-
tionally at high speeds.
The graph » Fig. 109 shows the ratio of fuel consumption to the speed of your
vehicle. Fuel consumption will be halved if you drive at only three-quarters of
the possible top speed of your vehicle.
Reducing idling
Read and observe
on page 109 first.
Idling also costs fuel.
In vehicles not equipped with the START-STOP system, turn off the engine
when in a traffic jam, at a level crossing or traffic lights with longer wait times.
Even after just 30 - 40 seconds you will have saved more fuel than that is nee-
ded when you start the engine up again.
If an engine is only idling it takes much longer for it to reach its normal operat-
ing temperature. Wear-and-tear and pollutant emissions, though, are particu- larly high in the warming-up phase. Therefore, start driving as soon as the en-
gine has started, In this case high engine speeds should be avoided.
Avoiding short distances
Fig. 110
Principle sketch: Fuel consump-
tion in l/100 km at different tem-
peratures
Read and observe on page 109 first.
Short distances result in an above-average high fuel consumption. We there- fore recommend avoiding distances of less than 4 km if the engine is cold.
A cold engine consumes the most fuel immediately after the start. Fuel con-
sumption drops to 10 litres/100 km after just 1 kilometre. The consumption sta-
bilises once the engine and catalytic converter have reached their operating
temperature.
An important factor in this connection is also the ambient temperature. The
graph » Fig. 110 shows the different levels of fuel consumption after driving a
certain distance at a temperature of +20 °C and a temperature of -10 °C.
Checking tyre pressure
Read and observe
on page 109 first.
Tyres which are correctly inflated save fuel.
110Driving
Page 113 of 197
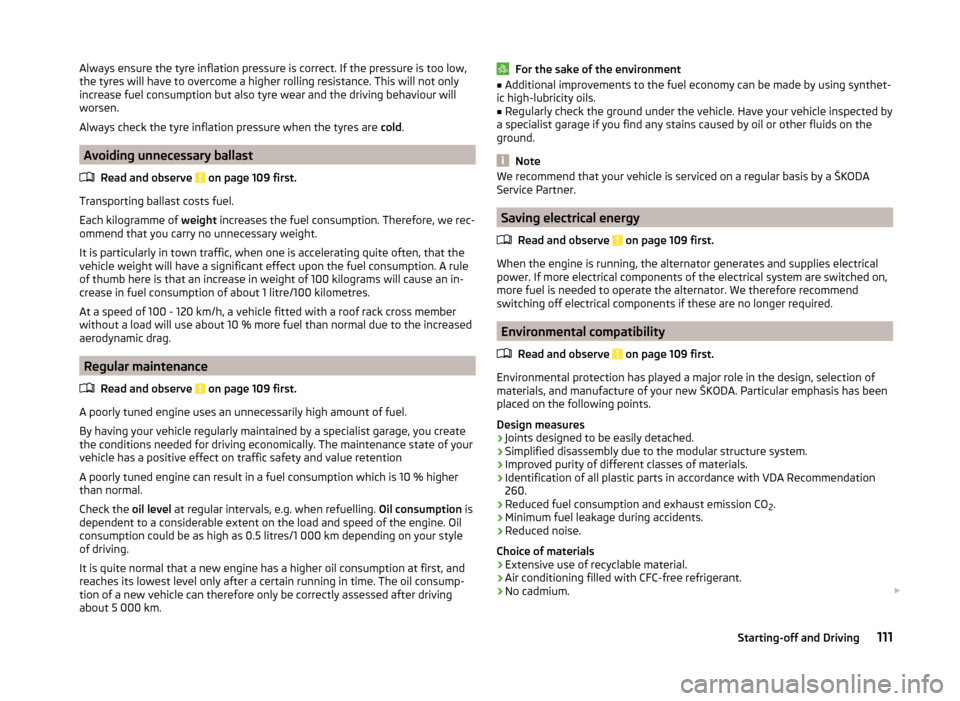
Always ensure the tyre inflation pressure is correct. If the pressure is too low,
the tyres will have to overcome a higher rolling resistance. This will not only
increase fuel consumption but also tyre wear and the driving behaviour will
worsen.
Always check the tyre inflation pressure when the tyres are cold.
Avoiding unnecessary ballast
Read and observe
on page 109 first.
Transporting ballast costs fuel.
Each kilogramme of weight increases the fuel consumption. Therefore, we rec-
ommend that you carry no unnecessary weight.
It is particularly in town traffic, when one is accelerating quite often, that the
vehicle weight will have a significant effect upon the fuel consumption. A rule
of thumb here is that an increase in weight of 100 kilograms will cause an in-
crease in fuel consumption of about 1 litre/100 kilometres.
At a speed of 100 - 120 km/h, a vehicle fitted with a roof rack cross member
without a load will use about 10 % more fuel than normal due to the increased
aerodynamic drag.
Regular maintenance
Read and observe
on page 109 first.
A poorly tuned engine uses an unnecessarily high amount of fuel.
By having your vehicle regularly maintained by a specialist garage, you create
the conditions needed for driving economically. The maintenance state of your
vehicle has a positive effect on traffic safety and value retention
A poorly tuned engine can result in a fuel consumption which is 10 % higher
than normal.
Check the oil level at regular intervals, e.g. when refuelling. Oil consumption is
dependent to a considerable extent on the load and speed of the engine. Oil
consumption could be as high as 0.5 litres/1 000 km depending on your style
of driving.
It is quite normal that a new engine has a higher oil consumption at first, and
reaches its lowest level only after a certain running in time. The oil consump-
tion of a new vehicle can therefore only be correctly assessed after driving
about 5 000 km.
For the sake of the environment■ Additional improvements to the fuel economy can be made by using synthet-
ic high-lubricity oils.■
Regularly check the ground under the vehicle. Have your vehicle inspected by
a specialist garage if you find any stains caused by oil or other fluids on the
ground.
Note
We recommend that your vehicle is serviced on a regular basis by a ŠKODA
Service Partner.
Saving electrical energy
Read and observe
on page 109 first.
When the engine is running, the alternator generates and supplies electricalpower. If more electrical components of the electrical system are switched on,
more fuel is needed to operate the alternator. We therefore recommend
switching off electrical components if these are no longer required.
Environmental compatibility
Read and observe
on page 109 first.
Environmental protection has played a major role in the design, selection ofmaterials, and manufacture of your new ŠKODA. Particular emphasis has been
placed on the following points.
Design measures › Joints designed to be easily detached.
› Simplified disassembly due to the modular structure system.
› Improved purity of different classes of materials.
› Identification of all plastic parts in accordance with VDA Recommendation
260.
› Reduced fuel consumption and exhaust emission CO
2.
› Minimum fuel leakage during accidents.
› Reduced noise.
Choice of materials
› Extensive use of recyclable material.
› Air conditioning filled with CFC-free refrigerant.
› No cadmium.
111Starting-off and Driving
Page 152 of 197
WARNING (Continued)■Unusual vibrations or pulling of the vehicle to one side could be a sign of
tyre damage. If there is any doubt that a wheel is damaged, immediately re-
duce your speed and stop! If no external damage is evident, drive slowly
and carefully to the nearest specialist garage to have the vehicle checked.■
Only use those tyres or wheel rims which have been approved by ŠKODA
for your model of vehicle. Failure to observe this instruction will adversely
affect the road safety of your vehicle – there is the risk of an accident.
WARNINGInformation regarding tyre damage or wear■Never use tyres if you do not know anything about the condition and age.■
Never drive with damaged tyres – there is the risk of an accident.
■
Immediately replace damaged wheel rims or tyres.
■
You must have your tyres replaced with new ones at the latest when the
wear indicators have been worn down.
■
Worn tyres do not provide the necessary grip particularly at high speeds
on wet roads. “Aquaplaning” (uncontrolled movements of the vehicle –
“swimming” on a wet road surface) could be the result.
WARNINGInformation on tyre pressure■The tyre control display does not absolve the driver of the responsibility
to ensure the correct tyre inflation pressure. Check the tyre pressure at
regular intervals.■
Pressures that are too low or too high impair handling – there is the risk
of an accident.
■
If the pressure is too low, the tyre must overcome a greater rolling resist-
ance. This will heat the tyre up, especially at higher speeds. This can result
in tread separation and a tyre blowout.
WARNINGInformation on the wheel bolts■The wheel bolts must be clean and must turn easily. Never treat them
with grease or oil.■
The prescribed tightening torque of the wheel bolts for steel and light al-
loy wheels is 120 Nm.
WARNING (Continued)■ If the wheel bolts are tightened to a too low tightening torque, the rim
can come loose when the car is moving – risk of accident! A tightening tor-
que which is too high can damage the bolts and threads and this can result
in permanent deformation of the contact surfaces on the rim.■
In case of incorrect treatment of the wheel bolts, the wheel can loosen
when the car is moving – risk of accident!
WARNINGInformation on the spare wheel■Only use the spare wheel while absolutely necessary.■
Never drive with more than one spare wheel mounted.
■
The snow chains cannot be used on the spare wheel.
CAUTION
■ If a spare wheel is used that is not identical to the fitted tyres, the following
must be observed » page 155, Spare and back-up wheel .■
Protect the tyres from contact with oil, grease and fuel.
■
Replace lost dust caps.
■
If, in the event of a puncture, it is necessary to fit a spare wheel with a tyre
without a dedicated running direction or the opposite running direction, drive
carefully as the optimum characteristics of the tyre are no longer applicable in
this situation.
For the sake of the environment
Tyres which are insufficiently inflated increase your fuel consumption.
Note
■ We recommend that any work on the wheels or tyres is carried out by a spe-
cialist garage.■
We recommend that you use wheel rims, tyres, full wheel trims and snow
chains from ŠKODA Original Accessories.
150General Maintenance
Page 153 of 197
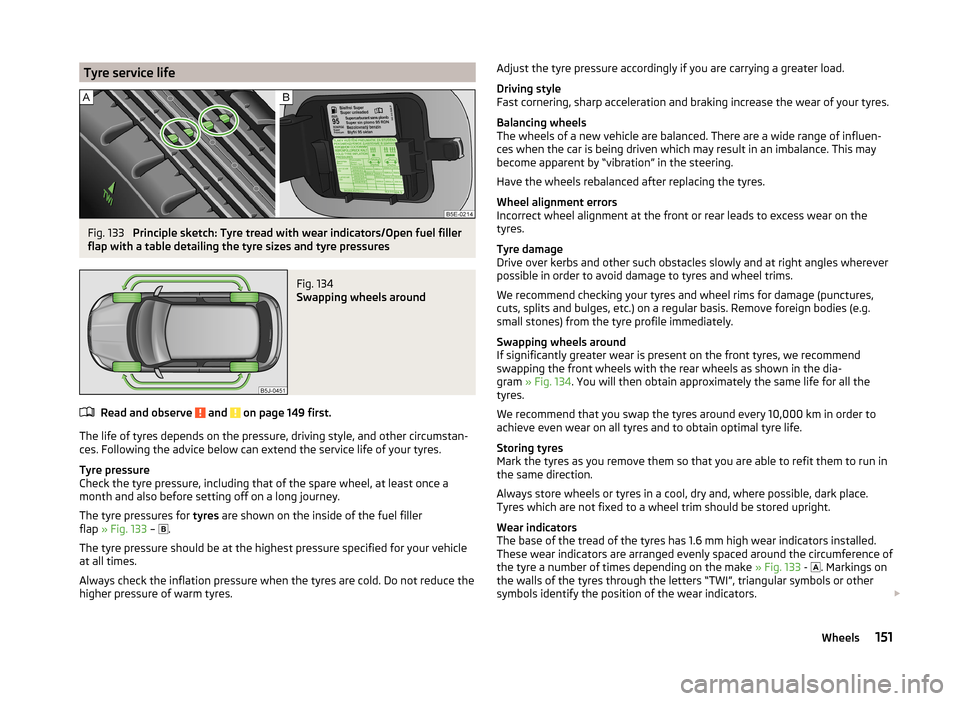
Tyre service lifeFig. 133
Principle sketch: Tyre tread with wear indicators/Open fuel filler
flap with a table detailing the tyre sizes and tyre pressures
Fig. 134
Swapping wheels around
Read and observe and on page 149 first.
The life of tyres depends on the pressure, driving style, and other circumstan-
ces. Following the advice below can extend the service life of your tyres.
Tyre pressure
Check the tyre pressure, including that of the spare wheel, at least once a
month and also before setting off on a long journey.
The tyre pressures for tyres are shown on the inside of the fuel filler
flap » Fig. 133 –
.
The tyre pressure should be at the highest pressure specified for your vehicle
at all times.
Always check the inflation pressure when the tyres are cold. Do not reduce the
higher pressure of warm tyres.
Adjust the tyre pressure accordingly if you are carrying a greater load.
Driving style
Fast cornering, sharp acceleration and braking increase the wear of your tyres.
Balancing wheels
The wheels of a new vehicle are balanced. There are a wide range of influen-
ces when the car is being driven which may result in an imbalance. This may
become apparent by “vibration” in the steering.
Have the wheels rebalanced after replacing the tyres.
Wheel alignment errors
Incorrect wheel alignment at the front or rear leads to excess wear on the
tyres.
Tyre damage
Drive over kerbs and other such obstacles slowly and at right angles wherever
possible in order to avoid damage to tyres and wheel trims.
We recommend checking your tyres and wheel rims for damage (punctures,
cuts, splits and bulges, etc.) on a regular basis. Remove foreign bodies (e.g.
small stones) from the tyre profile immediately.
Swapping wheels around
If significantly greater wear is present on the front tyres, we recommend
swapping the front wheels with the rear wheels as shown in the dia-
gram » Fig. 134 . You will then obtain approximately the same life for all the
tyres.
We recommend that you swap the tyres around every 10,000 km in order to
achieve even wear on all tyres and to obtain optimal tyre life.
Storing tyres
Mark the tyres as you remove them so that you are able to refit them to run in
the same direction.
Always store wheels or tyres in a cool, dry and, where possible, dark place.
Tyres which are not fixed to a wheel trim should be stored upright.
Wear indicators
The base of the tread of the tyres has 1.6 mm high wear indicators installed. These wear indicators are arranged evenly spaced around the circumference of
the tyre a number of times depending on the make » Fig. 133 -
. Markings on
the walls of the tyres through the letters “TWI”, triangular symbols or other
symbols identify the position of the wear indicators. 151Wheels
Page 166 of 197
›Do not remove the foreign body, e.g. screw or nail, from the tyre.›Unscrew the valve cap.›
Use the valve remover
1
to unscrew the valve core and place it on a clean
surface (rag, paper, etc.).
Sealing and inflating the tyre
Read and observe
on page 163 first.
Sealing
›
Shake the tyre inflator bottle
10
» Fig. 145 on page 163 vigorously several
times.
›
Firmly screw the inflation hose
3
onto the tyre inflator bottle
10
in a clock-
wise direction. The film on the cap is pierced automatically.
›
Remove the plug from the inflation hose
3
and plug the open end fully onto
the tyre valve.
›
Hold the bottle
10
with the bottom facing upwards and fill all of the sealing
agent from the tyre inflator bottle into the tyre.
›
Remove the empty tyre inflator bottle from the valve.
›
Screw the valve core back into the tyre valve using the valve remover
1
.
Inflating
›
Screw the air compressor tyre inflation hose
5
» Fig. 145 on page 163 firmly
onto the tyre valve.
›
Check that the air release valve
7
is closed.
›
Start the engine and run it in idle.
›
Plug the connector
9
into 12 Volt socket » page 79, 12-volt power outlet .
›
Switch on the air compressor with the ON and OFF switch
8
.
›
Allow the air compressor to run until a pressure of 2.0 - 2.5 bar is achieved.
Maximum run time of 8 minutes » .
›
Switch off the air compressor.
›
If you cannot reach an air pressure of 2.0 – 2.5 bar, unscrew the tyre inflation
hose
5
from the tyre valve.
›
Drive the vehicle 10 metres forwards or backwards to allow the sealing agent
to “distribute” in the tyre.
›
Firmly screw the tyre inflation hose
5
back onto the tyre valve and repeat
the inflation process.
›
If you cannot reach the required tyre inflation pressure here either, this
means the tyre has sustained too much damage. You cannot seal with tyre with the breakdown kit »
.
›
Switch off the air compressor.
›
Remove the tyre inflation hose
5
from the tyre valve.
Once a tyre pressure of 2.0 – 2.5 bar is reached, the journey may be continued
at a maximum speed of 80 km/h (50 mph).
Check the tyre inflation pressure after driving for 10 minutes » page 164.WARNING■
The tyre inflation hose and air compressor may get hot as the tyre is be-
ing inflated – there is a risk of injury.■
Do not place the hot tyre inflation hose or hot air compressor on flamma-
ble materials – there is a risk of fire.
■
If you cannot inflate the tyre to at least 2.0 bar, this means the damage
sustained was too serious. The sealing agent cannot be used to seal the
tyre.
Do not drive the vehicle. Seek help from a specialist garage.
CAUTION
Switch off the air compressor after running 8 minutes at the latest – there is a
risk of overheating. Allow the air compressor to cool a few minutes before
switching it on again.
Check after 10 minutes' driving
Read and observe
on page 163 first.
Check the tyre inflation pressure after driving for 10 minutes!
If the tyre pressure is 1.3 bar or less
›
Do not drive the vehicle. You cannot properly seal with tyre with the
breakdown kit.
If the tyre pressure is 1.3 bar or more
›
Adjust the tyre pressure to the correct value again (see inside of fuel filler
cap).
›
Continue driving carefully to the nearest specialist garage at a maximum speed of 80 km/h (50 mph).
Jump-starting
Introduction
This chapter contains information on the following subjects:
Jump-starting using the battery from another vehicle
165
Jump-starting in vehicles with the START-STOP system
166
164Do-it-yourself
Page 171 of 197
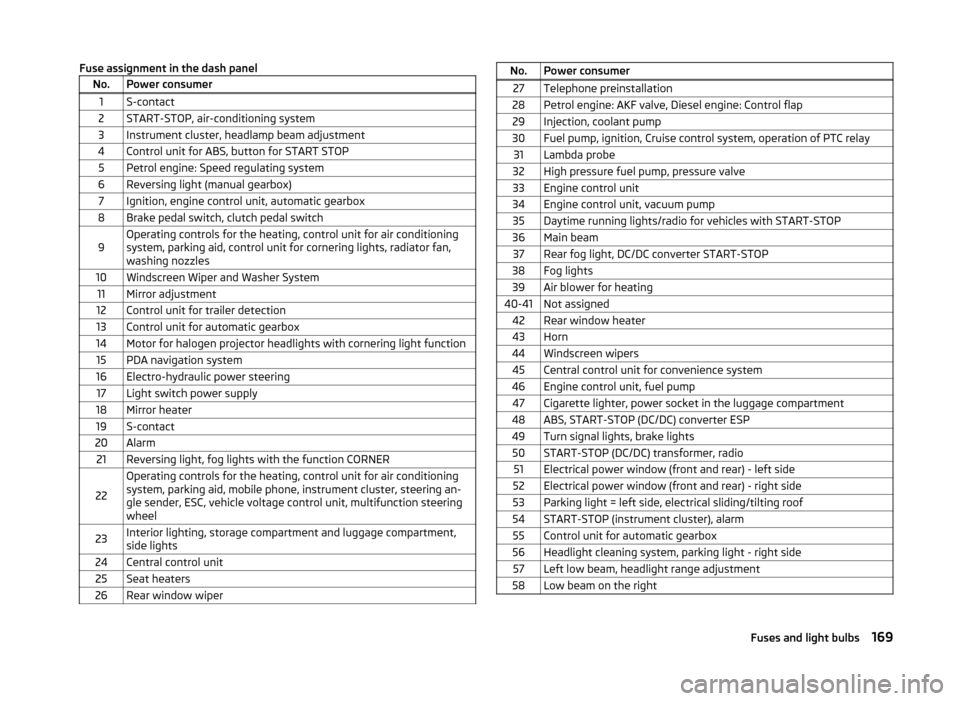
Fuse assignment in the dash panelNo.Power consumer1S-contact2START-STOP, air-conditioning system3Instrument cluster, headlamp beam adjustment4Control unit for ABS, button for START STOP5Petrol engine: Speed regulating system6Reversing light (manual gearbox)7Ignition, engine control unit, automatic gearbox8Brake pedal switch, clutch pedal switch9Operating controls for the heating, control unit for air conditioning
system, parking aid, control unit for cornering lights, radiator fan,
washing nozzles10Windscreen Wiper and Washer System11Mirror adjustment12Control unit for trailer detection13Control unit for automatic gearbox14Motor for halogen projector headlights with cornering light function15PDA navigation system16Electro-hydraulic power steering17Light switch power supply18Mirror heater19S-contact20Alarm21Reversing light, fog lights with the function CORNER
22
Operating controls for the heating, control unit for air conditioning
system, parking aid, mobile phone, instrument cluster, steering an-
gle sender, ESC, vehicle voltage control unit, multifunction steering
wheel23Interior lighting, storage compartment and luggage compartment,
side lights24Central control unit25Seat heaters26Rear window wiperNo.Power consumer27Telephone preinstallation28Petrol engine: AKF valve, Diesel engine: Control flap29Injection, coolant pump30Fuel pump, ignition, Cruise control system, operation of PTC relay31Lambda probe32High pressure fuel pump, pressure valve33Engine control unit34Engine control unit, vacuum pump35Daytime running lights/radio for vehicles with START-STOP36Main beam37Rear fog light, DC/DC converter START-STOP38Fog lights39Air blower for heating40-41Not assigned42Rear window heater43Horn44Windscreen wipers45Central control unit for convenience system46Engine control unit, fuel pump47Cigarette lighter, power socket in the luggage compartment48ABS, START-STOP (DC/DC) converter ESP49Turn signal lights, brake lights50START-STOP (DC/DC) transformer, radio51Electrical power window (front and rear) - left side52Electrical power window (front and rear) - right side53Parking light = left side, electrical sliding/tilting roof54START-STOP (instrument cluster), alarm55Control unit for automatic gearbox56Headlight cleaning system, parking light - right side57Left low beam, headlight range adjustment58Low beam on the right169Fuses and light bulbs
Page 189 of 197
De-icing rear window61
Deactivating airbags18
Decorative films131
Delayed locking of the boot lid see boot lid
51
Diesel refer to Fuel
137
Diesel fuel Operation in winter
137
Diesel particulate filter39
display messages39
Digital clock28
Dipstick142
Display Service interval
32
Distance driven28
Door Child safety lock
44
Closing44
Indicator light for an open door36
Opening44
Doors Emergency locking
45
driving emissions
177
fuel consumption177
Driving Abroad
113
Driving through water on streets112
Maximum speed179
Driving economically Economical gear changing
109
Driving through water112
E
Economical and environmentally friendly driv- ing
109
Economical driving Anticipation in driving109
Ballast111
Driving at full throttle110
Idling110
Regular maintenance111
Saving energy111
Short distances110
Tyre pressure110
EDS115
Electrical power windows Button in the driver's door
51, 52
Button in the rear door52
Central locking system53
Electric power windows Operational faults
53
Electric sliding/tilting roof53
Electronic Differential Lock115
Electronic immobilizer101
Emergency Changing a wheel
159
Hazard warning light system59
Jump-starting164, 165
locking of the doors45
Selector lever-unlocking108
Sliding/tilting roof55
Towing the vehicle166
Towing the vehicle using the tow hitch167
Tyre repair162
Unlocking the boot lid51
Emergency equipment Fire extinguisher
158
First aid kit158
Jack159
Vehicle tool kit159
Warning triangle158
Emissions177
Engine Running in
108
Starting and stopping the engine101
Starting the engine102
Switching off the engine102
Engine compartment138
Brake fluid145
Coolant144
Overview140
Vehicle battery145
Engine number176
Engine oil141
Capacity141
Changing143
Checking142
Replenishing143
Specifications141
Warning light36
Engine revolutions counter27
Environment109
Environmental compatibility111
Environmentally friendly driving109
ESC Function
114
warning light38
F
Films
131
Fire extinguisher158
First aid kit158
Flashers57
Fog lights58
Footmats104
see Footmats104
Front airbag15
Front seats65
Fuel135
Diesel137
Fuel gauge27
gauge27
refer to Fuel135
187Index