length SKODA FABIA 2014 2.G / 5J Owner's Manual
[x] Cancel search | Manufacturer: SKODA, Model Year: 2014, Model line: FABIA, Model: SKODA FABIA 2014 2.G / 5JPages: 197, PDF Size: 13.56 MB
Page 59 of 197
Activating on vehicles with the START-STOP system›Switch off the ignition.›
At the same time, pull the turn signal light stalk » Fig. 42 on page 57 to-
wards the steering wheel, push it upwards, and hold it in this position.
›
Switch on the ignition - wait until the right-turn signal light flashes 4x.
›
Switch off the ignition - an audible signal sounds which confirms the activa-
tion of the daylight driving lights.
›
Release the turn signal stalk.
On vehicles with separate lights for daylight driving lights in the fog lights or in
the front bumper, the parking lights and the licence plate light do not come on
when activating the function daylight driving lights (neither front nor rear).
If the vehicle is not equipped with separate lights for daylight driving lights,
the combination of the low beam, the parking lights (front and rear) including
the licence plate light is used as daylight driving lights.
Note
In vehicles with separate lights for daylight driving lights (in the bumper below
the main headlights) these lights also serve as side lights.
Turn signal and main beam lights
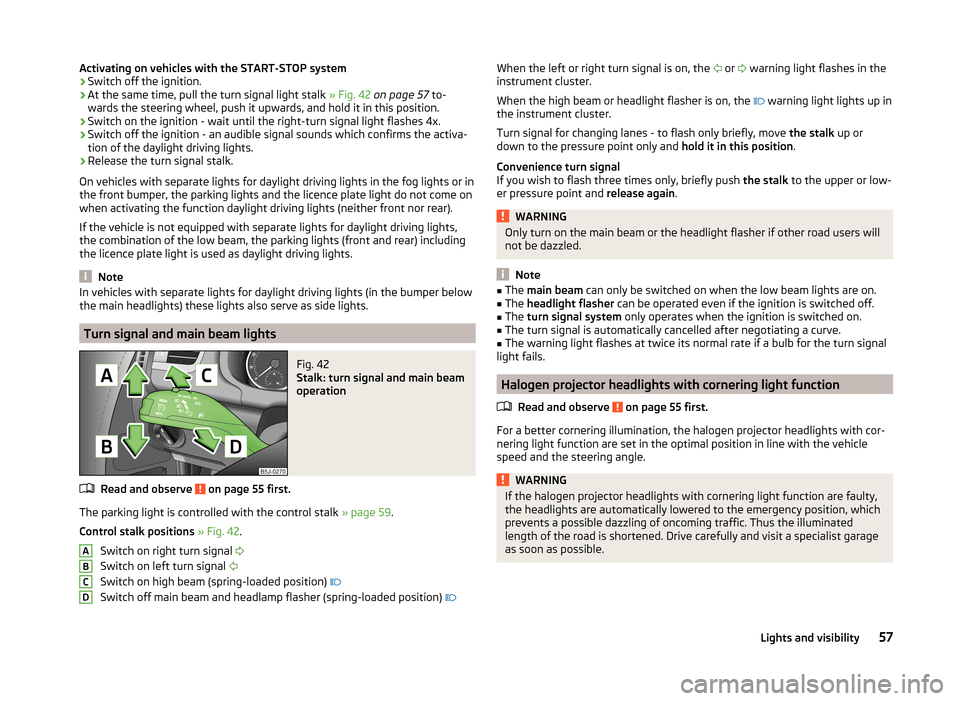
Fig. 42
Stalk: turn signal and main beam
operation
Read and observe on page 55 first.
The parking light is controlled with the control stalk » page 59.
Control stalk positions » Fig. 42 .
Switch on right turn signal
Switch on left turn signal
Switch on high beam (spring-loaded position)
Switch off main beam and headlamp flasher (spring-loaded position)
ABCDWhen the left or right turn signal is on, the
or warning light flashes in the
instrument cluster.
When the high beam or headlight flasher is on, the
warning light lights up in
the instrument cluster.
Turn signal for changing lanes - to flash only briefly, move the stalk up or
down to the pressure point only and hold it in this position.
Convenience turn signal
If you wish to flash three times only, briefly push the stalk to the upper or low-
er pressure point and release again.WARNINGOnly turn on the main beam or the headlight flasher if other road users will
not be dazzled.
Note
■ The main beam can only be switched on when the low beam lights are on.■The headlight flasher can be operated even if the ignition is switched off.■
The turn signal system only operates when the ignition is switched on.
■
The turn signal is automatically cancelled after negotiating a curve.
■
The warning light flashes at twice its normal rate if a bulb for the turn signal
light fails.
Halogen projector headlights with cornering light function
Read and observe
on page 55 first.
For a better cornering illumination, the halogen projector headlights with cor-
nering light function are set in the optimal position in line with the vehicle
speed and the steering angle.
WARNINGIf the halogen projector headlights with cornering light function are faulty,
the headlights are automatically lowered to the emergency position, which
prevents a possible dazzling of oncoming traffic. Thus the illuminated
length of the road is shortened. Drive carefully and visit a specialist garage
as soon as possible.57Lights and visibility
Page 90 of 197

The cooling system operates only if the following conditions are met.The cooling system is switched on » page 88.
The engine is running.
The outside temperature is above approximately +2 °C.
The blower switch is switched on (positions 1-4).
If the desired interior temperature can also be achieved without activating the
cooling system, fresh air mode should be selected.
If the coolant temperature is too high, the cooling system is switched off to
ensure that the engine cools down.
CAUTION
■ Under certain circumstances, air at a temperature of about 5 °C can flow out
of the vents when the cooling system is switched on.■
Lengthy and uneven distribution of the air flow out of the vents (especially
around the feet) and large differences in temperature, for example, when get-
ting out of the vehicle, can cause susceptible individuals to catch a cold.
Note
■ We recommend that you have the air conditioning system cleaned by a spe-
cialist garage once every year.■
During operation of the air conditioning, under certain circumstances an in-
crease in engine idle speed may occur in order to ensure sufficient heating
comfort.
OperationFig. 96
The air conditioning system: Control elements
Read and observe
on page 88 first.
Functions of the individual controls » Fig. 96 :
Set the temperature (turn to the left: to reduce the temperature, turn to
the right: to increase the temperature)
Set the blower level (level 0: blowers off, level 4: the highest blower
speed)
Set the direction of the air outlet » page 85
Switch recirculation on/off » page 89
Switch the cooling system on/off
Note
The warning light in the symbol button lights after activation, even if not all
of the conditions for the function of the cooling system are met » page 87. The
operational readiness of the cooling system is indicated by the indicator light
in the button lighting up.ABC88Using the system
Page 93 of 197
Switch recirculation on/off » page 91
Switch the cooling system on/off
Note
Do not stick anything on or cover the interior temperature sensor 11 » Fig. 97 ;
it could have an unfavourable effect on the Climatronic system.
Automatic mode
The automatic mode is used in order to maintain a constant temperature and
to demist the windows in the interior of the car.
Switching on
›
Set a temperature between +18 °C and +29 ℃.
›
Move the air outlet vents 3 » Fig. 94 on page 85 and 4 so that the air flow is
directed slightly upwards.
›
Press the button
» Fig. 97 on page 90 ;
will appear in the display.
Automatic mode can be switched off by pressing any of the air distribution
buttons or by increasing/decreasing the blower speed. The temperature is
nevertheless regulated.
Setting the temperature
Setting temperature
›
Switch on the ignition.
›
Turn the control dial
1
» Fig. 97 on page 90 to the left or to the right to in-
crease or decrease the temperature.
Switching between Celsius and Fahrenheit
›
Press and hold the and
buttons simultaneously.
The information appears in the display in the desired temperature unit (no.
3
» Fig. 97 on page 90 ).
The interior temperature can be set between +18 °C and +29 ℃. The interior
temperature is regulated automatically within this range.
If you set the temperature below +18 ℃, “LO” appears in the display.
If you set a temperature higher than +29 ℃, “HI” appears in the display.
In both end positions, the Climatronic operates at maximum cooling or heating capacity. There is therefore no automatic temperature control.
CAUTIONLengthy and uneven distribution of the air flow out of the vents (especially
around the feet) and large differences in temperature, for example, when get-
ting out of the vehicle, can cause susceptible individuals to catch a cold.
Recirculated air mode
Recirculated air mode prevents polluted air from outside the vehicle getting in-
to the vehicle, for example when driving through a tunnel or when standing in
a traffic jam.
Switching on
›
Press the button
» Fig. 97 on page 90 .
The display shows the icon.
Switching off
›
Press the button
» Fig. 97 on page 90 again.
The icon in the display goes out.
WARNINGNever leave recirculated air mode on over a longer period, as “stale air” can
cause fatigue in the driver and the passengers, reduce attention levels and
also cause the windows to mist up. The risk of having an accident increa-
ses. Switch off recirculated air mode as soon as the windows start to mist
up.
Note
If recirculated air mode is switched on for around 15 minutes, the symbol
will begin to flash in the display as a sign that the recirculated air mode is
switched on long-term. If the recirculated air mode is not switched off, the
symbol flashes for around 5 minutes.
Controlling the blower
The Climatronic system controls the blower stages automatically in line with
the interior temperature. However, the blower level can be manually adjusted
to suit your particular needs.
›
Turn control dial
10
» Fig. 97 on page 90 to the left or to the right to increase
or decrease the blower speed.
If the blower is switched off, the Climatronic system is switched off.
91Heating and air conditioning
Page 111 of 197
New tyres
New tyres have to be “run in” since they do not offer optimal grip at first. Drive
especially carefully for the first 500 km or so.
New brake pads
New brake pads initially do not provide optimal braking performance. They first
need to be “run in”. Drive especially carefully for the first 200 km or so.
Economical driving and respect the environment
Introduction
This chapter contains information on the following subjects:
Driving with anticipation
109
Economical gear changing.
109
Avoiding full throttle
110
Reducing idling
110
Avoiding short distances
110
Checking tyre pressure
110
Avoiding unnecessary ballast
111
Regular maintenance
111
Saving electrical energy
111
Environmental compatibility
111
The technical requirements for low fuel usage and economic efficiency of the
vehicle have already been built into the vehicle at the works. ŠKODA places a
particular emphasis on minimising negative effects on the environment.
It is necessary to take note of the guidelines given in this chapter in order to make best use of these characteristics and to maintain their effectiveness.
Fuel consumption, environmental pollution and the wear to the engine, brakes
and tyres depend essentially on the following three factors.
› Your personal driving style
› Operating conditions
› Technical requirements
The fuel economy by can be improved by 10 -15 % by always looking ahead and
driving in an economical way.
Fuel consumption is also be influenced by external factors which are beyond
the driver's control. Consumption increases during the winter or under difficult
conditions, on poor roads, etc.
Fuel consumption can vary considerably from the manufacturer's data, as a re-
sult of outside temperatures, the weather and driving style.
The optimal engine speed should be maintained when accelerating, to avoid a high fuel consumption and resonance of the vehicle.
CAUTION
All the speed and engine revolution figures apply only when the engine is at
its normal operating temperature.
Driving with anticipation
Read and observe
on page 109 first.
A vehicle's highest fuel consumption occurs when accelerating, therefore un-necessary accelerating and braking should be avoided. If looking ahead when
driving, less braking and consequently less accelerating are required.
If possible, let your vehicle coast to a stop, or use the engine brake, if you can see that the next set of traffic lights is on red, for example.
Economical gear changing.
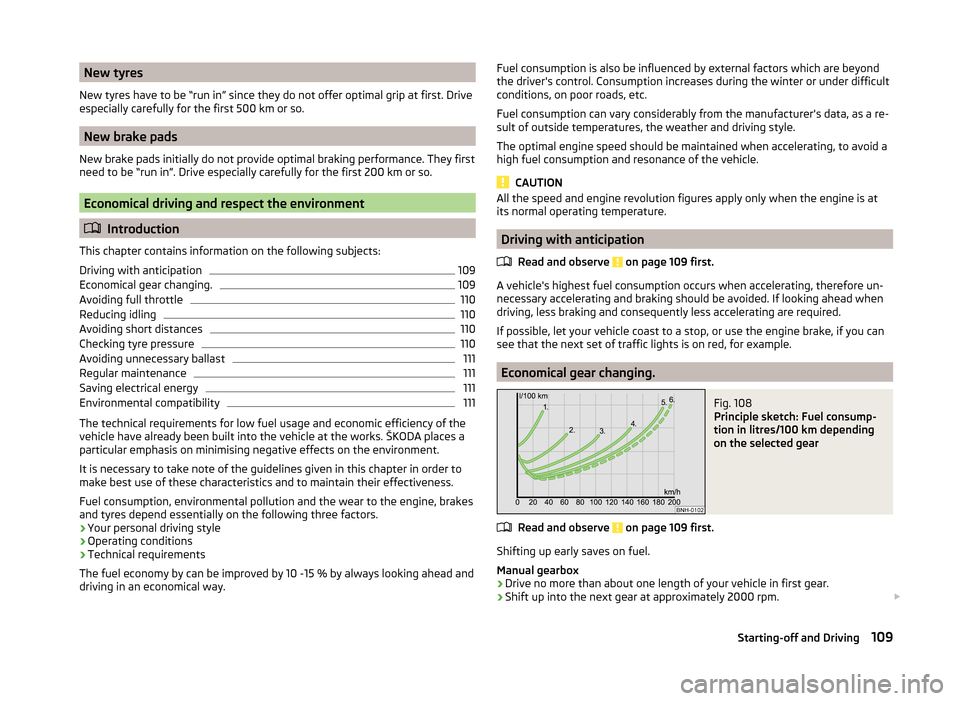
Fig. 108
Principle sketch: Fuel consump-
tion in litres/100 km depending
on the selected gear
Read and observe on page 109 first.
Shifting up early saves on fuel.
Manual gearbox › Drive no more than about one length of your vehicle in first gear.
› Shift up into the next gear at approximately 2000 rpm.
109Starting-off and Driving
Page 118 of 197
Parking aid
Introduction
This chapter contains information on the following subjects:
Function
116
Activation/deactivation
116WARNING■ The parking aid is not a substitute for the driver paying proper attention
and it is always the driver's responsibility to take care when reversing the
vehicle or carrying out similar manoeuvres. Pay particular attention to small
children and animals as they are not recognised by the parking aid sensors.■
Before reversing, you should make sure that there are no small obstacles,
such as rocks, thin posts, trailer drawbars etc. behind your vehicle. Such ob-
stacles may not be recognised by the parking aid sensors.
■
Under certain circumstances, surfaces of certain objects and types of
clothing cannot reflect the system signals. Thus, these objects or people
who wear such clothing are not recognised by the System sensors.
■
External sound sources can have a detrimental effect on the system. Un-
der adverse conditions, this may cause objects or people to not be recog-
nised by the system.
CAUTION
■ If a warning signal sounds for about 3 seconds after activating the system
and there is no obstacle close to your car, this indicates a system fault. Have
the fault rectified by a specialist garage.■
The sensors must be kept clean (free of ice, etc.) to enable the parking aid to
operate properly.
■
Under adverse weather conditions (heavy rain, water vapour, very low or
high temperatures etc.) system function may be limited.
■
Additionally fitted modules, such as a bicycle rack, can impair the function of
the parking aid.
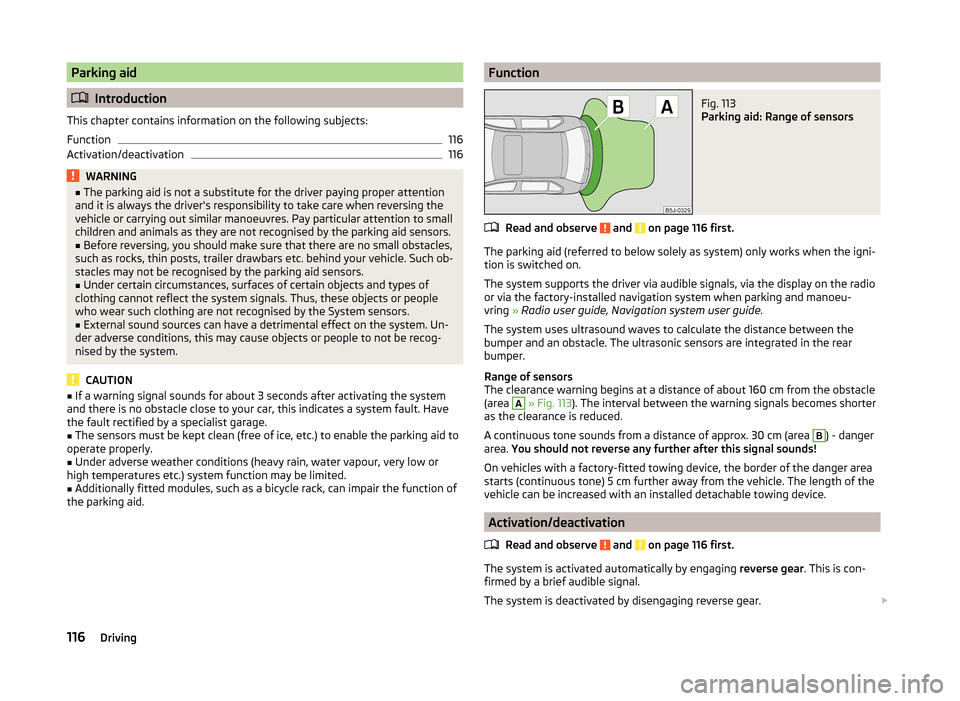
FunctionFig. 113
Parking aid: Range of sensors
Read and observe and on page 116 first.
The parking aid (referred to below solely as system) only works when the igni-
tion is switched on.
The system supports the driver via audible signals, via the display on the radio
or via the factory-installed navigation system when parking and manoeu-
vring » Radio user guide, Navigation system user guide.
The system uses ultrasound waves to calculate the distance between the
bumper and an obstacle. The ultrasonic sensors are integrated in the rear
bumper.
Range of sensors
The clearance warning begins at a distance of about 160 cm from the obstacle
(area
A
» Fig. 113 ). The interval between the warning signals becomes shorter
as the clearance is reduced.
A continuous tone sounds from a distance of approx. 30 cm (area
B
) - danger
area. You should not reverse any further after this signal sounds!
On vehicles with a factory-fitted towing device, the border of the danger area
starts (continuous tone) 5 cm further away from the vehicle. The length of the
vehicle can be increased with an installed detachable towing device.
Activation/deactivation
Read and observe
and on page 116 first.
The system is activated automatically by engaging reverse gear. This is con-
firmed by a brief audible signal.
The system is deactivated by disengaging reverse gear.
116Driving
Page 135 of 197
WARNING■Care products may be harmful to your health if not used according to the
instructions.■
Always keep the automobile care products safe from people who are not
completely independent, e.g. children - there is a danger of poisoning!
CAUTION
■ Be sure to check clothing for colourfastness to avoid any damage or visible
stains on the material (leather), panels and textiles.■
Remove fresh stains such as those from ball-point pens, ink, lipstick, shoe
polish, etc., from the material (leather), panels and textiles as quickly as possi-
ble.
■
Air fresheners and scents can be hazardous to heath when the temperature
inside the vehicle is high.
■
Do not attach scents and air fresheners to the dashboard – risk of damage to
the dash panel.
■
Do not stick any stickers on the inside of the rear windows, the rear side win-
dows and in the vicinity of the heating elements on the windscreen or near the
window aerial. These may get damaged.
■
Do not clean the headlining with a brush – risk of damage to the lining sur-
face.
■
Cleaners containing solvents can damage the material being cleaned.
■
Apply only a small amount of the cleaning and care product.
For the sake of the environment
Used cans of vehicle care product represent hazardous waste that is harmful
to the environment. These must be disposed of in accordance with national
legislation.
Note
Because of the special tools and knowledge required, and to avoid any poten-
tial problems with the cleaning and care of the interior of your vehicle, we rec-
ommend that cleaning and care of the interior of your vehicle be carried out by
a ŠKODA Service Partner.
Natural leather
Read and observe
and on page 133 first.
Leather is a natural material with specific properties and requires regular
cleaning and maintenance.
The leather should be cleaned on a regular basis depending on the amount of
wear-and-tear.
Dust and dirt in pores and creases act as abrasives. This leads to severe abra-
sion and the premature embrittlement of the leather surface.
We recommend that you remove dust at regular short intervals with a cloth or
vacuum cleaner.
Clean soiled leather surfaces with a cotton or woollen cloth lightly moistened
with water and then dry with a clean dry cloth »
.
Clean more severely soiled areas with a cloth soaked in a mild soap solution (2
tablespoons of natural soap to 1 litre of water).
Use a cleaning agent specially developed for the purpose to remove stains.
Treat the leather with a suitable leather care product at suitable regular inter-
vals.
CAUTION
■ Ensure that the leather is not soaked through at any point during cleaning
and that no water gets into the stitching of the seams. The leather would then
become brittle and cracked.■
Avoid leaving the vehicle for lengthy periods in bright sunlight to avoid the
leather from bleaching. If the vehicle is parked in the open for lengthy periods,
protect the leather from direct sunlight by covering it.
■
Sharp-edged objects on items of clothing such as zip fasteners, rivets, sharp-
edged belts, jewellery and pendants may leave permanent scratches or signs
of rubbing on the surface. Damage of this nature cannot later be recognized as
a justified complaint.
■
The use of a mechanical steering wheel lock may damage the leather surface
of the steering wheel.
■
Use a care cream with light blocker and impregnation effect on a regular ba-
sis and each time after cleaning. The cream nourishes the leather, allows it to
breathe and keeps it supple and also provides moisture. It also creates surface
protection.
■
Some clothing materials, such as dark denim, do not have sufficient colour
fastness. This can cause damage or clearly visible discolouration to seat covers
even when treated correctly. This is particularly true for light-coloured uphols-
tery. This is not a defect in the seat cover, but poor colour fastness of the
clothing textiles.
133Car care
Page 136 of 197
NoteDuring the life of the vehicle, minor visible changes can occur on the leather
parts of the covers (e. g wrinkles or creases as a result of the stress of the cov-
ers).
Synthetic leather, fabrics and Alcantara ®
Read and observe
and on page 133 first.
Synthetic leather
Clean the synthetic leather with a damp cloth.
If the synthetic leather does not come completely clean with this method, a
mild soap solution or specific cleaning agent must be used.
Fabrics
Clean upholstery cover materials and cloth trims on doors, boot cover, etc. us-
ing specific cleaning agents, e.g., dry foam.
Use a soft sponge, brush, or commercially available microfibre cloth.
Use a cloth and special detergent to clean the headlining.
Remove pilling and residues on upholstery with a brush.
Remove stubborn hair with a “cleaning glove”.
Alcantara ®
Dust and fine dirt particles in pores, creases and seams may chafe and damage
the surface.
If you leave your vehicle parked in the open for lengthy periods, protect the Al-
cantara ®
seat upholstery from direct sunlight to prevent fading.
Minor changes in colour caused by use are normal.
CAUTION
■ Do not use leather cleaners on Alcantara ®
seat upholstery.■Do not use solvents, floor wax, shoe cream, stain remover or similar agents
on Alcantara ®
seat upholstery.■ Avoid leaving the vehicle for lengthy periods in bright sunlight to prevent the
fabrics from bleaching. If the vehicle is parked in the open for lengthy periods,
protect the fabrics against direct sunlight by covering them.■
Some clothing materials, such as dark denim, do not have sufficient colour
fastness. This can cause damage or clearly visible discolouration to seat covers
even when treated correctly. This is particularly true for light-coloured uphols-
tery. This is not a defect in the seat cover, but poor colour fastness of the
clothing textiles.
Seat covers
Read and observe
and on page 133 first.
Electrically heated seats
Do not wet clean the seat covers as this can damage the seat heating system.
Use a specific cleaning agent such as dry foam or similar to clean the covers.
Seats without seat heating
Thoroughly vacuum the seat covers with a vacuum cleaner before cleaning.
Clean the seat covers with a damp cloth or cleaning agents particularly formu-
lated for them.
Compressed areas created on the fabrics by everyday use can be removed by
brushing against the nap with a lightly moistened brush.
Always treat all parts of the upholstery so that no visible boundaries are cre-
ated. Then leave the seat to dry completely.
CAUTION
■ Regularly vacuum dust from the seat covers using a vacuum cleaner.■Electrically heated seats must not be dried after cleaning by switching on the
heater.■
Do not sit on wet seats - there is a risk of stretching the upholstery.
■
Always clean the seats “from seam to seam”.
Seat belts
Read and observe
and on page 133 first.
The belt must always be kept clean.
Wash dirty seat belts with a mild, soapy solution.
Remove dirt with a soft brush.
134General Maintenance
Page 145 of 197
We recommend maintaining the oil level within the range A, but not above , if
the engine has been operating at high loads, for example, during a lengthy
motorway trip during the summer months, towing a trailer or negotiating a
high mountain pass.
The warning light in the instrument cluster will indicate whether the oil level is
too low » page 36 ,
Engine oil . Check the oil level using the dipstick as
soon as possible. Add oil accordingly.
CAUTION
■ Always check the oil level on vehicles with the 1.2 l/44 kW engine when the
engine is cold. Otherwise the measuring result is incorrect und oil could be in-
correctly replenished - risk of engine damage!■
The oil level must never be above the
A
range » Fig. 128 – there is a risk of
damaging the exhaust system.
Replenishing
Read and observe
and on page 141 first.
›
Check the oil level » page 142.
›
Unscrew the cap of the engine oil filler opening » Fig. 126 on page 140 .
›
Replenish the oil in portions of 0.5 litres in accordance with the correct speci-
fications » page 141 .
›
Check the oil level » page 142.
›
Carefully screw on the oil filler opening cap and push the dipstick in fully.
Changing
Read and observe
and on page 141 first.
The engine oil must be changed according to prescribed service intervals or ac-cording to the » Service plan service interval display.
Coolant
Introduction
This chapter contains information on the following subjects:
Capacity
144
Checking the coolant level
144
Replenishing
144The coolant consists of water with a concentration of coolant additive. This mixture guarantees antifreeze protection, protects the cooling/heater system
against corrosion and prevents the formation of scale.
Vehicles exported to countries with a mild climate are already factory-filled
with a coolant which offers antifreeze protection down to about -25 ℃. In
these countries the concentration of coolant additive should be at least 40 %.
Vehicles exported to countries with a cold climate are already factory-filled
with a coolant which offers antifreeze protection down to about -35 °C. In
these countries the concentration of coolant additive should be at least 50 %.
If a higher concentration of antifreeze is required for climatic reasons, the
amount of coolant additive can only be increased up to a maximum of 60 %
(antifreeze protection down to approx. -40 °C).
When refilling, only use the same antifreeze identified on the coolant expan-
sion vessel » Fig. 129 on page 144 .WARNING■
The engine compartment of your car is a hazardous area. While working in
the engine compartment, be sure to observe the following warn-
ings » page 138 .■
Do not continue your journey if for some reason it is not possible to top
up the coolant under the current conditions. Switch off the engine and
seek assistance from a specialist garage.
CAUTION
■ The amount of coolant additive in the coolant must never be allowed to fall
below 40 %.■
Over 60 % coolant additive in the coolant reduces the antifreeze protection
and coolant effectiveness.
■
A coolant additive that does not comply with the correct specifications can
significantly reduce the corrosion protection.
■
Any faults resulting from corrosion may cause a loss of coolant and can con-
sequently result in major engine damage!
■
Do not fill the coolant above the mark
A
» Fig. 129 on page 144 .
■
We recommend that you visit a specialist garage if a fault causes the engine
to overheat, otherwise serious engine damage may occur.
■
Additional headlights and other attached components in front of the air inlet
impair the cooling efficiency of the coolant.
■
Never cover the radiator - there is a risk of the engine overheating.
143Inspecting and replenishing
Page 158 of 197
Full wheel trimRead and observe
and on page 149 first.
Pulling off
›
Hook the clamp found in the vehicle tool kit » page 159 into the reinforced
edge of the wheel trim.
›
Push the wheel wrench through the clamp, support on the tyre and pull off
the wheel trim.
Fitting
›
Press the wheel trim onto the wheel rim at the valve opening provided.
›
Then press the trim into the wheel rim until its entire circumference latches
correctly into position.
CAUTION
■ Use the pressure of your hand only, do not strike the full wheel trim. Avoid
striking the trim heavily when it is not yet inserted in the wheel rim. This could
cause damage to the guide and centring elements of the trim.■
When using the anti-theft wheel bolt, ensure that it is in the hole in the
valve area » page 162, Securing wheels against theft .
■
If wheel trims are retrofitted it must be ensured that an adequate flow of air
is assured to cool the brake system.
Wheel bolts
Fig. 137
Remove the cap
Read and observe and on page 149 first.
Pulling off
›
Push the extraction pliers » page 159 sufficiently far onto the cap until the
inner catches of the pliers are positioned at the collar of the cap.
›
Remove the cover in the direction of the arrow » Fig. 137.
Fitting›Push the cap onto the wheel bolt up to the stop.
The wheel bolt caps are housed in a plastic box in the spare wheel or in the
storage space for the spare wheel.
Wheel bolts
Read and observe
and on page 149 first.
Wheels and wheel bolts are matched to each other in terms of design. When-
ever you change the wheels fitted, e.g. light alloy wheels or wheels with win-
ter tyres, you must also use the matching wheel bolts of the correct length
and shape of bolt head. Correct fastening of the wheels depends on this.
Winter use
Introduction
This chapter contains information on the following subjects:
Winter tyres
156
Snow chains
157
Winter tyres
The handling of your vehicle will be significantly improved when driving on
wintry roads if you fit winter tyres. Summer tyres have less grip on ice, snow
and at temperatures below 7 °C. This is especially true of low-profile tyres or
high-speed tyres .
To achieve the best possible handling properties, winter tyres must be fitted
on all four wheels, the minimum tread depth must be 4 mm and tyres must be
no older than 4 years.
Winter tyres (marked with M+S and a peak/snowflake symbol) of a lower speed
category can be used provided that the permissible maximum speed of these
tyres is not exceeded even if the possible maximum speed of the vehicle is
higher.
The speed limit for winter tyres can be set in the MAXI DOT display in the Win-
ter tyres menu item » page 34.
156General Maintenance
Page 180 of 197
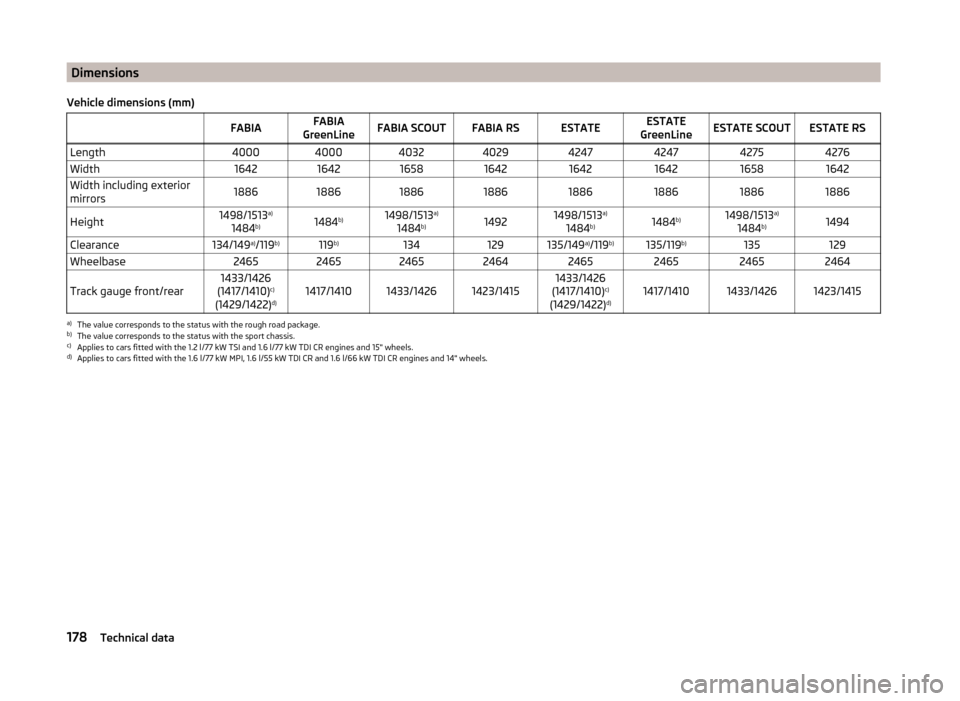
Dimensions
Vehicle dimensions (mm) FABIAFABIA
GreenLineFABIA SCOUTFABIA RSESTATEESTATE
GreenLineESTATE SCOUTESTATE RSLength40004000403240294247424742754276Width16421642165816421642164216581642Width including exterior
mirrors18861886188618861886188618861886Height1498/1513 a)
1484 b)1484
b)1498/1513 a)
1484 b)14921498/1513
a)
1484 b)1484
b)1498/1513 a)
1484 b)1494Clearance134/149
a)
/119 b)119b)134129135/149 a)
/119 b)135/119 b)135129Wheelbase24652465246524642465246524652464Track gauge front/rear1433/1426
(1417/1410) c)
(1429/1422) d)1417/14101433/14261423/14151433/1426
(1417/1410) c)
(1429/1422) d)1417/14101433/14261423/1415
a)
The value corresponds to the status with the rough road package.
b)
The value corresponds to the status with the sport chassis.
c)
Applies to cars fitted with the 1.2 l/77 kW TSI and 1.6 l/77 kW TDI CR engines and 15" wheels.
d)
Applies to cars fitted with the 1.6 l/77 kW MPI, 1.6 l/55 kW TDI CR and 1.6 l/66 kW TDI CR engines and 14" wheels.
178Technical data