ECO mode SKODA FABIA 2014 3.G / NJ Operating Instruction Manual
[x] Cancel search | Manufacturer: SKODA, Model Year: 2014, Model line: FABIA, Model: SKODA FABIA 2014 3.G / NJPages: 216, PDF Size: 30.9 MB
Page 115 of 216
Downloaded from www.Manualslib.com manuals search engine Reducing idling
If the vehicle is fitted with the START - STOP system there is an automatic re-
duction of the idling. If the engine is stopped on vehicles without START-STOP
system, such as when waiting in a traffic jam, the fuel economy is already
greater after 30 - 40 s than the fuel quantity which is required for engine re-
start.
Avoid short distances
When driving a short distance of less than about 4 km, the engine cannot
reach its operating temperature. As long as the engine has not reached oper-
ating temperature, the fuel consumption is significantly higher than with the
engine hot.
Pay attention to the correct tyre inflation pressure being maintained
Further information » page 161.
Avoid unnecessary ballast
Per 100 kg of weight, consumption increases by about 0.3 l/100 km. At a speed of 100 - 120 km/h, a vehicle fitted with a roof rack cross member without a load
will use about 10 % more fuel than normal due to the increased aerodynamic
drag.
Saving electricity
Electrical consumers (e.g. seat heating, air conditioning and the like) should
only be turned on for as long as necessary.
Use the cooling system economically
The air conditioning system compressor uses power from the engine when in
cooling mode, which will affect the fuel consumption.
It recommended to open the windows or the doors of a vehicle for which the
interior has been strongly heated through the effect of direct sunlight in order
to allow the heated air to escape.
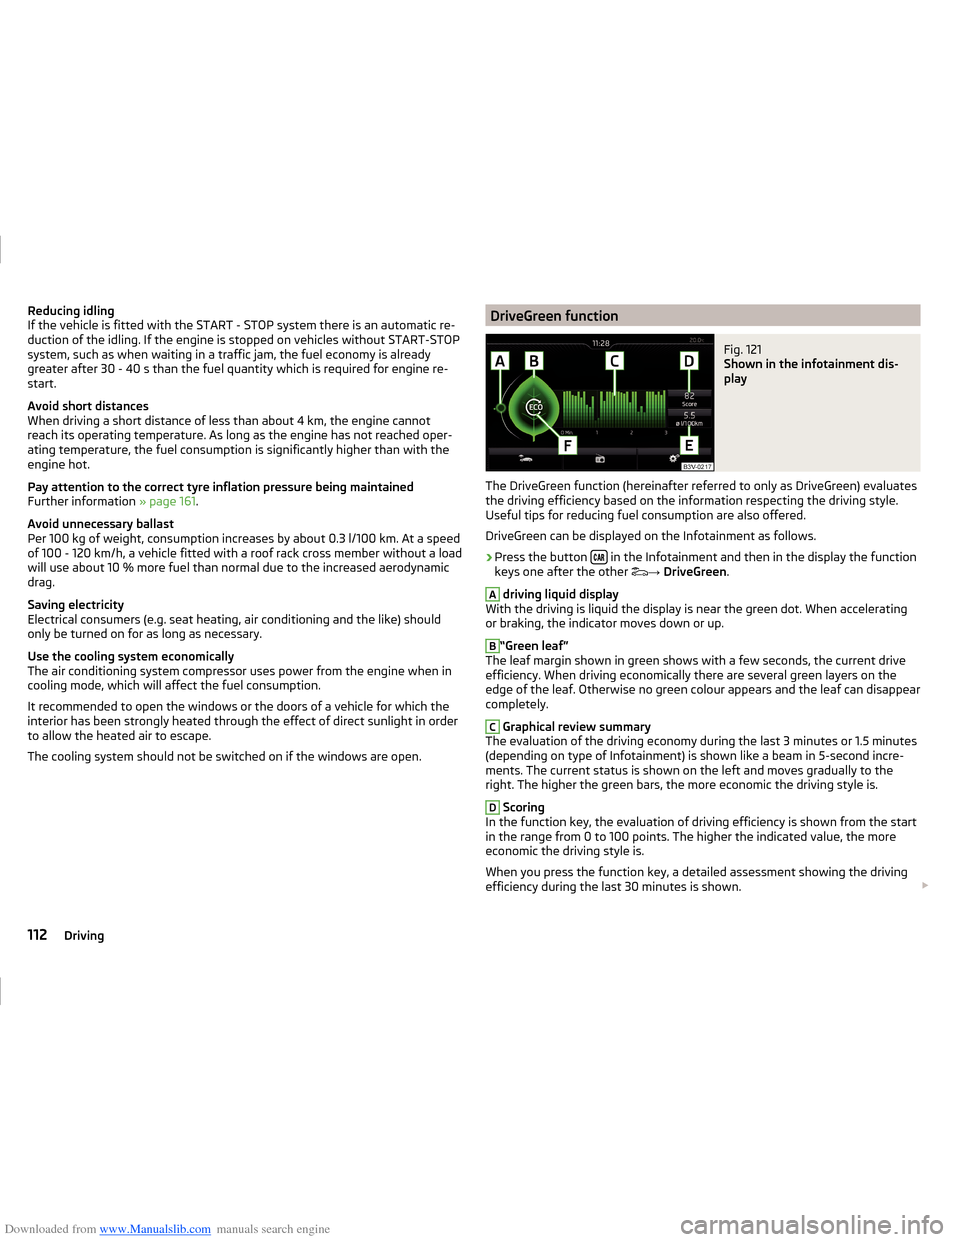
The cooling system should not be switched on if the windows are open.DriveGreen functionFig. 121
Shown in the infotainment dis-
play
The DriveGreen function (hereinafter referred to only as DriveGreen) evaluates
the driving efficiency based on the information respecting the driving style.
Useful tips for reducing fuel consumption are also offered.
DriveGreen can be displayed on the Infotainment as follows.
›
Press the button in the Infotainment and then in the display the function
keys one after the other →
DriveGreen .
A
driving liquid display
With the driving is liquid the display is near the green dot. When accelerating
or braking, the indicator moves down or up.
B
“Green leaf”
The leaf margin shown in green shows with a few seconds, the current drive
efficiency. When driving economically there are several green layers on the
edge of the leaf. Otherwise no green colour appears and the leaf can disappear
completely.
C
Graphical review summary
The evaluation of the driving economy during the last 3 minutes or 1.5 minutes
(depending on type of Infotainment) is shown like a beam in 5-second incre-
ments. The current status is shown on the left and moves gradually to the
right. The higher the green bars, the more economic the driving style is.
D
Scoring
In the function key, the evaluation of driving efficiency is shown from the start
in the range from 0 to 100 points. The higher the indicated value, the more
economic the driving style is.
When you press the function key, a detailed assessment showing the driving
efficiency during the last 30 minutes is shown.
112Driving
Page 140 of 216
Downloaded from www.Manualslib.com manuals search engine The ŠKODA Service Partners are up-to-date on the legally required tests and
will prepare the vehicle for the tests as part of a service operation if required,
or will be responsible for carrying out these tests. The specialist garages can
carry out the specified tests directly, if required by the customer, if they are
authorised to do so. This saves you time and money.
Even if you want to take your vehicle to an officially approved test centre for
prior checking in preparation of a legally required test, we recommend that you
consult the service consultant of your ŠKODA Service Partner beforehand.
Based on their appraisal, the service consultant will tell you which areas you
should focus on in order to ensure that your vehicle will pass the technical test
without any problems. This allows you to avoid additional expenses resulting
from a possible subsequent test.
ŠKODA Service Partners
Read and observe
on page 136 first.
ŠKODA Service Partners are equipped with modern, specially developed tools
and equipment. Here, trained specialists have access to a comprehensive
range of ŠKODA Original Parts and ŠKODA Original Accessories for carrying out
modifications, repairs and technical alterations.
All ŠKODA service partners operate according to the latest guidelines and in-
structions from ŠKODA AUTO a.s. All service and repair work is therefore car-
ried out on time and to the appropriate quality. Adhering to these instructions
and guidelines helps ensure road safety and helps keep your vehicle in a good
technical condition.
ŠKODA Service Partners are therefore properly prepared to service your vehicle
and to provide quality work. We therefore advise you to have all modifications,
repairs and technical alterations to your vehicle carried out by a ŠKODA Service
Partner.
ŠKODA Original parts
Read and observe
on page 136 first.
We recommend the use of ŠKODA Genuine Parts for your vehicle, since these
parts are approved by ŠKODA AUTO a.s. They correspond exactly to ŠKODA
AUTO a.s. specifications in respect of design, dimensional accuracy and materi-
al and are identical to the components used in the batch production.
ŠKODA AUTO a.s. can guarantee the safety, suitability, and long life of these
products. We therefore recommend that you only use ŠKODA Genuine Parts.
ŠKODA AUTO a.s. supplies the market with a complete range of ŠKODA Genu-
ine Parts not only while the model is still in production but with wear-and-tear parts for at least 15 years after the end of series production and with all other
vehicle parts for at least 10 years.
ŠKODA service partners are liable for any defects in ŠKODA original parts for a
period of 2 years after sale in accordance with materials defect liability under
the law unless otherwise agreed in the purchase agreement. You should keep
the confirmed warranty certificate and the receipt for these components for
this period, so that the commencement of the warranty term may be verified.
Body repairs
ŠKODA vehicles are designed so that if the body suffers damage, it is only nec-
essary to replace those parts which are in fact damaged.
Before you decide to have damaged body parts replaced, however, you should first contact your specialist garage to determine whether or not such parts can
also be repaired. Repairs to body parts are usually cheaper.
ŠKODA Original accessories
Read and observe
on page 136 first.
You should note the following if you wish to fit accessories to your vehicle:
We recommend that you use ŠKODA Genuine Accessories in your vehicle.
ŠKODA AUTO a.s. offers a warranty on the reliability, safety and suitability for
your particular vehicle of these accessories. Although we constantly monitor
the market, we are not able to assess or offer a warranty on other products
even though in some instances such products may have a type approval or
may have been approved by a nationally recognised approval authority.
All accessory products go through a fastidious process of technical develop-
ment (technical tests) and quality inspection (customer tests), and only if all
tests are positive does the product become a ŠKODA Genuine Accessory.
Our ŠKODA Genuine Accessories service also provides expert advice and pro-
fessional fitting if requested by the customer.
ŠKODA Service Partners are liable for any defects in ŠKODA Genuine Parts for a
period of 2 years after installation or delivery in accordance with materials de-
fect liability legislation, unless otherwise agreed in the purchase contract or in
137Care and maintenance
Page 156 of 216
Downloaded from www.Manualslib.com manuals search engine WARNINGThe engine compartment of your car is a hazardous area. While working in
the engine compartment, be sure to observe the following warnings
» page 149 .
CAUTION
Do not pour any additives into the engine oil – risk of serious damage to the
engine parts.
Note
■ Before a long drive we recommend that you purchase and carry with you en-
gine oil which complies with the specification for your vehicle.■
We recommend that you use oils from ŠKODA Original Accessories.
■
You must wash yourself thoroughly if your skin has come into contact with
oil.
Specification
Read and observe
and on page 153 first.
Vehicles with variable service intervals
Petrol enginesSpecification1.0 l/44, 55 kW MPI - EU6VW 504 001.2 l/66, 81 kW TSIDiesel engineSpecification1.4 l/66, 77 kW TDI CRVW 507 00
Vehicles with fixed service intervals
Petrol enginesSpecification1.0 l/44, 55 kW MPI - EU6
VW 502 00
1.0 l/55 kW MPI - EU41.2 l/66, 81 kW TSI1.6 l/66, 81 kW MPIDiesel engineSpecification1.4 l/66, 77 kW TDI CRVW 507 00CAUTION■If the above engine oils are not available, a different engine oil can be used in
an emergency. To prevent damage to the engine, a maximum of 0.5 litres only
of the following engine oils may be used: ■ For petrol engine models: ACEA A3/ACEA B4 or API SN, (API SM);
■ For diesel engine models: ACEA C3 or API CJ-4.
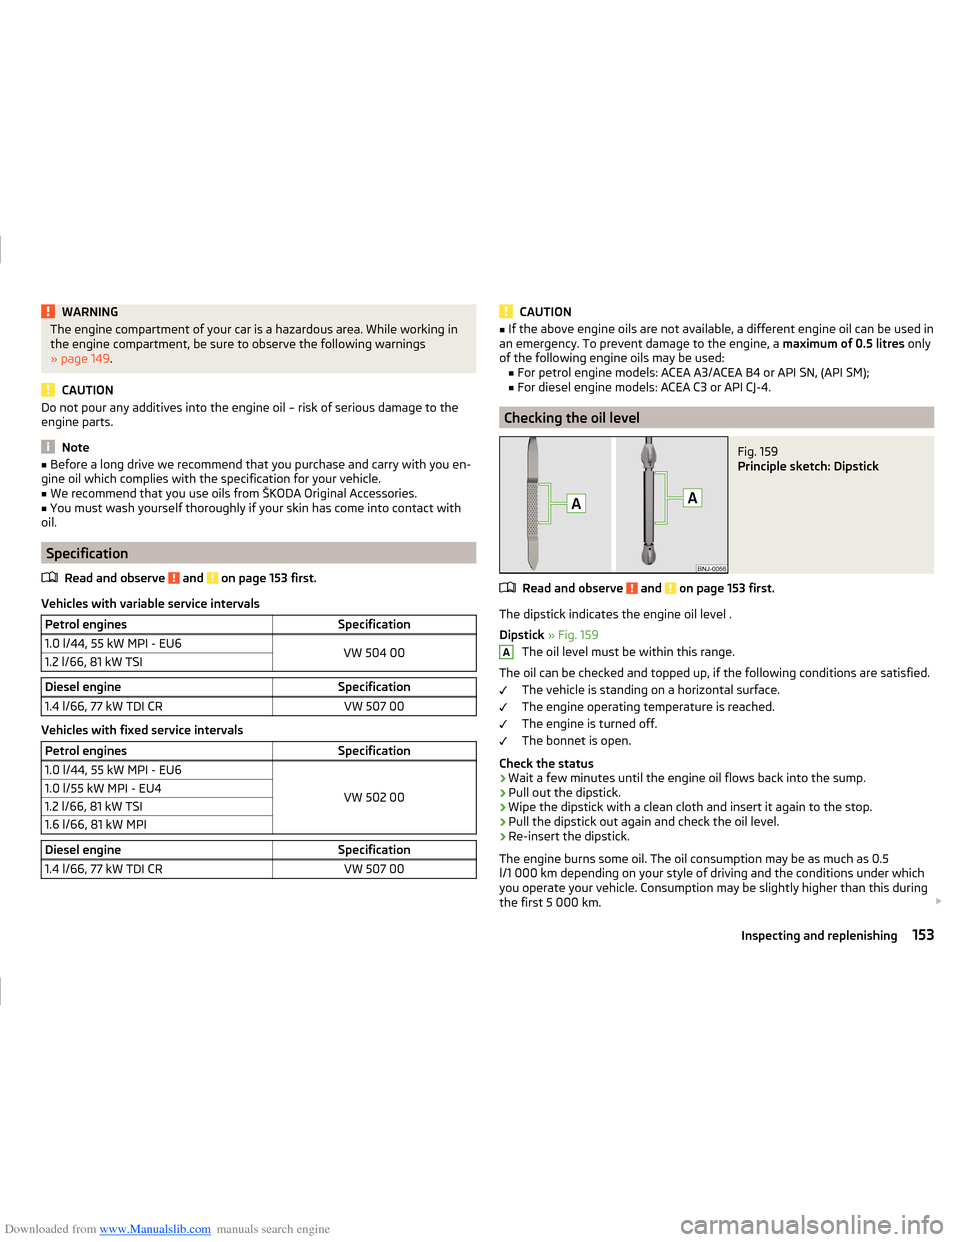
Checking the oil level
Fig. 159
Principle sketch: Dipstick
Read and observe and on page 153 first.
The dipstick indicates the engine oil level .
Dipstick » Fig. 159
The oil level must be within this range.
The oil can be checked and topped up, if the following conditions are satisfied. The vehicle is standing on a horizontal surface.
The engine operating temperature is reached.
The engine is turned off.
The bonnet is open.
Check the status
›
Wait a few minutes until the engine oil flows back into the sump.
›
Pull out the dipstick.
›
Wipe the dipstick with a clean cloth and insert it again to the stop.
›
Pull the dipstick out again and check the oil level.
›
Re-insert the dipstick.
The engine burns some oil. The oil consumption may be as much as 0.5
l/1 000 km depending on your style of driving and the conditions under which
you operate your vehicle. Consumption may be slightly higher than this during
the first 5 000 km.
A153Inspecting and replenishing
Page 160 of 216
Downloaded from www.Manualslib.com manuals search engine WARNINGThere is a risk of injuries, poisoning, chemical burns, explosions or fire
when carrying out any work on the battery and on the electrical system. It
is essential to comply with the generally applicable rules of safety as well
as the warning instructions outlined below.■
Keep the vehicle battery away from people who are not completely inde-
pendent, especially children.
■
Do not tilt the battery otherwise battery electrolyte may flow out of the
battery vent openings.
■
Protect your eyes by wearing safety glasses or a face shield – there is a
risk of being blinded.
■
Always wear protective gloves, eye and skin protection when handling
the vehicle battery.
■
The battery acid is strongly corrosive and must, therefore, be handled
with the greatest of care.
■
Corrosive fumes in the air irritate the air passages and lead to conjunctivi-
tis and inflammation of the air passages in the lungs.
■
Battery acid corrodes dental enamel and creates deep wounds on contact
with the skin which take a long time to heal.
■
If any battery electrolyte comes into contact with your eyes, rinse the
eyes immediately with clear water for several minutes - consult a doctor
immediately.
■
Splashes of acid on your skin or clothes should be neutralised as soon as
possible using soap suds and then rinsed with plenty of water.
■
Seek immediate medical assistance if you swallow battery acid.
WARNING■ The use of open flames and light should be avoided.■Smoking and radio triggering activities should be avoided.■
Never use a damaged vehicle battery – there is a risk of explosion.
■
Never charge a frozen or thawed vehicle battery – there is a risk of explo-
sion and caustic burns.
■
Replace a frozen vehicle battery.
■
Never jump-start vehicle batteries with an electrolyte level that is too low
– risk of explosion and caustic burns.
CAUTION
■ Improper handling of the vehicle battery may cause damage.■Ensure that battery acid does not come into contact with the bodywork –
there is a risk of damage to the paintwork.■ If the vehicle has not been driven for more than 3 to 4 weeks, the battery will
discharge. Prevent the battery from discharging by disconnecting the battery's
negative terminal
or continuously charging the battery with a very low
charging current.■
Do not place the battery in direct daylight in order to protect the vehicle bat-
tery housing from the effects of ultra-violet light.
■
If the vehicle is frequently used for making short trips, the vehicle battery
will not have time to charge up sufficiently and may discharge.
For the sake of the environment
A vehicle battery that has been removed is a special type of hazardous waste.
These must be disposed of in accordance with national legal regulations.
Note
■ We recommend having all work on the vehicle battery carried out by a spe-
cialist garage.■
You should replace batteries older than 5 years.
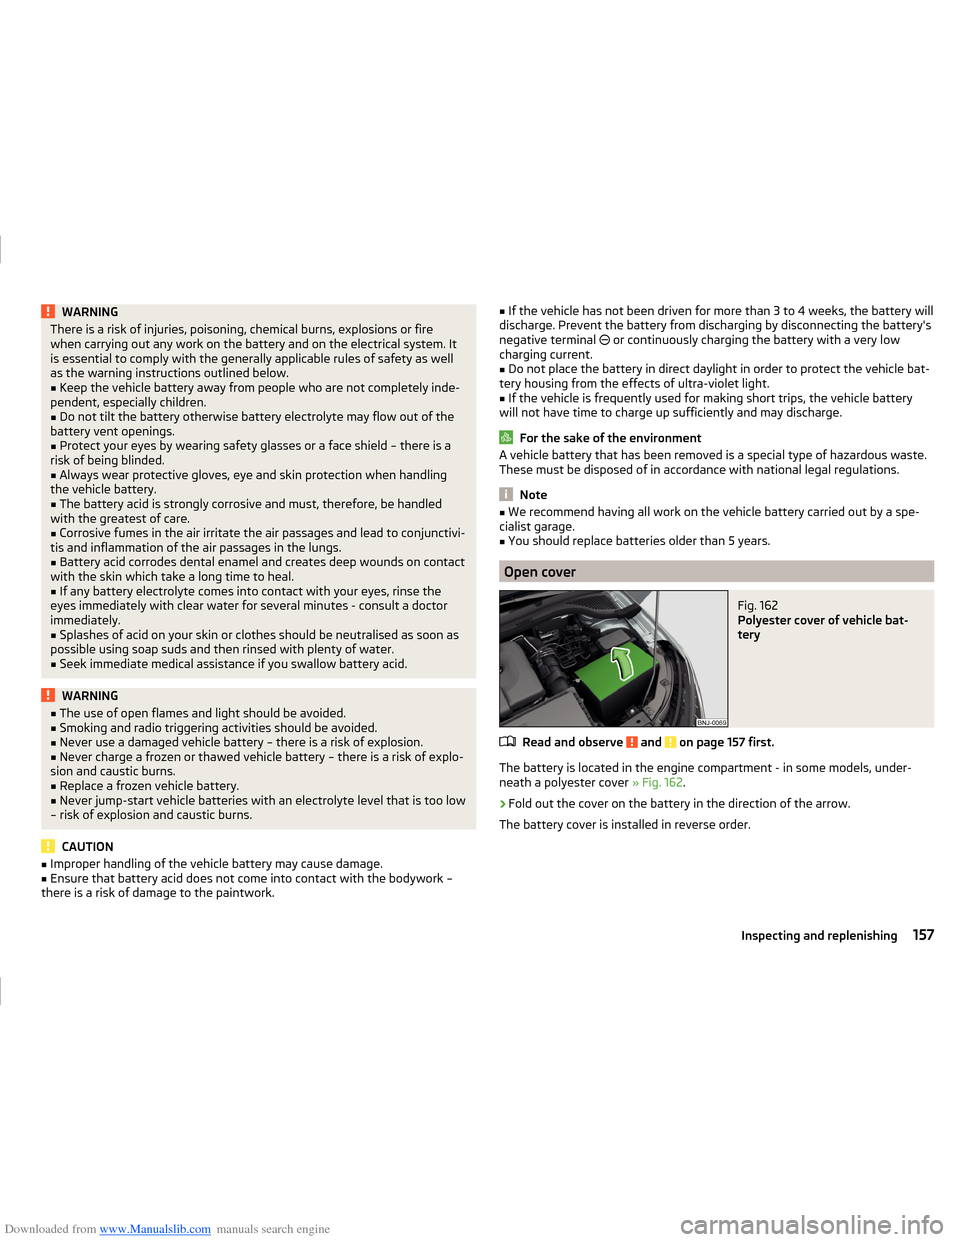
Open cover
Fig. 162
Polyester cover of vehicle bat-
tery
Read and observe and on page 157 first.
The battery is located in the engine compartment - in some models, under-
neath a polyester cover » Fig. 162.
›
Fold out the cover on the battery in the direction of the arrow.
The battery cover is installed in reverse order.
157Inspecting and replenishing
Page 163 of 216
Downloaded from www.Manualslib.com manuals search engine CAUTION■Despite such intervention by the vehicle electric system management, the
vehicle battery may be drained. For example, when the ignition is switched on
a long time with the engine turned off or the side or parking lights are turned
on during longer parking.■
Consumers which are supplied via a 12 V socket can cause the vehicle battery
to discharge when the ignition is switched off.
Note
Driving comfort is not disrupted by any shutting off of consumers. Often the
driver is not aware of it having taken place.Wheels
Tyres and rims
Introduction
This chapter contains information on the following subjects:
Notes on using wheels
161
Tyre pressure
161
Tyre wear
162
Tyre wear indicator and wheels exchange
162
Tyre damage
163
Unidirectional tyres
163
Spare wheel
163
Spare wheel
163
Tyre label
164
Only use those tyres or wheel rims which have been approved by ŠKODA for
your model of vehicle.
WARNINGNational legal requirements must be observed for the use of tyres.WARNINGFor safety reasons, do no replace tyres individually.
For the sake of the environment
Old and unserviceable tyres are a polluting hazardous waste. These must be disposed of in accordance with national legislation.
Note
■ We recommend that any work on the wheels or tyres is carried out by a spe-
cialist garage.■
We recommend that you use wheel rims, tyres, full wheel trims and snow
chains from ŠKODA Original Accessories.
160General Maintenance
Page 174 of 216
Downloaded from www.Manualslib.com manuals search engine ›Support the base plate of the jack with its full area resting on level ground
and ensure that the jack is located in a vertical position at the jacking point
» Fig. 176 -
.›
Position the lifting jack below the jacking point with the crank and move it up
until its claw encloses the web » Fig. 176 -
.
›
Continue turning up the jack until the wheel is just about lifted off the
ground.
WARNING■ Choose a flat and firm surface for jacking the vehicle.■If the wheel has to be changed on a slope, first of all block the opposite
wheel with a stone or similar object to prevent the vehicle from unexpect-
edly rolling away.■
Secure the base plate of the lifting jack with suitable means to prevent
possible moving. A soft and slippery ground under the base plate may move
the lifting jack, causing the vehicle to fall down. It is therefore always nec-
essary to place the lifting jack on a solid surface or use a wide and stable
base. Use a non-slip base (e.g. a rubber foot mat) if the surface is smooth,
such as cobbled stones, tiled floor, etc.
■
Only attach the lifting jack to the attachment points provided for this pur-
pose.
■
Always raise the vehicle with the doors closed.
■
Never position any body parts, such as arms or legs under the vehicle,
while the vehicle is raised with a lifting jack.
■
When the vehicle is raised, never start the engine.
CAUTION
Make sure that the jack is attached correctly to the web on the lower sil, oth-
erwise there is a risk of damage to the vehicle.
Remove the wheel / fix
When changing a wheel, the following instructions must be followed.
›
Remove the full wheel trim or the caps of the wheel bolts.
›
First of all slacken the anti-theft wheel bolt and then the other wheel bolts.
›
Jack up the vehicle until the wheel that needs changing is clear of the
ground.
›
Unscrew the wheel bolts and place them on a clean surface (cloth, paper, etc.).
›
Remove the wheel carefully.
›
Attach the wheel and slightly screw on the wheel bolts.
› Lower the vehicle.›Tighten the opposite wheel bolts alternately (cross-wise) with the wheel
wrench. Tighten the anti-theft wheel bolt last.›
Replace the wheel trim or the caps.
When fitting unidirectional tyres, ensure that the direction of rotation is cor-
rect » page 163 .
WARNING■
Undo the wheel bolts only a little (about one turn) until the vehicle has
been jacked up. Otherwise the wheel could become loose and fall off.■
All bolts must be clean and must turn easily.
■
If it is established when changing a wheel that the wheel bolts are corro-
ded and difficult to move, then these must be replaced.
■
Under no circumstances grease or oil the wheel bolts!
Subsequent steps
After changing the wheel, the following work should be carried out.
›
Stow the replaced wheel in the wheel well and secure it with a special screw.
›
Stow the tool kit in the space provided and secure using the strap.
›
Check the tyre pressure on the installed spare wheel as soon as possible.
›
Have the tightening torque of the wheel bolts checked with a torque
wrench as soon as possible.
After changing the wheel, the tyre pressure should be adjusted. In vehicles
with tyre pressure monitoring, save tyre pressure values » page 125.
Change the damaged wheel or consult a specialist garage about repair possi-
bilities.
WARNINGInformation on the wheel bolts■The prescribed tightening torque of the wheel bolts for steel and light al-
loy wheels is 120 Nm.■
If the wheel bolts are tightened to a too low tightening torque, the rim
can come loose when the car is moving. A tightening torque which is too
high can damage the bolts and threads and this can result in permanent
deformation of the contact surfaces on the rim.
■
Drive cautiously and only at a moderate speed until the tightening torque
has been checked.
171Emergency equipment, and self-help
Page 205 of 216
Downloaded from www.Manualslib.com manuals search engine Clean interiorSafety belt146
Climatronic Operating elements
97
Recirculated air mode96
Clothes hook81
Cockpit 12-volt power outlet
78
Ashtray77
Cigarette lighter77
General view26
Lighting64
Storage compartments74
useful equipment74
COMING HOME63
compartments74
Component protection138
Components of the puncture repair kit172
Computer see multifunction display
40
Convenience turn signal61
Coolant154
Checking155
Replenishing155
Temperature gauge29
Warning light36
Warning messages36
Cooling system Malfunctions
99
CORNER See Fog lights with CORNER function
62
Correct routing of seat belt
12
Correct seated position8
Front passenger10
Rear seats10
Correct seat position Driver
9
Counter for distance driven30
cruise control operation119
operation description119
Cup holders76
D
DAY LIGHT see Daylight running lights
60
Daylight running lights60
Dazzle see sun screen of the panoramic roof
66
De-icing windows
142
De-icing rear window65
Deactivating airbags18
Decorative foils142
Delayed locking of the boot lid see boot lid
56
Departure angle195
Diesel refer to Fuel
149
Diesel fuel Operation in winter
149
Diesel particulate filter37
information messages37
Digital Clock Time
31
Dipstick153
Display29
Compass points45
Coolant temperature29
Fuel supply30
Gear changes39
Service interval46
Disposal Acceptance and recycling of used vehicles
139
Distance driven30
Distance warning Warning light
38
DoorChild safety lock53
Closing50
Emergency locking179
Emergency locking the driver's door178
Opening50
Door warning39
Drive Driving through water
113
DriveGreen112
driving emissions
193
fuel consumption193
Driving Maximum speed
196
through water113
driving data operation
40
E
Economical driving Tips
111
EDL115
Electrical power windows Button in the rear doors
58
Electric power windows Operational faults
59
Electric Windows57
Button in driver's door57
Electronic differential lock (EDL, XDS)115
Electronic immobilizer100
Emergency Changing a wheel
168
Hazard warning light system63
Jump-starting174
Locking the door without a locking cylinder179
Locking the driver's door178
Selector lever-unlocking179
Switch off the engine by pressing a button103
Towing the vehicle175
202Index
Page 206 of 216
Downloaded from www.Manualslib.com manuals search engine Towing the vehicle using the tow hitch177
Tyre repair172
Unlocking the driver's door178
Emergency equipment Fire extinguisher
167
First aid kit166
Jack167
Reflective Vest166
Vehicle tool kit167
Warning triangle166
Emissions193
Engine Running-in
111
Starting the engine103
Warning messages36
Engine compartment149
Brake fluid156
Overview151
Vehicle battery156
Engine number192
engine oil specification
153
Engine oil152
change152
Checking153
Replenishing154
Warning light37
EPC Warning light
34
ESC Operation
114
Warning light33
Exhaust inspection system Warning light
33
F
Fastening elements
84
Fatigue detection125
Function125
Information messages125
Fire extinguisher167
First aid kit166
Flexible storage compartment88
Fog lights62
Warning light35
Fog lights with CORNER function62
Foils142
Fold variable loading floor up
90
Footmats108
see Footmats108
Force limitation Power windows
58
Front airbag16
Front assistant Warning light
38
Front Assistant122
Disable / enable124
Distance warning123
Information messages124
Operation123
Radar sensor122
Warning and automatic braking123
fuel lead-free petrol
148
Fuel147
Diesel149
Fuel gauge30
refer to Fuel147
Refuelling147
Warning light35
fuel consumption193
Fuses Assignment
181
Assignment of fuses in the dash panel182
Changing181
Colour coding181
Fuse assignment in the engine compartment183
Fuses in the engine compartment Assignment
183
G
Gear change Gear recommendation
39
Information on the selected gear39
Gear changing Gear stick
108
gears spare
168
General view Cockpit
26
Genuine parts137
Glasses compartment80
Glow plug system Warning light
34
H
Handbrake
107
Warning light32
Hazard warning light system63
HBA115
Head airbag18
Headlight cleaning system Headlight cleaning system
68
Headlights Bulb arrangement
185
Driving abroad64
Headlight cleaning system68
Headrests70
Adjust height70
Headrest, removing and installing
71
heater Rear window
65
Heater Recirculated air mode
96
203Index