coolant SKODA FABIA 2014 3.G / NJ Operating Instruction Manual
[x] Cancel search | Manufacturer: SKODA, Model Year: 2014, Model line: FABIA, Model: SKODA FABIA 2014 3.G / NJPages: 216, PDF Size: 30.9 MB
Page 98 of 216
Downloaded from www.Manualslib.com manuals search engine WARNING (Continued)■Under certain circumstances, air at a temperature of about 5 °C can flow
out of the vents when the cooling system is switched on.■
To reduce health risks (e.g. common colds), the following instructions for
the use of the cooling system are to be observed. ■The difference between the indoor temperature and the outdoor air
temperature should not be greater than about 5 ° C.
■ The cooling system is to be turned off about 10 minutes before the end
of the journey.
■ Once a year, disinfection of the air conditioner or the Climatronic is to be
carried out by a specialist company.
CAUTION
■ The air inlet in front of the windscreen must be free (e.g. of ice, snow or
leaves) to ensure that the heating and cooling system operates properly.■
After switching on the cooling system condensation from the evaporator of
the air conditioning may drip down and form a puddle below the vehicle. This is
not a leak!
■
If the coolant temperature is too high, the cooling system is switched off to
ensure that the engine cools down.
Note
The used air flows out through the vents in the luggage compartment.
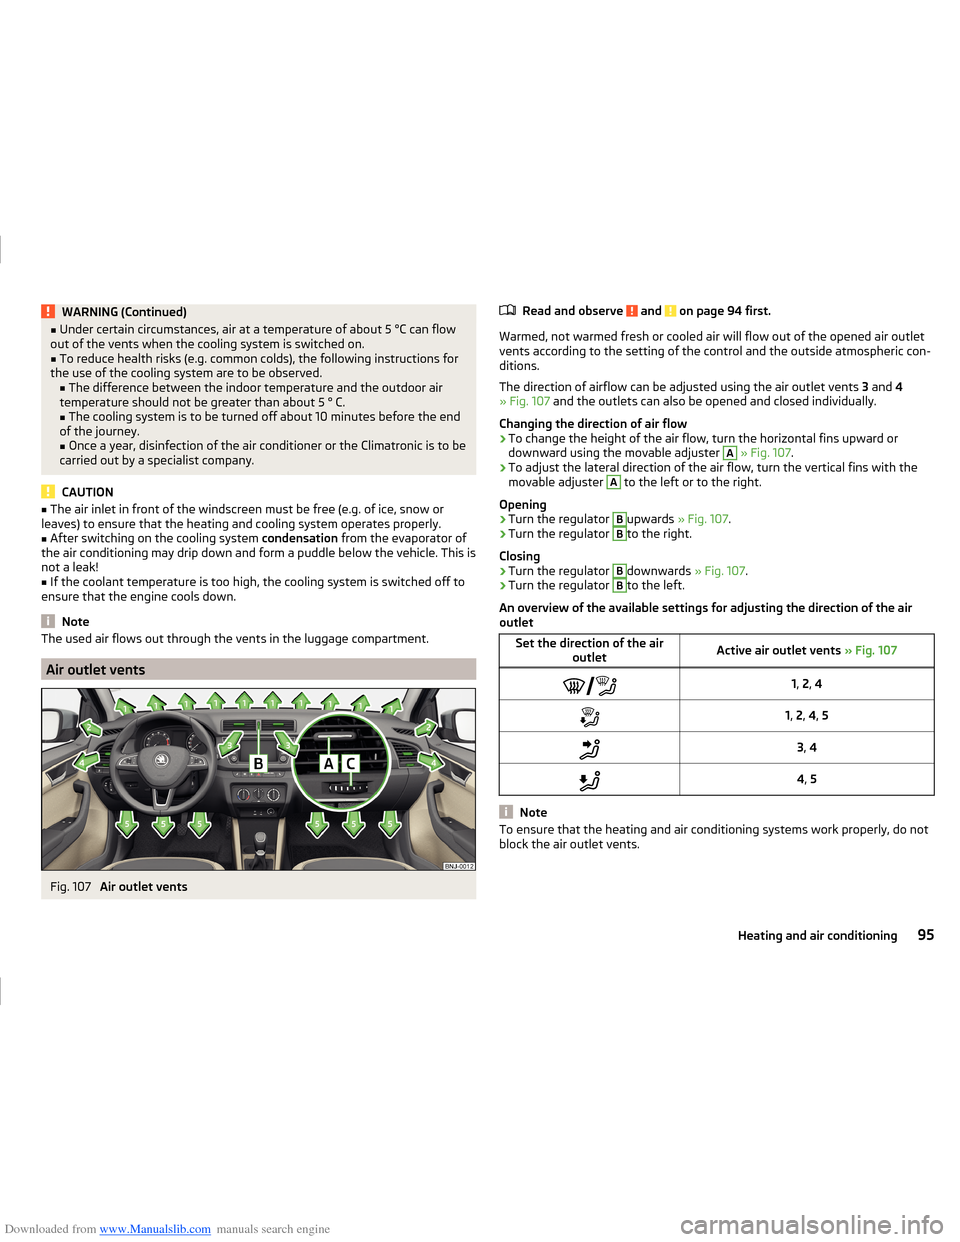
Air outlet vents
Fig. 107
Air outlet vents
Read and observe and on page 94 first.
Warmed, not warmed fresh or cooled air will flow out of the opened air outlet vents according to the setting of the control and the outside atmospheric con-
ditions.
The direction of airflow can be adjusted using the air outlet vents 3 and 4
» Fig. 107 and the outlets can also be opened and closed individually.
Changing the direction of air flow
›
To change the height of the air flow, turn the horizontal fins upward or
downward using the movable adjuster
A
» Fig. 107 .
›
To adjust the lateral direction of the air flow, turn the vertical fins with the
movable adjuster
A
to the left or to the right.
Opening
›
Turn the regulator
B
upwards » Fig. 107 .
›
Turn the regulator
B
to the right.
Closing
›
Turn the regulator
B
downwards » Fig. 107.
›
Turn the regulator
B
to the left.
An overview of the available settings for adjusting the direction of the air
outlet
Set the direction of the air outletActive air outlet vents » Fig. 1071, 2 , 41, 2 , 4 , 53 , 44 , 5
Note
To ensure that the heating and air conditioning systems work properly, do not
block the air outlet vents.95Heating and air conditioning
Page 102 of 216
Downloaded from www.Manualslib.com manuals search engine MalfunctionsRead and observe
and on page 94 first.
If the cooling system does not operate at outside temperatures higher than +5°C, there is a problem in the system. This can be because of the following.
› One of the fuses has blown. Check the fuse and replace if necessary
» page 182 .
› The cooling system has switched off automatically for a short time because
the coolant temperature of the engine is too hot » page 29.
If you are not able to resolve the fault yourself, or if the cooling output has re- duced, switch off the cooling system and obtain assistance from a specialist
garage.
99Heating and air conditioning
Page 137 of 216
Downloaded from www.Manualslib.com manuals search engine The distribution of the weight is very poor if your vehicle is unladen and the
trailer is laden. Maintain a particularly low speed if you cannot avoid driving
with this combination.
Tyre pressure
Correct the tyre inflation pressure on your vehicle for a “full load” » page 161.
Towing capacity and trailer weight
The permissible trailer load must not be exceeded under any circumstances
» page 192 , Technical data .
The details given in the vehicle's technical documentation always take prece-
dence over the details in the Owner's Manual.
The trailer loads specified apply only to altitudes up to 1,000 metres above
mean sea level.
The engine output falls as altitude increases, as does the ability to climb.
Therefore, for every additional 1,000 m in height (or part), the maximum per-
missible towed weight must be reduced by 10 %.
The towed weight comprises the actual weights of the (loaded) towing vehicle and the (loaded) trailer.
The trailer and drawbar load information on the type plate of the towing
equipment are merely test data for the towing equipment. The vehicle-specific
values are detailed in the vehicle documents.WARNING■ Do not exceed the maximum permissible axle and drawbar load and
weight of the trailer - risk of accident and serious injuries!■
An unsecured load can adversely affect stability and driving safety signifi-
cantly - there is a risk of accident!
Towing a trailer
Driving speed
For safety reasons, do not drive faster than 80 km/h when towing a trailer.
Immediately reduce your speed as soon as even the slightest swaying of the
trailer is detected. Never attempt to stop the trailer from “swaying” by acceler-
ating.
Brakes
Apply the brakes in good time! If the trailer is fitted with a trailer brake, apply
the brakes gently at first, then brake firmly. This will avoid brake jolts resulting
from the trailer wheels locking.
On downhill sections shift down a gear in good time to also use the engine as
a brake.
Engine overheating
If the pointer of the coolant temperature gauge reaches the red scale range,
the speed should be reduced immediately.
Stop and switch off the engine if the warning light
illuminates in the instru-
ment cluster display.
The following information must be observed » page 36,
Coolant
.
The coolant temperature can be reduced by switching on the heating.WARNING■ Always drive particularly carefully with the trailer.■Adapt your speed to the conditions of the road surface and to the traffic
situation.
CAUTION
If you tow a trailer frequently, you should also have your vehicle inspected be-
tween service intervals.
Anti-theft alarm system
When the vehicle is locked, the alarm is activated when the electrical connec-
tion to the trailer is interrupted.
Always switch off the anti-theft alarm system before a trailer is coupled or un-
coupled » page 54 .
Conditions for including a trailer in the anti-theft alarm system. The vehicle is factory-fitted with an anti-theft alarm system and towing
equipment.
The trailer is electrically connected to the towing vehicle by means of the
trailer socket.
The electrical system of the vehicle and trailer is functional.
The vehicle is locked with the vehicle key and the anti-theft alarm system
is activated.
134Driving
Page 139 of 216
Downloaded from www.Manualslib.com manuals search engine General Maintenance
Care and maintenance
Services, modifications and technical alterations
Introduction
This chapter contains information on the following subjects:
Vehicle operating under different weather conditions
136
Statutory checks
136
ŠKODA Service Partners
137
ŠKODA Original parts
137
ŠKODA Original accessories
137
Spoiler
138
Component protection
138
Airbags
138
Acceptance and recycling of used vehicles
139
The instructions and guidelines issued by ŠKODA AUTO a.s. must be observed
when making any modifications, repairs or technical changes to your vehicle.
Compliance with these guidelines and instructions is in the interest of the
roadworthiness and technical condition of your vehicle. The vehicle will comply
with road traffic regulations following the modifications, repairs and technical
changes.
Always consult a ŠKODA Partner » page 137before buying accessories or
parts, or before carrying out any modifications, repairs or technical alterations
to your vehicle.
WARNING■ Works on your vehicle, which have been carried out unprofessionally, can
cause operational faults – risk of accident!■
Interference on the electronic components and their software can lead to
operational faults. This interference can also impair not directly affected
systems because of the networking of the electronic components. The op-
erational safety of the vehicle may be at significant risk and parts may suf-
fer increased wear.
For the sake of the environmentTechnical documents regarding changes carried out on the vehicle must be
kept by the vehicle user, in order to be handed over to the recyclers later. This
ensures that vehicle recycling is in accordance with environmental regulations.
Note
■ We recommend only having these modifications, repairs and technical
changes performed by a specialist garage.■
Any damage caused by technical alterations made without the approval of
the manufacturer is excluded from the » Service schedule warranty.
■
The ŠKODA Partner cannot assume any liability for products which have not
been approved by ŠKODA AUTO a.s. even though these may be products with a
type approval or have been approved by a nationally recognised testing labo-
ratory.
■
We advise you only to use ŠKODA Original Accessories and ŠKODA Original
Parts which have been expressly approved for use on your vehicle. Reliability,
safety and suitability for your vehicle are guaranteed with these.
■
ŠKODA Original Accessories and ŠKODA Original Parts can be purchased from
a ŠKODA Partner who will also fit the purchased parts correctly.
Vehicle operating under different weather conditions
Read and observe
on page 136 first.
If you would like you operate your vehicle in countries other than its intended
weather conditions, you should contact a ŠKODA Partner.
They will advise you on certain precautions that should be taken to ensure the
full functioning of the vehicle as well as to prevent damage.
For example coolant and battery replacement or similar.
Statutory checks
Read and observe
on page 136 first.
Many countries have legislation requiring the operational reliability and road
worthiness and/or exhaust gas properties of a vehicle to be tested at specific
intervals. These tests can be carried out by workshops or testing stations that
have been legally authorised for this purpose.
136General Maintenance
Page 153 of 216
Downloaded from www.Manualslib.com manuals search engine WARNINGWhen working in the engine compartment, injuries, scalding, accident or
fire hazards may arise. For this reason, it is essential to comply with the
warning instructions stated below and with the generally applicable rules
of safety. The engine compartment of your car is a hazardous area.WARNINGInstructions before beginning work in the engine compartment■Turn off the engine and remove the ignition key.■
Firmly apply the handbrake.
■
For vehicles with manual transmission the lever into the neutral position.
■
On vehicles with automatic transmission, shift the selector lever into the
P position.
■
Allow the engine to cool.
■
Never open the bonnet if you can see steam or coolant flowing out of the
engine compartment – there is a risk of scalding. Wait until the steam or
coolant has stopped escaping.
WARNINGInformation for working in the engine room■Keep all people, especially children, away from the engine compartment.■
Never touch the radiator fan while the engine is still warm. The fan might
suddenly start running!
■
Do not touch any hot engine parts – there is a risk of burns.
WARNINGInformation for working in the engine compartment with the engine run-
ning■
Pay particular attention to moving engine parts, e.g. V-ribbed belt, gener-
ator, radiator fan - danger to life!
■
Never touch the electric wiring on the ignition system.
■
Avoid short circuits in the electrical system, particularly on the vehicle's
battery.
■
Always make sure that no jewellery, loose clothing or long hair can get
caught in rotating engine parts – there is a risk of death. Always remove
any jewellery, tie back long hair and wear tight fitting clothing before com-
pleting any work.
WARNINGInformation for working on the fuel system or the electrical system■Always disconnect the vehicle battery from the electrical system.■
Do not smoke.
■
Never work near open flames.
■
Always have a functioning fire extinguisher nearby.
WARNING■ Read the information and warning instructions on the fluid containers.■Keep the working fluids in sealed original containers and safe from peo-
ple who are not completely independent, e.g. children.■
Never spill operating fluids over the hot engine - risk of fire.
■
If you wish to work under the vehicle, you must secure the vehicle against
rolling away and support it with suitable axle stands: the car jack is not suf-
ficient for this – there is a risk of injury.
CAUTION
Always top up using the correct specification of fluids. This may result in major
operating problems and also vehicle damage!
For the sake of the environment
In view of the requirements for the environmentally friendly disposal of fluids and the special tools and knowledge required for such work, we recommend
that fluids be changed by a specialist garage.
Note
■ If there is anything you are not sure about concerning fluids, please consult a
specialist garage.■
Fluids with the proper specifications can be purchased from the ŠKODA Origi-
nal Accessories or from the ŠKODA Genuine Parts ranges.
150General Maintenance
Page 154 of 216
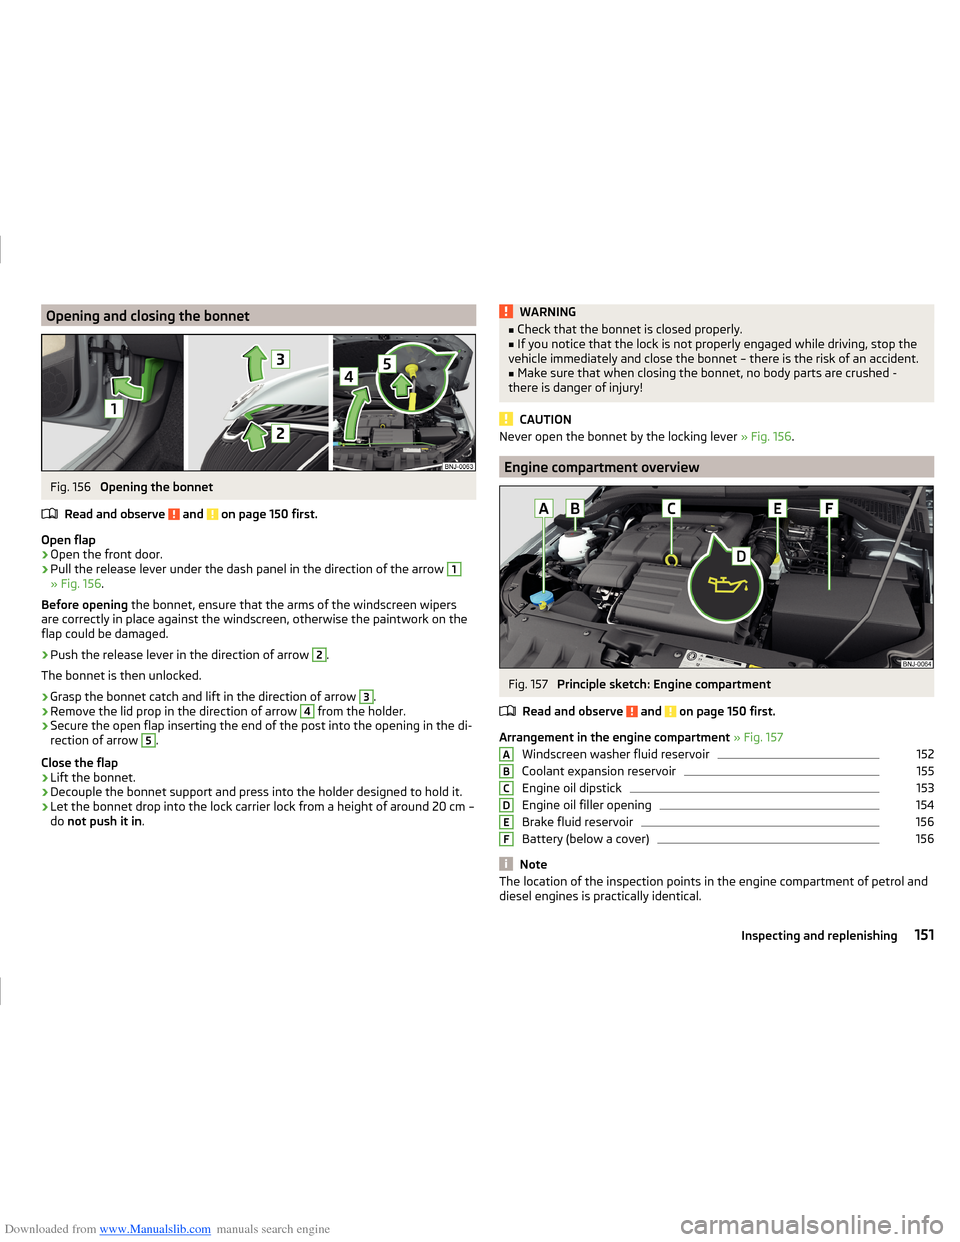
Downloaded from www.Manualslib.com manuals search engine Opening and closing the bonnetFig. 156
Opening the bonnet
Read and observe
and on page 150 first.
Open flap
›
Open the front door.
›
Pull the release lever under the dash panel in the direction of the arrow
1
» Fig. 156 .
Before opening the bonnet, ensure that the arms of the windscreen wipers
are correctly in place against the windscreen, otherwise the paintwork on the
flap could be damaged.
›
Push the release lever in the direction of arrow
2
.
The bonnet is then unlocked.
›
Grasp the bonnet catch and lift in the direction of arrow
3
.
›
Remove the lid prop in the direction of arrow
4
from the holder.
›
Secure the open flap inserting the end of the post into the opening in the di-
rection of arrow
5
.
Close the flap
›
Lift the bonnet.
›
Decouple the bonnet support and press into the holder designed to hold it.
›
Let the bonnet drop into the lock carrier lock from a height of around 20 cm –
do not push it in .
WARNING■
Check that the bonnet is closed properly.■If you notice that the lock is not properly engaged while driving, stop the
vehicle immediately and close the bonnet – there is the risk of an accident.■
Make sure that when closing the bonnet, no body parts are crushed -
there is danger of injury!
CAUTION
Never open the bonnet by the locking lever » Fig. 156.
Engine compartment overview
Fig. 157
Principle sketch: Engine compartment
Read and observe
and on page 150 first.
Arrangement in the engine compartment » Fig. 157
Windscreen washer fluid reservoir
152
Coolant expansion reservoir
155
Engine oil dipstick
153
Engine oil filler opening
154
Brake fluid reservoir
156
Battery (below a cover)
156
Note
The location of the inspection points in the engine compartment of petrol and
diesel engines is practically identical.ABCDEF151Inspecting and replenishing
Page 155 of 216
Downloaded from www.Manualslib.com manuals search engine Radiator fanRead and observe
and on page 150 first.
The radiator fan is powered by an electric motor. Operation is controlled ac-
cording to the temperature of the coolant.
WARNINGThe fan can intermittently continue to run for approximately 10 minutes af-
ter the ignition is switched off.
Windscreen washer system
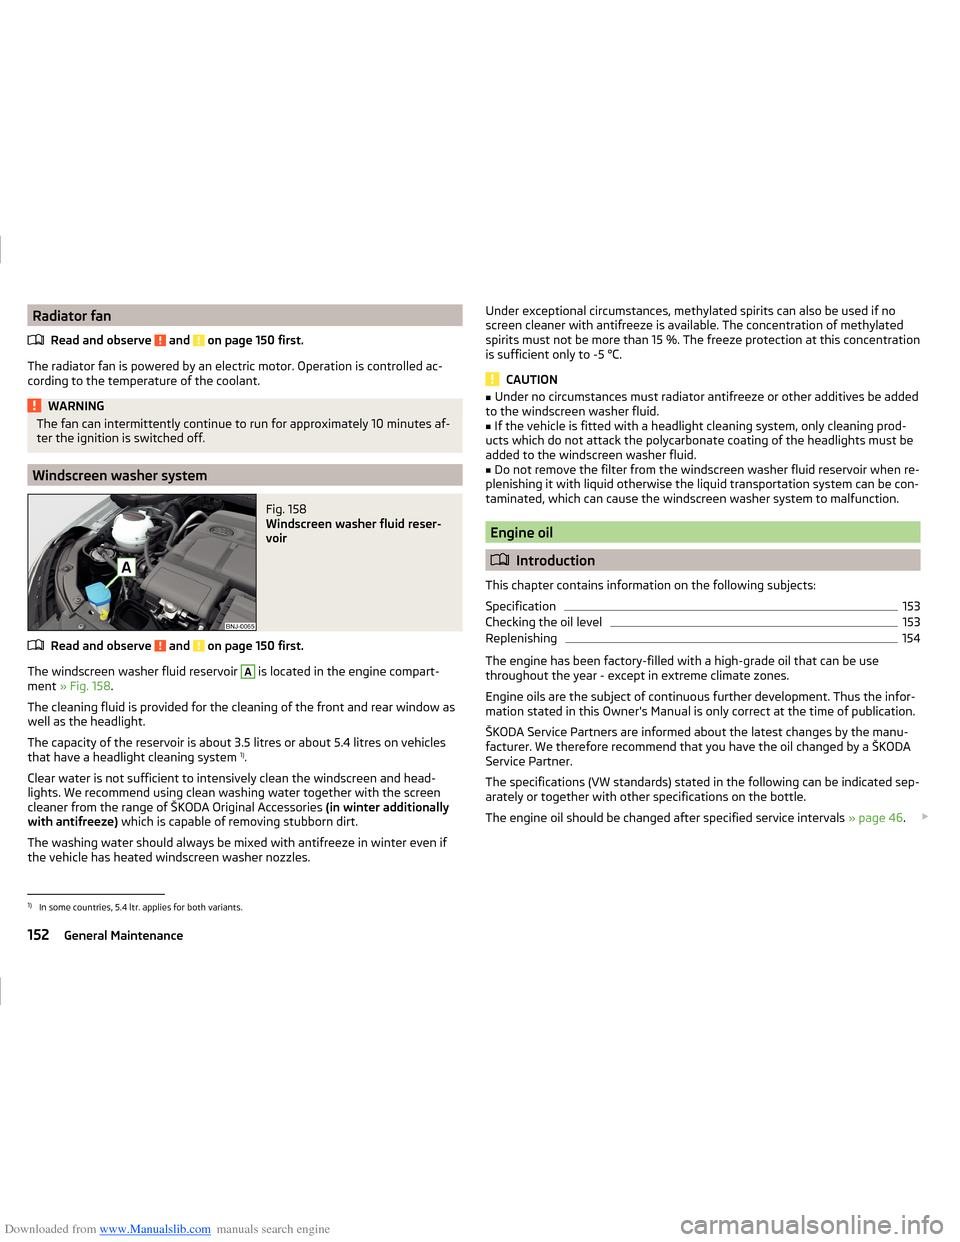
Fig. 158
Windscreen washer fluid reser-
voir
Read and observe and on page 150 first.
The windscreen washer fluid reservoir
A
is located in the engine compart-
ment » Fig. 158 .
The cleaning fluid is provided for the cleaning of the front and rear window as
well as the headlight.
The capacity of the reservoir is about 3.5 litres or about 5.4 litres on vehicles
that have a headlight cleaning system 1)
.
Clear water is not sufficient to intensively clean the windscreen and head-
lights. We recommend using clean washing water together with the screen
cleaner from the range of ŠKODA Original Accessories (in winter additionally
with antifreeze) which is capable of removing stubborn dirt.
The washing water should always be mixed with antifreeze in winter even if
the vehicle has heated windscreen washer nozzles.
Under exceptional circumstances, methylated spirits can also be used if no
screen cleaner with antifreeze is available. The concentration of methylated
spirits must not be more than 15 %. The freeze protection at this concentration
is sufficient only to -5 °C.
CAUTION
■ Under no circumstances must radiator antifreeze or other additives be added
to the windscreen washer fluid.■
If the vehicle is fitted with a headlight cleaning system, only cleaning prod-
ucts which do not attack the polycarbonate coating of the headlights must be
added to the windscreen washer fluid.
■
Do not remove the filter from the windscreen washer fluid reservoir when re-
plenishing it with liquid otherwise the liquid transportation system can be con-
taminated, which can cause the windscreen washer system to malfunction.
Engine oil
Introduction
This chapter contains information on the following subjects:
Specification
153
Checking the oil level
153
Replenishing
154
The engine has been factory-filled with a high-grade oil that can be use
throughout the year - except in extreme climate zones.
Engine oils are the subject of continuous further development. Thus the infor-
mation stated in this Owner's Manual is only correct at the time of publication.
ŠKODA Service Partners are informed about the latest changes by the manu-
facturer. We therefore recommend that you have the oil changed by a ŠKODA
Service Partner.
The specifications (VW standards) stated in the following can be indicated sep-
arately or together with other specifications on the bottle.
The engine oil should be changed after specified service intervals » page 46.
1)
In some countries, 5.4 ltr. applies for both variants.
152General Maintenance
Page 157 of 216
Downloaded from www.Manualslib.com manuals search engine The oil level must be checked at regular intervals.
In case of low oil level, the display of the instrument cluster shows a check
mark
as well as the relevant notification » page 37. Check the oil level using
the dipstick as soon as possible. Add oil accordingly.
CAUTION
■ The oil level must never be above the range A » Fig. 159 - risk of damage to
the motor as well as the exhaust system.■
If for some reason, it is not possible to top up the engine oil under the cur-
rent circumstances,
do not continue driving! Switch off the engine and seek
assistance from a specialist garage.
■
If the oil level is above the range
A
,
do not continue to drive! Switch off
the engine and seek assistance from a specialist garage.
Replenishing
Read and observe
and on page 153 first.
›
Unscrew the cap of the engine oil filler opening » Fig. 157 on page 151 .
›
Replenish the oil in portions of 0.5 litres in accordance with the correct speci-
fications » page 153 .
›
Check the oil level » page 153.
›
Screw the lid of the engine oil filler closed carefully.
›
Pull the dipstick out as far as the stop.
Coolant
Introduction
This chapter contains information on the following subjects:
Checking the coolant level
155
Replenishing
155
The coolant provides cooling for the motor.
It consists of water and coolant additive with additives that protect the cooling
system against corrosion and prevents furring.
The coolant additive level in the coolant must be at least 40%.
The coolant additive may be increased to a maximum of 60%.
The correct mixing ratio of water and coolant additive is to be checked if nec- essary by a specialist garage or is to be restored if necessary.
The description of the coolant is shown in the coolant expansion reservoir » Fig. 160 on page 155 .WARNINGThe engine compartment of your car is a hazardous area. While working in
the engine compartment, be sure to observe the following warnings
» page 149 .■
The coolant is harmful to health.
■
Avoid contact with the coolant.
■
Coolant vapours are harmful to health.
■
Never open the end cover of the coolant expansion reservoir while the
engine is still warm. The cooling system is pressurized!
■
When opening the end cover of the coolant expansion reservoir, cover it
with a cloth to protect your face, hands and arms from hot steam or hot
coolant.
■
If any coolant splashes into your eyes, immediately rinse out your eyes
with clear water and contact a doctor as soon as possible.
■
Always keep the coolant in the original container safe from people who
are not completely independent, especially children - there is a danger of
poisoning!
■
Consult a doctor immediately if coolant is swallowed.
■
Never spill operating fluids over the hot engine - risk of fire.
CAUTION
■ Do not continue if for some reason it is not possible to fill with coolant un-
der the current circumstances! Switch off the engine and seek assistance from
a specialist garage.■
With an empty expansion tank top up coolant. The system could ventilate -
there is a risk of engine damage,
not continue! Switch off the engine and
seek assistance from a specialist garage.
■
The amount of coolant additive in the coolant must never be allowed to fall
below 40 %.
■
Over 60 % coolant additive in the coolant reduces the antifreeze protection
and coolant effectiveness.
■
A coolant additive that does not comply with the correct specification can
significantly reduce the corrosion protection of the cooling system.
■
Any faults resulting from corrosion may cause a loss of coolant and can con-
sequently result in major engine damage.
■
Do not fill the coolant above the mark
A
» Fig. 160 on page 155 .
■
If an error occurs, leading to the engine overheating, the help of a professio-
nal garage is to be sought - there is a risk of serious engine damage occurring.
154General Maintenance
Page 158 of 216
Downloaded from www.Manualslib.com manuals search engine ■Additional headlights and other attached components in front of the air inlet
impair the cooling efficiency of the coolant.■
Never cover the radiator - there is a risk of the engine overheating.
Checking the coolant level
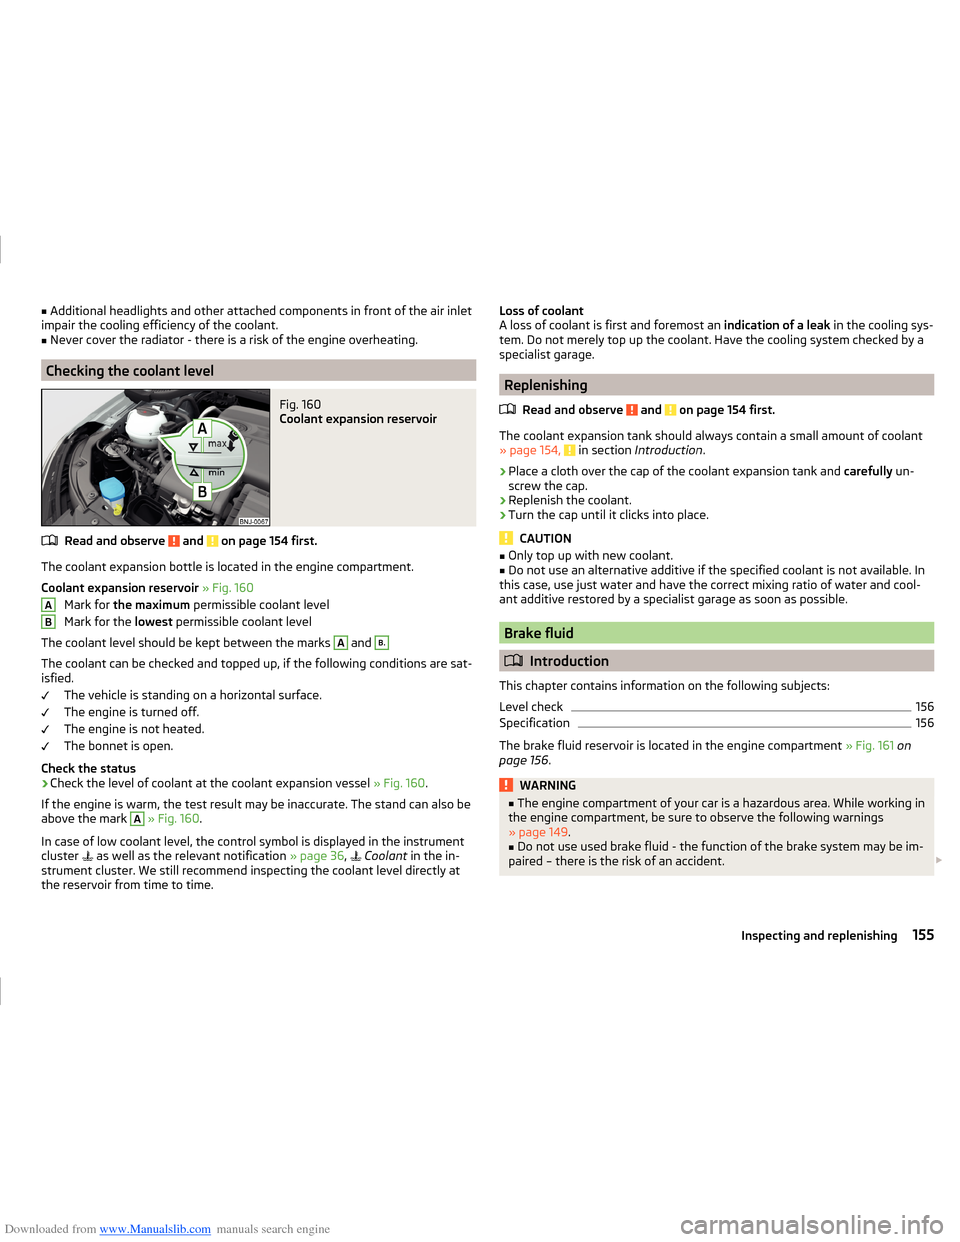
Fig. 160
Coolant expansion reservoir
Read and observe and on page 154 first.
The coolant expansion bottle is located in the engine compartment.
Coolant expansion reservoir » Fig. 160
Mark for the maximum permissible coolant level
Mark for the lowest permissible coolant level
The coolant level should be kept between the marks
A
and
B.
The coolant can be checked and topped up, if the following conditions are sat-
isfied.
The vehicle is standing on a horizontal surface.
The engine is turned off.
The engine is not heated.
The bonnet is open.
Check the status
›
Check the level of coolant at the coolant expansion vessel » Fig. 160.
If the engine is warm, the test result may be inaccurate. The stand can also be
above the mark
A
» Fig. 160 .
In case of low coolant level, the control symbol is displayed in the instrument
cluster as well as the relevant notification
» page 36,
Coolant
in the in-
strument cluster. We still recommend inspecting the coolant level directly at
the reservoir from time to time.
ABLoss of coolant
A loss of coolant is first and foremost an indication of a leak in the cooling sys-
tem. Do not merely top up the coolant. Have the cooling system checked by a
specialist garage.
Replenishing
Read and observe
and on page 154 first.
The coolant expansion tank should always contain a small amount of coolant» page 154, in section Introduction .
›
Place a cloth over the cap of the coolant expansion tank and carefully un-
screw the cap.
›
Replenish the coolant.
›
Turn the cap until it clicks into place.
CAUTION
■ Only top up with new coolant.■Do not use an alternative additive if the specified coolant is not available. In
this case, use just water and have the correct mixing ratio of water and cool-
ant additive restored by a specialist garage as soon as possible.
Brake fluid
Introduction
This chapter contains information on the following subjects:
Level check
156
Specification
156
The brake fluid reservoir is located in the engine compartment » Fig. 161 on
page 156 .
WARNING■
The engine compartment of your car is a hazardous area. While working in
the engine compartment, be sure to observe the following warnings
» page 149 .■
Do not use used brake fluid - the function of the brake system may be im-
paired – there is the risk of an accident.
155Inspecting and replenishing
Page 204 of 216
Downloaded from www.Manualslib.com manuals search engine BrakesBrake booster106
Brake fluid156
Braking and stabilisation systems114
Handbrake107
Information messages32
Running-in111
Warning light32
Brakes and parking106
Brake system114
Braking Information for braking
106
Breakdown kit172
Bulbs Replacing
184
Button CAR see Infotainment
4
Button in driver's door electric windows
57
C
Car care Jack
143
Car computer see multifunction display
40
Care and maintenance136
Car park107
Car park ticket holder75
Carrier Roof rack
93
Cavity protection143
Central locking49
Problems53
Central locking button53
Change Bulb for daytime running lights (halogen spot- light)
187
Bulb for indicator (halogen headlight)186
Engine oil152
Light bulb in tail light190
Changing Fuses
181
Fuses in the dash panel181
Fuses in the engine compartment183
Licence plate light bulb189
Wheels168
Changing a wheel Preparation
168
Subsequent steps171
Changing wheels Wheel removal and fix
171
Charging a vehicle battery158
Check Fit ball head properly
130
Checking Battery electrolyte level
158
Brake fluid156
Coolant level155
Engine oil153
Oil level153
Windscreen washer fluid152
Checks Statutory checks
136
Children and safety20
Child safety Side airbag
22
Child safety lock53
Child safety seat Use of child safety seats
22
child seat Use of ISOFIX child seats
23
Child seat Classification
22
ISOFIX22
on the front passenger seat21
TOP TETHER24
Chrome parts Refer to vehicle maintenance
142
Cigarette lighter77
Clean Anodized parts
142
Chrome parts142
Cleaning Alcantara
145
and maintaining belts146
artificial leather145
headlight glasses143
materials145
natural leather145
plastic parts141
seats covers of the electrically heated seats146
wheels143
Cleaning safety belt
146
Cleaning seat covers
146
Cleaning the interior artificial leather
145
Seat covers146
Cleaning the vehicle exterior Cavity protection
143
Door locking cylinder143
Headlight glasses143
Towing device144
Under-body protection144
wheels143
Windows and external mirrors142
Cleaning vehicle139
Cleaning vehicle exterior140
Anodized parts142
Chrome parts142
Decorative foils142
Plastic parts141
Protective foils142
Rubber seals141
Vehicle paint work141
Wiper blades144
201Index