warning SKODA FABIA 2014 3.G / NJ Operating Instruction Manual
[x] Cancel search | Manufacturer: SKODA, Model Year: 2014, Model line: FABIA, Model: SKODA FABIA 2014 3.G / NJPages: 216, PDF Size: 30.9 MB
Page 78 of 216
Downloaded from www.Manualslib.com manuals search engine WARNING (Continued)■No objects should be placed in the storage compartments nor in the
drinks holders; the vehicle occupants could be endangered if there is sud-
den braking or the vehicle collides with something.■
Ash, cigarettes, cigars and the like. may only be placed in the ashtray!
Car park ticket holder
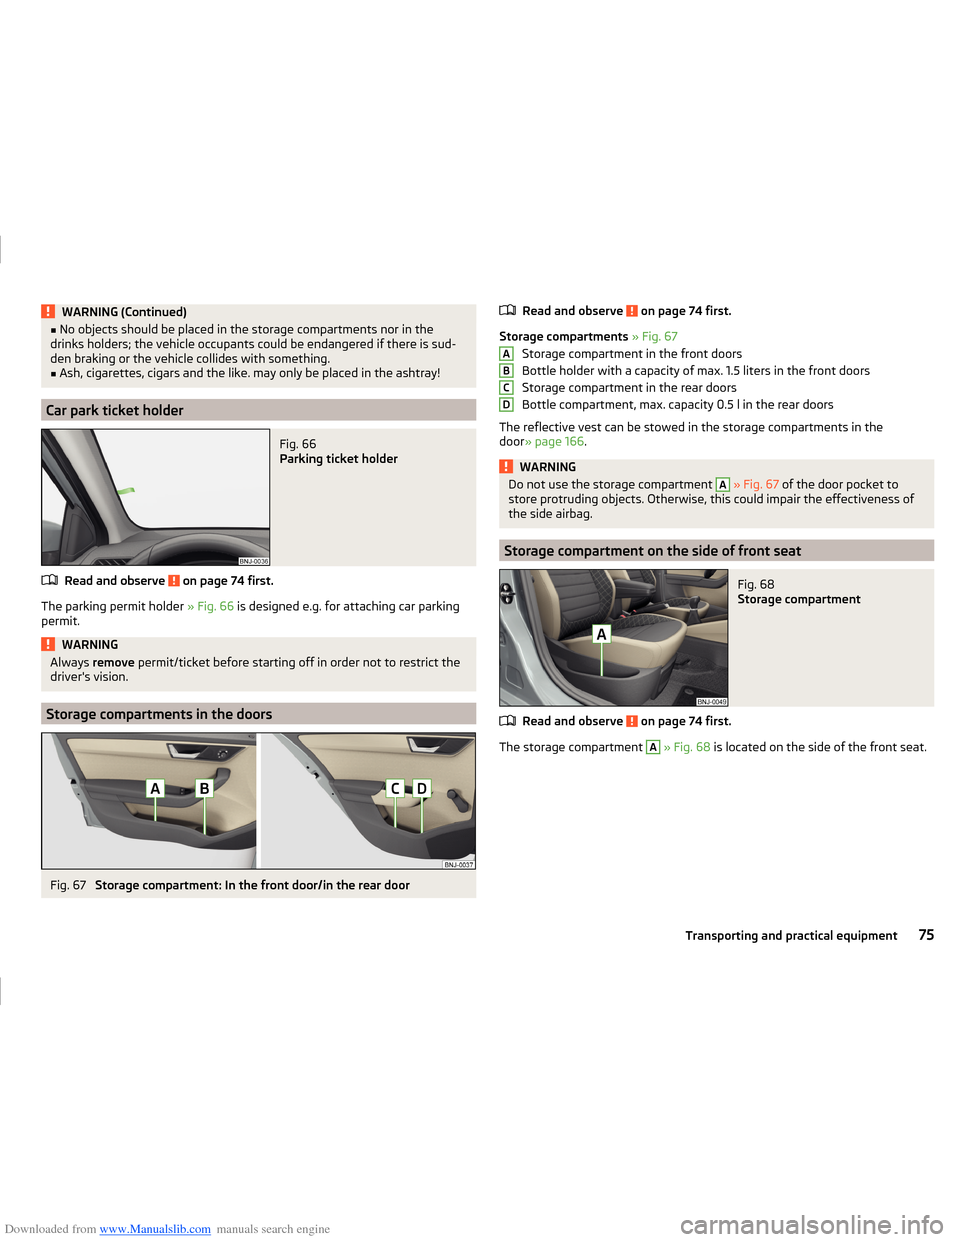
Fig. 66
Parking ticket holder
Read and observe on page 74 first.
The parking permit holder » Fig. 66 is designed e.g. for attaching car parking
permit.
WARNINGAlways remove permit/ticket before starting off in order not to restrict the
driver's vision.
Storage compartments in the doors
Fig. 67
Storage compartment: In the front door/in the rear door
Read and observe on page 74 first.
Storage compartments » Fig. 67
Storage compartment in the front doors
Bottle holder with a capacity of max. 1.5 liters in the front doors
Storage compartment in the rear doors
Bottle compartment, max. capacity 0.5 l in the rear doors
The reflective vest can be stowed in the storage compartments in the
door » page 166 .
WARNINGDo not use the storage compartment A » Fig. 67 of the door pocket to
store protruding objects. Otherwise, this could impair the effectiveness of
the side airbag.
Storage compartment on the side of front seat
Fig. 68
Storage compartment
Read and observe on page 74 first.
The storage compartment
A
» Fig. 68 is located on the side of the front seat.
ABCD75Transporting and practical equipment
Page 79 of 216
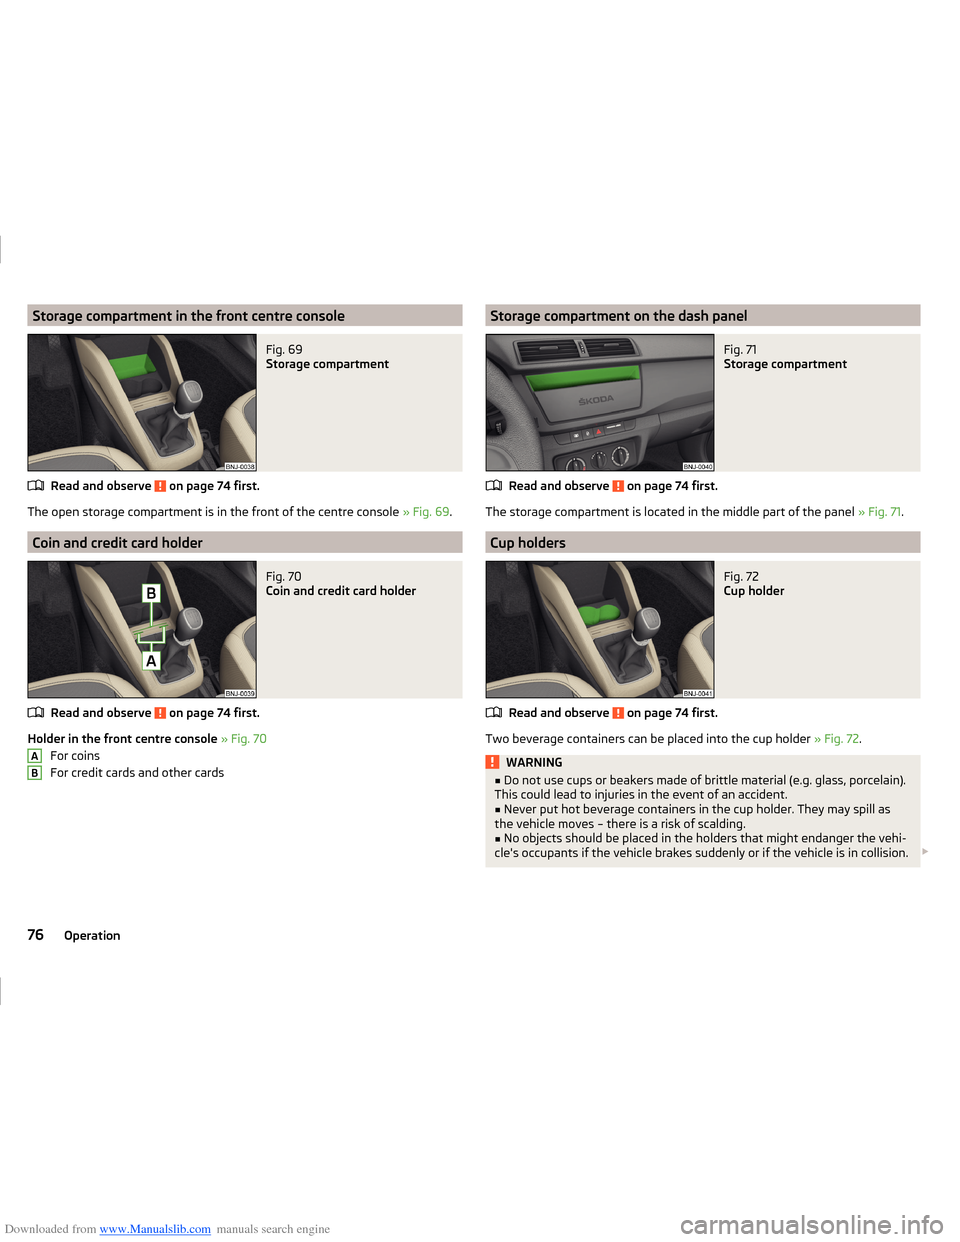
Downloaded from www.Manualslib.com manuals search engine Storage compartment in the front centre consoleFig. 69
Storage compartment
Read and observe on page 74 first.
The open storage compartment is in the front of the centre console » Fig. 69.
Coin and credit card holder
Fig. 70
Coin and credit card holder
Read and observe on page 74 first.
Holder in the front centre console » Fig. 70
For coins
For credit cards and other cards
ABStorage compartment on the dash panelFig. 71
Storage compartment
Read and observe on page 74 first.
The storage compartment is located in the middle part of the panel » Fig. 71.
Cup holders
Fig. 72
Cup holder
Read and observe on page 74 first.
Two beverage containers can be placed into the cup holder » Fig. 72.
WARNING■
Do not use cups or beakers made of brittle material (e.g. glass, porcelain).
This could lead to injuries in the event of an accident.■
Never put hot beverage containers in the cup holder. They may spill as
the vehicle moves – there is a risk of scalding.
■
No objects should be placed in the holders that might endanger the vehi-
cle's occupants if the vehicle brakes suddenly or if the vehicle is in collision.
76Operation
Page 80 of 216
Downloaded from www.Manualslib.com manuals search engine CAUTIONDo not leave open beverage containers in the cup holder during the journey.
There is a risk of spilling e.g. when braking which may cause damage to the
electrical components or seat upholstery.
Cigarette lighter
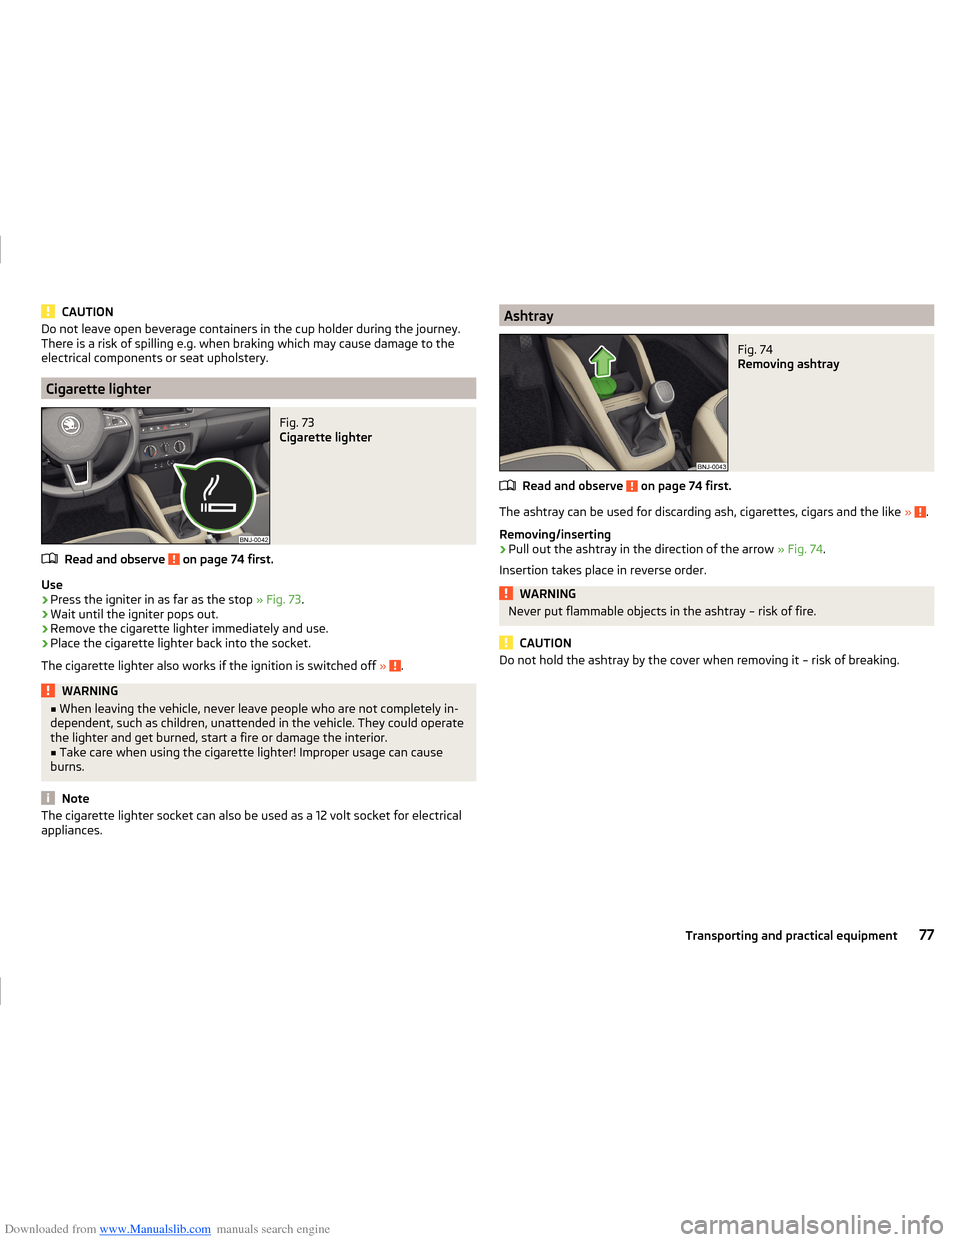
Fig. 73
Cigarette lighter
Read and observe on page 74 first.
Use
›
Press the igniter in as far as the stop » Fig. 73.
›
Wait until the igniter pops out.
›
Remove the cigarette lighter immediately and use.
›
Place the cigarette lighter back into the socket.
The cigarette lighter also works if the ignition is switched off »
.
WARNING■
When leaving the vehicle, never leave people who are not completely in-
dependent, such as children, unattended in the vehicle. They could operate
the lighter and get burned, start a fire or damage the interior.■
Take care when using the cigarette lighter! Improper usage can cause
burns.
Note
The cigarette lighter socket can also be used as a 12 volt socket for electrical
appliances.AshtrayFig. 74
Removing ashtray
Read and observe on page 74 first.
The ashtray can be used for discarding ash, cigarettes, cigars and the like » .
Removing/inserting
›
Pull out the ashtray in the direction of the arrow » Fig. 74.
Insertion takes place in reverse order.
WARNINGNever put flammable objects in the ashtray – risk of fire.
CAUTION
Do not hold the ashtray by the cover when removing it – risk of breaking.77Transporting and practical equipment
Page 81 of 216
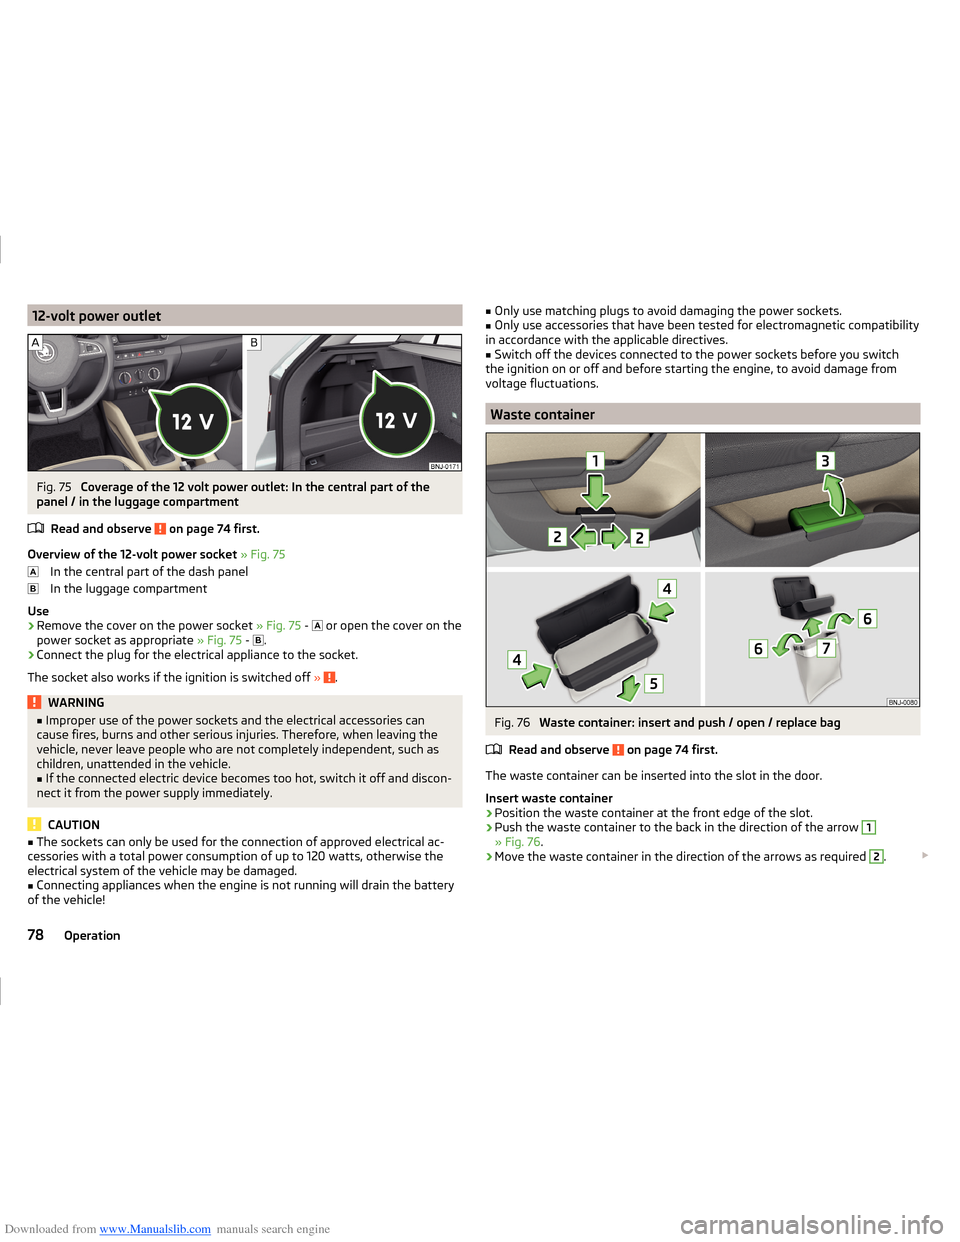
Downloaded from www.Manualslib.com manuals search engine 12-volt power outletFig. 75
Coverage of the 12 volt power outlet: In the central part of the
panel / in the luggage compartment
Read and observe
on page 74 first.
Overview of the 12-volt power socket » Fig. 75
In the central part of the dash panel
In the luggage compartment
Use
›
Remove the cover on the power socket » Fig. 75 -
or open the cover on the
power socket as appropriate » Fig. 75 -
.
›
Connect the plug for the electrical appliance to the socket.
The socket also works if the ignition is switched off »
.
WARNING■
Improper use of the power sockets and the electrical accessories can
cause fires, burns and other serious injuries. Therefore, when leaving the
vehicle, never leave people who are not completely independent, such as
children, unattended in the vehicle.■
If the connected electric device becomes too hot, switch it off and discon-
nect it from the power supply immediately.
CAUTION
■ The sockets can only be used for the connection of approved electrical ac-
cessories with a total power consumption of up to 120 watts, otherwise the
electrical system of the vehicle may be damaged.■
Connecting appliances when the engine is not running will drain the battery
of the vehicle!
■ Only use matching plugs to avoid damaging the power sockets.■Only use accessories that have been tested for electromagnetic compatibility
in accordance with the applicable directives.■
Switch off the devices connected to the power sockets before you switch
the ignition on or off and before starting the engine, to avoid damage from
voltage fluctuations.
Waste container
Fig. 76
Waste container: insert and push / open / replace bag
Read and observe
on page 74 first.
The waste container can be inserted into the slot in the door.
Insert waste container
›
Position the waste container at the front edge of the slot.
›
Push the waste container to the back in the direction of the arrow
1
» Fig. 76 .
›
Move the waste container in the direction of the arrows as required
2
.
78Operation
Page 82 of 216
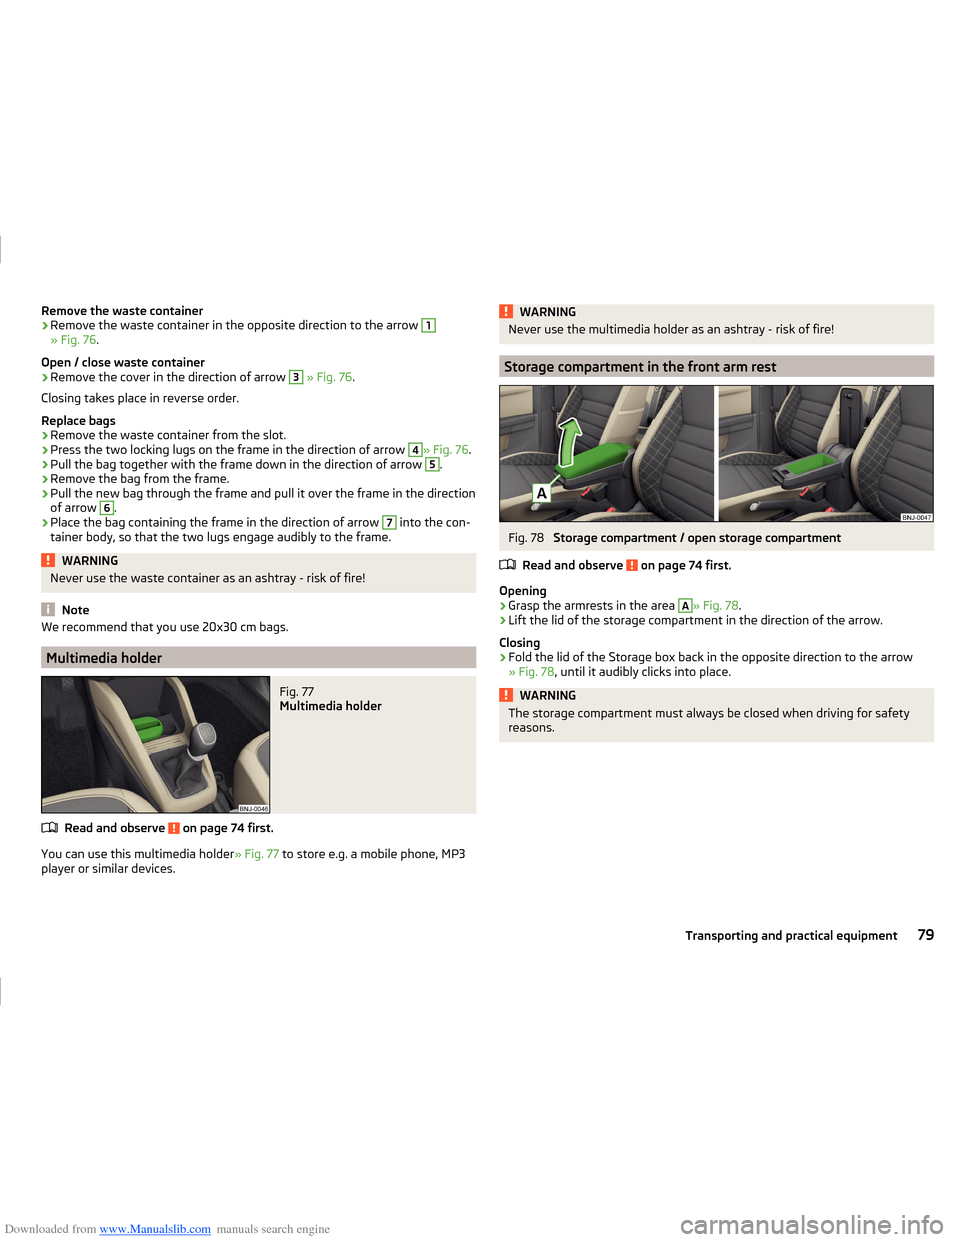
Downloaded from www.Manualslib.com manuals search engine Remove the waste container›Remove the waste container in the opposite direction to the arrow 1
» Fig. 76.
Open / close waste container
›
Remove the cover in the direction of arrow
3
» Fig. 76 .
Closing takes place in reverse order.
Replace bags
›
Remove the waste container from the slot.
›
Press the two locking lugs on the frame in the direction of arrow
4
» Fig. 76 .
›
Pull the bag together with the frame down in the direction of arrow
5
.
›
Remove the bag from the frame.
›
Pull the new bag through the frame and pull it over the frame in the direction
of arrow
6
.
›
Place the bag containing the frame in the direction of arrow
7
into the con-
tainer body, so that the two lugs engage audibly to the frame.
WARNINGNever use the waste container as an ashtray - risk of fire!
Note
We recommend that you use 20x30 cm bags.
Multimedia holder
Fig. 77
Multimedia holder
Read and observe on page 74 first.
You can use this multimedia holder » Fig. 77 to store e.g. a mobile phone, MP3
player or similar devices.
WARNINGNever use the multimedia holder as an ashtray - risk of fire!
Storage compartment in the front arm rest
Fig. 78
Storage compartment / open storage compartment
Read and observe
on page 74 first.
Opening
›
Grasp the armrests in the area
A
» Fig. 78 .
›
Lift the lid of the storage compartment in the direction of the arrow.
Closing
›
Fold the lid of the Storage box back in the opposite direction to the arrow
» Fig. 78 , until it audibly clicks into place.
WARNINGThe storage compartment must always be closed when driving for safety
reasons.79Transporting and practical equipment
Page 83 of 216
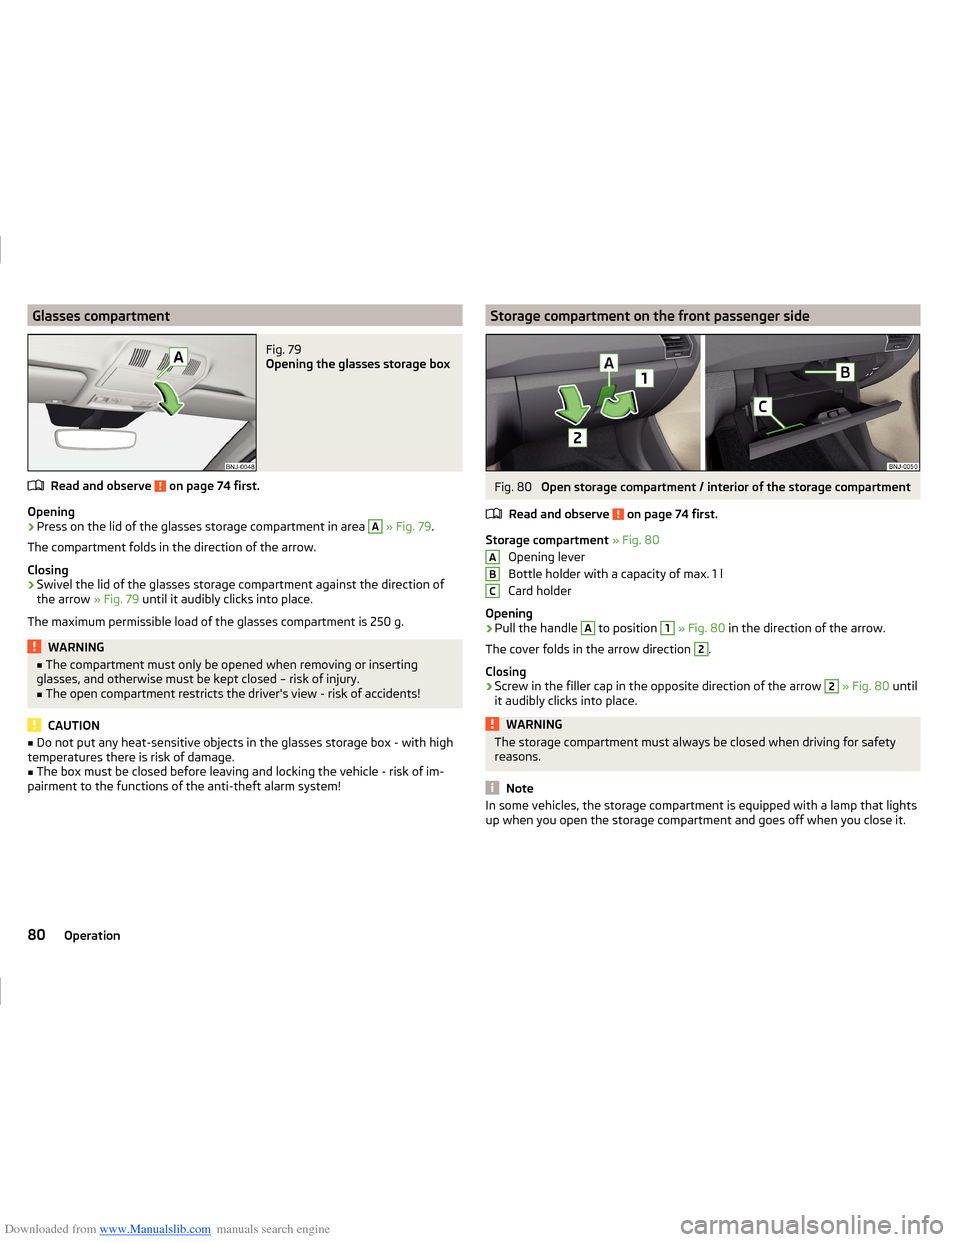
Downloaded from www.Manualslib.com manuals search engine Glasses compartmentFig. 79
Opening the glasses storage box
Read and observe on page 74 first.
Opening
›
Press on the lid of the glasses storage compartment in area
A
» Fig. 79 .
The compartment folds in the direction of the arrow.
Closing
›
Swivel the lid of the glasses storage compartment against the direction of
the arrow » Fig. 79 until it audibly clicks into place.
The maximum permissible load of the glasses compartment is 250 g.
WARNING■ The compartment must only be opened when removing or inserting
glasses, and otherwise must be kept closed – risk of injury.■
The open compartment restricts the driver's view - risk of accidents!
CAUTION
■ Do not put any heat-sensitive objects in the glasses storage box - with high
temperatures there is risk of damage.■
The box must be closed before leaving and locking the vehicle - risk of im-
pairment to the functions of the anti-theft alarm system!
Storage compartment on the front passenger sideFig. 80
Open storage compartment / interior of the storage compartment
Read and observe
on page 74 first.
Storage compartment » Fig. 80
Opening lever
Bottle holder with a capacity of max. 1 l
Card holder
Opening
›
Pull the handle
A
to position
1
» Fig. 80 in the direction of the arrow.
The cover folds in the arrow direction
2
.
Closing
›
Screw in the filler cap in the opposite direction of the arrow
2
» Fig. 80 until
it audibly clicks into place.
WARNINGThe storage compartment must always be closed when driving for safety
reasons.
Note
In some vehicles, the storage compartment is equipped with a lamp that lights
up when you open the storage compartment and goes off when you close it.ABC80Operation
Page 84 of 216

Downloaded from www.Manualslib.com manuals search engine Storage compartment under the front seatFig. 81
Opening the storage compart-
ment
Read and observe on page 74 first.
Opening
›
Pull the handle to position
1
» Fig. 81 in the direction of the arrow.
›
Remove the wiper blade in the direction of the arrow
2
.
Closing
›
Grip the compartment by the handle and close in the opposite direction to
that of the arrow
2
» Fig. 81 .
›
Keep hold of the handle until the compartment is closed.
The storage compartment is designed for storing small objects of up to 1.5 kg.
in weight.
WARNINGThe storage compartment must always be closed when driving for safety
reasons.
Clothes hook
Read and observe
on page 74 first.
The clothes hooks are located on the handles of the headliner above each of
the rear doors.
The maximum permissible load of the hooks is 2 kg.
WARNING■ Only hang light items of clothing on the hooks. Never leave any heavy or
sharp-edged objects in the pockets of the items of clothing.■
Do not use clothes hangers for hanging up items of clothing; this may re-
duce the effectiveness of the head airbags.
■
Ensure that any clothes hanging from the hooks do not impair your vision
to the rear.
Storage pockets on the front seats
Fig. 82
Map pockets
Read and observe on page 74 first.
The Storage pockets » Fig. 82 are intended for the Storage e.g. of maps, maga-
zines, etc.
WARNINGNever put heavy items in the map pockets – risk of injury.
CAUTION
Never put large objects into the map pockets, e.g. bottles or objects with sharp
edges - risk of damaging the pockets and seat coverings.81Transporting and practical equipment
Page 85 of 216
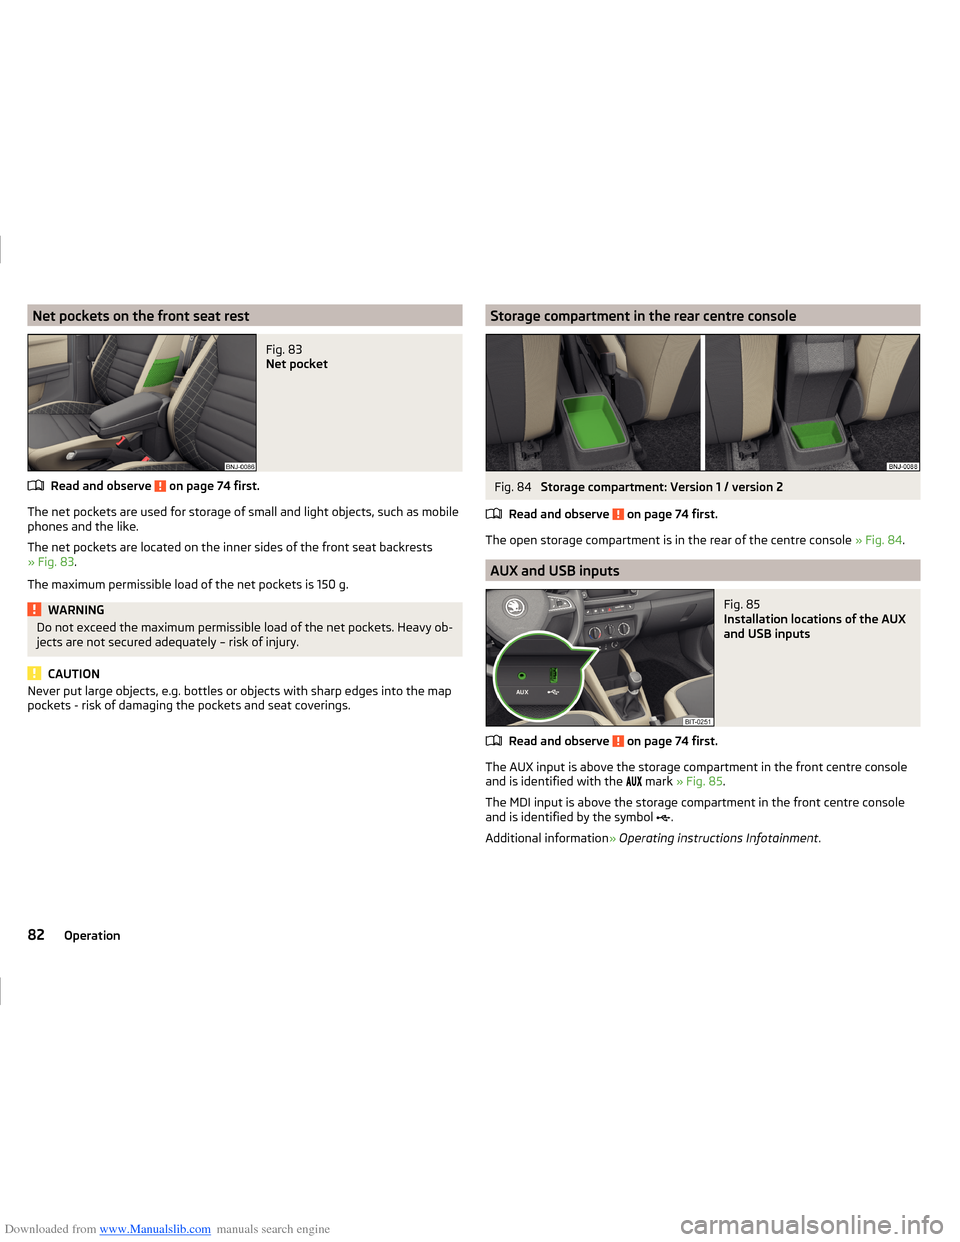
Downloaded from www.Manualslib.com manuals search engine Net pockets on the front seat restFig. 83
Net pocket
Read and observe on page 74 first.
The net pockets are used for storage of small and light objects, such as mobile
phones and the like.
The net pockets are located on the inner sides of the front seat backrests
» Fig. 83 .
The maximum permissible load of the net pockets is 150 g.
WARNINGDo not exceed the maximum permissible load of the net pockets. Heavy ob-
jects are not secured adequately – risk of injury.
CAUTION
Never put large objects, e.g. bottles or objects with sharp edges into the map
pockets - risk of damaging the pockets and seat coverings.Storage compartment in the rear centre consoleFig. 84
Storage compartment: Version 1 / version 2
Read and observe
on page 74 first.
The open storage compartment is in the rear of the centre console » Fig. 84.
AUX and USB inputs
Fig. 85
Installation locations of the AUX
and USB inputs
Read and observe on page 74 first.
The AUX input is above the storage compartment in the front centre console
and is identified with the mark
» Fig. 85 .
The MDI input is above the storage compartment in the front centre console
and is identified by the symbol .
Additional information » Operating instructions Infotainment .
82Operation
Page 86 of 216
Downloaded from www.Manualslib.com manuals search engine Luggage compartment
Introduction
This chapter contains information on the following subjects:
Fastening elements
84
Fixing nets
84
Hooks
85
Storage compartments in the luggage compartment
85
Luggage compartment cover
86
Other positions of the luggage compartment cover
86
Roll-up cover
87
Storage compartments under the floor
87
Cargo element
88
Flexible storage compartment
88
Class N1 vehicles
88
Please observe the following for the purpose of maintaining good handling
characteristics of your vehicle:
›
Distribute loads as evenly as possible.
›
Place heavy objects as far forward as possible.
›
Attach the items of luggage to the lashing eyes or by using the fixing nets
» page 84 .
In the event of an accident, even small and light objects gain so much kinetic energy that they can cause severe injuries.
The magnitude of the kinetic energy is dependent on the speed at which the
vehicle is travelling and the weight of the object.
Example: In the event of a frontal collision at a speed of 50 km/h, an object
weighing 4.5 kg produces energy corresponding to 20 times its own weight.
This means that it results in a weight of approx. 90 kg “ ”.
Luggage compartment light
The warning light turns on when tailgate is opened.
The warning light turns off when the tailgate is closed.
If the boot lid is open and the ignition switched off, the light will extinguish
automatically after around 10 minutes.
WARNING■ Always store transported objects in the boot and attach them to the lash-
ing eyes.■
Loose objects can be thrown forward during a sudden manoeuvre or in
case of an accident and can injure the occupants or other road users.
■
Loose objects could hit a deployed airbag and injure occupants – risk to
life!
■
Please note that the handling properties of the vehicle may be affected
when transporting heavy objects as the centre of gravity can be shifted –
risk of accident. The speed and style of driving must be adjusted according-
ly.
■
If the items of luggage or objects are attached to the lashing eyes with
unsuitable or damaged lashing straps, injuries can occur in the event of
braking manoeuvres or accidents. To prevent items of luggage from moving
around, always use suitable lashing straps that are firmly attached to the
lashing eyes.
■
Items carried in the luggage compartment must be stowed in such a way
that no objects are able to slip forward under sudden driving manoeuvres
or braking – risk of injury.
■
When transporting objects in the luggage compartment that has been en-
larged by folding the rear seats forward, ensure the safety of the passen-
gers transported on the other rear seats » page 10.
■
Do not drive with the luggage compartment lid open or unlatched, other-
wise exhaust gases may get into the interior of the vehicle – risk of poison-
ing!
■
Do not exceed the permissible axle loads and permissible gross weight of
the vehicle – risk of accident!
■
Do not transport people in the boot!
CAUTION
■ Please ensure that the heating elements for the rear window heater are not
damaged as a result of abrasive objects.■
Tyre pressure must be adjusted to the load » page 161.
83Transporting and practical equipment
Page 87 of 216

Downloaded from www.Manualslib.com manuals search engine Fastening elementsFig. 86
Fasteners
Read and observe and on page 83 first.
Overview of the fasteners » Fig. 86
Lashing eyes for fastening items of luggage and fixing nets
Fastening element only for fastening fixing nets
Lashing eyes only for fastening fixing nets
The upper front lashing eye
C
is located behind the folding rear seat backrest.
The maximum permissible static load of the individual lashing eyes
A
is 3.5 kN
(350 kg).
CAUTION
The lashing eyelets A cannot be used for attaching bags and nets when the
variable loading floor is in the upper position » page 891)
.ABCFixing netsFig. 87
Fastening examples for nets
Fig. 88
Fastening vertical pocket
Read and observe and on page 83 first.
Securing of the nets » Fig. 87 and » Fig. 88
Horizontal pocket
Floor net
Vertical pocket (only applies to some vehicles)
The maximum permissible load of the fixing nets is 1.5 kg.
WARNINGDo not exceed the maximum permissible load of the fixing nets. Heavy ob-
jects are not secured adequately – risk of injury. ABC1)
Applies to vehicles with a variable loading floor.
84Operation