cooling SKODA FABIA 2014 3.G / NJ Operating Instruction Manual
[x] Cancel search | Manufacturer: SKODA, Model Year: 2014, Model line: FABIA, Model: SKODA FABIA 2014 3.G / NJPages: 216, PDF Size: 30.9 MB
Page 5 of 216
Downloaded from www.Manualslib.com manuals search engine Table of Contents
Board literature4
Notes
5
Structure and more information about the
Operating Instructions
6
Abbreviations
Safety
Passive Safety
8
General information
8
Correct and safe seated position
8
Seat belts
11
Wearing seat belts
11
Inertia reel and belt pre-tensioners
13
Airbag system
14
Description of the airbag system
14
Airbag overview
15
Deactivating airbags
18
Transporting children safely
20
Child seat
20
Fastening systems
22
Operation
Cockpit
26
Overview
25
Instruments and warning lights
27
Instrument cluster
27
Warning lights
31
Information system
39
Driver information system
39
Driving data (Multifunction display)
40
MAXI DOT display
42Service interval display46SmartGate47
Unlocking and opening
49
Unlocking and locking
49
Anti-theft alarm system
54
Tailgate
55
Window operations
56
Lights and visibility
59
Lights
59
Interior lights
64
Visibility
65
Windscreen wipers and washers
66
Rear mirror
68
Seats and headrests
70
Seats and headrests
70
Seat features
71
Transporting and practical equipment
74
Useful equipment
74
Luggage compartment
83
Variable loading floor in the luggage
compartment
88
Bicycle carrier in the luggage compartment
90
Roof rack
93
Heating and air conditioning
94
Heating, ventilation, cooling
94
Driving
Starting-off and driving
100
Starting and stopping the engine using the
key
100
Starting and stopping the engine at the push
of the button
102
START-STOPsystem
104
Brakes and parking
106
Manual gear shifting and pedals
107Automatic transmission108Running-in and economical driving111
Avoiding damage to your vehicle
113
Assist systems
114
Braking and stabilisation systems
114
Parking assistance (ParkPilot)
116
Speed control system
118
Speed limiter
120
Front Assistant
122
Fatigue detection
125
Tyre pressure monitoring
125
Hitch and trailer
127
Hitch
127
Trailer
132
General Maintenance
Care and maintenance
136
Services, modifications and technical
alterations
136
Washing vehicle
139
Cleaning vehicle exterior
140
Interior care
144
Inspecting and replenishing
147
Fuel
147
Engine compartment
149
Engine oil
152
Coolant
154
Brake fluid
155
Vehicle battery
156
Wheels
160
Tyres and rims
160
Winter use
1642Table of Contents
Page 32 of 216
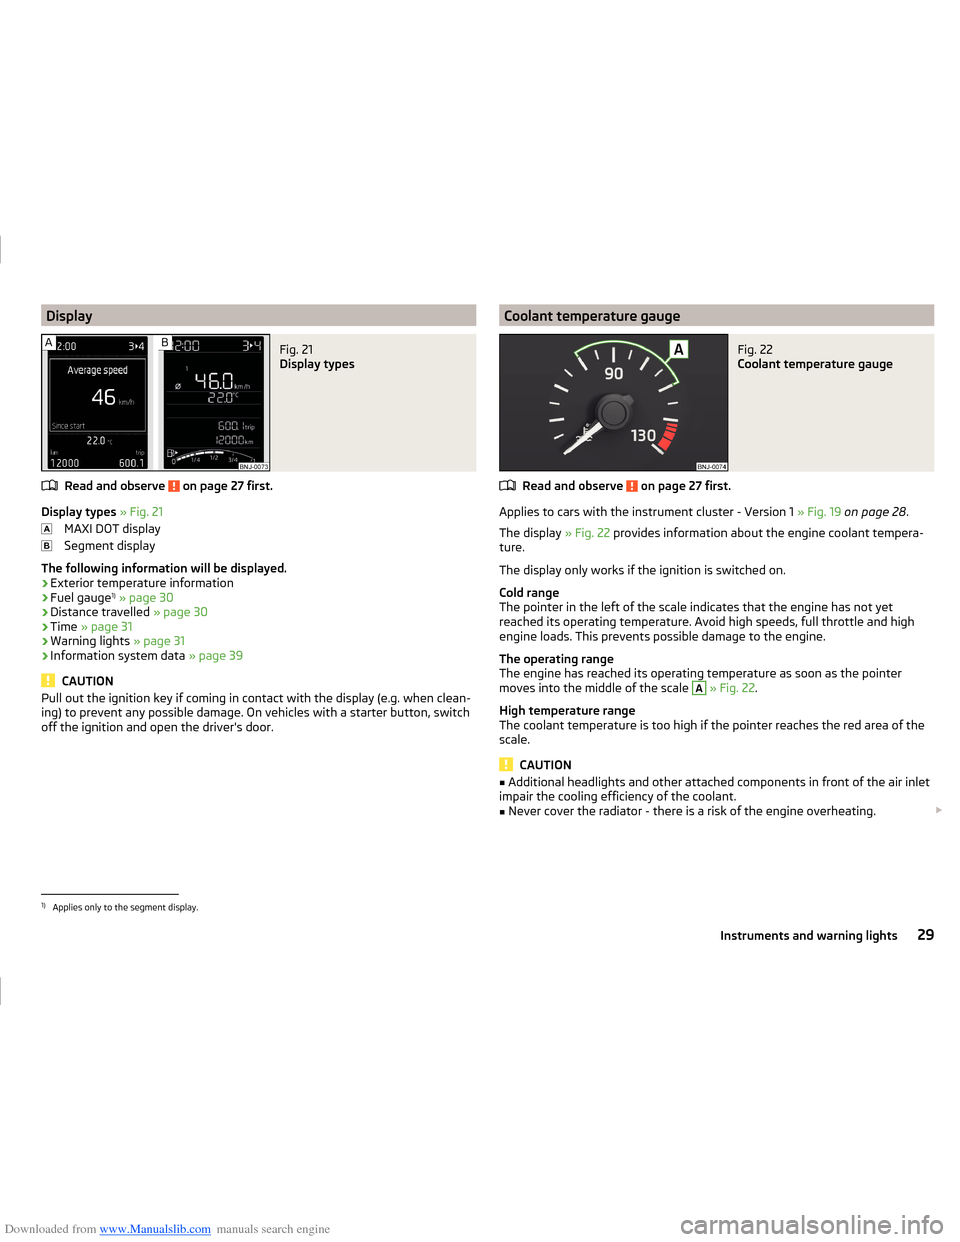
Downloaded from www.Manualslib.com manuals search engine DisplayFig. 21
Display types
Read and observe on page 27 first.
Display types » Fig. 21
MAXI DOT display
Segment display
The following information will be displayed.
› Exterior temperature information
› Fuel gauge 1)
» page 30
› Distance travelled
» page 30
› Time
» page 31
› Warning lights
» page 31
› Information system data
» page 39
CAUTION
Pull out the ignition key if coming in contact with the display (e.g. when clean-
ing) to prevent any possible damage. On vehicles with a starter button, switch
off the ignition and open the driver's door.Coolant temperature gaugeFig. 22
Coolant temperature gauge
Read and observe on page 27 first.
Applies to cars with the instrument cluster - Version 1 » Fig. 19 on page 28 .
The display » Fig. 22 provides information about the engine coolant tempera-
ture.
The display only works if the ignition is switched on.
Cold range
The pointer in the left of the scale indicates that the engine has not yet
reached its operating temperature. Avoid high speeds, full throttle and high
engine loads. This prevents possible damage to the engine.
The operating range
The engine has reached its operating temperature as soon as the pointer
moves into the middle of the scale
A
» Fig. 22 .
High temperature range
The coolant temperature is too high if the pointer reaches the red area of the
scale.
CAUTION
■ Additional headlights and other attached components in front of the air inlet
impair the cooling efficiency of the coolant.■
Never cover the radiator - there is a risk of the engine overheating.
1)
Applies only to the segment display.
29Instruments and warning lights
Page 39 of 216
Downloaded from www.Manualslib.com manuals search engine Automatic TransmissionRead and observe
on page 32 first.
Gearbox overheated
The warning light
is only shown in the MAXI DOTdisplay.
Illumi-
nates
Gearbox overheated. Stop! Owner's manual!
STOP VEHICLE GEARBOX OVERHEAT Illumi-
nates
Gearbox overheated.
GEARBOX OVERHEATED
›
do not continue to drive! Stop the vehicle and turn off the engine.
You can continue your journey as soon as the warning light disappears.
If the warning light does not go out, do not continue driving. Seek help from a specialist garage.
Transmission problem
The warning light is only shown in the MAXI DOTdisplay.
Illumi-
nates
Gearbox faulty. Workshop!
GEARBOX FAULTY WORKSHOP Illumi-
nates
Error: gearbox. Reverse gear not available.
GEARBOX ERROR REV_ GEAR NOT AVAIL Illumi-
nates
Error: gearbox
GEARBOX ERROR
Seek help from a specialist garage.
Rear seat belt warning light
Read and observe
on page 32 first.
illuminates - a rear seat belt is not fastened.
illuminates - a rear seat belt is fastened.
When the seat belt is fastened/unfastened, the particular light lights up briefly
and indicates the current belt status!
Generator
Read and observe
on page 32 first.
illuminates - while the engine is running the battery is not being charged.
Seek help from a specialist garage.
CAUTION
If in addition to the light the light lights up while driving, stop driving -
risk of engine damage! Switch off the engine and seek assistance from a spe-
cialist garage.
Coolant
Read and observe
on page 32 first.
Coolant level too low
Illumi-
nates
Check coolant! Owner's manual!
ENGINE COOLANT PLEASE CHECK
› Stop the vehicle, switch off the engine, and check the coolant level
» page 155 , Checking the coolant level .
If the coolant level is within the specified range and the warning light illumi-
nated again after ignition on, then there may be a malfunction of the cooling
fan.
› Switch off the ignition.
› Check the fuse for the radiator fan, replace if necessary.
If the coolant level and the fan fuse are OK and the warning light illuminates
again after ignition on
do not continue to drive!
Seek help from a specialist garage.
Coolant temperature too high
Illumi-
nates
Engine overheat. Stop! Owner's manual!
ENGINE OVERHEAT STOP
› Stop the vehicle and turn off the engine.
› Continue your journey only after the warning light
has disappeared.
36Operation
Page 97 of 216
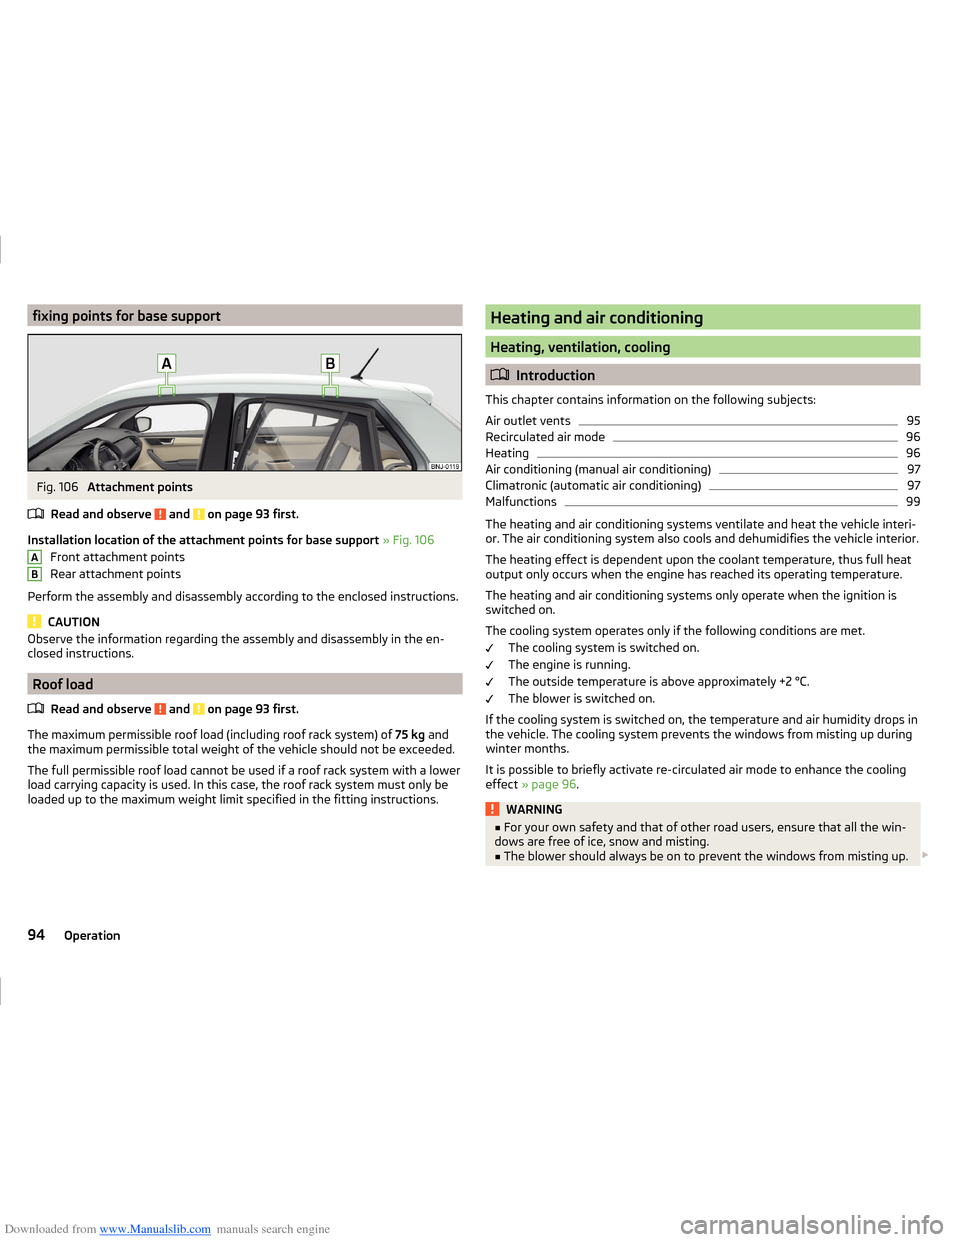
Downloaded from www.Manualslib.com manuals search engine fixing points for base supportFig. 106
Attachment points
Read and observe
and on page 93 first.
Installation location of the attachment points for base support » Fig. 106
Front attachment points
Rear attachment points
Perform the assembly and disassembly according to the enclosed instructions.
CAUTION
Observe the information regarding the assembly and disassembly in the en-
closed instructions.
Roof load
Read and observe
and on page 93 first.
The maximum permissible roof load (including roof rack system) of 75 kg and
the maximum permissible total weight of the vehicle should not be exceeded.
The full permissible roof load cannot be used if a roof rack system with a lower
load carrying capacity is used. In this case, the roof rack system must only be
loaded up to the maximum weight limit specified in the fitting instructions.
ABHeating and air conditioning
Heating, ventilation, cooling
Introduction
This chapter contains information on the following subjects:
Air outlet vents
95
Recirculated air mode
96
Heating
96
Air conditioning (manual air conditioning)
97
Climatronic (automatic air conditioning)
97
Malfunctions
99
The heating and air conditioning systems ventilate and heat the vehicle interi-
or. The air conditioning system also cools and dehumidifies the vehicle interior.
The heating effect is dependent upon the coolant temperature, thus full heat
output only occurs when the engine has reached its operating temperature.
The heating and air conditioning systems only operate when the ignition is
switched on.
The cooling system operates only if the following conditions are met. The cooling system is switched on.
The engine is running.
The outside temperature is above approximately +2 °C.
The blower is switched on.
If the cooling system is switched on, the temperature and air humidity drops in
the vehicle. The cooling system prevents the windows from misting up during
winter months.
It is possible to briefly activate re-circulated air mode to enhance the cooling
effect » page 96 .
WARNING■
For your own safety and that of other road users, ensure that all the win-
dows are free of ice, snow and misting.■
The blower should always be on to prevent the windows from misting up.
94Operation
Page 98 of 216
Downloaded from www.Manualslib.com manuals search engine WARNING (Continued)■Under certain circumstances, air at a temperature of about 5 °C can flow
out of the vents when the cooling system is switched on.■
To reduce health risks (e.g. common colds), the following instructions for
the use of the cooling system are to be observed. ■The difference between the indoor temperature and the outdoor air
temperature should not be greater than about 5 ° C.
■ The cooling system is to be turned off about 10 minutes before the end
of the journey.
■ Once a year, disinfection of the air conditioner or the Climatronic is to be
carried out by a specialist company.
CAUTION
■ The air inlet in front of the windscreen must be free (e.g. of ice, snow or
leaves) to ensure that the heating and cooling system operates properly.■
After switching on the cooling system condensation from the evaporator of
the air conditioning may drip down and form a puddle below the vehicle. This is
not a leak!
■
If the coolant temperature is too high, the cooling system is switched off to
ensure that the engine cools down.
Note
The used air flows out through the vents in the luggage compartment.
Air outlet vents
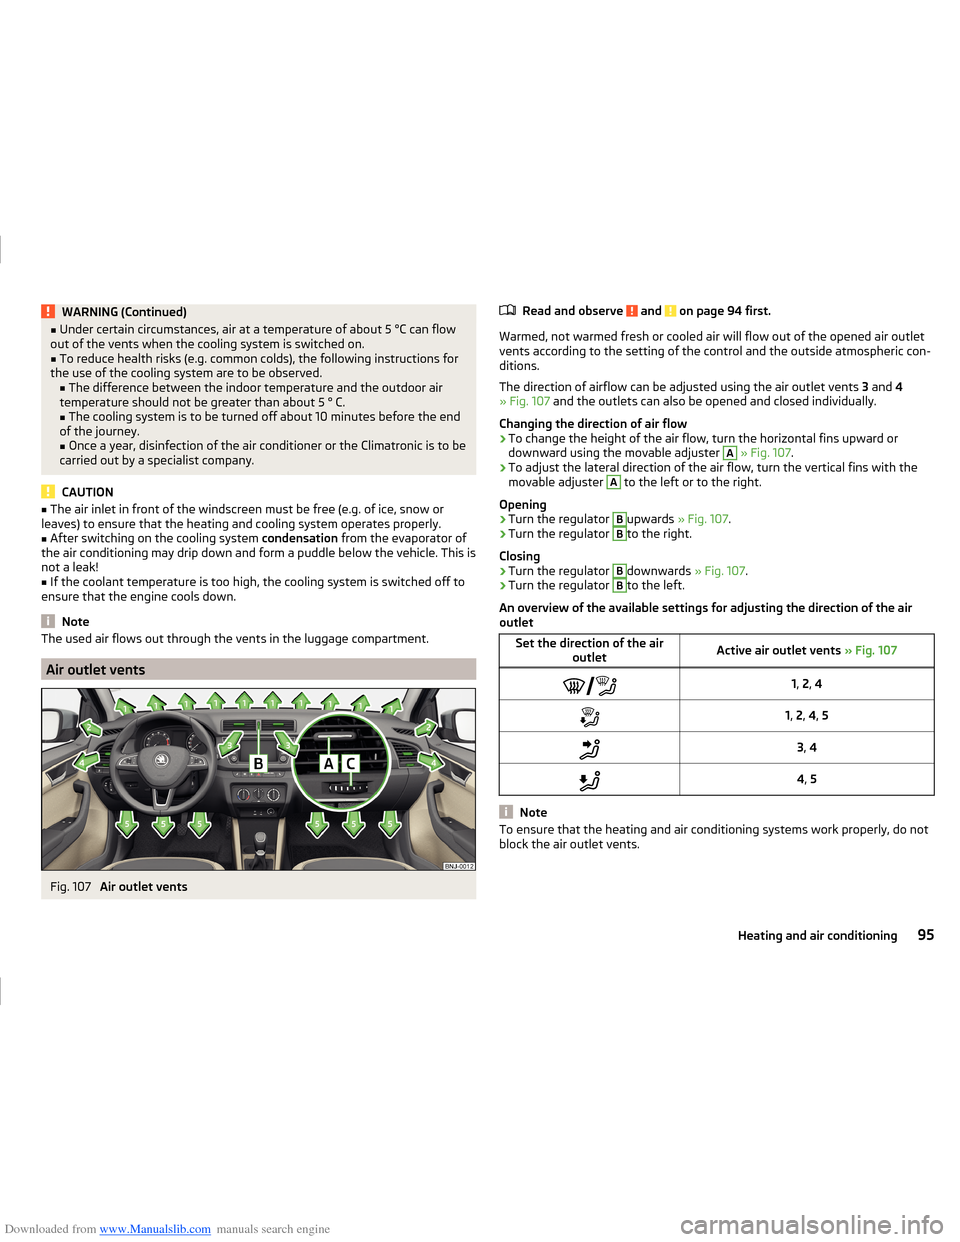
Fig. 107
Air outlet vents
Read and observe and on page 94 first.
Warmed, not warmed fresh or cooled air will flow out of the opened air outlet vents according to the setting of the control and the outside atmospheric con-
ditions.
The direction of airflow can be adjusted using the air outlet vents 3 and 4
» Fig. 107 and the outlets can also be opened and closed individually.
Changing the direction of air flow
›
To change the height of the air flow, turn the horizontal fins upward or
downward using the movable adjuster
A
» Fig. 107 .
›
To adjust the lateral direction of the air flow, turn the vertical fins with the
movable adjuster
A
to the left or to the right.
Opening
›
Turn the regulator
B
upwards » Fig. 107 .
›
Turn the regulator
B
to the right.
Closing
›
Turn the regulator
B
downwards » Fig. 107.
›
Turn the regulator
B
to the left.
An overview of the available settings for adjusting the direction of the air
outlet
Set the direction of the air outletActive air outlet vents » Fig. 1071, 2 , 41, 2 , 4 , 53 , 44 , 5
Note
To ensure that the heating and air conditioning systems work properly, do not
block the air outlet vents.95Heating and air conditioning
Page 100 of 216
Downloaded from www.Manualslib.com manuals search engine Set the direction of the air outlet » page 95
›
Air flow to the windows
›
Air flow to the upper body
›
Air flow in the footwell
›
Airflow to the windows and into the footwell
Switch recirculation on/off » page 96
Air conditioning (manual air conditioning)
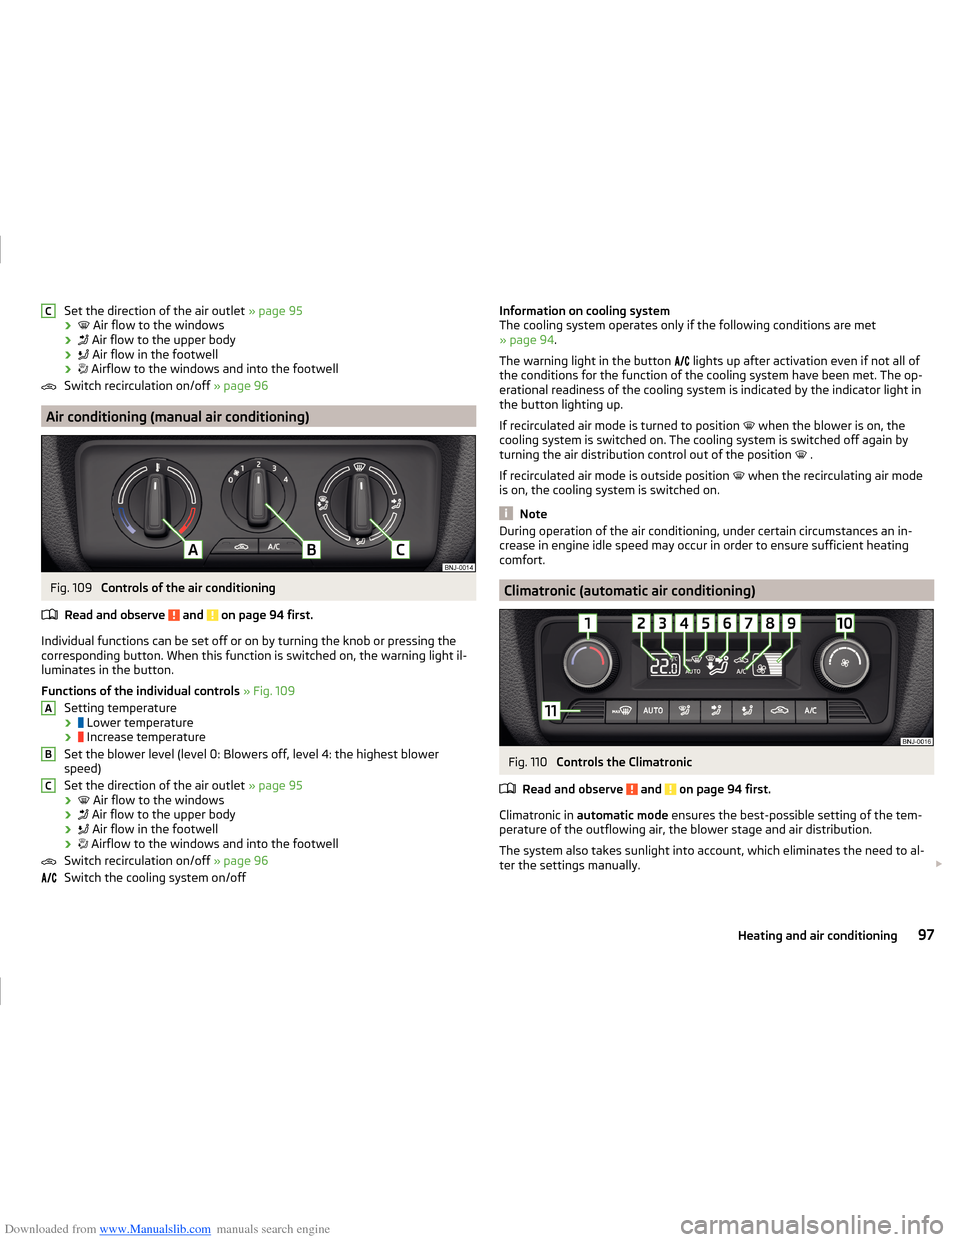
Fig. 109
Controls of the air conditioning
Read and observe
and on page 94 first.
Individual functions can be set off or on by turning the knob or pressing the corresponding button. When this function is switched on, the warning light il-
luminates in the button.
Functions of the individual controls » Fig. 109
Setting temperature ›
Lower temperature
›
Increase temperature
Set the blower level (level 0: Blowers off, level 4: the highest blower
speed)
Set the direction of the air outlet » page 95
›
Air flow to the windows
›
Air flow to the upper body
›
Air flow in the footwell
›
Airflow to the windows and into the footwell
Switch recirculation on/off » page 96
Switch the cooling system on/off
CABCInformation on cooling system
The cooling system operates only if the following conditions are met
» page 94 .
The warning light in the button
lights up after activation even if not all of
the conditions for the function of the cooling system have been met. The op-
erational readiness of the cooling system is indicated by the indicator light in
the button lighting up.
If recirculated air mode is turned to position
when the blower is on, the
cooling system is switched on. The cooling system is switched off again by
turning the air distribution control out of the position
.
If recirculated air mode is outside position when the recirculating air mode
is on, the cooling system is switched on.
Note
During operation of the air conditioning, under certain circumstances an in-
crease in engine idle speed may occur in order to ensure sufficient heating
comfort.
Climatronic (automatic air conditioning)
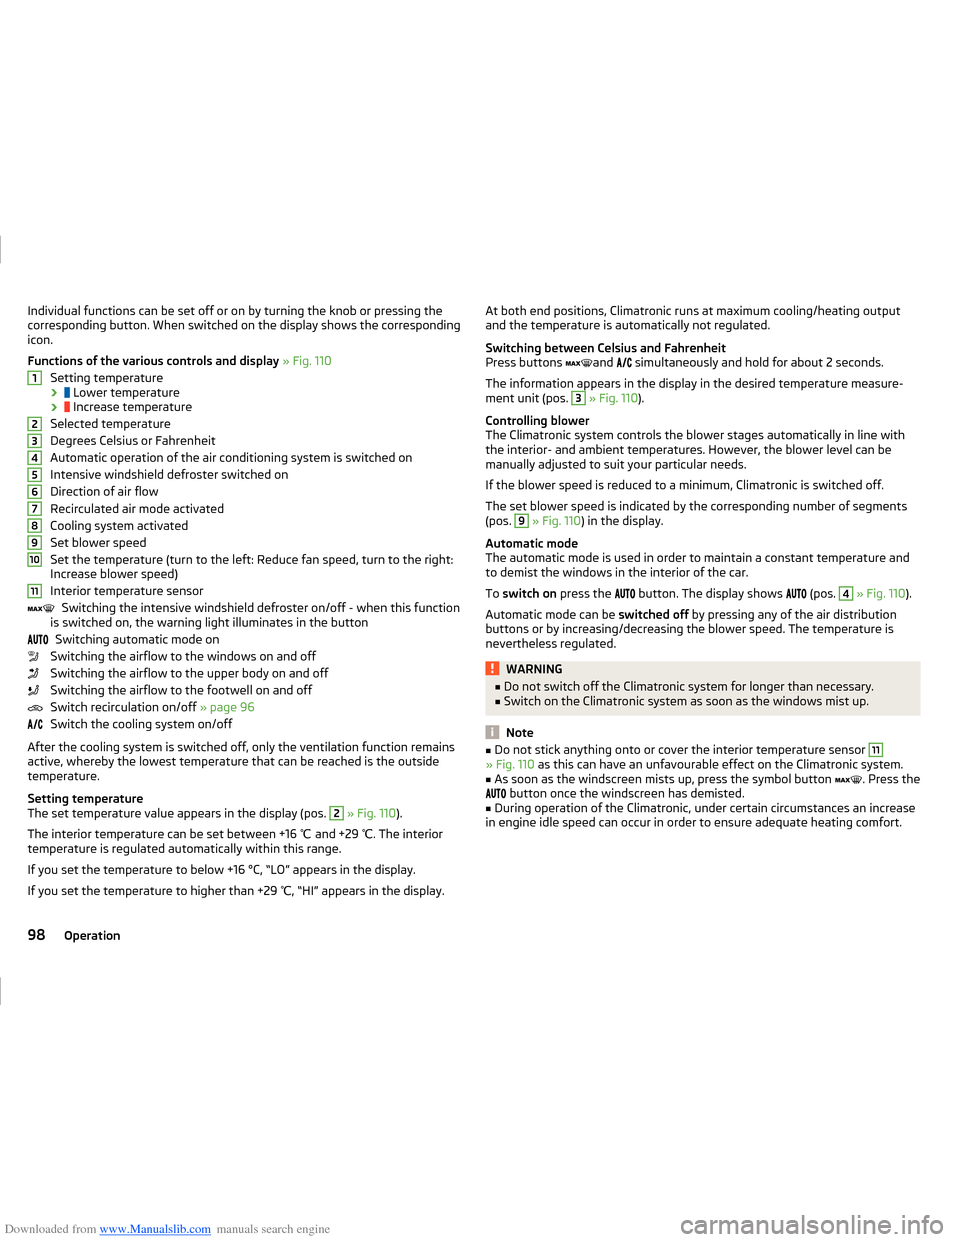
Fig. 110
Controls the Climatronic
Read and observe
and on page 94 first.
Climatronic in automatic mode ensures the best-possible setting of the tem-
perature of the outflowing air, the blower stage and air distribution.
The system also takes sunlight into account, which eliminates the need to al-
ter the settings manually.
97Heating and air conditioning
Page 101 of 216
Downloaded from www.Manualslib.com manuals search engine Individual functions can be set off or on by turning the knob or pressing the
corresponding button. When switched on the display shows the corresponding
icon.
Functions of the various controls and display » Fig. 110
Setting temperature ›
Lower temperature
›
Increase temperature
Selected temperature
Degrees Celsius or Fahrenheit
Automatic operation of the air conditioning system is switched on
Intensive windshield defroster switched on
Direction of air flow
Recirculated air mode activated
Cooling system activated
Set blower speed
Set the temperature (turn to the left: Reduce fan speed, turn to the right:
Increase blower speed)
Interior temperature sensor Switching the intensive windshield defroster on/off - when this function
is switched on, the warning light illuminates in the button
Switching automatic mode on
Switching the airflow to the windows on and off Switching the airflow to the upper body on and off
Switching the airflow to the footwell on and off
Switch recirculation on/off » page 96
Switch the cooling system on/off
After the cooling system is switched off, only the ventilation function remains
active, whereby the lowest temperature that can be reached is the outside
temperature.
Setting temperature
The set temperature value appears in the display (pos. 2
» Fig. 110 ).
The interior temperature can be set between +16 ℃ and +29 ℃. The interior
temperature is regulated automatically within this range.
If you set the temperature to below +16 °C, “LO” appears in the display. If you set the temperature to higher than +29 ℃, “HI” appears in the display.
1234567891011At both end positions, Climatronic runs at maximum cooling/heating output
and the temperature is automatically not regulated.
Switching between Celsius and Fahrenheit
Press buttons
and
simultaneously and hold for about 2 seconds.
The information appears in the display in the desired temperature measure-
ment unit (pos. 3
» Fig. 110 ).
Controlling blower
The Climatronic system controls the blower stages automatically in line with
the interior- and ambient temperatures. However, the blower level can be
manually adjusted to suit your particular needs.
If the blower speed is reduced to a minimum, Climatronic is switched off.
The set blower speed is indicated by the corresponding number of segments
(pos.
9
» Fig. 110 ) in the display.
Automatic mode
The automatic mode is used in order to maintain a constant temperature and
to demist the windows in the interior of the car.
To switch on press the
button. The display shows
(pos.
4
» Fig. 110 ).
Automatic mode can be switched off by pressing any of the air distribution
buttons or by increasing/decreasing the blower speed. The temperature is
nevertheless regulated.
WARNING■ Do not switch off the Climatronic system for longer than necessary.■Switch on the Climatronic system as soon as the windows mist up.
Note
■Do not stick anything onto or cover the interior temperature sensor 11» Fig. 110 as this can have an unfavourable effect on the Climatronic system.■
As soon as the windscreen mists up, press the symbol button
. Press the
button once the windscreen has demisted.
■
During operation of the Climatronic, under certain circumstances an increase
in engine idle speed can occur in order to ensure adequate heating comfort.
98Operation
Page 102 of 216
Downloaded from www.Manualslib.com manuals search engine MalfunctionsRead and observe
and on page 94 first.
If the cooling system does not operate at outside temperatures higher than +5°C, there is a problem in the system. This can be because of the following.
› One of the fuses has blown. Check the fuse and replace if necessary
» page 182 .
› The cooling system has switched off automatically for a short time because
the coolant temperature of the engine is too hot » page 29.
If you are not able to resolve the fault yourself, or if the cooling output has re- duced, switch off the cooling system and obtain assistance from a specialist
garage.
99Heating and air conditioning
Page 115 of 216
Downloaded from www.Manualslib.com manuals search engine Reducing idling
If the vehicle is fitted with the START - STOP system there is an automatic re-
duction of the idling. If the engine is stopped on vehicles without START-STOP
system, such as when waiting in a traffic jam, the fuel economy is already
greater after 30 - 40 s than the fuel quantity which is required for engine re-
start.
Avoid short distances
When driving a short distance of less than about 4 km, the engine cannot
reach its operating temperature. As long as the engine has not reached oper-
ating temperature, the fuel consumption is significantly higher than with the
engine hot.
Pay attention to the correct tyre inflation pressure being maintained
Further information » page 161.
Avoid unnecessary ballast
Per 100 kg of weight, consumption increases by about 0.3 l/100 km. At a speed of 100 - 120 km/h, a vehicle fitted with a roof rack cross member without a load
will use about 10 % more fuel than normal due to the increased aerodynamic
drag.
Saving electricity
Electrical consumers (e.g. seat heating, air conditioning and the like) should
only be turned on for as long as necessary.
Use the cooling system economically
The air conditioning system compressor uses power from the engine when in
cooling mode, which will affect the fuel consumption.
It recommended to open the windows or the doors of a vehicle for which the
interior has been strongly heated through the effect of direct sunlight in order
to allow the heated air to escape.
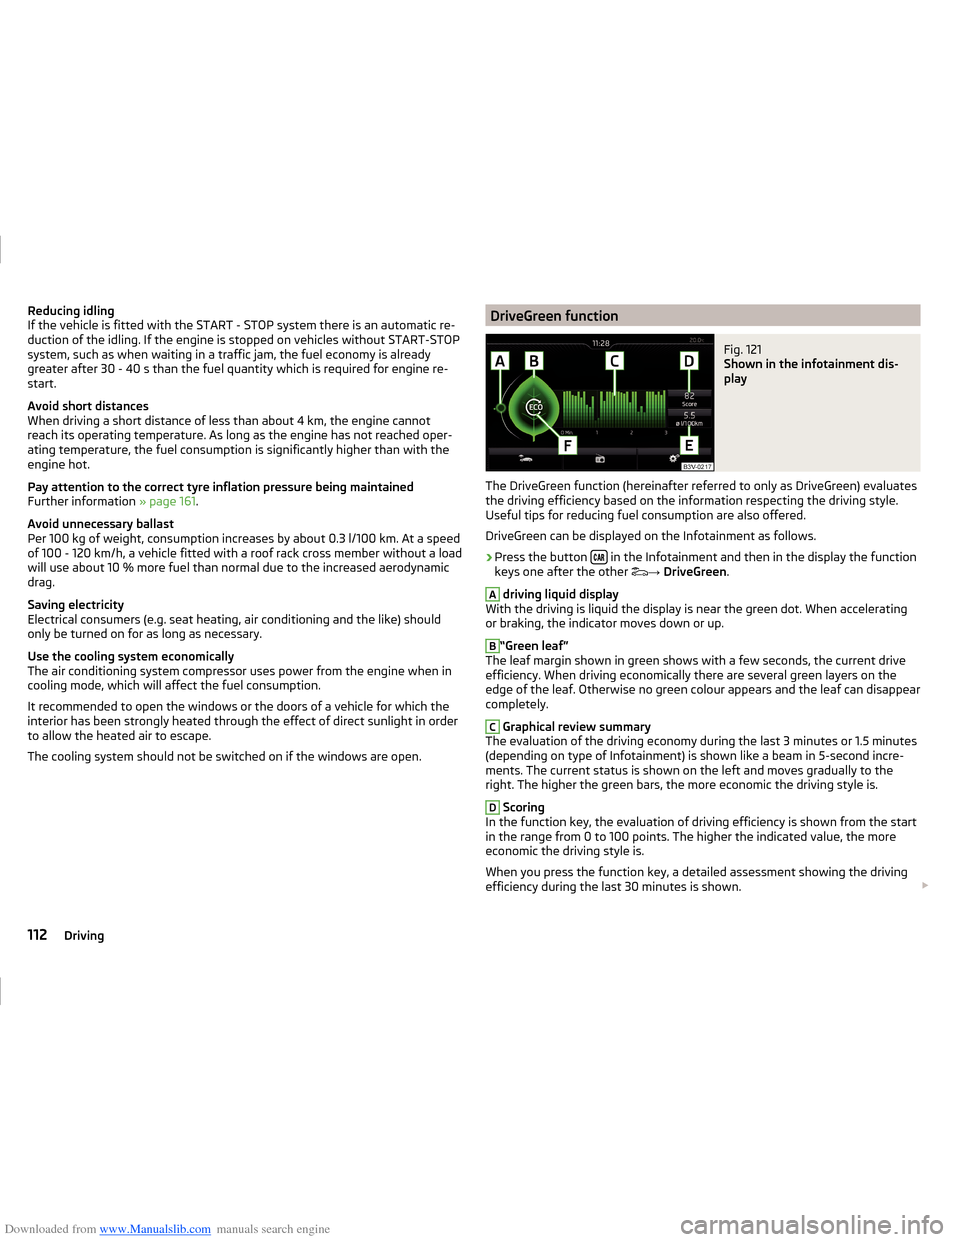
The cooling system should not be switched on if the windows are open.DriveGreen functionFig. 121
Shown in the infotainment dis-
play
The DriveGreen function (hereinafter referred to only as DriveGreen) evaluates
the driving efficiency based on the information respecting the driving style.
Useful tips for reducing fuel consumption are also offered.
DriveGreen can be displayed on the Infotainment as follows.
›
Press the button in the Infotainment and then in the display the function
keys one after the other →
DriveGreen .
A
driving liquid display
With the driving is liquid the display is near the green dot. When accelerating
or braking, the indicator moves down or up.
B
“Green leaf”
The leaf margin shown in green shows with a few seconds, the current drive
efficiency. When driving economically there are several green layers on the
edge of the leaf. Otherwise no green colour appears and the leaf can disappear
completely.
C
Graphical review summary
The evaluation of the driving economy during the last 3 minutes or 1.5 minutes
(depending on type of Infotainment) is shown like a beam in 5-second incre-
ments. The current status is shown on the left and moves gradually to the
right. The higher the green bars, the more economic the driving style is.
D
Scoring
In the function key, the evaluation of driving efficiency is shown from the start
in the range from 0 to 100 points. The higher the indicated value, the more
economic the driving style is.
When you press the function key, a detailed assessment showing the driving
efficiency during the last 30 minutes is shown.
112Driving
Page 157 of 216
Downloaded from www.Manualslib.com manuals search engine The oil level must be checked at regular intervals.
In case of low oil level, the display of the instrument cluster shows a check
mark
as well as the relevant notification » page 37. Check the oil level using
the dipstick as soon as possible. Add oil accordingly.
CAUTION
■ The oil level must never be above the range A » Fig. 159 - risk of damage to
the motor as well as the exhaust system.■
If for some reason, it is not possible to top up the engine oil under the cur-
rent circumstances,
do not continue driving! Switch off the engine and seek
assistance from a specialist garage.
■
If the oil level is above the range
A
,
do not continue to drive! Switch off
the engine and seek assistance from a specialist garage.
Replenishing
Read and observe
and on page 153 first.
›
Unscrew the cap of the engine oil filler opening » Fig. 157 on page 151 .
›
Replenish the oil in portions of 0.5 litres in accordance with the correct speci-
fications » page 153 .
›
Check the oil level » page 153.
›
Screw the lid of the engine oil filler closed carefully.
›
Pull the dipstick out as far as the stop.
Coolant
Introduction
This chapter contains information on the following subjects:
Checking the coolant level
155
Replenishing
155
The coolant provides cooling for the motor.
It consists of water and coolant additive with additives that protect the cooling
system against corrosion and prevents furring.
The coolant additive level in the coolant must be at least 40%.
The coolant additive may be increased to a maximum of 60%.
The correct mixing ratio of water and coolant additive is to be checked if nec- essary by a specialist garage or is to be restored if necessary.
The description of the coolant is shown in the coolant expansion reservoir » Fig. 160 on page 155 .WARNINGThe engine compartment of your car is a hazardous area. While working in
the engine compartment, be sure to observe the following warnings
» page 149 .■
The coolant is harmful to health.
■
Avoid contact with the coolant.
■
Coolant vapours are harmful to health.
■
Never open the end cover of the coolant expansion reservoir while the
engine is still warm. The cooling system is pressurized!
■
When opening the end cover of the coolant expansion reservoir, cover it
with a cloth to protect your face, hands and arms from hot steam or hot
coolant.
■
If any coolant splashes into your eyes, immediately rinse out your eyes
with clear water and contact a doctor as soon as possible.
■
Always keep the coolant in the original container safe from people who
are not completely independent, especially children - there is a danger of
poisoning!
■
Consult a doctor immediately if coolant is swallowed.
■
Never spill operating fluids over the hot engine - risk of fire.
CAUTION
■ Do not continue if for some reason it is not possible to fill with coolant un-
der the current circumstances! Switch off the engine and seek assistance from
a specialist garage.■
With an empty expansion tank top up coolant. The system could ventilate -
there is a risk of engine damage,
not continue! Switch off the engine and
seek assistance from a specialist garage.
■
The amount of coolant additive in the coolant must never be allowed to fall
below 40 %.
■
Over 60 % coolant additive in the coolant reduces the antifreeze protection
and coolant effectiveness.
■
A coolant additive that does not comply with the correct specification can
significantly reduce the corrosion protection of the cooling system.
■
Any faults resulting from corrosion may cause a loss of coolant and can con-
sequently result in major engine damage.
■
Do not fill the coolant above the mark
A
» Fig. 160 on page 155 .
■
If an error occurs, leading to the engine overheating, the help of a professio-
nal garage is to be sought - there is a risk of serious engine damage occurring.
154General Maintenance