service indicator SKODA FABIA 2014 3.G / NJ Operating Instruction Manual
[x] Cancel search | Manufacturer: SKODA, Model Year: 2014, Model line: FABIA, Model: SKODA FABIA 2014 3.G / NJPages: 216, PDF Size: 30.9 MB
Page 22 of 216
Downloaded from www.Manualslib.com manuals search engine ›If special attachments are required in the area of the steering wheel because
of a physical disability.
› If other seats have been installed (e.g. orthopaedic seats without side air-
bags).
The front passenger airbag can be switched off with the key-operated switch
» Fig. 11 on page 19 -
.
We recommend that you ask a ŠKODA Service Partner to switch off any other
airbags.
Deactivation indicator
Display of the airbag deactivation » page 34,
Airbag system .
Note
A ŠKODA Service Partner will be able to inform you which airbags in your vehi-
cle can/must be deactivated.
Switching off the front passenger airbag
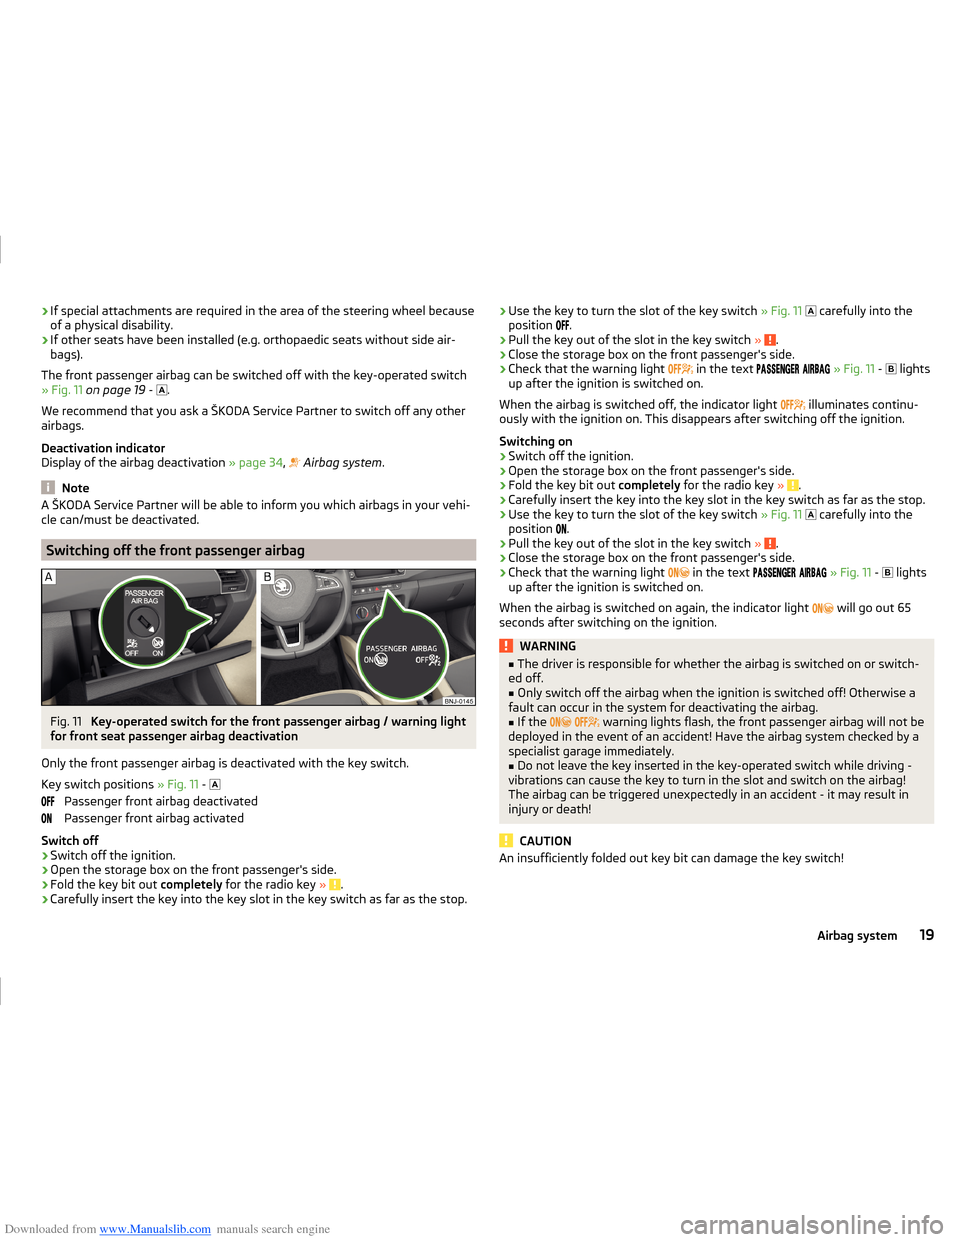
Fig. 11
Key-operated switch for the front passenger airbag / warning light
for front seat passenger airbag deactivation
Only the front passenger airbag is deactivated with the key switch.
Key switch positions » Fig. 11 -
Passenger front airbag deactivated
Passenger front airbag activated
Switch off
›
Switch off the ignition.
›
Open the storage box on the front passenger's side.
›
Fold the key bit out completely for the radio key » .
›
Carefully insert the key into the key slot in the key switch as far as the stop.
›Use the key to turn the slot of the key switch
» Fig. 11 carefully into the
position .›
Pull the key out of the slot in the key switch » .
›
Close the storage box on the front passenger's side.
›
Check that the warning light
in the text
» Fig. 11 -
lights
up after the ignition is switched on.
When the airbag is switched off, the indicator light
illuminates continu-
ously with the ignition on. This disappears after switching off the ignition.
Switching on
›
Switch off the ignition.
›
Open the storage box on the front passenger's side.
›
Fold the key bit out completely for the radio key » .
›
Carefully insert the key into the key slot in the key switch as far as the stop.
›
Use the key to turn the slot of the key switch » Fig. 11
carefully into the
position .
›
Pull the key out of the slot in the key switch
» .
›
Close the storage box on the front passenger's side.
›
Check that the warning light
in the text
» Fig. 11 -
lights
up after the ignition is switched on.
When the airbag is switched on again, the indicator light will go out 65
seconds after switching on the ignition.
WARNING■ The driver is responsible for whether the airbag is switched on or switch-
ed off.■
Only switch off the airbag when the ignition is switched off! Otherwise a
fault can occur in the system for deactivating the airbag.
■
If the
warning lights flash, the front passenger airbag will not be
deployed in the event of an accident! Have the airbag system checked by a
specialist garage immediately.
■
Do not leave the key inserted in the key-operated switch while driving -
vibrations can cause the key to turn in the slot and switch on the airbag!
The airbag can be triggered unexpectedly in an accident - it may result in
injury or death!
CAUTION
An insufficiently folded out key bit can damage the key switch!19Airbag system
Page 161 of 216
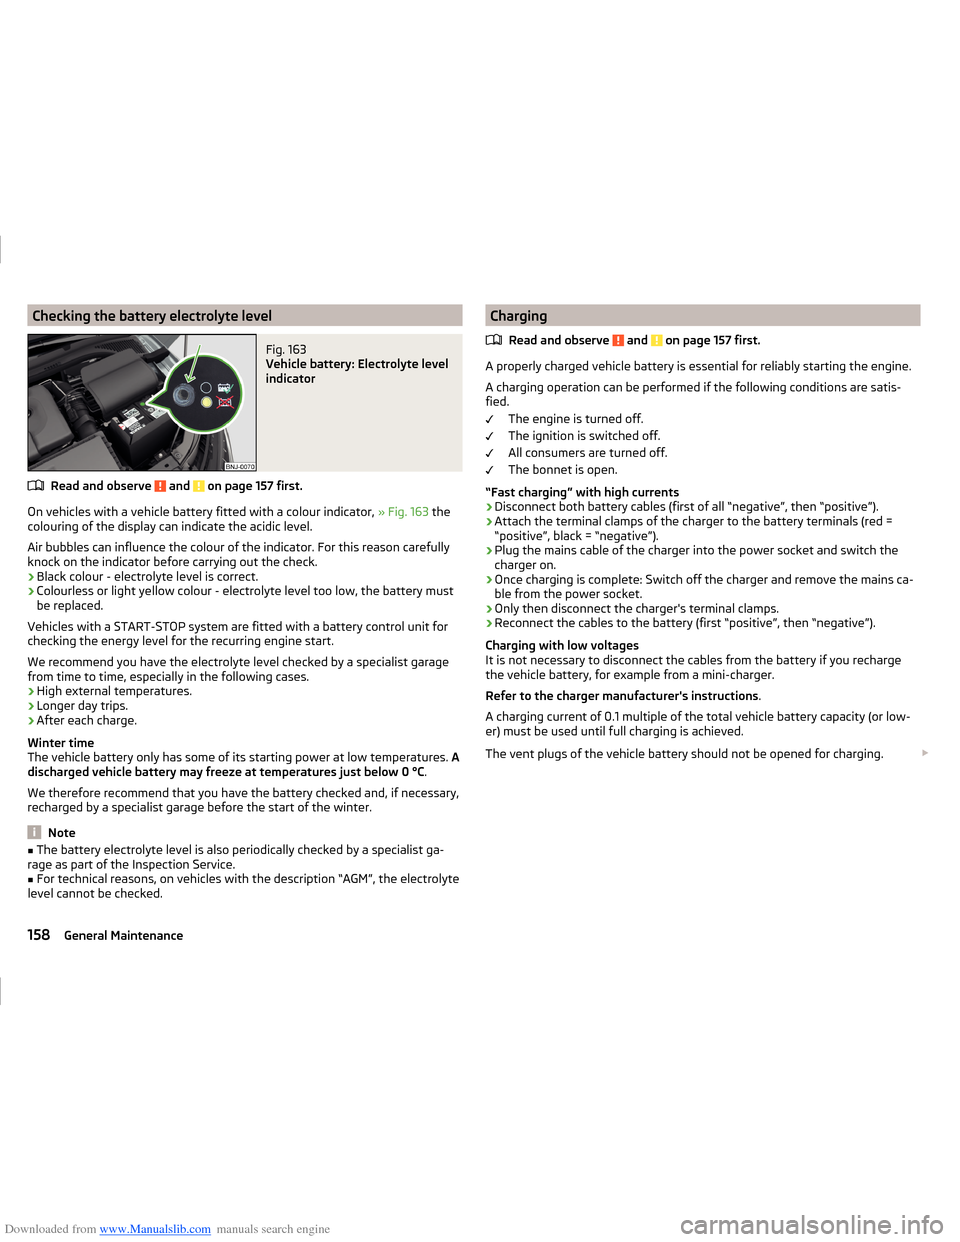
Downloaded from www.Manualslib.com manuals search engine Checking the battery electrolyte levelFig. 163
Vehicle battery: Electrolyte level
indicator
Read and observe and on page 157 first.
On vehicles with a vehicle battery fitted with a colour indicator, » Fig. 163 the
colouring of the display can indicate the acidic level.
Air bubbles can influence the colour of the indicator. For this reason carefully knock on the indicator before carrying out the check.
› Black colour - electrolyte level is correct.
› Colourless or light yellow colour - electrolyte level too low, the battery must
be replaced.
Vehicles with a START-STOP system are fitted with a battery control unit for
checking the energy level for the recurring engine start.
We recommend you have the electrolyte level checked by a specialist garage from time to time, especially in the following cases.
› High external temperatures.
› Longer day trips.
› After each charge.
Winter time
The vehicle battery only has some of its starting power at low temperatures. A
discharged vehicle battery may freeze at temperatures just below 0 °C .
We therefore recommend that you have the battery checked and, if necessary,
recharged by a specialist garage before the start of the winter.
Note
■ The battery electrolyte level is also periodically checked by a specialist ga-
rage as part of the Inspection Service.■
For technical reasons, on vehicles with the description “AGM”, the electrolyte
level cannot be checked.
Charging
Read and observe
and on page 157 first.
A properly charged vehicle battery is essential for reliably starting the engine.A charging operation can be performed if the following conditions are satis-
fied.
The engine is turned off.
The ignition is switched off.
All consumers are turned off.
The bonnet is open.
“Fast charging” with high currents
›
Disconnect both battery cables (first of all “negative”, then “positive”).
›
Attach the terminal clamps of the charger to the battery terminals (red =
“positive”, black = “negative”).
›
Plug the mains cable of the charger into the power socket and switch the
charger on.
›
Once charging is complete: Switch off the charger and remove the mains ca-
ble from the power socket.
›
Only then disconnect the charger's terminal clamps.
›
Reconnect the cables to the battery (first “positive”, then “negative”).
Charging with low voltages
It is not necessary to disconnect the cables from the battery if you recharge
the vehicle battery, for example from a mini-charger.
Refer to the charger manufacturer's instructions .
A charging current of 0.1 multiple of the total vehicle battery capacity (or low-
er) must be used until full charging is achieved.
The vent plugs of the vehicle battery should not be opened for charging.
158General Maintenance
Page 163 of 216
Downloaded from www.Manualslib.com manuals search engine CAUTION■Despite such intervention by the vehicle electric system management, the
vehicle battery may be drained. For example, when the ignition is switched on
a long time with the engine turned off or the side or parking lights are turned
on during longer parking.■
Consumers which are supplied via a 12 V socket can cause the vehicle battery
to discharge when the ignition is switched off.
Note
Driving comfort is not disrupted by any shutting off of consumers. Often the
driver is not aware of it having taken place.Wheels
Tyres and rims
Introduction
This chapter contains information on the following subjects:
Notes on using wheels
161
Tyre pressure
161
Tyre wear
162
Tyre wear indicator and wheels exchange
162
Tyre damage
163
Unidirectional tyres
163
Spare wheel
163
Spare wheel
163
Tyre label
164
Only use those tyres or wheel rims which have been approved by ŠKODA for
your model of vehicle.
WARNINGNational legal requirements must be observed for the use of tyres.WARNINGFor safety reasons, do no replace tyres individually.
For the sake of the environment
Old and unserviceable tyres are a polluting hazardous waste. These must be disposed of in accordance with national legislation.
Note
■ We recommend that any work on the wheels or tyres is carried out by a spe-
cialist garage.■
We recommend that you use wheel rims, tyres, full wheel trims and snow
chains from ŠKODA Original Accessories.
160General Maintenance
Page 208 of 216
Downloaded from www.Manualslib.com manuals search engine Unlock the boot lid179
Variable loading floor88
Luggage compartment cover86
Other positions86
Roll-up cover87
Luggage Storage 12-volt power outlet
78
Roll-up cover87
Storage compartments85
M
Main beam
61
Warning light35
Maintenance see vehicle care
141
Manual air conditioning Operating elements
97
Recirculated air mode96
Manual gear changing see Gear changing
108
MAXI DOT display42
Main menu42
Menu item assist systems45
Menu item Audio44
Menu item navigation44
Menu item telephone44
Operation43
MAXI DOT see MAXI DOT display
42
Maximum permissible weights
192
Maximum speed196
MCB116
Mechanical window lifter open and close
57
Mechanical window lifters56
Media AUX
82
see Infotainment4
USB82
Memory42
Mirror Exterior mirrors
69
Interior mirror68
Make-up66
Modifications136
Modifications and technical alterations Service
137
Multi-function display operation
40
Multi collision brake (MCB)116
Multifunction display Functions
40
Information40
Memory42
Multimedia AUX
82
USB82
Multimedia holder79
N
N1
88
Nameplate192
Navigation see Infotainment
4
Nets84
Notes for driving with tyre repaired174
Notes on using wheels161
O
Oil see Engine oil
153
Warning messages37
Oil pressure Warning messages
37
Onboard computer see multifunction display
40
Operating weight193
Operation in winter Diesel fuel149
Vehicle battery158
Original accessories137
Overspeed Indicator light
35
Overview Engine compartment
151
Warning lights31
P
Parking
107
Parking assistance116
Parking aid Automatic system activation when moving for-ward
118
Function117
Parking assistance116
Activation / deactivation118
Display in the Infotainment display117
parking lights60
Park Pilot116
Park the vehicle see Parking
107
Part replacement136
Passive safety Before every journey
8
Driving safety8
Passive Safety8
Payload193
Pedals108
Footmats108
Petrol see fuel
148
Phone see Infotainment
4
Plastic parts141
Pockets on the front seat rests82
205Index
Page 210 of 216
Downloaded from www.Manualslib.com manuals search engine Rear seat73
Seat backrests72
Seats and headrest70
Secure variable loading floor
90
see Instrument cluster see Instrument cluster
27
Selector lever Refer to Selector lever
109
Selector lever lock Indicator light
35
Service137
Service interval display46
Warning light38
setting Lower position of the variable loading floor
89
Setting31
Seat belt height12
seats and headrests70
Upper position of the variable loading floor89
Settings Interior mirror
68
Setting the31
Side airbag17
SmartGate Connection via the search for a Wi-Fi network
47
Setting48
Wi-Fi direct48
SmartLink see Infotainment
4
Snow chains165
Sockets 12 V
78
Spare change
168
spare wheel change
168
Spare wheel163
Speed control system118
Speed limiter120
Indicator light35
Operation120
Operation description121
Speed symbol see Wheels
164
Spoiler138
Stabilisation system114
Stability Control (ESC)114
Staring engine Jump-starting
174
START-STOP104
Jump-starting174
Manually deactivating/activating the system105
operation104
Warning light38
START-STOP system104
Starter button Problems with the engine start
104
Steering column lock locking102
Steering column lock unlocking102
Switching off the engine103
Switch off the ignition103
Switch on the ignition103
Starting and stopping the engine at the push of the button
102
Starting and stopping the engine using the key 100
Starting engine Jump-starting
174
Starting the engine Starter button
103
START STOP Information messages
105
Start the engine Key
101
Steering column lock locking Starter button
102
Steering column lock unlocking Starter button
102
Steering lock lockingKey100
Steering lock unlocking Key
100
Steering lock (engine start push-button) Warning light
32
Steering wheel correct posture
9
setting9
Stop see Parking
107
Stopping the engine Key
101
Storage74
compartment beneath the front seat81
storage compartment Glasses compartment
80
Storage compartment in the doors
75
in the front arm rest79
in the front centre console76
in the rear centre console82
on the dash panel76
on the front passenger side80
on the side of the front seat75
Storage compartments74
Storage pockets on the front seats81
sun visors66
Sun visors66
Switching lights on and off60
Switching off the engine Starter button
103
Switch off the ignition Key
101
Starter button103
Switch on the ignition Key
101
Starter button103
207Index
Page 212 of 216
Downloaded from www.Manualslib.com manuals search engine Chrome parts142
Cleaning vehicle exterior140
Cleaning wheels143
Decorative and protective foils142
Door locking cylinder143
Headlight glasses143
Interior care144
Maintenance141
Materials145
Natural leather145
Plastic parts141
Polishing vehicle paint work141
Rubber seals141
Safety belt146
Seat covers146
Under-body protections144
washing139
Vehicle condition see Auto-check control
39
Vehicle data sticker192
Vehicle data sticker and nameplate Vehicle data sticker and nameplate
192
Vehicle dimensions194
Vehicle height194
Vehicle Identification Number (VIN)192
Vehicle length194
Vehicle tool kit167
Vehicle width194
Vest Placement of the reflective vest
166
VIN Vehicle Identification Number
192
Visibility65
Visors see front sun visors
66
W
Warning indicator of a low temperature Warning light
38
Warning lights31
Warning symbols see Warning lights
31
Warning triangle166
warning when speeding41
Washing Automatic car wash system
140
by hand140
High-pressure cleaner140
Washing vehicles139
Waste container78
Weather conditions136
Wheel bolts Anti-theft wheel bolts
169
Caps169
Loosening and tightening170
wheels spare wheel
168
Wheels Age of wheels
161
Changing168
Driving style162
Full trim168
General information160
Load index164
Snow chains165
Speed symbol164
Storage of wheels161
Tyre damage163
Tyre pressure161
Tyre size164
Tyre wear162
Tyre wear indicator162
Unidirectional tyres163
Wheel balance162
Wheels exchange162
Winter tyres164
Wi-Fi Password
47
Setting48
Wi-Fi direct48
Window wiper Replacing the rear window wiper blade
180
Windscreen washer fluid Checking
152
Replenishing152
Warning light38
Winter152
Windscreen washers Windscreen washers
67
Windscreen washer system152
Windscreen wipers operation
67
Replacing the windscreen wipers180
Windscreen washer fluid152
Windscreen wipers and washers66
Winter operation De-icing windows
142
Snow chains165
Winter tyres See Wheels
164
Winter use164
Winter tyres164
Wiper blades144
Service position of the windscreen wiper arms 180
Wiper interval
67
Wipers Maintaining wiper blades
144
X
XDS
115
209Index