stop start SKODA FABIA 2014 3.G / NJ User Guide
[x] Cancel search | Manufacturer: SKODA, Model Year: 2014, Model line: FABIA, Model: SKODA FABIA 2014 3.G / NJPages: 216, PDF Size: 30.7 MB
Page 59 of 216
WARNING■Ensure that the lock is properly engaged after closing the boot lid. Other-
wise, the lid might open suddenly while the vehicle is moving, even if the
lid was locked – risk of accident!■
Never drive with the tailgate fully opened or slightly ajar otherwise ex-
haust gases may get into the interior of the vehicle – risk of poisoning.
■
Do not press on the rear window when closing the tailgate, as otherwise
this could crack – risk of injury.
■
Make sure that when closing the boot lid, no body parts are crushed -
there is danger of injury!
Note
The function of the button in the grip above the licence plate is deactivated
when starting off or at a speed of 5 km/hour or more for vehicles with central
locking. The function is restored after the vehicle stops and the door is
opened.
Opening/closing
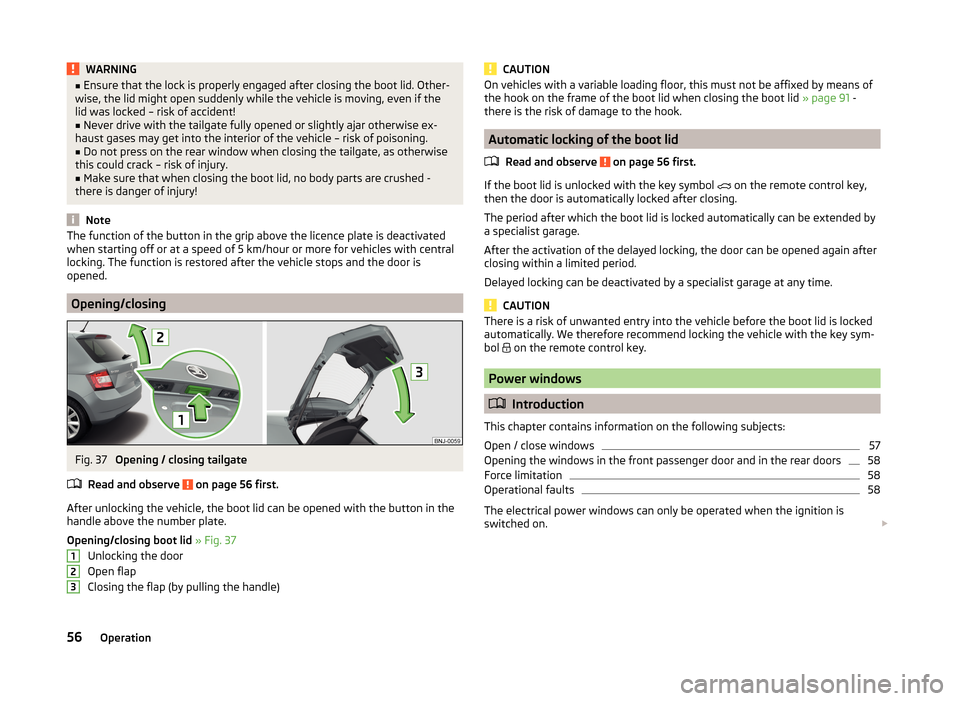
Fig. 37
Opening / closing tailgate
Read and observe
on page 56 first.
After unlocking the vehicle, the boot lid can be opened with the button in the
handle above the number plate.
Opening/closing boot lid » Fig. 37
Unlocking the door
Open flap
Closing the flap (by pulling the handle)
123CAUTIONOn vehicles with a variable loading floor, this must not be affixed by means of
the hook on the frame of the boot lid when closing the boot lid » page 91 -
there is the risk of damage to the hook.
Automatic locking of the boot lid
Read and observe
on page 56 first.
If the boot lid is unlocked with the key symbol on the remote control key,
then the door is automatically locked after closing.
The period after which the boot lid is locked automatically can be extended by
a specialist garage.
After the activation of the delayed locking, the door can be opened again after
closing within a limited period.
Delayed locking can be deactivated by a specialist garage at any time.
CAUTION
There is a risk of unwanted entry into the vehicle before the boot lid is locked
automatically. We therefore recommend locking the vehicle with the key sym-
bol
on the remote control key.
Power windows
Introduction
This chapter contains information on the following subjects:
Open / close windows
57
Opening the windows in the front passenger door and in the rear doors
58
Force limitation
58
Operational faults
58
The electrical power windows can only be operated when the ignition is
switched on.
56Operation
Page 76 of 216
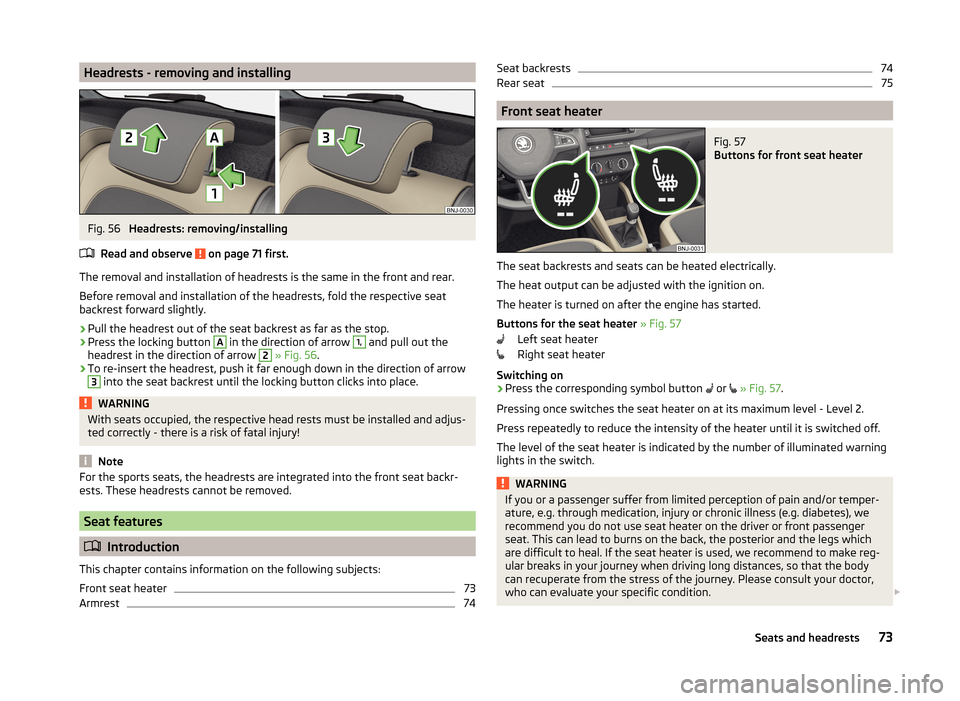
Headrests - removing and installingFig. 56
Headrests: removing/installing
Read and observe
on page 71 first.
The removal and installation of headrests is the same in the front and rear.
Before removal and installation of the headrests, fold the respective seat
backrest forward slightly.
›
Pull the headrest out of the seat backrest as far as the stop.
›
Press the locking button
A
in the direction of arrow
1,
and pull out the
headrest in the direction of arrow
2
» Fig. 56 .
›
To re-insert the headrest, push it far enough down in the direction of arrow
3
into the seat backrest until the locking button clicks into place.
WARNINGWith seats occupied, the respective head rests must be installed and adjus-
ted correctly - there is a risk of fatal injury!
Note
For the sports seats, the headrests are integrated into the front seat backr-
ests. These headrests cannot be removed.
Seat features
Introduction
This chapter contains information on the following subjects:
Front seat heater
73
Armrest
74Seat backrests74Rear seat75
Front seat heater
Fig. 57
Buttons for front seat heater
The seat backrests and seats can be heated electrically.
The heat output can be adjusted with the ignition on.
The heater is turned on after the engine has started.
Buttons for the seat heater » Fig. 57
Left seat heater
Right seat heater
Switching on
›
Press the corresponding symbol button or
» Fig. 57 .
Pressing once switches the seat heater on at its maximum level - Level 2.
Press repeatedly to reduce the intensity of the heater until it is switched off.
The level of the seat heater is indicated by the number of illuminated warning
lights in the switch.
WARNINGIf you or a passenger suffer from limited perception of pain and/or temper-
ature, e.g. through medication, injury or chronic illness (e.g. diabetes), we
recommend you do not use seat heater on the driver or front passenger
seat. This can lead to burns on the back, the posterior and the legs which
are difficult to heal. If the seat heater is used, we recommend to make reg-
ular breaks in your journey when driving long distances, so that the body
can recuperate from the stress of the journey. Please consult your doctor,
who can evaluate your specific condition. 73Seats and headrests
Page 106 of 216
Driving
Starting-off and driving
Starting and stopping the engine using the key
Introduction
This chapter contains information on the following subjects:
Electronic immobilizer
103
Lock / unlock steering lock
103
Turn ignition on / off and start the engine
104
Stopping the engine
104
With the key in the ignition, the ignition can be switched on and off and the
engine can be started / stopped.
WARNING■ While driving with the engine stopped, the ignition must always be
switched on » page 104, Turn ignition on / off and start the engine .
■ With the ignition off, the steering may lock » page 103 - danger of an
accident!■
Do not withdraw the ignition key from the ignition lock until the vehicle
has come to a stop » page 109, Parking . Otherwise the steering wheel
could lock – risk of accident.
■
Never leave the key in the vehicle when you exit the vehicle. Unauthor-
ized persons, children for example, could lock the car, turn on the ignition
or start the engine - risk of injury and accidents!
■
Never leave the vehicle unattended with the engine running - risk of acci-
dent, damage or theft!
■
Never switch off the engine before the vehicle has come to a halt – risk of
accident.
WARNING■ Never (e.g. in garages) run the engine in a closed place - risk of poisoning
and death!■
Do not leave any items (e.g. cleaning cloths or tools) in the engine com-
partment. There is a fire hazard and the risk of engine damage.
■
Never cover the engine with additional insulation material (e.g. with a
blanket) – risk of fire.
CAUTION■ Only start the engine when the engine and the vehicle are stationary - risk of
starter and engine damage!■
Do not push-start the engine – there is a risk of damaging the engine and
the catalytic converter. The battery from another vehicle can be used as a
jump-start aid » page 176.
Note
Do not warm up the engine while the vehicle is stationary. If possible, start
your journey as soon as the engine has started. Through this, the engine rea-
ches its operating temperature faster.
Electronic immobilizer
Read and observe
and on page 103 first.
The electronic immobilizer makes a possible attempted theft or unauthorizeduse of your vehicle more difficult.
An electronic chip is integrated in the head of the key. The immobilizer is deac-
tivated with the aid of this chip when the key is inserted in the ignition lock.
The electronic immobilizer is automatically activated when the ignition key is
withdrawn from the lock.
The engine will not start if an unauthorized ignition key is used.
The following message is shown in the information cluster display. Immobilizer active.
IMMOBILIZER ACTIVE
Lock / unlock steering lock
Read and observe
and on page 103 first.
The steering lock (steering lock) deters any attempted theft of your vehicle.
Locking
›
Withdraw the ignition key.
›
Turn the steering wheel to the left or right until the steering lock clicks into
place.
Unlocking
›
Insert the key into the ignition lock.
›
Switch on the ignition » page 104.
103Starting-off and driving
Page 107 of 216
The vehicle is unlocked.
If the ignition switch cannot be turned on, turn the steering wheel back and
forth slightly to unlock the steering lock.
Turn ignition on / off and start the engine
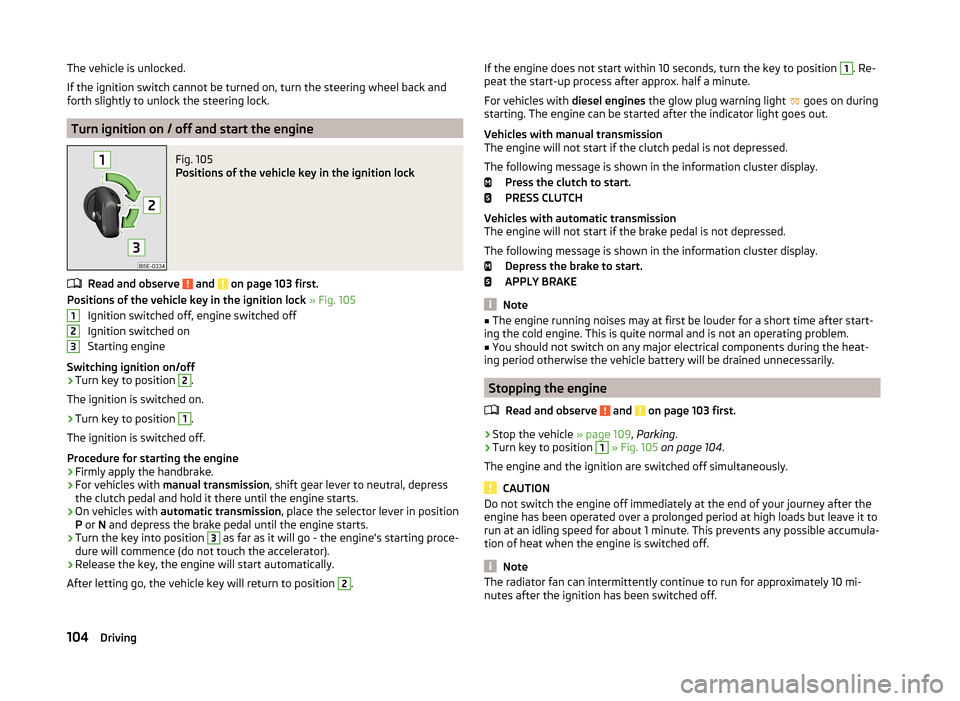
Fig. 105
Positions of the vehicle key in the ignition lock
Read and observe and on page 103 first.
Positions of the vehicle key in the ignition lock » Fig. 105
Ignition switched off, engine switched off
Ignition switched on
Starting engine
Switching ignition on/off
›
Turn key to position
2
.
The ignition is switched on.
›
Turn key to position
1
.
The ignition is switched off.
Procedure for starting the engine
›
Firmly apply the handbrake.
›
For vehicles with manual transmission , shift gear lever to neutral, depress
the clutch pedal and hold it there until the engine starts.
›
On vehicles with automatic transmission , place the selector lever in position
P or N and depress the brake pedal until the engine starts.
›
Turn the key into position
3
as far as it will go - the engine's starting proce-
dure will commence (do not touch the accelerator).
›
Release the key, the engine will start automatically.
After letting go, the vehicle key will return to position
2
.
123If the engine does not start within 10 seconds, turn the key to position 1. Re-
peat the start-up process after approx. half a minute.
For vehicles with diesel engines the glow plug warning light
goes on during
starting. The engine can be started after the indicator light goes out.
Vehicles with manual transmission
The engine will not start if the clutch pedal is not depressed.
The following message is shown in the information cluster display. Press the clutch to start.
PRESS CLUTCH
Vehicles with automatic transmission
The engine will not start if the brake pedal is not depressed.
The following message is shown in the information cluster display. Depress the brake to start.
APPLY BRAKE
Note
■ The engine running noises may at first be louder for a short time after start-
ing the cold engine. This is quite normal and is not an operating problem.■
You should not switch on any major electrical components during the heat-
ing period otherwise the vehicle battery will be drained unnecessarily.
Stopping the engine
Read and observe
and on page 103 first.
›
Stop the vehicle » page 109, Parking .
›
Turn key to position
1
» Fig. 105 on page 104 .
The engine and the ignition are switched off simultaneously.
CAUTION
Do not switch the engine off immediately at the end of your journey after the
engine has been operated over a prolonged period at high loads but leave it to
run at an idling speed for about 1 minute. This prevents any possible accumula-
tion of heat when the engine is switched off.
Note
The radiator fan can intermittently continue to run for approximately 10 mi-
nutes after the ignition has been switched off.104Driving
Page 108 of 216
Start or stop the engine by pressing button
Introduction
Fig. 106
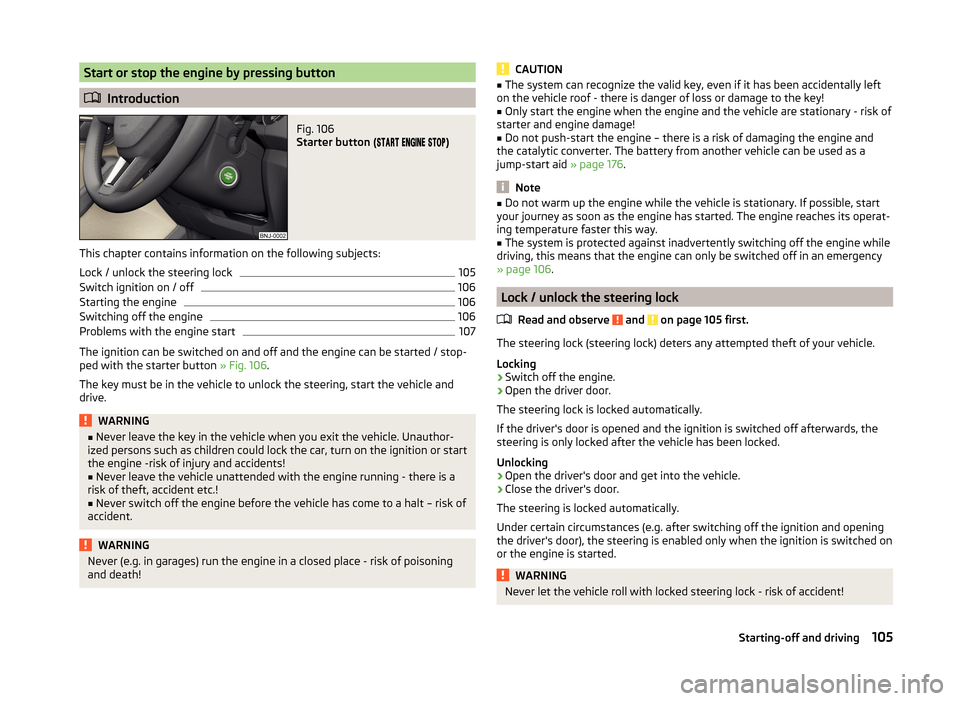
Starter button (
)
This chapter contains information on the following subjects:
Lock / unlock the steering lock
105
Switch ignition on / off
106
Starting the engine
106
Switching off the engine
106
Problems with the engine start
107
The ignition can be switched on and off and the engine can be started / stop-
ped with the starter button » Fig. 106.
The key must be in the vehicle to unlock the steering, start the vehicle and
drive.
WARNING■ Never leave the key in the vehicle when you exit the vehicle. Unauthor-
ized persons such as children could lock the car, turn on the ignition or start
the engine -risk of injury and accidents!■
Never leave the vehicle unattended with the engine running - there is a
risk of theft, accident etc.!
■
Never switch off the engine before the vehicle has come to a halt – risk of
accident.
WARNINGNever (e.g. in garages) run the engine in a closed place - risk of poisoning
and death!CAUTION■ The system can recognize the valid key, even if it has been accidentally left
on the vehicle roof - there is danger of loss or damage to the key!■
Only start the engine when the engine and the vehicle are stationary - risk of
starter and engine damage!
■
Do not push-start the engine – there is a risk of damaging the engine and
the catalytic converter. The battery from another vehicle can be used as a
jump-start aid » page 176.
Note
■
Do not warm up the engine while the vehicle is stationary. If possible, start
your journey as soon as the engine has started. The engine reaches its operat-
ing temperature faster this way.■
The system is protected against inadvertently switching off the engine while
driving, this means that the engine can only be switched off in an emergency
» page 106 .
Lock / unlock the steering lock
Read and observe
and on page 105 first.
The steering lock (steering lock) deters any attempted theft of your vehicle.
Locking
›
Switch off the engine.
›
Open the driver door.
The steering lock is locked automatically.
If the driver's door is opened and the ignition is switched off afterwards, the
steering is only locked after the vehicle has been locked.
Unlocking
›
Open the driver's door and get into the vehicle.
›
Close the driver's door.
The steering is locked automatically.
Under certain circumstances (e.g. after switching off the ignition and opening
the driver's door), the steering is enabled only when the ignition is switched on
or the engine is started.
WARNINGNever let the vehicle roll with locked steering lock - risk of accident!105Starting-off and driving
Page 109 of 216
Switch ignition on / offRead and observe
and on page 105 first.
›
Press the button » Fig. 106 on page 105 briefly.
The ignition is switched on or off.
On vehicles fitted with a manual transmission, the clutch pedal must not be
depressed while switching the ignition on or off, otherwise the system would
try to start.
On vehicles fitted with a automatic transmission, the brake pedal must not be
depressed while switching the ignition on or off, otherwise the system would
try to start.
If the driver's door is opened while the ignition is on, an audible signal sounds
and the following message appears in the instrument cluster display.
Ignition on!
IGNITION STILL ON
When leaving the vehicle always switch off the ignition.
Starting the engine
Read and observe
and on page 105 first.
Procedure for starting the engine
›
Firmly apply the handbrake.
›
For vehicles with manual transmission , shift gear stick to neutral, depress
the clutch pedal and hold it there until the engine starts.
›
On vehicles with automatic transmission , place the selector lever in position
P or N and depress the brake pedal until the engine starts.
›
Press the starter button » Fig. 106 on page 105 briefly – the engine starts au-
tomatically.
In vehicles with diesel engines the glow plug warning light
lights up after
pressing the button. The engine can be started after the indicator light goes
out.
Note
■ The engine running noises may louder at first be louder for a short time after
starting the cold engine. This is quite normal and is not an operating problem.■
You should not switch on any major electrical components during the heat-
ing period otherwise the vehicle battery will be drained unnecessarily.
Switching off the engine
Read and observe
and on page 105 first.
Switching off
›
Stop the vehicle » page 109, Parking .
›
Press the button » Fig. 106 on page 105 briefly.
The engine and the ignition are switched off simultaneously.
Emergency shutdown
If necessary and in exceptional cases, the engine may even be turned off while driving.
›
Press the starter button » Fig. 106 on page 105 for longer than 1 second or
twice within 1 second.
After the emergency stop of the engine, the steering lock will remain un-
locked.
CAUTION
Do not switch the engine off immediately at the end of your journey after the
engine has been operated over a prolonged period at high loads but leave it to
run at an idling speed for about 1 minute. This prevents any possible accumula-
tion of heat when the engine is switched off.
Note
The radiator fan can intermittently continue to run for approximately 10 mi-
nutes after the ignition has been switched off.106Driving
Page 112 of 216

WARNINGPlease note that the handbrake must be fully released. A handbrake which
is only partially released can result in the rear brakes overheating. This can
have a negative effect on the operation of the brake system – risk of acci-
dent!
Parking
Read and observe
and on page 107 first.
When stopping and parking, look for a place with a suitable surface » .
Only carry out the activities while parking in the specified order.
›
Bring the vehicle to a stop and depress the brake pedal.
›
Firmly apply the handbrake.
›
On vehicles with Automatic transmission , place the selector lever in the P
position.
›
Switch off the engine.
›
For vehicles with manual transmission , engage the first gear or reverse gear.
›
Release the brake pedal.
WARNINGThe parts of the exhaust system can become very hot. Therefore, never
stop the vehicle at places where the underside of your vehicle can come in-
to contact with flammable materials such as dry grass, undergrowth,
leaves, spilled fuel or such like. - Risk of fire and serious injury can occur!
Manual gear shifting and pedals
Introduction
This chapter contains information on the following subjects:
Manual gear changing
109
Pedals
110Manual gear changingFig. 109
Shift pattern of the transmission Version 1/version 2
The individual gear positions are shown on the gear shift » Fig. 109.
The gearshift indicator must be observed when changing gear » page 44.
Always depress the clutch pedal all the way down. This prevents uneven wear
on the clutch.
Engage reverse gear - Version 1
›
Stop the vehicle.
›
The clutch pedal must be fully depressed.
›
Move the shift lever to the idle position, switch and press down.
›
Move the shift lever fully to the left and then forward into the Rposition
» Fig. 109 .
Engage reverse gear - Version 2
›
Stop the vehicle.
›
The clutch pedal must be fully depressed.
›
Move the shift lever to the idle position, switch and press down.
›
Move the shift lever fully to the right and then backwards to position R.
The reversing lights will come on once reverse gear is engaged, provided the
ignition is on.
WARNINGNever engage reverse gear when driving – risk of accident! 109Starting-off and driving
Page 113 of 216

CAUTION■If not in the process of changing gear, do not leave your hand on the gear-
shift lever while driving. The pressure from the hand can cause the gearshift
mechanism to wear excessively.■
When stopping on a slope, never try to keep the vehicle in position by using
the accelerator pedal – this may lead to damage of clutch parts.
Pedals
The operation of the pedals must not be hindered under any circumstances!
In the driver's foot well, only a foot mat, which is attached to the two corre-
sponding attachment points, may be used.
Only use factory-supplied foot mats or foot mats from the range of
ŠKODAOriginal Accessories, which are fitted to two the two required attach-
ment points.
WARNINGNo objects are allowed in the driver's footwell – there is a risk of obstruct-
ing or restriction pedal operation.
Automatic transmission
Introduction
This chapter contains information on the following subjects:
Modes and use of selector lever
111
Selector lever lock
111
Manual gear shifting (Tiptronic)
112
Starting-off and driving
112
The automatic transmission performs automatic gear changes.
The modes for the automatic transmission can be adjusted by the driver by
means of the selector lever.
WARNING■ Never accelerate when the mode for moving forward is set with the se-
lector lever - there is a risk of accident!■
Never shift the selector lever to R or P modes when driving – there is a
risk of an accident.
■
The vehicle must be held on the brake pedal in D, S or R modes if the ve-
hicle is halted and the engine is running. Even when the engine is idling,
power transmission is never completely interrupted – the vehicle will creep.
■
When leaving the vehicle, the selector lever is always to be put in the P
mode. Otherwise the vehicle could then start to move and potentially cause
an accident.
CAUTION
■ If the selector lever is moved to mode N while driving, the accelerator pedal
must be released and you will need to wait until the engine has reached its
idling speed before moving the selector lever to a forward driving mode again.■
When the outdoor temperature is below -10 ° C, the selector lever, when
starting, must always be in P mode.
■
When stopping on a slope, never try to keep the vehicle in position by using
the accelerator pedal – this may lead to gear damage.
Note
After the ignition is switched off, the ignition key can only be withdrawn if the
selector lever is in the position P (valid only for certain countries).110Driving
Page 115 of 216
Manual gear shifting (Tiptronic)Fig. 111
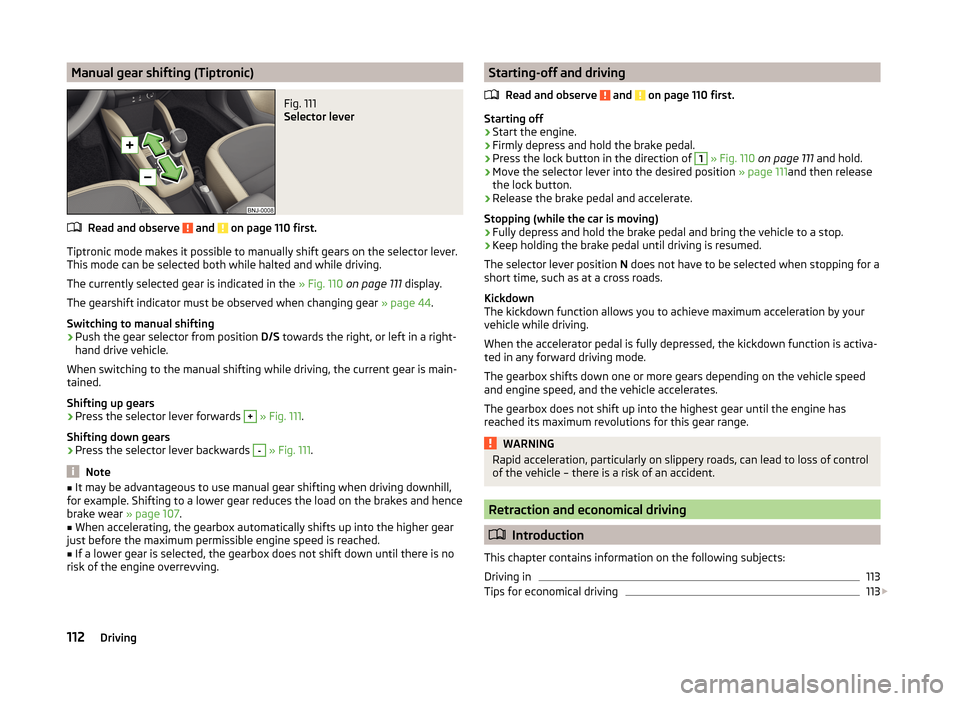
Selector lever
Read and observe and on page 110 first.
Tiptronic mode makes it possible to manually shift gears on the selector lever.This mode can be selected both while halted and while driving.
The currently selected gear is indicated in the » Fig. 110 on page 111 display.
The gearshift indicator must be observed when changing gear » page 44.
Switching to manual shifting
›
Push the gear selector from position D/S towards the right, or left in a right-
hand drive vehicle.
When switching to the manual shifting while driving, the current gear is main-
tained.
Shifting up gears
›
Press the selector lever forwards
+
» Fig. 111 .
Shifting down gears
›
Press the selector lever backwards
-
» Fig. 111 .
Note
■
It may be advantageous to use manual gear shifting when driving downhill,
for example. Shifting to a lower gear reduces the load on the brakes and hence
brake wear » page 107.■
When accelerating, the gearbox automatically shifts up into the higher gear
just before the maximum permissible engine speed is reached.
■
If a lower gear is selected, the gearbox does not shift down until there is no
risk of the engine overrevving.
Starting-off and driving
Read and observe
and on page 110 first.
Starting off
›
Start the engine.
›
Firmly depress and hold the brake pedal.
›
Press the lock button in the direction of
1
» Fig. 110 on page 111 and hold.
›
Move the selector lever into the desired position » page 111and then release
the lock button.
›
Release the brake pedal and accelerate.
Stopping (while the car is moving)
›
Fully depress and hold the brake pedal and bring the vehicle to a stop.
›
Keep holding the brake pedal until driving is resumed.
The selector lever position N does not have to be selected when stopping for a
short time, such as at a cross roads.
Kickdown
The kickdown function allows you to achieve maximum acceleration by your vehicle while driving.
When the accelerator pedal is fully depressed, the kickdown function is activa-
ted in any forward driving mode.
The gearbox shifts down one or more gears depending on the vehicle speed
and engine speed, and the vehicle accelerates.
The gearbox does not shift up into the highest gear until the engine has
reached its maximum revolutions for this gear range.
WARNINGRapid acceleration, particularly on slippery roads, can lead to loss of control
of the vehicle – there is a risk of an accident.
Retraction and economical driving
Introduction
This chapter contains information on the following subjects:
Driving in
113
Tips for economical driving
113
112Driving
Page 126 of 216

NoteThe system can be impaired or may not be available, for example when driving
in “sharp ”curves or with an ESC engagement » page 115.
Proximity warning (dangerous proximity)
Read and observe
and on page 122 first.
If a safe distance to the vehicle ahead is not maintained, the display of the in-
strument cluster shows the symbol
» Fig. 124 on page 122 -
.
Immediately increase the proximity if the current traffic situation allows you
to do so!
The proximity at which the warning is displayed depends on the current speed.
The warning may occur when driving between about 60 km/h and 210 km/h.
Warning and automatic braking
Read and observe
and on page 122 first.
Emergency braking at low speed
In a driving speed range of about 5 km/h to about 30 km/h the automatic brak-
ing action is not preceded by a warning. With an immediate impact hazard au-
tomatic braking is done with the breaking force increasing in stages.
With automatic braking the symbol appears » Fig. 124
on page 122 -
in the
display.
Advance warning
If the system detects a risk of collision, the symbol » Fig. 124
on page 122 -
appears in the display and you will hear an acoustic signal.
At the same time, the braking system is prepared for possible emergency brak- ing.
The pre-warning display can occur in the following situations. › If there is a risk of collision with a moving obstacle in a driving speed range of
about 30 km/h to about 210 km/h.
› There is a risk of a collision with a stationary moving obstacle in a vehicle
speed range of approximately 30 km/h to about 85 km/h.
With a warning the brake pedal must be pressed or the moving obstacle is to
be avoided!
Acute alert
If the driver does not react to the advance warning, the system briefly applies
the brake automatically via an active brake intervention to draw attention to
the potential danger of a collision again.
Automatic Braking
If the driver fails to respond to the acute warning, the system starts to apply
the brakes automatically with increasing stopping power in several stages.
Brake assist
If the driver brakes inadequate with an impending collision, the system auto-
matically increases braking force.
The braking assistance only occurs as long as the brake pedal is being firmly
pressed down.
Note
■ If an automatic brake intervention is triggered by the system, the pressure in
the brake system increases and the brake pedal cannot be operated with the
normal pedal stroke.■
The automatic braking interventions can be cancelled by pressing the accel-
erator pedal or by steering intervention.
Activating/deactivating
Read and observe
and on page 122 first.
The function is automatically activated each time the ignition is switched on.
The system should only be disabled in exceptional cases »
.
The activation or deactivation of the system can be done in one of two ways.
› In the menu item
Assist systemsthe display of the instrument cluster
» page 45 , MAXI DOT display .
› In Infotainment
» Operating instructions for Infotainment , chapter Vehicle
settings (CAR button) .
The following functions can be activated or deactivated separately in infotain-
ment.
› Distance warning
› Advance warning
Upon deactivation of these functions remains disabled even after switching
off and switching on the ignition.
123Assist systems