window SKODA FABIA 2014 3.G / NJ Owner's Guide
[x] Cancel search | Manufacturer: SKODA, Model Year: 2014, Model line: FABIA, Model: SKODA FABIA 2014 3.G / NJPages: 216, PDF Size: 30.7 MB
Page 96 of 216

CAUTIONThe bike stowed in the rack must not touch either the boot lid or other vehicle
parts - there is a risk of damage to the vehicle occurring.
Place bicycle into the carrier
Fig. 98
Insert the front fork of the bicycle into the carrier / mounting ex-
ample of the front wheel
Read and observe
and on page 91 first.
›
Remove the front wheel from the bike.
›
Release the quick release
A
» Fig. 98 on the carrier and adjust according to
the bicycle fork width.
›
Place the bicycle fork on the fixing axle and tighten with the quick release
A
.
›
Set the left bicycle pedal towards the vehicle front to secure the front wheel
more easily.
›
If you want to transport two bicycles, loosen screw
A
» Fig. 97 on page 92
on the carrier and move the carrier along with attached bike to the left.
The handlebar must not touch the side window of the luggage compartment.
›
Tighten screw
A
» Fig. 97 on page 92 on the support.
›
Guide the boot lid gently downwards and check while doing this that there is
no contact between the handlebar and the rear window.
›
If necessary, the position of the sliding part
E
» Fig. 97 on page 92 can be
adjusted.
›
The dismantled front wheel can best be stowed between the left crank and
the bicycle frame.
›
Attach the front wheel with belt
B
to the front fork » Fig. 98 or to the bicy-
cle frame.
›
The second carrier is installed and the bicycle is secured in a similar way.
Ensure the stability of the bicycles with a beltFig. 99
Ensure the stability of the bicycles with a belt
Read and observe
and on page 91 first.
›
In order to loosen the rubber part of the clamp, push both parts against each
other and open the clamp.
›
Position the clamp with the rubber part in the direction of travel as low down
on the saddle support as possible and close it.
›
When transporting two bicycles, stretch the belt » Fig. 99 -
between the
saddles by moving the bicycles apart.
›
Hook the carabiners on the ends of the belt into the lower lashing eyelets
behind the rear seats » Fig. 99 -
.
›
Pull the belt through the tensioning clasps on both sides in turn.
›
If necessary, you can correct the position of the bicycles in the vehicle after-
wards.
Roof rack
Introduction
This chapter contains information on the following subjects:
fixing points for base support
94
Roof load
94
93Transporting and practical equipment
Page 98 of 216
Heating and air conditioning
Heating, ventilation, cooling
Introduction
This chapter contains information on the following subjects:
Air outlet vents
96
Recirculated air mode
96
Heating
97
Air conditioning (manual air conditioning)
98
Climatronic (automatic air conditioning)
98
Efficient handling of the cooling system
99
Malfunctions
100
The heating and air conditioning systems ventilate and heat the vehicle interi-
or. The air conditioning system also cools and dehumidifies the vehicle interior.
The heating effect is dependent upon the coolant temperature, thus full heat
output only occurs when the engine has reached its operating temperature.
The heating and air conditioning systems only operate when the ignition is
switched on.
The cooling system operates only if the following conditions are met. The cooling system is switched on.
The engine is running.
The outside temperature is above approximately +2 °C.
The blower is switched on.
If the cooling system is switched on, the temperature and air humidity drops in
the vehicle. The cooling system prevents the windows from misting up during
winter months.
It is possible to briefly activate re-circulated air mode to enhance the cooling
effect » page 96 .
WARNING■
For your own safety and that of other road users, ensure that all the win-
dows are free of ice, snow and misting.■
The blower should always be on to prevent the windows from misting up.
WARNING (Continued)■ Under certain circumstances, air at a temperature of about 5 °C can flow
out of the vents when the cooling system is switched on.■
To reduce health risks (e.g. common colds), the following instructions for
the use of the cooling system are to be observed. ■The difference between the indoor temperature and the outdoor air
temperature should not be greater than about 5 ° C.
■ The cooling system is to be turned off about 10 minutes before the end
of the journey.
■ Once a year, disinfection of the air conditioner or the Climatronic is to be
carried out by a specialist company.
CAUTION
■ The air inlet in front of the windscreen must be free (e.g. of ice, snow or
leaves) to ensure that the heating and cooling system operates properly.■
After switching on the cooling system condensation from the evaporator of
the air conditioning may drip down and form a puddle below the vehicle. This is
not a leak!
■
If the coolant temperature is too high, the cooling system is switched off to
ensure that the engine cools down.
Note
The used air flows out through the vents in the luggage compartment.95Heating and air conditioning
Page 100 of 216
Recirculated air mode is switched off automatically if the following conditions
are met.
The blower is switched on.
The airflow adjuster is outside position
.
The temperature controller is turned to the left.
Recirculated air mode is switched off automatically if the following conditions
are met.
The blower is switched on.
The airflow adjuster is in position
.
Climatronic (automatic air conditioning)
To switch on recirculated air mode, press the symbol key
. The display
shows the icon.
To switch off recirculated air mode, press the symbol key
again. The
icon in the display goes out.WARNINGThe recirculation system cannot be switched on for a longer period of time,
because there is no supply of fresh air from the outside. “Stale air” may re-
sult in fatigue in the driver and occupants, reduce attention levels and also
cause the windows to mist up. The risk of having an accident increases.
Switch off recirculated air mode as soon as the windows start to mist up.
CAUTION
We recommend not smoking in the vehicle when the recirculating air operation
is switched on. The smoke sucked from inside the vehicle is deposited on the
evaporator of the air conditioner. This produces a permanent odour when the
air conditioning system is operating which can only be eliminated through con-
siderable effort and expense (replacement of compressor).HeatingFig. 102
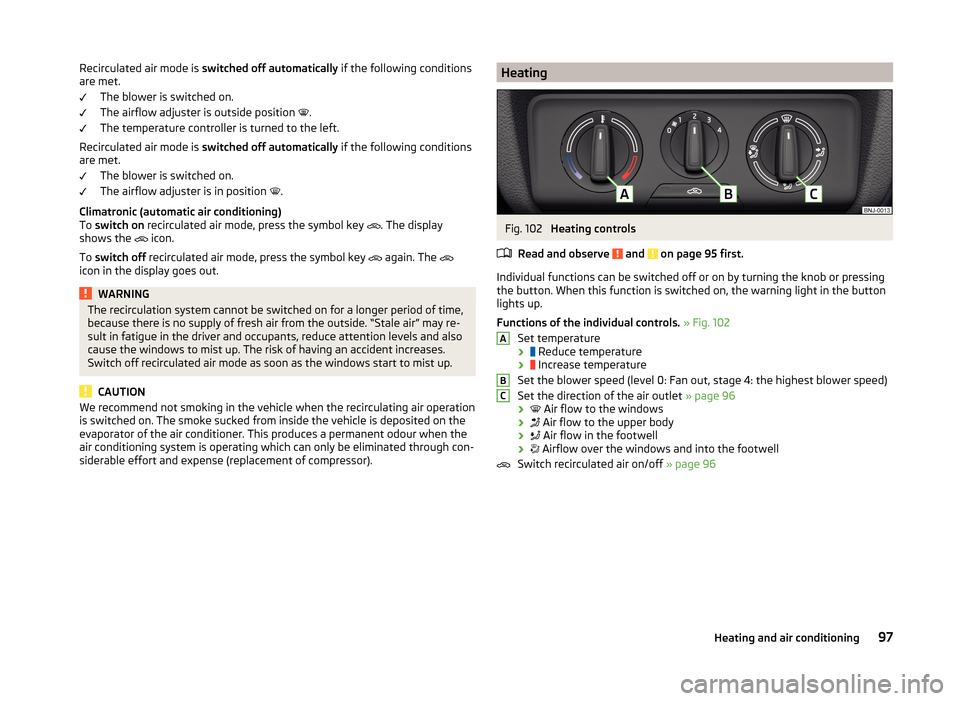
Heating controls
Read and observe
and on page 95 first.
Individual functions can be switched off or on by turning the knob or pressing the button. When this function is switched on, the warning light in the button
lights up.
Functions of the individual controls. » Fig. 102
Set temperature ›
Reduce temperature
›
Increase temperature
Set the blower speed (level 0: Fan out, stage 4: the highest blower speed)
Set the direction of the air outlet » page 96
›
Air flow to the windows
›
Air flow to the upper body
›
Air flow in the footwell
›
Airflow over the windows and into the footwell
Switch recirculated air on/off » page 96
ABC97Heating and air conditioning
Page 101 of 216
Air conditioning (manual air conditioning)Fig. 103
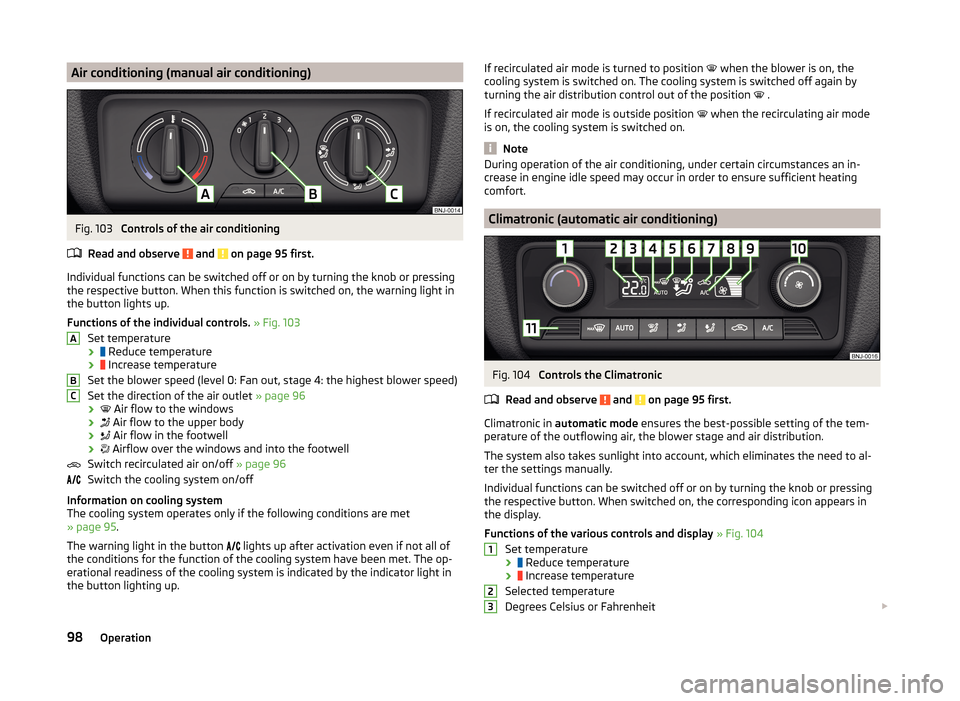
Controls of the air conditioning
Read and observe
and on page 95 first.
Individual functions can be switched off or on by turning the knob or pressing the respective button. When this function is switched on, the warning light in
the button lights up.
Functions of the individual controls. » Fig. 103
Set temperature ›
Reduce temperature
›
Increase temperature
Set the blower speed (level 0: Fan out, stage 4: the highest blower speed)
Set the direction of the air outlet » page 96
›
Air flow to the windows
›
Air flow to the upper body
›
Air flow in the footwell
›
Airflow over the windows and into the footwell
Switch recirculated air on/off » page 96
Switch the cooling system on/off
Information on cooling system
The cooling system operates only if the following conditions are met
» page 95 .
The warning light in the button lights up after activation even if not all of
the conditions for the function of the cooling system have been met. The op-
erational readiness of the cooling system is indicated by the indicator light in
the button lighting up.
ABCIf recirculated air mode is turned to position when the blower is on, the
cooling system is switched on. The cooling system is switched off again by
turning the air distribution control out of the position
.
If recirculated air mode is outside position
when the recirculating air mode
is on, the cooling system is switched on.
Note
During operation of the air conditioning, under certain circumstances an in-
crease in engine idle speed may occur in order to ensure sufficient heating
comfort.
Climatronic (automatic air conditioning)
Fig. 104
Controls the Climatronic
Read and observe
and on page 95 first.
Climatronic in automatic mode ensures the best-possible setting of the tem-
perature of the outflowing air, the blower stage and air distribution.
The system also takes sunlight into account, which eliminates the need to al-
ter the settings manually.
Individual functions can be switched off or on by turning the knob or pressing
the respective button. When switched on, the corresponding icon appears in
the display.
Functions of the various controls and display » Fig. 104
Set temperature ›
Reduce temperature
›
Increase temperature
Selected temperature
Degrees Celsius or Fahrenheit
12398Operation
Page 102 of 216
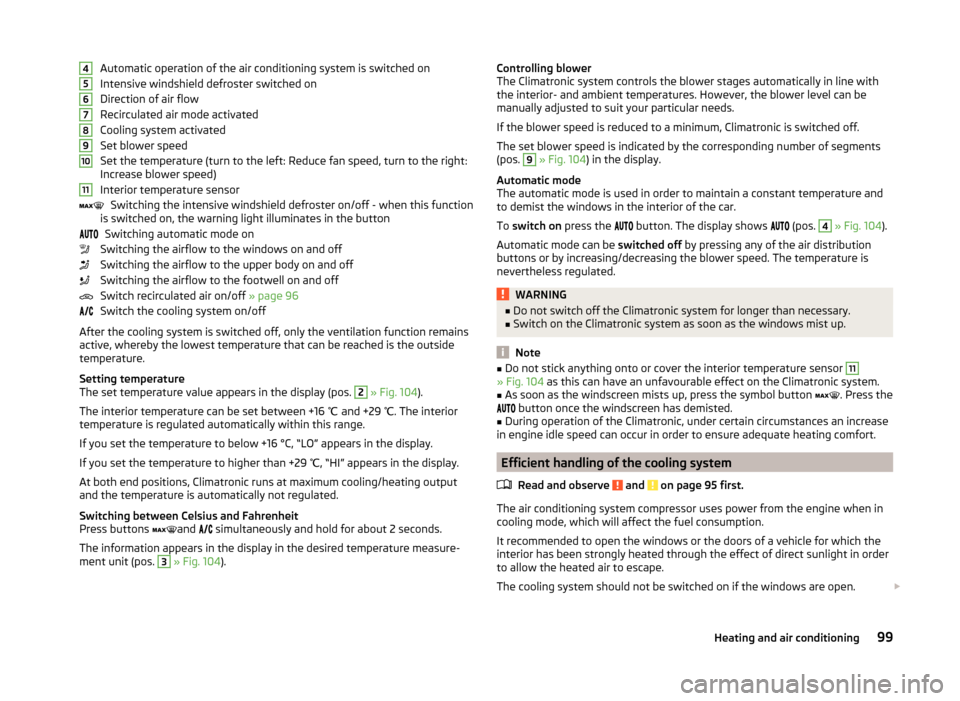
Automatic operation of the air conditioning system is switched on
Intensive windshield defroster switched on
Direction of air flow
Recirculated air mode activated
Cooling system activated
Set blower speed
Set the temperature (turn to the left: Reduce fan speed, turn to the right:
Increase blower speed)
Interior temperature sensor Switching the intensive windshield defroster on/off - when this function
is switched on, the warning light illuminates in the button
Switching automatic mode on
Switching the airflow to the windows on and off
Switching the airflow to the upper body on and off
Switching the airflow to the footwell on and off
Switch recirculated air on/off » page 96
Switch the cooling system on/off
After the cooling system is switched off, only the ventilation function remains active, whereby the lowest temperature that can be reached is the outside
temperature.
Setting temperature
The set temperature value appears in the display (pos. 2
» Fig. 104 ).
The interior temperature can be set between +16 ℃ and +29 ℃. The interior
temperature is regulated automatically within this range.
If you set the temperature to below +16 °C, “LO” appears in the display. If you set the temperature to higher than +29 ℃, “HI” appears in the display.
At both end positions, Climatronic runs at maximum cooling/heating output
and the temperature is automatically not regulated.
Switching between Celsius and Fahrenheit
Press buttons and
simultaneously and hold for about 2 seconds.
The information appears in the display in the desired temperature measure-
ment unit (pos.
3
» Fig. 104 ).
4567891011Controlling blower
The Climatronic system controls the blower stages automatically in line with
the interior- and ambient temperatures. However, the blower level can be
manually adjusted to suit your particular needs.
If the blower speed is reduced to a minimum, Climatronic is switched off.
The set blower speed is indicated by the corresponding number of segments
(pos. 9
» Fig. 104 ) in the display.
Automatic mode
The automatic mode is used in order to maintain a constant temperature and
to demist the windows in the interior of the car.
To switch on press the
button. The display shows
(pos.
4
» Fig. 104 ).
Automatic mode can be switched off by pressing any of the air distribution
buttons or by increasing/decreasing the blower speed. The temperature is
nevertheless regulated.
WARNING■ Do not switch off the Climatronic system for longer than necessary.■Switch on the Climatronic system as soon as the windows mist up.
Note
■Do not stick anything onto or cover the interior temperature sensor 11» Fig. 104 as this can have an unfavourable effect on the Climatronic system.■
As soon as the windscreen mists up, press the symbol button
. Press the
button once the windscreen has demisted.
■
During operation of the Climatronic, under certain circumstances an increase
in engine idle speed can occur in order to ensure adequate heating comfort.
Efficient handling of the cooling system
Read and observe
and on page 95 first.
The air conditioning system compressor uses power from the engine when incooling mode, which will affect the fuel consumption.
It recommended to open the windows or the doors of a vehicle for which the
interior has been strongly heated through the effect of direct sunlight in order
to allow the heated air to escape.
The cooling system should not be switched on if the windows are open.
99Heating and air conditioning
Page 144 of 216

Washing by handRead and observe
and on page 140 first.
Soften the dirt with plenty of water and rinse as much as you can of this off.Clean the vehicle with a soft sponge, a washing glove or a washing brush.
Work from the top to the bottom - starting with the roof.
For stubborn dirt, agents specifically intended for this purpose are to be used.
Wash out the sponge or washing glove thoroughly at short intervals.
Clean wheels, door sills and similar parts last. Use a second sponge for such areas.
Give the vehicle a good rinse after washing it and dry it off using a chamois
leather.
WARNINGProtect your hands and arms from sharp-edged metal parts when cleaning
the underfloor or the inside of the wheel housings or the wheel trims – risk
of cuts!
CAUTION
■ Only apply slight pressure when cleaning the vehicle's paintwork.■Do not wash your vehicle in bright sunlight – there is a risk of paint damage.
Automatic car wash systems
Read and observe
and on page 140 first.
The usual precautionary measures must be taken before washing the vehicle
in an automatic car wash system (e.g. closing the windows including the slid-
ing/tilting roof, etc.).
If your vehicle is fitted with any particular mounted parts, such as a spoiler,
roof rack, two-way radio aerial – it is best to consult the operator of the car
wash system beforehand.
The lips of the windscreen wiper rubbers must be cleaned and degreased with
cleaning agents especially formulated for the task after an automatic wash
with wax.
CAUTIONFold in the exterior mirrors to prevent damage before washing the vehicle in
an automatic car wash system. Never manually fold in electric exterior mirrors -
always use the electric controls.
Washing with a high-pressure cleaner
Read and observe
and on page 140 first.
When washing the vehicle with a high-pressure cleaner, the instructions foruse of the equipment must be observed. This applies in particular to the pres-
sure used and to the spraying distance .
Maintain a sufficiently large distance to the parking aid sensors and soft mate-
rials such as rubber hoses or insulation material.
CAUTION
■ Do not aim the water jet directly at the lock cylinders or the door or opening
joints when washing the vehicle in the winter using a hose or high-pressure
cleaner – there is a risk of freezing.■
To avoid damaging the parking aid sensors while cleaning with high-pressure
cleaners or steam jets, the sensors must only be directly sprayed for short pe-
riods while a minimum distance of 10 cm must be observed.
Note
See also Washing a vehicle with decorative film trim using a high-pressure
cleaner » page 143 .
Cleaning vehicle exterior
Introduction
This chapter contains information on the following subjects:
Vehicle paint work
142
Plastic parts
142
Rubber seals
143
Chrome parts
143
Decorative films
143
Windows and external mirrors
143
Headlight glasses
144
Door closing cylinder
144
141Care and maintenance
Page 145 of 216

Cavity protection144Jack144
Wheels
144
Towing device and mounting recess
145
Under-body protection
145
Wiper blades
145
We recommend using care products from ŠKODA Original Accessories that are
available from ŠKODA Partners. The instructions for use on the package must
be observed.
WARNING■ Care products may be harmful to your health if not used according to the
instructions.■
Always keep the automobile care products safe from people who are not
completely independent, e.g. children - there is a danger of poisoning!
■
Protect your hands and arms from sharp-edged metal parts when clean-
ing the underfloor, the inside of the wheel housings or the wheel trims –
risk of cuts!
CAUTION
■ Do not use any insect sponges, kitchen scrubbers or similar cleaning prod-
ucts – there is a risk of damaging the paintwork finish.■
Cleaners containing solvents can damage the material being cleaned.
For the sake of the environment
Used cans of vehicle care product represent hazardous waste that is harmful
to the environment. These must be disposed of in accordance with national
legislation.
Note
Because of the special tools and knowledge required, and to avoid any poten-
tial problems with the cleaning and care of the exterior of your vehicle, we rec-
ommend that cleaning and care of your vehicle be carried out by a ŠKODA
Service Partner.Vehicle paint work
Read and observe
and on page 142 first.
Preserving the vehicle paintwork
Thorough wax treatment is an effective way of protecting the paintwork from
harmful environmental influences.
The vehicle must be treated with a high-quality hard wax polish at the latest,
when no more drops form on the clean paintwork.
A new layer of a high-quality hard wax polish can be applied to the clean body- work after it has dried thoroughly.
Even if you use a wax preserver regularly we still recommend that you treat
the paintwork of the vehicle at least twice a year with hard wax.
Polishing
Polishing is necessary if the vehicle's paintwork has become unattractive and
if it is no longer possible to achieve a gloss with wax preservatives.
If the polish does not contain any preserving elements, the paint must be trea- ted with a preservative afterwards.
CAUTION
■ Paint damage is to be repaired immediately.■Never apply wax to the windows.■
Mat painted or plastic parts must not be treated with polishing products or
hard waxes.
■
Do not polish the paintwork in a dusty environment - there is a risk of
scratching the paintwork.
■
Do not apply polish to door seals or window guides.
■
If possible, do not apply any polish to body surfaces that come into contact
with door seals and window guides.
Plastic parts
Read and observe
and on page 142 first.
Clean plastic parts with a damp cloth.
If this method does not clean plastic parts completely, use a specific plastic
care product.
142General Maintenance
Page 146 of 216
CAUTIONDo not use polish on plastic parts.
Rubber sealsRead and observe
and on page 142 first.
All door seals and window guides are factory-treated with a colourless matt
varnish layer against a freezing to painted body parts and against road noise.
CAUTION
■ Do not treat the door seals or window guides with any cleaning agent.■An additional treatment of the seals can attack their protective coating and
road noise may be generated.
Chrome parts
Read and observe
and on page 142 first.
First clean the chrome parts with a damp cloth and then polish them with a
soft, dry cloth.
If this method does not completely clean chrome parts, use a specific chrome
care product.
CAUTION
Do not polish the chrome parts in a dusty environment - there is a risk of
scratching the finish.
Decorative films
Read and observe
and on page 142 first.
Wash the films with a mild soap solution and clean, warm water.
The following instructions must be observed for the high-pressure washing
the vehicle.
› The minimum distance between the nozzle and the vehicle body should be
50 cm.
› Keep the jet perpendicular to the film surface.
› The maximum water temperature is 50 °C.
› The maximum water pressure is 80 bar.
CAUTION■
Never use aggressive cleaning agents or chemical solvents for the glued sur-
faces with films - there is a danger of film damage.■
No ice scrapers should be used in the winter months to remove ice and snow
from the areas to which films have been applied. Do not remove frozen snow
or ice using other objects - there is a risk of damage to the film.
Windows and external mirrors
Fig. 142
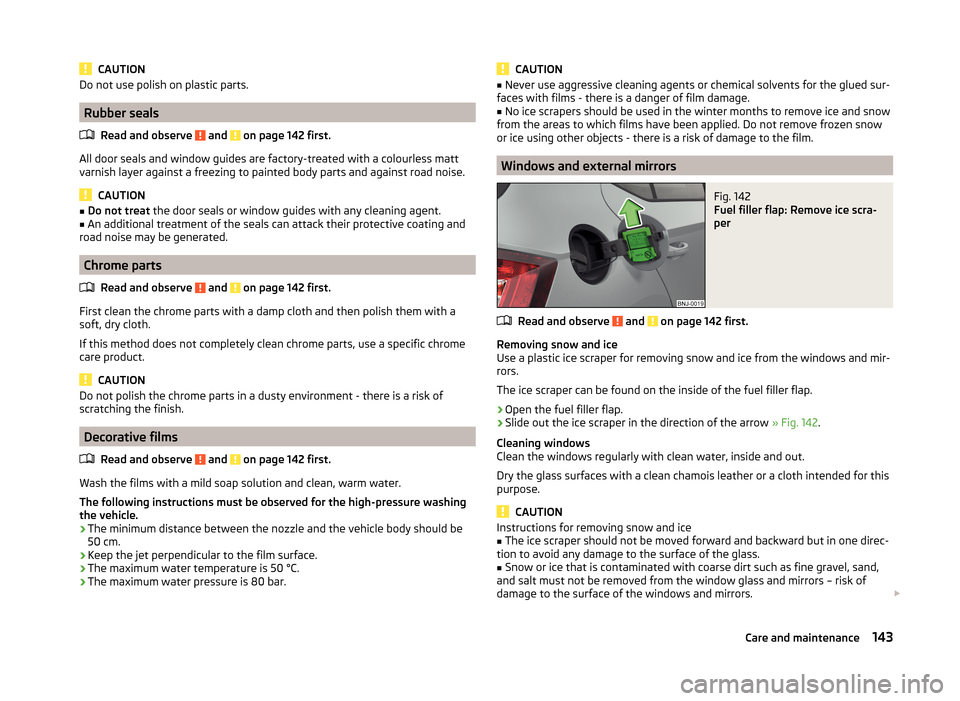
Fuel filler flap: Remove ice scra-
per
Read and observe and on page 142 first.
Removing snow and ice
Use a plastic ice scraper for removing snow and ice from the windows and mir-
rors.
The ice scraper can be found on the inside of the fuel filler flap.
›
Open the fuel filler flap.
›
Slide out the ice scraper in the direction of the arrow » Fig. 142.
Cleaning windows
Clean the windows regularly with clean water, inside and out.
Dry the glass surfaces with a clean chamois leather or a cloth intended for this
purpose.
CAUTION
Instructions for removing snow and ice■The ice scraper should not be moved forward and backward but in one direc-
tion to avoid any damage to the surface of the glass.■
Snow or ice that is contaminated with coarse dirt such as fine gravel, sand,
and salt must not be removed from the window glass and mirrors – risk of
damage to the surface of the windows and mirrors.
143Care and maintenance
Page 147 of 216

■Never remove snow or ice from glass parts using warm or hot water – there
is a risk of cracking in glass.■
Make sure that when removing snow and ice from the windows, the labels
attached to the vehicle by the factory are not damaged.
CAUTION
Information for cleaning windows■Do not clean the inside of the windows with sharp-edged objects or corro-
sive and acidic cleaning agents – there is a risk of damaging the heating ele-
ments or window aerial.■
When drying the windows after washing the vehicle, do not use window
leathers that have been used to polish the bodywork. Residues of preserva-
tives in the chamois leather can smear the windows and reduce visibility.
Headlight glasses
Read and observe
and on page 142 first.
Clean the plastic headlight lenses with clean, warm water and soap.
CAUTION
■The headlights are never to be wiped dry - there is a risk of damaging the
protective lacquer and the headlight glass subsequently developing cracks.■
Do not use sharp objects to clean the glasses - there is a risk of damaging
the protective lacquer and the headlight glasses subsequently developing
cracks.
■
Do not use any aggressive cleaning or chemical solvent products to clean the
headlights – risk of damaging the headlight lenses.
Door closing cylinder
Read and observe
and on page 142 first.
Specific products must be used for de-icing door lock cylinders.
CAUTION
Make sure that as little water as possible gets into the locking cylinder when
washing the vehicle - there is a risk of freezing the lock cylinder!Cavity protection
Read and observe
and on page 142 first.
All the cavities of your vehicle which are at risk from corrosion are protected
for life by a layer of protective wax applied in the factory.
Wax protection does not require to be inspected or re-treated.
If any small amount of wax flow out of the cavities at high temperatures, these
must be removed with a plastic scraper and the stains cleaned using a petrole-
um cleaner.
WARNINGSafety regulations should be observed when using petroleum cleaner to re-
move wax – there is a risk of fire.
Jack
Read and observe
and on page 142 first.
The jack is maintenance-free.
If necessary, the moving parts of the jack should be lubricated with a suitable
lubricant.
Wheels
Read and observe
and on page 142 first.
Wheel rims
Also thoroughly wash the wheel rims when washing the vehicle on a regular
basis.
Regularly remove salt and brake dust otherwise the rim material will be at-
tacked.
Light alloy wheels
After washing thoroughly and treat the wheel rims with a protective product
for light alloy wheels.
For the treatment of wheel rims do not use products which may cause damage
to the paint on the rims.
144General Maintenance
Page 156 of 216
Radiator fanRead and observe
and on page 151 first.
The radiator fan is powered by an electric motor. Operation is controlled ac-
cording to the temperature of the coolant.
WARNINGThe fan can intermittently continue to run for approximately 10 minutes af-
ter the ignition is switched off.
Windscreen washer system
Fig. 146
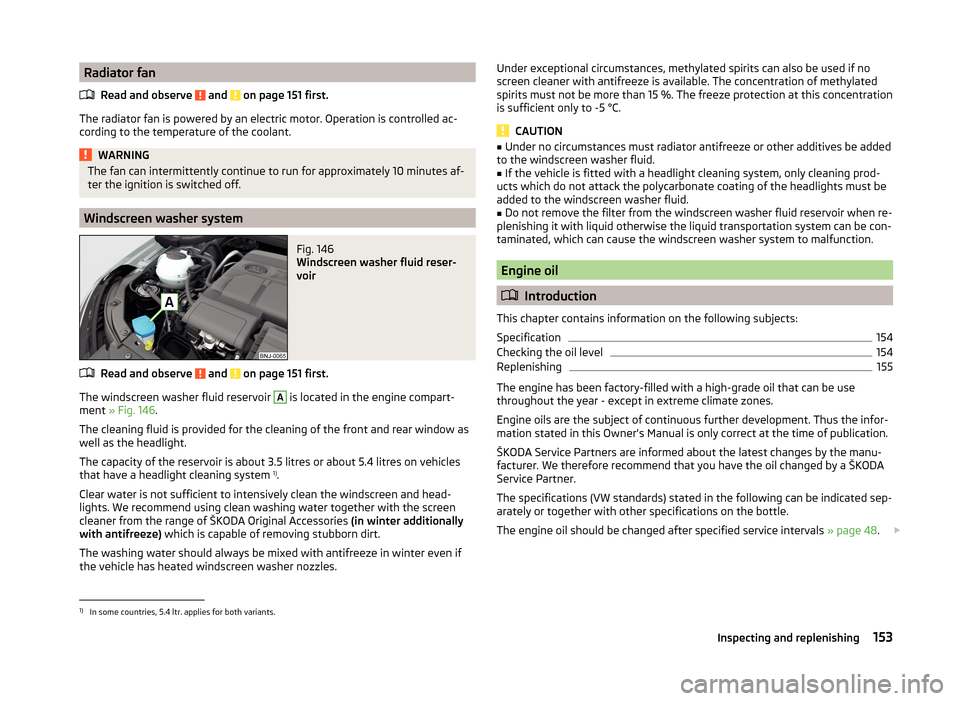
Windscreen washer fluid reser-
voir
Read and observe and on page 151 first.
The windscreen washer fluid reservoir
A
is located in the engine compart-
ment » Fig. 146 .
The cleaning fluid is provided for the cleaning of the front and rear window as
well as the headlight.
The capacity of the reservoir is about 3.5 litres or about 5.4 litres on vehicles
that have a headlight cleaning system 1)
.
Clear water is not sufficient to intensively clean the windscreen and head-
lights. We recommend using clean washing water together with the screen
cleaner from the range of ŠKODA Original Accessories (in winter additionally
with antifreeze) which is capable of removing stubborn dirt.
The washing water should always be mixed with antifreeze in winter even if
the vehicle has heated windscreen washer nozzles.
Under exceptional circumstances, methylated spirits can also be used if no
screen cleaner with antifreeze is available. The concentration of methylated
spirits must not be more than 15 %. The freeze protection at this concentration
is sufficient only to -5 °C.
CAUTION
■ Under no circumstances must radiator antifreeze or other additives be added
to the windscreen washer fluid.■
If the vehicle is fitted with a headlight cleaning system, only cleaning prod-
ucts which do not attack the polycarbonate coating of the headlights must be
added to the windscreen washer fluid.
■
Do not remove the filter from the windscreen washer fluid reservoir when re-
plenishing it with liquid otherwise the liquid transportation system can be con-
taminated, which can cause the windscreen washer system to malfunction.
Engine oil
Introduction
This chapter contains information on the following subjects:
Specification
154
Checking the oil level
154
Replenishing
155
The engine has been factory-filled with a high-grade oil that can be use
throughout the year - except in extreme climate zones.
Engine oils are the subject of continuous further development. Thus the infor-
mation stated in this Owner's Manual is only correct at the time of publication.
ŠKODA Service Partners are informed about the latest changes by the manu-
facturer. We therefore recommend that you have the oil changed by a ŠKODA
Service Partner.
The specifications (VW standards) stated in the following can be indicated sep-
arately or together with other specifications on the bottle.
The engine oil should be changed after specified service intervals » page 48.
1)
In some countries, 5.4 ltr. applies for both variants.
153Inspecting and replenishing