window SKODA FABIA 2014 3.G / NJ User Guide
[x] Cancel search | Manufacturer: SKODA, Model Year: 2014, Model line: FABIA, Model: SKODA FABIA 2014 3.G / NJPages: 216, PDF Size: 30.7 MB
Page 60 of 216
WARNINGPower windows in the driver's door and the rear doors are equipped with a
force limiter (only applies to the Variant 2 ) » page 58 . If there is an obsta-
cle, the closing process is stopped and the window goes down by several
centimetres. The windows should nevertheless be closed carefully – risk of
injury.
CAUTION
■ Keep the windows clean to ensure the correct functionality of the electric
windows.■
In the event that the windows are frozen, first of all eliminate the ice
» page 143 , Windows and external mirrors and only then operate the electrical
power windows. Otherwise, the window sealing and the electrical power win-
dow mechanism could be damaged.
■
In the winter, ice on the window may cause greater resistance as the win-
dow is closed. The window will stop and open again by several centimetres. It
is necessary to deactivate the force limiter to close the window » page 58.
■
Always make sure that the windows are closed when you leave the locked
vehicle.
■
Always close the windows before disconnecting the battery » page 58,
Force limitation .
■
The window lift mechanism is equipped with protection against overheater.
Repeated opening and closing of the window can cause this mechanism to
overheat. If this happens, it will not be possible to operate the window for a
short time. You will be able to operate the window again as soon as the over-
heater protection has cooled down.
For the sake of the environment
At high speeds you should keep the windows closed to prevent unnecessarily high fuel consumption.
Note
When driving always use the existing heater, air conditioning and ventilation
system for ventilating the interior of the vehicle. With the windows open, dust
and other dirt can get into the vehicle. In addition, wind noises can occur at
certain speeds.Open / close windowsFig. 38
Buttons for window-openers Version 1/version 2
Read and observe
and on page 57 first.
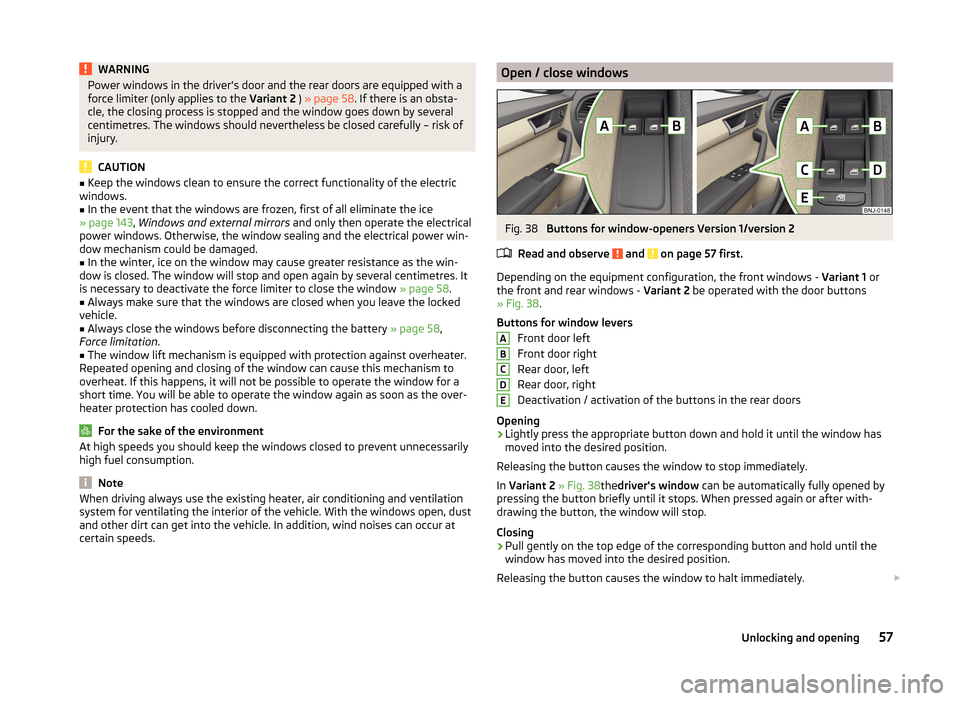
Depending on the equipment configuration, the front windows - Variant 1 or
the front and rear windows - Variant 2 be operated with the door buttons
» Fig. 38 .
Buttons for window levers Front door left
Front door right
Rear door, left
Rear door, right
Deactivation / activation of the buttons in the rear doors
Opening
›
Lightly press the appropriate button down and hold it until the window has
moved into the desired position.
Releasing the button causes the window to stop immediately.
In Variant 2 » Fig. 38thedriver's window can be automatically fully opened by
pressing the button briefly until it stops. When pressed again or after with-
drawing the button, the window will stop.
Closing
›
Pull gently on the top edge of the corresponding button and hold until the
window has moved into the desired position.
Releasing the button causes the window to halt immediately.
ABCDE57Unlocking and opening
Page 61 of 216
In Variant 2 » Fig. 38the driver's window can be automatically closed com-
pletely by drawing the button to the stop. When drawn again or after pressing
the button, the window will stop.
Disable / enable the buttons in the rear doors›
Press the button
E
» Fig. 38 .
When the buttons are disabled in the rear doors, the indicator light
in the
button
E
lights up.
WARNINGIf the rear seats are accommodating people who are not completely inde-
pendent, e.g. children, it is recommended that for safety reasons the but-
tons in the rear doors are disabled with the button E
» Fig. 38 .
Opening the windows in the front passenger door and in the rear
doors
Fig. 39
Window winder button
Read and observe and on page 57 first.
There is a button in the front passenger door and in the rear doors for that
window.
Opening
›
Lightly press the appropriate button down and hold it until the window has
moved into the desired position.
Releasing the button causes the window to halt immediately.
Closing
›
Pull gently on the top edge of the corresponding button and hold until the
window has moved into the desired position.
Releasing the button causes the window to halt immediately.
Force limitation
Only version 2 of the power windows is equipped with the power limiter (does
not apply to the passenger window).
Read and observe
and on page 57 first.
If there is an obstacle, the closing process is stopped and the window goes
down by several centimetres.
If the obstacle prevents the window from being closed during the next 10 sec-
onds, the closing process is interrupted once again and the window goes down
by several centimetres.
If you attempt to close the window again within 10 seconds of the window be-
ing moved down for the second time, even though the obstacle was not yet
been removed, the closing process is only stopped. During this time it is not
possible to automatically close the window. The force limiter is still switched
on.
The force limiter is only switched off if you attempt to close the window again
within the next 10 seconds - the window will now close with full force!
If you wait longer than 10 seconds, the force limiter is switched on again.
WARNING■ Variant 1 of the power window » Fig. 38 on page 57 has no force limiter.
The windows should nevertheless be closed carefully – risk of injury!■
The passenger window in variant 2 of the power window » Fig. 38 on
page 57 has no force limiter. The windows should nevertheless be closed
carefully – risk of injury!
Operational faults
Read and observe
and on page 57 first.
The electric window levers do not work if the vehicle battery has been discon-nected and connected again while a window was open. The system must be
activated.
Activation sequence:
›
Switch on the ignition.
›
Pull the top edge of the button and close the window.
›
Release the button.
58Operation
Page 62 of 216
›Pull the relevant button upwards again for approx. 1 seconds, and keep it
pressed down.
Mechanical windows
Introduction
This chapter contains information on the following subjects:
Opening / closing windows
59
The window can be operated mechanically by the winder attached to the re-
spective door panel.
WARNINGThe windows should be closed carefully – risk of injury!
CAUTION
■ In the event that the windows are frozen, first of all eliminate the ice
» page 143 , Windows and external mirrors and only then operate the electri-
cal power windows. Otherwise, the window sealing and the electrical power
window mechanism could be damaged.■
Always make sure that the windows are closed when you leave the locked
vehicle.
For the sake of the environment
At high speeds, you should keep the windows closed to prevent unnecessarily high fuel consumption.
Note
When driving always use the existing heater, air conditioning and ventilation
system for ventilating the interior of the vehicle. If the windows are opened,
dust as well as other dirt can get into the vehicle and in addition the wind
noise is more at certain speeds.Opening / closing windowsFig. 40
Window operations: left/right
Read and observe
and on page 59 first.
Only one window can be operated mechanically at a time.
Opening
Turn the winder in the direction of arrow
A
» Fig. 40 .
Closing
Turn the winder in the direction of the arrow
B
» Fig. 40 .
59Unlocking and opening
Page 69 of 216
The system is turned off when any of the following is present.
› The vehicle is locked.
› The ignition is switched on.
› About 30 seconds after all the doors have been closed.
Rear interior light
Fig. 47
Interior lights at the rear
Positions of the lens of the rear light
» Fig. 47
Switching on
Operate using the door contact switch (middle position) 1)
Switching off
Visibility
Introduction
This chapter contains information on the following subjects:
Rear window heater
66
Sun visors in the front
67
Sun screen of the panoramic roof
67Rear window heaterFig. 48
Button for rear window heater
The heater for quick defrosting and ventilation of the rear window.
Button in the centre console » Fig. 48
Switching the rear window heater on/off
When the heater is switched on, a lamp lights up inside the button.
The heater only works when the engine is running.
The heater automatically switches off after approximately 10 minutes.
If the heater of the motor is switched off with the heater turned on and then
started again within 15 minutes again, the heater is continued. The start of the
time limit for the Auto Off is counted before switching off the engine already
from switching on the heater.
For the sake of the environment
The heater should be switched off as soon as the window is de-iced or free
from mist. The reduced current consumption will have a favourable effect on
fuel economy.
Note
If the on-board voltage drops, the heater switches off automatically, in order
to provide sufficient electrical energy for the engine control » page 160, Auto-
matic load deactivation .1)
In this position, apply the same rules to the rear interior light as for the front interior light » page 65.
66Operation
Page 70 of 216
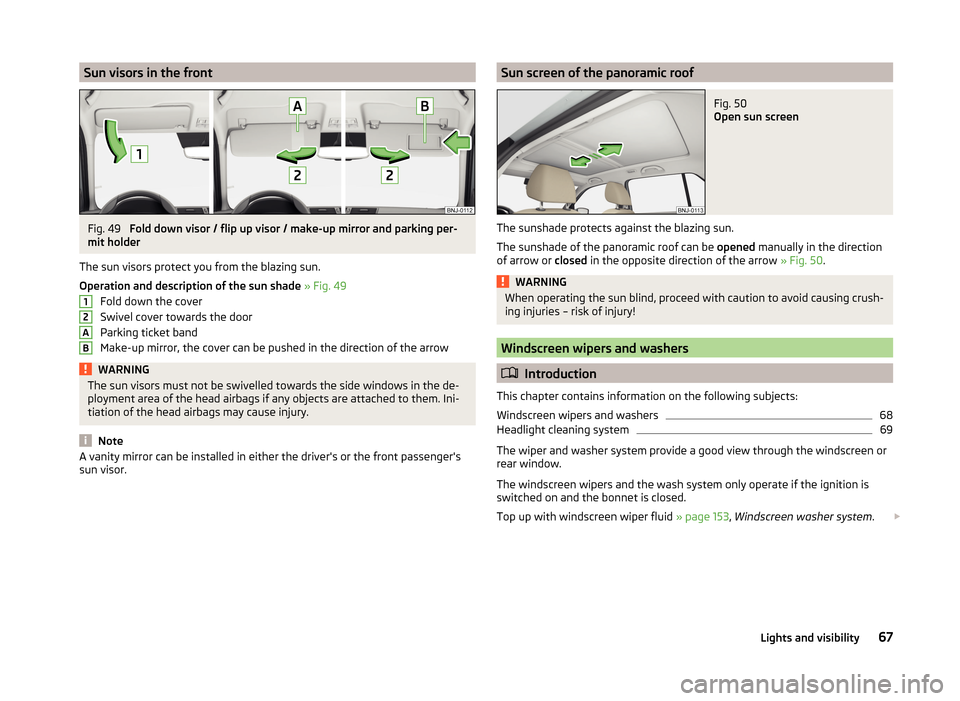
Sun visors in the frontFig. 49
Fold down visor / flip up visor / make-up mirror and parking per-
mit holder
The sun visors protect you from the blazing sun.
Operation and description of the sun shade » Fig. 49
Fold down the cover
Swivel cover towards the door
Parking ticket band
Make-up mirror, the cover can be pushed in the direction of the arrow
WARNINGThe sun visors must not be swivelled towards the side windows in the de-
ployment area of the head airbags if any objects are attached to them. Ini-
tiation of the head airbags may cause injury.
Note
A vanity mirror can be installed in either the driver's or the front passenger's
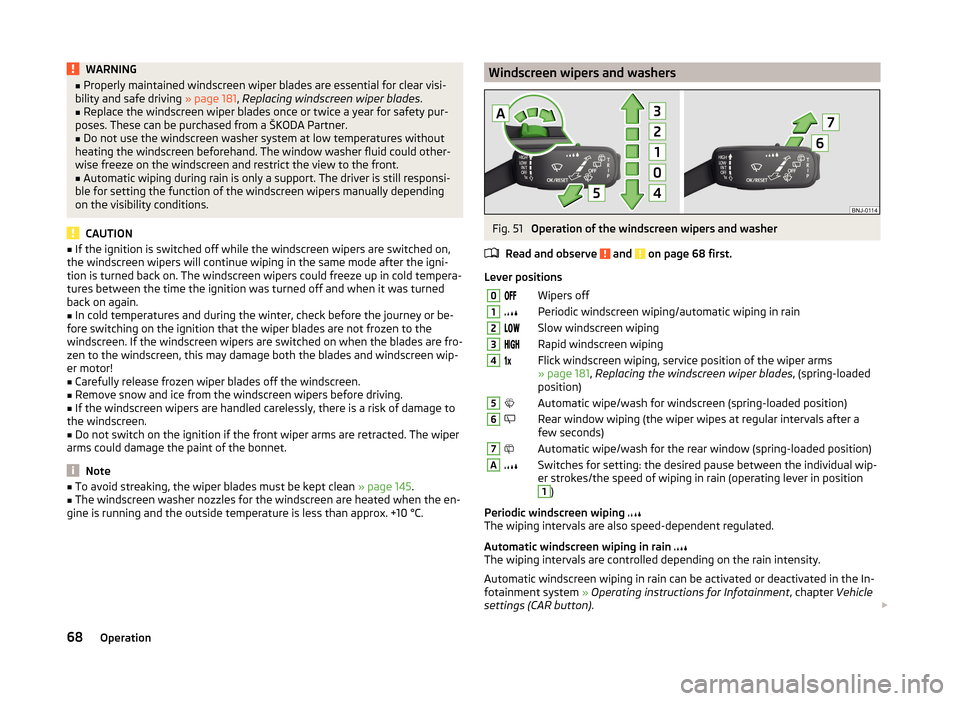
sun visor.12ABSun screen of the panoramic roofFig. 50
Open sun screen
The sunshade protects against the blazing sun.
The sunshade of the panoramic roof can be opened manually in the direction
of arrow or closed in the opposite direction of the arrow » Fig. 50.
WARNINGWhen operating the sun blind, proceed with caution to avoid causing crush-
ing injuries – risk of injury!
Windscreen wipers and washers
Introduction
This chapter contains information on the following subjects:
Windscreen wipers and washers
68
Headlight cleaning system
69
The wiper and washer system provide a good view through the windscreen or
rear window.
The windscreen wipers and the wash system only operate if the ignition is
switched on and the bonnet is closed.
Top up with windscreen wiper fluid » page 153, Windscreen washer system .
67Lights and visibility
Page 71 of 216
WARNING■Properly maintained windscreen wiper blades are essential for clear visi-
bility and safe driving » page 181, Replacing windscreen wiper blades .■
Replace the windscreen wiper blades once or twice a year for safety pur-
poses. These can be purchased from a ŠKODA Partner.
■
Do not use the windscreen washer system at low temperatures without
heating the windscreen beforehand. The window washer fluid could other-
wise freeze on the windscreen and restrict the view to the front.
■
Automatic wiping during rain is only a support. The driver is still responsi-
ble for setting the function of the windscreen wipers manually depending
on the visibility conditions.
CAUTION
■ If the ignition is switched off while the windscreen wipers are switched on,
the windscreen wipers will continue wiping in the same mode after the igni-
tion is turned back on. The windscreen wipers could freeze up in cold tempera-
tures between the time the ignition was turned off and when it was turned
back on again.■
In cold temperatures and during the winter, check before the journey or be-
fore switching on the ignition that the wiper blades are not frozen to the
windscreen. If the windscreen wipers are switched on when the blades are fro-
zen to the windscreen, this may damage both the blades and windscreen wip-
er motor!
■
Carefully release frozen wiper blades off the windscreen.
■
Remove snow and ice from the windscreen wipers before driving.
■
If the windscreen wipers are handled carelessly, there is a risk of damage to
the windscreen.
■
Do not switch on the ignition if the front wiper arms are retracted. The wiper
arms could damage the paint of the bonnet.
Note
■ To avoid streaking, the wiper blades must be kept clean » page 145.■The windscreen washer nozzles for the windscreen are heated when the en-
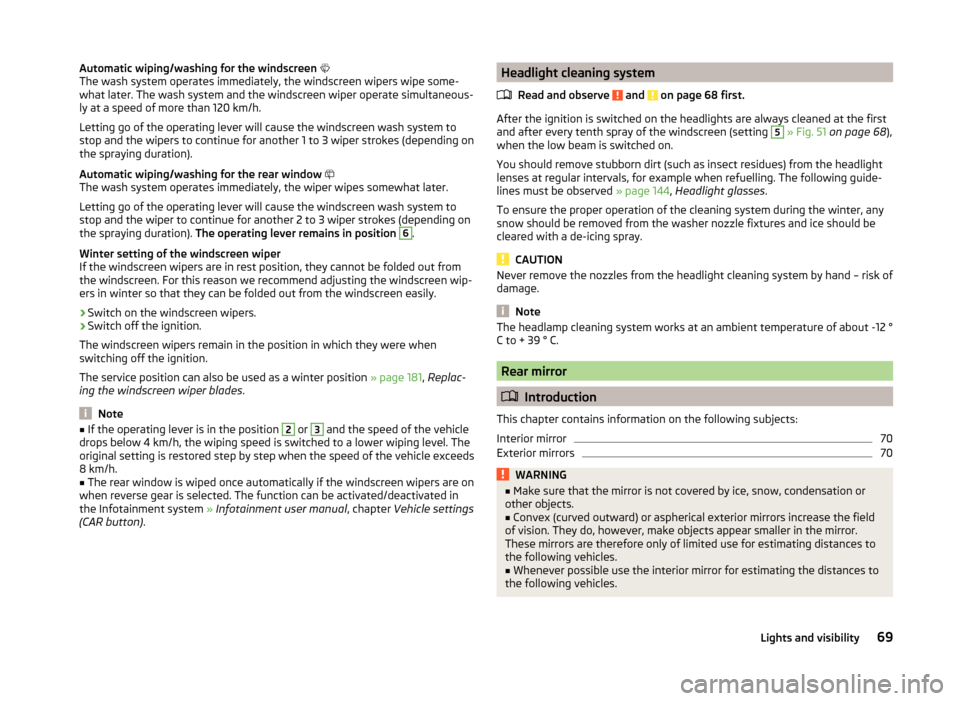
gine is running and the outside temperature is less than approx. +10 °C.Windscreen wipers and washersFig. 51
Operation of the windscreen wipers and washer
Read and observe
and on page 68 first.
Lever positions
0Wipers off1Periodic windscreen wiping/automatic wiping in rain2Slow windscreen wiping3Rapid windscreen wiping4 Flick windscreen wiping, service position of the wiper arms
» page 181 , Replacing the windscreen wiper blades , (spring-loaded
position)5Automatic wipe/wash for windscreen (spring-loaded position)6Rear window wiping (the wiper wipes at regular intervals after a
few seconds)7Automatic wipe/wash for the rear window (spring-loaded position)ASwitches for setting: the desired pause between the individual wip-
er strokes/the speed of wiping in rain (operating lever in position1
)
Periodic windscreen wiping
The wiping intervals are also speed-dependent regulated.
Automatic windscreen wiping in rain
The wiping intervals are controlled depending on the rain intensity.
Automatic windscreen wiping in rain can be activated or deactivated in the In-
fotainment system » Operating instructions for Infotainment , chapter Vehicle
settings (CAR button) .
68Operation
Page 72 of 216
Automatic wiping/washing for the windscreen
The wash system operates immediately, the windscreen wipers wipe some-
what later. The wash system and the windscreen wiper operate simultaneous-
ly at a speed of more than 120 km/h.
Letting go of the operating lever will cause the windscreen wash system to
stop and the wipers to continue for another 1 to 3 wiper strokes (depending on
the spraying duration).
Automatic wiping/washing for the rear window
The wash system operates immediately, the wiper wipes somewhat later.
Letting go of the operating lever will cause the windscreen wash system to
stop and the wiper to continue for another 2 to 3 wiper strokes (depending on
the spraying duration). The operating lever remains in position 6
.
Winter setting of the windscreen wiper
If the windscreen wipers are in rest position, they cannot be folded out from
the windscreen. For this reason we recommend adjusting the windscreen wip-
ers in winter so that they can be folded out from the windscreen easily.
› Switch on the windscreen wipers.
› Switch off the ignition.
The windscreen wipers remain in the position in which they were when
switching off the ignition.
The service position can also be used as a winter position » page 181, Replac-
ing the windscreen wiper blades .
Note
■
If the operating lever is in the position 2 or 3 and the speed of the vehicle
drops below 4 km/h, the wiping speed is switched to a lower wiping level. The
original setting is restored step by step when the speed of the vehicle exceeds
8 km/h.■
The rear window is wiped once automatically if the windscreen wipers are on
when reverse gear is selected. The function can be activated/deactivated in
the Infotainment system » Infotainment user manual , chapter Vehicle settings
(CAR button) .
Headlight cleaning system
Read and observe
and on page 68 first.
After the ignition is switched on the headlights are always cleaned at the first
and after every tenth spray of the windscreen (setting
5
» Fig. 51 on page 68 ),
when the low beam is switched on.
You should remove stubborn dirt (such as insect residues) from the headlight
lenses at regular intervals, for example when refuelling. The following guide-
lines must be observed » page 144, Headlight glasses .
To ensure the proper operation of the cleaning system during the winter, any
snow should be removed from the washer nozzle fixtures and ice should be
cleared with a de-icing spray.
CAUTION
Never remove the nozzles from the headlight cleaning system by hand – risk of
damage.
Note
The headlamp cleaning system works at an ambient temperature of about -12 °
C to + 39 ° C.
Rear mirror
Introduction
This chapter contains information on the following subjects:
Interior mirror
70
Exterior mirrors
70WARNING■ Make sure that the mirror is not covered by ice, snow, condensation or
other objects.■
Convex (curved outward) or aspherical exterior mirrors increase the field
of vision. They do, however, make objects appear smaller in the mirror.
These mirrors are therefore only of limited use for estimating distances to
the following vehicles.
■
Whenever possible use the interior mirror for estimating the distances to
the following vehicles.
69Lights and visibility
Page 73 of 216
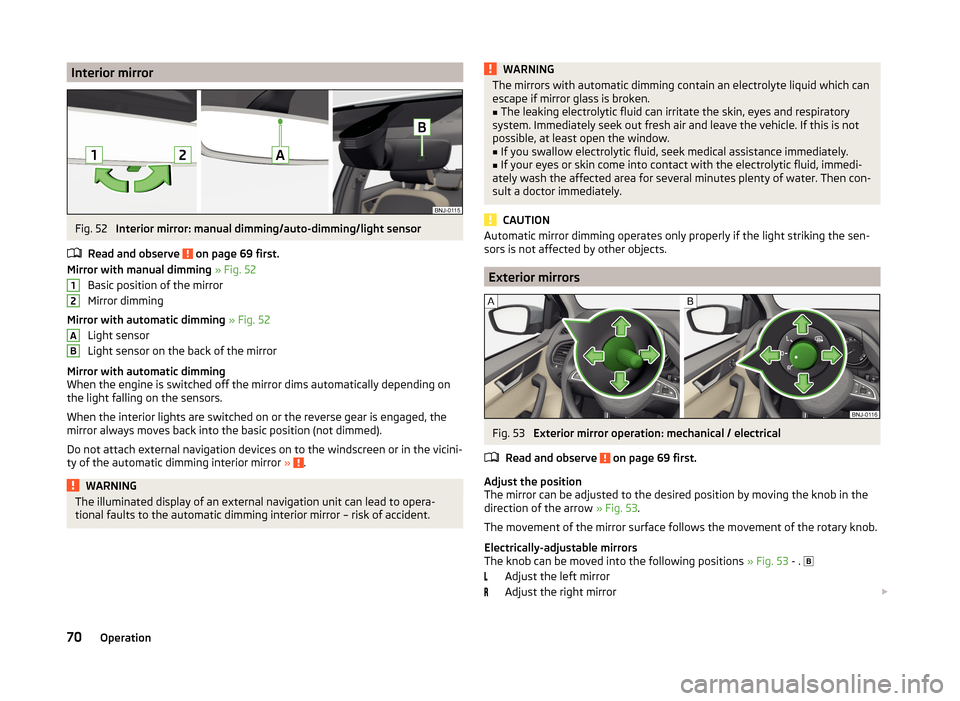
Interior mirrorFig. 52
Interior mirror: manual dimming/auto-dimming/light sensor
Read and observe
on page 69 first.
Mirror with manual dimming » Fig. 52
Basic position of the mirror
Mirror dimming
Mirror with automatic dimming » Fig. 52
Light sensor
Light sensor on the back of the mirror
Mirror with automatic dimming
When the engine is switched off the mirror dims automatically depending on
the light falling on the sensors.
When the interior lights are switched on or the reverse gear is engaged, the
mirror always moves back into the basic position (not dimmed).
Do not attach external navigation devices on to the windscreen or in the vicini-
ty of the automatic dimming interior mirror »
.
WARNINGThe illuminated display of an external navigation unit can lead to opera-
tional faults to the automatic dimming interior mirror – risk of accident.12ABWARNINGThe mirrors with automatic dimming contain an electrolyte liquid which can
escape if mirror glass is broken.■
The leaking electrolytic fluid can irritate the skin, eyes and respiratory
system. Immediately seek out fresh air and leave the vehicle. If this is not
possible, at least open the window.
■
If you swallow electrolytic fluid, seek medical assistance immediately.
■
If your eyes or skin come into contact with the electrolytic fluid, immedi-
ately wash the affected area for several minutes plenty of water. Then con-
sult a doctor immediately.
CAUTION
Automatic mirror dimming operates only properly if the light striking the sen-
sors is not affected by other objects.
Exterior mirrors
Fig. 53
Exterior mirror operation: mechanical / electrical
Read and observe
on page 69 first.
Adjust the position
The mirror can be adjusted to the desired position by moving the knob in the
direction of the arrow » Fig. 53.
The movement of the mirror surface follows the movement of the rotary knob.
Electrically-adjustable mirrors
The knob can be moved into the following positions » Fig. 53 - .
Adjust the left mirror
Adjust the right mirror
70Operation
Page 74 of 216
Switch off mirror control
Mirror heater
Folding in the exterior mirrors
The whole exterior mirror can be manually folded towards the side windows.
To restore it to its original position, fold back from the side window until it au-
dibly clicks into place.WARNINGDo not touch the exterior mirror surfaces if the exterior mirror heater is
switched on - risk of burns.
Note
■ The mirror heater only operates when the engine is running and up to an
outside temperature of +35 ℃.■
If the electrical mirror setting fails at any time, the mirrors can be adjusted by
hand by pressing on the edge of the mirror surface.
Seats and headrests
Seats and headrests
Introduction
This chapter contains information on the following subjects:
Adjusting the front seats
72
Headrests - adjusting height
72
Headrests - removing and installing
73
The driver's seat should be adjusted in such a way that the pedals can be fully
pressed to the floor with slightly bent legs.
The seat backrest on the driver's seat should be adjusted in such a way that the upper point of the steering wheel can be easily reached with slightly bent
arms.
Correct adjustment of the seats is particularly important for the following rea-
sons.
› Reaching the controls safely and quickly.
› A relaxed and fatigue-free body position.
› Achieving the maximum protection offered by the seat belts and the airbag
system.
WARNING■ Only adjust the driver's seat when the vehicle is stationary – risk of acci-
dent.■
Caution when adjusting the seat! You may suffer crushing injuries as a re-
sult of adjusting the seat without paying proper attention.
■
Never carry more people than the number of seats in the vehicle.
■
Do not transport any objects on the front passenger seat other than ob-
jects intended for this purpose (e.g. child safety seat) – risk of accident.
Note
After a certain time, play can develop within the adjustment mechanism for
the backrest angle.71Seats and headrests
Page 88 of 216
WARNING (Continued)■Do not drive with the luggage compartment lid open or unlatched, other-
wise exhaust gases may get into the interior of the vehicle – risk of poison-
ing!■
Do not exceed the permissible axle loads and permissible gross weight of
the vehicle – risk of accident!
■
Do not transport people in the boot!
CAUTION
■ Please ensure that the heating elements for the rear window heater are not
damaged as a result of abrasive objects.■
Tyre pressure must be adjusted to the load » page 162.
Fastening elements
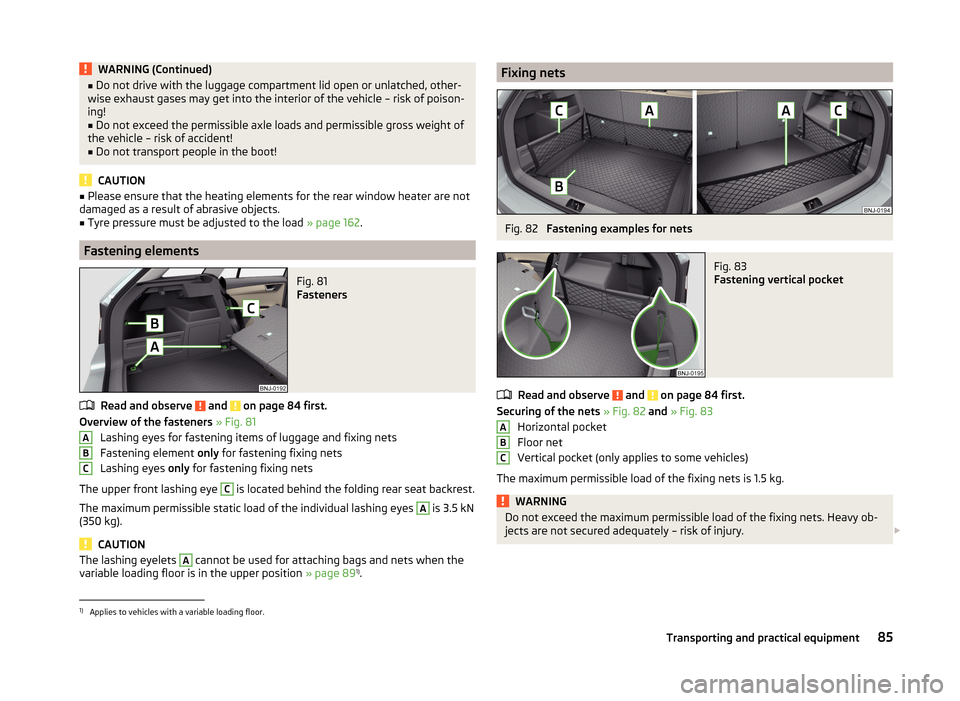
Fig. 81
Fasteners
Read and observe and on page 84 first.
Overview of the fasteners » Fig. 81
Lashing eyes for fastening items of luggage and fixing nets
Fastening element only for fastening fixing nets
Lashing eyes only for fastening fixing nets
The upper front lashing eye
C
is located behind the folding rear seat backrest.
The maximum permissible static load of the individual lashing eyes
A
is 3.5 kN
(350 kg).
CAUTION
The lashing eyelets A cannot be used for attaching bags and nets when the
variable loading floor is in the upper position » page 891)
.ABCFixing netsFig. 82
Fastening examples for nets
Fig. 83
Fastening vertical pocket
Read and observe and on page 84 first.
Securing of the nets » Fig. 82 and » Fig. 83
Horizontal pocket
Floor net
Vertical pocket (only applies to some vehicles)
The maximum permissible load of the fixing nets is 1.5 kg.
WARNINGDo not exceed the maximum permissible load of the fixing nets. Heavy ob-
jects are not secured adequately – risk of injury. ABC1)
Applies to vehicles with a variable loading floor.
85Transporting and practical equipment