Break SKODA FABIA 2016 3.G / NJ User Guide
[x] Cancel search | Manufacturer: SKODA, Model Year: 2016, Model line: FABIA, Model: SKODA FABIA 2016 3.G / NJPages: 196, PDF Size: 31.86 MB
Page 125 of 196

CAUTION■Place the tow bar in the standby position, with the key upwards, and store in
the box - otherwise there is a risk of damage to the key!■
Do not use excessive force when handling the operating lever (e.g. do not
step on it).
Vertical load with mounted accessories
Fig. 161
Representation of the maximum
length of the mounted accesso-
ries and the permissible total
weight of the accessory depend-
ing on the load centre of gravity
Read and observe on page 119 first.
When using the accessories (e.g. bicycle carrier), the maximum length and the
permissible total weight including load must be considered.
The maximum length of the mounted accessories (from the ball of the towing
device) is 70 cm » Fig. 161 .
The total permitted weight of the accessories including load changes with in-
creasing distance of the load centre of gravity from the ball head of the towing
device.
Distance of the load centre of gravity from the ball headPermissible total weight of the ac-cessories, including load0 cm50 kg30 cm50 kg60 cm25 kg70 cm0 kg
CAUTION
Never exceed the permissible total weight of the accessories incl. load and
maximum length of the accessories - risk of damage to the towing device.NoteWe recommend that you use the accessories from ŠKODA Original Accessories.
Using hitch
Trailer (accessory) connect and disconnect
Fig. 162
Housing of the 13 pin socket,
safety eyelet
Connect and disconnect
›
Install the ball bar and the remove the protective cap
3
» Fig. 150 on page 119
lose weight.
›
Place the trailer (the accessory) onto the tow ball.
›
Plug the trailer cable into 13-pin socket
A
» Fig. 162 . (If the trailer / accesso-
ries have a 7-pin connector, use a corresponding reduction piece from the
ŠKODA Original Accessories).
›
Suspend the breakaway cable of the trailer at the safety eyelet
B
(the
breakaway cable must sag in all trailer settings in view of the vehicle).
Uncoupling takes place in reverse order.
Exterior mirrors
You should have additional exterior mirrors fitted if you are not able to see the
traffic behind the trailer using the standard rear-view mirrors.
Headlights
The front of the vehicle may lift up when a trailer (accessory) is being towed
and the headlights may dazzle other road users. Set the range of the head-
lights » page 53 , Operating the lights .
Power supply of the trailer / accessory power system
In the electrical connection between the vehicle and trailer (accessory), the
trailer (accessories) is supplied with power from the vehicle (with ignition
switched on and off).
123Towing device and trailer
Page 152 of 196

Fire extinguisherFig. 179
Release the fire extinguisher
The fire extinguisher is attached by two straps in a bracket under the front
passenger's seat.
›
To remove the fire extinguisher, release the safety catches on the two belts
in the direction of arrow » Fig. 179and remove the fire extinguisher.
›
To secure , place the fire extinguisher back in the mount and secure with the
belts.
The Owner´s Manual is fitted next to the fire extinguisher.
Pay attention to the expiration date of the fire extinguisher. After this date,
the correct function of the device is not guaranteed.
WARNINGAlways properly secure the fire extinguisher, there is a risk of injury in the
event of sudden braking or a vehicle collision.Vehicle tool kitFig. 180
Vehicle tool kit
The box with the tool kit is located in the storage compartment for the spare
wheel and may be secured with tape, depending on specification.
Depending on the equipment, not all of the following components in the on-
board tool kit have to be contained in it.
Screwdriver
Top section for the anti-theft wheel bolts
Towing eye
Clamps for removing the wheel trims
Jack with sign
Wheel brace
Extraction pliers for the wheel bolt caps
Breakdown kit
WARNING■ The factory-supplied lifting jack is only intended for your model of vehicle.
Under no circumstances attempt to lift other vehicles or loads with it –
there is a risk of injury.■
Always stow the tool safely in the box and make sure that it is attached
with the belt to the spare wheel - otherwise it could cause injury to the oc-
cupants if breaking suddenly or colliding with another vehicle.
12345678150Do-it-yourself
Page 156 of 196

Fig. 186
Attach lifting jack
The procedure for lifting the vehicle is valid for all body versions.
Before the vehicle is raised, please take note of the safety instructions »
.
To lift the vehicle, us the jack from the tool kit. Position the car jack at the
jacking point closest to the flat tyre.
The jacking points are located on the lower sill » Fig. 185.
›
Position the base plate of the jack with its full area resting on level ground
and ensure that the jack will fit in the jacking point when raised » Fig. 186 -
.
›
Use the crank to raise the jack until its pawl covers the jacking
point » Fig. 186 -
.
›
Raise the vehicle until the wheel is a little off the floor.
WARNINGThe following instructions must be observed, otherwise there is risk of in-
jury.■
Ensure the vehicle cannot unexpectedly roll away.
■
Always ensure the base plate of the lifting jack cannot slip.
■ Place a wide and stable base material under the jack if on a loose surfa-
ces (e.g. gravel).
■ Place an anti-slip base material (e.g. a rubber mat) under the jack if on a
smooth surface (e.g. cobblestones).
■
Always raise the vehicle with the doors closed.
■
Never position any body parts (e.g. arms or legs) under the vehicle while
the vehicle is raised.
■
When the vehicle is raised, never start the engine.
CAUTIONIt is important to ensure that the jack is correctly positioned against the bar of
the lower beam - otherwise there is a risk of damage to the vehicle.
Breakdown kit
Introduction
This chapter contains information on the following subjects:
Description of the breakdown kit
155
Preparing to use the breakdown kit
155
Sealing and inflating tyres
155
Information on driving with repaired tyres
156
The following information applies for the breakdown kit supplied ex-factory.
The breakdown kit can be used to seal punctures with a diameter of up to
about 4 mm.
A repair made using the breakdown kit is never intended to replace a perma-
nent repair on the tyre. Its purpose is to get you to the nearest specialist ga-
rage.
Replace the tyre that was repaired using the breakdown kit as soon as possi-
ble, or consult a specialist garage about repair options.
Do not remove foreign bodies which have penetrated into the tyre (e.g. nails).
Do not use the breakdown kit in the following cases.
▶ The rim is damaged.
▶ The outside temperature is below -20 ° C.
▶ Tyre punctures greater than 4 mm.
▶ Damage to the tyre wall.
▶ The use-by date (see inflation bottle) has passed.
WARNING■ If there is skin contact with the sealant wash the affected area immedi-
ately.■
Observe the manufacturer's usage instructions for the breakdown kit.
154Do-it-yourself
Page 157 of 196
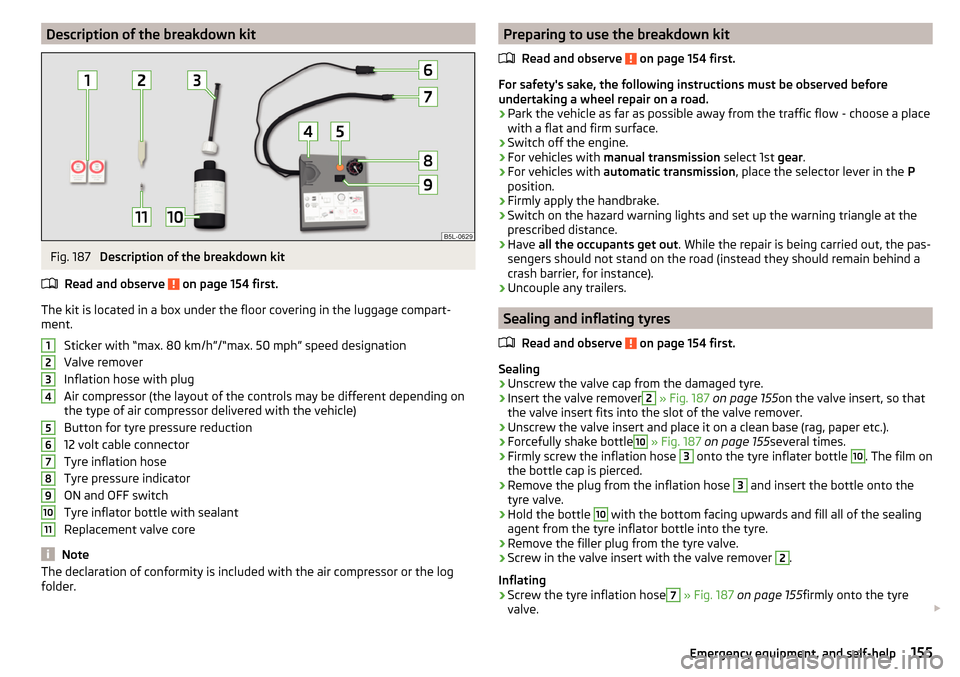
Description of the breakdown kitFig. 187
Description of the breakdown kit
Read and observe
on page 154 first.
The kit is located in a box under the floor covering in the luggage compart-
ment.
Sticker with “max. 80 km/h”/“max. 50 mph” speed designation
Valve remover
Inflation hose with plug
Air compressor (the layout of the controls may be different depending on
the type of air compressor delivered with the vehicle)
Button for tyre pressure reduction
12 volt cable connector
Tyre inflation hose
Tyre pressure indicator
ON and OFF switch
Tyre inflator bottle with sealant
Replacement valve core
Note
The declaration of conformity is included with the air compressor or the log
folder.1234567891011Preparing to use the breakdown kit
Read and observe
on page 154 first.
For safety's sake, the following instructions must be observed before
undertaking a wheel repair on a road.
›
Park the vehicle as far as possible away from the traffic flow - choose a place
with a flat and firm surface.
›
Switch off the engine.
›
For vehicles with manual transmission select 1st gear.
›
For vehicles with automatic transmission , place the selector lever in the P
position.
›
Firmly apply the handbrake.
›
Switch on the hazard warning lights and set up the warning triangle at the
prescribed distance.
›
Have all the occupants get out . While the repair is being carried out, the pas-
sengers should not stand on the road (instead they should remain behind a
crash barrier, for instance).
›
Uncouple any trailers.
Sealing and inflating tyres
Read and observe
on page 154 first.
Sealing
›
Unscrew the valve cap from the damaged tyre.
›
Insert the valve remover
2
» Fig. 187 on page 155 on the valve insert, so that
the valve insert fits into the slot of the valve remover.
›
Unscrew the valve insert and place it on a clean base (rag, paper etc.).
›
Forcefully shake bottle
10
» Fig. 187 on page 155 several times.
›
Firmly screw the inflation hose
3
onto the tyre inflater bottle
10
. The film on
the bottle cap is pierced.
›
Remove the plug from the inflation hose
3
and insert the bottle onto the
tyre valve.
›
Hold the bottle
10
with the bottom facing upwards and fill all of the sealing
agent from the tyre inflator bottle into the tyre.
›
Remove the filler plug from the tyre valve.
›
Screw in the valve insert with the valve remover
2
.
Inflating
›
Screw the tyre inflation hose
7
» Fig. 187 on page 155 firmly onto the tyre
valve.
155Emergency equipment, and self-help
Page 158 of 196
›For vehicles with
manual transmission , set the lever in the neutral position.›On vehicles with automatic transmission , place the selector lever in the P
position.›
Start the engine.
›
Plug the connector
6
into 12 volt socket » page 70.
›
Switch on the air compressor with the ON and OFF switch
9
.
›
Once tyre inflation pressure of 2.0-2.5 bar has been reached, turn off the air
compressor. Maximum run time of 6 minutes » .
›
If you cannot reach an air pressure of 2.0 - 2.5 bar, unscrew the tyre inflation
hose
7
from the tyre valve.
›
Drive the vehicle 10 metres forwards or backwards to allow the sealing agent
to “distribute” in the tyre.
›
Firmly screw the tyre inflation hose
7
back onto the tyre valve and repeat
the inflation process.
›
Stick the corresponding sticker
1
» Fig. 187 on page 155 on the dashboard in
the driver's field of view.
At a tyre inflation pressure of 2.0–2.5 bar, the journey can be continued at a maximum speed of 80 km/h or 50 mph.
WARNING■ If the tire does not inflate at least. 2.0 bar, the damage is too great. The
sealing agent cannot be used to seal the tyre. Stop driving! Seek help
from a specialist garage.■
The tyre inflation hose and air compressor may get hot while the tyre is
being inflated – there is a risk of injury.
CAUTION
Switch off the air compressor if it has been running for as much as 6 minutes –
risk of damage to the compressor! Allow the air compressor to cool a few mi-
nutes before switching it on again.
Information on driving with repaired tyres
Read and observe
on page 154 first.
The filling pressure of the repaired tyre is a 10-minute test drive.
If the tyre pressure is 1.3 bar or less
›
You cannot properly seal the tyre using the breakdown kit.
Do not contin-
ue to drive! Seek help from a specialist garage.
If the tyre pressure is 1.3 bar or more›Set the tyre pressure back to the correct value » page 146.›
Continue driving carefully to the nearest specialist garage at a maximum
speed of 80 km/h (50 mph).
WARNINGA tyre filled with sealant has the same driving characteristics as a standard
tyre. The following guidelines must therefore be observed.■
Do not drive faster than 80 km/h (50 mph).
■
Avoid accelerating at full throttle, sharp braking and fast cornering.
Jump-starting
Introduction
This chapter contains information on the following subjects:
Jump-starting using the battery from another vehicle
157WARNING■ The following instructions must be followed at all times when working on
the engine compartment » page 137.■
When handling the vehicle battery, the following warnings must be ob-
served » page 142 .
■
A discharged vehicle battery can freeze at temperatures just below 0 °C.
If the battery is frozen, do not carry out a jump start with the battery of an-
other vehicle – risk of explosion and injury!
■
Never jump-start vehicle batteries with an electrolyte level that is too low
– risk of explosion and caustic burns!
156Do-it-yourself
Page 159 of 196
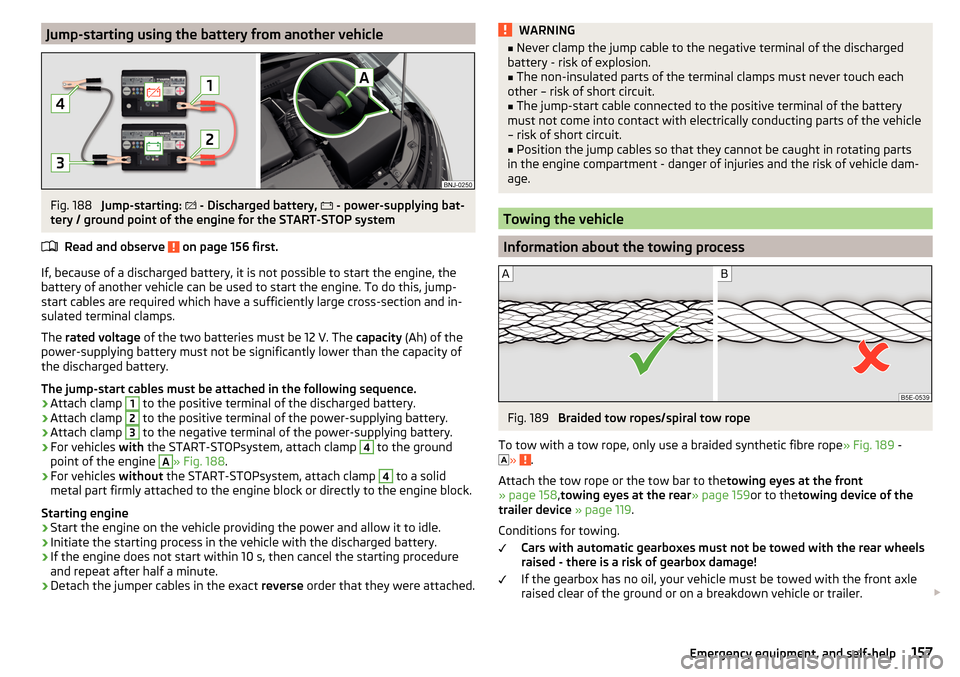
Jump-starting using the battery from another vehicleFig. 188
Jump-starting:
- Discharged battery,
- power-supplying bat-
tery / ground point of the engine for the START-STOP system
Read and observe
on page 156 first.
If, because of a discharged battery, it is not possible to start the engine, the
battery of another vehicle can be used to start the engine. To do this, jump-
start cables are required which have a sufficiently large cross-section and in-
sulated terminal clamps.
The rated voltage of the two batteries must be 12 V. The capacity (Ah) of the
power-supplying battery must not be significantly lower than the capacity of
the discharged battery.
The jump-start cables must be attached in the following sequence.
›
Attach clamp
1
to the positive terminal of the discharged battery.
›
Attach clamp
2
to the positive terminal of the power-supplying battery.
›
Attach clamp
3
to the negative terminal of the power-supplying battery.
›
For vehicles with the START-STOPsystem, attach clamp
4
to the ground
point of the engine
A
» Fig. 188 .
›
For vehicles without the START-STOPsystem, attach clamp
4
to a solid
metal part firmly attached to the engine block or directly to the engine block.
Starting engine
›
Start the engine on the vehicle providing the power and allow it to idle.
›
Initiate the starting process in the vehicle with the discharged battery.
›
If the engine does not start within 10 s, then cancel the starting procedure
and repeat after half a minute.
›
Detach the jumper cables in the exact reverse order that they were attached.
WARNING■
Never clamp the jump cable to the negative terminal of the discharged
battery - risk of explosion.■
The non-insulated parts of the terminal clamps must never touch each
other – risk of short circuit.
■
The jump-start cable connected to the positive terminal of the battery
must not come into contact with electrically conducting parts of the vehicle
– risk of short circuit.
■
Position the jump cables so that they cannot be caught in rotating parts
in the engine compartment - danger of injuries and the risk of vehicle dam-
age.
Towing the vehicle
Information about the towing process
Fig. 189
Braided tow ropes/spiral tow rope
To tow with a tow rope, only use a braided synthetic fibre rope » Fig. 189 -
»
.
Attach the tow rope or the tow bar to the towing eyes at the front
» page 158 ,towing eyes at the rear » page 159or to thetowing device of the
trailer device » page 119 .
Conditions for towing. Cars with automatic gearboxes must not be towed with the rear wheels
raised - there is a risk of gearbox damage!
If the gearbox has no oil, your vehicle must be towed with the front axle
raised clear of the ground or on a breakdown vehicle or trailer.
157Emergency equipment, and self-help
Page 160 of 196
The maximum towing speed is 50 km/h.
The vehicle must be transported on a special breakdown vehicle or trailer
if it is not possible to tow the vehicle in the way described or if the towing
distance is greater than 50 km.
Driver of the tow vehicle›
On vehicles with manual transmission , engage gear slowly when starting.
›
On vehicles with automatic transmission , accelerate with particular care.
›
Only then, approach correctly when the rope is taut.
Driver of the towed vehicle
›
If possible, the vehicle should be towed with the engine running. The brake
booster and power steering only operate if the engine is running, otherwise
much greater force has to be applied to the brake pedal and more power has
to be expended for steering.
›
If it is not possible to start the engine, switch on the ignition so that the
steering wheel does not lock and so that the turn signal lights, windscreen
wipers and windscreen washer system can be used.
›
Take the vehicle out of gear or move the selector lever into position N if the
vehicle is fitted with an automatic gearbox.
›
Keep the tow rope taut at all times during the towing procedure.
WARNING■ Spiral tow ropes must not be used for towing » Fig. 189- , the towing
eye may unscrew out of the vehicle - There is a risk of an accident.■
The tow rope should not be twisted - risk of accident.
CAUTION
■ Do not tow-start the engine – There is a risk of damaging the engine. The
battery from another vehicle can be used as a jump-start aid » page 156, Jump-
starting .■
For off-road towing manoeuvres, there is a risk to both vehicles that the fas-
teners may become overloaded and damaged.
Note
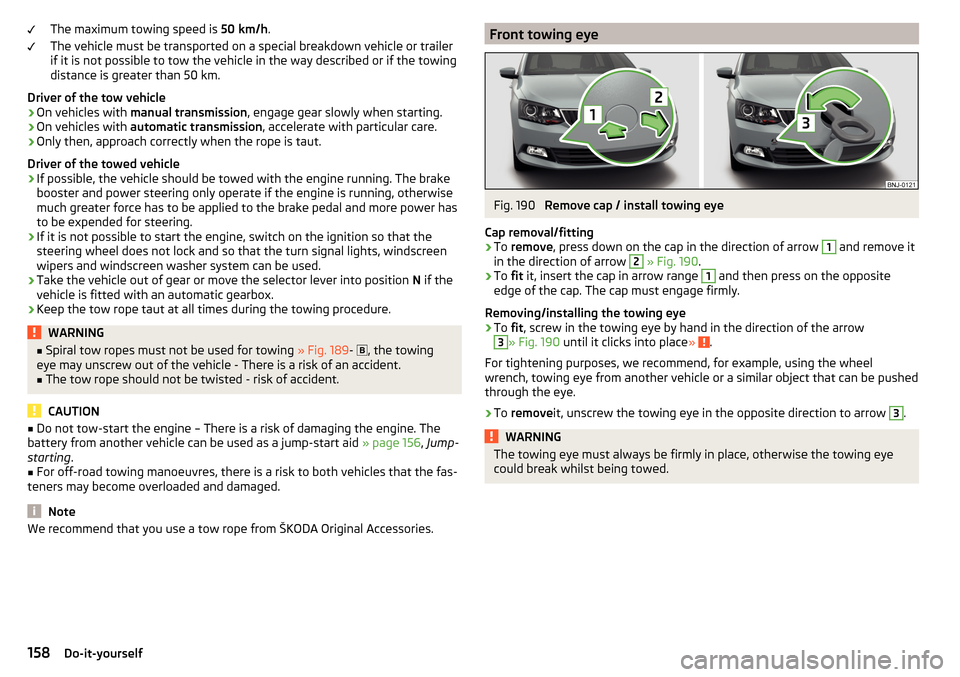
We recommend that you use a tow rope from ŠKODA Original Accessories.Front towing eyeFig. 190
Remove cap / install towing eye
Cap removal/fitting
›
To remove , press down on the cap in the direction of arrow
1
and remove it
in the direction of arrow
2
» Fig. 190 .
›
To fit it, insert the cap in arrow range
1
and then press on the opposite
edge of the cap. The cap must engage firmly.
Removing/installing the towing eye
›
To fit, screw in the towing eye by hand in the direction of the arrow
3
» Fig. 190 until it clicks into place » .
For tightening purposes, we recommend, for example, using the wheel
wrench, towing eye from another vehicle or a similar object that can be pushed through the eye.
›
To remove it, unscrew the towing eye in the opposite direction to arrow
3
.
WARNINGThe towing eye must always be firmly in place, otherwise the towing eye
could break whilst being towed.158Do-it-yourself
Page 185 of 196
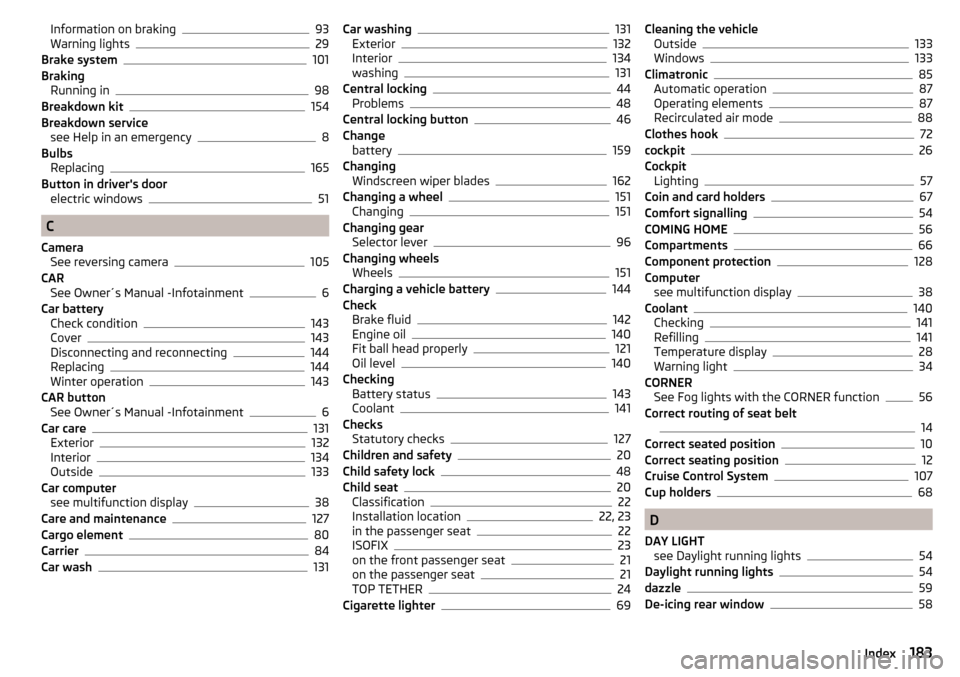
Information on braking93
Warning lights29
Brake system101
Braking Running in
98
Breakdown kit154
Breakdown service see Help in an emergency
8
Bulbs Replacing
165
Button in driver's door electric windows
51
C
Camera See reversing camera
105
CAR See Owner´s Manual -Infotainment
6
Car battery Check condition
143
Cover143
Disconnecting and reconnecting144
Replacing144
Winter operation143
CAR button See Owner´s Manual -Infotainment
6
Car care131
Exterior132
Interior134
Outside133
Car computer see multifunction display
38
Care and maintenance127
Cargo element80
Carrier84
Car wash131
Car washing131
Exterior132
Interior134
washing131
Central locking44
Problems48
Central locking button46
Change battery
159
Changing Windscreen wiper blades
162
Changing a wheel151
Changing151
Changing gear Selector lever
96
Changing wheels Wheels
151
Charging a vehicle battery144
Check Brake fluid
142
Engine oil140
Fit ball head properly121
Oil level140
Checking Battery status
143
Coolant141
Checks Statutory checks
127
Children and safety20
Child safety lock48
Child seat20
Classification22
Installation location22, 23
in the passenger seat22
ISOFIX23
on the front passenger seat21
on the passenger seat21
TOP TETHER24
Cigarette lighter69
Cleaning the vehicle Outside133
Windows133
Climatronic85
Automatic operation87
Operating elements87
Recirculated air mode88
Clothes hook72
cockpit26
Cockpit Lighting
57
Coin and card holders67
Comfort signalling54
COMING HOME56
Compartments66
Component protection128
Computer see multifunction display
38
Coolant140
Checking141
Refilling141
Temperature display28
Warning light34
CORNER See Fog lights with the CORNER function
56
Correct routing of seat belt
14
Correct seated position10
Correct seating position12
Cruise Control System107
Cup holders68
D
DAY LIGHT see Daylight running lights
54
Daylight running lights54
dazzle59
De-icing rear window58
183Index