remove seats SKODA FABIA 2016 3.G / NJ Owner's Manual
[x] Cancel search | Manufacturer: SKODA, Model Year: 2016, Model line: FABIA, Model: SKODA FABIA 2016 3.G / NJPages: 196, PDF Size: 31.86 MB
Page 15 of 196

Seat belts
Wearing seat belts
Introduction
This chapter contains information on the following subjects:
Correct routing of seat belt
14
Fastening and unfastening seat belts
14
Seat belts that are fastened correctly offer good protection in the event of an
accident. They reduce the risk of an injury and increase the chance of survival
in the event of a major accident.
The seat belts reduce kinetic energy to a considerable extent. They also pre-
vent uncontrolled movements which, in turn, may well result in severe injuries.
When transporting a child the following instructions must be observed
» page 20 , Transporting children safely .
WARNING■
Fasten seat belts before every journey! This also applies to other passen-
gers - there is a danger of injury!■
Maximum seat belt protection is only achieved if you are correctly seated
» page 10 , Correct and safe seated position .
■
The seat backrests of the front seats must not be tilted too far to the
rear, otherwise the seatbelts can lose their effectiveness.
WARNINGInformation on dealing with the safety belts■The belt webbing must not be jammed in-between at any point or twis-
ted or chafe against any sharp edges.■
Make sure you do not catch the seat belt in the door when closing it.
WARNINGInformation on the proper use of the safety belts■Adjust the height of the belt in such a way that the shoulder part of the
belt is roughly positioned across the middle of your shoulder - on no ac-
count across your neck.WARNING (Continued)■ No two persons (also not children) should ever use a single seat belt to-
gether.■
The lock tongue should only be inserted into the lock which is the correct
one for your seat. Wrong use of the safety belt will reduce its capacity to
protect and the risk of injury increases.
■
Many layers of clothing and loose clothing (e. g. a winter coat over a jack-
et) do not allow you to be correctly seated and impairs proper operation of
the seat belts.
■
Do not use clamps or other objects to adjust seat belts (e.g. for shorten-
ing the belts for smaller persons).
■
The seat belts for the rear seats can only fulfil their function reliably
when the seat backrests are correctly locked into position » page 63.
WARNINGInformation on the care and maintenance of the safety belts■The belt webbing must always be kept clean. Soiled belt webbing may im-
pair proper operation of the inertia reel » page 134.■
The seat belts must not be removed or changed in any way. Do not at-
tempt to repair the seat belts yourself.
■
Check the condition of all the seat belts on a regular basis. If damage to
the parts of the seat belt system (e.g. the strap, the belt connectors, the
retractor, the lock or similar) are detected, the seat belt in question must
be replaced by a specialist immediately.
■
Seat belts which have been subject to stress in an accident should be re-
placed by a specialist garage. The anchorage points for the belts should al-
so be checked.
13Seat belts
Page 22 of 196

Transporting children safely
Child seat
Introduction
To reduce the risk of injury in an accident, children should only be transported
in child seats!
This chapter contains information on the following subjects:
Use of a child seat on the front passenger seat
21
Use of a child seat on the front seat
21
Child safety and the side airbag
22
Classification of child seats
22
Use of child safety seats which are secured using a seat belt
22
Please refer to the instructions in this Owner's Manual and the child seat man-
ufacturer's instructions with regard to the installation and use of the child
seat.
For safety reasons, we recommend that you always transport children in the
rear seats. Only transport a child in the passenger seat in exceptional circum-
stances.
Child seats complying with the ECE-R 44 Economic Commission for Europe
standard must be used.
Child seats that comply with the ECE-R 44 standard are identified with a test
mark that cannot be removed: Large E in a circle, the approval number is un-
derneath.
WARNING■ You should never carry children - including babies! - on your lap.■When leaving the vehicle, do not leave children unattended in the vehicle.
In an emergency, they might not be able to get out of the vehicle on their
own or to help themselves. Can be fatal at very high or very low tempera-
tures!■
The child must be secured in the vehicle throughout the journey! Other-
wise, in the event of an accident, the child would be thrown through the
vehicle and as a result may suffer fatal injuries and also injure other occu-
pants.
WARNING (Continued)■ Children are exposed to an increased risk of injury in the event of an acci-
dent if they lean forward or adopt an incorrect seated position when the
vehicle is moving. This particularly applies to children who are transported
on the front passenger seat, as they can suffer severe, or even fatal, inju-
ries if the airbag system is deployed!■
Pay particular attention to the information provided by the manufacturer
of the child safety seat regarding the correct routing of the belt. Seat belts
which are not correctly adjusted can themselves cause injuries even, in mi-
nor accidents.
■
Safety belts must be checked to ensure that they are positioned properly.
Care should also be taken to ensure that the belt is not damaged by sharp-
edged fittings.
■
When installing the child seat on the back seat, the corresponding front
seat must be adjusted so that there is no contact between the front seat
and the child seat or the child being transported in a child seat.
■
When installing a child seat in which the child faces forward, adjust the
head restraints so that they are as high as possible.
■
If the head restraints still prevent the child seat from being installed,
even in the highest position, you will need to remove them » page 64. Af-
ter removing the child seat, refit the head restraints.
Note
We recommend that you use child seats from ŠKODA Original Accessories.
These child seats were developed and also tested for use in ŠKODA vehicles.
They meet the ECE-R 44 standard.20Safety
Page 66 of 196

Rear seat
Applies to the Fabia EstateFig. 57
Fold rear seat forward / remove split rear bench seat
Fig. 58
Fold the rear seat back
The luggage space can be increased by folding the rear seat forward and re-
moving it.
For vehicles with split rear seats, the parts of the rear seat can be folded for-
ward individually and removed.
›
To fold , pull up the bench in the direction of arrow
1
and fold down in arrow
direction
2
» Fig. 57 .
›
To Remove , press the wire clamps in the direction of arrows
3
so that they
become detached from the holders, and remove the seat.
›
To use , press the wire clamps in the direction of arrows
3
and insert it into
the brackets.
›
To open , lift the armrest in the direction of arrow
4
» Fig. 58 .
›
Place the rear seat on the eyelets
A
, so that the eyelets
A
click into the
recesses in the plastic caps for
B
.
WARNINGThe rear seat may not be pulled in under the eyelets A when folding back.
The rear seat could not be properly secured.
CAUTION
The rear seat must not be pulled in under the eyelets A when being folded
back - there is a risk of damaging the rear seat.
Headrests
Introduction
This chapter contains information on the following subjects:
Setting the height
64
Removing/inserting
65
Note
■ The middle rear headrest is only adjustable in two positions.■In sports seats, the headrests are integrated into the seat backrests and can-
not be adjusted in height.
Setting the height
Fig. 59
Setting the height of the back headrest
Height adjustment of the headrests is the same in the front and rear.
›
Grasp the headrest and move upwards in the direction of arrow
1
» Fig. 59 .
›
To move the headrest down, press the securing button
A
in the direction of
arrow
2
and hold it down while pressing the headrest in the direction of ar-
row
3
.
64Operation
Page 67 of 196
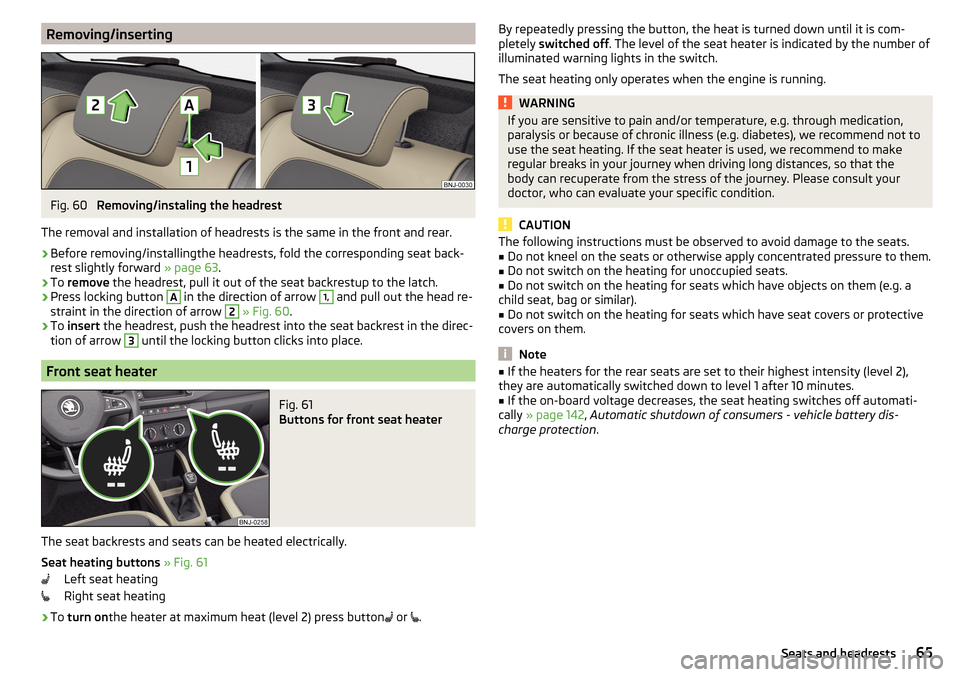
Removing/insertingFig. 60
Removing/instaling the headrest
The removal and installation of headrests is the same in the front and rear.
›
Before removing/installingthe headrests, fold the corresponding seat back-
rest slightly forward » page 63.
›
To remove the headrest, pull it out of the seat backrestup to the latch.
›
Press locking button
A
in the direction of arrow
1,
and pull out the head re-
straint in the direction of arrow
2
» Fig. 60 .
›
To insert the headrest, push the headrest into the seat backrest in the direc-
tion of arrow
3
until the locking button clicks into place.
Front seat heater
Fig. 61
Buttons for front seat heater
The seat backrests and seats can be heated electrically.
Seat heating buttons » Fig. 61
Left seat heating
Right seat heating
›
To turn on the heater at maximum heat (level 2) press button
or
.
By repeatedly pressing the button, the heat is turned down until it is com-
pletely switched off . The level of the seat heater is indicated by the number of
illuminated warning lights in the switch.
The seat heating only operates when the engine is running.WARNINGIf you are sensitive to pain and/or temperature, e.g. through medication,
paralysis or because of chronic illness (e.g. diabetes), we recommend not to
use the seat heating. If the seat heater is used, we recommend to make
regular breaks in your journey when driving long distances, so that the
body can recuperate from the stress of the journey. Please consult your
doctor, who can evaluate your specific condition.
CAUTION
The following instructions must be observed to avoid damage to the seats.■Do not kneel on the seats or otherwise apply concentrated pressure to them.■
Do not switch on the heating for unoccupied seats.
■
Do not switch on the heating for seats which have objects on them (e.g. a
child seat, bag or similar).
■
Do not switch on the heating for seats which have seat covers or protective
covers on them.
Note
■ If the heaters for the rear seats are set to their highest intensity (level 2),
they are automatically switched down to level 1 after 10 minutes.■
If the on-board voltage decreases, the seat heating switches off automati-
cally » page 142 , Automatic shutdown of consumers - vehicle battery dis-
charge protection .
65Seats and headrests
Page 75 of 196

WARNING■Never leave any heavy or sharp-edged objects in the pockets of the items
of clothing that has been hung up - is a risk of injury.■
Do not use hangers to hang up the clothes - there is a risk of restricting
the effectiveness of head airbags and a danger of injury from the hanger.
■
Make sure that any clothes hanging from the hooks do not impede your
vision.
Storage pockets on the backs of the front seats
Fig. 82
Map pockets
Read and observe and on page 66 first.
The Storage pockets » Fig. 82 are intended for the Storage e.g. of maps, maga-
zines, etc.
Storage pockets on the inner sides of the front seats
Fig. 83
Storage pocket
Read and observe and on page 66 first.
The storage pockets are located on the inside of the front seats » Fig. 83and
are used to store small and light objects (e.g. mobile phones).
The maximum permissible load of each of the pockets is 150 g.
Storage compartment in the rear centre console
Fig. 84
Storage compartment: Version 1 / version 2
Read and observe
and on page 66 first.
The open storage compartment is in the rear of the centre console » Fig. 84.
Tablet holder
Introduction
This chapter contains information on the following subjects:
Installing / Remove
74
Handle holder
74
External devices (e.g. tablet, smartphone, etc.) measuring min. 122 mm and
max. 195 mm can be secured in the support.
The maximum permissible load of the compartment is 750 g.
CAUTION
Never exceed the maximum permissible load of the holder - there is a risk of
damage or functional impairment.73Useful features
Page 80 of 196

Luggage compartment coverFig. 95
Remove the luggage compartment cover
Read and observe
and on page 75 first.
If the support straps
A
» Fig. 95 are attached to the boot lid, then opening the
lid will raise the boot lid cover (hereafter only referred to as "cover").
The cover can be removed from the vehicle and stowed behind the rear seat
backrests if required » Fig. 96 on page 78 .
The maximum permissible load of the cover is 1 kg.
Removing
›
On both sides of the boot lid, unhook the straps
A
in direction of arrow
1
» Fig. 95 .
›
Hold the raised cover and press on the two sides on the underside of the
cover in the area of the recess
C
.
›
Remove the cover in the direction of the arrow
2
.
Fitting
›
Position the fixtures
D
on the cover over the studs
C
» Fig. 95 .
›
Press both sides onto the upper side of the cover near the studs
C
. The fix-
ture
B
must lock into place on the studs
C
on both sides of the luggage
compartment.
›
On both sides of the boot lid, unhook the straps
A
.
WARNINGDo not place any objects on the cover during the trip - There is a risk of in-
jury if you brake or have a collision!CAUTION■ Observe the following instructions to avoid canting and the subsequent
damage to the cover or the side trim. ■ The cover must be inserted properly and the load must not exceed the
height of the cover.
■ The cover must not be jammed in the surrounding seal of the luggage com-
partment lid when it is in the raised position. ■ There must be no object in the gap between the cover in the raise position
and the rear backrest.
Other positions of the luggage compartment cover
Fig. 96
Luggage compartment cover: stowed behind the rear seats/in the
lower position
Read and observe
and on page 75 first.
The luggage compartment cover behind the rear seat backrests can be stor-ed » Fig. 96 -
or in the lower position » Fig. 96 -
.
Store cover in the lower position
›
Press the top of the cover in the arrow direction » Fig. 96 -
.
In the front area, slots
B
» Fig. 95 on page 78 on the cover must be fully en-
gaged with the bolts on the side trim. In the back, the cover must be secured
at both ends under the latching.
In the lower position, the cover is designed for storing small objects up to a
weight of 2.5 kg in total.
WARNINGDo not place any objects on the cover during the trip - There is a risk of in-
jury if you brake or have a collision!78Operation
Page 81 of 196

Roll-up coverFig. 97
Roll-up cover: Pulling/ rolling up / removing
Read and observe
and on page 75 first.
›
To Herausziehen , grasp the cover at grip-point
A
and pull it out in the direc-
tion of the arrow
1
until it audibly clicks into place » Fig. 97.
›
To the roll up the cover in the handle area
A
in direction of arrow
2
to
press. The cover rolls up automatically.
›
To Remove press the rolled door on the side of the cross bar in the direction
of arrow
3
and remove the cover in the arrow direction
4
.
›
To install , first insert the cover on the left side.
›
Press on the side of the cross bar in the direction of arrow
3
and insert the
cover against arrow direction
4
.
WARNINGNo objects should be placed on the roll-up cover - there is a risk of damage
to the cover and a risk of injury in the event of a sudden stop or a vehicle
collision!Net partitionFig. 98
Net partition behind the rear seats
Read and observe
and on page 75 first.
The net partition can be installed behind the rear seats.
For ease of installation / removal of the carabiner
B
Move the variable loading
floor back, remove it from the vehicle if necessary.
Installing/removing
›
To the installremove the foldable luggage compartment cover » Fig. 97 on
page 79 or the rear seat backrests » page 63.
›
First insert the rod into the mount
B
» Fig. 98 on one side and push it for-
wards. Insert the transverse rod into the mount
C
on the other side of the
vehicle in the same way.
›
Hang the carabines
C
at the belt ends into the lashing eyes behind the rear
seats.
›
Pull the belts through the tensioning clasp
C
.
Ausbau is carried out in the reverse order.
Note
For vehicles with variable loading floor, the nets can be secured only when the
variable loading floor is in the lower position » page 81.79Transport of cargo
Page 82 of 196

Storage compartments under the floorFig. 99
Fold the floor back / storage compartment under the floor
Read and observe
and on page 75 first.
The storage compartment
A
is located under the floor of the luggage com-
partment » Fig. 99.
›
Lift the rear portion of the floor and fold forward in the direction of arrow
1
- .
The storage compartment is designed for storing small objects of up to 15 kg.
in weight in total.
Cargo elements
Fig. 100
Removing cargo element/example on how to mount the load by
means of the cargo element
Read and observe and on page 75 first.
The cargo element is designed for attaching and securing objects with a maxi-
mum total weight of 8 kg.
›
To use theCargoRemove element in the direction of arrow » Fig. 100 -
.
›
Use thecargoelements to secure the load as close as possible to the rear
seats » Fig. 100
.
›
After use, secure the cargoelements in their original position.
Flexible storage compartment
Fig. 101
Flexible storage compartment
Read and observe and on page 75 first.
The flexible storage compartment can be installed on either side of the boot
» Fig. 101 .
The storage compartment is designed for storing small objects with a maxi-
mum total weight of 8 kg.
›
To use ,insert the two ends of the storage compartment into the openings in
the side trim of the luggage compartment and push the shelf down to lock.
›
To Remove grasp the storage compartment at the top edges and remove by
pulling upwards and towards you.
Class N1 vehicles
Read and observe
and on page 75 first.
In class N1 vehicles that are not fitted with a protective grille, a lashing set that
complies with the EN 12195 standard (1-4) must be used for fastening the load.
80Operation
Page 84 of 196

Folding / fasteningFig. 104
Fold up variable loading floor / secure variable loading floor
The variable loading floor can be folded up and secured using a hook on the
frame of the boot lid in the two positions (at the top as well as the bottom).
›
Fold the variable loading floor together using the handle
A
and fold in the
direction of arrow » Fig. 104.
›
Hook the
B
hook to the frame of the boot lid.
WARNINGThe folded-up variable cargo floor limits the driver's view to the rear.
CAUTION
Before closing the boot lid the variable loading floor must be unhook from the
frame . There is the risk of damage to the hook.
Bicycle carrier in the luggage compartment
Introduction
This chapter contains information on the following subjects:
Install/remove crossmember
82
Fitting/removing the bike rack
83
Place bicycle into the carrier
84
Ensure the stability of the bicycles with a belt
84
up to two bicycles can be transported in the luggage compartment (maximum
size - 19 "frame with 26" wheels) in a carrier.
Before transporting, the following steps must be taken.
› Remove the roll-up cover
» page 79.›Push the head rests into the seat backrests up to the latch » page 64.›
Fold the rear seats forward » page 64 and fold rear seats forward » page 63.
WARNINGWhen transporting bicycles, ensuring the safety of the passengers is para-
mount.
CAUTION
Take care handling the bicycle - there is a risk of damaging the vehicle.
Note
The bike rack cannot be installed if the variable cargo floor is stowed in the
luggage compartment.
Install/remove crossmember
Fig. 105
Install crossmember: Loosen the screws and unlock brackets /
place crossmember on the lashing eyelets
82Operation
Page 86 of 196

Place bicycle into the carrierFig. 108
Insert the front fork of the bicycle into the carrier / mounting ex-
ample of the front wheel
Read and observe
and on page 82 first.
›
Remove the front wheel from the bike.
›
Release the quick release
A
» Fig. 108 on the carrier and adjust according to
the bicycle fork width.
›
Place the bicycle fork on the fixing axle and tighten with the quick release
A
.
›
Set the left bicycle pedal towards the vehicle front to secure the front wheel
more easily.
›
If you want to transport two bicycles, loosen screw
A
» Fig. 107 on page 83
on the carrier and move the carrier along with attached bike to the left.
The handlebar must not touch the side window of the luggage compartment.
›
Tighten screw
A
» Fig. 107 on page 83 on the support.
›
Guide the boot lid gently downwards and check while doing this that there is
no contact between the handlebar and the rear window.
›
If necessary, the position of the sliding part
E
» Fig. 107 on page 83 can be
adjusted.
›
The dismantled front wheel can best be stowed between the left crank and
the bicycle frame.
›
Attach the front wheel with belt
B
to the front fork » Fig. 108 or to the bicy-
cle frame.
›
The second carrier is installed and the bicycle is secured in a similar way.
Ensure the stability of the bicycles with a beltFig. 109
Ensure the stability of the bicycles with a belt
Read and observe
and on page 82 first.
›
In order to loosen the rubber part of the clamp, push both parts against each
other and open the clamp.
›
Position the clamp with the rubber part in the direction of travel as low down
on the saddle support as possible and close it.
›
When transporting two bicycles, stretch the belt » Fig. 109 -
between the
saddles by moving the bicycles apart.
›
Hook the carabiners on the ends of the belt into the lower lashing eyelets
behind the rear seats » Fig. 109 -
.
›
Pull the belt through the tensioning clasps on both sides in turn.
If necessary, you can correct the position of the bicycles in the vehicle after-
wards.
Transportation on the roof rack
Fig. 110
Attachment points
84Operation