buttons SKODA KODIAQ 2016 1.G User Guide
[x] Cancel search | Manufacturer: SKODA, Model Year: 2016, Model line: KODIAQ, Model: SKODA KODIAQ 2016 1.GPages: 344, PDF Size: 58.96 MB
Page 88 of 344
With repeated pressing of the button, the level is down-regulated until it
switches off . The level of the seat heating is indicated by the number of illu-
minated warning lights underneath / in the button.
Increasing in heating power of the rear seat heating can be locked / unlocked .
To do this, press button
on the Climatronic → Tap the function surfaces
/
on the Infotainment screen (applies to vehicles with Climatronic controls
in the rear). In the locked heating power increase, the heating power can only
be adjusted down to turn off.
Front seats with heating and ventilation
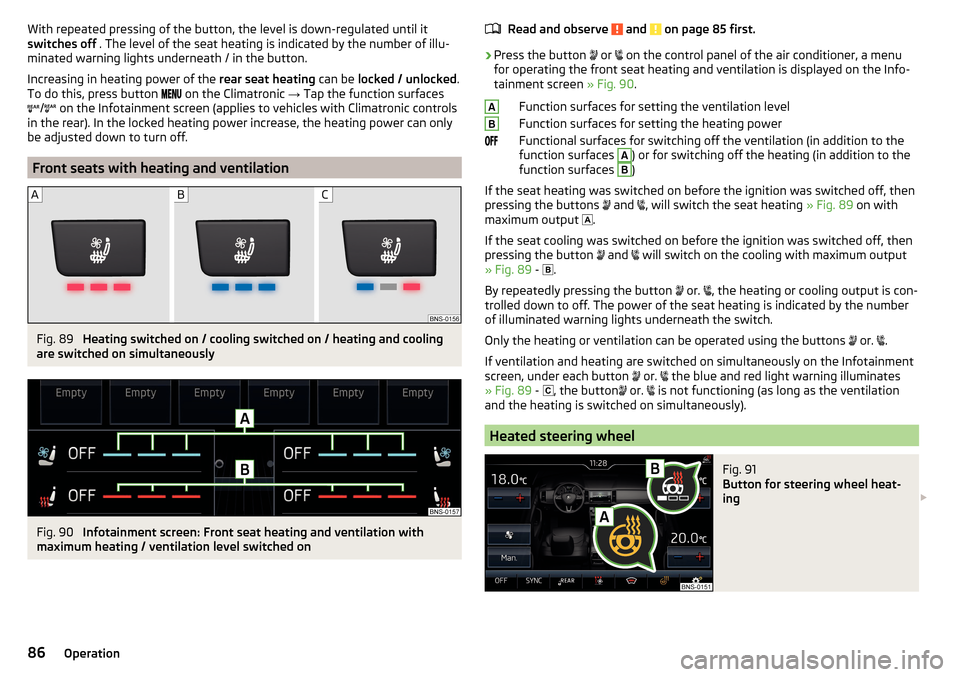
Fig. 89
Heating switched on / cooling switched on / heating and cooling
are switched on simultaneously
Fig. 90
Infotainment screen: Front seat heating and ventilation with
maximum heating / ventilation level switched on
Read and observe and on page 85 first.›
Press the button
or
on the control panel of the air conditioner, a menu
for operating the front seat heating and ventilation is displayed on the Info-
tainment screen » Fig. 90.
Function surfaces for setting the ventilation level
Function surfaces for setting the heating power
Functional surfaces for switching off the ventilation (in addition to the
function surfaces
A
) or for switching off the heating (in addition to the
function surfaces
B
)
If the seat heating was switched on before the ignition was switched off, then
pressing the buttons and
, will switch the seat heating
» Fig. 89 on with
maximum output .
If the seat cooling was switched on before the ignition was switched off, then
pressing the button and
will switch on the cooling with maximum output
» Fig. 89 -
.
By repeatedly pressing the button or.
, the heating or cooling output is con-
trolled down to off. The power of the seat heating is indicated by the number
of illuminated warning lights underneath the switch.
Only the heating or ventilation can be operated using the buttons or.
.
If ventilation and heating are switched on simultaneously on the Infotainment
screen, under each button or.
the blue and red light warning illuminates
» Fig. 89 -
, the button
or.
is not functioning (as long as the ventilation
and the heating is switched on simultaneously).
Heated steering wheel
Fig. 91
Button for steering wheel heat-
ing
AB86Operation
Page 114 of 344
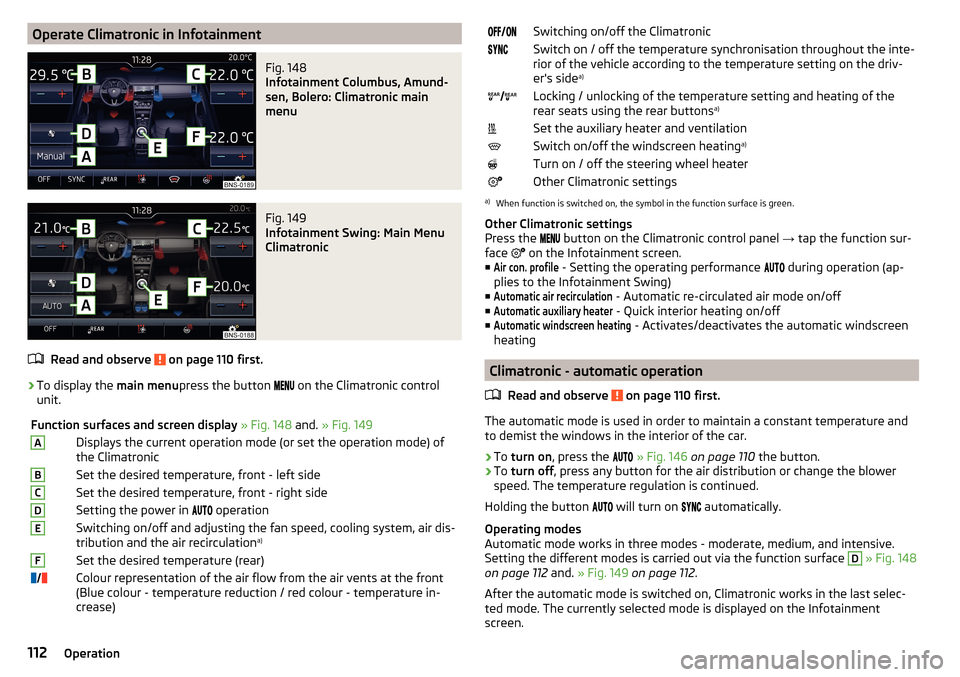
Operate Climatronic in InfotainmentFig. 148
Infotainment Columbus, Amund-
sen, Bolero: Climatronic main
menu
Fig. 149
Infotainment Swing: Main Menu
Climatronic
Read and observe on page 110 first.
›
To display the main menupress the button
on the Climatronic control
unit.
Function surfaces and screen display » Fig. 148 and. » Fig. 149ADisplays the current operation mode (or set the operation mode) of
the ClimatronicBSet the desired temperature, front - left sideCSet the desired temperature, front - right sideDSetting the power in operationESwitching on/off and adjusting the fan speed, cooling system, air dis-
tribution and the air recirculation a)FSet the desired temperature (rear)
Colour representation of the air flow from the air vents at the front
(Blue colour - temperature reduction / red colour - temperature in-
crease)Switching on/off the ClimatronicSwitch on / off the temperature synchronisation throughout the inte-
rior of the vehicle according to the temperature setting on the driv-
er's side a)
Locking / unlocking of the temperature setting and heating of the
rear seats using the rear buttons a)Set the auxiliary heater and ventilationSwitch on/off the windscreen heating
a)Turn on / off the steering wheel heaterOther Climatronic settingsa)
When function is switched on, the symbol in the function surface is green.
Other Climatronic settings
Press the button on the Climatronic control panel
→ tap the function sur-
face on the Infotainment screen.
■
Air con. profile
- Setting the operating performance during operation (ap-
plies to the Infotainment Swing)
■
Automatic air recirculation
- Automatic re-circulated air mode on/off
■
Automatic auxiliary heater
- Quick interior heating on/off
■
Automatic windscreen heating
- Activates/deactivates the automatic windscreen
heating
Climatronic - automatic operation
Read and observe
on page 110 first.
The automatic mode is used in order to maintain a constant temperature andto demist the windows in the interior of the car.
›
To turn on , press the
» Fig. 146 on page 110 the button.
›
To turn off , press any button for the air distribution or change the blower
speed. The temperature regulation is continued.
Holding the button will turn on
automatically.
Operating modes
Automatic mode works in three modes - moderate, medium, and intensive.
Setting the different modes is carried out via the function surface
D
» Fig. 148
on page 112 and. » Fig. 149 on page 112 .
After the automatic mode is switched on, Climatronic works in the last selec-
ted mode. The currently selected mode is displayed on the Infotainment
screen.
112Operation
Page 126 of 344

Infotainment operation
Infotainment operation
Operation principles and screen areas
Fig. 166
Screen area / screen display
Description of the display » Fig. 166
Status line with time and outdoor temperature data and other information
Information and the operation of the current menu
Function surfaces of the current menu
Identification of the current menu
Return to the higher-level menu
Sliding regulator
Menu item with “Checkbox” ▶ - Function is switched on
▶ - Function is switched off
Open a sub menu of the menu item with the “pop-up window”
Functional surfaces
The screen areas which confirm a function or a menu are called “ function sur-
faces ”.
▶ White text - the surface is active and thus selectable
▶ Grey text - the surface is inactive and therefore not selectable
▶ Green frame - currently selected surface
Selecting menu/menu item/function
▶ By moving your finger across the screen in the desired direction (applies to
Infotainment Columbus, Amundsen, Bolero).
▶ Turning the knob ,
ABCDEFGHConfirm menu/menu item/function
▶ By tapping on the function surface.
▶ By pressing the knob
,
Returning to higher-level menu ▶ By tapping on the function surface
,
▶ By tapping on the screen outside of the “pop-up window”.
▶ By pressing the corresponding button next to the screen (e.g. in the menu
Media , by pressing the
button).
Select the menu item / function value ▶ - Selected menu item / function value
▶ - Deselected menu item / function value
Set value ▶ By tapping on the function surface or
the bottom of the screen.
▶ By touching or moving your finger over the scale.
▶ Turning the knob ,
Note
Depending on the equipment fitted, Infotainment can be operated using the
buttons on the multifunction steering wheel. Further information » page 45.
Operating the menus
Fig. 167
Operating the menus
Operating the menus » Fig. 167
Enlargement / reduction of the menu window
Browse the menu- List entries Open / close the menu window
Close the menu window
A 124Infotainment
Page 135 of 344
■Network settings - Setting of the data connection from the associated tele-
phone service provider (APN settings) ■Access point name: ...
- Setting of the access point name
■
User name: …
- Setting of user name
■
Password: ...
- Password setting
■
Authentication
- Setting for the type of verification
■
Normal
- Without verification
■
Safe
- Verification required
■
Reset Access Point (APN)
- Delete the parameters for the network setting
■
Store
- Storage of the parameters for the network setting
■
Network provider: ...
- Selecting the data service provider (the menu item is visi-
ble when the data services of the SIM card inserted in the external module
are active)
■
Data roaming
- Enable / disable the use of data roaming connection
■
Current connection details
- Display of information on data downloaded (by tap-
ping the function button
Reset
the data information is deleted)
■
Data Connection:
- Settings of the data services of the SIM card inserted in the
external module
■
Off
- The data services are turned off
■
Ask
- The data services are active after confirmation
■
On
- The data services are turned on
Settings of online services ŠKODA Connect
›
Press the button, then tap on the function surface
→
ŠKODA Connect (on-line services)
Tap or press press, then the function surface
→
.
■
network
- Settings of the data connection of the telephone service provider
(not applicable to the infotainment Bolero) » page 132, Settings
■
WIRELESS INTERNET ACCESS
- WLAN settings of the Infotainment system (does
not apply to the infotainment Bolero) » page 132, Wireless settings
■
Services Management
- Information on licensing of the respective online services
and the option to switch them on / off
■
registration
- Enter the activation PIN code for online services (in the user pro-
file on the website ŠKODA Connect Portal receive)
System information
›
Press the button, then tap on the function surface
Tap on
→
System in-formation
.
›
To perform a Software Update (Z. B. Bluetooth®
or radio station logo) Tap
the function surface
Update software
.
Displaying system information.
▶ Device part number: - Infotainment part number
▶ Hardware: - Hardware version
▶ Software: - Software version
▶ Navigation database: - Version of the navigation data
▶ “Gracenote” database: ... - Version of the Gracenote multimedia database (ap-
plies to Infotainment Columbus)
▶ Media Codec: ... - Version of media codecs
▶ Bluetooth version: ... - Version of the Bluetooth ®
software
The information on available software updates is obtained from a ŠKODA part-
ner or from the following ŠKODA Internet pages.
http://go.skoda.eu/updateportal
Radio menu settings
Settings for all broadcasting areas
›
Tap on the function surface in the Radio main menu
.
■
Sound
- sound settings
■
Scan
- Automatic play short portions of all available stations in the current
frequency range
■
Arrow buttons:
- Setting the function of the function surfaces
■
Preset list
- Change between stations stored under the preset buttons
■
Station list
- Change between all available stations of the selected broad-
casting range
■
Traffic programme (TP)
- Switches TP traffic programme on/off
■
Delete presets
- Deletes the preset buttons
■
Station logos
- Manual management of station logos
■
Radio text
- Switching the text display radio (FM and DAB) on and off
■
Advanced settings
- Other settings that are different depending on the selected
broadcasting range (FM and DAB)
Advanced settings (FM)
›
Select the FM band in the Radio main menu and tap on the function surface
→
Advanced settings
.
■
Auto-save station logos
- Automatic storage of the station logos
■
Region for station logo:
- Setting the region for station logos
■
Automatic frequency control (AF)
- Search for alternative frequencies of the station
currently being played to on/off
133Infotainment settings - Columbus, Amundsen, Bolero
Page 142 of 344
Radio menu settings
Settings for all broadcasting areas
›
Tap on the function surface in the Radio main menu
.
■
Scan
- Automatic play short portions of all available stations in the current
frequency range
■
Arrow buttons:
- Setting the function of the function surfaces
■
Presets
- Switch between stations stored under the preset buttons
■
Stations
- Switch between all available stations of the selected broadcasting
range
■
Traffic programme (TP)
- Switches traffic programme on/off
■
Radio text
- Switching the text display radio (FM and DAB) on and off
■
Station list:
- Sort types of radio stations in the station list (FM)
■
Group
- Sort by transmitted program type
■
Alphabetically
- Alphabetically order according to station name
■
Station logos
- Manual management of station logos
■
Delete presets
- Delete the stations stored under preset buttons
■
Advanced settings
- Other settings that are different depending on the selected
broadcasting range (FM and DAB)
Advanced settings (FM)
›
Select the FM band in the Radio main menu and tap on the function surface
→
Advanced settings
.
■
RDS Regional:
- Switch on/off the automatic tracking of related regional sta-
tions
■
Automatic
- Auto-selects the station with the best reception at the moment.
If you lose reception in the given the region, Infotainment will automatical-
ly set another available region.
■
Fixed
- Maintains the selected regional station continuously. When the sig-
nal is lost, another station must be set manually.
■
Automatic frequency control (AF)
- Search for alternative frequencies of the station
currently being played to on/off
■
Radio Data System (RDS)
- enable/disable RDS function (receiving additional in-
formation from the station) 1)
■Station list: - Sort types of radio stations in the station list
■Group
- Sort by transmitted program type
■
Alphabet
- Alphabetically order according to station name
Advanced Settings (DAB)
›
In the Radio main menu, select the DAB range and tap on the function sur-
face
→
Advanced settings
.
■
DAB traffic messages
- Turn on / off DAB messages
■
Other DAB messages
- Switch on/off other announcements (e.g., warnings, re-
gional weather, sports reports, financial news)
■
DAB station tracking
- Switch on/off automatic DAB station tracking on another
frequency or in other station groups
■
Aut. DAB - FM switching
- switches on/off auto-switching from DAB to the FM
frequency band if the DAB signal is lost
Automatic change from DAB to FM
In the event of bad DAB reception, the device tries to find an FM station.
The station name is followed by ( ) while the station is being received on the
FM band. When the corresponding DAB station is received again, the system
automatically switches from FM to DAB.
If a DAB station is also not available in the FM band due to poor reception, In-
fotainment will be switched to mute.
Media menu settings
›
Tap the function surface in the Media main menu
.
■
Sound
- sound settings
■
Mix/repeat including subfolders
- Switching the title display including subfolders
■
Bluetooth
- Settings for the Bluetooth ®
function
■
Traffic programme (TP)
- Switches traffic programme on/off
■
Activate AUX
- Enables / disables the AUX input
■
Remove safely:
- Safe removal of the external device
Import contactsTelephone menu settings
›
In the Telephone main menu, tap on the function surface
.
1)
Only valid for some countries.
140Infotainment
Page 143 of 344
■Hands-free - Switching a call to the phone / back to Infotainment (the menu
item is displayed during a call)
■Select telephone
- Search for available telephones/list of paired telephones/se-
lect telephone
■
Find
- search for available phones
■
Bluetooth
- Bluetooth ®
settings
■
User profile
- user profile settings
■
Manage favourites
- set the function surfaces for your favourite contacts
■
Sort by:
- Arrangement of the phone contact list
■
Surname
- Sort by contact name
■
Name
- sort by contact first name
■
Import contacts
- Import phone contacts
■
Select ring tone
- Selecting the ring tone
■
Reminder: remember your mobile phone
- Turn on/off the warning against forget-
ting the phone in the vehicle (if the phone was connected to the Infotain-
ment)
■
Simultan. calls
Simultaneous calls - enable/disable the option to hold two con-
current calls
SmartLink menu settings
›
In the SmartLink main menu, tap on the function surface
.
■
Activate data transfer for ŠKODA apps
- Turning data transfer on and off for ŠKODA
applications
■ MirrorLink® - Settings of the system MirrorLink ®
■
Allow Bluetooth automatic pairing
- Turn on / off option, which is to be connected
external device via Bluetooth ®
to pair and connect to
■
Allow MirrorLink® notification to be shown
- Turn on / off the display of messages
of Mirror link ®
applications on the Infotainment screen
Radio
service
Introduction to the subject
Infotainment allows analogue radio reception of FM and AM frequency ranges
as well as DAB digital radio reception.
CAUTION
■ For vehicles with window antennas do not stick foil or metal coated stickers
to the window - Radio signal reception could be affected.■
Car parks, tunnels, tall buildings or mountains can interfere with the radio
signal even causing it to fail completely.
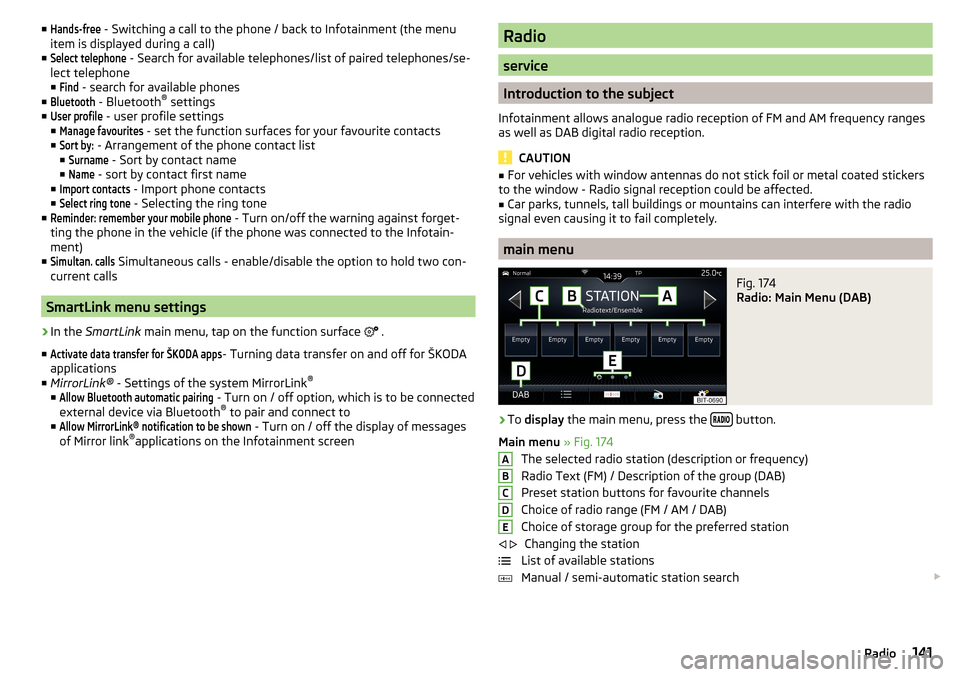
main menu
Fig. 174
Radio: Main Menu (DAB)
›
To display the main menu, press the button.
Main menu » Fig. 174
The selected radio station (description or frequency)
Radio Text (FM) / Description of the group (DAB)
Preset station buttons for favourite channels
Choice of radio range (FM / AM / DAB) Choice of storage group for the preferred station Changing the station
List of available stations
Manual / semi-automatic station search
ABCDE
141Radio
Page 144 of 344
Radio text display / image presentation (DAB) (does not apply to Infotain-
ment Swing)
Menu Settings Radio
Information symbol in the status lineSymbolMeaningTraffic signal is available Traffic signal is not available RDS function is switched off (FM) AF Alternative frequency is switched off (FM)Signal is not available (DAB)
If the displayed station name continuously changes (dynamic text), then it is
possible to fix the current text by holding your finger on the device screen in
the station name area. By holding your finger in the area of the station name
again, the station name is displayed in its entirety again.
Display DAB main menu (does not apply to Infotainment Swing)
In DAB broadcasting, the display of additional information and images (Slide- show) is possible as long as the currently tuned station is broadcasting this in-
formation.
The display variant can be selected from the menu that appears as follows. ▶ In the Radio main menu, press the function surface in the
DAB
area
.
Search stations and select frequency
Find stations
›
Tap on the function surface in the Radio main menu
or
.
Depending on the setting
Arrow buttons:
will set an available station from the
Station list or a station of the current broadcast range on the Station buttons.
Select frequency
›
To display the value of the currently chosen frequency, tap the function sur-
face in the Radio main menu
.
›
To
Set the desired frequency value in Infotainment Swing, use the slider or
the function surfaces
Use the bottom of the screen, if necessary, turn
the controller .
The frequency selection is terminated by pressing
the button.
Scan through the stations one after the other (scan)
The function scans through all the available stations in the current frequency
range in succession, for a few seconds each.›
To start/finish the automatic play of the available stations in Infotainment
Columbus, Amundsen, Bolero press the function surface in the Radio main
menu
Tap →
scan
.
›
To end autoplay, tap the function surface
.
›
To start/finish the automatic play of the available stations in Infotainment
Swing, press the controller in the Radio main menu
/ press.
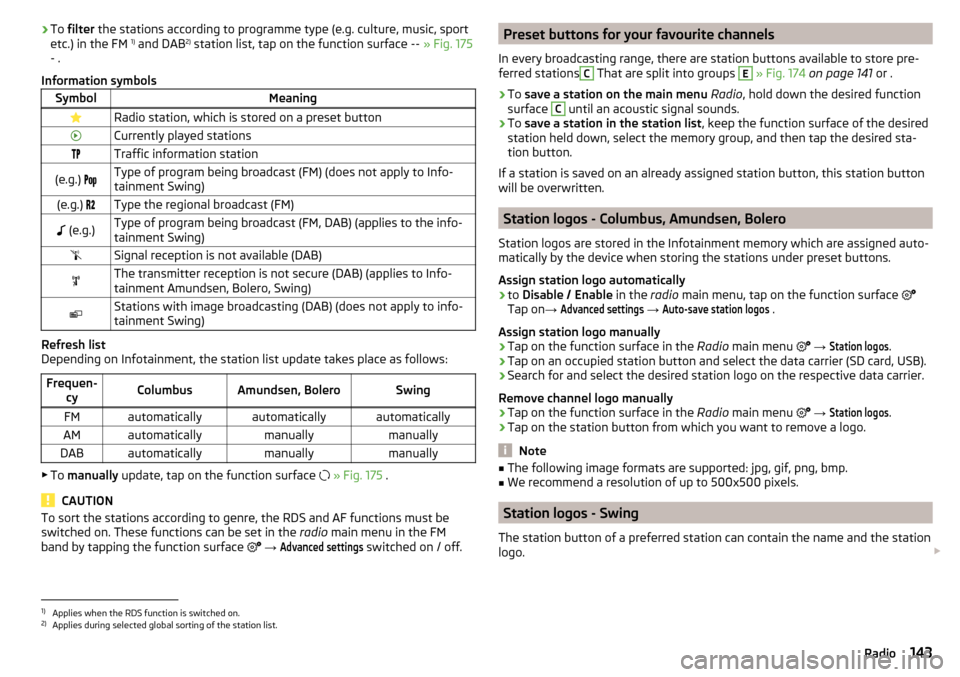
List of available stations
Fig. 175
Example, the list of available FM/DAB stations
Applies to Infotainment Columbus, Amundsen, Bolero
›
To display the list of available stations of the currently selected broadcasting
area, tap the function surface in the Radio main menu
.
›
To
play , tap on the function surface of the desired station.
›
To Sort (FM) the stations in alphabetical order, by group or genre, tap on the
function surface
A
» Fig. 175 » .
Applies to Infotainment Swing
›
To display the list of available stations of the currently selected broadcasting
area, tap the function surface in the Radio main menu
.
›
To
play , tap on the function surface of the desired station.
142Infotainment
Page 145 of 344
›To
filter the stations according to programme type (e.g. culture, music, sport
etc.) in the FM 1)
and DAB 2)
station list, tap on the function surface -- » Fig. 175
- .
Information symbolsSymbolMeaningRadio station, which is stored on a preset buttonCurrently played stationsTraffic information station(e.g.) Type of program being broadcast (FM) (does not apply to Info-
tainment Swing)(e.g.) Type the regional broadcast (FM) (e.g.)Type of program being broadcast (FM, DAB) (applies to the info-
tainment Swing)Signal reception is not available (DAB)The transmitter reception is not secure (DAB) (applies to Info-
tainment Amundsen, Bolero, Swing)Stations with image broadcasting (DAB) (does not apply to info-
tainment Swing)
Refresh list
Depending on Infotainment, the station list update takes place as follows:
Frequen- cyColumbusAmundsen, BoleroSwingFMautomaticallyautomaticallyautomaticallyAMautomaticallymanuallymanuallyDABautomaticallymanuallymanually
▶To manually update, tap on the function surface
» Fig. 175 .
CAUTION
To sort the stations according to genre, the RDS and AF functions must be
switched on. These functions can be set in the radio main menu in the FM
band by tapping the function surface
→ Advanced settings
switched on / off.
Preset buttons for your favourite channels
In every broadcasting range, there are station buttons available to store pre-
ferred stationsC
That are split into groups
E
» Fig. 174 on page 141 or .
›
To save a station on the main menu Radio , hold down the desired function
surface
C
until an acoustic signal sounds.
›
To save a station in the station list , keep the function surface of the desired
station held down, select the memory group, and then tap the desired sta-
tion button.
If a station is saved on an already assigned station button, this station button will be overwritten.
Station logos - Columbus, Amundsen, Bolero
Station logos are stored in the Infotainment memory which are assigned auto- matically by the device when storing the stations under preset buttons.
Assign station logo automatically
›
to Disable / Enable in the radio main menu, tap on the function surface
Tap on →
Advanced settings
→
Auto-save station logos
.
Assign station logo manually
›
Tap on the function surface in the Radio main menu
→
Station logos
.
›
Tap on an occupied station button and select the data carrier (SD card, USB).
›
Search for and select the desired station logo on the respective data carrier.
Remove channel logo manually
›
Tap on the function surface in the Radio main menu
→
Station logos
.
›
Tap on the station button from which you want to remove a logo.
Note
■
The following image formats are supported: jpg, gif, png, bmp.■We recommend a resolution of up to 500x500 pixels.
Station logos - Swing
The station button of a preferred station can contain the name and the station
logo.
1)
Applies when the RDS function is switched on.
2)
Applies during selected global sorting of the station list.
143Radio
Page 146 of 344
Assign a station logo›Tap on the function surface in the Radio main menu →
Station logos
.›
Tap on an occupied station button and select the data carrier (SD card, USB).
›
Search for and select the desired station logo on the respective data carrier.
Remove station logo
›
Tap on the function surface in the Radio main menu
→
Station logos
.
›
Tap on the station button from which you want to remove a logo.
›
or The function surface
All
to delete the logos of all the station buttons si-
multaneously.
›
Confirm / cancel the removal.
Note
■ jpg, gif, png, bmp (we recommend using the png format).■Maximum resolution 400x240 pixels.
TP Traffic program
›
To switch on/off traffic monitoring in the main menu Radio, tap on the func-
tion surface
→
Traffic programme (TP)
.
During a traffic announcement, it is possible to cancel the current announce-
ment if necessary by deactivating traffic monitoring.
Note
■ If the station that is currently set does not transmit traffic reports or the sig-
nal is not available, then Infotainment automatically searches in the back-
ground for another TP station.■
During playback in the Media menu or a station in the AM radio range, traffic
news is received from the previously selected FM radio range.
Media
service
Main menu
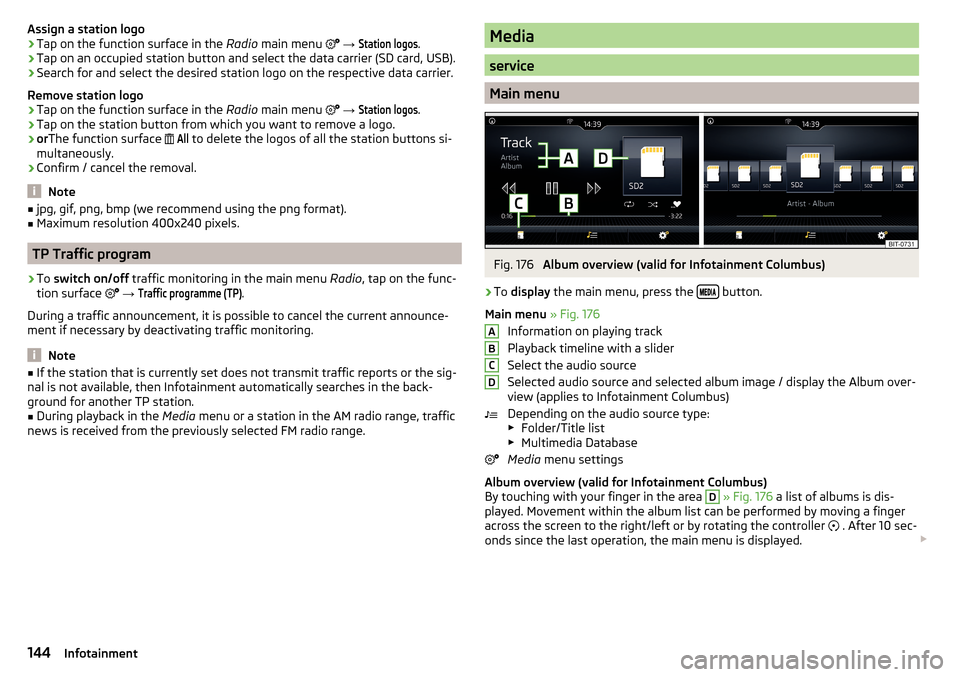
Fig. 176
Album overview (valid for Infotainment Columbus)
›
To display the main menu, press the button.
Main menu » Fig. 176
Information on playing track
Playback timeline with a slider
Select the audio source
Selected audio source and selected album image / display the Album over-
view (applies to Infotainment Columbus)
Depending on the audio source type:
▶ Folder/Title list
▶ Multimedia Database
Media menu settings
Album overview (valid for Infotainment Columbus)
By touching with your finger in the area
D
» Fig. 176 a list of albums is dis-
played. Movement within the album list can be performed by moving a finger
across the screen to the right/left or by rotating the controller . After 10 sec-
onds since the last operation, the main menu is displayed.
ABCD144Infotainment
Page 174 of 344
›Observe the infotainment screen and if necessary, adjust the required net-
work of data service provider.›
If the SIM card is protected by a PIN code, then the PIN code of the SIM card
must be entered » Fig. 195 on page 162 ,
›
Confirm the entered PIN code.
or
›
If you would like to save the entered PIN code in the device memory, then
press the function key
Tap the PIN-code is stored and simultaneously con-
firmed.
The display of the signal strength, connection type and a possible data trans-
fer occurs in the status bar by the symbol left next to the time.
The parameters of the telephone service provider network can be set
» page 132 ,
CAUTION
When inserting an incorrectly sized SIM card, there is a risk of damage to the
CarStick device.
Note
The Internet connection may be chargeable based on the terms and conditions
of your data provider.SmartLink
Introductory information
Introduction to the subject
Fig. 209
Information on SmartLink on the
ŠKODA websites
Read in the QR code » Fig. 209orenter the following address in the web brows-
er to open the website with information on the SmartLink system.
http://go.skoda.eu/connectivity-smartlink
SmartLink offers the option to display certified applications on an external de-
vice equipped with a USB device on the Infotainment screen and to operate
them.
SmartLink supports the following communication systems. ▶ Android Auto
▶ Apple CarPlay
▶ MirrorLink ®
Using the applications in the connected external device, you can use naviga-
tion to make a call and to listen to music.
For reasons of safety, the operation of some applications while driving is not
possible or only limited.
Depending on the model of the connected external device, some applications
can be started using voice activation, via the Infotainment screen, using the
operating elements on Infotainment, or using the buttons on the multi-func-
tion steering wheel.
The voice control of the connected external device can be activated by holding
the button
or holding the button
on the multifunction steering
wheel.
172Infotainment