warning light SKODA KODIAQ 2016 1.G Manual Online
[x] Cancel search | Manufacturer: SKODA, Model Year: 2016, Model line: KODIAQ, Model: SKODA KODIAQ 2016 1.GPages: 344, PDF Size: 58.96 MB
Page 262 of 344
WARNING■Please take note of the general points relating to the use of assistance
systems » page 215, in section Introduction .■
For the driving ability is always the driver's responsibility. Never drive if
you feel tired.
■
The system may not detect all cases where a break is needed.
■
Therefore, take regular, sufficient breaks during long trips.
■
There will be no system warning during the so-called micro-sleep.
Note
■ In some situations, the system may evaluate the driving incorrectly and thus
mistakenly recommend a break (e.g. sporty driving, adverse weather condi-
tions or poor road conditions).■
The system is designed primarily for use on motorways.
Tyre pressure monitoring
Introduction
This chapter contains information on the following subjects:
Storing the tyre pressure values and Infotainment display
260
The tyre pressure monitoring function (following known as system) monitors
the tyre pressure while driving.
If the tyre inflation pressure changes, the warning light
lights up in the in-
strument cluster and an audible signal sounds » page 37.
The system can only function properly if the tyres have the prescribed inflation
pressure and these pressure values are stored in the system.
Always save the tyre pressure values in the system if one of the following
events occurs.
▶ Change of tyre pressure values.
▶ Change one or more wheels.
▶ Change in position of a wheel on the vehicle.
▶ The warning light
in the instrument cluster.
WARNING■
Please take note of the general points relating to the use of assistance
systems » page 215, in section Introduction .■
Having the correct tyre inflation pressure is always the driver's responsi-
bility. Tyre pressure should be checked regularly » page 286.
■
The system cannot warn in case of very rapid tyre inflation pressure loss,
e.g. in case of sudden tyre damage.
■
Before storing the pressures, the tyres must be inflated to the specified
inflation pressure » page 286. If the wrong pressure valuesare stored, the
system may not issue any warnings, even if the tyre pressure is too low.
CAUTION
To ensure proper system function, the tyre pressure values must be stored ev-
ery 10,000 km or 1x a year.
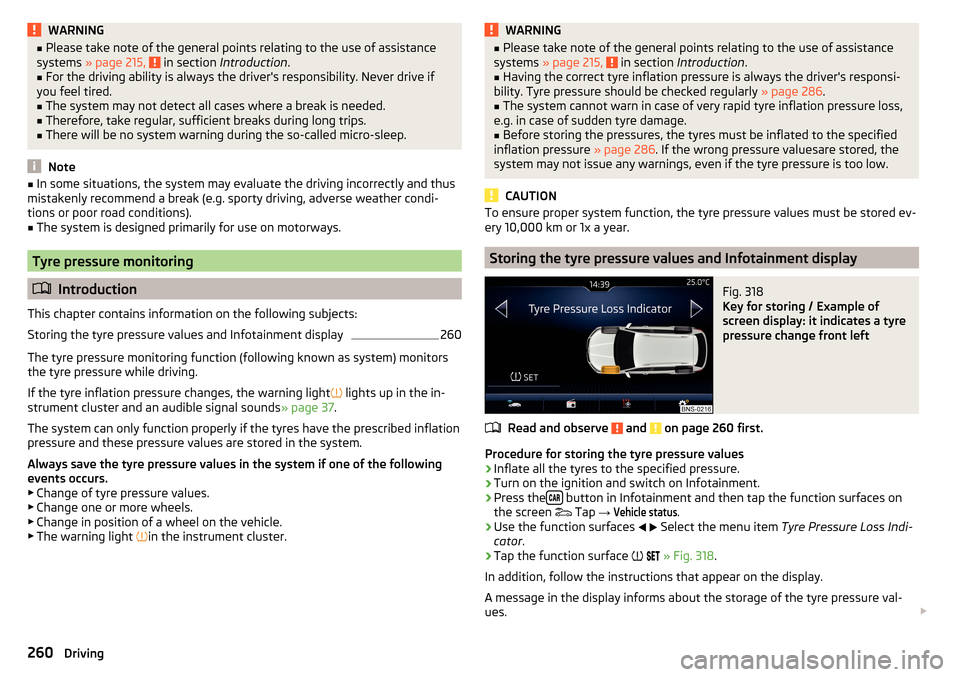
Storing the tyre pressure values and Infotainment display
Fig. 318
Key for storing / Example of
screen display: it indicates a tyre
pressure change front left
Read and observe and on page 260 first.
Procedure for storing the tyre pressure values
›
Inflate all the tyres to the specified pressure.
›
Turn on the ignition and switch on Infotainment.
›
Press the button in Infotainment and then tap the function surfaces on
the screen Tap
→
Vehicle status
.
›
Use the function surfaces
Select the menu item
Tyre Pressure Loss Indi-
cator .
›
Tap the function surface
» Fig. 318 .
In addition, follow the instructions that appear on the display.
A message in the display informs about the storage of the tyre pressure val-
ues.
260Driving
Page 263 of 344
NoteWhen a warning light in the instrument cluster appears, the affected tyre
can be displayed on the infotainment » Fig. 318.Towing device and trailer
Hitch
Introduction
This chapter contains information on the following subjects:
Swinging in and out the tow bar
262
Vertical load with mounted accessories
262
The maximum trailer nose weight when towing a trailer depends on the en-
gine and the vehicle version in the following table. Other data (e.g. shown on
the nameplate of the hitch) on provides information about the test values of
the device .
EngineTransmissionFive-seat versionSeven-seat version1.4 ltr./92 kW TSIMG75 kg66 kg1.4 l/110 kW TSI ACTMG 4x4100 kg80 kgDSG75 kg72 kg1.4 ltr./110 kW TSIDSG 4x4100 kg80 kg2.0 ltr./132 kW TSIDSG 4x4 (EU6)100 kg80 kg
2.0 ltr./110 kW TDI CR
MG 4x4100 kg-DSG80 kg80 kgDSG 4x4 (EU6)100 kg80 kg2.0 ltr./140 kW TDI CRDSG 4x4100 kg80 kgWARNINGDo not use the towing device if it is damaged or if there are parts missing.261Towing device and trailer
Page 264 of 344
Swinging in and out the tow barFig. 319
Tow bar: swing out
Fig. 320
Tow bar: engage
Read and observe
on page 261 first.
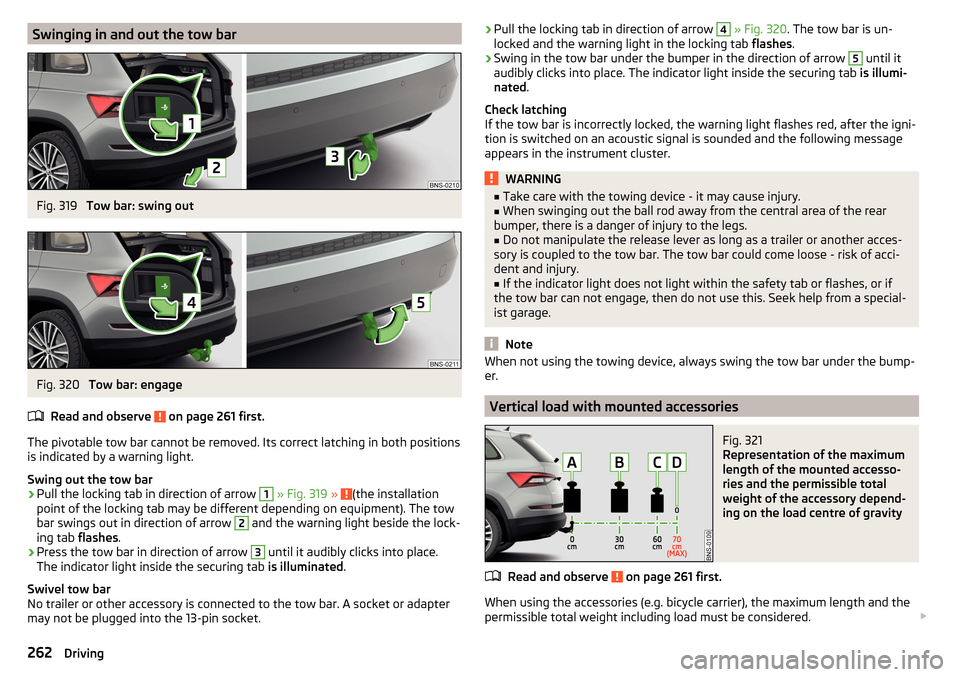
The pivotable tow bar cannot be removed. Its correct latching in both positions is indicated by a warning light.
Swing out the tow bar
›
Pull the locking tab in direction of arrow
1
» Fig. 319 » (the installation
point of the locking tab may be different depending on equipment). The tow
bar swings out in direction of arrow
2
and the warning light beside the lock-
ing tab flashes.
›
Press the tow bar in direction of arrow
3
until it audibly clicks into place.
The indicator light inside the securing tab is illuminated.
Swivel tow bar
No trailer or other accessory is connected to the tow bar. A socket or adapter
may not be plugged into the 13-pin socket.
› Pull the locking tab in direction of arrow 4
» Fig. 320 . The tow bar is un-
locked and the warning light in the locking tab flashes.›
Swing in the tow bar under the bumper in the direction of arrow
5
until it
audibly clicks into place. The indicator light inside the securing tab is illumi-
nated .
Check latching
If the tow bar is incorrectly locked, the warning light flashes red, after the igni-
tion is switched on an acoustic signal is sounded and the following message
appears in the instrument cluster.
WARNING■ Take care with the towing device - it may cause injury.■When swinging out the ball rod away from the central area of the rear
bumper, there is a danger of injury to the legs.■
Do not manipulate the release lever as long as a trailer or another acces-
sory is coupled to the tow bar. The tow bar could come loose - risk of acci-
dent and injury.
■
If the indicator light does not light within the safety tab or flashes, or if
the tow bar can not engage, then do not use this. Seek help from a special-
ist garage.
Note
When not using the towing device, always swing the tow bar under the bump-
er.
Vertical load with mounted accessories
Fig. 321
Representation of the maximum
length of the mounted accesso-
ries and the permissible total
weight of the accessory depend-
ing on the load centre of gravity
Read and observe on page 261 first.
When using the accessories (e.g. bicycle carrier), the maximum length and the
permissible total weight including load must be considered.
262Driving
Page 265 of 344
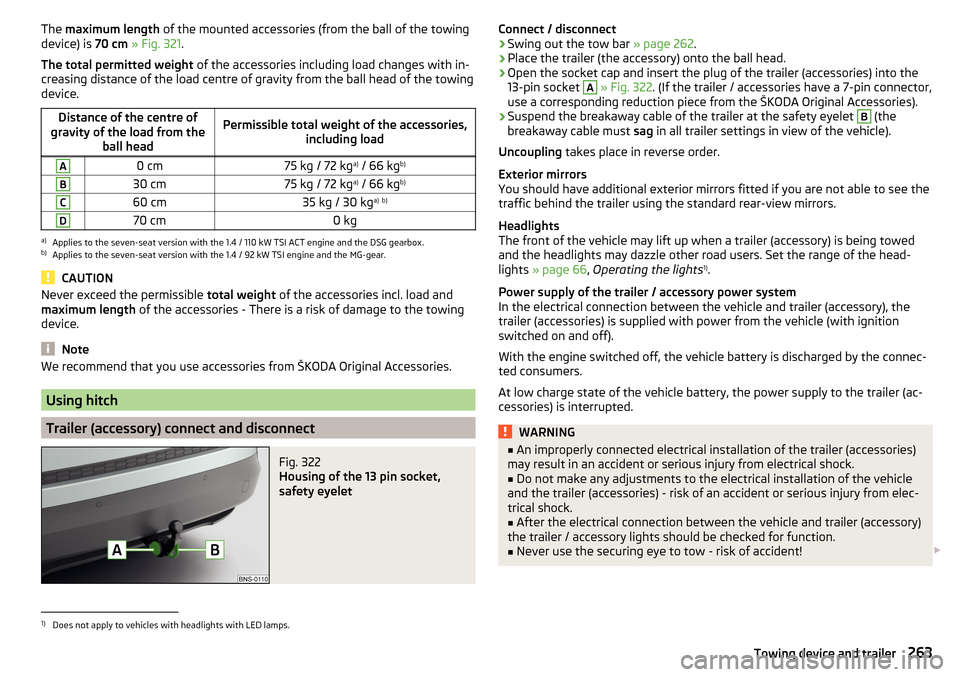
The maximum length of the mounted accessories (from the ball of the towing
device) is 70 cm » Fig. 321 .
The total permitted weight of the accessories including load changes with in-
creasing distance of the load centre of gravity from the ball head of the towing
device.Distance of the centre of
gravity of the load from the ball headPermissible total weight of the accessories, including loadA0 cm75 kg / 72 kga)
/ 66 kg b)B30 cm75 kg / 72 kg a)
/ 66 kg b)C60 cm35 kg / 30 kg a)
b)D70 cm0 kga)
Applies to the seven-seat version with the 1.4 / 110 kW TSI ACT engine and the DSG gearbox.
b)
Applies to the seven-seat version with the 1.4 / 92 kW TSI engine and the MG-gear.
CAUTION
Never exceed the permissible
total weight of the accessories incl. load and
maximum length of the accessories - There is a risk of damage to the towing
device.
Note
We recommend that you use accessories from ŠKODA Original Accessories.
Using hitch
Trailer (accessory) connect and disconnect
Fig. 322
Housing of the 13 pin socket,
safety eyelet
Connect / disconnect›Swing out the tow bar » page 262.›
Place the trailer (the accessory) onto the ball head.
›
Open the socket cap and insert the plug of the trailer (accessories) into the
13-pin socket
A
» Fig. 322 . (If the trailer / accessories have a 7-pin connector,
use a corresponding reduction piece from the ŠKODA Original Accessories).
›
Suspend the breakaway cable of the trailer at the safety eyelet
B
(the
breakaway cable must sag in all trailer settings in view of the vehicle).
Uncoupling takes place in reverse order.
Exterior mirrors
You should have additional exterior mirrors fitted if you are not able to see the
traffic behind the trailer using the standard rear-view mirrors.
Headlights
The front of the vehicle may lift up when a trailer (accessory) is being towed
and the headlights may dazzle other road users. Set the range of the head-
lights » page 66 , Operating the lights 1)
.
Power supply of the trailer / accessory power system
In the electrical connection between the vehicle and trailer (accessory), the
trailer (accessories) is supplied with power from the vehicle (with ignition
switched on and off).
With the engine switched off, the vehicle battery is discharged by the connec-
ted consumers.
At low charge state of the vehicle battery, the power supply to the trailer (ac-
cessories) is interrupted.
WARNING■ An improperly connected electrical installation of the trailer (accessories)
may result in an accident or serious injury from electrical shock.■
Do not make any adjustments to the electrical installation of the vehicle
and the trailer (accessories) - risk of an accident or serious injury from elec-
trical shock.
■
After the electrical connection between the vehicle and trailer (accessory)
the trailer / accessory lights should be checked for function.
■
Never use the securing eye to tow - risk of accident!
1)
Does not apply to vehicles with headlights with LED lamps.
263Towing device and trailer
Page 267 of 344
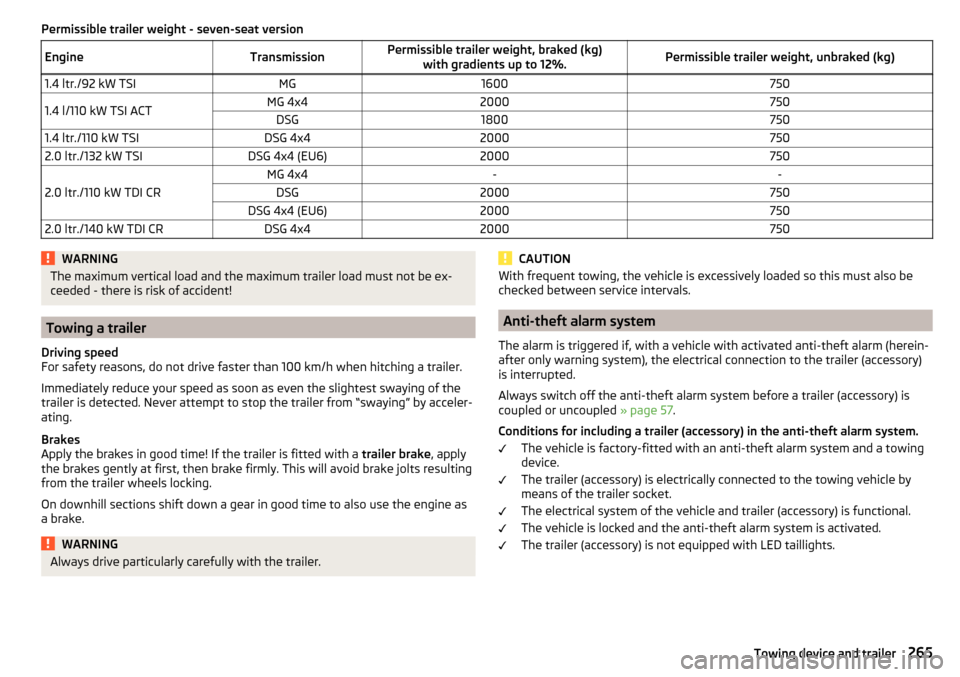
Permissible trailer weight - seven-seat versionEngineTransmissionPermissible trailer weight, braked (kg)with gradients up to 12%.Permissible trailer weight, unbraked (kg)1.4 ltr./92 kW TSIMG16007501.4 l/110 kW TSI ACTMG 4x42000750DSG18007501.4 ltr./110 kW TSIDSG 4x420007502.0 ltr./132 kW TSIDSG 4x4 (EU6)2000750
2.0 ltr./110 kW TDI CR
MG 4x4--DSG2000750DSG 4x4 (EU6)20007502.0 ltr./140 kW TDI CRDSG 4x42000750WARNINGThe maximum vertical load and the maximum trailer load must not be ex-
ceeded - there is risk of accident!
Towing a trailer
Driving speed
For safety reasons, do not drive faster than 100 km/h when hitching a trailer.
Immediately reduce your speed as soon as even the slightest swaying of the
trailer is detected. Never attempt to stop the trailer from “swaying” by acceler-
ating.
Brakes
Apply the brakes in good time! If the trailer is fitted with a trailer brake, apply
the brakes gently at first, then brake firmly. This will avoid brake jolts resulting
from the trailer wheels locking.
On downhill sections shift down a gear in good time to also use the engine as
a brake.
WARNINGAlways drive particularly carefully with the trailer.CAUTIONWith frequent towing, the vehicle is excessively loaded so this must also be
checked between service intervals.
Anti-theft alarm system
The alarm is triggered if, with a vehicle with activated anti-theft alarm (herein-
after only warning system), the electrical connection to the trailer (accessory)
is interrupted.
Always switch off the anti-theft alarm system before a trailer (accessory) is
coupled or uncoupled » page 57.
Conditions for including a trailer (accessory) in the anti-theft alarm system. The vehicle is factory-fitted with an anti-theft alarm system and a towing
device.
The trailer (accessory) is electrically connected to the towing vehicle by
means of the trailer socket.
The electrical system of the vehicle and trailer (accessory) is functional.
The vehicle is locked and the anti-theft alarm system is activated.
The trailer (accessory) is not equipped with LED taillights.
265Towing device and trailer
Page 273 of 344
The longer insect residues, bird droppings, road salt and other aggressive de-
posits remain on the paintwork of your vehicle, the more detrimental their de-
structive effect can be. High temperatures, such as those caused by intensive
sun's rays, accentuate this caustic effect.
It is essential to also thoroughly clean the underside of the vehicle at the end
of the winter.
Washing by hand
Wash the vehicle from top to bottom, if necessary, wash using a soft sponge or
washing mitt and plenty of water with appropriate detergents. Wash out the
sponge or washing glove thoroughly at short intervals.
Use a different sponge for the wheels, door sills and lower vehicle areas.
Give the vehicle a good rinse after washing it and dry it off using a chamois
leather.
Automatic car washes
The usual precautionary measures must be taken before washing the vehicle
in an automatic car wash system (e.g. closing the windows and the sliding/tilt-
ing roof etc.).
If your vehicle is fitted with any particular attached parts, such as a spoiler,
roof rack system, two-way radio aerial etc., it is best to consult the operator of
the car wash system beforehand.
After an automatic wash with wax treatment, the blades of the wipers should
be cleaned with cleaning agents specially designed for the purpose, and then
degreased.
Pressure washer
When washing the vehicle with a high-pressure cleaner, the instructions for
use of the equipment must be observed. This particularly applies to informa-
tion with respect to the pressure and spray distance from the vehicle surface.WARNING■
When washing your vehicle in the winter: Water and ice in the braking
system can affect the braking efficiency – risk of accident!■
Take care when cleaning the underbody or the inside of the wheel wells -
there is a risk of injury on sharp metal parts!
CAUTION■ Do not wash the vehicle in direct sunlight, do not exert pressure on the body
while washing. The temperature of the washing water should be max. 60 ° C -
otherwise there is a risk of damaging the vehicle paint.■
Before driving through a car wash, fold in the exterior mirrors - there is a risk
of damage.
CAUTION
Washing the vehicle using pressure washers■The foils should not be washed using pressure washers - there is a risk of
damage .■
Do not aim the water jet directly at the lock cylinders or the door or opening
joints when washing the vehicle in the winter – there is a risk of freezing.
■
During cleaning, always keep a sufficiently large spraying distance to the
parking sensors, the rear camera lens, to external decorative and protective
plastic parts (e.g. roof racks, spoilers, protective strips) and other vehicle parts
made of non-metallic materials such as rubber hoses or insulation materials.
■
The sensors of the parking aid can be sprayed only for a short time and there
must be a minimum distance of 10 cm - there is a risk of damage.
■
When washing the vehicle, do not point the water jet directly at the tow bar
or the trailer socket - there is a risk of seal damage or washing out the grease.
Caring for the outside of the vehicle
Read and observe
and on page 270 first.
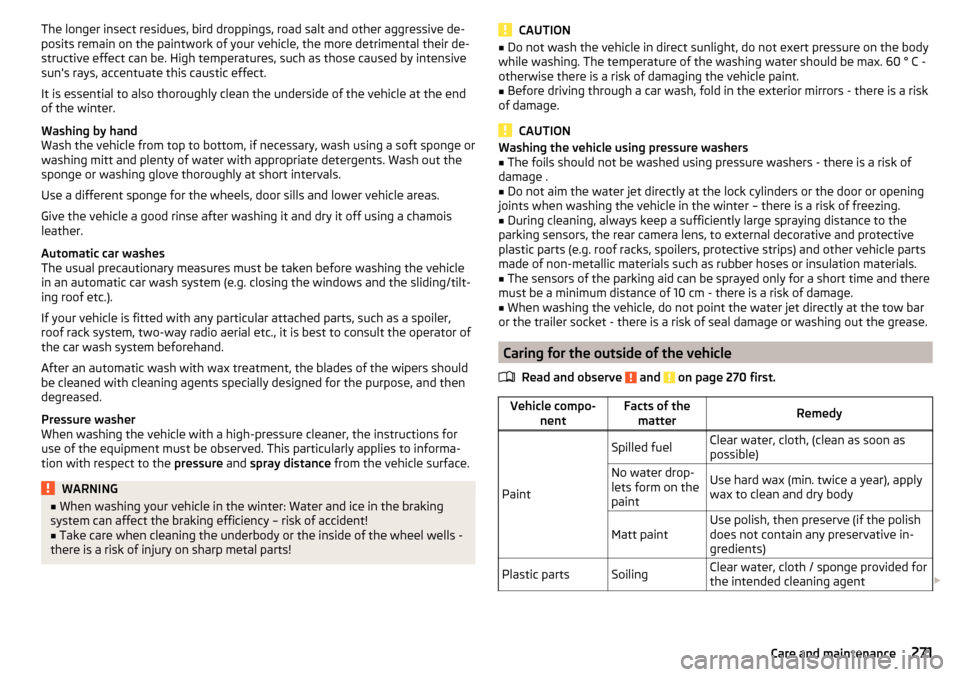
Vehicle compo- nentFacts of thematterRemedy
Paint
Spilled fuelClear water, cloth, (clean as soon as
possible)No water drop-
lets form on the
paintUse hard wax (min. twice a year), apply
wax to clean and dry bodyMatt paintUse polish, then preserve (if the polish
does not contain any preservative in-
gredients)Plastic partsSoilingClear water, cloth / sponge provided for
the intended cleaning agent 271Care and maintenance
Page 275 of 344

■Front, side and rear view cameras
The following instructions must be observed, otherwise there is a risk of
camera damage.
■ Do not remove snow / ice with warm / hot water.
■ To wash, never use a pressure washer or steam jet.
■ For cleaning, do not use abrasive cleaners.■
Door lock cylinder
■ Make sure that as little water as possible gets into the locking cylinder
when washing the vehicle - there is a risk of freezing the lock cylinder!
■
Wheels ■ Heavy contamination of the wheels can affect the balance of the wheels -
this can result in vibrations and, under some circumstances, can cause pre-
mature wear of the steering wheel.
Remove ice and snow from the windows
Fig. 324
Installation location of the ice
scraper, removing the scraper
Read and observe and on page 270 first.
Use a plastic ice scraper for removing snow and ice from the windows and mir-
rors. This can be on the inside of the fuel filler flap.
›
Open the fuel filler flap and slide the scraper in the direction of arrow
» Fig. 324 .
CAUTION
■
Move the scraper in one direction only, otherwise there is a risk of damage to
the glass surface.■
Do not remove snow / ice on the surface that is soiled (e.g. pea gravel, sand,
road salt) - there is a risk of damaging the surface.
■
Remove snow / ice carefully, otherwise there is a risk of damaging the labels
that have been fitted by the factory.
Caring for the interior
Read and observe
and on page 270 first.
Vehicle compo- nentFacts of thematterRemedy
Natural leather /
Faux leather /
Alcantara ®
/
Material
Dust, surface
contaminationVacuum cleanerPollution (fresh)Water, slightly damp cotton / wool
cloth, if necessary, mild soap solution a)
,
then wipe with a soft clothStubborn stainsSpecially prepared detergentCare (natural
leather)Treat the leather periodically with a
suitable leather protector and use a
care cream with light blocker and im-
pregnation after each cleaning.Care (Alcan-
tara ®
/ fabric)Remove stubborn hairs using a “clean-
ing glove”
Remove pills from materials with a
brushPlastic partsSoilingWater, slightly damp cloth or sponge, or
cleaning agent provided for this pur-
poseWindowsSoilingWash with clean water and dry using
the intended clothCovers of electri-
cally heated seatsSoilingSpecially provided cleaning agentSeat belts » Soilingsoft cloth and mild soap solution a)a)
Mild soap solution = 2 tablespoons of natural soap to 1 litre of lukewarm water.
WARNING■
Never clean the seat belts chemically as chemical cleaning products could
destroy the fabric.■
Air fresheners and scents can be hazardous to heath when the tempera-
ture inside the vehicle is high.
273Care and maintenance
Page 276 of 344
CAUTION■Natural leather /Faux leather / Alcantara ®
/ material
■ In lengthy periods in bright sunlight, it might be sensible to cover these
materials in order to avoid bleaching. ■ Fresh stains (e.g. from pens, lipstick, shoe polish etc.) should be removed as
soon as possible.
■ Ensure that no part of the leather is soaked through during cleaning and
that no water gets into the seams.
■ Do not clean the roof panelling with a brush – risk of damage to the surface
of the panelling.
■ Do not use solvents, floor wax, shoe cream, stain remover or similar agents
on Alcantara ®
seat upholstery.
■ Some clothing fabrics (e.g. dark denim) do not have sufficient colour fast-
ness - this may leave evident marks on upholstery. This is not a defect in the
fabric.
■ Sharp objects on garments (e.g. zips, rivets, sharp- edged belts) can dam-
age the upholstery fabrics in the vehicle. Such damage cannot be subse-
quently recognised as a justified complaint.■
Plastic parts ■ Do not attach scents or air fresheners to the dashboard – there is a risk of
damage to the dashboard.
■
Windows
■ Do not attach any stickers to the filaments or glass antenna - there is risk
of damage.
■
Covers of electrically heated seats
■ Do not clean with water or other liquids - there is a risk of damage to the
heating system.
■ Do not dry by switching on the heating.
■
Seat belts
■ Allow to dry before rolling up the seat belts.
Note
During vehicle use, the leather and Alcantara ®
parts may show minor changes
(e.g. folds, discolouration).Inspecting and replenishing
Fuel
Introduction
Fig. 325
Stickers with prescribed fuel
This chapter contains information on the following subjects:
Petrol and diesel refuelling
275
Unleaded petrol
275
Diesel fuel
276
The correct fuel for your vehicle is specified on the inside of the fuel filler flap
» Fig. 325 .
The fuel capacity for vehicles with front wheel drive is about 58 litres, and for
vehicles with four-wheel drive about 60 litres, with about 7 litres as reserve.
WARNINGFuel vapours are explosive - can be fatal!
CAUTION
■
Never drive until the fuel tank is completely empty! The irregular supply of
fuel can cause misfiring, which can result in damage to parts of the engine and
the exhaust system.■
Immediately remove any fuel that has spilled onto the vehicle's paintwork –
risk of paint damage.
■
If you would like to operate your vehicle in countries other than those with
its intended weather conditions, please contact a ŠKODA Partner. They will tell
you whether the fuel specified by the manufacturer is offered in the accompa-
nying country or whether it is permissible to operate the vehicle with another
fuel.
274General Maintenance
Page 281 of 344
CAUTIONRefill only operating fluids of the correct specification - danger of damaging
the vehicle!
Note
■ Fluids with the proper specifications can be purchased from the ŠKODA Origi-
nal Accessories or from the ŠKODA Genuine Parts ranges.■
We recommend you have the battery replaced by a specialist garage.
Open the bonnet and close
Fig. 329
Opening the bonnet
Read and observe
and on page 278 first.
Open flap
›
Make sure that the windscreen wiper arms are not folded away from the
windscreen - there is a risk of damage to the bonnet.
›
Open the driver's door and pull the unlocking lever below the dashboard in
the direction of arrow
1
» Fig. 329 .
›
Press the release lever in the direction of the arrow
2
and the bonnet is un-
locked.
›
Hold the bonnet and lift up until it is held open by the pressurised gas spring.
Close the bonnet lid
›
Pull the bonnet lid down far enough to overcome the force of the pressur-
ised gas spring.
›
From around 20 cm, lightly push the bonnet lid closed until it securely engag-
es.
If the bonnet lid is not properly closed, the display of the instrument cluster
will show this.
WARNING■ Never drive if the bonnet is open - could cause an accident!■Make sure that when closing the engine compartment lid, no body parts
are crushed - there is danger of injury!
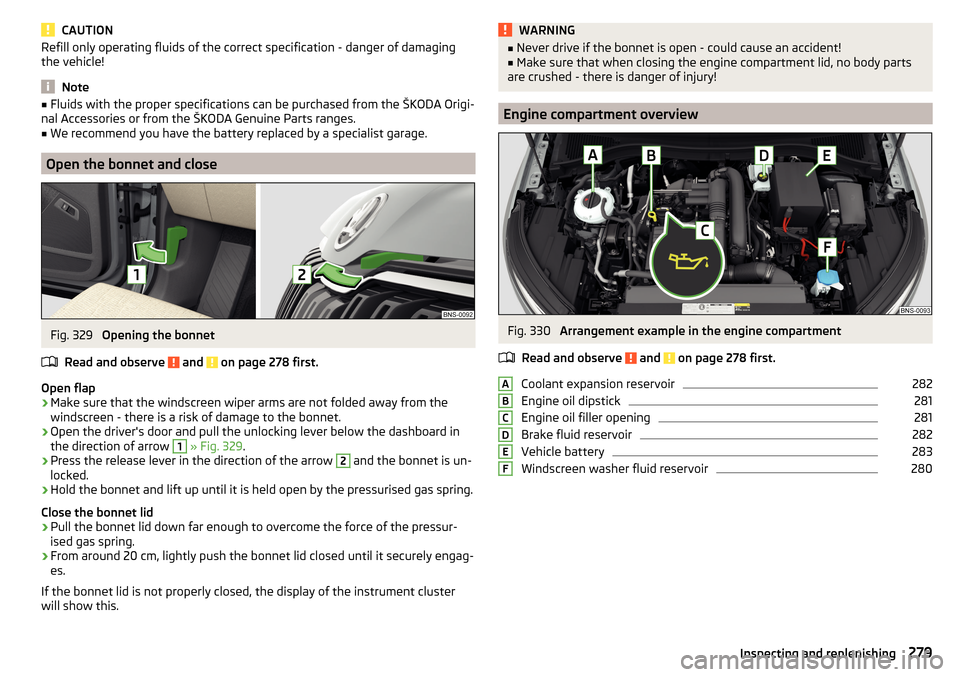
Engine compartment overview
Fig. 330
Arrangement example in the engine compartment
Read and observe
and on page 278 first.
Coolant expansion reservoir
282
Engine oil dipstick
281
Engine oil filler opening
281
Brake fluid reservoir
282
Vehicle battery
283
Windscreen washer fluid reservoir
280ABCDEF279Inspecting and replenishing
Page 282 of 344
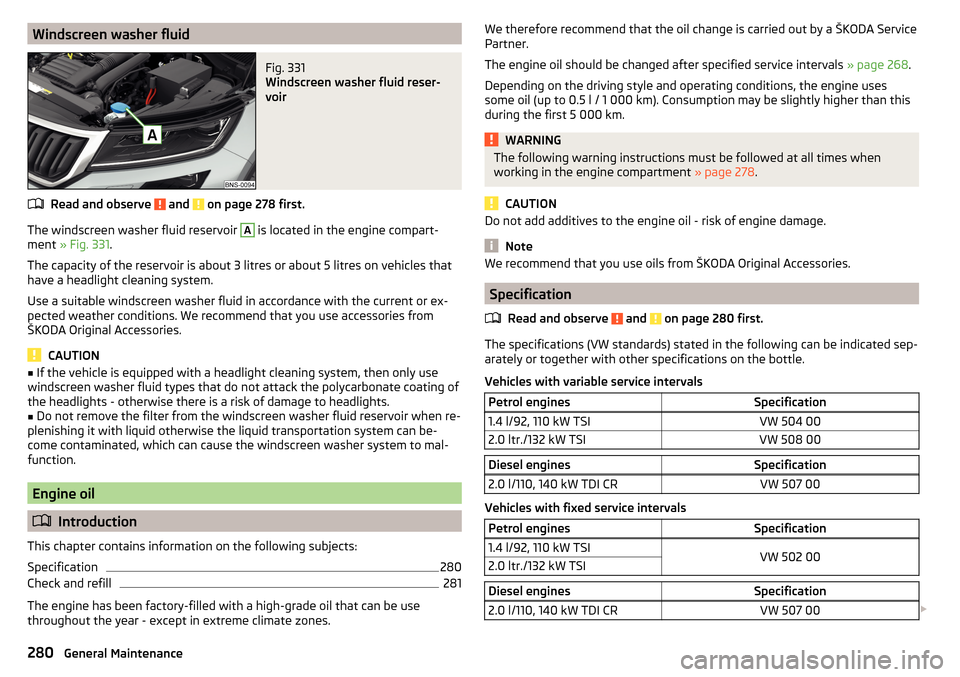
Windscreen washer fluidFig. 331
Windscreen washer fluid reser-
voir
Read and observe and on page 278 first.
The windscreen washer fluid reservoir
A
is located in the engine compart-
ment » Fig. 331 .
The capacity of the reservoir is about 3 litres or about 5 litres on vehicles that
have a headlight cleaning system.
Use a suitable windscreen washer fluid in accordance with the current or ex-
pected weather conditions. We recommend that you use accessories from
ŠKODA Original Accessories.
CAUTION
■ If the vehicle is equipped with a headlight cleaning system, then only use
windscreen washer fluid types that do not attack the polycarbonate coating of
the headlights - otherwise there is a risk of damage to headlights.■
Do not remove the filter from the windscreen washer fluid reservoir when re-
plenishing it with liquid otherwise the liquid transportation system can be-
come contaminated, which can cause the windscreen washer system to mal-
function.
Engine oil
Introduction
This chapter contains information on the following subjects:
Specification
280
Check and refill
281
The engine has been factory-filled with a high-grade oil that can be use
throughout the year - except in extreme climate zones.
We therefore recommend that the oil change is carried out by a ŠKODA Service
Partner.
The engine oil should be changed after specified service intervals » page 268.
Depending on the driving style and operating conditions, the engine uses
some oil (up to 0.5 l / 1 000 km). Consumption may be slightly higher than this
during the first 5 000 km.WARNINGThe following warning instructions must be followed at all times when
working in the engine compartment » page 278.
CAUTION
Do not add additives to the engine oil - risk of engine damage.
Note
We recommend that you use oils from ŠKODA Original Accessories.
Specification
Read and observe
and on page 280 first.
The specifications (VW standards) stated in the following can be indicated sep-arately or together with other specifications on the bottle.
Vehicles with variable service intervals
Petrol enginesSpecification1.4 l/92, 110 kW TSIVW 504 002.0 ltr./132 kW TSIVW 508 00Diesel enginesSpecification2.0 l/110, 140 kW TDI CRVW 507 00
Vehicles with fixed service intervals
Petrol enginesSpecification1.4 l/92, 110 kW TSIVW 502 002.0 ltr./132 kW TSIDiesel enginesSpecification2.0 l/110, 140 kW TDI CRVW 507 00 280General Maintenance