wiper blades SKODA KODIAQ 2016 1.G Owner's Manual
[x] Cancel search | Manufacturer: SKODA, Model Year: 2016, Model line: KODIAQ, Model: SKODA KODIAQ 2016 1.GPages: 344, PDF Size: 58.96 MB
Page 6 of 344
Do-it-yourself
Emergency equipment and self-help290
Emergency equipment
290
Changing a wheel
291
Puncture repair kit
295
Jump-starting
297
Towing the vehicle
298
Remote control and removable light -
replacing the battery/batteries
300
Emergency unlocking / locking of doors
302
Replacing windscreen wiper blades
303
Fuses and light bulbs
305
Fuses
305
Bulbs
308
Technical data
Technical data
313
Basic vehicle data
313
Vehicle-specific details per engine type
318
Index
4Table of Contents
Page 14 of 344
Safety
Passive Safety
General information
Introduction
This chapter contains information on the following subjects:
Before setting off
12
Driving safety
12
This section of the manual includes important information on the subject of
passive safety. We have combined everything here which you should be famili-
ar with, for example, regarding seat belts, airbags, safety of children and any-
thing similar.
Other important safety information can also be found in the following chapters
of this Owner´s Manual. The Owner´s Manual should therefore always be in
the vehicle.
Before setting off
For your own safety and the safety of the people travelling with you, please
pay attention to the following points before setting off.
▶ Check the function of the lighting and turn signal systems.
▶ Check the function of the wipers and check the wiper blades for wear. Check
the windscreen washer fluid level.
▶ Ensure that all of the windows offer good visibility to the outside.
▶ Adjust the rear-view mirror so that vision to the rear is guaranteed. Ensure
that the mirrors are not covered.
▶ Check the tyre inflation pressure.
▶ Check the engine oil, brake fluid and coolant level.
▶ Secure all items of luggage.
▶ Do not exceed the permissible axle loads and permissible gross weight of the
vehicle.
▶ Close all doors as well as the bonnet and boot lid.
▶ Ensure that no objects can obstruct the pedals.
▶
Protect children by using a suitable child seat » page 23, Transporting chil-
dren safely .
▶ Adopt the correct seated position. Instruct your passengers to assume the
correct seated position » page 12, Correct and safe seated position .
Driving safety
In the interests of traffic safety, the following information must be observed. ▶ Do not become distracted from concentrating on the traffic situation, (e.g. by
your passengers or mobile phone calls).
▶ Never drive when your driving ability is impaired, (e.g. due to medication, al-
cohol or drugs).
▶ Keep to the traffic regulations and the permissible speed limit.
▶ Always adjust the driving speed to the road, traffic and weather conditions.
▶ Take regular breaks on long journeys (at least every two hours).
Correct and safe seated position
Introduction
This chapter contains information on the following subjects:
Driver’s correct seated position
13
Adjusting the steering wheel position
13
Passenger’s correct seating position
14
Passengers’ correct seating position on the rear seats
14
Always assume the correct seated position before setting off and do not
change this position while driving. Also advise your passengers to adopt the
correct seated position and not to change this position while the car is moving.
The following list contains instructions for the Passenger which, if not ob-
served, may cause serious injuries or death. ▶ Do not lean against the dash panel.
▶ Do not put your feet on the dash panel.
The following list contains instructions for all Passengers which, if not ob-
served, may cause serious injuries or death.
▶ Do not sit only on the front part of the seat.
▶ Do not sit facing to the side.
▶ Do not lean out of the window.
▶ Do not put your limbs out of the window.
▶ Do not put your feet on the seat cushion.
12Safety
Page 76 of 344
WARNINGDo not use the windscreen washer system at low temperatures, without
heating the windscreen beforehand. The window washer fluid could other-
wise freeze on the windscreen and restrict the view to the front.
CAUTION
■ If the windscreen wipers are in rest position, they cannot be folded out from
the windscreen. The wipers must be set to the service position to raise them
off the windscreen » page 304.■
In cold temperatures and during the winter, check before switching on the
ignition that the wiper blades are not frozen to the windscreen. If the wind-
screen wipers are switched on when the blades are frozen to the windscreen,
this may damage both the blades and windscreen wiper motor.
■
Carefully release the frozen-on windscreen wiper blades from the wind-
screen and remove snow and ice.
■
Handle the windscreen wipers with care - there is the risk of damaging the
windscreen with the windscreen wiper arms.
■
Do not switch on the ignition when the front windscreen wiper arms are fol-
ded down - there is the danger of damaging the bonnet by the windscreen
wiper arms.
■
If there is an obstacle on the windscreen, the wipers will try to push away
the obstacle five times. Thereafter, the wipers will stop to prevent them be-
coming damaged. Turn on the wipers again only after the obstacle has been
removed.
Note
■ Each time the ignition switches off for the third time, the position of the
windscreen wipers changes. This counteracts an early fatigue of the wiper
blades.■
The windscreen washer nozzles for the windscreen are heated when the en-
gine is running and the outside temperature is less than +10 °C.
Front wipers and washersFig. 65
Operating the windscreen wipers
and washing system at the front
Read and observe and on page 74 first.
The lever can be moved to the following positions » Fig. 65
Fast disk wiping Slow disk wiping
Depending on equipment fitted:
▶ Intermittent wipe of the windscreen
▶ Automatic windscreen wiping in the rain
Wipers and washers off
Single windscreen wipe (sprung position)
Setting of windscreen wiper interval for the position
- by setting the
switch in the direction of the arrow, the windscreen wipers will wipe more
often
Spraying and wiping the windscreen (sprung position)
Spraying and wiping the window
After releasing the operating lever, the wipers will make from 2 to 3 wiper
strokes.
At a speed of more than 2 km/h, the wiper wipes once again 5 seconds after
the last wiper stroke in order to wipe the last drops from the windscreen. This
function can be activated/deactivated by a specialist garage.
Automatic windscreen wiping during rain can be activated/ deactivated in
the Infotainment menu
→
→
Mirrors and wipers
.
A74Operation
Page 273 of 344
The longer insect residues, bird droppings, road salt and other aggressive de-
posits remain on the paintwork of your vehicle, the more detrimental their de-
structive effect can be. High temperatures, such as those caused by intensive
sun's rays, accentuate this caustic effect.
It is essential to also thoroughly clean the underside of the vehicle at the end
of the winter.
Washing by hand
Wash the vehicle from top to bottom, if necessary, wash using a soft sponge or
washing mitt and plenty of water with appropriate detergents. Wash out the
sponge or washing glove thoroughly at short intervals.
Use a different sponge for the wheels, door sills and lower vehicle areas.
Give the vehicle a good rinse after washing it and dry it off using a chamois
leather.
Automatic car washes
The usual precautionary measures must be taken before washing the vehicle
in an automatic car wash system (e.g. closing the windows and the sliding/tilt-
ing roof etc.).
If your vehicle is fitted with any particular attached parts, such as a spoiler,
roof rack system, two-way radio aerial etc., it is best to consult the operator of
the car wash system beforehand.
After an automatic wash with wax treatment, the blades of the wipers should
be cleaned with cleaning agents specially designed for the purpose, and then
degreased.
Pressure washer
When washing the vehicle with a high-pressure cleaner, the instructions for
use of the equipment must be observed. This particularly applies to informa-
tion with respect to the pressure and spray distance from the vehicle surface.WARNING■
When washing your vehicle in the winter: Water and ice in the braking
system can affect the braking efficiency – risk of accident!■
Take care when cleaning the underbody or the inside of the wheel wells -
there is a risk of injury on sharp metal parts!
CAUTION■ Do not wash the vehicle in direct sunlight, do not exert pressure on the body
while washing. The temperature of the washing water should be max. 60 ° C -
otherwise there is a risk of damaging the vehicle paint.■
Before driving through a car wash, fold in the exterior mirrors - there is a risk
of damage.
CAUTION
Washing the vehicle using pressure washers■The foils should not be washed using pressure washers - there is a risk of
damage .■
Do not aim the water jet directly at the lock cylinders or the door or opening
joints when washing the vehicle in the winter – there is a risk of freezing.
■
During cleaning, always keep a sufficiently large spraying distance to the
parking sensors, the rear camera lens, to external decorative and protective
plastic parts (e.g. roof racks, spoilers, protective strips) and other vehicle parts
made of non-metallic materials such as rubber hoses or insulation materials.
■
The sensors of the parking aid can be sprayed only for a short time and there
must be a minimum distance of 10 cm - there is a risk of damage.
■
When washing the vehicle, do not point the water jet directly at the tow bar
or the trailer socket - there is a risk of seal damage or washing out the grease.
Caring for the outside of the vehicle
Read and observe
and on page 270 first.
Vehicle compo- nentFacts of thematterRemedy
Paint
Spilled fuelClear water, cloth, (clean as soon as
possible)No water drop-
lets form on the
paintUse hard wax (min. twice a year), apply
wax to clean and dry bodyMatt paintUse polish, then preserve (if the polish
does not contain any preservative in-
gredients)Plastic partsSoilingClear water, cloth / sponge provided for
the intended cleaning agent 271Care and maintenance
Page 274 of 344
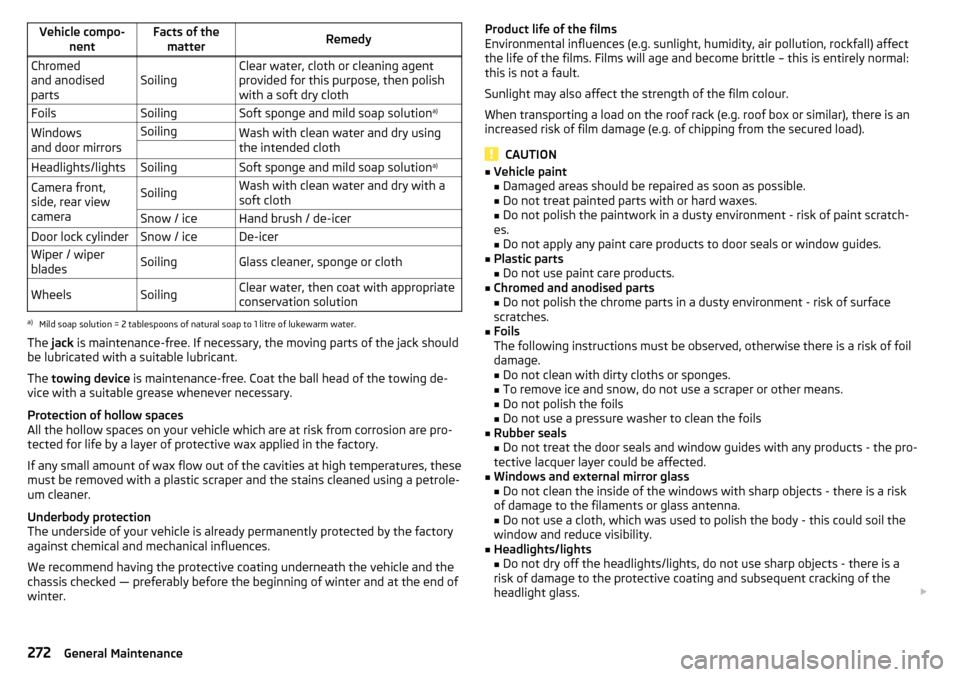
Vehicle compo-nentFacts of thematterRemedyChromed
and anodised
partsSoilingClear water, cloth or cleaning agent
provided for this purpose, then polish
with a soft dry clothFoilsSoilingSoft sponge and mild soap solution a)Windows
and door mirrorsSoilingWash with clean water and dry using
the intended cloth Headlights/lightsSoilingSoft sponge and mild soap solution a)Camera front,
side, rear view
cameraSoilingWash with clean water and dry with a
soft clothSnow / iceHand brush / de-icerDoor lock cylinderSnow / iceDe-icerWiper / wiper
bladesSoilingGlass cleaner, sponge or clothWheelsSoilingClear water, then coat with appropriate
conservation solutiona)
Mild soap solution = 2 tablespoons of natural soap to 1 litre of lukewarm water.
The jack is maintenance-free. If necessary, the moving parts of the jack should
be lubricated with a suitable lubricant.
The towing device is maintenance-free. Coat the ball head of the towing de-
vice with a suitable grease whenever necessary.
Protection of hollow spaces
All the hollow spaces on your vehicle which are at risk from corrosion are pro-
tected for life by a layer of protective wax applied in the factory.
If any small amount of wax flow out of the cavities at high temperatures, these
must be removed with a plastic scraper and the stains cleaned using a petrole-
um cleaner.
Underbody protection
The underside of your vehicle is already permanently protected by the factory
against chemical and mechanical influences.
We recommend having the protective coating underneath the vehicle and the
chassis checked — preferably before the beginning of winter and at the end of winter.
Product life of the films
Environmental influences (e.g. sunlight, humidity, air pollution, rockfall) affect
the life of the films. Films will age and become brittle – this is entirely normal:
this is not a fault.
Sunlight may also affect the strength of the film colour.
When transporting a load on the roof rack (e.g. roof box or similar), there is an
increased risk of film damage (e.g. of chipping from the secured load).
CAUTION
■ Vehicle paint
■ Damaged areas should be repaired as soon as possible.
■ Do not treat painted parts with or hard waxes.
■ Do not polish the paintwork in a dusty environment - risk of paint scratch-
es. ■ Do not apply any paint care products to door seals or window guides.■
Plastic parts
■ Do not use paint care products.
■
Chromed and anodised parts
■ Do not polish the chrome parts in a dusty environment - risk of surface
scratches.
■
Foils
The following instructions must be observed, otherwise there is a risk of foil
damage.
■ Do not clean with dirty cloths or sponges.
■ To remove ice and snow, do not use a scraper or other means.
■ Do not polish the foils
■ Do not use a pressure washer to clean the foils
■
Rubber seals
■ Do not treat the door seals and window guides with any products - the pro-
tective lacquer layer could be affected.
■
Windows and external mirror glass
■ Do not clean the inside of the windows with sharp objects - there is a risk
of damage to the filaments or glass antenna. ■ Do not use a cloth, which was used to polish the body - this could soil the
window and reduce visibility.
■
Headlights/lights ■ Do not dry off the headlights/lights, do not use sharp objects - there is a
risk of damage to the protective coating and subsequent cracking of the
headlight glass.
272General Maintenance
Page 305 of 344
›On vehicles with the
KESSY system, hold the emergency key with the handle
facing downwards » Fig. 360 - into the lock cylinder and unlock / lock the
vehicle.›
Pull on the door handle and hold.
›
Replace the cover.
CAUTION
Make sure you do not damage the paint when performing an emergency lock-
ing/unlocking.
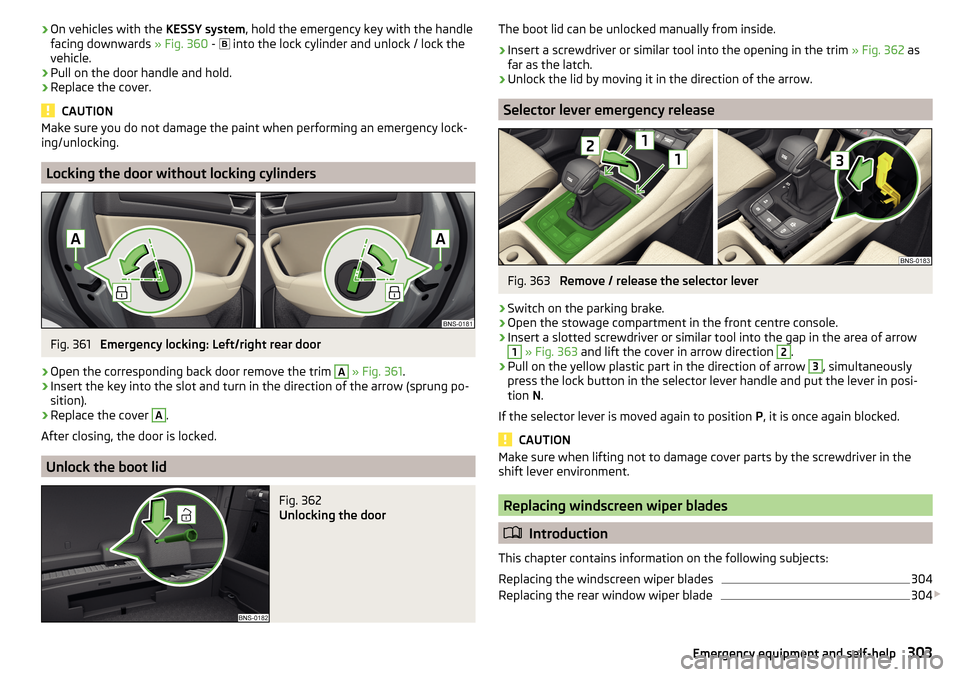
Locking the door without locking cylinders
Fig. 361
Emergency locking: Left/right rear door
›
Open the corresponding back door remove the trim
A
» Fig. 361 .
›
Insert the key into the slot and turn in the direction of the arrow (sprung po-
sition).
›
Replace the cover
A
.
After closing, the door is locked.
Unlock the boot lid
Fig. 362
Unlocking the door
The boot lid can be unlocked manually from inside.›
Insert a screwdriver or similar tool into the opening in the trim » Fig. 362 as
far as the latch.
›
Unlock the lid by moving it in the direction of the arrow.
Selector lever emergency release
Fig. 363
Remove / release the selector lever
›
Switch on the parking brake.
›
Open the stowage compartment in the front centre console.
›
Insert a slotted screwdriver or similar tool into the gap in the area of arrow
1
» Fig. 363 and lift the cover in arrow direction
2
.
›
Pull on the yellow plastic part in the direction of arrow
3
, simultaneously
press the lock button in the selector lever handle and put the lever in posi-
tion N.
If the selector lever is moved again to position P, it is once again blocked.
CAUTION
Make sure when lifting not to damage cover parts by the screwdriver in the
shift lever environment.
Replacing windscreen wiper blades
Introduction
This chapter contains information on the following subjects:
Replacing the windscreen wiper blades
304
Replacing the rear window wiper blade
304
303Emergency equipment and self-help
Page 306 of 344
WARNINGReplace the windscreen wiper blades once or twice a year for safety rea-
sons.
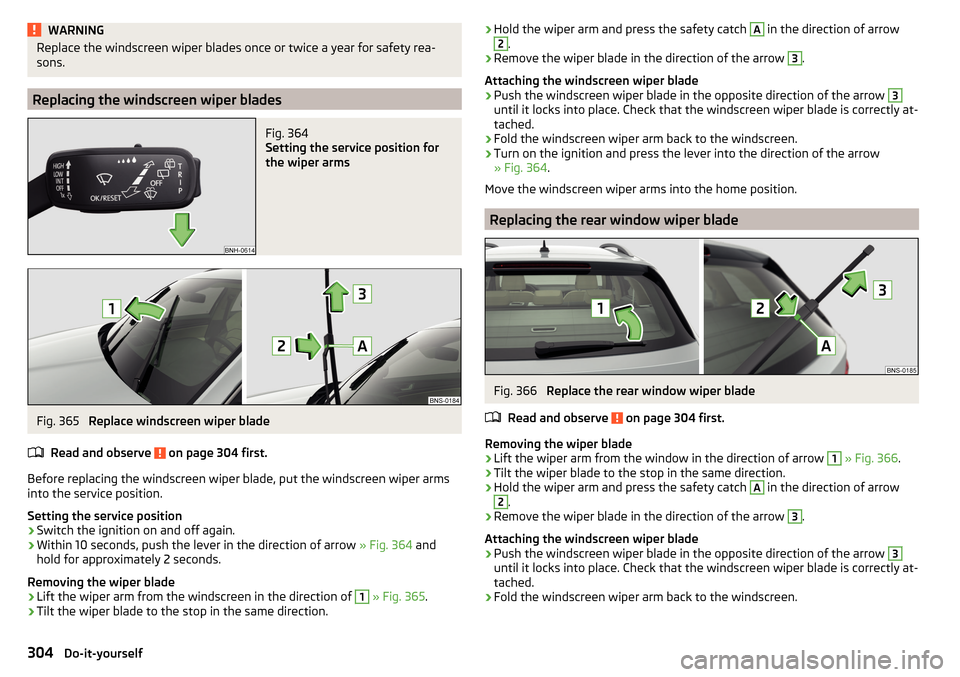
Replacing the windscreen wiper blades
Fig. 364
Setting the service position for
the wiper arms
Fig. 365
Replace windscreen wiper blade
Read and observe
on page 304 first.
Before replacing the windscreen wiper blade, put the windscreen wiper arms
into the service position.
Setting the service position
›
Switch the ignition on and off again.
›
Within 10 seconds, push the lever in the direction of arrow » Fig. 364 and
hold for approximately 2 seconds.
Removing the wiper blade
›
Lift the wiper arm from the windscreen in the direction of
1
» Fig. 365 .
›
Tilt the wiper blade to the stop in the same direction.
›Hold the wiper arm and press the safety catch A in the direction of arrow2.›
Remove the wiper blade in the direction of the arrow
3
.
Attaching the windscreen wiper blade
›
Push the windscreen wiper blade in the opposite direction of the arrow
3
until it locks into place. Check that the windscreen wiper blade is correctly at-
tached.
›
Fold the windscreen wiper arm back to the windscreen.
›
Turn on the ignition and press the lever into the direction of the arrow
» Fig. 364 .
Move the windscreen wiper arms into the home position.
Replacing the rear window wiper blade
Fig. 366
Replace the rear window wiper blade
Read and observe
on page 304 first.
Removing the wiper blade
›
Lift the wiper arm from the window in the direction of arrow
1
» Fig. 366 .
›
Tilt the wiper blade to the stop in the same direction.
›
Hold the wiper arm and press the safety catch
A
in the direction of arrow
2
.
›
Remove the wiper blade in the direction of the arrow
3
.
Attaching the windscreen wiper blade
›
Push the windscreen wiper blade in the opposite direction of the arrow
3
until it locks into place. Check that the windscreen wiper blade is correctly at-
tached.
›
Fold the windscreen wiper arm back to the windscreen.
304Do-it-yourself
Page 325 of 344
ChangingBatteries for the removable light302
Battery300, 301
Wheels291
Windscreen wiper blades304
Changing a wheel291
Changing gear Selector lever
210
Tiptronic211
Charging a vehicle battery284
Check Brake fluid
282
Engine oil281
Oil level281
Checking Battery status
284
Coolant282
Checks Statutory checks
266
Children and safety23
Child safety lock56
Child seat23
Classification26
I-Size28
Installation location26, 27, 28
ISOFIX27
on the front passenger seat24, 25
TOP TETHER28
Cigarette lighter99
Cleaning the vehicle Interior
273
Outside271
Washing270
Climatronic109
air distribution control113
Automatic operation112
Operate in Infotainment112
Operating elements110
Clock change display
125
Clothes hook94
Cockpit31
Lighting71
Columbus external module
123
infotainment Description121
Comfort flashing67
COMING HOME69
Compartments87
Compatible sources DVD video
154
Pictures152
Component protection267
Computer see multifunction display
46
Conditions for pairing160
Conference call167
Configuration wizard126
Connection with the infotainment Hotspot170
Connect to the hotspot of the external device170
Coolant281
Checking282
Refilling282
Temperature display32
Warning light39
CORNER See Fog lights with CORNER function
69
Correct routing of seat belt
16
Correct seated position12
Correct seating position14
Crew Protect Assist253
Cruise control240
Cruise Control System239
Cup holders90
D
DAB
141, 142
additional information141
Radio Text and images presentation141
set to134, 140
DAB Slideshow141
Data Connection Carstick
171
connection171
Internet171
rSAP171
SIM card171
WIRELESS INTERNET ACCESS171
Data roaming132
Data transfer of external devices127
Date131, 138
DAY LIGHT See Daytime running lights
66
Daytime running lights66
Dazzle73
DCC42, 251
De-icing the windscreen and rear window72
Deactivation Airbag
22
default settings201
Delayed locking of the boot lid See boot lid
59
Delete destination192
Demo mode138, 193
Descent Control System42
Destination Enter destination using the address
183
Favourite192
final destinations184
Home address185
Image with GPS189
Memory192
Destination details192
323Index
Page 333 of 344
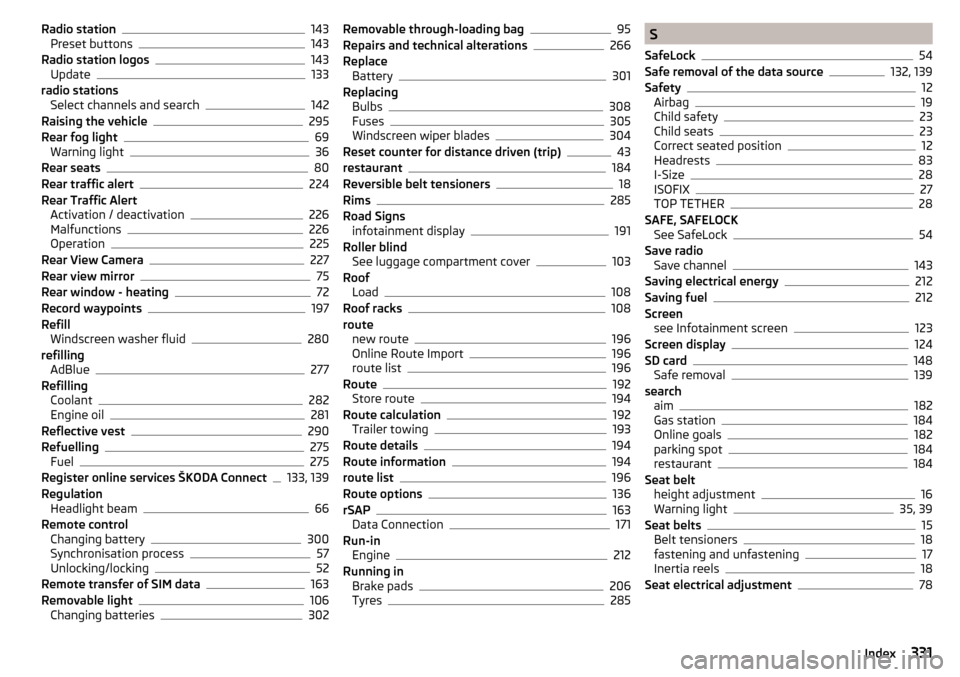
Radio station143
Preset buttons143
Radio station logos143
Update133
radio stations Select channels and search
142
Raising the vehicle295
Rear fog light69
Warning light36
Rear seats80
Rear traffic alert224
Rear Traffic Alert Activation / deactivation
226
Malfunctions226
Operation225
Rear View Camera227
Rear view mirror75
Rear window - heating72
Record waypoints197
Refill Windscreen washer fluid
280
refilling AdBlue
277
Refilling Coolant
282
Engine oil281
Reflective vest290
Refuelling275
Fuel275
Register online services ŠKODA Connect133, 139
Regulation Headlight beam
66
Remote control Changing battery
300
Synchronisation process57
Unlocking/locking52
Remote transfer of SIM data163
Removable light106
Changing batteries302
Removable through-loading bag95
Repairs and technical alterations266
Replace Battery
301
Replacing Bulbs
308
Fuses305
Windscreen wiper blades304
Reset counter for distance driven (trip)43
restaurant184
Reversible belt tensioners18
Rims285
Road Signs infotainment display
191
Roller blind See luggage compartment cover
103
Roof Load
108
Roof racks108
route new route
196
Online Route Import196
route list196
Route192
Store route194
Route calculation192
Trailer towing193
Route details194
Route information194
route list196
Route options136
rSAP163
Data Connection171
Run-in Engine
212
Running in Brake pads
206
Tyres285
S
SafeLock
54
Safe removal of the data source132, 139
Safety12
Airbag19
Child safety23
Child seats23
Correct seated position12
Headrests83
I-Size28
ISOFIX27
TOP TETHER28
SAFE, SAFELOCK See SafeLock
54
Save radio Save channel
143
Saving electrical energy212
Saving fuel212
Screen see Infotainment screen
123
Screen display124
SD card148
Safe removal139
search aim
182
Gas station184
Online goals182
parking spot184
restaurant184
Seat belt height adjustment
16
Warning light35, 39
Seat belts15
Belt tensioners18
fastening and unfastening17
Inertia reels18
Seat electrical adjustment78
331Index
Page 338 of 344
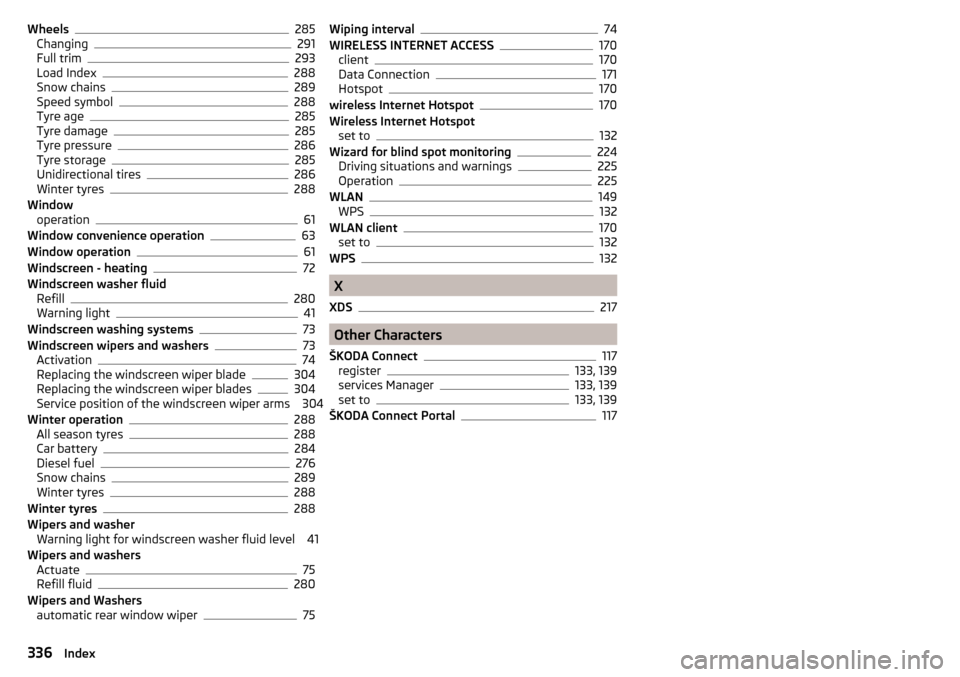
Wheels285
Changing291
Full trim293
Load Index288
Snow chains289
Speed symbol288
Tyre age285
Tyre damage285
Tyre pressure286
Tyre storage285
Unidirectional tires286
Winter tyres288
Window operation
61
Window convenience operation63
Window operation61
Windscreen - heating72
Windscreen washer fluid Refill
280
Warning light41
Windscreen washing systems73
Windscreen wipers and washers73
Activation74
Replacing the windscreen wiper blade304
Replacing the windscreen wiper blades304
Service position of the windscreen wiper arms 304
Winter operation
288
All season tyres288
Car battery284
Diesel fuel276
Snow chains289
Winter tyres288
Winter tyres288
Wipers and washer Warning light for windscreen washer fluid level 41
Wipers and washers Actuate
75
Refill fluid280
Wipers and Washers automatic rear window wiper
75
Wiping interval74
WIRELESS INTERNET ACCESS170
client170
Data Connection171
Hotspot170
wireless Internet Hotspot170
Wireless Internet Hotspot set to
132
Wizard for blind spot monitoring224
Driving situations and warnings225
Operation225
WLAN149
WPS132
WLAN client170
set to132
WPS132
X
XDS
217
Other Characters
ŠKODA Connect
117
register133, 139
services Manager133, 139
set to133, 139
ŠKODA Connect Portal117
336Index