change time SKODA OCTAVIA 2008 2.G / (1Z) Amundsen Infotainment Navigation System Manual
[x] Cancel search | Manufacturer: SKODA, Model Year: 2008, Model line: OCTAVIA, Model: SKODA OCTAVIA 2008 2.G / (1Z)Pages: 37, PDF Size: 2.02 MB
Page 5 of 37
General information3
General informationEquipment overview
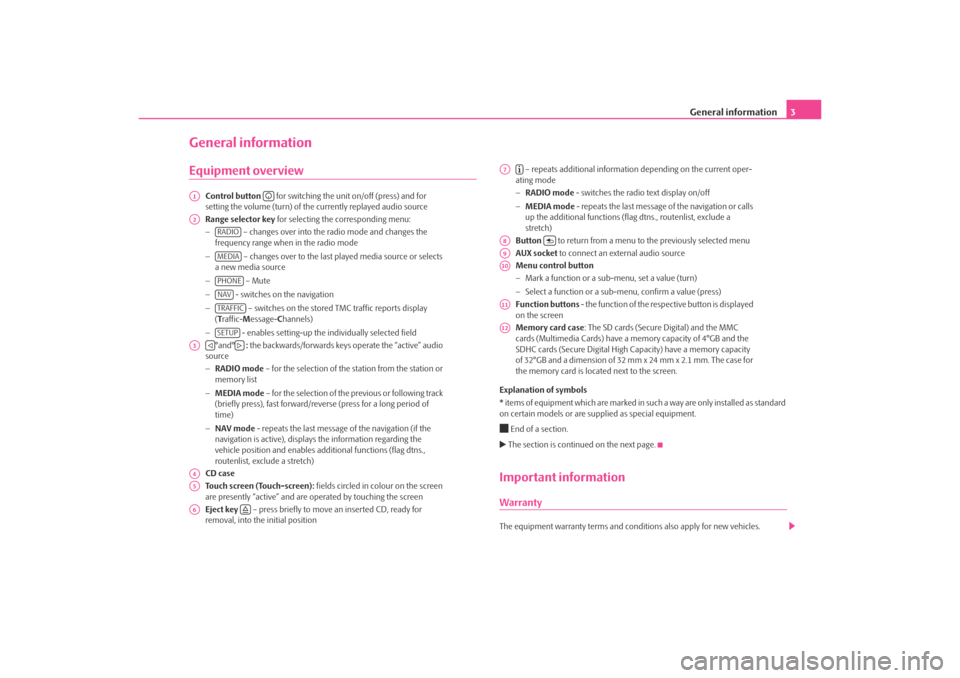
Control button for switching the unit on/off (press) and for
setting the volume (turn) of the currently replayed audio source
Range selector key for selecting the corresponding menu:
− – changes over into the radio mode and changes the
frequency range when in the radio mode
− – changes over to the last played media source or selects
a new media source
− – Mute
− - switches on the navigation
− – switches on the stored TMC traffic reports display
( T raffic- Message- Channels)
− - enables setting-up the in dividually selected field
°and° : the backwards/forwards keys operate the “active” audio
source
− RADIO mode – for the selection of the station from the station or
memory list
− MEDIA mode – for the selection of the previous or following track
(briefly press), fast forward/reve rse (press for a long period of
time)
− NAV mode - repeats the last message of the navigation (if the
navigation is active), displays the information regarding the
vehicle position and enables addi tional functions (flag dtns.,
routenlist, exclude a stretch)
CD case
Touch screen (Touch-screen): fields circled in colour on the screen
are presently “active” and are operated by touching the screen
Eject key – press briefly to move an inserted CD, ready for
removal, into the initial position – repeats additional informatio
n depending on the current oper-
ating mode
− RADIO mode - switches the radio text display on/off
− MEDIA mode - repeats the last message of the navigation or calls
up the additional functions (flag dtns., routenlist, exclude a
stretch)
Button to return from a menu to the previously selected menu
AUX socket to connect an external audio source
Menu control button
− Mark a function or a sub-menu, set a value (turn)
− Select a function or a sub-menu, confirm a value (press)
Function buttons - the function of the respective button is displayed
on the screen
Memory card case : The SD cards (Secure Digital) and the MMC
cards (Multimedia Cards) have a me mory capacity of 4°GB and the
SDHC cards (Secure Digital High Ca pacity) have a memory capacity
of 32°GB and a dimension of 32 mm x 24 mm x 2.1 mm. The case for
the memory card is located next to the screen.
Explanation of symbols
* items of equipment which are marked in such a way are only installed as standard
on certain models or are su pplied as special equipment.
End of a section. The section is continued on the next page.Important informationWarrantyThe equipment warranty terms and conditions also apply for new vehicles.
A1
A2
RADIOMEDIAPHONENAVTRAFFICSETUP
A3
A4A5A6
A7
A8
A9A10A11A12
s3lk.book Page 3 Friday, November 7, 2008 11:07 AM
Page 6 of 37
General information
4After the expiration of the warranty, a piece of equipment in need of repair will be
replaced with a reconditione d, original item with spare part warranty. It is,
however, a precondition that the housin g has not been damaged and no unauthor-
ised attempts have been made to carry out repairs.
Note
Damage within the meaning of the warranty must not be the result of improper
handling of the system or fr om unprofessional repair attempts. It is also essential
that there is no external damage.Information on how to operate the navigation systemThe requirements of today's road traffic demand the driver’s full concentration at
all times.
Apart from the availability entertainmen t, the extensive and demanding equipment
details of this system also offer a wide range of information, which will help you to
reach your destination quickly and safely.
But you should only operate the navigation system with its wide range of
possibilities when the traffic situation allows.
The volume settings must be selected in such a way that audible signals from the
outside, e.g. a Martins horn from utility vehicles (police cars, ambulances and fire
brigade), can be heard at all times.
WARNING
Please concentrate fully at all times on your driving! As the driver you are
fully responsible for road safety. Only use the functions in such a way that
you are always in full control of your vehicle in all traffic situations!Before using the navigation system•
Please observe the respective traffic regulations when driving.
•
Street and location names can be changed. It is therefore possible that the
names stored on the CD might not correspond to the changed names.
•
The route calculated by the navigation system is a recommendation for
reaching the intended destination. While driving please pay attention to stopping
restrictions, traffic lights, one-way street s, lane change restrictions, canals and
ferries.
WARNING
Road traffic legislation (StVO) applies at all times, even if a driving recom-
mendation contradicts the StVO.
Caution
•
Inserting a second CD while a CD is being ejected can destroy the CD drive in
the unit. Please note that the CD ejection lasts a few seconds after pressing the
Eject button . During this time the lock in front of the CD case is open. It is
essential that you wait until the CD has been fully ejected before you try to insert a
new CD.
•
Press the buttons and the keys of the unit gently in order to avoid damaging
them. Gentle pressure on the appropriate key is sufficient to operate the unit.
Please note that the rotary/push knobs have predetermined breaking points, in
order to reduce the risk of injury.
•
Do not use any pointed or sharp-edged objects to operate the touch-screen.
Slight finger pressure sufficient to operate the equipment. A display on the screen,
which cannot be called up by pressing the button, is therefore not available at that
time.
•
Please note that a dirty or scratched na vigation CD can considerably impair the
speed and the functions of the navigation system.
Screen careTreat the screen with great care, because dents and scratches can occur through
finger pressure or contact with sharp objects.
s3lk.book Page 4 Friday, November 7, 2008 11:07 AM
Page 11 of 37
Range selector key SETUP9
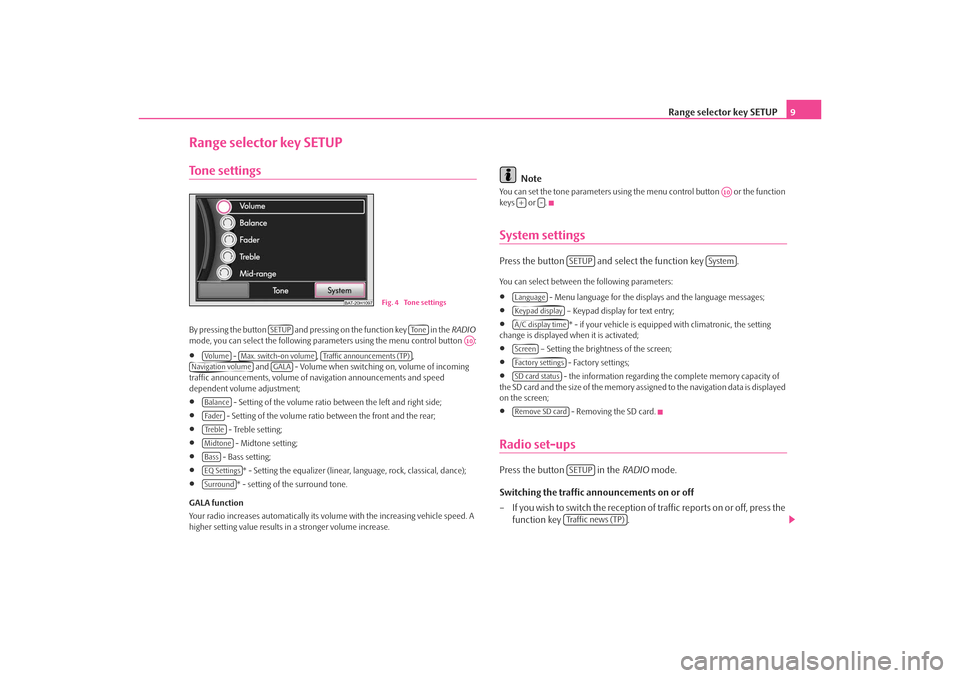
Range selector key SETUPTone settingsBy pres si ng the butto n and pre ssi ng on the function key i n the RADIO
mode, you can select the following parameters using the menu control button :•
- , ,
and - Volume when switching on, volume of incoming
traffic announcements, volume of na vigation announcements and speed
dependent volume adjustment;
•
- Setting of the volume ratio between the left and right side;
•
- Setting of the volume ratio between the front and the rear;
•
- Treble setting;
•
- Midtone setting;
•
- Bass setting;
•
* - Setting the equalizer (linear, language, rock, classical, dance);
•
* - setting of the surround tone.
GALA function
Your radio increases automatically its volu me with the increasing vehicle speed. A
higher setting value results in a stronger volume increase.
Note
You can set the tone parameters using th e menu control button or the function
keys or .System settingsPress the button and select the function key .You can select between the following parameters:•
- Menu language for the displa ys and the language messages;
•
– Keypad display for text entry;
•
* - if your vehicle is equipped with climatronic, the setting
change is displayed when it is activated;
•
– Setting the brightness of the screen;
•
- Factory settings;
•
- the information regarding the complete memory capacity of
the SD card and the si ze of the m emor y as si gned to the navigation data is displayed
on the screen;
•
- Removing the SD card.
Radio set-upsPress the button in the RADIO mode.
Switching the traffic announcements on or off
– If you wish to switch the reception of traffic reports on or off, press the function key .
BAT-20H1097
Fig. 4 Tone settings
SETUP
To n e
A10
Vo lume
Max. switch-on volume
Traffic announcements (TP)
Navigation volume
GALA
BalanceFa d e rTre b l eMidtoneBassEQ SettingsSurround
A10
+
-
SETUP
System
LanguageKeypad displayA/C display timeScreenFactory settingsSD card statusRemove SD card
SETUPTraffic news (TP)
s3lk.book Page 9 Friday, November 7, 2008 11:07 AM
Page 12 of 37
Range selector key SETUP
10
Determining the station selection via the
– By pressing on or , you can select the source from which the stations are to be selected while in the RADIO mode
using the arrow keys. If the is selected, only stored
stations from the memory list are called up. The symbol “
” is
displayed on the screen.
Switching the RDS function on or off (RDS regional)
– Press on the function key (regional station) and select a
set-up in the opening pop-up window.
– Press on the button , doing so always chooses the frequency for the heard radio station which offers the best reception
at the present time.
– When pressing on the button , the unit attempts to hold a radio station emitting regionally long enough until the reception quality is
so bad, that there is a risk of a program loss.
Delete stored stations
– Press the function key and confirm the following safety interroga-
tion in order to delete all radio stations stored in the memory list.
Traffic station set-upsPress the range selector key and then the range selector key .Switching the traffic announcements on or off
A tick in the check box
indicates that the traffic radio function is already switched
on. Dynamic route
Opens a pop-up window where it is consider
ed if the TMC traffic reports, received
during the route calculation, are to be entered.
Screen set-upsPress the button in the RADIO mode and then the function keys
and .
Brightness
– Press the function key and select the desired setting for brightness (5°stages) in a pop-up window.
– A light sensor, which is located in the top right corner of the front panel, is used for the automati c correction of the brightness
depending on the light conditions in the vehicle.
Day/Night
– Press on the function key and select a setting in the pop-up window.
– Press the function key if switching the headlights on and off should also change the map display from night to day design.
– Press on the function key or to manually determine the night and day design of the map display.
Confirmation tone
– Press on the function key and select a setting in the
pop-up window.
– Press or to switch the tone for confirmation of a function key operation on the screen on or off.
Arrow keys
Station list
Memory listMemory listRDS regional
Automatic
Fixed
Delete presetsAllTRAFFIC
SETUP
Tra f f i c n e w s ( T P )
Dynamic routeSETUP
System
Screen
BrightnessDay/NightAutomatic
Day
Night
Confirmation tone
On
Off
s3lk.book Page 10 Friday, November 7, 2008 11:07 AM
Page 13 of 37
Range selector key SETUP11
Media set-upsPress the button in the MEDIA mode.Function keys in the menu – Media•
- a tick in the check box
means that the function of the traffic
information is switched on.
•
– Check box for setting the play function mode Scan,
Mix and Repeat incl. sub-folder (“switched on”) or without sub-folder (“switched
off”).
•
- Setting the volume of the external audio source (audio source
AUX is located on the unit).
•
* – Activates the external audio source AUX via the input
MDI.
•
* - Setting the volume of the external audio source (the audio
source MDI is located under the armrest of the front seats or in a storage compart-
ment on the front passenger side).
•
* - enables a wireless transfer of MP3 data to the tele-
phone preinstallation. Only operates in combination with the telephone preinstal-
lation GSM°l - enables the audio play func tion by means of Bluetooth interface of
portable units (mobile phones) which support the protocol A2DP.
Navigation settingsPress the button in the Navigation mode.Function keys in the menu°–°Navigation•
- route options are determined according to the route being
calculated and along which roads the route should lead ,
, and - Route criteria,
dynamic route guidance, route withou t motorways and route without toll
roads/ferries.
•
- Setting the volume of the navigation announcements.
•
- changes between day and night display, as well as automatic, if the
map display changes automatically accordin g to the setting of the light switch.
•
- displays a point of interest on the map.
•
- during a route guidance, either the arrival or the driving time is
shown in the map display.
•
- Enter home address.
•
- you can start a virtual (appare nt) route guidance in the demo
mode. Virtual route guidance will be repeated when reaching the fictive travel
destination. Stop virtual route guidance normally and deactivate the demo mode
to restart “real” route guidance. As in this case the unit must first reorient itself it can
take some time, depending on the number of the currently receiving satellites, until
the unit has again found the real location. Drive a short distance.
•
- Entering a fictive (invented) starting point in the
demo mode.
•
- Deleting the destination memory or the list of the
last destinations.
•
- Display of information via the data base on CD or SD
card, delete the data base of the SD card or copy the data.
Route criteria
Fas t : It calculates the fastest route to your destination, even if a detour is necessary.
Short : Longer driving time in favour of a shorter route is acceptable. Please note
that the setting “Short route” during ro ute guidance can sometimes lead to unex-
pected results.
Economical : The aim of the calculation is a ba lance between minimal driving time
and driving distance.
Dynamic route guidance with TMC use
If the dynamic navigation is switched off, traffic reports are nevertheless received
in the background and updated. The naviga tion displays traffic problems on the
map and draws attention to them verbally , however does not consider them for
calculating the route (the route can lead through the traffic problems).
SETUP
Tra f f i c n e w s ( T P )Scan/Mix/Repeat inkl. AUX VolumeActivate AUX 2 inputMDI VolumeActivate Bluetooth audio
SETUP
Route options
Route criteria
Dynamic route
Avoid motorways
Avoid toll roads/ferry
Announcement volume
Day/NightPOIs on mapTime displayEnter home addressDemo modeDemo mode starting pointDelete destinations memoryData base navigation
Route criteria
Dynamic route
s3lk.book Page 11 Friday, November 7, 2008 11:07 AM
Page 23 of 37
Range selector key MEDIA21
Input MDI - Multimedia socket
– The input MDI is located under the armrest of the front seats or in the storage compartment on the front passenger side.
– Audio data in MP3, WMA, OGG Vorbis and AAC format from the external data sticker, connected to the multimedia socket, can be
played via the radio.
– External audio sources, which are connected to the MDI socket, can
be operated via the radio.
You can select another audio source on the radio at any time. As long as the
external audio source is not switched off, it remains always active in the back-
ground.
Please refer to the Owner's manual of the respective manufacturer for the opera-
tion of the external audio source.
Use the standard jack plug 3.5 mm for the AUX socket. If the external audio source
does not have this jack pl ug, you must use an adapter.
iPod
If an iPod is connected to the MDI socket , a menu is opened in which you can select
the folders of the iPods (playlists, artists, albums, songs etc.).
Adjust the play function volume of the external audio source
The play function volume of the external audio source can be changed via the
volume control on the radio.
Depending on the connected audio source , the output volume on the external
audio source can be changed.
You can also change the input sensitivity of the external audio source, in order for
the play function volume of the external audio source to adapt to other audio
sources or to avoid distortions of the play function volume.
Adapter
A special adapter is required to connect audio sources via the input MDI. We recommend that you purchase an adap
ter for connecting the USB devices, the
devices with Mini USB output or an iPod , at an authorized Škoda Service Partner.
Conditions for proper connection
•
Only USB devices with the spec ification 2.0 can be connected.
•
The version of the file allocation tabl e FAT (File Allocation Table) of the
connected device must be FAT16 (< 2 GB) or FAT32 (> 2 GB).
•
In order to replay from a unit with a hard disk (HDD) which includes a large data
volume, it can lead to a time delay when reading in the overview of the music data.
•
In order to replay from a unit, which incl udes a complicated folder structure, it
can lead to a time delay when reading in the overview of the music data.
•
The folder structure in the connected uni t must not exceed a depth of 8 levels.
One folder must not contain more than 1°000° data.
•
A USB extension cable or US B distributor (HUB) must not be used to connect
the unit.
WARNING
•
On no account place an external audio source on the dash panel. You
could make sudden manoeuvres in the passenger compartment and injure
the occupants.
•
On no account place an external audio source close to the airbags. You
could be thrown back in the passenger compartment by the airbags being
deployed and injure the occupants.
•
You must not hold the external audio source in the hand or on the knees
while driving. You could make sudden manoeuvres in the passenger
compartment and injure the occupants.
•
Always guide the connection cable of th e external audio source in such a
way that is does not restrict you when driving.Caution
The AUX socket must only be used for audio sources!
s3lk.book Page 21 Friday, November 7, 2008 11:07 AM
Page 25 of 37
Range selector key NAV (Navigation)23
Range selector key NAV (Navigation)OverviewSafety information regarding the use of the navigation systemThe route is recalculated each time if you ignore driving recommendations or
change the route. This process takes only a few seconds. Driving recommendations
can only then be re-transmitted.
Incomplete navigation data
The navigation system cannot receive any data from GPS satellites if you drive for
longer periods under thick forest canopy or when your vehicle is in a garage, under-
pass or tunnel. In this case, the navigation system orientates itself solely with the
help of the vehicle sensors.
In regions not at all or only partially digitalised and stored as such on the navigation
CD, the navigation system will try to prov ide guidance to the destination. Please
note that under these circumstances the guidance to the destination may not be
completely correct if, for example, one-wa y streets and road categories (motorway,
country road etc.) are not at all or only partially included in the navigation data
used.
WARNING
Always concentrate fully on your drivin g. Inattention by the driver can lead
to accidents and injuries.•
Do not allow yourself to be distracted or loose your concentration, pay
attention to the traffic situation and do not carry out settings or use the radio
navigation system.
•
Only use the radio navigation system if road, weather and traffic situa-
tions permit this and you are not distracted.
•
The various volume settings must be selected in such a way that audible
signals from the outside, su ch as e.g. a Martins horn from police cars and fire
brigade, can be heard at all times.
WARNING
Please observe the legal requirements for road traffic when following the
driving recommendations provided by your radio navigation system.•
The driving recommendations provided may vary from current situa-
tions, e.g. due to road works or out of date navigation data. In such a case,
always observe the traffic regulations and ignore the driving recommenda-
tions.
•
Traffic signs and traffice regulations always have priority over the
driving recommendations provided by the navigation system.
•
Route guidance is subject to constant changes despite the information
about one-way streets, pedestrian zone s etc. stored on the navigation CD.
Information on traffic lights, stop and right of way signs, parking and stop-
ping restrictions as well as lane constrictions and speed restrictions is not
included in the radio navigation system.
•
Adjust your speed to suit weather, road and traffic conditions. Do not
allow the navigation system to make you drive faster in fog – risk of
accident!
GeneralYou can continue to listen to the radi o or play CDs during the route guidance
When entering an address (town, street), only those letters or symbols which make
up a logical entry will be presented. A list of possible names will be shown. Do not
forget to enter the blank space in names made up of more than one word, such as
High Wycombe.
The route will be recalculated if you leave or disregard the route that was originally
calculated. This process takes only a few seconds.
The last voice response can be repeated by pressing the button or the menu
control button . The volume of a navigation recommendation can be changed
whilst it is being made.
A10
s3lk.book Page 23 Friday, November 7, 2008 11:07 AM
Page 26 of 37
Range selector key NAV (Navigation)
24The GPS satellites will not be able to reac h the aerial once you are in a tunnel or
underground garage. The uni t will orientate itself via the wheel sensors.
Note
All dtns. (country-, village-, road-, special destination names) must be entered
including all country specific (or language-spe cific for points of interest) special
characters.Navigation data, navigation CD and memory cardInserting the navigation CD
– Push a navigation CD with the written side facing up as far as possible into the CD case until it is automatically drawn in.
– If you wish to take out the na vigation CD, press the button .
Update navigation data
– If the data of the navigation CD is not identical to the data on the SD
card, a corresponding message will be displayed.
– Press on the function key to overwrite the data stored on the SD card with the data from the navigation CD.
Store the navigation data from the navigation CD onto the memory
card
– Push a navigation CD with the written side facing up as far as possible into the CD case until it is automatically drawn in.
– Push the memory card into the card case .
– Press the range selector key and while in the main menu Navi-
gation , press the range selector key .
– Select the function key using the menu control
button and then press the function keys and .
The navigation data can be stored ei ther on the CD or on the SD card.
If an SD card with navigation data of the same country as on the CD is inserted in
the unit (however the data on the CD corr espond to a newer version), a question is
displayed after inserting the CD asking if the data should be overwritten with the
new version or if only the data of th e CD should be used for navigating.
If an SD card is inserted with the cards of other countries than the card contained
on the CD, a question is displayed asking if the data on the CD should be added
onto the SD card or if only the data of the CD should be used.
You can copy data from several navigation CDs onto an SD card. The navigation
data on the SD card are automatically li nked by the navigation system. For this
reason, we recommend to use an SD card with sufficient memory capacity. A
memory capacity of approx. 4°GB is necess ary in order to copy the navigation data
of Western Europe.
Using the data of a navigation CD for a short period of time
If you only drive for short periods through an area which is not stored on the SD
card, insert the navigation CD for the driven area.
Up to date navigation data and new navigation CD
Road guidance is subject to constant changes (e.g. new streets, changes of street
names and house numbers). A navigation CD is a huge data store, which unfortu-
nately will not be up to date after a certain time. This can lead to complaints during
route guidance.
It is for this reason that you must regula rly update the navigation data on your unit
with a current navigation CD.
Remaining function buttons
The following function buttons are only active if a navigation CD is inserted in the
unit and the memory card contains navigation data.•
- displays information regarding the navigation CD
(area and version number of the navigation CD);
•
- displays information regarding the stored naviga-
tion data and their volume;
•
- opens the menu with whic h you can delete the navi-
gation data on the memory card;
Copy
A12
NAV
SETUP
Navigation data basis
A10
Copy data
Start
Show CD data informationShow SD data informationDelete SD navigation data
s3lk.book Page 24 Friday, November 7, 2008 11:07 AM
Page 32 of 37
Range selector key NAV (Navigation)
30
– Press the button and then the function key
while in the main menu Navigation.
– Press on the function key .
– You can determine which types of destinations should be provided or not by using the function keys ,
and . These types of destinations will, however,
be used for the route calculation if there is no other logical route to the
destination (e.g an island is to be used without using a ferry).Determining the parameters for the route calculation•
Fa st : It calculates the fastest route to your destination, even if a detour is neces-
sary.
•
Short : Longer driving time in favour of a shorter route is acceptable. Please
note that the setting “Short route” duri ng route guidance can sometimes lead to
unexpected results.
•
Economical : The aim of the calculation is a balance between minimal driving
time and driving distance.
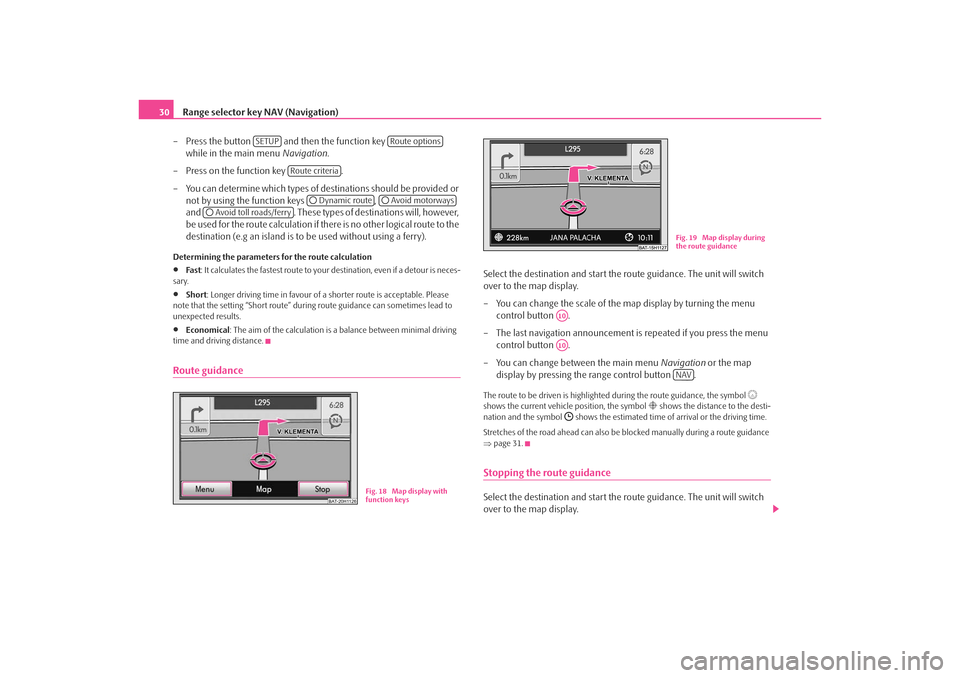
Route guidance
Select the destination and start the route guidance. The unit will switch
over to the map display.
– You can change the scale of the map display by turning the menu control button .
– The last navigation announcement is repeated if you press the menu
control button .
– You can change between the main menu Navigation or the map
display by pressing the range control button .The route to be driven is highlighted during the route guidance, the symbol
shows the current vehicle position, the symbol
shows the distance to the desti-
nation and the symbol
shows the estimated time of arrival or the driving time.
Stretches of the road ahead can also be blocked manually during a route guidance
⇒ page 31.
Stopping the route guidanceSelect the destination and start the route guidance. The unit will switch
over to the map display.
SETUP
Route options
Route criteria
Dynamic route
Avoid motorways
Avoid toll roads/ferry
BAT-20H1126
Fig. 18 Map display with
function keys
Fig. 19 Map display during
the route guidance
A10A10
NAV
s3lk.book Page 30 Friday, November 7, 2008 11:07 AM
Page 33 of 37
Range selector key NAV (Navigation)31
– The route guidance is interrupted and the function key changes to “Start ” by pressing the range control button and then the func-
tion key .
– If you press on the function key the route guidance will continue at the current position.
Inserting routenlistThe routenlist for the trip can only be displayed during a route guidance.
Additional window in the map display
– An additional window opens if you press the button during the route guidance.
– Select the function key in the additional window. The routenlist is displayed. The list of the points (street names, street
descriptions and stretches of the road ) still to be driven, is displayed
in the Routenlist .
– In addition, the distance still to be driven on the driven road and the estimated time to the following turning point are displayed.
Manually excluding a stretch of the road
– You can select the beginning of the stretch of the road to be excluded
by using the control button .
– Press on the function key , this changes to the function key .
– Select the end of the stretch of the road to be excluded and select the
function key .
– The route is newly calculated.
– If you wish to cancel the exclusion of the stretch of the road, press the
function key .
Dynamic route guidance with TMC use Switching the dynamic navigation on or off
– Press the button and then select the function key while in the main menu Navigation.
– In the menu Route options, activate the check box
and select the desired set-up by pressing your choice in the pop-up
window.Requirements for a dynamic route guidance
TMC (Traffic Message Channel) is a digital radio data service for continuous trans-
mission of traffic information.
The unit has a continuous background of TMC traffic reports providing a TMC
station at the current location can be received.
The quality of the transmitted traffic reports depends on the broadcast editing
carried out by the radio station. The rece ption of the TMC traffic reports cannot be
switched on or off.
The station you are listening to does not have to be a TMC station.
TMC traffic reports can only be evaluated and displayed by the unit if the navigation
data for the currently driven area is stored in the unit memory or can be called up
via an inserted navigation CD.
The current TMC traffic reports can be di splayed by pressing the selector key
.
Note
•
There may not be any advantage in avoiding the traffic jam if, as a result of the
TMC traffic reports, the diversion is also heavily congested.
•
You can manually block the information for the route in front of you if a traffic
problem ahead has not yet been included in the TMC traffic reports ⇒page 31.
NAV
Stop
Start
Routenlist
A1Exclude
Exclude to
Exclude toCancel
SETUP
Route options
Dynamic route
TRAFFIC
s3lk.book Page 31 Friday, November 7, 2008 11:07 AM