warning SKODA OCTAVIA 2008 2.G / (1Z) Bolero Car Radio Manual
[x] Cancel search | Manufacturer: SKODA, Model Year: 2008, Model line: OCTAVIA, Model: SKODA OCTAVIA 2008 2.G / (1Z)Pages: 25, PDF Size: 0.94 MB
Page 5 of 25

General information3
WARNING
Please concentrate fully at all times on your driving! As the driver you are
fully responsible for road safety. Only use the functions of the radio in such
a way that you are always in full contro l of your vehicle in all traffic situa-
tions!
Caution
•
Inserting a second CD while a CD is being ejected can destroy the CD drive in
the unit. Please note that the CD ejecti on lasts a few seconds after pressing the
Eject key . During this time the lock in fron t of the CD case is open. It is essen-
tial that you wait until the CD has been fully ejected before you try to insert a new
CD.
•
Press the buttons and the keys of the uni t gently in order to avoid damaging
them. Gentle pressure on the appropriate key is sufficient to operate the unit.
Please note that the rotary/push knobs have predetermined breaking points, in
order to reduce the risk of injury.
•
Do not use any pointed or sharp-edged objects to operate the touch-screen.
Slight finger pressure sufficient to oper ate the equipment. A text in the display,
which cannot be called up by pressing the button, is therefore not available at that
time.
Using the displayCarefully handle the display because dent s and scratches can occur through pres-
sure of the finger or contact with sharp objects.
The display can be cleaned with a soft cl oth and finger marks can be wiped away
with pure alcohol.
Note
Do not use solvent such as turpentine or petrol as they will corrode the display
surface.
Anti-theft protectionAnti-theft codingYour radio is equipped with a convenience coding. If the radio is being operated for
the first time, the safety code is not only st ored in the radio but also in the vehicle.
After disconnecting and reconnecting the battery, first of all switch on the ignition
and then the radio.
If you wish to install the radio in another vehicle, the safety code must be entered.
In this case, please do not hesitate to contact a Škoda Service Partner or a Škoda
importer.
As the unit only functions afte r entering the safety code, this practically excludes its
use after a theft - a contribution to increased anti-theft safety.
Note
The code is stored in the instrument cluste r. This ensures that it is automatically
decoded (convenience coding). Manual input of the code is normally not
necessary.Enter codeIf a keypad appears after switching on with the command to enter the
code, the unit can be unlocked by ente ring the correct four-digit code
number. The number of the possible attempts is shown in the second
display line.
– Press directly a digit from to on the digit block displayed on the
display. The digit is accepted in the entry line.
– After a four-digit order has been entered, the group of digits will turn grey (inactive) and no further digits can be accepted in the entry line.
– Press on the display to erase the digits in the entry line from right
to left and thereby correct your input, if necessary.
/
0
9
s3d0.3.book Page 3 Monday, August 11, 2008 12:49 PM
Page 14 of 25

Basic setting
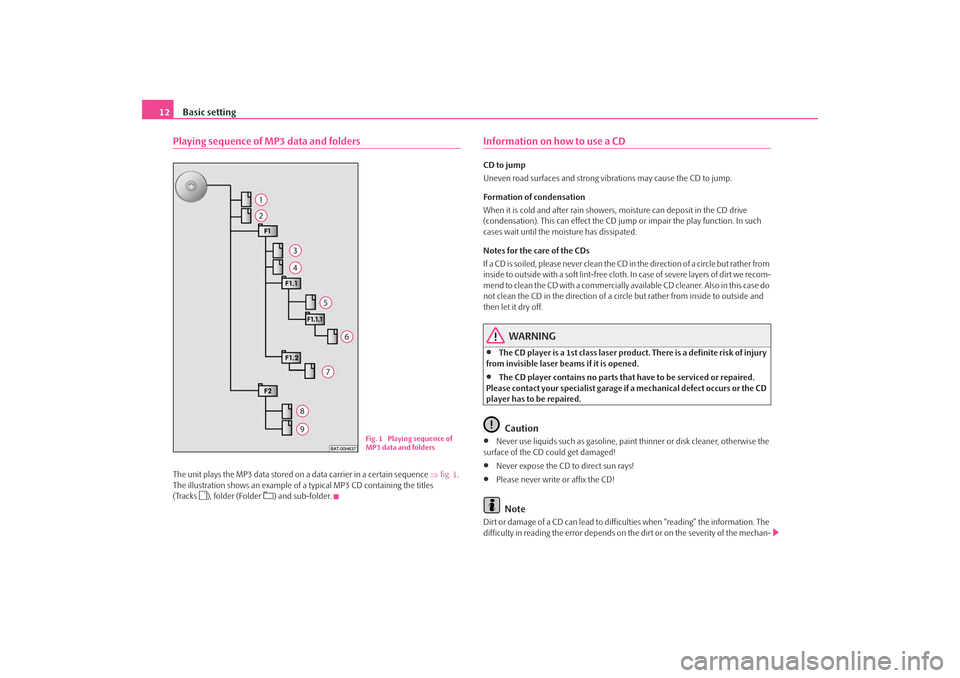
12Playing sequence of MP3 data and foldersThe unit plays the MP3 data stored on a data carrier in a certain sequence ⇒fig. 1 .
The illustration shows an example of a typical MP3 CD containing the titles
(Tracks
), folder (Folder
) and sub-folder.
Information on how to use a CDCD to jump
Uneven road surfaces and strong vi brations may cause the CD to jump.
Formation of condensation
When it is cold and after rain showers, moisture can deposit in the CD drive
(condensation). This can effect the CD jump or impair the play function. In such
cases wait until the moisture has dissipated.
Notes for the care of the CDs
If a CD is soiled, please never clean the CD in the direction of a circle but rather from
inside to outside with a soft lint-free cloth. In case of severe layers of dir t we recom-
mend to clean the CD with a commercially av ailable CD cleaner. Also in this case do
not clean the CD in the direction of a circ le but rather from inside to outside and
then let it dry off.
WARNING
•
The CD player is a 1st class laser produc t. There is a definite risk of injury
from invisible laser beams if it is opened.
•
The CD player contains no parts that have to be serviced or repaired.
Please contact your speciali st garage if a mechanical defect occurs or the CD
player has to be repaired.Caution
•
Never use liquids such as gasoline, paint thinner or disk cleaner, otherwise the
surface of the CD could get damaged!
•
Never expose the CD to direct sun rays!
•
Please never write or affix the CD!Note
Dirt or damage of a CD can lead to difficulties when “reading” the information. The
difficulty in reading the error depends on th e dirt or on the severity of the mechan-
Fig. 1 Playing sequence of
MP3 data and folders
s3d0.3.book Page 12 Monday, August 11, 2008 12:49 PM
Page 16 of 25

Basic setting
14Conditions for proper connection•
Only USB devices with the specification 2.0 can be connected.
•
The version of the file allocation tabl e FAT (File Allocation Table) of the
connected device must be FAT16 (< 2 GB) or FAT32 (> 2 GB).
•
In order to replay from a unit with a hard disk (HDD) which includes a large data
volume, it can lead to a time delay when reading in the overview of the music data.
•
In order to replay from a unit, which incl udes a complicated folder structure, it
can lead to a time delay when readin g in the overview of the music data.
•
The folder structure in the connected uni t must not exceed a depth of 8 levels.
One folder must not contai n more than 1°000° data.
•
A USB extension cable or USB distributo r (HUB) must not be used to connect
the unit.
WARNING
•
On no account place an external audio source on the dash panel. You
could make sudden manoeuvres in th e passenger compartment and injure
the occupants.
•
On no account place an external audio source close to the airbags. You
could be thrown back in the passen ger compartment by the airbags being
deployed and injure the occupants.
•
You must not hold the external audio source in the hand or on the knees
while driving. You could make sudden manoeuvres in the passenger
compartment and injure the occupants.
•
Always guide the connection cable of the external audio source in such a
way that is does not re strict you when driving.Caution
The AUX-IN socket must only be used for audio sources!
Note
•
The external audio source, which is conne cted via AUX-IN, can only be used if
no unit is connected via MDI at the same time.
•
If an external audio source is connecte d via AUX-IN, which is equipped with an
adapter for external power supply, it can o ccur that the audio signal is interrupted.
This depends on the quality of the adapter which is used.
•
The loudspeakers in the vehicle are matc hed to a power output of the radio of
30°W.
Range selector key SETUPMain menu set-ups (Setup)– Press the range selector key to open the main menu Set-ups.
– Select the area for which you wish to change the set-ups or carry out set-ups by pressing on your selection.
– Press on the function key , to switch back to the last selected menu.Overview of the set-up menus – When in the radio mode, carry out set-ups for the function of the arrow
keys, for the displayed memory keys, th e memory list and the traffic reports.
– Determine the set-ups for the play and display of MP3 data and activate
or deactivate the external audio sources.
– Change the system set-ups such as voice response and time and cancel
or delete stored set-ups in individual areas.
– Select preferred TMC station and determine the area for TMC
announcements.
– Adjust the brightness of the displa y, day/night design of the map display
and select/deselect the confirmation tone for the keystroke.
– Update the phone book in the unit, delete all call lists and modify the
assignment of the shortcut keys.
SETUP
RadioMediaSystemTraffic informationScreenPhone
s3d0.3.book Page 14 Monday, August 11, 2008 12:49 PM