change time SKODA OCTAVIA 2008 2.G / (1Z) Columbus Navigation System Manual
[x] Cancel search | Manufacturer: SKODA, Model Year: 2008, Model line: OCTAVIA, Model: SKODA OCTAVIA 2008 2.G / (1Z)Pages: 75, PDF Size: 3.54 MB
Page 5 of 75
General information3
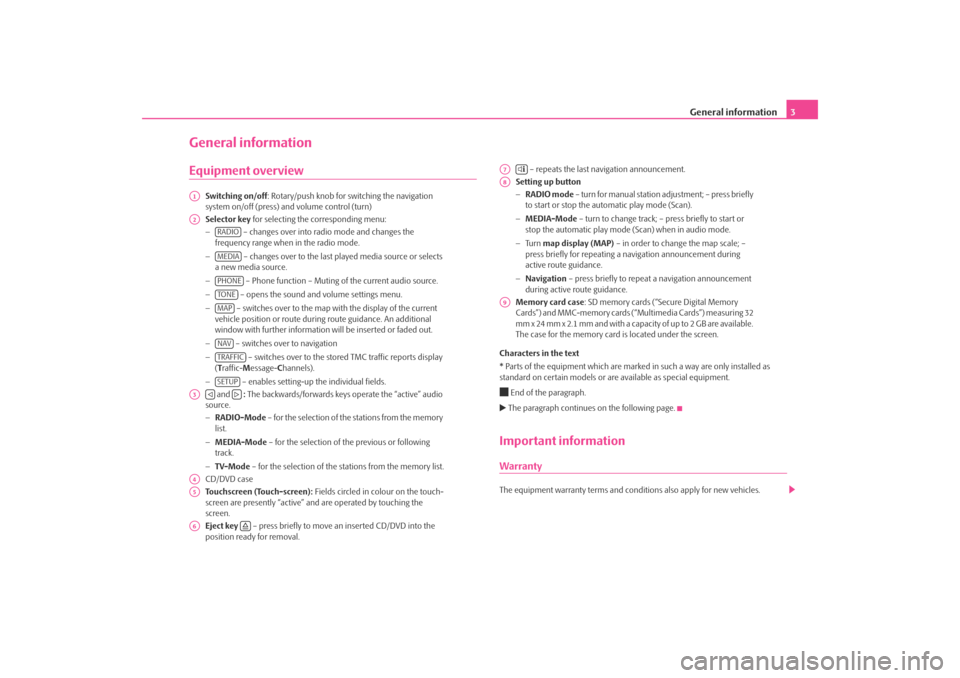
General informationEquipment overview
Switching on/off: Rotary/push knob for switching the navigation
system on/off (press) and volume control (turn)
Selector key for selecting the corresponding menu:
− – changes over into radio mode and changes the
frequency range when in the radio mode.
− – changes over to the last played media source or selects
a new media source.
− – Phone function – Muting of the current audio source.
− – opens the sound and volume settings menu.
− – switches over to the map with the display of the current
vehicle position or route during route guidance. An additional
window with further information will be inserted or faded out.
− – switches over to navigation
− – switches over to the stor ed TMC traffic reports display
( T raffic- Message- Channels).
− – enables setting-up the individual fields.
and : The backwards/forwards keys operate the “active” audio
source.
− RADIO-Mode – for the selection of the stations from the memory
list.
− MEDIA-Mode – for the selection of the previous or following
track.
− TV-Mode – for the selection of the st ations from the memory list.
CD/DVD case
Touchscreen (Touch-screen): Fields circled in colour on the touch-
screen are presently “active” and are operated by touching the
screen.
Eject key – press briefly to move an inserted CD/DVD into the
position ready for removal. – repeats the last navigation announcement.
Setting up button
− RADIO mode – turn for manual station adjustment; – press briefly
to start or stop the automatic play mode (Scan).
− MEDIA-Mode – turn to change track; – press briefly to start or
stop the automatic play mode (Scan) when in audio mode.
− Tu r n map display (MAP) – in order to change the map scale; –
press briefly for repeating a na vigation announcement during
active route guidance.
− Navigation – press briefly to repeat a navigation announcement
during active route guidance.
Memory card case : SD memory cards (“Secure Digital Memory
Cards”) and MMC-memory cards (“Multimedia Cards”) measuring 32
mm x 24 mm x 2.1 mm and with a capacity of up to 2 GB are available.
The case for the memory card is located under the screen.
Characters in the text
* Parts of the equipment which are marked in such a way are only installed as
standard on certain models or are available as special equipment.
End of the paragraph. The paragraph continues on the following page.Important informationWarrantyThe equipment warranty te rms and conditions also apply for new vehicles.
A1A2
RADIOMEDIAPHONETO NEMAPNAVTRAFFICSETUP
A3
A4A5A6
A7
A8A9
s2u4.6.book Page 3 Wednesday, August 13, 2008 7:57 AM
Page 6 of 75
General information
4
NoteDamage within the meaning of the warranty must not be the result of improper
handling of the system or fr om unprofessional repair attempts. It is also essential
that there is no external damage.Information on how to operate the navigation systemThe requirements of today's road traffic demand the driver’s full concentration at all
times.
Apart from the availability entertainmen t, the extensive and demanding equipment
details of this system also offer a wide range of information, which will help you to
reach your destination quickly and safely.
But you should only operate the navigation system with its wide range of
possibilities when the traffic situation allows.
The volume settings must be selected in such a way that audible signals from the
outside, e.g. a Martins horn from utility vehicles (police cars, ambulances and fire
brigade), can be heard at all times.
WARNING
Please concentrate fully at all times on your driving! As the driver you are
fully responsible for road safety. Only use the functions in such a way that
you are always in full control of your vehicle in all traffic situations!Before using the navigation system•
Please observe the respective traffic regulations when driving.
•
Street and location names can be change d. It is therefore possible that the
names stored on the CD might not correspond to the changed names.
•
The route calculated by the navigati on system is a recommendation for
reaching the intended destination. While driving please pay attention to stopping restrictions, traffic lights, one-way street
s, lane change restrictions, canals and
ferries.
WARNING
Road traffic legislation (StVO) applies at all times, even if a driving recom-
mendation contradicts the StVO.
Caution
•
Inserting a second CD/DVD while a CD/D VD is being ejected can destroy the
CD/DVD drive in the unit. Please note that the CD/DVD ejection lasts a few seconds
after pressing the Eject key During this time the lock in front of the CD/DVD
case is open. It is essential that you wait until the CD/DVD has been fully ejected
before you try to insert a new CD/DVD.
•
Press the buttons and the keys of the unit gently in order to avoid damaging
them. Gentle pressure on the appropriate key is sufficient to operate the unit.
Please note that the rotary/push knobs have predetermined breaking points, in
order to reduce the risk of injury.
•
Do not use any pointed or sharp-edged objects to operate the touch-screen.
Slight finger pressure sufficient to operate the equipment. A display on the screen,
which cannot be called up by pressing the button, is therefore not available at that
time.
•
Please note that a dirty or scratched navigation DVD can considerably impair
the speed and the functions of the navigation system.Note
•
Your navigation system is a high-powered computer. Just as your computer at
home, this unit needs a few seconds for processing complicated control
sequences. In such a case it is possible that the unit will no longer react when oper-
ated from the outside until the triggered processes have been dealt with processed
in the background. Please be patient, as it is quite possible that the unit “stores” the
carried-out operating steps even if it does not appear to react to the operation from
the outside. These operating steps are processed one after the other by the unit
once the processes in the background have been completed, which can be
confusing.
s2u4.6.book Page 4 Wednesday, August 13, 2008 7:57 AM
Page 14 of 75
Selector key SETUP
12Selector key SETUPMain menu set-ups (Setup)– Press the selector key to open the main menu Set-ups.Overview of the set-up menus
– When in the radio mode, carry out set-ups for the function of the arrow
keys , for the displayed memory keys, the memory list and the TMC traffic reports
⇒ page 12, “Radio set-ups”.
– Carry out set-ups for the map display and select symbols for the display in
the map ⇒page 13, “Map set-ups”.
– Select preferred TMC station and determine the area for TMC
announcements ⇒page 13, “Traffic station set-ups”.
– Adjust the brightness of the touc h-screen, day/night design of the map
display and select/deselect the confirmation tone for the key depression stroke
⇒ page 14, “Touch-screen set-ups”.
– Determine the set-ups for the play and display of MP3 data and activate
or deactivate the external connections ⇒page 14, “Media set-ups”.
– Determine the set-ups for receiving driving recommendations, define
or change an address to a home address and start a virtual demonstration drive
with a manually set starting point ⇒page 15, “Navigation set-ups”.
– Change the system set-ups such as voice response and time and take
back or erase stored set-ups in individual areas ⇒page 15, “System set-ups”.
– Carry out set-ups for voice response with an inserted Video DVD and
adjust the aspect ratio of the touch-screen. It is also possible to adjust the audio
video standard ⇒page 16, “Video set-ups”when operating an external media
source as well as carrying out the set-ups for the TV operation.
– Update the phone book in the unit, erase all call lists and modify the
assignment of the shortcut keys ⇒page 16, “Phone set-ups”.
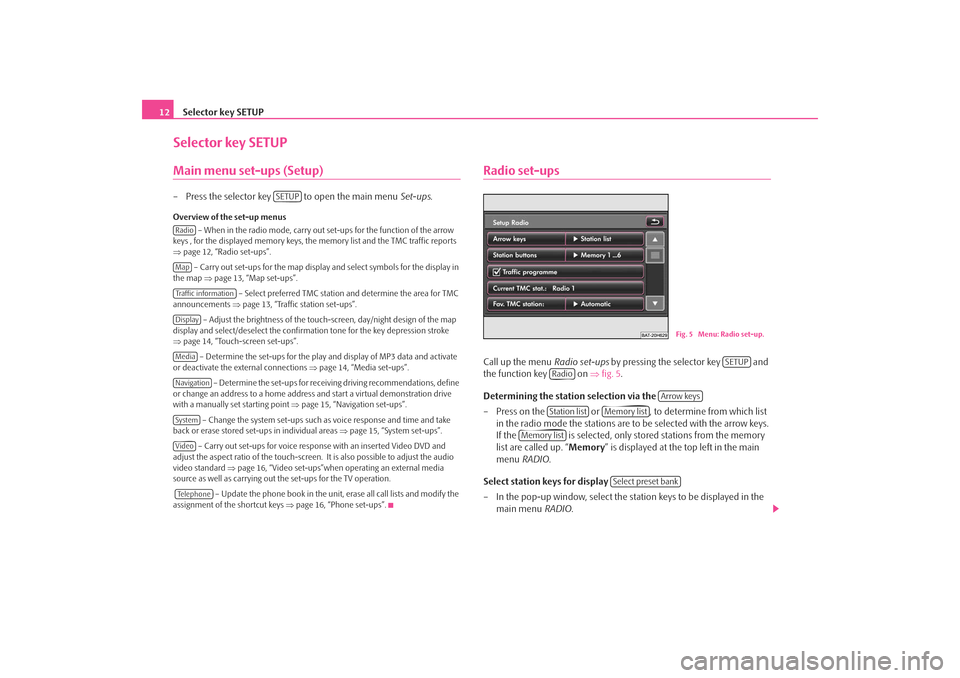
Radio set-upsCall up the menu Radio set-ups by pressing the selector key and
the function key on ⇒fig. 5 .
Determining the station selection via the
– Press on the or , to determine from which list in the radio mode the stations are to be selected with the arrow keys.
If the is selected, only stor ed stations from the memory
list are called up. “ Memory” is displayed at the top left in the main
menu RADIO .
Select station keys for display
– In the pop-up window, select the st ation keys to be displayed in the
main menu RADIO.
SETUP
RadioMapTraffic informationDisplayMediaNavigationSystemVideoTe l e p h o n e
Fig. 5 Menu: Radio set-up.
SETUP
Radio
Arrow keys
Station list
Memory list
Memory list
Select preset bank
s2u4.6.book Page 12 Wednesday, August 13, 2008 7:57 AM
Page 17 of 75
Selector key SETUP15
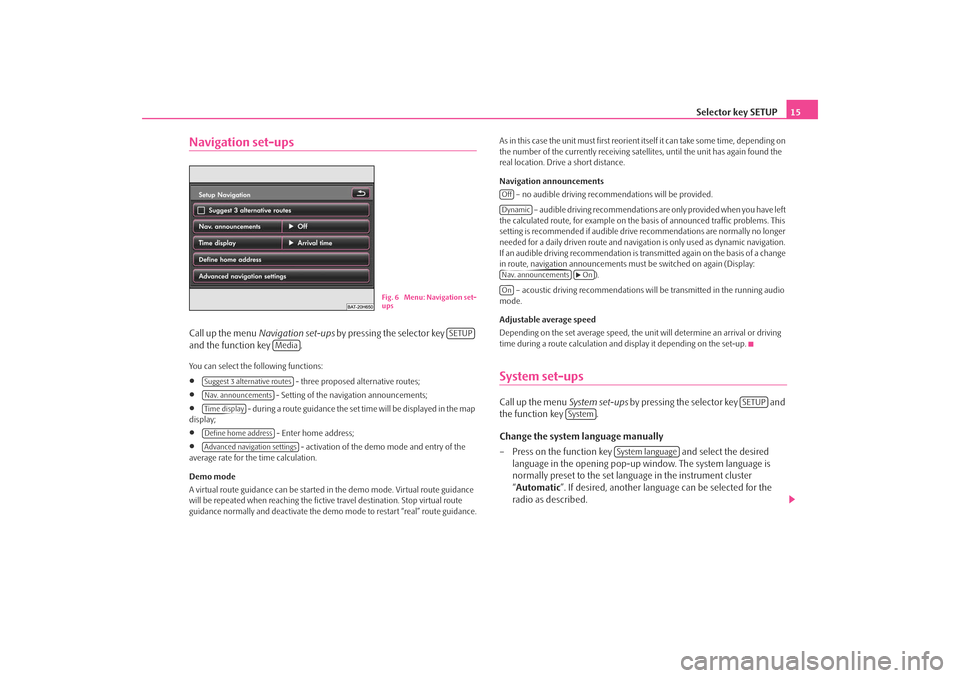
Navigation set-upsCall up the menu Navigation set-ups by pressing the selector key
and the function key .You can select the following functions:•
- three proposed alternative routes;
•
- Setting of the navigation announcements;
•
- during a route guidance the set time will be displayed in the map
display;
•
- Enter home address;
•
- activation of the demo mode and entry of the
average rate for the time calculation.
Demo mode
A virtual route guidance can be started in the demo mode. Virtual route guidance
will be repeated when reaching the fictiv e travel destination. Stop virtual route
guidance normally and deactivate the demo mode to restart “real” route guidance. As in this case the unit must first reorient itself it can take some time, depending on
the number of the currently receiving satellites, until the unit has again found the
real location. Drive a short distance.
Navigation announcements
– no audible driving recomme ndations will be provided.
– audible driving recommendations are only provided when you have left
the calculated route, for example on the basis of announced traffic problems. This
setting is recommended if audible drive recommendations are normally no longer
needed for a daily driven route and navigati on is only used as dynamic navigation.
If an audible driving recommendation is transmitted again on the basis of a change
in route, navigation announcements mu st be switched on again (Display:
).
– acoustic driving recommendations wi ll be transmitted in the running audio
mode.
Adjustable average speed
Depending on the set average speed, the unit will determine an arrival or driving
time during a route calculation and display it depending on the set-up.
System set-upsCall up the menu System set-ups by pressing the selector key and
the function key .
Change the system language manually
– Press on the function key and select the desired
language in the opening pop-up window. The system language is
normally preset to the set language in the instrument cluster
“ Automatic ”. If desired, another langua ge can be selected for the
radio as described.
Fig. 6 Menu: Navigation set-
ups
SETUP
Media
Suggest 3 alternative routesNav. announcementsTime displayDefine home addressAdvanced navigation settings
OffDynamicNav. announcements
On
On
SETUP
System
System language
s2u4.6.book Page 15 Wednesday, August 13, 2008 7:57 AM
Page 30 of 75
Selector key MEDIA
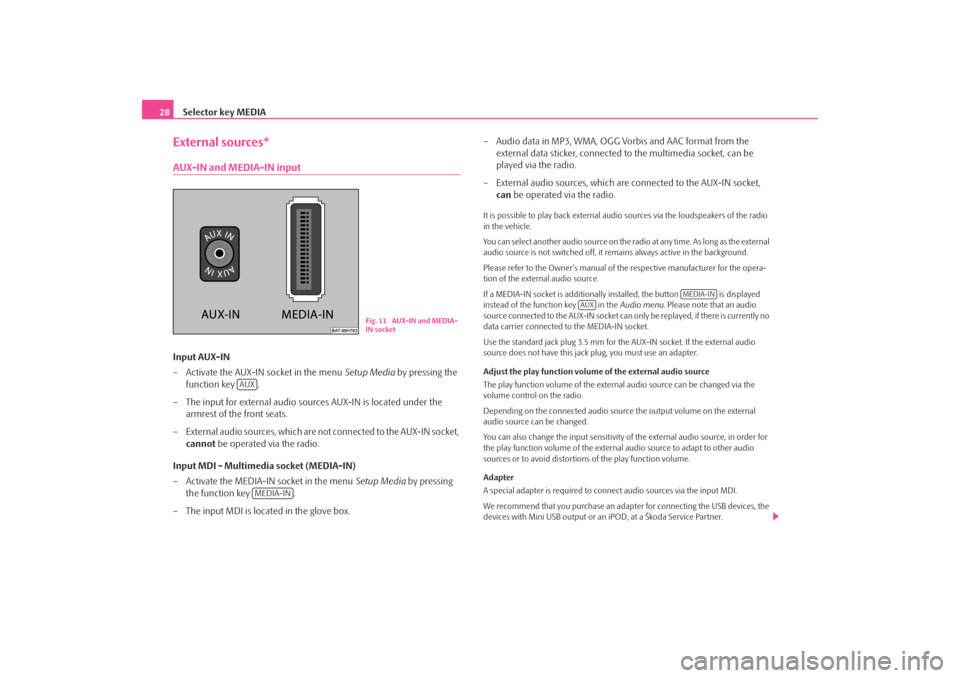
28External sources*AUX-IN and MEDIA-IN inputInput AUX-IN
– Activate the AUX-IN socket in the menu Setup Media by pressing the
function key .
– The input for external audio sources AUX-IN is located under the armrest of the front seats.
– External audio sources, which are no t connected to the AUX-IN socket,
cannot be operated via the radio.
Input MDI - Multimedia socket (MEDIA-IN)
– Activate the MEDIA-IN socket in the menu Setup Media by pressing
the function key .
– The input MDI is located in the glove box. – Audio data in MP3, WMA, OGG Vorbis and AAC format from the
external data sticker, connected to the multimedia socket, can be
played via the radio.
– External audio sources, which are connected to the AUX-IN socket,
can be operated via the radio.
It is possible to play back external audio sources via the loudspeakers of the radio
in the vehicle.
You can select another audio source on the ra dio at any time. As long as the external
audio source is not switched off, it re mains always active in the background.
Please refer to the Owner's manual of the respective manufacturer for the opera-
tion of the external audio source.
If a MEDIA-IN socket is additionally installed, the button is displayed
instead of the function key in the Audio menu. Please note that an audio
source connected to the AUX-IN socket can on ly be replayed, if there is currently no
data carrier connected to the MEDIA-IN socket.
Use the standard jack plug 3.5 mm for the AUX-IN socket. If the external audio
source does not have this jack plug, you must use an adapter.
Adjust the play function volume of the external audio source
The play function volume of the external audio source can be changed via the
volume control on the radio.
Depending on the connected audio source the output volume on the external
audio source can be changed.
You can also change the input sensitivity of the external audio source, in order for
the play function volume of the external audio source to adapt to other audio
sources or to avoid distortions of the play function volume.
Adapter
A special adapter is required to connect audio sources via the input MDI.
We recommend that you purchase an adap ter for connecting the USB devices, the
devices with Mini USB output or an iPOD, at a Škoda Service Partner.
Fig. 11 AUX-IN and MEDIA-
IN socket
AUX
MEDIA-IN
MEDIA-IN
AUX
s2u4.6.book Page 28 Wednesday, August 13, 2008 7:57 AM
Page 32 of 75
Selector key MEDIA
30
– Or press if a new folder should be created for the title or folder. Choose a name for this folder from the following menu. The
newly created folder is opened and the name you choose will be indi-
cated in the title line.
– You can now create another folder (one folder has a maximum of
seven sub-folders) or you can store the selected title or folder in the
currently described folder. Press the function key to open the
appropriate higher priority folder.
– Press the function key if you wish to store the title
or folder at the selected point.
– Press to abort the storing process of the currently stored title. Once the storing process has been completed, the pop-up window
will close automatically.Storing 100 music titles of av erage length of time (3 - 5 minutes) will take approxi-
mately 40 minutes.
If the unit is switched off during the storing process, the storing process will be
terminated with the last fully stored title.
Functions and progress display during the memory procedure
You can continue listening to this or anot her audio source while storing other audio
data.
Data names with a length of max. 32 characters can be displayed.
The function key is blocked in the Audio menu during the saving process.
If the function key is pressed regardless, a pop-up window will open
instead of the selection menu where the progress of the saving process is displayed.
If you press in the pop-up window, the storing process will be aborted with
the last fully stored title. Press the se lector key twice to close the pop-up
window and continue the storing process.
Editing stored audio data (titles) and foldersSelect title or folder
– Open the selection menu of the available audio sources ⇒page 25.
– Press the function key to disp lay the stored titles and folders
on the hard disk.
– Select the title or folder to be pr ocessed. Press on the display of a
folder to open it. Press the function key to open the
appropriate higher priority folder. The names of the currently opened
folders are displayed in the title line.
– Press the function key behind the display of the title or folder you wish to process. A po p-up window will open.
– The play function can be started and the title or folder can be copied, renamed or erased via the pop-up window.Function keys in the pop-up window:
– starts the play function of the selected title or folder ⇒page 27, “Playing
sequence of MP3 data and folders”.
– stores a copy of the title or folder ⇒page 29, “Selecting storage space and
store titles”.
– opens the entry mask to change the title or folder name.
– erases the selected title or folder after renewed confirmation.
New folder
Drop file/folder here
Cancel
SelectionSelection
Cancel
MEDIA
HDD
... Name
PlayCopyRenameDelete
s2u4.6.book Page 30 Wednesday, August 13, 2008 7:57 AM
Page 33 of 75
Selector key MEDIA31
Video DVD OperationInserting a Video DVD and starting
Insert a Video DVD
– Push a Video DVD with the printed side facing up as far as possible
into the CD/DVD case until it is automatically drawn in.
– The DVD will start automatically. Th e readout of the data from the
DVD can take a few seconds, during which time the screen turns dark.
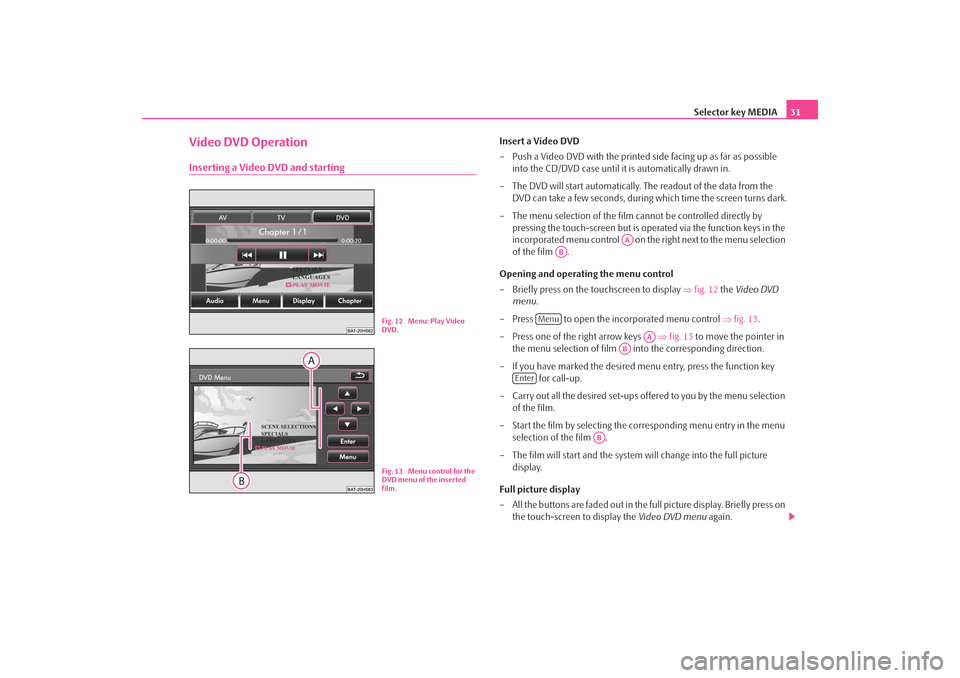
– The menu selection of the film cannot be controlled directly by pressing the touch-screen but is oper ated via the function keys in the
incorporated menu control on the right next to the menu selection
of the film .
Opening and operating the menu control
– Briefly press on the touchscreen to display ⇒fig. 12 the Video DVD
menu .
– Press to open the incorporated menu control ⇒ fig. 13.
– Press one of the right arrow keys ⇒fig. 13 to move the pointer in
the menu selection of film into the corresponding direction.
– If you have marked the desired menu entry, press the function key for call-up.
– Carry out all the desired set-ups offered to you by the menu selection of the film.
– Start the film by selecting the corresponding menu entry in the menu selection of the film .
– The film will start and the system will change into the full picture display.
Full picture display
– All the buttons are faded out in the full picture display. Briefly press on the touch-screen to display the Video DVD menu again.
Fig. 12 Menu: Play Video
DVD.Fig. 13 Menu control for the
DVD menu of the inserted
film.
AA
AB
Menu
AA
AB
Enter
AB
s2u4.6.book Page 31 Wednesday, August 13, 2008 7:57 AM
Page 34 of 75
Selector key MEDIA
32
– If you press the free part of the touch-screen again the Video DVD
menu will fade out again. The Video DVD menu will automatically fade
out after approx. 15 seconds without an operation.Aspect ratio (4:3 or 16:9)
The film started with the pre-set aspect ra tio (4:3 or 16:9). You change the aspect
ratio in the set-up menu.
Note
The manufacturer of the DVD is responsible for the display of the menu selection
of a film and the selection and settings offered there. The manufacturer of the DVD
is also responsible for the different behavi ours of individual films during identical
operation.The Video DVD menuChanging over between audio and video function
– Press the function key in the Video DVD menu to change
⇒ page 23, fig. 8 into the Audio menu .
Opening the incorporated menu control
– Press the function key in the Video DVD menu to open
⇒ page 31, fig. 13 the incorporated menu control. When a film is
running and switches back to menu selection ⇒page 31, “Opening
and operating the menu control”.
– Press to open the incorporated menu control. The image will change again to the full picture di splay. Depending on the data struc-
ture of the inserted DVD, the film will stop while in the menu selection
or the play function is conti nued from the last played point. Changing the display set-ups
– Press the function key in the
Video DVD menu to change the
brightness, contrast or colour of the film shown on the touch-screen.
Opening chapter selection
– Press the function key in the Video DVD menu during the
running time of a film to display the list of the chapters in the Video
DVD. The current chapter will be shown at the top, all the others are
shown underneath.
– Press directly on the display of a chapter (e.g. ). The play function of the film will continue at the beginning of the selected
chapter.
– Alternatively, you may change the current chapter by pressing the arrow keys on the unit or in the Video DVD menu or by turning the set-
up button .
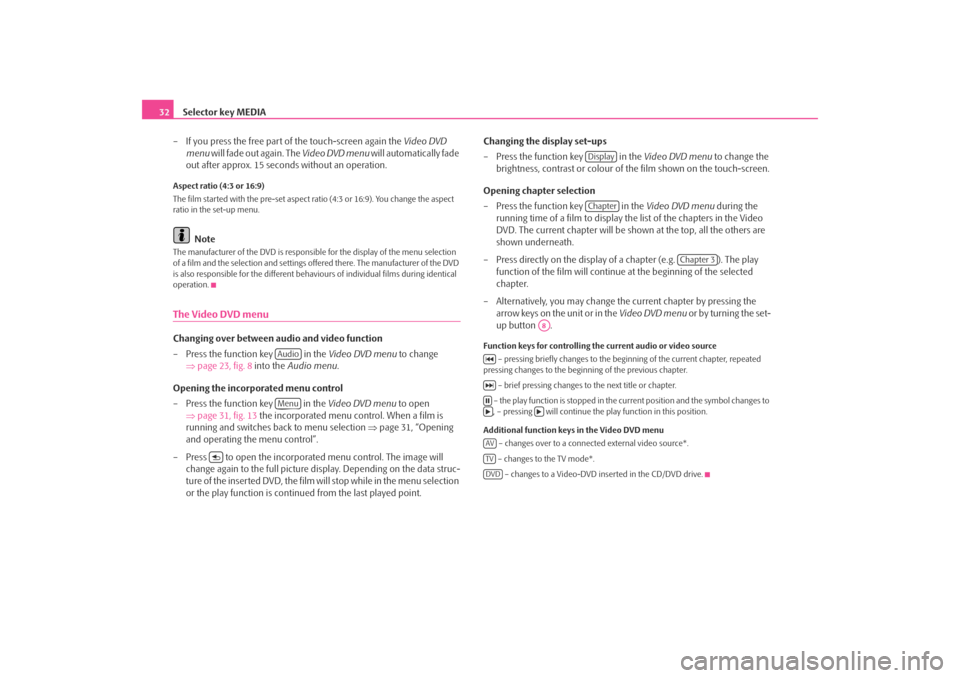
Function keys for controlling the current audio or video source
– pressing briefly changes to the beginning of the current chapter, repeated
pressing changes to the beginning of the previous chapter.
– brief pressing changes to the next title or chapter.
– the play function is stopped in the current position and the symbol changes to , – pressing will continue the play function in this position.
Additional function keys in the Video DVD menu – changes over to a connected external video source*.
– changes to the TV mode*. – changes to a Video-DVD inserted in the CD/DVD drive.
AudioMenu
DisplayChapter
Chapter 3
A8
AVTVDVD
s2u4.6.book Page 32 Wednesday, August 13, 2008 7:57 AM
Page 40 of 75
Selector key NAV (Navigation)
38Selector key NAV (Navigation)OverviewSafety information regarding the use of the navigation systemThe route is recalculated each time if you ignore driving recommendations or
change the route. This process takes only a few seconds. Driving recommendations
can only then be re-transmitted.
Incomplete navigation data
The navigation system cannot receive any da ta from GPS satellites if you drive for
longer periods under thick forest canopy or when your vehicle is in a garage, under-
pass or tunnel. In this case, th e navigation system orientates itself solely with the
help of the vehicle sensors.
In regions not at all or only partially digitalised and stored as such on the navigation
DVD, the navigation system will try to provide guidance to the destination. Please
note that under these circumstances the guidance to the destination may not be
completely correct if, for example, one-wa y streets and road categories (motorway,
country road etc.) are not at all or only partially included in the navigation data
used.
WARNING
Always concentrate fully on your drivin g. Inattention by the driver can lead
to accidents and injuries.•
Do not allow yourself to be distracted or loose your concentration, pay
attention to the traffic situation and do not carry out settings or use the radio
navigation system.
•
Only use the radio navigation system if road, weather and traffic situa-
tions permit this and you are not distracted.
•
The various volume settings must be selected in such a way that audible
signals from the outside, such as e.g. a Martins horn from police cars and fire
brigade, can be heard at all times.
WARNING
Please observe the legal requirements for road traffic when following the
driving recommendations provided by your radio navigation system.•
The driving recommendations provided may vary from current situa-
tions, e.g. due to road works or out of date navigation data. In such a case,
always observe the traffic regulations and ignore the driving recommenda-
tions.
•
Traffic signs and traffice regulations al ways have priority over the driving
recommendations provided by the navigation system.
•
Route guidance is subject to constant changes, particularly to informa-
tion relating to one-way streets, pedestrian zones etc. stored on the naviga-
tion DVD. Information on traffic lights, stop and right of way signs, parking
and stopping restrictions as well as lane constrictions and speed restrictions
is not included in the radio navigation system.
•
Adjust your speed to suit weather, road and traffic conditions. Do not
allow the navigation system to make yu drive faster in fog – risk of
accident!
Navigation data and the navigation DVDStoring navigation data in the unit
– Push a navigation DVD with as far as possible into the CD/DVD case
with the written side facing up until it is automatically drawn in. The
unit will compare the data on the navigation DVD with the data in the
navigation system memory. No message will appear if the data in the
navigation system memory of the unit is identical to the data on the
navigation DVD.
– Press the function key , to find out that the storing process has
been completed.
Notify
s2u4.6.book Page 38 Wednesday, August 13, 2008 7:57 AM
Page 41 of 75
Selector key NAV (Navigation)39
– If the corresponding message appears, press the key or press the function key and take out the navigation DVD. Active route guid-
ance is interrupted and must be restarted.
Updating navigation data in the unit
– If the data of the navigation DVD is not identical to that stored in the
navigation memory of the unit, a corresponding message will be
displayed.
– Press on the function key to ov erwrite the data in the navigation
system memory of the unit with the data from the navigation DVD.
Using the data of a navigation DVD for a short period of time
– If you leave the stored area map in the navigation memory of the unit
for only a short period of time, insert the navigation DVD for the area
to be driven.
– Press on the function key and leave the navigation DVD in the unit. The unit uses only the data from the navigation DVD for the
navigation.
– If you are again in the area of the ma p material stored in the navigation
memory, press the key to take out the navigation DVD.
Storing the navigation data can take up to one hour. Route guidance will start via
the navigation DVD while the navigation data is being stored. Please note that route
guidance will be interrupted if the navi gation DVD is taken out. Route guidance
must then be restarted with details suppl ied from the navigation system memory
of the unit.
Up to date navigation data and new navigation DVD
Road guidance is subject to constant chan ges (e.g. new streets, changes of street
names and house numbers). A navigation DVD is a huge data store, which unfortu-
nately will not be up to date after a cert ain time. This can lead to complaints during
route guidance. It is for this reason that you must regula
rly update the navigation data on your unit
with a current navigation DVD.
Input windows of the navigation systemSelecting a destination from the list
– If you press on the function key after opening the input mask, a list will open with all the destinations containing the relevant parameters
selectable from the navigation memory (e.g. and ).
– If need be, move the sliding regulator to the right edge of the touch- screen for all entries in the list to be displayed.
– Press the desired entry in the list to take it over for the address.
Limiting the destination and selecting from the list
– You can open a list of the selectable destinations any time by pressing the function key behind the entry line while making entries in the
entry line. Only destinations select able from the navigation memory
will be displayed and which corres pond to the requirements and the
character sequence in the entry line.
– The number of selectable destinatio ns will be displayed in the func-
tion key if fewer than one hundred destinations can be selected.
–If fewer than six destinations ar e selectable, the entry window will
close automatically and a list of possible destinations will be
displayed.
Eject
SaveTe m p o r a r y
State
City
**
**
s2u4.6.book Page 39 Wednesday, August 13, 2008 7:57 AM