225 SKODA OCTAVIA 2008 2.G / (1Z) Owner's Manual
[x] Cancel search | Manufacturer: SKODA, Model Year: 2008, Model line: OCTAVIA, Model: SKODA OCTAVIA 2008 2.G / (1Z)Pages: 304, PDF Size: 17.69 MB
Page 19 of 304
Instruments and Indicator/Warning Lights
18
Engine revolutions counter
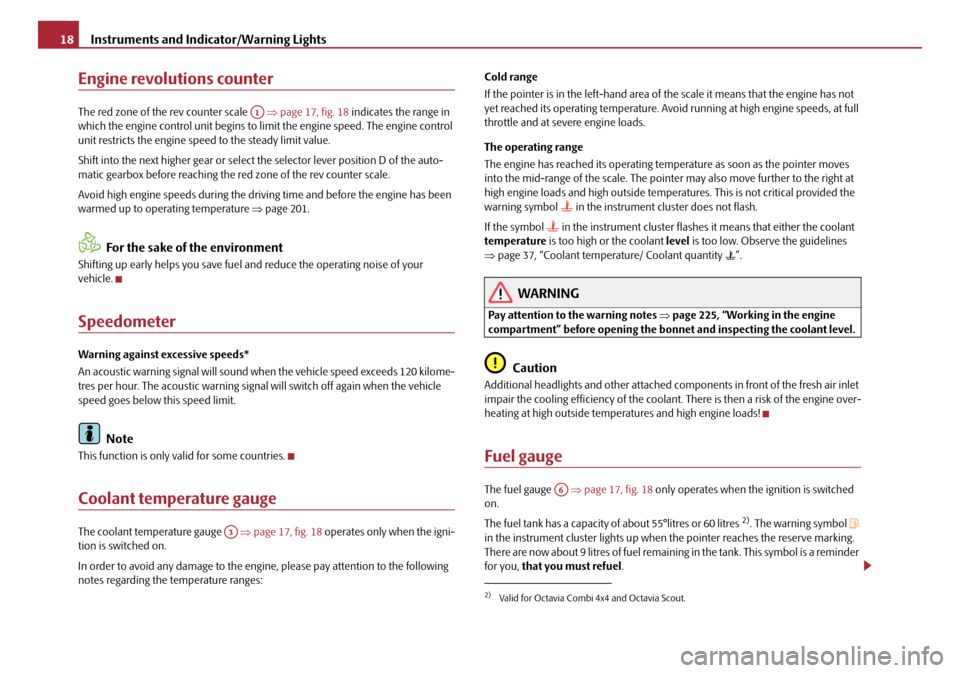
The red zone of the rev counter scale ⇒page 17, fig. 18 indicates the range in
which the engine control unit begins to li mit the engine speed. The engine control
unit restricts the engine speed to the steady limit value.
Shift into the next higher gear or select the selector lever position D of the auto-
matic gearbox before reaching the red zone of the rev counter scale.
Avoid high engine speeds during the driving time and before the engine has been
warmed up to operating temperature ⇒page 201.
For the sake of the environment
Shifting up early helps you save fuel and reduce the operating noise of your
vehicle.
Speedometer
Warning against excessive speeds*
An acoustic warning signal will sound when the vehicle speed exceeds 120 kilome-
tres per hour. The acoustic warning signal will switch off again when the vehicle
speed goes below this speed limit.
Note
This function is only valid for some countries.
Coolant temperature gauge
The coolant temperature gauge ⇒page 17, fig. 18 operates only when the igni-
tion is switched on.
In order to avoid any damage to the engine , please pay attention to the following
notes regarding the temperature ranges: Cold range
If the pointer is in the left-hand area of the scale it means that the engine has not
yet reached its operating temperature. Avoi
d running at high engine speeds, at full
throttle and at severe engine loads.
The operating range
The engine has reached its operating temperature as soon as the pointer moves
into the mid-range of the scale. The pointe r may also move further to the right at
high engine loads and high outside temper atures. This is not critical provided the
warning symbol
in the instrument cluster does not flash.
If the symbol
in the instrument cluster flashes it means that either the coolant
temperature is too high or the coolant level is too low. Observe the guidelines
⇒ page 37, “Coolant temperature/ Coolant quantity ”.
WARNING
Pay attention to the warning notes ⇒page 225, “Working in the engine
compartment” before opening the bonnet and inspecting the coolant level.
Caution
Additional headlights and other attached components in front of the fresh air inlet
impair the cooling efficiency of the coolant. There is then a risk of the engine over-
heating at high outside temperatures and high engine loads!
Fuel gauge
The fuel gauge ⇒page 17, fig. 18 only operates when the ignition is switched
on.
The fuel tank has a capacity of about 55°litres or 60 litres
2). The warning symbol
in the instrument cluster li ghts up when the pointer reaches the reserve marking.
There are now about 9 litres of fuel remaining in the tank. This symbol is a reminder
for you, that you must refuel .
A1
A3
2)Valid for Octavia Combi 4x4 and Octavia Scout.
A6
20A5Facelift.book Page 18 Saturday, September 6, 2008 2:13 PM
Page 34 of 304
Instruments and Indicator/Warning Lights33
Using the systemSafetyDriving TipsGeneral MaintenanceBreakdown assistanceTechnical Data
WARNING
•If you do not pay attention to the warning lights coming on and the corre-
sponding descriptions and warning notes, this may result in severe body
injuries or major vehicle damage.
•The engine compartment of your car is a hazardous area. There is a risk
of injuries, scalding, accidents and fire when working in the engine
compartment, e.g. inspecting and replenis hing oil and other fluids. It is also
essential to observe all warnings ⇒page 225, “Working in the engine
compartment”.
Note
•The arrangement of the indicator light is dependent on the model version. The
symbols shown in the following functional description are to be found as indicator
lights in the instrument cluster.
•Operational faults are shown in the instrument cluster as red symbols (priority
1 - danger) or yellow symbols (priority 2 - warning).
Turn signal system
Either the left or right indicator light flashes depending on the position of the
turn signal lever.
The indicator light flashes at twice its normal rate if a turn signal light fails. This does
not apply when towing a trailer.
Switching off the hazard warning light system is switched on will cause all of the
turn signal lights as well as both indicator lights to flash.
Electromechanica l power steering⇒page 35
Engine oil pressure⇒page 36
EPC fault light (petrol engine)⇒page 36
Glow plug system (diesel engine)⇒page 36
Coolant temperature/coolant level⇒page 37
Tra c t i o n c o n t r o l s y s t e m ( TC S )⇒page 37
Electronic stability programme (ESP)*⇒page 38
Selector lever lock*⇒page 38
Tyre pressure*⇒page 38
Antilock brake system (ABS)⇒page 38
Bonnet⇒page 39
Seat belt warning light⇒page 39
Brake pad wear*⇒page 39
Boot lid⇒page 40
Open door⇒page 40
Fluid level in windshield washer system*⇒page 40
Brake system⇒page 40
Dynamo⇒page 41
Engine oil level⇒page 41
Fuel reserve⇒page 41
20A5Facelift.book Page 33 Saturday, September 6, 2008 2:13 PM
Page 40 of 304
Instruments and Indicator/Warning Lights39
Using the systemSafetyDriving TipsGeneral MaintenanceBreakdown assistanceTechnical Data
A fault in the ABS
The system is not functioning pr
operly if the ABS warning light
does not go out
within a few seconds after switching on the ignition, does not light up at all or lights
up while driving. The vehicle will only be braked by the normal brake system. Visit
a specialist garage as quickly as possible and adjust your style of driving in the
meantime since you will not kn ow how great the damage is.
Further information about ABS ⇒page 197, “Antilock brake system (ABS)”.
A fault in the entire brake system
If the ABS warning light
comes on together with the brake system warning light (handbrake must be released), there is a fault not only in the ABS but also in
another part of the brake system ⇒.
WARNING
•If the brake system warning light comes on together with the ABS
warning light stop the vehicle immediatel y and check the brake fluid
level in the reservoir ⇒page 231, “Brake fluid”. If the fluid level has dropped
below the MIN marking, do not drive any further - risk of accident! Contact
a Škoda dealer to obtain professional assistance.
•Pay attention to the following instructions ⇒page 225, “Working in the
engine compartment” before checking the brake fluid level and opening the
bonnet.
•If the brake fluid is at the correct level, the ABS control function has
failed. The rear wheels may then block ve ry rapidly when braking. In certain
circumstances, this can result in the rear end of the car breaking away - risk
of skidding! Drive carefully to the ne arest specialist garage and have the
fault rectified.
Bonnet
The warning light comes on if the bonnet is unl ocked. If the engine bonnet
unlocks while driving , the warning light lights up and an audible signal sounds.
The warning light comes on even when the ignition is switched off. The warning
light lights up for a maximum of 5 minutes. On vehicles with informatio
n display* this warning light is replaced by a vehicle
symbol ⇒page 27.
Seat belt warning light
The warning light comes on after the ignition is switched on as a reminder for the
driver and front passenger to fasten the seat belt. The warning light only goes out if
the driver or front passenger has fastened his seat belt.
If the seat belt has not been fastened by the driver or front passenger, a permanent
warning signal sounds at vehicle speeds greater than 20 km/h and simultaneously
the warning light
flashes.
If the seat belt is not fastened by the dr iver or front passenger during the next 90
seconds, the warning signal is deactivated and the warning light
lights up perma-
nently.
Further information on the seat belts ⇒page 168, “Seat belts”.
Thickness of the brake pads*
The warning light comes on for a few seconds 6) when the ignition is switched
on.
If the warning light
comes on, contact a specialist garage immediately and have
the brake pads on all of the wheels inspected.
The following text will be displayed in the information display*: Check brake pads!
6)The warning light on vehicles fitted with information display does not come on after
switching the ignition on, but only if a fault exists.
20A5Facelift.book Page 39 Saturday, September 6, 2008 2:13 PM
Page 41 of 304
Instruments and Indicator/Warning Lights
40
Boot lid
The warning light comes on when the ignition is switched on if the luggage
compartment door is open. If th e boot lid opens while driving , the warning light
lights up and an audible signal sounds.
An audible signal sounds as an additional warning signal.
The warning light comes on even when the ignition is switched off. The warning
light lights up for a maximum of 5 minutes.
On vehicles with information display* this warning light is replaced by a vehicle
symbol ⇒page 27.
Open door
The warning light comes on if one or several doors are opened or if the boot lid
is opened. If one of the doors opens wh ile driving, the warning light lights up
and an audible signal sounds.
The warning light comes on even when the ignition is switched off. The warning
light lights up for a maximum of 5 minutes.
On vehicles with information display* this warning light is replaced by a vehicle
symbol ⇒page 27.
Windshield washer fluid level*
The warning light comes on when the ignition is switched on if there is insuffi-
cient fluid in the windshield washer system. Top up with liquid ⇒page 235.
The following text will be displayed in the information display*: Add wash fluid!
Brake system
The warning light flashes or comes on if the brake fluid level is too low, if there
is a fault in the ABS or if the handbrake is applied.
If the warning light
flashes and an audible signal sounds three times (handbrake
is not applied), stop and check the brake fluid level ⇒.
The following text will be displayed in the information display*: Brake fluid Owner's manual
If there is a fault in the ABS which also in fluences the function of the brake system
(e.g. distribution of brake pressure), the ABS warning light
comes on and at the
same time the brake system warning light starts flashing . Be aware that not only
the ABS but also another part of th brake system is defective ⇒.
An audible signal sounds three times as an additional warning signal.
One should get used to high pedal forces, long braking distances and long free play
of the brake pedal when driving to the next specialist garage.
For further information on the brake system ⇒page 196, “Brakes”.
Handbrake applied
The warning light
also comes on if the handbrake is applied. An audible warning
is also given if you drive the vehicle for at least 3 seconds at a speed of more than 6
km/h.
The following text will be displayed in the information display*:
Release parking brake!
WARNING
•Pay attention to the following instructions ⇒page 225, “Working in the
engine compartment” before checking the brake fluid level and opening the
bonnet.
•If the brake system warning light does not go out a few seconds after
switching on the ignition or comes on when driving, stop immediately and
check the brake fluid in the reservoir ⇒page 231. If the fluid level has
20A5Facelift.book Page 40 Saturday, September 6, 2008 2:13 PM
Page 128 of 304
Starting-off and Driving127
Using the systemSafetyDriving TipsGeneral MaintenanceBreakdown assistanceTechnical Data
You should not switch on any major electrical components during the heating
period otherwise the vehicle battery will be drained unnecessarily.
•You should start the engine immediately after the glow plug warning light
has gone out.
•The glow plug warning light will come on for about one second if the engine is
at a normal operating temperature or if th e outside temperature is above +5°C. This
means that you can start the engine right away.
•Interrupt the attempt at starting after 10 seconds if the engine does not start
right awayand wait for about 30 seconds before repeating the attempt.
•It is possible that the fuse on the diesel preglow system is defect if the engine
still does not start. Check the fuse and replace it if necessary ⇒page 257.
•Contact the nearest specialist garage to obtain professional assistance.
Starting the engine after the fuel tank has run dry
It may take longer than normal to start the engine after refuelling if the fuel tank has
run completely dry - up to one minute. This is because the fuel system must first of
all be filled while the attempting to start the engine.
Switching off the engine
– The engine can be switched off by turning the ignition key from posi- tion into ⇒page 125, fig. 146 .
WARNING
•Never switch off the engine before the vehicle is stationary - risk of acci-
dent!
•The brake booster only operates when the engine is running. Greater
physical effort for braking is required when engine is switched off. Because
if you do not stop as normal, this can cause an accident and severe injuries.
Caution
you should not switch the engine off right away at the end of your journey after the
engine has been operated for a lengthy peri od at high loads but should be allowed
it to run at idling speed for about 2 minutes . This prevents any accumulation of heat
when the engine is switched off.
Note
•The radiator fan may continue running fo r a further 10 minutes or so after the
engine and the ignition have been switched off. The coolant fan may, however, also
switch on again after some time if the coolant temperature rises because of an
accumulation of heat in the engine or if the engine is warm and the engine
compartment is additionally heated by strong sunlight.
•This is why particular care is required when carrying out any work in the engine
compartment ⇒page 225, “Working in the engine compartment”.
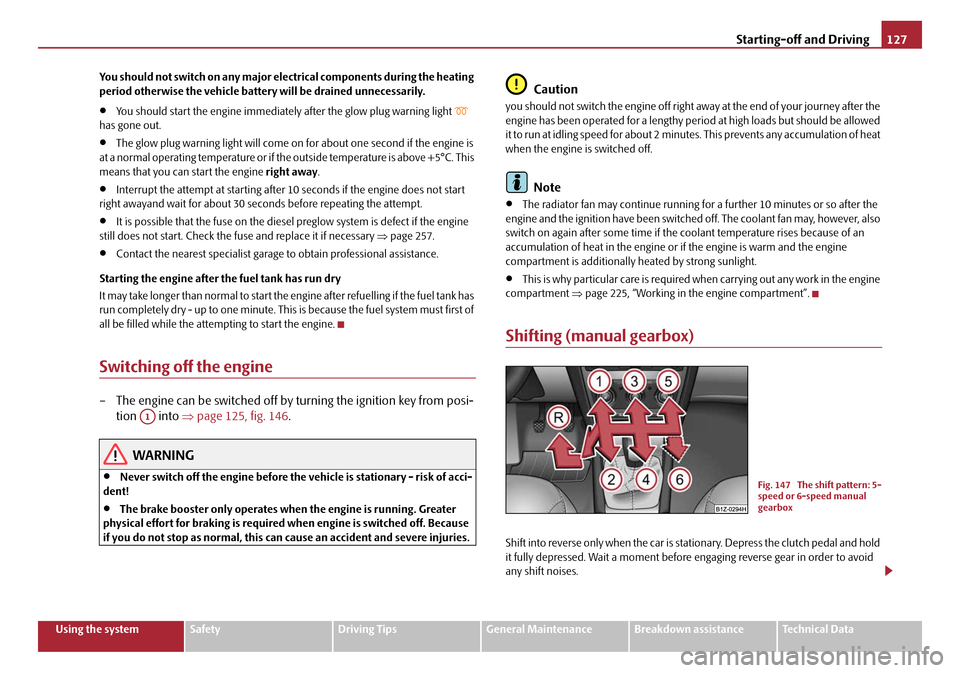
Shifting (manual gearbox)
Shift into reverse only when the car is stationary. Depress the clutch pedal and hold
it fully depressed. Wait a moment before engaging reverse gear in order to avoid
any shift noises.
A1
Fig. 147 The shift pattern: 5-
speed or 6-speed manual
gearbox
20A5Facelift.book Page 127 Saturday, September 6, 2008 2:13 PM
Page 138 of 304
Automatic gearbox137
Using the systemSafetyDriving TipsGeneral MaintenanceBreakdown assistanceTechnical Data
The gearbox does not shift into the 6th gear in the position
S, because the
maximum speed is reached with the 5th gear
12).
The Shiftlock on the selector lever grip must be pressed when moving the selector
lever out of the position D into the position S.
WARNING
•Never move the selector lever into position R or P when driving - risk of
an accident!
•When the engine is running and the vehicle is stationary, it is necessary
to hold the car with the brake pedal in all the positions of the selector lever
(except P and N) since the power transmission is never completely inter-
rupted, also not when the engine is idling - the vehicle "creeps".
•You must on no account unintentionally operate the throttle (e.g. by
hand from the engine compartment) if a drive position is engaged when the
car is stationary. The vehicle would ot herwise immediately start off - also
when the handbrake is firmly applied - risk of an accident!
•You must move the selector lever into position P and firmly apply the
handbrake first before you or any other person opens the bonnet and starts
working on the engine when it is running - risk of accident! It is also essential
to observe all warnings ⇒page 225, “Working in the engine
compartment”.
Selector lever lock
Automatic selector lever lock
With the ignition on, the selector lever is locked when it is in the positions P and N.
You must first of all depress the brake peda l in order to move the selector lever out
of this position. The warning light
⇒ page 38 lights up in the instrument cluster
as a reminder for the driver when the selector lever is in position P and N:
A time delay element ensures that the selector lever is not blocked when rapidly
switching over the position N (e.g. from R to D). This does, for example, allow one to seesaw out a stuck vehicle. The selector
lever lock will click into place if the lever
is in the N position for more than 2 seconds without the brake pedal being pressed.
The selector lever lock is only active if th e vehicle is stationary or moving at speed
of less than 5 km/hour. The lock is switched off automatically into position N when
the car is travelling at a higher speed.
Shiftlock button
The Shiftlock button in the handle of selector lever prevents certain selector lever
positions being engaged inadvertently. The selector lever lock is cancelled when
you press the Shiftlock button.
Keylock - Ignition key withdrawal lock
You can only withdraw the ignition key after switching off the ignition if the selector
lever is in position P. If the ignition key is withdrawn, the selector lever is blocked in
position P.
Kickdown function
The kickdown function provides you with maximum acceleration
power.
Depressing the accelerator pedal allows the kickdown function to be activated in
the desired driving program. This function has precedence over the driving
programme and serves for maximum accelera tion of the vehicle when exploiting
the maximum power potential of the engine without taking into account the
current selector lever position ( D, S or Tiptronic ). The gearbox shifts down to one
or several gears in line with the driving state and the vehicle accelerates. The
gearbox does not shift up into the highes t gear until the engine has reached its
maximum revolutions for this gear range.
WARNING
Please note that using the kickdown f unction can result in the driven wheels
spinning on a smooth or slippery road surface - risk of skidding!
12)Not valid for vehicles with automatic gearbox DSG.
20A5Facelift.book Page 137 Saturday, September 6, 2008 2:13 PM
Page 217 of 304
Taking care of your vehicle and cleaning the vehicle
216
Engine compartment
Good corrosion protection is very importan t, particularly in winter when one often
drives over its salt-strewn roads. One should therefore clean the whole engine
compartment before and after the salt spre ading period and treat with preservative
in order to prevent the salt from being destructive.
Škoda Service Partners have the cleaning agents and preservatives recommended
by the manufacturer and also the required equipment.
WARNING
•It is necessary to observe the guidelines given in the chapter before
working on the engine compartment ⇒page 225, “Working in the engine
compartment”.
•Let the engine cool down before cleaning the engine compartment.
Caution
•Engine cleaning may be only be und ertaken when the ignition is off.
•It is recommended to cover the generator before washing the engine compart-
ment.
For the sake of the environment
The dirty water produced by washing the engine has washed away petrol, and resi-
dues of grease and oil and should therefor e be cleaned by an oil separator. This is
why engine washing should only be undertake n in a specialist garage or at a fueling
station (when these are fitted with the required equipment).
Care of the interior of vehicle
Plastic parts, artificial leather and cloths
You can clean plastic parts and artificial le ather with a moist cloth. You should only
treat such parts with special solvent-free plastic cleaning and care products it
does prove to be adequate.
Upholstery cloth and cloth trim on the doors, luggage compartment cover, head-
liner etc. are best treated with special cleaning products, using if necessary a dry
foam and a soft sponge or brush.
We recommend using a cleaning product from Škoda genuine accessories offered
by your Škoda dealer.
Caution
Solvent-free cleaners attack the material and can damage it.
Fabric covers of electrically heated seats
Do not clean the seat covers moist as this may result in damage to the seat heating
system.
Clean such covers using special agents, for example dry foam.
Natural leather
Natural leather requires quite particular care and attention.
Leather should be treated from time to time according the following
guidelines depending on how much it is used.
Normal cleaning
– Clean soiled areas of the leather with slightly moistened cotton or
woollen cloth.
20A5Facelift.book Page 216 Saturday, September 6, 2008 2:13 PM
Page 226 of 304
Inspecting and replenishing225
Using the systemSafetyDriving TipsGeneral MaintenanceBreakdown assistanceTechnical Data
– Grip with the hand under the radiator grille and lift up the bonnet.
– Take the bonnet support out of its holder and set it in the opening designed for it ⇒page 224, fig. 210 .
Closing the bonnet
– Lift the bonnet slightly and unhook the bonnet support. Press the bonnet support into the hold er designed to hold it.
– Allow the bonnet to drop from a height of about 20 cm into the lock - bonnet do not press down on it !
WARNING
•Never open the bonnet if you see that steam or coolant is flowing out of
the engine compartment - risk of scaldi ng! Wait long enough until the steam
or coolant has stopped escaping.
•For safety reasons, the bonnet must always be properly closed when
driving. One should therefore check that the lock has in fact engaged prop-
erly after closing the bonnet.
•Stop your vehicle immediately while driv ing if you notice that the lock is
not properly engaged and close the bonnet properly - risk of an accident!
Caution
Never open the bonnet using the hand le - danger of causing damage.
Working in the engine compartment
Particular care is required when carrying out any work in the engine
compartment!
There is a risk of injuries, scalding, accidents and fire when working in the
engine compartment, e.g. inspecting and replenishing oil and other fluids. For
this reason, it is essential to comply with the warning instructions stated below and with the general applicable
rules of safety. The engine compart-
ment of your car is a hazardous area ⇒ .
WARNING
•Never open the bonnet if you see that steam or coolant is flowing out of
the engine compartment - risk of scaldi ng! Wait long enough until the steam
or coolant has stopped escaping.
•Switch off the engine and pull out the ignition key.
•Apply the handbrake firmly.
•If your vehicle is fitted with a ma nual gearbox, move the gearshift lever
into Neutral, or if it is fitted with automatic gearbox, move the selector lever
into position P.
•Allow the engine to cool down.
•Keep children clear of the engine compartment.
•Never spill oil and other fluids over the hot engine. Such fluids (e.g. the
antifreeze contained in the coolant) may ignite!
•Avoid short circuits in the electrical system - particularly on the battery.
•Never place your hand into the radiator fan as long as the engine is still
warm. The fan might suddenly start running!
•Never open the cap of the coolant expa nsion bottle as long as the engine
is still warm. The cooling system is pressurized!
•Cover over the cap of the coolant expansion reservoir with a large cloth
when opening it as protection for your face, hands and arms from hot steam
or hot coolant.
•Do not let objects, such as e.g cleaning cloth or tools lie in the engine
compartment.
•If you wish to work under the vehicle, you must secure the vehicle from
rolling away and support it with suitable supporting blocks: the car jack is
not sufficient for this - risk of injury!
•In cases where it be necessary to carry out inspection work when the
engine is running there is an additional risk from rotating parts (e.g. the V-
ribbed belt, alternator, radiator fan) and from the high-voltage ignition
system. Please observe in addition the following:
20A5Facelift.book Page 225 Saturday, September 6, 2008 2:13 PM
Page 228 of 304
Inspecting and replenishing227
Using the systemSafetyDriving TipsGeneral MaintenanceBreakdown assistanceTechnical Data
Engine oil
Check engine oil level
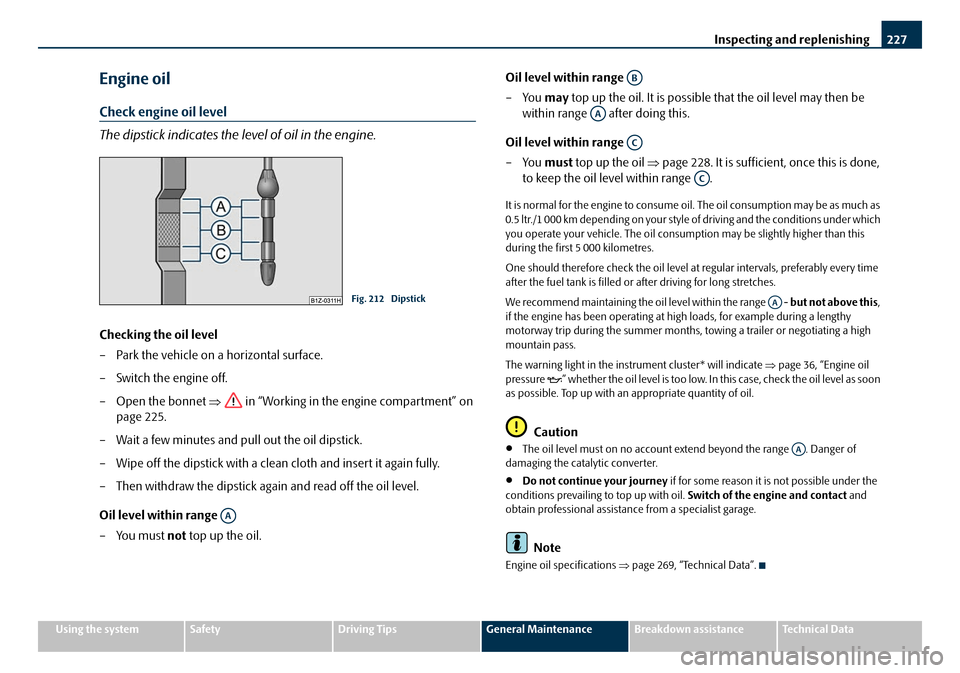
The dipstick indicates the level of oil in the engine.
Checking the oil level
– Park the vehicle on a horizontal surface.
– Switch the engine off.
– Open the bonnet ⇒ in “Working in the engine compartment” on
page 225.
– Wait a few minutes and pull out the oil dipstick.
– Wipe off the dipstick with a clea n cloth and insert it again fully.
– Then withdraw the dipstick ag ain and read off the oil level.
Oil level within range
– You must not top up the oil. Oil level within range
–You
may top up the oil. It is possible that the oil level may then be
within range after doing this.
Oil level within range
–You must top up the oil ⇒page 228. It is sufficient, once this is done,
to keep the oil level within range .
It is normal for the engine to consume oi l. The oil consumption may be as much as
0.5 ltr./1 000 km depending on your style of driving and the conditions under which
you operate your vehicle. The oil consumpt ion may be slightly higher than this
during the first 5 000 kilometres.
One should therefore check the oil level at regular intervals, preferably every time
after the fuel tank is filled or after driving for long stretches.
We recommend maintaining the oil level within the range - but not above this,
if the engine has been operating at hi gh loads, for example during a lengthy
motorway trip during the summer months, towing a trailer or negotiating a high
mountain pass.
The warning light in the instrument cluster* will indicate ⇒page 36, “Engine oil
pressure ” whether the oil level is too low. In this case, check the oil level as soon
as possible. Top up with an appropriate quantity of oil.
Caution
•The oil level must on no account ex tend beyond the range . Danger of
damaging the catalytic converter.
•Do not continue your journey if for some reason it is not possible under the
conditions prev ailing to top up with oil. Switch of the engine and contact and
obtain professional assistance from a specialist garage.
Note
Engine oil specifications ⇒page 269, “Technical Data”.
Fig. 212 Dipstick
AA
AB
AA
AC
AC
AA
AA
20A5Facelift.book Page 227 Saturday, September 6, 2008 2:13 PM
Page 229 of 304
Inspecting and replenishing
228
Replenishing engine oil
– Inspecting the engine oil level ⇒page 227.
– Unscrew the cap of the engine oil filler opening.
– Pour in a suitable grade of oil in portions of 0.5 litres ⇒page 272,
“Engine oil specifications”.
– Inspect the oil level ⇒page 227.
– Carefully screw on the cap of the filler opening and push the dipstick
in fully.
WARNING
•Avoid dripping oil onto hot parts of the engine when topping up will oil -
a risk of fire!
•Read and observe the warning notes ⇒page 225, “Working in the engine
compartment” before working in the engine compartment.
For the sake of the environment
The oil level must on no account extend beyond the range ⇒page 227. Oil will
otherwise be drawn in through the crankc ase ventilation and may pass through the
exhaust system to atmosphere. The oil ma y combust in the catalytic converter and
damage it.
Changing engine oil
The engine oil must be changed at the intervals stated in the Service schedule or
according to the service interval indicator ⇒page 20, “Service Interval Display”.
WARNING
•Only carry out the engine oil change, if you have the required profes-
sional knowledge!
•Read and observe the warning notes ⇒page 225, “Working in the engine
compartment” before working in the engine compartment.
•Let the engine cool down - risk of burning from hot oil.
•Wear an eye protection - risk of caustic burns due to oil splashes.
•Oil is toxic! Store old oil in a safe place out of the reach of children and
unauthorized persons until you dispose of it properly.
Caution
You must not pour any additives into th e engine oil - risk of engine damage!
Damage, which results from such produc t, are excluded from the warranty.
For the sake of the environment
•You must on no account pour oil into the ground or into the sewage system.
•In view of the problems involved in prop erly disposing of old oil, the material,
equipment and the knowledge required fo r such work, we recommend that you
have the oil and oil filter change carr ied out by your Škoda Service Partner.
Note
After your skin has come in contact with the oil, you must thoroughly wash your
skin.
Cooling system
Coolant
The job of the coolant is to cool the engine.
The cooling system does not require an y maintenance under normal operating
conditions. The coolant consis ts of water with a concentration of coolant additive
of 40 %. This mixture not only provides antifreeze protection down to -25°C but
AA
WARNING (continued)
20A5Facelift.book Page 228 Saturday, September 6, 2008 2:13 PM