225 SKODA OCTAVIA 2008 2.G / (1Z) User Guide
[x] Cancel search | Manufacturer: SKODA, Model Year: 2008, Model line: OCTAVIA, Model: SKODA OCTAVIA 2008 2.G / (1Z)Pages: 304, PDF Size: 17.69 MB
Page 231 of 304
Inspecting and replenishing
230
Losses can only occur through the pressure relief in the cap of the coolant expan-
sion bottle which is completely free of leak s if the coolant boils as a result of over-
heating and is forced out of the cooling system.
WARNING
Read and observe the warning notes ⇒page 225, “Working in the engine
compartment” before working in the engine compartment.
Caution
One should contact a specialist garage as soon as possible if the source of over-
heating itself cannot be determined and removed, since there may be grave
damage to the engine.
Replenishing the coolant
– Switch the engine off.
– Allow the engine to cool down.
– Place a cloth over the cap of the coolant expansion reservoir ⇒page 229, fig. 213 and unscrew the cap carefully by turning it to the
left ⇒ .
– Top up the coolant.
– Screw the cap tight until it is heard to lock.
The coolant which you use for replenishing the system, must comply with one
specific specification ⇒ page 228. Do not use an alternative additive if the coolant
additive G12 PLUS is not available in exceptional cases. Just top up the system with
water and as soon as possible arrange ad justment to correct the mixing ratio of
water and coolant additive again by a specialist garage.
Only use fresh coolant for topping up the system. Do not fill up over the “MAX” marking! Excess coolant which is heated up is forced
out of the cooling system through the pressure relief valve in the cap of the coolant
compensation bottle.
Wait until the engine has cooled down for a system which has suffered a major loss
of coolant before pouring in coolant. This is necessary to avoid engine damage.
WARNING
•The cooling system is pressurized! Do not open the cap of the coolant
expansion bottle if the engine is still hot - risk of scalding!
•The coolant additive and thus all of the coolant is harmful to your health.
Avoid contact with the coolant. Coolant vapours are also harmful to the
health. It is important, therefore, to always safely store any coolant additive
in its original container out of the reach of children - risk of poisoning!
•If any splashes of coolant get into yo ur eyes, rinse out your eyes immedi-
ately with clear water and contact a doctor as soon as possible.
•You should also consult a doctor without delay if you have inadvertently
swallowed coolant.
Caution
Do not continue your journey if for some reason it is not possible under the
conditions prevailing to top up with coolant. Switch of the engine and contact
and obtain professional assistance from a specialist garage.
For the sake of the environment
Do not re-use coolant if it is necessary to drain the coolant in the system. It should
be collected and disposed of in comp liance with environmental protection
regulations.
20A5Facelift.book Page 230 Saturday, September 6, 2008 2:13 PM
Page 232 of 304
Inspecting and replenishing231
Using the systemSafetyDriving TipsGeneral MaintenanceBreakdown assistanceTechnical Data
Radiator fan
The radiator fan may switch on suddenly.
The radiator fan is driven by an electr ic motor and controlled according to the
coolant temperature.
The radiator fan may continue running fo r up to 10 minutes after the engine has
been switched off - even if the ignition is also off. It may also switch on suddenly
after a certain time, if
•the coolant temperature ha s risen because of an accumulation of heat or
•the warm engine compartment is heated up additionally by strong sunlight.
WARNING
You must therefore be aware when work ing in the engine compartment that
the fan may switch on suddenly - risk of injury!
Brake fluid
Inspecting the brake fluid level
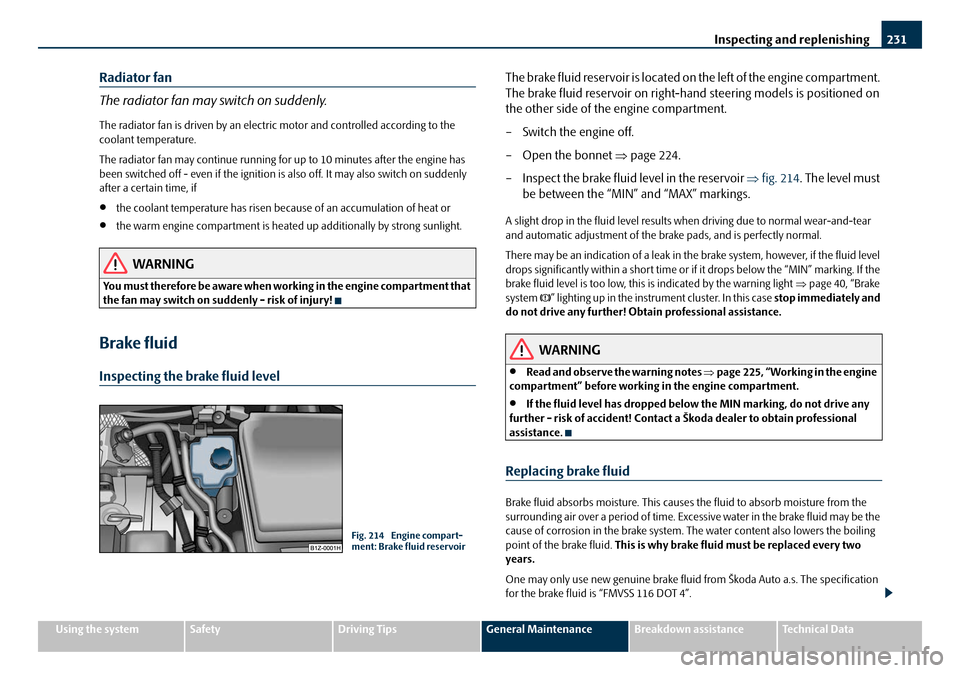
The brake fluid reservoir is located on the left of the engine compartment.
The brake fluid reservoir on right-hand steering models is positioned on
the other side of the engine compartment.
– Switch the engine off.
– Open the bonnet ⇒page 224.
– Inspect the brake fluid level in the reservoir ⇒fig. 214 . The level must
be between the “MIN” and “MAX” markings.
A slight drop in the fluid level results when driving due to normal wear-and-tear
and automatic adjustment of the br ake pads, and is perfectly normal.
There may be an indication of a leak in the brake system, however, if the fluid level
drops significantly within a short time or if it drops below the “MIN” marking. If the
brake fluid level is too low, this is indicated by the warning light ⇒page 40, “Brake
system ” lighting up in the instru ment cluster. In this case stop immediately and
do not drive any further! Obtain professional assistance.
WARNING
•Read and observe the warning notes ⇒page 225, “Working in the engine
compartment” before working in the engine compartment.
•If the fluid level has dropped below the MIN marking, do not drive any
further - risk of accident! Contact a Škoda dealer to obtain professional
assistance.
Replacing brake fluid
Brake fluid absorbs moisture. This causes the fluid to absorb moisture from the
surrounding air over a period of time. Excessive water in the brake fluid may be the
cause of corrosion in the brake system. Th e water content also lowers the boiling
point of the brake fluid. This is why brake fluid must be replaced every two
years.
One may only use new genuine brake fluid from Škoda Auto a.s. The specification
for the brake fluid is “FMVSS 116 DOT 4”.
Fig. 214 Engine compart-
ment: Brake fluid reservoir
20A5Facelift.book Page 231 Saturday, September 6, 2008 2:13 PM
Page 237 of 304
Inspecting and replenishing
236
not be more than 15 %. Please note, howeve r, that the antifreeze protection at this
concentration is only adequate down to -5°C.
WARNING
Read and observe the warning notes ⇒page 225, “Working in the engine
compartment” before working in the engine compartment.
Caution
•On no account should you add radiator antifreeze or other additives to the
windscreen washer fluid.
•If the vehicle is fitted with headligh t cleaning system, you should only add
cleaning products which do not attack th e polycarbonate coating of the headlights
to the windscreen washer fluid. Please contact your Škoda Service Partner, who will
tell you which cleaning agent you can use.
20A5Facelift.book Page 236 Saturday, September 6, 2008 2:13 PM
Page 250 of 304
Breakdown assistance249
Using the systemSafetyDriving TipsGeneral MaintenanceBreakdown assistanceTechnical Data
Note
•If you find, when changing the wheel, that the wheel bolts are corroded and
difficult to turn, the bolts mu st be replaced before checking the tightening torque.
•Drive cautiously and only at a moderate speed to a workshop where the tight-
ening torque can be checked.
Full wheel trim*
Pulling off
– Hook the clamp found in the vehicle tool kit into the reinforced edge of the full wheel trim.
– Push the wheel key through the clamp, support the wheel key at the tyre and pull off the wheel trim.
Installing
– First press the full wheel trim onto the wheel at the valve opening provided. Then press the full wheel trim into the wheel in such a way
that its entire circumference locks correctly in place.
Caution
•Use the pressure of your hand, do not knock on the full wheel trim! Heavy
knocks mainly on the points where the full wheel trim has not been inserted into
the wheel, can result in damage to the guide and centering elements of the full
wheel trim.
•First check for yourself that the th eft-deterrent wheel bolt is located
⇒ page 251 in the hole in the area of the valve before fitting the full wheel trim onto
a steel wheel which is attached with a theft-deterrent wheel bolt.
Wheel bolts with caps*
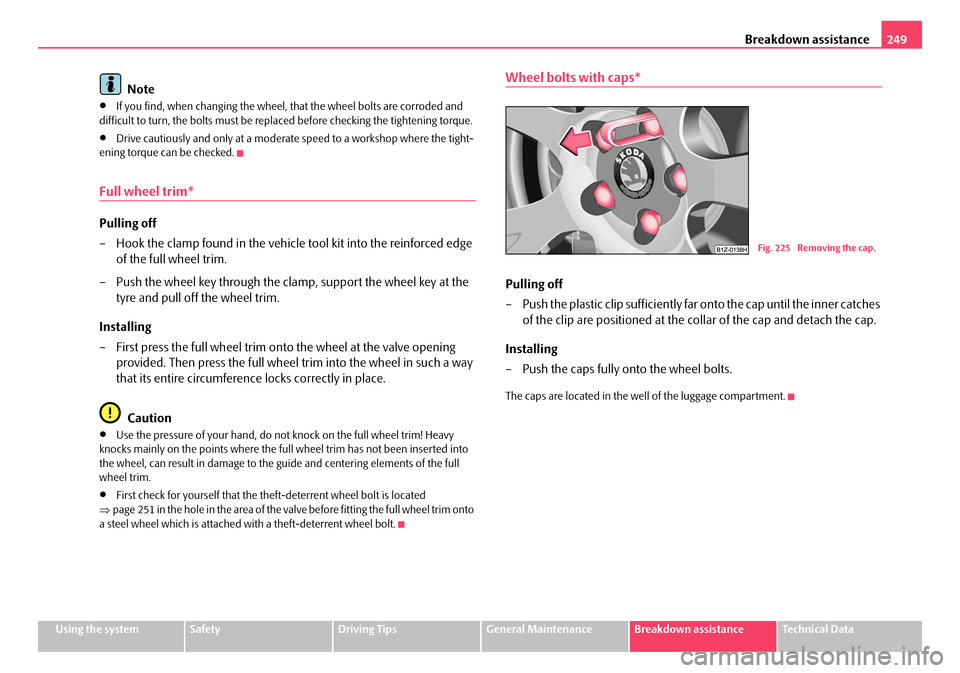
Pulling off
– Push the plastic clip sufficiently fa r onto the cap until the inner catches
of the clip are positioned at the collar of the cap and detach the cap.
Installing
– Push the caps fully onto the wheel bolts.
The caps are located in the we ll of the luggage compartment.
Fig. 225 Removing the cap.
20A5Facelift.book Page 249 Saturday, September 6, 2008 2:13 PM
Page 253 of 304
Breakdown assistance
252
– Reinstall the full wheel trim/wheel cap after removing the adapter or place the cap onto the safety wheel bolt.
– Have the tightening torque checked w i t h a t o rq u e w re n c h a s s o o n a s
possible. Steel and light alloy wheels must be tightened to a tightening
torque of 120 Nm.
The safety wheel bolts on vehicles fitted with them (one safety wheel bolt per
wheel) can only be loosened or tigh ten up by using the adapter provided.
It is meaningful to note the code numbe r hammered into the rear side of the
adapter or the rear side of the safety wheel bolts. You can obtain a replacement
adapter from a Škoda Service Partner, if necessary, by quoting this number.
We recommend that you always carry the adapter for the wheel bolts with you in
the vehicle. It should be st owed in the vehicle tool kit.
Caution
Damage can occur to the adapter and safety wheel bolt if the safety wheel bolt is
tightened up too much.
Note
The set of safety wheel bolts can be obtained from a Škoda Service Partner.
Jump-starting
Initial steps
You can use the battery of another vehicl e for jump-starting yours if the engine
does not start because the battery on your vehicle is flat. You will require jump-start
cables for this purpose.
Both batteries must have a rated voltage of 12 V. The capacity (Ah) of the battery
supplying the power must not be significa ntly less than the capacity of the
discharged battery in your vehicle. Jump-start cables
Only use jump-start cables which have an
adequately large cross-section and insu-
lated terminal clamps. Please pay attent ion to the manufacturer's instructions.
Positive cable - colour coding in the majority of cases red.
Negative cable - colour coding in the majority of cases black.
WARNING
•A discharged battery may already freeze at temperatures just below 0°C.
In case of frozen battery carry out no jump-starting - risk of explosion!
•Please pay attention to the warning instructions relating to working in
the engine compartment ⇒page 225, “Working in the engine compart-
ment”.
Note
•There must not be any contact between the two vehicles otherwise current may
flow as soon as the negative terminals are connected.
•The discharged battery must be properly connected to the system of the
vehicle.
•Switch off any mobile phone, pay attent ion to the instructions for use of the
mobile phone in such a situation.
•We recommend purchasing jump-start cabl es from Škoda Service Partners as a
Škoda original accessory or from retailers who sell branded batteries.
20A5Facelift.book Page 252 Saturday, September 6, 2008 2:13 PM
Page 263 of 304
Fuses and light bulbs
262
Electrically adjustable seats are protected by automatic circuit breakers, which
switch on again automatically after a few seconds after the overload has been
eliminated.
Bulbs
Changing bulbs
The relevant lamp must always be switch ed off before a light bulb is replaced.
Defect light bulbs should only be replaced with light bulbs of the same type. The
designation is located on the light socket or the glass bulb.
Changing certain bulbs is not something wh ich you can do yourself, but requires to
be done by a specialist. Other parts of the vehicle must be removed in order to change the light bulbs. This applies, in particular, to bulbs which can only be
reached from the engine compartment.
We therefore recommend that you have any bulbs changed by a Škoda Service
Partner or, in exceptional cases, by ca
lling on other professional assistance.
Please note that the engine compartment is a hazardous area ⇒page 225,
“Working in the engine compartment”.
We recommend that you carry the set of light bulbs with you which was delivered
in your vehicle. Replacement light bulbs
23) are available at specialist garages.
The set of light bulbs can be stowed in the locable box in the spare wheel.
Fitted with a xenon headlight
Change of light bulbs on Xenon lights (low beam lights, parking lights and main
beam lights) should be undertaken by a specialist garage.
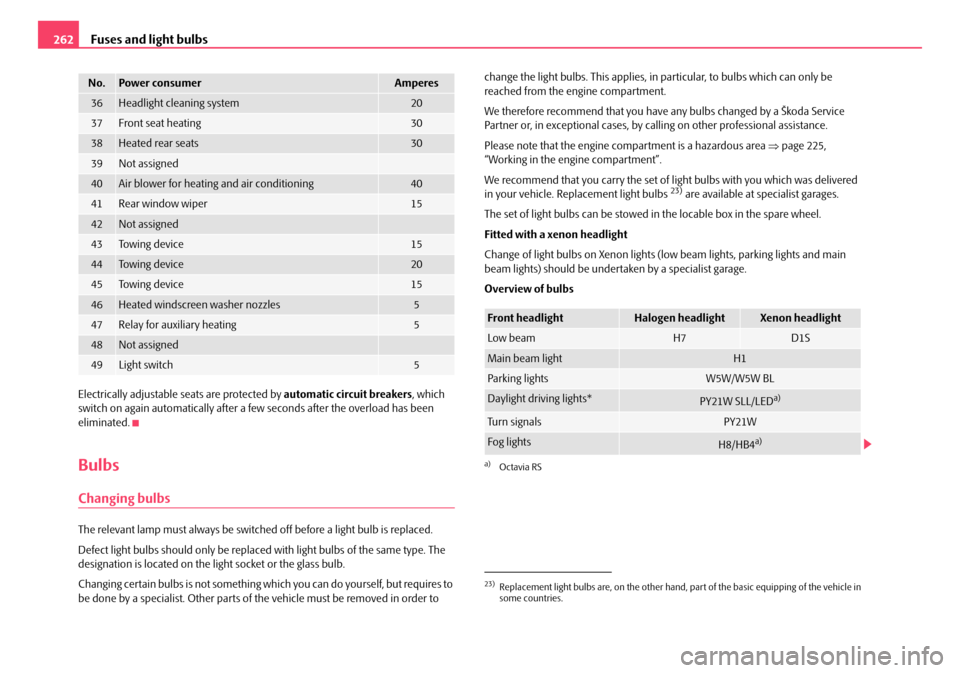
Overview of bulbs
36Headlight cleaning system20
37Front seat heating30
38Heated rear seats30
39Not assigned
40Air blower for heating and air conditioning40
41Rear window wiper15
42Not assigned
43To w i n g d e v i c e15
44To w i n g d e v i c e20
45To w i n g d e v i c e15
46Heated windscreen washer nozzles5
47Relay for auxiliary heating5
48Not assigned
49Light switch5
No.Power consumerAmperes
23)Replacement light bulbs are, on the other hand, part of the basic equipping of the vehicle in
some countries.
Front headlightHalogen headlightXenon headlight
Low beam H7D1S
Main beam lightH1
Parking lightsW5W/W5W BL
Daylight driving lights*PY21W SLL/LEDa)
a)Octavia RS
Tu r n s i g n a l sPY21W
Fog lightsH8/HB4a)
20A5Facelift.book Page 262 Saturday, September 6, 2008 2:13 PM
Page 276 of 304
Technical Data275
Using the systemSafetyDriving TipsGeneral MaintenanceBreakdown assistanceTechnical Data
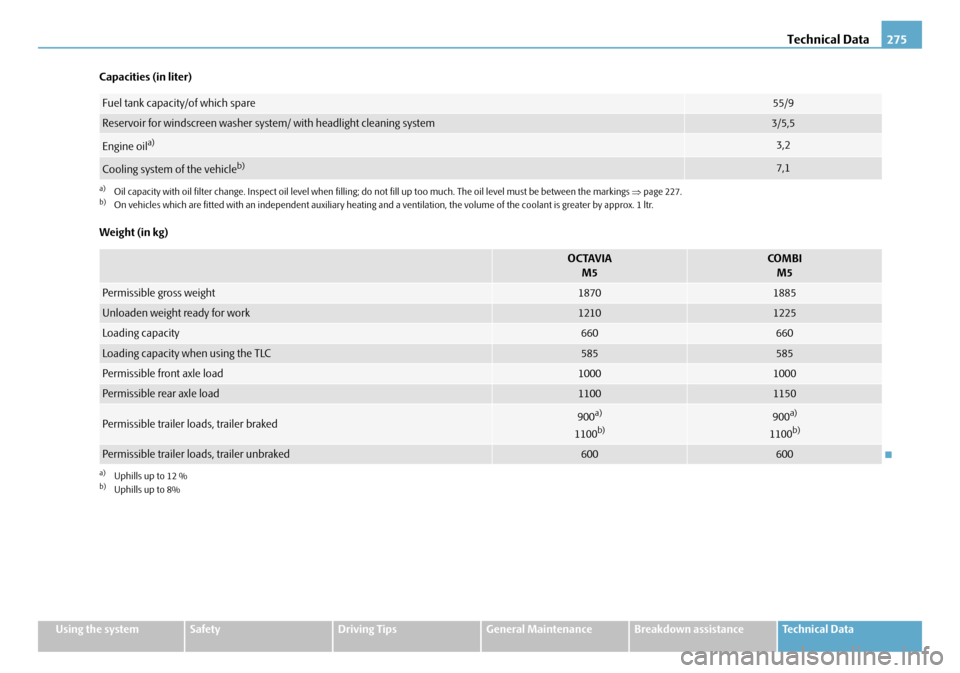
Capacities (in liter)
Weight (in kg)
Fuel tank capacity/of which spare55/9
Reservoir for windscreen washer system/ with headlight cleaning system3/5,5
Engine oila)
a)Oil capacity with oil filter change. Inspec
t oil level when filling; do not fill up too much. The oil level must be between the markings ⇒page 227.
3,2
Cooling system of the vehicleb)
b)On vehicles which are fitted with an independent auxiliary heating and a ventilation, the volume of the coolant is greater by a pprox. 1 ltr.
7,1
OCTAVIA
M5COMBIM5
Permissible gross weight 18701885
Unloaden weight ready for work12101225
Loading capacity660660
Loading capacity when using the TLC585585
Permissible front axle load10001000
Permissible rear axle load11001150
Permissible trailer loads, trailer braked900a)
1100b)
a)Uphills up to 12 %b)Uphills up to 8%
900a)
1100b)
Permissible trailer loads, trailer unbraked600600
20A5Facelift.book Page 275 Saturday, September 6, 2008 2:13 PM
Page 293 of 304
Technical Data
292
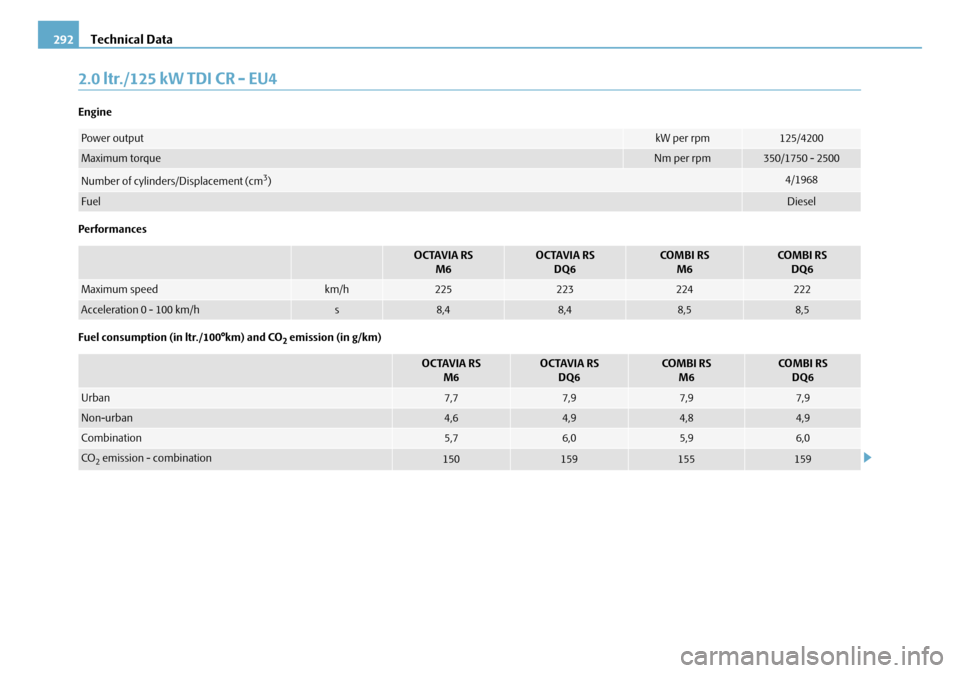
2.0 ltr./125 kW TDI CR - EU4
Engine
Performances
Fuel consumption (in ltr./100°km) and CO
2 emission (in g/km)
Power outputkW per rpm125/4200
Maximum torqueNm per rpm350/1750 - 2500
Number of cylinders/Displacement (cm3)4/1968
FuelDiesel
OCTAVIA RS
M6OCTAVIA RSDQ6CO M B I R SM6CO M B I R SDQ6
Maximum speedkm/h225223224222
Acceleration 0 - 100 km/hs8,48,48,58,5
OCTAVIA RS M6OCTAVIA RSDQ6CO M B I R SM6CO M B I R SDQ6
Urban7,77,97,97,9
Non-urban4,64,94,84,9
Combination5,76,05,96,0
CO2 emission - combination150159155159
20A5Facelift.book Page 292 Saturday, September 6, 2008 2:13 PM
Page 297 of 304
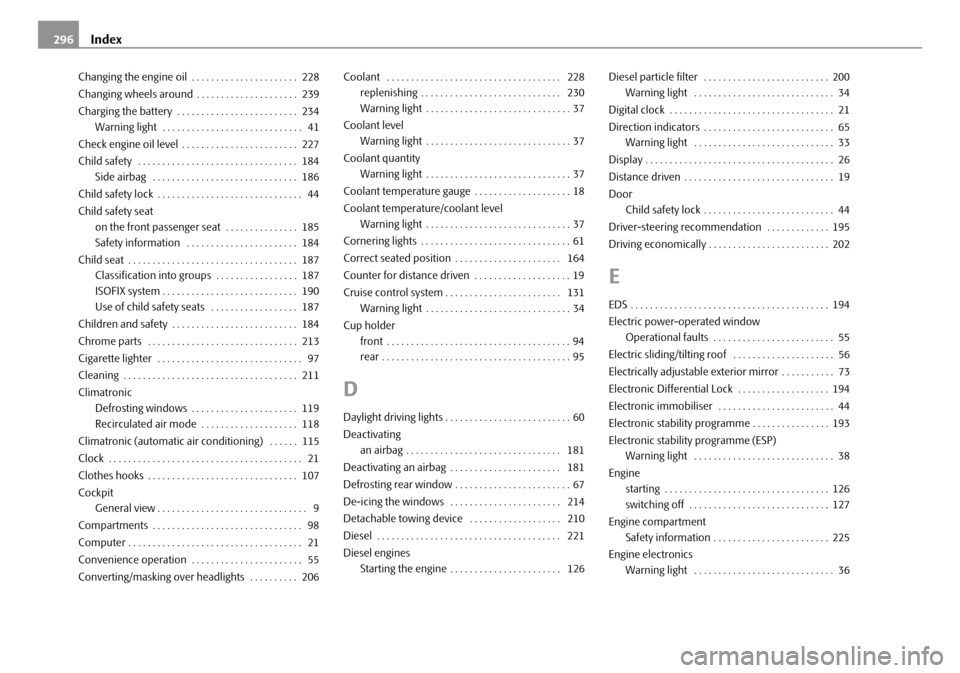
Index
296
Changing the engine oil . . . . . . . . . . . . . . . . . . . . . . 228
Changing wheels around . . . . . . . . . . . . . . . . . . . . . 239
Charging the battery . . . . . . . . . . . . . . . . . . . . . . . . . 234
Warning light . . . . . . . . . . . . . . . . . . . . . . . . . . . . . 41
Check engine oil level . . . . . . . . . . . . . . . . . . . . . . . . 227
Child safety . . . . . . . . . . . . . . . . . . . . . . . . . . . . . . . . . 184 Side airbag . . . . . . . . . . . . . . . . . . . . . . . . . . . . . . 186
Child safety lock . . . . . . . . . . . . . . . . . . . . . . . . . . . . . . 44
Child safety seat on the front passenger seat . . . . . . . . . . . . . . . 185
Safety information . . . . . . . . . . . . . . . . . . . . . . . 184
Child seat . . . . . . . . . . . . . . . . . . . . . . . . . . . . . . . . . . . 187 Classification into groups . . . . . . . . . . . . . . . . . 187
ISOFIX system . . . . . . . . . . . . . . . . . . . . . . . . . . . . 190
Use of child safety seats . . . . . . . . . . . . . . . . . . 187
Children and safety . . . . . . . . . . . . . . . . . . . . . . . . . . 184
Chrome parts . . . . . . . . . . . . . . . . . . . . . . . . . . . . . . . 213
Cigarette lighter . . . . . . . . . . . . . . . . . . . . . . . . . . . . . . 97
Cleaning . . . . . . . . . . . . . . . . . . . . . . . . . . . . . . . . . . . . 211
Climatronic Defrosting windows . . . . . . . . . . . . . . . . . . . . . . 119
Recirculated air mode . . . . . . . . . . . . . . . . . . . . 118
Climatronic (automatic air conditioning) . . . . . . 115
Clock . . . . . . . . . . . . . . . . . . . . . . . . . . . . . . . . . . . . . . . . 21
Clothes hooks . . . . . . . . . . . . . . . . . . . . . . . . . . . . . . . 107
Cockpit General view . . . . . . . . . . . . . . . . . . . . . . . . . . . . . . . 9
Compartments . . . . . . . . . . . . . . . . . . . . . . . . . . . . . . . 98
Computer . . . . . . . . . . . . . . . . . . . . . . . . . . . . . . . . . . . . 21
Convenience operation . . . . . . . . . . . . . . . . . . . . . . . 55
Converting/masking over headlights . . . . . . . . . . 206 Coolant . . . . . . . . . . . . . . . . . . . . . . . . . . . . . . . . . . . . 228
replenishing . . . . . . . . . . . . . . . . . . . . . . . . . . . . . 230
Warning light . . . . . . . . . . . . . . . . . . . . . . . . . . . . . . 37
Coolant level Warning light . . . . . . . . . . . . . . . . . . . . . . . . . . . . . . 37
Coolant quantity Warning light . . . . . . . . . . . . . . . . . . . . . . . . . . . . . . 37
Coolant temperature gauge . . . . . . . . . . . . . . . . . . . . 18
Coolant temperatur e/coolant level
Warning light . . . . . . . . . . . . . . . . . . . . . . . . . . . . . . 37
Cornering lights . . . . . . . . . . . . . . . . . . . . . . . . . . . . . . . 61
Correct seated position . . . . . . . . . . . . . . . . . . . . . . 164
Counter for distance driven . . . . . . . . . . . . . . . . . . . . 19
Cruise control system . . . . . . . . . . . . . . . . . . . . . . . . 131 Warning light . . . . . . . . . . . . . . . . . . . . . . . . . . . . . . 34
Cup holder front . . . . . . . . . . . . . . . . . . . . . . . . . . . . . . . . . . . . . . 94
rear . . . . . . . . . . . . . . . . . . . . . . . . . . . . . . . . . . . . . . . 95
D
Daylight driving lights . . . . . . . . . . . . . . . . . . . . . . . . . . 60
Deactivatingan airbag . . . . . . . . . . . . . . . . . . . . . . . . . . . . . . . . 181
Deactivating an airbag . . . . . . . . . . . . . . . . . . . . . . . 181
Defrosting rear window . . . . . . . . . . . . . . . . . . . . . . . . 67
De-icing the windows . . . . . . . . . . . . . . . . . . . . . . . 214
Detachable towing device . . . . . . . . . . . . . . . . . . . 210
Diesel . . . . . . . . . . . . . . . . . . . . . . . . . . . . . . . . . . . . . . 221
Diesel engines Starting the engine . . . . . . . . . . . . . . . . . . . . . . . 126 Diesel particle filter . . . . . . . . . . . . . . . . . . . . . . . . . . 200
Warning light . . . . . . . . . . . . . . . . . . . . . . . . . . . . . 34
Digital clock . . . . . . . . . . . . . . . . . . . . . . . . . . . . . . . . . . 21
Direction indicators . . . . . . . . . . . . . . . . . . . . . . . . . . . 65 Warning light . . . . . . . . . . . . . . . . . . . . . . . . . . . . . 33
Display . . . . . . . . . . . . . . . . . . . . . . . . . . . . . . . . . . . . . . . 26
Distance driven . . . . . . . . . . . . . . . . . . . . . . . . . . . . . . . 19
Door Child safety lock . . . . . . . . . . . . . . . . . . . . . . . . . . . 44
Driver-steering recommendation . . . . . . . . . . . . . 195
Driving economically . . . . . . . . . . . . . . . . . . . . . . . . . 202
E
EDS . . . . . . . . . . . . . . . . . . . . . . . . . . . . . . . . . . . . . . . . . 194
Electric power-operated window Operational faults . . . . . . . . . . . . . . . . . . . . . . . . . 55
Electric sliding/tilting roof . . . . . . . . . . . . . . . . . . . . . 56
Electrically adjustable exterior mirror . . . . . . . . . . . 73
Electronic Differential Lock . . . . . . . . . . . . . . . . . . . 194
Electronic immobiliser . . . . . . . . . . . . . . . . . . . . . . . . 44
Electronic stability programme . . . . . . . . . . . . . . . . 193
Electronic stability programme (ESP) Warning light . . . . . . . . . . . . . . . . . . . . . . . . . . . . . 38
Engine starting . . . . . . . . . . . . . . . . . . . . . . . . . . . . . . . . . . 126
switching off . . . . . . . . . . . . . . . . . . . . . . . . . . . . . 127
Engine compartment Safety information . . . . . . . . . . . . . . . . . . . . . . . . 225
Engine electronics Warning light . . . . . . . . . . . . . . . . . . . . . . . . . . . . . 36
20A5Facelift.book Page 296 Saturday, September 6, 2008 2:13 PM
Page 300 of 304
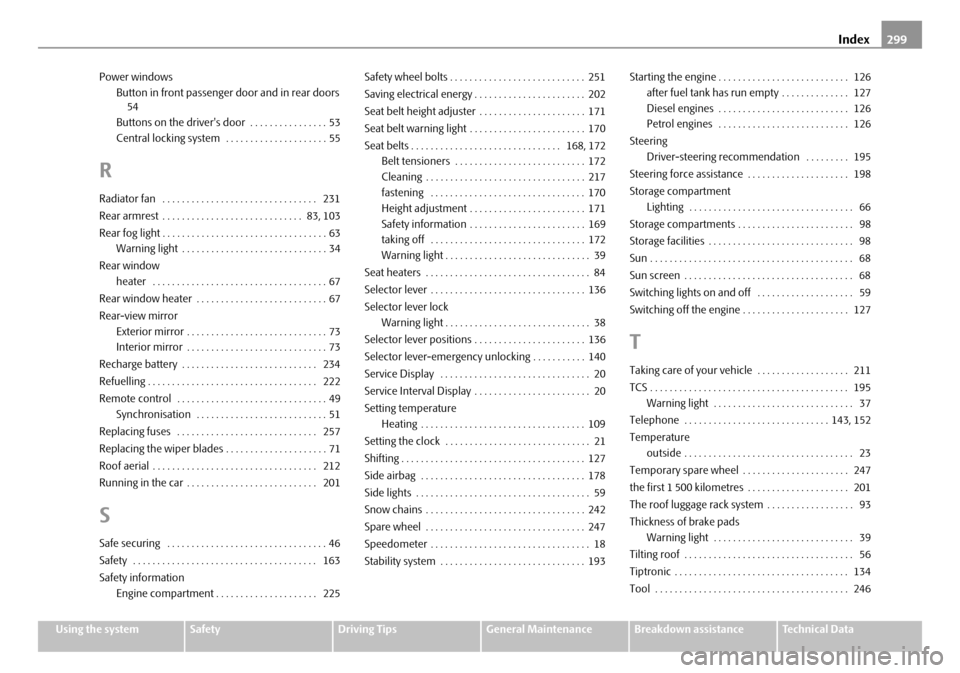
Index299
Using the systemSafetyDriving TipsGeneral MaintenanceBreakdown assistanceTechnical Data
Power windows
Button in front passenger door and in rear doors54
Buttons on the driver's door . . . . . . . . . . . . . . . . 53
Central locking system . . . . . . . . . . . . . . . . . . . . . 55
R
Radiator fan . . . . . . . . . . . . . . . . . . . . . . . . . . . . . . . . 231
Rear armrest . . . . . . . . . . . . . . . . . . . . . . . . . . . . . 83, 103
Rear fog light . . . . . . . . . . . . . . . . . . . . . . . . . . . . . . . . . . 63 Warning light . . . . . . . . . . . . . . . . . . . . . . . . . . . . . . 34
Rear window heater . . . . . . . . . . . . . . . . . . . . . . . . . . . . . . . . . . . . 67
Rear window heater . . . . . . . . . . . . . . . . . . . . . . . . . . . 67
Rear-view mirror Exterior mirror . . . . . . . . . . . . . . . . . . . . . . . . . . . . . 73
Interior mirror . . . . . . . . . . . . . . . . . . . . . . . . . . . . . 73
Recharge battery . . . . . . . . . . . . . . . . . . . . . . . . . . . . 234
Refuelling . . . . . . . . . . . . . . . . . . . . . . . . . . . . . . . . . . . 222
Remote control . . . . . . . . . . . . . . . . . . . . . . . . . . . . . . . 49 Synchronisation . . . . . . . . . . . . . . . . . . . . . . . . . . . 51
Replacing fuses . . . . . . . . . . . . . . . . . . . . . . . . . . . . . 257
Replacing the wiper blades . . . . . . . . . . . . . . . . . . . . . 71
Roof aerial . . . . . . . . . . . . . . . . . . . . . . . . . . . . . . . . . . 212
Running in the car . . . . . . . . . . . . . . . . . . . . . . . . . . . 201
S
Safe securing . . . . . . . . . . . . . . . . . . . . . . . . . . . . . . . . . 46
Safety . . . . . . . . . . . . . . . . . . . . . . . . . . . . . . . . . . . . . . 163
Safety information Engine compartment . . . . . . . . . . . . . . . . . . . . . 225 Safety wheel bolts . . . . . . . . . . . . . . . . . . . . . . . . . . . . 251
Saving electrical energy . . . . . . . . . . . . . . . . . . . . . . . 202
Seat belt height adjuster . . . . . . . . . . . . . . . . . . . . . . 171
Seat belt warning light . . . . . . . . . . . . . . . . . . . . . . . . 170
Seat belts . . . . . . . . . . . . . . . . . . . . . . . . . . . . . . . 168, 172
Belt tensioners . . . . . . . . . . . . . . . . . . . . . . . . . . . 172
Cleaning . . . . . . . . . . . . . . . . . . . . . . . . . . . . . . . . . 217
fastening . . . . . . . . . . . . . . . . . . . . . . . . . . . . . . . . 170
Height adjustment . . . . . . . . . . . . . . . . . . . . . . . . 171
Safety information . . . . . . . . . . . . . . . . . . . . . . . . 169
taking off . . . . . . . . . . . . . . . . . . . . . . . . . . . . . . . . 172
Warning light . . . . . . . . . . . . . . . . . . . . . . . . . . . . . . 39
Seat heaters . . . . . . . . . . . . . . . . . . . . . . . . . . . . . . . . . . 84
Selector lever . . . . . . . . . . . . . . . . . . . . . . . . . . . . . . . . 136
Selector lever lock Warning light . . . . . . . . . . . . . . . . . . . . . . . . . . . . . . 38
Selector lever positions . . . . . . . . . . . . . . . . . . . . . . . 136
Selector lever-emergency unlocking . . . . . . . . . . . 140
Service Display . . . . . . . . . . . . . . . . . . . . . . . . . . . . . . . 20
Service Interval Display . . . . . . . . . . . . . . . . . . . . . . . . 20
Setting temperature Heating . . . . . . . . . . . . . . . . . . . . . . . . . . . . . . . . . . 109
Setting the clock . . . . . . . . . . . . . . . . . . . . . . . . . . . . . . 21
Shifting . . . . . . . . . . . . . . . . . . . . . . . . . . . . . . . . . . . . . . 127
Side airbag . . . . . . . . . . . . . . . . . . . . . . . . . . . . . . . . . . 178
Side lights . . . . . . . . . . . . . . . . . . . . . . . . . . . . . . . . . . . . 59
Snow chains . . . . . . . . . . . . . . . . . . . . . . . . . . . . . . . . . 242
Spare wheel . . . . . . . . . . . . . . . . . . . . . . . . . . . . . . . . . 247
Speedometer . . . . . . . . . . . . . . . . . . . . . . . . . . . . . . . . . 18
Stability system . . . . . . . . . . . . . . . . . . . . . . . . . . . . . . 193 Starting the engine . . . . . . . . . . . . . . . . . . . . . . . . . . . 126
after fuel tank has run empty . . . . . . . . . . . . . . 127
Diesel engines . . . . . . . . . . . . . . . . . . . . . . . . . . . 126
Petrol engines . . . . . . . . . . . . . . . . . . . . . . . . . . . 126
Steering Driver-steering recommendation . . . . . . . . . 195
Steering force assistance . . . . . . . . . . . . . . . . . . . . . 198
Storage compartment Lighting . . . . . . . . . . . . . . . . . . . . . . . . . . . . . . . . . . 66
Storage compartments . . . . . . . . . . . . . . . . . . . . . . . . 98
Storage facilities . . . . . . . . . . . . . . . . . . . . . . . . . . . . . . 98
Sun . . . . . . . . . . . . . . . . . . . . . . . . . . . . . . . . . . . . . . . . . . 68
Sun screen . . . . . . . . . . . . . . . . . . . . . . . . . . . . . . . . . . . 68
Switching lights on and off . . . . . . . . . . . . . . . . . . . . 59
Switching off the engine . . . . . . . . . . . . . . . . . . . . . . 127
T
Taking care of your vehicle . . . . . . . . . . . . . . . . . . . 211
TCS . . . . . . . . . . . . . . . . . . . . . . . . . . . . . . . . . . . . . . . . . 195 Warning light . . . . . . . . . . . . . . . . . . . . . . . . . . . . . 37
Telephone . . . . . . . . . . . . . . . . . . . . . . . . . . . . . . 143, 152
Temperature outside . . . . . . . . . . . . . . . . . . . . . . . . . . . . . . . . . . . 23
Temporary spare wheel . . . . . . . . . . . . . . . . . . . . . . 247
the first 1 500 kilometres . . . . . . . . . . . . . . . . . . . . . 201
The roof luggage rack system . . . . . . . . . . . . . . . . . . 93
Thickness of brake pads Warning light . . . . . . . . . . . . . . . . . . . . . . . . . . . . . 39
Tilting roof . . . . . . . . . . . . . . . . . . . . . . . . . . . . . . . . . . . 56
Tiptronic . . . . . . . . . . . . . . . . . . . . . . . . . . . . . . . . . . . . 134
Tool . . . . . . . . . . . . . . . . . . . . . . . . . . . . . . . . . . . . . . . . 246
20A5Facelift.book Page 299 Saturday, September 6, 2008 2:13 PM