towing SKODA OCTAVIA 2009 2.G / (1Z) User Guide
[x] Cancel search | Manufacturer: SKODA, Model Year: 2009, Model line: OCTAVIA, Model: SKODA OCTAVIA 2009 2.G / (1Z)Pages: 304, PDF Size: 19.56 MB
Page 139 of 304

Automatic gearbox
138
Selector lever-emergency unlockingIn case of interruption of the power su
pply (e.g. flat vehicle battery, defec-
tive fuse) or defect of the selector lever lock, the selector lever can no longer be shifted from the position
P in the normal way and the vehicle
can no longer be moved. The selector
lever must be unlocked in case of
emergency. – Apply the handbrake firmly. – Open the storage compartment in front centre console* or the front
ashtray.
– Carefully pull up the front left and right cover. – Pull up rear cover. – Press with a narrow object (e.g. ignition key) the yellow plastic hoop
⇒
fig. 158
to the left.
– Simultaneously press the shiftlock button in the handle of the selector
lever in the position
N13).
Tow-starting and towing vehicle Tow-starting a vehicle It is not possible to tow-start vehi
cles fitted with automatic gearbox
⇒page 253.
you can use jump-start cables connected
to the battery of another vehicle for
starting your car if the vehicle battery is flat
⇒page 252.
Towing a vehicle Please pay attention to the following info
rmation if it comes necessary to tow-in
your car
⇒page 253.
13)If the selector lever is moved again into the position
P, it is once again blocked.
Fig. 158 Selector lever- emergency unlocking
se0.1.book Page 138 Frida
y, April 10, 2009 3:19 PM
Page 200 of 304

Intelligent Technology
199
Using the system
Safety
Driving Tips
General Maintenance
Breakdown assistance
Technical Data
Tyre inflation pressu
re-control system*
The tyre inflation pressure-control system compares with the aid of the ABS sensors the speed and also the rolling circumference
of the individual wheels. If the rolling
circumference of a wheel is changed, the warning light
lights up in the instru-
ment cluster
⇒page 38 and an audible signal sound
s. The rolling circumference of
the tyre can change if:•
the tyre inflation pressure is too low,
•
the structure of the tyre is damaged,
•
the vehicle is loaded on one side,
•
the wheels of an axle are loaded heavily (e.g. when towing a trailer or when
driving uphill or downhill),•
snow chains are mounted,
•
the temporary spare wheel is mounted,
•
one wheel per axle was changed.
Basic setting of tyre inflation pressure-control system After changing the tyre inflation pressures or after changing one or several wheels, a basic setting of the system must be carried out as follows.•
Inflate all tyres to the specified inflation pressure
⇒page 238.
•
Switch on the ignition.
•
Press button
⇒fig. 198
for more than 2 seconds. While pressing the
button, the warning light
lights up. At the same time the memory of the system
is erased and the new calibration is star
ted, which is confirmed with an audible
signal and then the warning light
goes out.
•
If the warning light
does not go out after the basic setting, there is a fault in
the system. Have the vehicle inspected by your nearest specialist garage. Warning light
lights up
If the tyre inflation pressure of at least on
e wheel is insufficiently inflated in compar-
ison to the stored basic value, the warning light
⇒
lights up.
Warning light
flashes
If the warning light flashes, there is a system fault. Have the vehicle inspected by your nearest specialist garage.
WARNING
•
When the warning light
lights up, immediately reduce the speed and
avoid sudden steering and brake mano
euvres. Please stop the vehicle
without delay at the nearest possible stop and inspect the tyres and their inflation pressures.•
The driver is responsible for the correc
t tyre inflation pressures. For this
reason, the tyre inflation pressures must be checked regularly.•
Under certain circumstances (e.g. sporty style of driving, wintry or
unpaved roads) the warning light
can be delayed or does not light up at
all.•
The tyre inflation pressure-control system does not take away the
responsability from the driver for the correct tyre inflation pressure.
Note
The tyre inflation pressure-control system:•
does not replace the regular tyre inflatio
n pressure control, because the system
cannot detect an even pressure loss,
Fig. 198 Button for setting the tyre inflation pressure control value
se0.1.book Page 199 Frida
y, April 10, 2009 3:19 PM
Page 203 of 304
Driving and the Environment
202
Catalytic converterProper operation of the emission co
ntrol system (catal
ytic converter)
is of major significance for drivin
g your vehicle in an environmen-
tally conscious way.Please refer to the following guidelines: – For vehicles with petrol engine
only refuel with unleaded petrol
⇒
page 219, “Grades of petrol”.
– Never run the fuel tank completely empty. – Do not switch off the ignition while you are driving the vehicle. – Do not pour too much oil into the engine
⇒
page 228, “Replenishing
engine oil”.
– Do not tow-start the vehicle over a
distance of more than 50 metres
⇒
page 253, “Tow-starting and towing vehicle”.
If you drive your vehi
cle in a country in which unleaded
petrol is not available, you
must have the catalytic converter replaced
later when driving the vehicle into a
country in which use of a cata
lytic converter is mandatory.
WARNING
•
In view of the high temperatures which may be produced in the catalytic
converter, one should always park a vehicle in such a way that the catalytic converter cannot come into contact with
easily flammable materials below
the vehicle - a risk of fire!•
Never use additional underbody protection or corrosion-protection
agents for the exhaust pipes, catalyti
c converters or heat shields. Such
substances might ignite when driving - risk of fire!
Caution
•
On vehicles fitted with
a catalytic converter, never let the fuel tank run
completely empty. An irregular fuel supply can result in poor ignition or misfiring. Unburnt fuel may get into the exhaust sy
stem and damage the catalytic converter.
•
Filling the tank even only once with le
aded petrol will resu
lt in the catalytic
converter being destroyed.•
If you detect misfiring, a drop in performance or irregular engine running when
driving, reduce your speed immediately and have the vehicle inspected by the nearest specialist garage. The symptoms described may be caused by a fault in the ignition system. Unburnt fuel may get in
to the exhaust system and damage the
catalytic converter.
For the sake of the environment
Even if the exhaust system is operating properly, a sulphur-like exhaust odour may be produced under certain op
erating conditions of the en
gine. This depends on the
sulphur content of the fuel. It is often su
fficient to refuel with unleaded premium-
grade petrol of a different brand or at a different filling station.Driving in an economical and environmentally conscious mannerGeneral Your personal style of driving is a major factor.Your fuel consumption, any pollution of
the environmental and the wear-and-tear
to the engine, brakes and tyres, depend essentially on three factors:•
your personal style of driving,
•
the conditions under which
your vehicle is operated,
•
technical aspects.
You can easily improve your fuel economy by 10 - 15 percent by driving in an economical way with foresight. This section is intended to provide you with a
se0.1.book Page 202 Frida
y, April 10, 2009 3:19 PM
Page 204 of 304

Driving and the Environment
203
Using the system
Safety
Driving Tips
General Maintenance
Breakdown assistance
Technical Data
number of tips on how to protect the environment and at the same time save money. The fuel consumption can naturally also be
influenced by factors which are beyond
the driver's control. It is,
for example, normal for the fu
el consumption to increase
in winter and under worsened
conditions such as poor road conditions, towing a
trailer, etc. The technical requirements for low fuel
usage and economic efficiency of the
vehicle have already been built into the ve
hicle at the works.
Special attention has
been given to minimising ne
gative effects on the environment. It is necessary to
take note of the guidelines given in this
chapter in order to make best use of these
characteristics and to maintain their effectiveness. The optimal engine speed should be obtained when accelerating, in order to avoid a high fuel consumption an
d resonance of the vehicle.
Looking ahead when driving A vehicle's highest fuel consumption occurs it accelerates.Avoid accelerating and brakin
g unnecessarily. If you drive
with forsight you will not
need to brake so often and will also then
not have to accelerate so much. Let your
vehicle coast to a stop, for example, if this
is possible, when you see that the next
set of traffic lights is at red.
Shifting gears and saving energy Shifting up early saves on fuel.Manual gearbox – Drive no more than about one length of your vehicle in first gear. – Always shift up into the next higher gear at approx. 2 000 to 2 500 revs. Automatic gearbox – Depress the accelerator pedal
slowly
. Do not depress it beyond the
kickdown position, however.
An effective way of achieving good
fuel economy is to shift up
early
. You will
consume more fuel if you drive at unnecessa
rily high revolutions in any given gear.
The
⇒fig. 200
shows the ratio of fuel consumption to the speed of your vehicle in
the relevant gears. Fuel consumption in 1st
gear is the highest, while that in 5th or
the 6th gear is the lowest. Only depress the accelerator pedal slowly if
your vehicle is fitted with an automatic
gearbox in order to automatically select an economic driving programme. You will achieve good fuel economy by shifting
up early and shifting down late.
Fig. 200 Fuel consumption in litres/100 km. and speed in km/h.
se0.1.book Page 203 Frida
y, April 10, 2009 3:19 PM
Page 209 of 304

Towing a trailer
208
Towing a trailerTo w i n g a t r a i l e rTechnical requirements The towing device must satisfy
certain technical requirements.
Your vehicle is designed primarily for tr
ansporting persons and luggage. It can,
however, also be used for towing a traile
r - provided certain te
chnical equipment is
fitted. If your vehicle has already been supplied with a
factory-fitted
towing device then
everything that is necessary
for towing a trailer in technical terms, and in terms of
the law, has already been taken into account. Your vehicle is fitted with a 13-pin po
wer socket for the electrical connection
between the vehicle and trailer. If th
e trailer which you wish to tow has a
7-pin
connector
, you can use a suitable adapter
18) from Škoda original accessories.
This work must be carried out in accordan
ce with the manufacturer's specifications
if a towing device is retrofitted. Authorised Škoda Service Partners are familiar with details relating to retrofitting a towing device and for any necessary
modifications to the cooling system.
WARNING
We recommend that you have the towing device from Škoda original acces- sories installed by an authorised Škoda Service Partner. He is familiar with all the relevant details relating to retrofitting such equipment. There is a risk of an accident if the towing device is not properly fitted!
General Maintenance There are a number of points to
pay attention to when towing a
trailer.Trailer load The permissible trailer load must
on no account be exceeded.
You can negotiate appropriatel
y steeper inclines and desc
ents if you do not make
full use of the perm
issible trailer load.
The trailer loads specified only apply for
altitudes
up to 1 000 metres above mean
sea level. The fact that the engine power ou
tput drops with increasing height due to
a lowering of air pressure and thus the abil
ity to climb, means that the towed weight
must be reduced by 10% for every further increase of 1 000 metres in height above sea level. The towed weight is the weight of the (laden) vehicle and the (laden) trailer together. One should take this into account before driving up to higher alti- tudes. The trailer and drawbar load information on the type plate of the towing device are merely test data for the tow
ing device The data relating to your
vehicle, which is often less than this test data, can be found in your vehicle registration documents. Distribution of the load Distribute the load in the trailer in such a way that any heavy items are located as close as possible to the axle. Secure
the items to prevent them slipping.
Tyre inflation pressure Select the tyre inflation pressure on your vehicle for that of “fully laden”, ⇒ page 238. The inflation pressure of the tyres fitted to the trailer adjust in accord- ance with the manufacturer's recommendation. Exterior mirrors You have to have additional
exterior mirrors fitted if you are not able to see the
traffic behind the trailer with the standard rear-view mirrors. Both exterior mirrors
18)In some countries the adapter is
supplied with the towing device.
se0.1.book Page 208 Frida
y, April 10, 2009 3:19 PM
Page 210 of 304
Towing a trailer
209
Using the system
Safety
Driving Tips
General Maintenance
Breakdown assistance
Technical Data
should be attached to folding arms. Adjust
the mirrors so that they provide you with
an adequate field of view to the rear. Headlights Before starting off with a hitched trailer, also check the setting of the headlights. Alter the setting as necessary with th
e aid of the headlight beam adjuster
⇒ page 63. Detachable ball head The ball rod is detachable on vehicles which feature a factory-fitted towing device. It is stowed together with separate fitting instructions in the spare wheel well in the luggage compartment of the vehicle. Further information on the towing device
⇒page 210.
Note
•
We recommend that you also have yo
ur vehicle inspected between service
intervals if you tow a trailer frequently.•
The handbrake on the towing vehicle
must be put on when coupling and
decoupling the trailer.Driving Tips Particular caution is required when towing a trailer.– Do not, as far as possible, drive
with your vehicle unladen and the
trailer laden.
– Do not make full use of the legal maximum speeds. This applies in
particular to downhill sections.
– Apply the brakes in good time.– Keep a check on the coolant temper
ature gauge if the outside temper-
ature is high.
Distribution of weight The distribution of the weight is very poor
if your vehicle is
unladen and the trailer
is laden. Maintain a particularly low speed if you cannot avoid driving with this combination. Driving speed Do not drive faster than 80 km/hour for safety reasons. This also applies for coun- tries in which higher speeds are allowed. The fact that the driving stability of the vehicle + trailer combination reduces with increasing speed means that the legally allowed speed should not be used when there are unfavourable road, weather or wind
conditions, particul
arly near accident
black spots. You must always reduce your speed immedi
ately as soon as you detect even just
the
slightest swaying
of the trailer. On no account attempt to stop the trailer from
“swaying” by
accelerating.
Apply the brakes in good time! If the trailer is fitted with a
trailer brake
, apply the
brakes gently at first and then brake firmly
. This will avoid brake jolts resulting from
the trailer wheels locking. Shift down gears
in good time before negotiating a down-
hill section to allow the engine to also act as a brake. Engine overheating Please keep a check on the coolant temperature gauge if you have to negotiate a lengthy slope in a low gear at a high engine speed when the outside temperature is very high
⇒page 18, “Coolant temperature gauge”.
If the needle of the coolant temperature gauge moves into the right-hand area or even the red area of the scale, reduce yo
ur speed immediately. Stop and switch off
the engine if the warning light
in the instrument cluste
r begins flashing. Wait a
few minutes and check the level of coolant in the coolant expansion bottle ⇒ page 229, “Inspecting the coolant level”. Please refer to the following guidelines
⇒page 36, “Coolant temperature/ Coolant
quantity
”.
The coolant temperature can be reduced by switching on the heating.Any increase in the cooling effect of the coolant fan through shifting down a gear and increasing the engine speed is not possible since the fan speed is independent
se0.1.book Page 209 Frida
y, April 10, 2009 3:19 PM
Page 211 of 304
Towing a trailer
210
of the engine speed. One should also not
drop a gear for this reason when towing
a trailer as long as the en
gine can manage the slope
without any drop in speed.
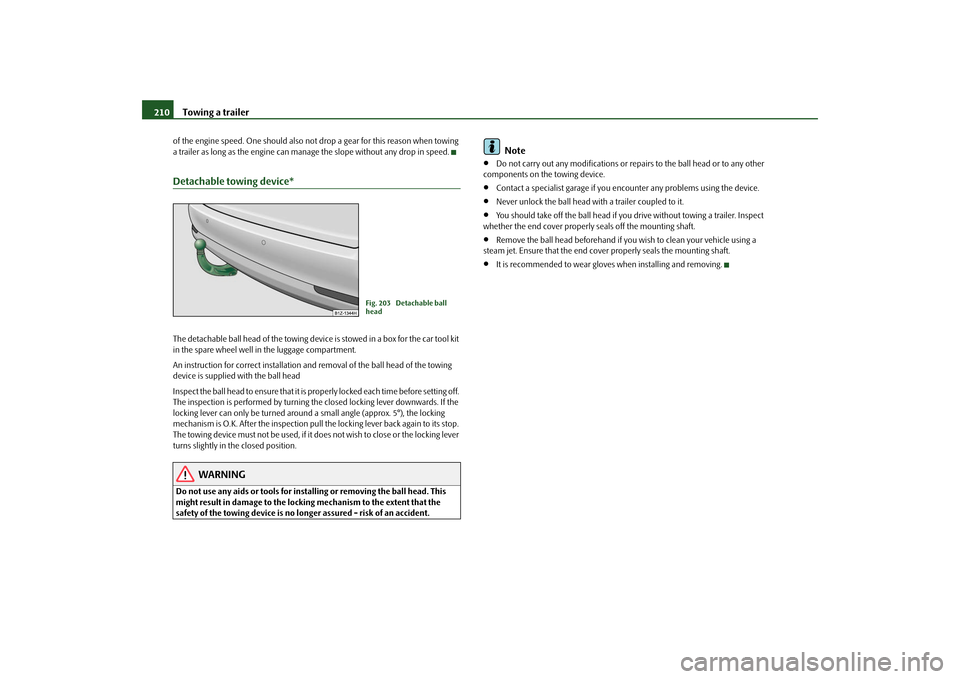
Detachable towing device*The detachable ball head of the towing device
is stowed in a box for the car tool kit
in the spare wheel well in the luggage compartment. An instruction for correct installation an
d removal of the ball head of the towing
device is supplied
with the ball head
Inspect the ball head to ensure that it is pr
operly locked each time before setting off.
The inspection is performed by turning the closed locking lever downwards. If the locking lever can only be turned around a small angle (approx. 5°), the locking mechanism is O.K. After the inspection pull
the locking lever back again to its stop.
The towing device must not be used, if it does not wish to close or the locking lever turns slightly in the closed position.
WARNING
Do not use any aids or tools for installing or removing the ball head. This might result in damage to the locking mechanism to the extent that the safety of the towing device is no longer assured - risk of an accident.
Note
•
Do not carry out any modifications or repairs to the ball head or to any other
components on the towing device.•
Contact a specialist garage if you en
counter any problems using the device.
•
Never unlock the ball head with a trailer coupled to it.
•
You should take off the ball head if you drive without towing a trailer. Inspect
whether the end cover properly seals off the mounting shaft.•
Remove the ball head beforehand if yo
u wish to clean your vehicle using a
steam jet. Ensure that the end cover properly seals the mounting shaft.•
It is recommended to wear gloves
when installing and removing.
Fig. 203 Detachable ball head
se0.1.book Page 210 Frida
y, April 10, 2009 3:19 PM
Page 228 of 304

Inspecting and replenishing
227
Using the system
Safety
Driving Tips
General Maintenance
Breakdown assistance
Technical Data
Engine oilCheck engine oil level The dipstick indicates the level of oil in the engine.Checking the oil level – Ensure that the vehicle is positioned on a level surface. – Switch the engine off. – Open the bonnet
⇒
in “Working in the engine compartment” on
page 225.
– Wait a few minutes and pull out the oil dipstick.– Wipe off the dipstick with a clea
n cloth and insert it again fully.
– Then withdraw the dipstick ag
ain and read off the oil level.
Oil level within range – You must
not
top up the oil.
Oil level within range –You
may
top up the oil. It is possible that the oil level may then be
within range after doing this.
Oil level within range –You
must
top up the oil
⇒
page 228. It is sufficient, once this is done,
to keep the oil level within range .
It is normal for the engine to consume oi
l. The oil consumption may be as much as
0.5 l/1 000 km depending on your style of driving and the conditions under which you operate your vehicle. The oil consumpt
ion may be slightly higher than this
during the first 5 000 kilometres. One should therefore check the oil level at regular intervals, preferably every time after the fuel tank is filled or after driving for long stretches. We recommend maintaining the oil level within the range -
but not above this
,
if the engine has been operating at hi
gh loads, for example during a lengthy
motorway trip during the summer months,
towing a trailer or negotiating a high
mountain pass. The warning light in the instrument cluster* will indicate
⇒page 35, “Engine oil
pressure
” whether the oil level is too low. In this case, check the oil level as soon
as possible. Top up with an appropriate quantity of oil.
Caution
•
The oil level must on no account ex
tend beyond the range . Danger of
damaging the cata
lytic converter.
•
Do not continue your journey
if for some reason it is not possible under the
conditions prev
ailing to top up with oil.
Switch of the engine and contact
and
obtain professional assistance from a specialist garage.
Note
Engine oil specifications
⇒page 271, “Technical Data”.
Fig. 211 Dipstick
AA
AB
AA
AC
AB
AA
AA
se0.1.book Page 227 Frida
y, April 10, 2009 3:19 PM
Page 247 of 304

Breakdown assistance
246
The fire extinguisher must
be checked by an authoris
ed person or company annu-
ally (please observe the differing legal requirements).
WARNING
If the fire extinguisher is not correc
tly attached, in case of sudden manoeu-
vres or an accident it can be “thrown” through the interior compartment and cause injuries.
Note
•
The fire extinguisher must comply with
the relevant and valid legal require-
ments.•
Pay attention to the expiration date of the fire extinguisher. If the fire extin-
guisher is used after the expiration date,
its proper function is
no longer assured.
•
The fire extinguisher is only supplied in
certain countries within the scope of
delivery.Vehicle tool kitThe vehicle tool kit and the lifting jack*, on which a note sticker is affixed, are stored in a box in the spare wheel*
⇒fig. 223
. There is also space here for the removable
ball for the trailer towing device*. The bo
x is attached with a strap on the spare
wheel. The vehicle tool kit contains
the following parts (depen
ding on equipment fitted):
•
Wire clamps for removing the full wheel trims,
•
Plastic clip for a wheel bolt cover,
•
Wheel wrench*,
•
To w i n g e y e ,
•
Adapter for the wheel bolts lock.*
•
Screwdriver* for removing the front fog lights
20).
After using the lifting jack*, screw in the arm of the lifting jack fully before placing it back in its storage area.
WARNING
•
The factory-supplied liftin
g jack* is only intended for your model of
vehicle. On no account attempt to lift a heavier vehicle or other loads - risk of injury!•
Ensure that the vehicle tool kit is
safely attached in the luggage compart-
ment.
Note
Ensure that the box is alwa
ys secured with the strap.
Tyre repair kit*The tyre repair kit is intended for the repair of minor tyre defects. The tyre repair kit contains a compressor, inflation bottle, operating instructions and accessories. The repair with the
tyre repair kit is
not at all intended to replace
a permanent
repair on the tyre, this repair only serves
to reach the next specialist garage. The
Fig. 223 Luggage compart- ment: storage compartment for vehicle tool kit
20)Valid for Octavia RS and Octavia Scout.
se0.1.book Page 246 Frida
y, April 10, 2009 3:19 PM
Page 254 of 304
Breakdown assistance
253
Using the system
Safety
Driving Tips
General Maintenance
Breakdown assistance
Technical Data
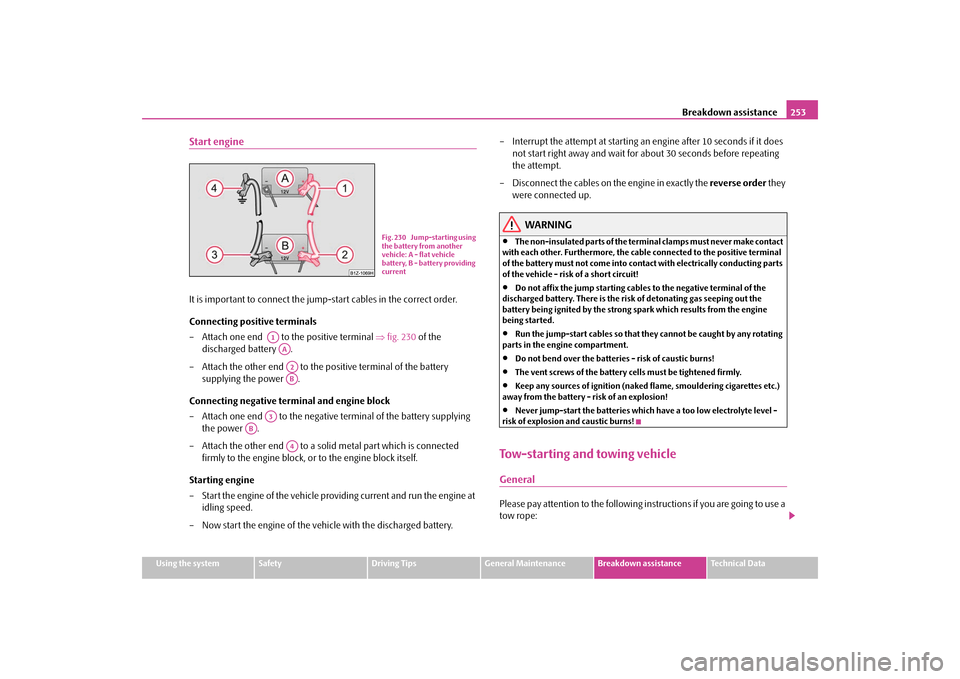
Start engineIt is important to connect the jump
-start cables in the correct order.
Connecting positive terminals – Attach one end to the positive terminal
⇒
fig. 230
of the
discharged battery .
– Attach the other end to the positive terminal of the battery
supplying the power .
Connecting negative term
inal and engine block
– Attach one end to the negative
terminal of the battery supplying
the power .
– Attach the other end to a solid metal part which is connected
firmly to the engine block, or
to the engine block itself.
Starting engine – Start the engine of the vehicle providing current and run the engine at
idling speed.
– Now start the engine of the vehicle with the discharged battery.
– Interrupt the attempt at starting an engine after 10 seconds if it does
not start right away and wait for about 30 seconds before repeating the attempt.
– Disconnect the cables on the engine in exactly the
reverse order
they
were connected up.
WARNING
•
The non-insulated parts of the terminal clamps must never make contact
with each other. Furthermore, the cable connected to the positive terminal of the battery must not come into contact with electrically conducting parts of the vehicle - risk of a short circuit!•
Do not affix the jump starting cables to the negative terminal of the
discharged battery. There is the risk
of detonating gas seeping out the
battery being ignited by the strong
spark which results from the engine
being started.•
Run the jump-start cables so that th
ey cannot be caught
by any rotating
parts in the engine compartment.•
Do not bend over the batteries - risk of caustic burns!
•
The vent screws of the battery cells must be tightened firmly.
•
Keep any sources of ignition (naked
flame, smouldering cigarettes etc.)
away from the battery - risk of an explosion!•
Never jump-start the batteries which have a too low electrolyte level -
risk of explosion and caustic burns!Tow-starting and towing vehicleGeneralPlease pay attention to the following in
structions if you are going to use a
tow rope:
Fig. 230 Jump-starting using the battery from another vehicle: A - flat vehicle battery, B - battery providing current
A1AAA2AB
A3
AB
A4
se0.1.book Page 253 Frida
y, April 10, 2009 3:19 PM