buttons SKODA OCTAVIA 2009 2.G / (1Z) Owner's Manual
[x] Cancel search | Manufacturer: SKODA, Model Year: 2009, Model line: OCTAVIA, Model: SKODA OCTAVIA 2009 2.G / (1Z)Pages: 304, PDF Size: 19.56 MB
Page 10 of 304
Cockpit
9
Using the system
Safety
Driving Tips
General Maintenance
Breakdown assistance
Technical Data
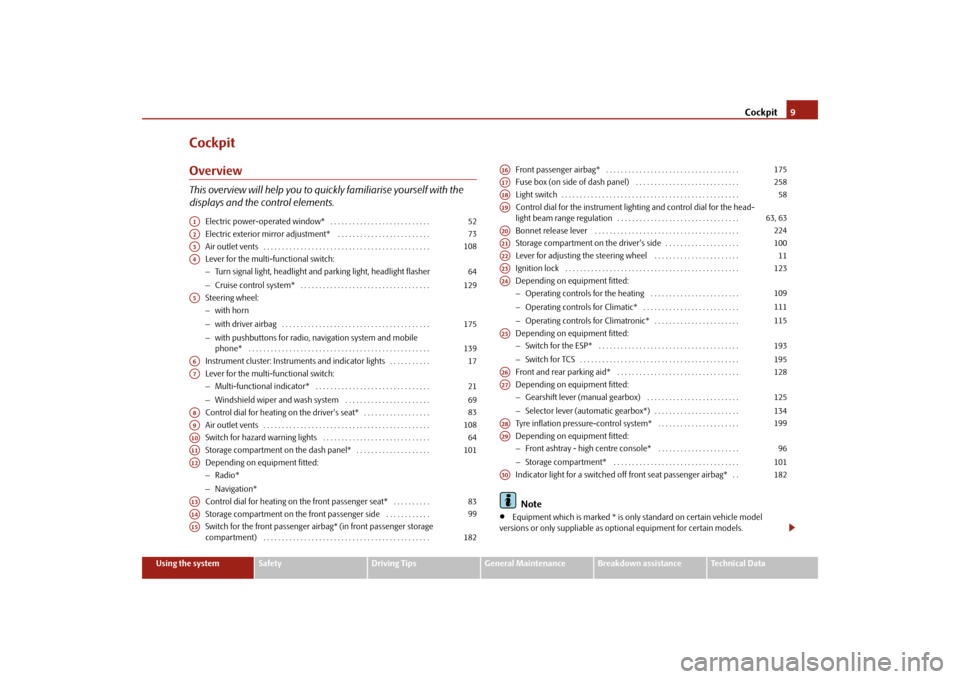
CockpitOverviewThis overview will help you to quickly familiarise yourself with the displays and the control elements.
Electric power-operated window* . . . . . . . . . . . . . . . . . . . . . . . . . . . Electric exterior mirror adjustment* . . . . . . . . . . . . . . . . . . . . . . . . . Air outlet vents . . . . . . . . . . . . . . . . . . . . . . . . . . . . . . . . . . . . . . . . . . . . . Lever for the multi-functional switch:− Turn signal light, headlight and parking light, headlight flasher − Cruise control system* . . . . . . . . . . . . . . . . . . . . . . . . . . . . . . . . . . . Steering wheel: − with horn − with driver airbag . . . . . . . . . . . . . . . . . . . . . . . . . . . . . . . . . . . . . . . . − with pushbuttons for radio, na
vigation system and mobile
phone* . . . . . . . . . . . . . . . . . . . . . . . . . . . . . . . . . . . . . . . . . . . . . . . . . Instrument cluster: Instrum
ents and indicator lights . . . . . . . . . . .
Lever for the multi-functional switch:− Multi-functional indicator* . . . . . . . . . . . . . . . . . . . . . . . . . . . . . . . − Windshield wiper and wash system . . . . . . . . . . . . . . . . . . . . . . . Control dial for heating on the driver's seat* . . . . . . . . . . . . . . . . . . Air outlet vents . . . . . . . . . . . . . . . . . . . . . . . . . . . . . . . . . . . . . . . . . . . . . Switch for hazard warning lights . . . . . . . . . . . . . . . . . . . . . . . . . . . . . Storage compartment on the dash panel* . . . . . . . . . . . . . . . . . . . . Depending on equipment fitted:− Radio* − Navigation* Control dial for heating on the front passenger seat* . . . . . . . . . . Storage compartment on the front passenger side . . . . . . . . . . . . Switch for the front passenger airbag* (in front passenger storage compartment) . . . . . . . . . . . . . . . . . . . . . . . . . . . . . . . . . . . . . . . . . . . . .
Front passenger airbag* . . . . . . . . . . . . . . . . . . . . . . . . . . . . . . . . . . . . Fuse box (on side of dash panel) . . . . . . . . . . . . . . . . . . . . . . . . . . . . Light switch . . . . . . . . . . . . . . . . . . . . . . . . . . . . . . . . . . . . . . . . . . . . . . . . Control dial for the instrument lighting and control dial for the head- light beam range regulation . . . . . . . . . . . . . . . . . . . . . . . . . . . . . . . . . Bonnet release lever . . . . . . . . . . . . . . . . . . . . . . . . . . . . . . . . . . . . . . . Storage compartment on the driver's side . . . . . . . . . . . . . . . . . . . . Lever for adjusting the steering wheel . . . . . . . . . . . . . . . . . . . . . . . Ignition lock . . . . . . . . . . . . . . . . . . . . . . . . . . . . . . . . . . . . . . . . . . . . . . . Depending on equipment fitted:− Operating controls for the heating . . . . . . . . . . . . . . . . . . . . . . . . − Operating controls for Climatic* . . . . . . . . . . . . . . . . . . . . . . . . . . − Operating controls for Climatronic* . . . . . . . . . . . . . . . . . . . . . . . Depending on equipment fitted: − Switch for the ESP* . . . . . . . . . . . . . . . . . . . . . . . . . . . . . . . . . . . . . . − Switch for TCS . . . . . . . . . . . . . . . . . . . . . . . . . . . . . . . . . . . . . . . . . . . Front and rear parking aid* . . . . . . . . . . . . . . . . . . . . . . . . . . . . . . . . . Depending on equipment fitted: − Gearshift lever (manual gearbox) . . . . . . . . . . . . . . . . . . . . . . . . . − Selector lever (automatic gearbox*) . . . . . . . . . . . . . . . . . . . . . . . Tyre inflation pressure-control system* . . . . . . . . . . . . . . . . . . . . . . Depending on equipment fitted: − Front ashtray - high centre console* . . . . . . . . . . . . . . . . . . . . . . − Storage compartment* . . . . . . . . . . . . . . . . . . . . . . . . . . . . . . . . . . Indicator light for a switched off front seat passenger airbag* . . Note
•
Equipment which is marked * is only standard on certain vehicle model
versions or only suppliable as op
tional equipment for certain models.
A1
52
A2
73
A3
108
A4
64 129
A5
175 139
A6
17
A7
21 69
A8
83
A9
108
A10
64
A11
101
A12A13
83
A14
99
A15
182
A16
175
A17
258
A18
58
A19
63, 63
A20
224
A21
100
A22
11
A23
123
A24
109111115
A25
193195
A26
128
A27
125134
A28
199
A29
96101
A30
182
se0.1.book Page 9 Friday, April 10, 2009 3:19 PM
Page 15 of 304
The brief instruction
14
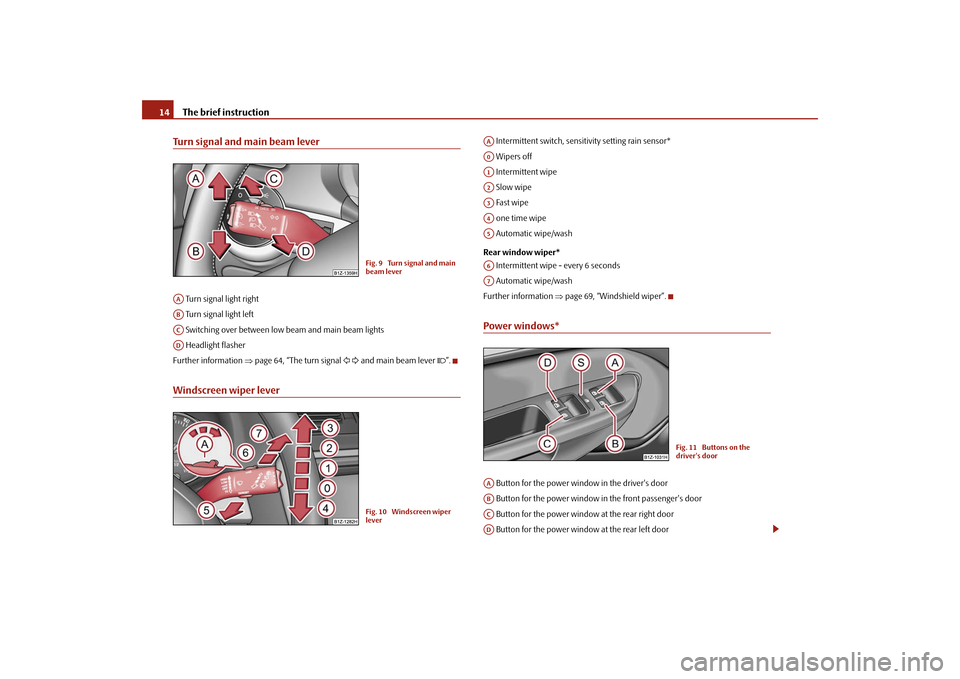
Turn signal and main beam lever Turn signal light right Turn signal light left Switching over between low beam and main beam lights Headlight flasherFurther information
⇒page 64, “The turn signal
and main beam lever
”.
Windscreen wiper lever
Intermittent switch, sensitivity setting rain sensor* Wipers off Intermittent wipe Slow wipe Fast wipe one time wipe Automatic wipe/wash Rear window wiper* Intermittent wipe - every 6 seconds Automatic wipe/washFurther information
⇒page 69, “Windshield wiper”.
Power windows* Button for the power window in the driver's door Button for the power window in the front passenger's door Button for the power window at the rear right door Button for the power window at the rear left door
Fig. 9 Turn signal and main beam lever
AAABACAD
Fig. 10 Windscreen wiper lever
AAA0A1A2A3A4A5A6A7
Fig. 11 Buttons on the driver's door
AAABACAD
se0.1.book Page 14 Friday, April 10, 2009 3:19 PM
Page 23 of 304
Instruments and Indicator/Warning Lights
22
Single-trip memory (memory 1) The single-trip memory collates the driving information from the moment the igni- tion is switched on until it
is switched off. New data will
also flow into the calcula-
tion of the current driving information if the trip is continued
within 2 hours
after
switching off the ignition. The memory will
be is automatically erased, on the other
hand, if the trip is interrupted for
more than 2 hours
.
Total-trip memory (memory 2) The total distance driven memory gathers
data from any number of individual jour-
neys up to a total of 99 hours and 59 minutes driving or 9.999 kilometres driven. The memory is deleted when either of these limits is reached and the calculation starts from anew. The total-trip memory will not, contrary
to the single-trip memory, be deleted after
a period of interruption
of driving of 2 hours.
Note
All information in the memory
1 and
2 is erased if the battery of the vehicle is
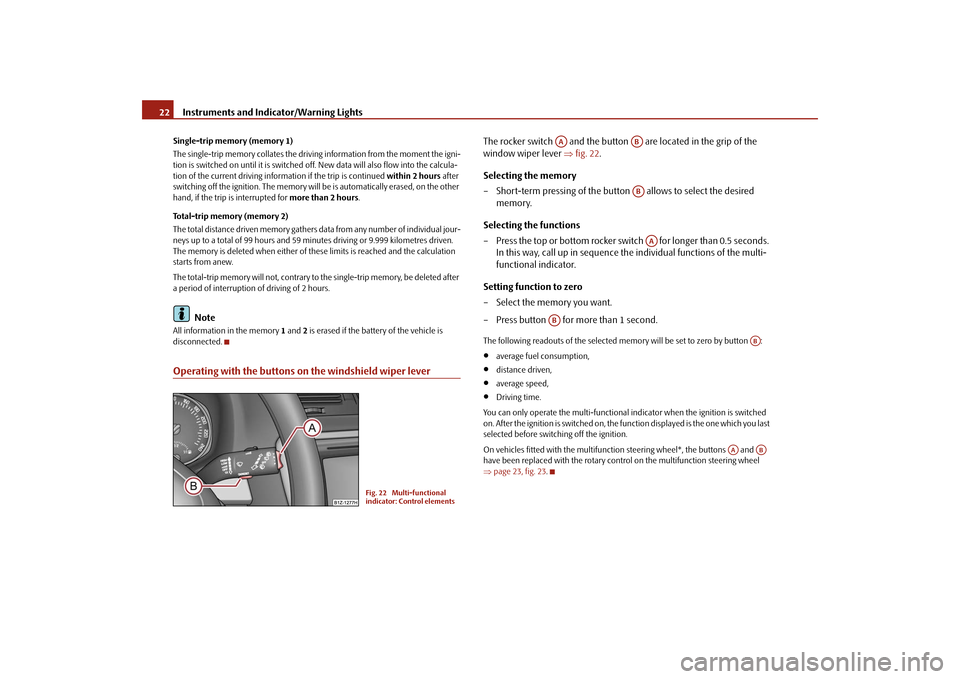
disconnected.Operating with the buttons on the windshield wiper lever
The rocker switch and the button are located in the grip of the window wiper lever
⇒
fig. 22
.
Selecting the memory – Short-term pressing of the button
allows to select the desired
memory.
Selecting the functions – Press the top or bottom rocker switch for longer than 0.5 seconds.
In this way, call up in sequence the individual functions of the multi-functional indicator.
Setting function to zero – Select the memory you want. – Press button for more than 1 second.The following readouts of the selected memory will be set to zero by button :•
average fuel consumption,
•
distance driven,
•
average speed,
•
Driving time.
You can only operate the multi-functional
indicator when the ignition is switched
on. After the ignition is switched on, the fu
nction displayed is the one which you last
selected before switching off the ignition. On vehicles fitted with the multifunction steering wheel*, the buttons and have been replaced with the rotary cont
rol on the multifunction steering wheel
⇒ page 23, fig. 23
.
Fig. 22 Multi-functional indicator: Control elements
AA
ABABAA
AB
AB
AA
AB
se0.1.book Page 22 Friday, April 10, 2009 3:19 PM
Page 24 of 304

Instruments and Indicator/Warning Lights
23
Using the system
Safety
Driving Tips
General Maintenance
Breakdown assistance
Technical Data
Operating with the buttons on the multifunction steering wheel*Switching over and resetting is performed with the handwheel ⇒
fig. 23
.
Selecting the memory – Short-term pressing of the button
allows to select the desired
memory.
Selecting the functions – By pressing the button , you can call up the menu of the multi-func-
tional indicator.
– Turn the handwheel upwards or downwards. In this way, call up in
sequence the individual functions of the multi-functional indicator.
– Short-term pressing of the button
allows to select the highlighted
function.
Setting function to zero – Select the memory you want. – Press the button for more than 1 second.
The following readouts of the selected memo
ry will be set to zero with the button
:•
average fuel consumption,
•
distance driven,
•
average speed,
•
Driving time.
You can only operate the multi-functional
indicator when the ignition is switched
on. After the ignition is switched on, the f
unction displayed is the one which you last
selected before switching off the ignition.Outside temperatureThe outside temperature appears in the disp
lay when the ignition is switched on.
If the outside temperature drops below +4 °C
, a snow flake symbol (warning signal
for ice on the road) appears before the temperature indicator
⇒fig. 24
and a
warning signal sounds. After pressing the rocker switch at the windshield wiper lever
⇒page 22, fig. 22
or the button at the multifunction steering wheel
⇒ fig. 23
, the function shown last is indicated.
Fig. 23 Multi-functional indicator: Operating with the buttons on the multifunction steering wheel
AD
AD
AC
AD
AD
AD
AD
Fig. 24 The outside tempera-tureAA
AC
se0.1.book Page 23 Friday, April 10, 2009 3:19 PM
Page 28 of 304

Instruments and Indicator/Warning Lights
27
Using the system
Safety
Driving Tips
General Maintenance
Breakdown assistance
Technical Data
Operating with the buttons on the windshield wiper lever – You can activate the
MAIN MENU
by pressing the rocker switch
⇒
page 26, fig. 28
for more than 1 second.
– You can select the menu through the rocker switch . When the
pushbutton is briefly pressed, the information you have selected is displayed.
Operating with the buttons on the multifunction steering wheel – You can activate the
MAIN MENU
by pressing the rocker switch
⇒
page 26, fig. 29
for more than 1 second.
– You can select the individual menus by pressing the handwheel .
After briefly pressing the handwh
eel , the desired menu is indi-
cated.
– After briefly pressing the button
you can achieve a higher level, by
pressing the button for longer than 1 second, you can call up the MAIN MENU
.
You can select the following information (d
epending on the equipment installed on
the vehicle):�„
MFD (Onboard computer)
⇒page 21
�„
Audio
*
�„
Navigation
*
�„
Phone
* ⇒page 142
�„
Aux. Heating (auxiliary heating)
* ⇒page 119
�„
Assistant
* ⇒page 60
�„
Vehicle status
⇒page 28
�„
Setup
⇒page 29
The menu point
Audio
is only then displayed when the factory-fitted Radio* is
switched on.
The menu point
Navigation
is only then displayed when the factory-fitted Naviga-
tion system* is switched on. The menu point
Aux. Heating
is only then displayed, if the vehicle is fitted with the
factory-fitted auxiliary heating*. The menu point
Assistant
is only then displayed, if the vehicle is fitted with
cornering lights*.
Note
•
If warning messages are shown on the information display
⇒page 27
⇒ page 28, these messages ca
n be confirmed with the button on the wind-
shield wiper lever or with the button
on the multifunction steering wheel in
order to call up the main menu.•
If you do not activate the information
display at that moment, the menu shifts
to one level higher every 10 seconds.•
The operation of the factory-fitted radio*
or the navigation system* is described
in separate operating instructions to be found in the on-board literature.Door, luggage compartment door and bonnet ajar warningThe door, luggage compartment and bonnet aj
ar warning lights up if at least one
door, the luggage compartment or bonnet are not closed. The symbol indicates
AA
AA
AB
ACAD
AD
AC
AC
AB
AD
Fig. 30 Information display: Door warning
se0.1.book Page 27 Friday, April 10, 2009 3:19 PM
Page 47 of 304

Unlocking and locking
46
Unlocking the vehicle using the key– Turn the key in the lock of the driver
's door in the direction of travel
(opening position)
⇒
fig. 41
.
– Pull on the door handle and open the door.•
All the doors (only the driver's door on vehicles with anti-theft alarm system)
and the fuel filler flap* are unlocked.•
The boot lid is then unlocked.
•
The switched on interior lights come on over the door contact.
•
The safe securing system is deactivated.
•
The windows are opened provided the key
is held
in the opening position*. On
vehicles fitted with anti-theft alarm system
the window operation is only possible
45 seconds after deactivation of the warning system.•
The indicator light in the driver's door stops flashing if the vehicle is not fitted
with an anti-theft alarm system*
⇒page 51.
Note
If the vehicle is equipped with an anti-t
heft alarm system*, you must unlock the
vehicle by inserting the key into the driver door you then have to insert the key into the ignition lock and switch the ignition
on within 15 seconds after opening the
door. The
alarm will be triggered
if you do
not switch on
the ignition within 15
seconds.Closing the vehicle with the key– Turn the key in the lock of the driver's door in the opposite direction of
travel (closing position)
⇒
fig. 41
.
•
The doors, the boot lid and the fuel filler flap* are locked.
•
The switched on interior lights wi
ll switch off over the door contact.
•
The windows and the electric sliding/tilting roof* are closed provided the key is
held
in the locking position.
•
The safe securing system is activated immediately.
•
The indicator light in the driver door begins flashing.Note
The opened driver door cannot be locked. It
must be locked separately after closing
it.Button for the central locking system
Fig. 41 Turning the key for unlocking and locking the vehicle
AA
AB
Fig. 42 Centre console: Buttons for central locking
se0.1.book Page 46 Friday, April 10, 2009 3:19 PM
Page 48 of 304
Unlocking and locking
47
Using the system
Safety
Driving Tips
General Maintenance
Breakdown assistance
Technical Data
If the vehicle was not locked from ou
tside, you can also
unlock and lock
it with the rocker switch on the centre console without the ignition switched on. Locking all doors and the boot lid – Press button
⇒
page 46, fig. 42
. The symbol
in the button comes
on.
Unlocking all doors and the boot lid – Press button
⇒
page 46, fig. 42
. The symbol
goes out in the
button.
The following applies if you have lock
ed your vehicle using the button :
•
It is not possible to open the doors or the boot lid from the outside (safety
feature, e.g. when stopping at traffic lights etc.).•
You can unlock the doors individually from
the inside and open them by pulling
the door opening lever.•
As long as one door is opened
8), the vehicle cannot be lo
cked in order to avoid
inadvertently locking the key in the vehicle.•
In the event of an accident in which the airbags are deployed, the locked doors
are automatically unlocked from the inside
in order to enable rescuers to gain
access to the vehicle. By pressing and holding th
e button or , you can conveniently close or open
the windows
⇒page 54.
WARNING
The central locking system al
so operates if the ignition is switched off. All the
doors and the boot lid are locked. Childr
en should never be left unattended
in the vehicle since it is difficult to
provide assistance from the outside when
the doors are locked. Locked doors make
it difficult for rescuers to get into
the vehicle in an emergency - hazard!
Note
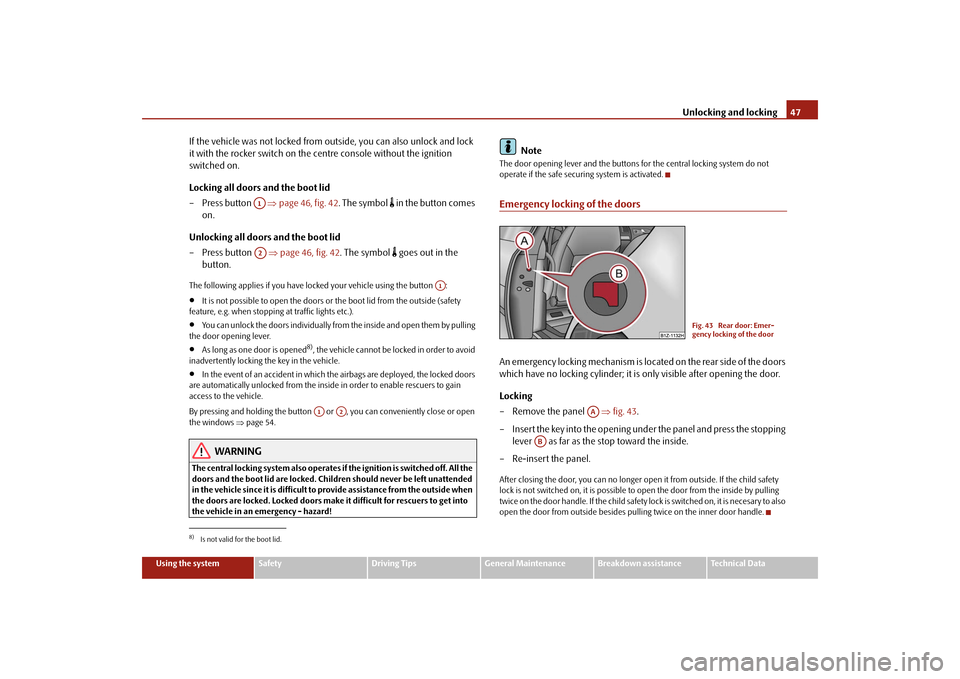
The door opening lever and the buttons for the central locking system do not operate if the safe securing system is activated.Emergency locking of the doorsAn emergency locking mechanism is located on the rear side of the doors which have no locking cyli
nder; it is only visible after opening the door.
Locking – Remove the panel
⇒
fig. 43
.
– Insert the key into the opening under the panel and press the stopping
lever as far as the stop toward the inside.
– Re-insert the panel.After closing the door, you can no longer op
en it from outside. If the child safety
lock is not switched on, it is possible to
open the door from the inside by pulling
twice on the door handle. If the child safety lock is switched on, it is necesary to also open the door from outside besides pu
lling twice on the
inner door handle.
8)Is not valid for the boot lid.
A1A2
A1
A1
A2
Fig. 43 Rear door: Emer- gency locking of the door
AA
AB
se0.1.book Page 47 Friday, April 10, 2009 3:19 PM
Page 51 of 304
Unlocking and locking
50
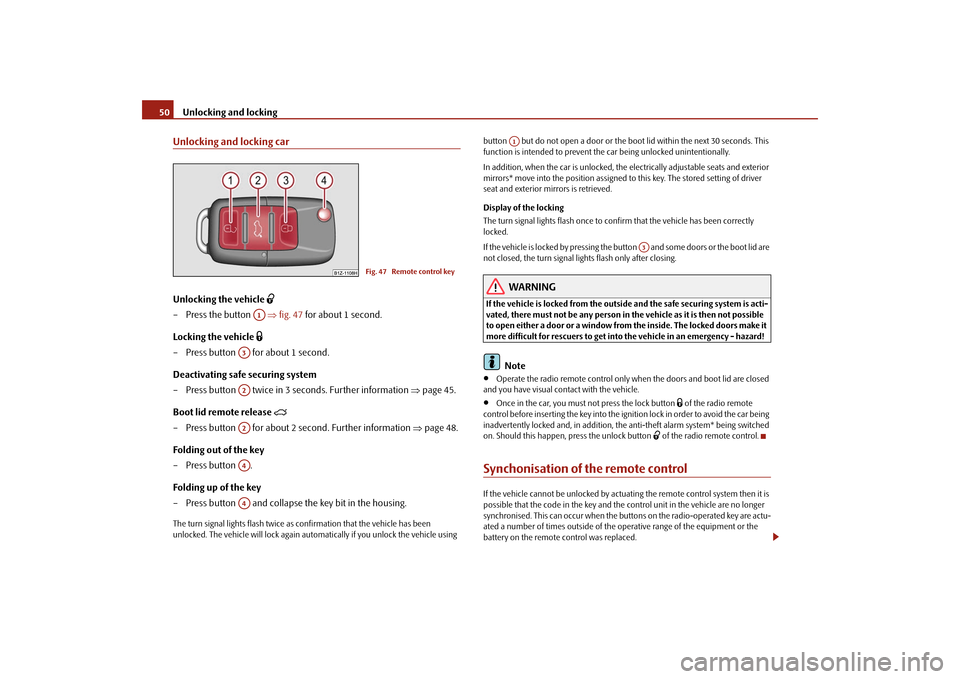
Unlocking and locking carUnlocking the vehicle
– Press the button
⇒
fig. 47
for about 1 second.
Locking the vehicle
– Press button for about 1 second.Deactivating safe securing system – Press button twice in 3 seconds. Further information
⇒
page 45.
Boot lid remote release
– Press button for about 2 second. Further information
⇒
page 48.
Folding out of the key – Press button . Folding up of the key – Press button and collapse the key bit in the housing.The turn signal lights flash twice as
confirmation that the vehicle has been
unlocked. The vehicle will lock again auto
matically if you unlock the vehicle using
button but do not open a door or the b
oot lid within the next 30 seconds. This
function is intended to prevent the car being unlocked unintentionally. In addition, when the car is unlocked, the el
ectrically adjustable seats and exterior
mirrors* move into the position assigned to this key. The stored setting of driver seat and exterior mirrors is retrieved. Display of the locking The turn signal lights flash once to co
nfirm that the vehicle has been correctly
locked. If the vehicle is locked by
pressing the button and some doors or the boot lid are
not closed, the turn signal lights flash only after closing.
WARNING
If the vehicle is locked from the outsid
e and the safe securing system is acti-
vated, there must not be any person in the vehicle as it is then not possible to open either a door or a window from the inside. The locked doors make it more difficult for rescuers to get into
the vehicle in an emergency - hazard!
Note
•
Operate the radio remote control only when the doors and boot lid are closed
and you have visual co
ntact with the vehicle.
•
Once in the car, you must
not press the lock button
of the radio remote
control before inserting the key into the ignition lock in order to avoid the car being inadvertently locked and, in addition, the anti-theft alarm system* being switched on. Should this happen, press the unlock button
of the radio remote control.
Synchonisation of the remote controlIf the vehicle cannot be unlocked by actuatin
g the remote control system then it is
possible that the code in the key and the
control unit in the vehicle are no longer
synchronised. This can occur when the buttons on the radio-operated key are actu- ated a number of times outside of the operative range of the equipment or the battery on the remote control was replaced.
Fig. 47 Remote control key
A1
A3A2A2A4A4
A1
A3
se0.1.book Page 50 Friday, April 10, 2009 3:19 PM
Page 53 of 304
Unlocking and locking
52
Switch off the interior monitor and towing protection monitoring – Switch off the ignition. – Open the driver door. – Press the button
at the centre column on the driver side
⇒
page 51, fig. 48
, the symbol
which lights up in the button
changes from red to orange.
– Lock the vehicle within 30 seconds.The interior monitor and the towing protec
tion monitoring are switched on again
automatically the next ti
me the car is locked.
Note
•
You can switch the interior monitor and th
e towing protection monitoring off if
there is a possibility that movements from (e.g. children or animals) inside the vehicle interior or if the vehicle must be transported (e.g. by train or ship) or towed, might trigger the alarm.•
The opened storage compartment for spectacles reduces the effectiveness of
the interior monitor. In order to ensure the function of the interior monitor to be fully operational, always close the stor
age compartment for spectacles before
locking the vehicle.
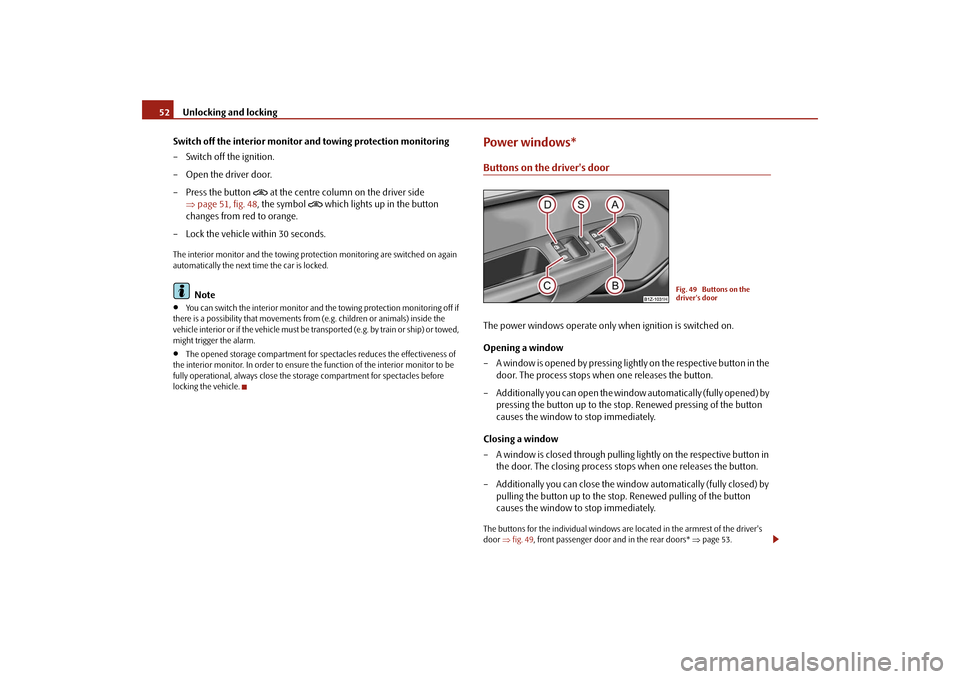
Power windows*Buttons on the driver's doorThe power windows operate only when ignition is switched on. Opening a window – A window is opened by pressing lightly on the respective button in the
door. The process stops when one releases the button.
– Additionally you can open the window automatically (fully opened) by
pressing the button up to the stop. Renewed pressing of the button causes the window to stop immediately.
Closing a window – A window is closed through pulling lightly on the respective button in
the door. The closing process stops when one releases the button.
– Additionally you can close the window automatically (fully closed) by
pulling the button up to the stop. Renewed pulling of the button causes the window to stop immediately.
The buttons for the individual windows are located in the armrest of the driver's door
⇒fig. 49
, front passenger door and in the rear doors*
⇒page 53.
Fig. 49 Buttons on the driver's door
se0.1.book Page 52 Friday, April 10, 2009 3:19 PM
Page 54 of 304
Unlocking and locking
53
Using the system
Safety
Driving Tips
General Maintenance
Breakdown assistance
Technical Data
Buttons for the power windows in the armrest for the driver Button for the power window in the driver's door Button for the power window in the front passenger's door Button for the power window in the rear door on the right* Button for the power window in the rear door on the left* Safety pushbutton* Safety pushbutton* You can deactivate the switches for power
windows at rear door
s by pressing the
safety pushbutton
⇒page 52, fig. 49
. The buttons for power windows at rear
doors are activated again by pressing the safety pushbutton again. If the buttons for the rear doors are deactivated, the indicator light
in the safety
switch lights up.
WARNING
•
If you lock the vehicle from the outside, do not leave any person in the
vehicle since it is no long
er possible to open the windows from the inside in
an emergency.•
The system is fitted with a force limiter
⇒page 54. If there is an obstacle,
the closing process is stopped and the
window goes down by several centim-
eters. You should then take particular care when closing the windows! You may otherwise suffer severe injuries
as a result of getting an arm, for
example, jammed in the window!•
It is recommended to deactivate
the electrically operated power
windows in the rear doors (safety pushbutton)
⇒page 52, fig. 49
when
children are being transported on the rear seats.
Note
•
After switching the ignition off, it is still possible to open or close the windows
for a further 10 minutes. During this time the automatic closing and opening func-tions of the window will operate. The po
wer windows are switched off completely
once you open the driver or front passenger door.
•
When driving always use the existing he
ating, air conditioning and ventilation
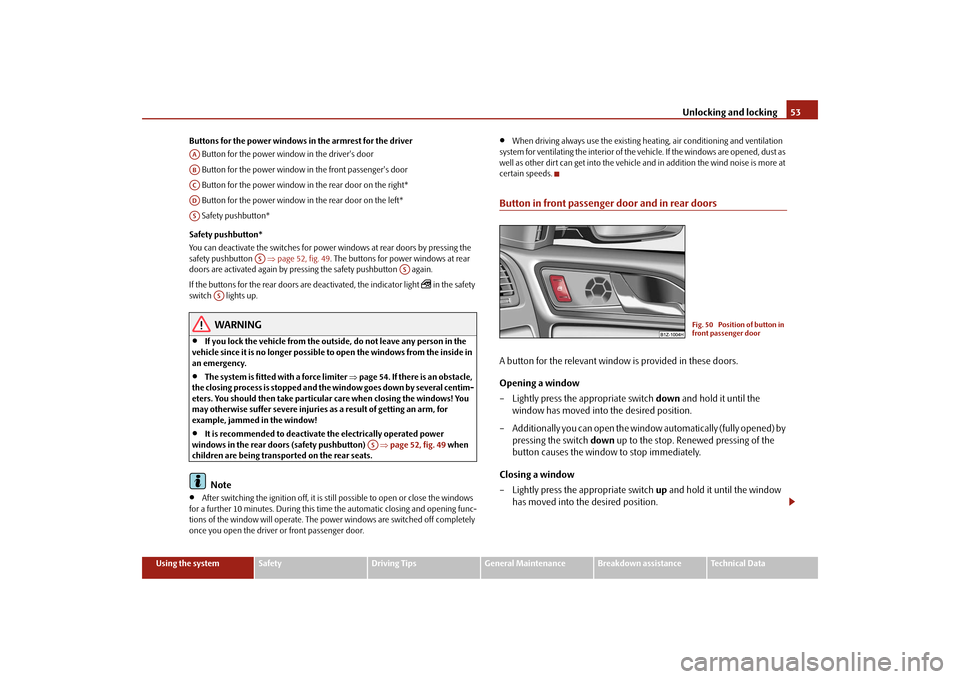
system for ventilating the interior of the vehicle. If the windows are opened, dust as well as other dirt can get into the vehicle and in addition the wind noise is more at certain speeds.Button in front passenger door and in rear doorsA button for the relevant window is provided in these doors. Opening a window – Lightly press the appropriate switch
down
and hold it until the
window has moved into the desired position.
– Additionally you can open the window
automatically (fully opened) by
pressing the switch
down
up to the stop. Renewed pressing of the
button causes the window to stop immediately.
Closing a window – Lightly press the appropriate switch
up and hold it until the window
has moved into the desired position.
AAABACADAS
AS
AS
AS
AS
Fig. 50 Position of button in front passenger door
se0.1.book Page 53 Friday, April 10, 2009 3:19 PM