change time SKODA OCTAVIA 2010 2.G / (1Z) Owner's Manual
[x] Cancel search | Manufacturer: SKODA, Model Year: 2010, Model line: OCTAVIA, Model: SKODA OCTAVIA 2010 2.G / (1Z)Pages: 275, PDF Size: 16.43 MB
Page 19 of 275
Instruments and warning lights
18
makes an entry in the Service schedule,
affix the sticker with the entry of the following service interval to the side of the
dash panel on the driver's side.
Reset the service interval displays by using the button page 15, fig. 15 .
On vehicles which are equipped with inform ation display*, you can call up this infor-
mation in the following menu on page 23:
SETUP
Service Interval
ResetCaution
We recommend that you do not reset the Se rvice Interval Display yourself otherwise
this can result in the service interval display being incorrectly set, which may also result
in problems with operation of your vehicle.
Note
Never reset the display between service intervals otherwise this may result in
incorrect readouts.
information is retained in the Service Interval Display also after the battery of the
vehicle is disconnected.
If the instrument cluster is exchanged af ter a repair, the correct values must be
entered in the counter for the Service Interval Display. This work is carried out by a
specialist garage.
The data displayed is the same after resetting the display with flexible service inter-
vals (QG1) using the reset button as that for a vehicle with fixed service intervals (QG2).
We therefore recommend having the Service Interval Display reset only by an author-
ised Škoda Service Partner who is familiar with the procedure for resetting the display
with a vehicle system tester.
Please refer to the brochure Service schedule for extensive information about the
service intervals.
Digital clockYou can set the time with the rotary knob page 15, fig. 15 .
Select the information which you wish to change by turning the button and carry
out the change of the selected in formation by pressing the button.
On vehicles which are fitted out with the information display*, it is possible to set the
time in the menu Time page 25.
WARNING
The clock should not be adjusted while driving for safety reasons but only when
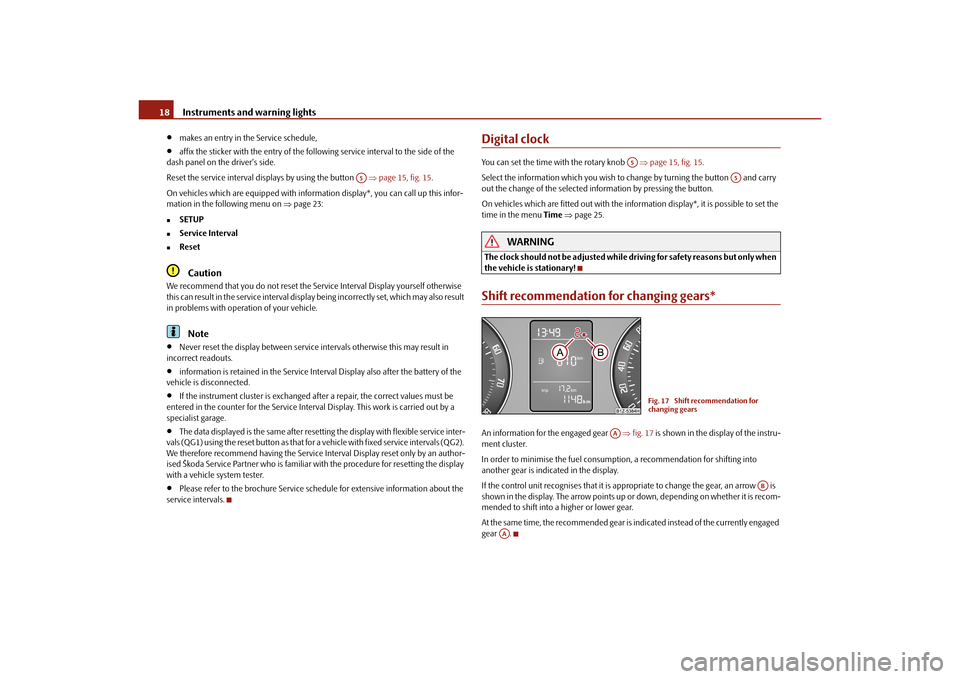
the vehicle is stationary!Shift recommendation for changing gears*An information for the engaged gear fig. 17 is shown in the display of the instru-
ment cluster.
In order to minimise the fuel consumptio n, a recommendation for shifting into
another gear is indicated in the display.
If the control unit recognises that it is ap propriate to change the gear, an arrow is
shown in the display. The arrow points up or down, depending on whether it is recom-
mended to shift into a higher or lower gear.
At the same time, the recommended gear is indicated instead of the currently engaged
gear .
A5
A5
A5
Fig. 17 Shift recommendation for
changing gears
AA
AB
AA
s43s.1.book Page 18 Thursday, May 13, 2010 1:21 PM
Page 26 of 275
Instruments and warning lights25
Using the system
Safety
Driving Tips
General Maintenance
Breakdown assistance
Technical Data
In certain countries, if a yellow symbol appears
one warning signal will sound as well.
If several operational faults of priority 2 exist, the symbols appear one after the other
and are each illuminated for about 5 seconds.
SetupYou can change certain setti ngs by means of the information display. The current
setting is shown on the information display in the respective menu at the top below the
line.
You can select the following information (d epending on the equipment installed on
the vehicle):
Language
MFD Data
Convenience
Lights & Vision
Time
Winter tyres
Units
Assistants
Alt. speed dis.
Service Interval
Factory Setting
Back
After selecting the menu point Back you will reach one level higher in the menu.
Language
Here you can set in which language the warning and information texts should be
displayed.
Displays of the MFA
Here you can switch off or on certain displays of the multi-functional indicator.
Comfort*
You can set the following f unctions (depending on the equipment installed on the
vehicle):
Check engine oil level,
engine oil sensor faulty
page 35
Brake pad worn
page 34
Problem with engine oil pressure
It is also important to have the vehi-
cle inspected without delay by a spe- cialist garage. The information about the maximum permissible engine
speed is displayed together with this symbol.
Rain closing
On vehicles with rain sensor you can switch on or off the
function for automatic closing of the windows and the
sliding/tilting roof in case of ra in and locked vehicle. If it is
not raining and the function is set, the windows including
the sliding/tilting roof are closed automatically after
approx. 12 hours.
Door open
Here you can switch on or off the functions for opening a
single door and automatic closing.
ATA c onfirm
Here you can set if a signal tone should sound additionally
when activating or deactivating the anti-theft alarm system
.
Window op.
Here you can set the convenience mode only for the driver
window or for all the windows.
s43s.1.book Page 25 Thursday, May 13, 2010 1:21 PM
Page 27 of 275
Instruments and warning lights
26
Lights and Visibility
Here you can set how long the light should stay on for the function Coming/Leaving
Home. Furthermore you can here switch on or off the functions daylight driving lights
and convenience turn signal.
After selecting the menu point Fa ct or y se t ting the factory setting of the lighting is
established again.
Time
Here you can set the time, the time format (12 or 24 hour indicator) and the time
change summer/winter time.
Winter tyres
Here you can set at which speed a warning si gnal should sound. This function is used
for e.g winter tyres with the permissibl e maximum speed less than the maximum
speed of the vehicle.
When exceeding the speed, the following is displayed on the information display*:
Winter tyres max. speed ... km/h
Measures
Here you can set the units for temperature, consumption and distance driven. Assistant
Here you can adjust the tones of the
acoustic signals of the parking aid*.
Second speed
Here you can switch on the display of the second speed in mph or in km/h
3).
Service
Here you can have the kilometers still to be driven and the days until the following
service interval shown and the Service Interval Display reset.
Factory Setting
After selecting the menu point Factory Setting the factory setting of the information
display is established again.
Mirror down
Here you can switch on or off the function for mirror low-
ering on the front passenger side when engaging the
reverse gear
a).
Mirror adjust.
Here you can switch on or off the function for left and right
exterior mirror adjustment simultaneously.
Fa cto r y se tt ing
After selecting this menu the convenience setting is reset
to factory setting. The following is displayed in the infor-
mation display:
Convenience factory settings restored
a)This function is only available on vehicles with an electrically adjustable driver seat.
3)Valid for countries where the values are indicated in British measuring units.
s43s.1.book Page 26 Thursday, May 13, 2010 1:21 PM
Page 38 of 275
Unlocking and locking37
Using the system
Safety
Driving Tips
General Maintenance
Breakdown assistance
Technical Data
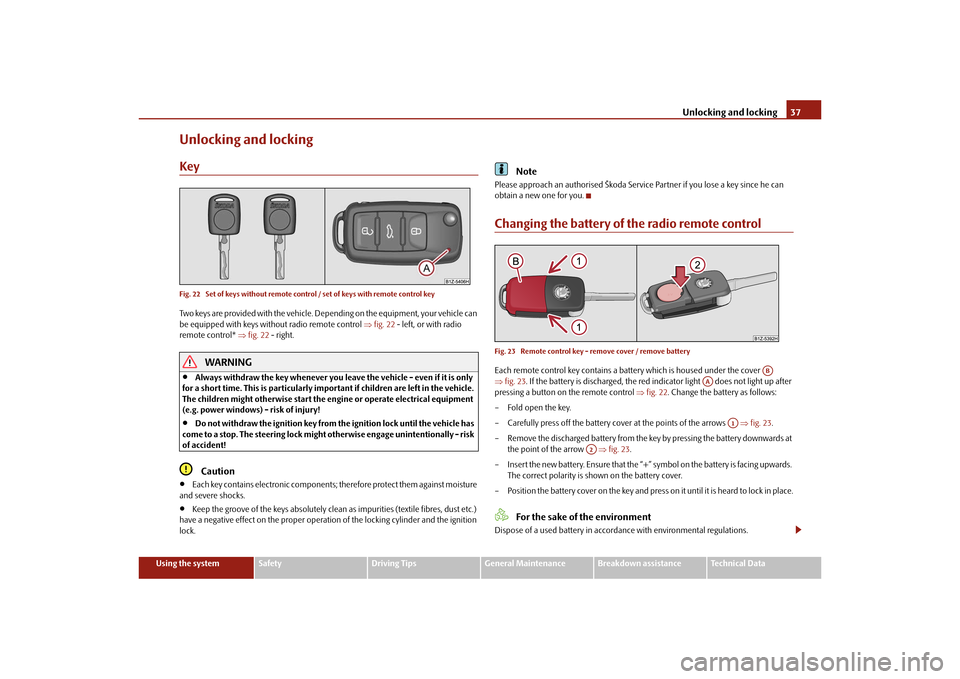
Unlocking and lockingKeyFig. 22 Set of keys without remote control / set of keys with remote control keyTwo keys are provided with the vehicle. Depending on the equipment, your vehicle can
be equipped with keys without radio remote control fig. 22 - left, or with radio
remote control* fig. 22 - right.
WARNING
Always withdraw the key whenever you leave the vehicle - even if it is only
for a short time. This is particularly important if children are left in the vehicle.
The children might otherwise start the en gine or operate electrical equipment
(e.g. power windows) - risk of injury!
Do not withdraw the ignition key from the ignition lock until the vehicle has
come to a stop. The steerin g lock might otherwise enga ge unintentionally - risk
of accident!Caution
Each key contains electronic components; therefore protect them against moisture
and severe shocks.
Keep the groove of the keys absolutely clean as impurities (textile fibres, dust etc.)
have a negative effect on the proper operation of the locking cylinder and the ignition
lock.
Note
Please approach an authorised Škoda Servic e Partner if you lose a key since he can
obtain a new one for you.Changing the battery of the radio remote controlFig. 23 Remote control key - remove cover / remove batteryEach remote control key contains a batt ery which is housed under the cover
fig. 23 . If the battery is discharged, the red in dicator light does not light up after
pressing a button on the remote control fig. 22 . Change the battery as follows:
– Fold open the key.
– Carefully press off the battery cover at the points of the arrows fig. 23 .
– Remove the discharged battery from the key by pressing the battery downwards at the point of the arrow fig. 23 .
– Insert the new battery. Ensure that the “+” symbol on the battery is facing upwards.
The correct polarity is shown on the battery cover.
– Position the battery cover on the key and press on it until it is heard to lock in place.
For the sake of the environment
Dispose of a used battery in accord ance with environmental regulations.
AB
AA
A1
A2
s43s.1.book Page 37 Thursday, May 13, 2010 1:21 PM
Page 62 of 275
Lights and Visibility61
Using the system
Safety
Driving Tips
General Maintenance
Breakdown assistance
Technical Data
Windshield wiper and wash systemWindshield wiper
You can operate the windscreen wipers and automatic wipe/wash
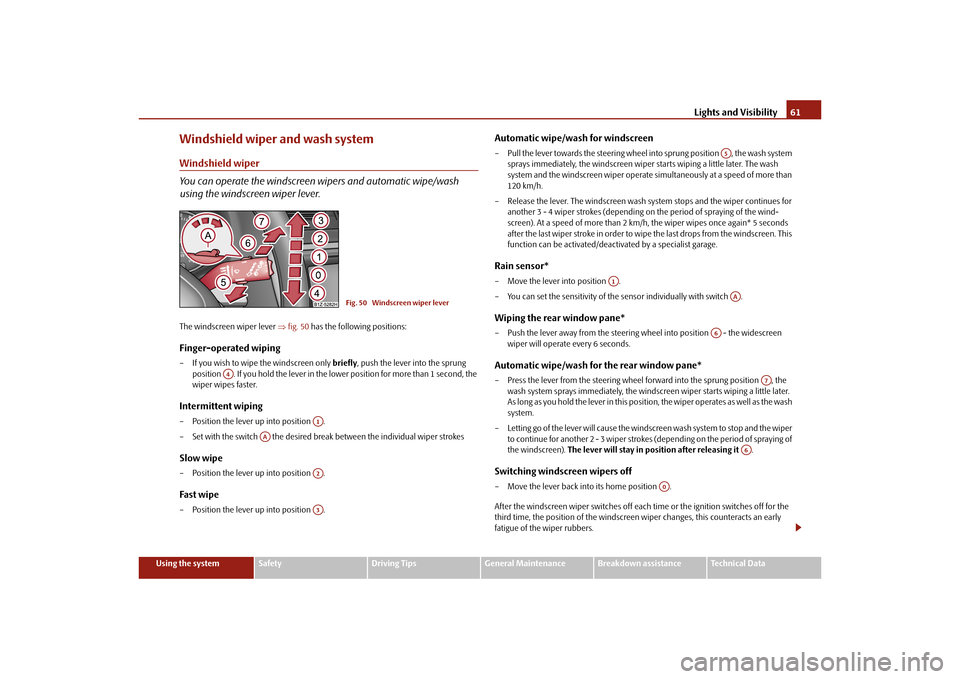
using the windscreen wiper lever.The windscreen wiper lever fig. 50 has the following positions:Finger-operated wiping– If you wish to wipe the windscreen only briefly, push the lever into the sprung
position . If you hold the lever in the lo wer position for more than 1 second, the
wiper wipes faster.Intermittent wiping– Position the lever up into position .
– Set with the switch the desired brea k between the individual wiper strokesSlow wipe– Position the lever up into position .Fast wipe– Position the lever up into position .
Automatic wipe/wash for windscreen– Pull the lever towards the steering wheel into sprung position , the wash system
sprays immediately, the windscreen wiper starts wiping a little later. The wash
system and the windscreen wiper operate simultaneously at a speed of more than
120 km/h.
– Release the lever. The windscreen wash system stops and the wiper continues for another 3 - 4 wiper strokes (depending on the period of spraying of the wind-
screen). At a speed of more than 2 km/h, the wiper wipes once again* 5 seconds
after the last wiper stroke in order to wipe the last drops from the windscreen. This
function can be activated/deacti vated by a specialist garage.Rain sensor*– Move the lever into position .
– You can set the sensitivity of the sensor individually with switch .Wiping the rear window pane*– Push the lever away from the steering wheel into position - the widescreen
wiper will operate every 6 seconds.Automatic wipe/wash for the rear window pane*– Press the lever from the steering wheel forward into the sprung position , the wash system sprays immediately, the windscreen wiper starts wiping a little later.
A s l o n g a s y o u h o l d t h e l e v e r i n t h i s p o s i t i o n, th e w i p e r o p e ra t e s a s w e l l a s t h e w a s h
system.
– Letting go of the lever will cause the windscreen wash system to stop and the wiper to continue for another 2 - 3 wiper strokes (depending on the period of spraying of
the windscreen). The lever will stay in position after releasing it .Switching windscreen wipers off– Move the lever back into its home position .
After the windscreen wiper switches off each time or the ignition switches off for the
third time, the position of the windscreen wiper changes, this counteracts an early
fatigue of the wiper rubbers.
Fig. 50 Windscreen wiper lever
A4
A1
AA
A2A3
A5
A1
AA
A6
A7
A6
A0
s43s.1.book Page 61 Thursday, May 13, 2010 1:21 PM
Page 107 of 275
Heating and air conditioning system
106
– In the menu Aux. Heating select the menu point Running time and set the
desired operating period in steps of 5 m inutes. The running time can be 10 to 60
minutes.
– By selecting the menu point Back, you will reach in the menu Aux. Heating.
– In the menu Aux. heating select the menu point Mode.
– In the menu Mode select the desired mode Heating for or Ventilation for .ProgrammingFor the programming of the auxiliary heating (auxiliary heating and ventilation) in the
menu Aux. heating there are three pre-set times:
Pre-set time 1
Pre-set time 2
Pre-set time 3
In each pre-set time, the day and the time (hour and minute) can be set for switching
on the auxiliary heating and/or ventilation.
An empty position can be fo und between Sunday and Monday when selecting the day.
If this empty position is selected, the activation is performed without taking into
account the day.
If you leave the pre-set menu by selecting the menu Back or do not make changes on
the display for longer than 10 seconds, the set values are stored, but the pre-set time
is not active.
Both other pre-set times can be programmed and stored in the same way.
If you select the menu Activate after setting the desired values, appears on the display
Pre-set time (weekday, hours, minute) activated! and the set pre-set time is active.
Only one programmed pre-set time can be active.
The last programmed pre-set time remains active.
After the auxiliary heating activates at the set time, it is necessary to pre-set a time
again.
Changing the active pre-set time is carried out after selecting the menu point Activate
in the menu Aux. heating by selecting a pre-set time. The prerequisite for the correct switching on
of the auxiliary heating (auxiliary heating
and ventilation) according to the programmed pre-set time is the correct setting of the
current time and the weekday page 105.
If the system is running, a warning light in th e button for direct switching on/off of the
auxiliary heating lights up.
The running system deactivates after expirati on of the operating period or is deacti-
vated earlier by pressing the button for direct switching on/off of the auxiliary heating
page 105.
A random pre-set time can be deactivated by selecting the menu point Deactivate in
the menu Activate.
After selecting the menu point Fa ct or y se t ti ng in the menu Aux. heating , it is possible
to return to the factory setting.
s43s.1.book Page 106 Thursday, May 13, 2010 1:21 PM
Page 120 of 275
Automatic gearbox119
Using the system
Safety
Driving Tips
General Maintenance
Breakdown assistance
Technical Data
stationary. The vehicle would otherwise
immediately start off - also when the
handbrake is firmly applied - risk of an accident!
You must move the selector lever into position P and firmly apply the hand-
brake first before you or any other person opens the bonnet and starts working
on the engine when it is running - risk of accident! It is also essential to observe
all warnings page 197, “Working in the engine compartment”.
Selector lever lockAutomatic selector lever lock
With the ignition on, the selector lever is locked when it is in the positions P and N . You
must first of all depress the brake pedal in or der to move the selector lever out of this
position. The warning light
page 33 lights up in the instrument cluster as a
reminder for the driver when the selector lever is in the positions P and N.
A time delay element ensures that the selector lever is not blocked when rapidly
switching over the position N (e.g. from R to D). This does, for example, allow one to
seesaw out a stuck vehicle. The selector lever lo ck will click into place if the lever is in
the N position for more than 2 seconds without the brake pedal being pressed.
The selector lever lock is only active if the vehicle is stationary or moving at speed of
less than 5 km/hour. The lock is swit ched off automatically into position N when the
car is travelling at a higher speed.
Shiftlock button
The Shiftlock button in the hand le of selector lever prevents certain selector lever posi-
tions being engaged inadvertently. The selector lever lock is cancelled when you press
the Shiftlock button.
Keylock - Ignition key withdrawal lock
You can only withdraw the ignition key after switching off the ignition if the selector
lever is in position P. If the ignition key is withdrawn, the selector lever is blocked in
position P.
Kickdown function
The kickdown function provides you with maximum acceleration
power.Fully depressing the a ccelerator pedal allows the kickdown function to be activated in
the desired driving program. This function has precedence over the driving
programme and serves for maximum accelerati on of the vehicle when exploiting the
maximum power potential of the engine wi thout taking into account the current
selector lever position ( D, S or Tiptronic). The gearbox shifts down to one or several
gears in line with the driving state and the vehicle accelerates. The gearbox does not
shift up into the highest gear until the en gine has reached its maximum revolutions for
this gear range.
WARNING
Please note that using the kickdown function can result in the driven wheels
spinning on a smooth or slippery road surface - risk of skidding!Dynamic shift programmeThe automatic gearbox of your vehicle is controlled electronically. Shifting up and
down through the gears is performed automatically on the basis of pre-defined driving
programmes.
Adopting a moderate style of driving will cause the gearbox to select the most
economical driving programme. Shifting up into a higher gear as soon as possible and
shifting down as late as po ssible will have a favourable effect on your fuel consump-
tion.
Adopting a sporty style of driving with rapid movements of the accelerator pedal
combined with sharp acceleration and freque nt changes in speed, exploiting the top
speed of the car or depressing the accele rator pedal (kickdown function), will cause
the gearbox to switch over to this style of driving and shift down earlier with frequent
changes in gears in comparison to the moderate style of driving.
Selecting the most appropriate driving programme for the particular style of driving is
a continuous process. Irrespective of this it is, however, possible to switch or shift down
into a dynamic shift programme by depressi ng the accelerator rapidly. The gearbox
shifts down into a lower gear matching the speed of the car and this allows you to
WARNING (continued)
s43s.1.book Page 119 Thursday, May 13, 2010 1:21 PM
Page 125 of 275
Communication
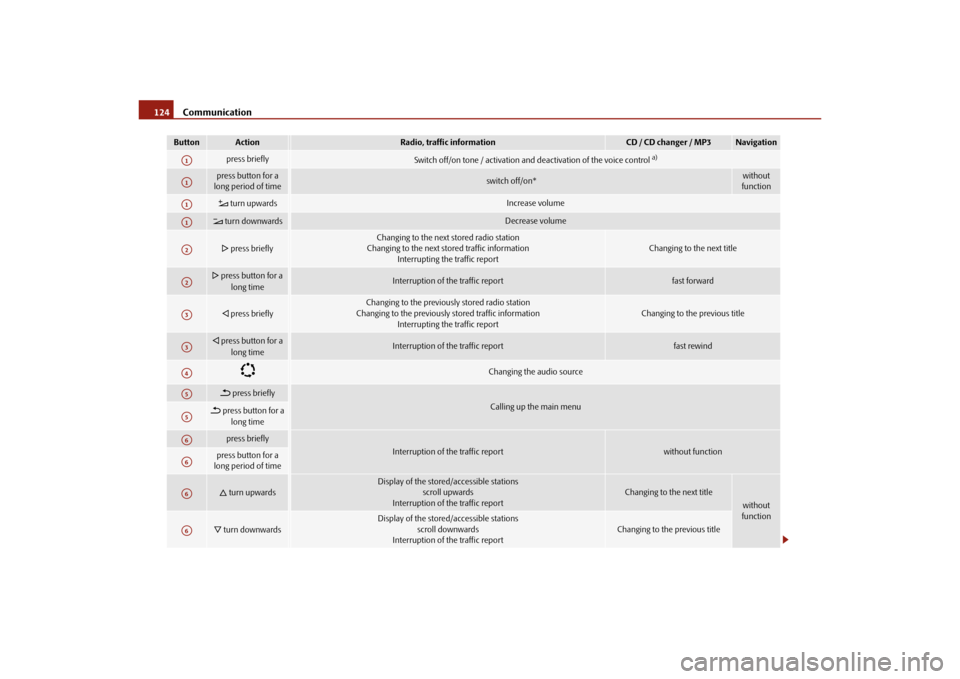
124Button
Action
Radio, traffic information
CD / CD changer / MP3
Navigation
press briefly
Switch off/on tone / activation and deactivation of the voice control
a)
press button for a
long period of time
switch off/on*
without
function
turn upwards
Increase volume
turn downwards
Decrease volume
press briefly
Changing to the next stored radio station
Changing to the next stored traffic information Interrupting the traffic report
Changing to the next title
press button for a
long time
Interruption of the traffic report
fast forward
press briefly
Changing to the previously stored radio station
Changing to the previously stored traffic information
Interrupting the traffic report
Changing to the previous title
press button for a
long time
Interruption of the traffic report
fast rewind
Changing the audio source
press briefly
Calling up the main menu
press button for a long time
press briefly
Interruption of the traffic report
without function
press button for a
long period of time
turn upwards
Display of the stored/accessible stations scroll upwards
Interruption of the traffic report
Changing to the next title
without
function
turn downwards
Display of the stored/accessible stations
scroll downwards
Interruption of the traffic report
Changing to the previous title
A1A1A1A1A2A2A3A3A4A5A5A6A6A6A6
s43s.1.book Page 124 Thursday, May 13, 2010 1:21 PM
Page 127 of 275
Communication
126
Furthermore the volume can be changed indivi dually during the call at any time with
the button for setting the radio* or navigation system* or with the buttons on the
multifunction steering wheel*.
WARNING
Pay attention primarily to the traffic situation! As the driver you are fully
responsible for road safety. Use the teleph one system only to such an extent, so
that you are in full control of your vehicle at any time.
Note
Please also refer to the additional instructions page 125, “Mobile phones and
two-way radio systems”.
Should you have any questions, please contact an authorised Škoda Service
Par tner.
Phone PhonebookA phone phonebook is part of the mobile ph one preinstallation with voice control. In
the phone phonebook there are 2500 free memory locations available. This phone
phonebook can be used in line with the mobile telephone.
After the first connection of the telephone, the system begins to load the phone book
from the phone and the SIM card into the memory of the control unit.
Each time the telephone has establishe d a new connection with the hands-free
system, an update of the relevant phone b ook is performed. The updating can take a
few minutes. During this time the phone book, which was stored after the last update
was completed, is available. Newly stored telephone numbers are only shown after the
updating has ended.
If the number of contacts loaded exceed s 2 500, the phone book is not complete.
If a telephone event (e.g. incoming or outgoing call, dialogue of the voice control)
occurs during the updating pr ocedure, the updating is interrupted. After the telephone
event has ended, the updating starts anew. Store voice recording of a contact
For each entry in the menu
Phone book, you can store your own voice entry for the
voice control with Voice Tag - Record. You can also store your own voice entry using
voice control in the menu “further options”.
Connection of the mobile phone with the hands-free systemIn order to connect a mobile phone with th e hands-free system, it is necessary to
connect the telephone to the hands-free sy stem. Detailed information on this is
provided in the operating instructions of your mobile phone. The following steps must
be carried out for the connection:
– Activate the Bluetooth
® in your telephone and the visibility of the mobile phone.
– Switch on the ignition.
– Select the menu Phone - Phone search in the information display and wait until
the control unit has ended the search.
– Select your mobile phone in the menu of the units found.
–Confirm the PIN (as standard 1234).
– If the hands-free system announces (as standard Skoda UHV) on the display of the
mobile phone, enter the PIN (as standard 1234) within 30 seconds and wait until
the connection is established
12).
– After ending the connection, confirm in the information display that a new user profile was created.
If no more free space is available for creating a new user profile, delete an existing user
profile.
If you have not managed to connect your mobile phone with the hands-free system
within 3 minutes after switching on the ignition, switch the ignition off and then again
on. The visibility of the hands-free system is established again for 3 minutes. The visi-
bility of the Bluetooth
® device is automatically switched off if the vehicle starts off or
if the mobile phone connects to the device.
12)Some mobile phones have a menu, in which the authorization for establishing a Bluetooth
®
connection is performed via the input of a code. If the input for the authorization is necessary, it
must always be performed when re-e stablishing the Bluetooth connection.
s43s.1.book Page 126 Thursday, May 13, 2010 1:21 PM
Page 131 of 275
Communication
130
the handwheel. You can select the numbers 0 - 9, the symbols +,
, # and the func-
tions Delete, Call, Cancel .
Call register
In the menu point Call register, you can select the following menu points:
Missed calls
Received calls
Last calls
Voice mailbox
In the menu Voice mailbox , it is possible to set the number of the voice mailbox and
then dial the number.
Bluetooth
In the menu Bluetooth you can select the following menu points:
User - the overview of the stored users
New user - Search for new telephones which are in the reception range
Visibility - Switching on the visibility of the telephone unit for other devices
Media player
Active device
Paired devices
Search
Phone name - the possibility to change the name of the telephone unit (pre-set
SKODA UHV)
Settings
In the menu Settings you can select the following menu points:
Phone book
Update
List
Surname
First name
Ring tone Back
Return in the basic menu of the telephone.
Voice controlIntroductionThe period, in which the telephone system is ready to receive voice commands and
carry out the voice commands, is called DIALOGUE. The system gives audible feedback
and guides you if necessary th
rough the relevant functions.
Switch on voice control (dialogue)
You can start the dialogue at any time by briefly pressing the PTT button
on the
adapter* page 128, fig. 123 or on the multifunction steering wheel* page 128.
If the system does not recognise your command, it repeats the first part of the aid and
thus a new entry is possible. After the 2nd error the system repeats the second part of
the aid. After the 3rd error the answer “ Cancel” is given and the dialogue is ended.
Switching off voice control (dialogue)
You can end the dialogue at any time by briefly pressing the PTT button
on the
adapter* page 128, fig. 123 or on the multifunction steering wheel* page 128. If
the system expects a voice command, you can end the dialogue with the command
CANCEL .
Only the message just repeated can be ended by pressing the PTT button during the
message and thus it is possible to pronounce the expected command sooner.
When receiving an incoming call, the dialog ue is immediately interrupted and you can
accept the call by pressing the button
on the multifunction steering wheel* or by
pressing the button for receiving a call directly on your telephone.
Optimum understanding of the voice commands depends on the following
factors:
Speak with a normal tone of voice withou t intonation and excessive voice pauses.
Avoid insufficient articulation.
Close the doors, windows and sliding roof, in order to reduce or stop disturbing
exterior noise.
s43s.1.book Page 130 Thursday, May 13, 2010 1:21 PM