lock SKODA OCTAVIA 2010 2.G / (1Z) Manual PDF
[x] Cancel search | Manufacturer: SKODA, Model Year: 2010, Model line: OCTAVIA, Model: SKODA OCTAVIA 2010 2.G / (1Z)Pages: 275, PDF Size: 16.43 MB
Page 185 of 275
Towing a trailer
184
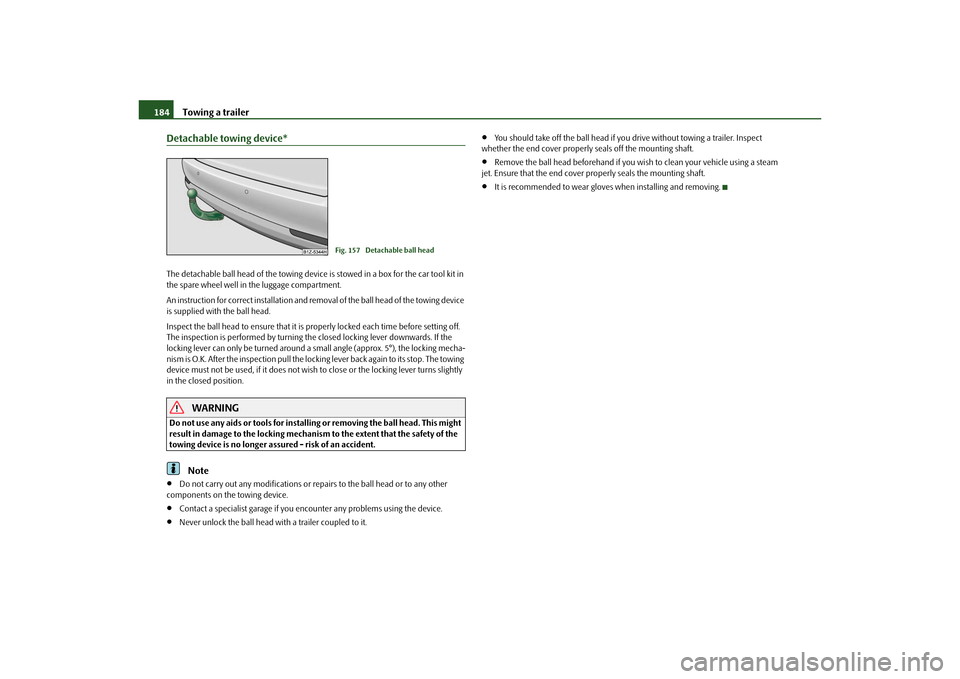
Detachable towing device*The detachable ball head of the towing device is stowed in a box for the car tool kit in
the spare wheel well in the luggage compartment.
An instruction for correct installation and remo val of the ball head of the towing device
is supplied with the ball head.
Inspect the ball head to ensure that it is prop erly locked each time before setting off.
The inspection is performed by turning th e closed locking lever downwards. If the
locking lever can only be turned around a small angle (approx. 5°), the locking mecha-
nism is O.K. After the inspection pull the locking lever back again to its stop. The towing
device must not be used, if it does not wish to close or the locking lever turns slightly
in the closed position.
WARNING
Do not use any aids or tools for installing or removing the ball head. This might
result in damage to the locking mechanism to the extent that the safety of the
towing device is no longer assured - risk of an accident.
Note
Do not carry out any modifications or repairs to the ball head or to any other
components on the towing device.
Contact a specialist garage if you en counter any problems using the device.
Never unlock the ball head with a trailer coupled to it.
You should take off the ball head if yo u drive without towing a trailer. Inspect
whether the end cover properly seals off the mounting shaft.
Remove the ball head beforehand if you wish to clean your vehicle using a steam
jet. Ensure that the end cover properly seals the mounting shaft.
It is recommended to wear gloves when installing and removing.
Fig. 157 Detachable ball head
s43s.1.book Page 184 Thursday, May 13, 2010 1:21 PM
Page 187 of 275
Taking care of your vehicle and cleaning the vehicle
186
There are no particular points to note be fore washing your vehicle in an automatic
vehicle wash system other than the usua l precautionary measures (closing the
windows and the sliding/tilting roof etc.).
If you have any particular attached parts fitted to your car - such as spoiler, roof rack
system, two-way radio aerial - it is best to first of all consult the operator of the car
wash plant.
It is important to degrease the lips of the windscreen wiper rubbers after passing
through the automatic vehicle wash system.Washing vehicle by handIt is important to first soften the dirt with plenty of water and rinse it off as thoroughly
as possible before washin g your vehicle by hand.
One should then clean the vehicle using a soft washing sponge, washing glove or a
washing brush and only slight pressure. Work from the top to the bottom - beginning
with the roof. Only place slight pressure on the vehicle paintwork during cleaning Only
use a car shampoo for stubborn dirt.
Wash out the sponge or washing glove thoroughly at short intervals.
Clean wheels, door sills and similar parts last. Use a second sponge for such areas.
Rinse off the vehicle well after giving it a wash and dry it off using a chamois leather.
WARNING
The ignition should always be switched off when you wash your vehicle -
risk of accident!
Protect your hands and arms from sharp-edged metal parts when you are
cleaning the underfloor, the inside of the wheel housings or the wheel trims -
risk of cuts.Caution
Do not wash your vehicle in bright sunlight - risk of paint damage.
Ensure that the jet of water is not aimed di rectly at the locking cylinders or at the
door and panel joints if you spray your vehi cle in winter down with a hose - risk of
freezing.
Do not use any insect sponges, rough kitc hen sponges or similar cleaning products
- risk of damage to the surface of paintwork.For the sake of the environment
Only wash your vehicle at wa shing bays specifically reserved for this purpose. This
ensures that no water which may be contaminated by oil flows into the sewage system.
It is not even permitted to wash your vehicl e in certain areas except at such specific
washing bays.Washing with a high-pressure cleanerWhen you wash your vehicle with a high-press ure cleaner, it is essential to comply with
the instructions for use of the cleaning equi pment. This applies in particular to the
pressure used and to the spraying distance . Maintain a sufficiently large distance to
soft materials such as rubber hoses or insulation material.
On no account use circular spray nozzles or so-called dirt cutters!
WARNING
It is particularly important that you do not clean tyres with circular spray jets.
Visible but also invisible damage to tyres may occur even at a relatively large
spraying distance and if sprayed only for a short time - risk of accident!
Caution
The water containing wax must be no hotter than 60°C, otherwise the vehicle can be
damaged.Wax treatmentGood wax treatment is an effective way of protecting the paintwork from harmful envi-
ronmental influences and minor mechanical damage.
The vehicle must be treated with a high-quali ty hard wax polish at the latest, when no
more drops form on the clean paintwork.
s43s.1.book Page 186 Thursday, May 13, 2010 1:21 PM
Page 189 of 275
Taking care of your vehicle and cleaning the vehicle
188
Do not use window leathers which you have us ed to polish the vehicle body to dry off
the windows. Residues of preservatives in the window leather can dirty the window
and reduce visibility.
Do not affix any stickers over the inside of the rear window to avoid damage to the
heating elements of the rear window heater .
We recommend using a preserva tive from Škoda genuine accessories offered by your
Škoda dealer.
Caution
Never remove snow or ice from the glass parts with warm or hot water - risk of forma-
tion of cracks in the glass!The headlight lensesPlease do not use any aggressi ve cleaning or chemical solvent products for cleaning
the front headlights - risk of damage to the plastic lenses. Please use soap and clean
warm water.
Caution
Never wipe the headlights dry and do not use any sharp objects for cleaning the plastic
lenses, this may result in damage to the protective paintwork and consequently in
formation of cracks on the headlight lenses, e.g through effect of chemical products.Door and window sealsThe rubber seals on the doors, boot lid, bonnet and windows remain supple and last
longer if you treat them from time to time with a rubber care product (e.g. with a spray
with silicone-free oil). You also avoid premature wear of the seals and prevent leakages
in this way. It is also easier to open the doors. Rubber seals which are well cared for also
do not stick together in cold winter weather.Locking cylinderWe recommend that you use the spray from Škoda original accessories with regreasing
and anticorrosive effect for de-icing locking cylinders.
Note
When washing your vehicle, ensure that as little water as possible gets into the locking
cylinders.WheelsSteel wheels
You should also thoroughly wash the wheels and wheel trims when giving your vehicle
its regular wash. This prevents any brake dust, dirt and road salt from sticking to the
wheel hubs. You can remove stubborn brake abrasion adhering to the wheels with an
industrial cleaner. Touch up any damage to the paintwork on the wheels before rust is
able to form.
Light alloy wheels
Regular care of light alloy wh eels is necessary in order to retain their decorative
appearance over long periods. It is particul arly important to remove regularly any road
salt and brake abrasion from light alloy wheels, otherwise the light metal will suffer.
Wash thoroughly and then treat the wheels with a protective product for light alloy
wheels which does not cont ain any acidic components. We recommend to apply a
hard wax layer onto the wheel hubs every three months. You must not use any prod-
ucts which cause abrasion when treating the wheel hubs. Any damage to the paint
layer on the wheel hubs must be touched up immediately.
We recommend using a preservative from Šk oda genuine accessories offered by your
Škoda dealer.
WARNING
One should remember when cleaning th e wheels that moisture, ice and road
salt may adversely affect braking ef ficiency - risk of an accident!
Note
Severe layers of dirt on the wheels can also result in wheel imbalance. This may show
itself in the form of a wheel vibration which is transmitted to the steering wheel which,
in certain circumstances, can cause premature wear of the steering. This means it is
necessary to remove the dirt.
s43s.1.book Page 188 Thursday, May 13, 2010 1:21 PM
Page 191 of 275
Taking care of your vehicle and cleaning the vehicle
190
Upholstery cloth and cloth trim on the d oors, luggage compartment cover, headliner
etc. are best treated with special cleaning products, using if necessary a dry foam and
a soft sponge or brush.
We recommend using a cleaning product from Škoda genuine accessories offered by
your Škoda dealer.
Caution
Solvent-free cleaners attack th e material and can damage it.Fabric covers of electrically heated seatsDo not clean the seat covers moist as this may re sult in damage to the seat heating
system.
Clean such covers using specia l agents, for example dry foam.Natural leather
Natural leather requires quite particular care and attention.Leather should be treated from time to time according the following guidelines
depending on how much it is used.Normal cleaning– Clean soiled areas of the leather with slightly moistened cotton or woollen cloth.Severe soiling– Clean severely soiled areas with a cloth dipped in a mild soapy solution (2 spoon-
fuls of natural soap to 1 litre of water).
– Ensure that the leather is not soaked through at any point and that no water gets into the stitching of the seams.
– Dry off the leather with a soft, dry cloth.
Removing stains– Remove fresh stains which are water-based (e.g. coffee, tea, juices, blood etc.)
with an absorbent cloth or household paper or use the cleaner from the care set
for a stain which has already dried in.
– Remove fresh stains on a fat base (e.g. butter, mayonnaise, chocolate etc.) with an
absorbent cloth or household cleaning paper or with the cleaner from the care set
if the stain has not yet pe netrated into the surface.
– Use a grease dissolver for grease stains which have dried in .
–Eliminate special stains (e.g. ball-point pens, felt pe n, nail varnish, dispersion
paint, shoe cream etc.) with a special stain remover suitable for leather.Leather care– Treat the leather every six months with th e leather care product available from an
authorised Škoda Service Partner.
– Apply only a small amount of the care product.
– Dry the leather off with a soft cloth
It is best to consult an authorised Škod a Service Partner if you have any questions
regarding cleaning and care of the leather interior in your vehicle.
Caution
You must on no account treat the leather wi th solvents (e.g. gasoline, turpentine),
floor wax, shoe cream or such like.
Avoid leaving your vehicle for lengthy period s in bright sunlight in order to avoid
bleaching the leather. If you leave your vehicle parked in the open for lengthy periods,
protect the leather from the direct ra ys of the sun by covering it over.
Sharp-edged objects on items of clothing su ch as zip fasteners, rivets, sharp-edged
belts may leave permanent scratches or signs of rubbing on the surface.Note
Use a care cream with ligh t blocker and impregnation effect regularly and each
time after cleaning the leathe r. The cream nourishes the leather, allows it to breathe
and keeps it supple and also provides mois ture. It also creates surface protection.
s43s.1.book Page 190 Thursday, May 13, 2010 1:21 PM
Page 192 of 275
Taking care of your vehicle and cleaning the vehicle191
Using the system
Safety
Driving Tips
General Maintenance
Breakdown assistance
Technical Data
Clean the leather every 2 to 3 months, remove fresh soiling each time this occurs.
Remove fresh stains such as those from ball-point pens, ink, lipstick, shoe cream
etc., as quickly as possible.
Care also for the leather dye. Refreshen ar eas which have lost their colour with a
special coloured leather cream as required.
The leather is a natural material with specific properties. During the use of the
vehicle, minor optical changes can occur on the leather parts of the covers (e. g wrin-
kles or creases as a result of the stress of the covers).
Seat belts– Keep the seat belts clean!
– Wash seat belts which have become soiled using a mild soapy solution.
– Inspect the seat belts regularly to ensure they are in good condition.
Belt webbing which has become severely so iled may prevent the inertia reel from
reeling up the belt properly.
WARNING
The seat belts must not be removed for cleaning.
Never clean the seat belts chemically as dry cleaning may destroy the fabric.
The seat belts must also not be allowed to come into contact with corrosive
liquids (such as acids etc.).
Seat belts which have damage to the webbing, the connections, the inertia
reel or the lock should be replaced by an authorised Škoda Service Partner.
Inertia reel belts must be completely dried before being reeled up.
s43s.1.book Page 191 Thursday, May 13, 2010 1:21 PM
Page 196 of 275
Fuel195
Using the system
Safety
Driving Tips
General Maintenance
Breakdown assistance
Technical Data
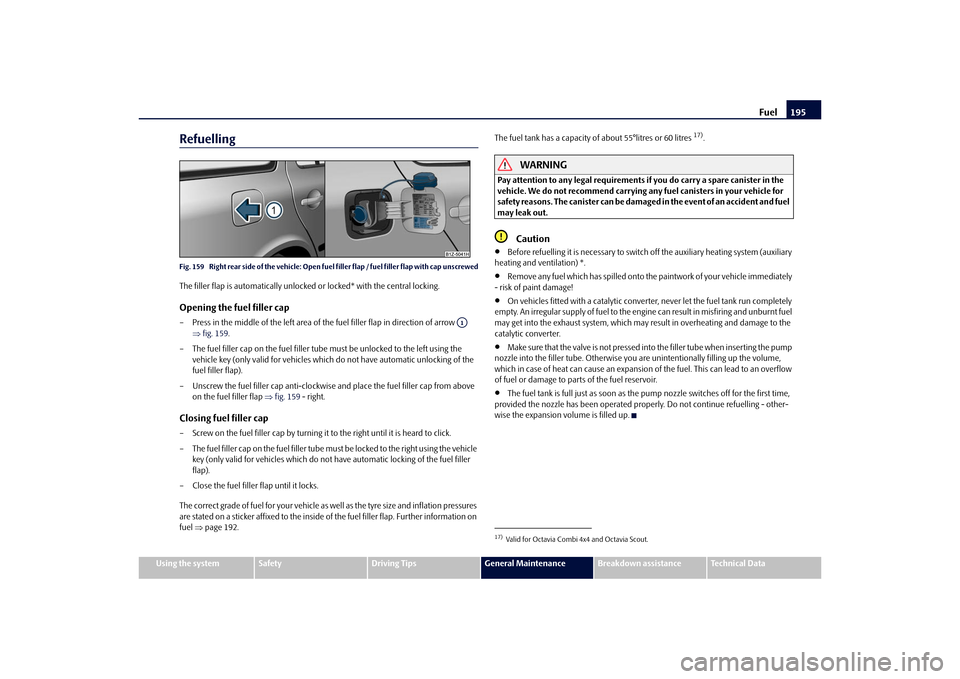
RefuellingFig. 159 Right rear side of the vehicle: Open fuel filler flap / fuel filler flap with cap unscrewedThe filler flap is automatically unlocked or locked* with the central locking.Opening the fuel filler cap– Press in the middle of the left area of the fuel filler flap in direction of arrow
fig. 159 .
– The fuel filler cap on the fuel filler tube must be unlocked to the left using the
vehicle key (only valid for vehicles which do not have automatic unlocking of the
fuel filler flap).
– Unscrew the fuel filler cap anti-clockwise and place the fuel filler cap from above
on the fuel filler flap fig. 159 - right.Closing fuel filler cap– Screw on the fuel filler cap by turning it to the right until it is heard to click.
– The fuel filler cap on the fuel filler tube mu st be locked to the right using the vehicle
key (only valid for vehicles which do not ha ve automatic locking of the fuel filler
flap).
– Close the fuel filler flap until it locks.
The correct grade of fuel for your vehicle as well as the tyre size and inflation pressures
are stated on a sticker affixed to the inside of the fuel filler flap. Further information on
fuel page 192. The fuel tank has a capacity of about 55°litres or 60 litres
17).
WARNING
Pay attention to any legal requirements if
you do carry a spare canister in the
vehicle. We do not recommend carrying any fuel canisters in your vehicle for
safety reasons. The canister can be damaged in the event of an accident and fuel
may leak out.
Caution
Before refuelling it is necessary to switch off the auxiliary heating system (auxiliary
heating and ventilation) *.
Remove any fuel which has spilled onto th e paintwork of your vehicle immediately
- risk of paint damage!
On vehicles fitted with a ca talytic converter, never let the fuel tank run completely
empty. An irregular supply of fuel to the engine can result in misfiring and unburnt fuel
may get into the exhaust system, which may result in overheating and damage to the
catalytic converter.
Make sure that the valve is not pressed into the filler tube when inserting the pump
nozzle into the filler tube. Otherwise you ar e unintentionally filling up the volume,
which in case of heat can cause an expansion of the fuel. This can lead to an overflow
of fuel or damage to parts of the fuel reservoir.
The fuel tank is full just as soon as the pump nozzle switches off for the first time,
provided the nozzle has been operated properly. Do not continue refuelling - other-
wise the expansion volume is filled up.
A1
17)Valid for Octavia Combi 4x4 and Octavia Scout.
s43s.1.book Page 195 Thursday, May 13, 2010 1:21 PM
Page 197 of 275
Inspecting and replenishing
196
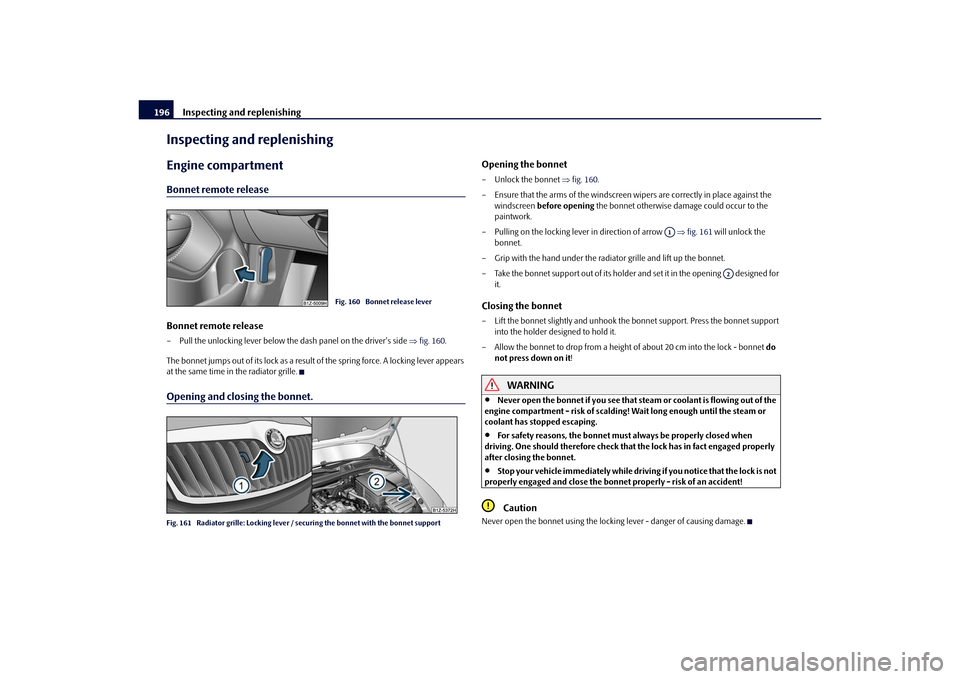
Inspecting and replenishingEngine compartmentBonnet remote releaseBonnet remote release– Pull the unlocking lever below the dash panel on the driver's side fig. 160 .
The bonnet jumps out of its lock as a result of the spring force. A locking lever appears
at the same time in the radiator grille.Opening and closing the bonnet.Fig. 161 Radiator grille: Locking lever / se curing the bonnet with the bonnet support
Opening the bonnet– Unlock the bonnet fig. 160 .
– Ensure that the arms of the windscreen wipers are correctly in place against the windscreen before opening the bonnet otherwise damage could occur to the
paintwork.
– Pulling on the locking leve r in direction of arrow fig. 161 will unlock the
bonnet.
– Grip with the hand under the radiator grille and lift up the bonnet.
– Take the bonnet support out of its holder and set it in the opening designed for
it.Closing the bonnet– Lift the bonnet slightly and unhook the bonnet support. Press the bonnet support into the holder designed to hold it.
– Allow the bonnet to drop from a height of about 20 cm into the lock - bonnet do
not press down on it !
WARNING
Never open the bonnet if you see that steam or coolant is flowing out of the
engine compartment - risk of scalding! Wait long enough until the steam or
coolant has stopped escaping.
For safety reasons, the bonnet must always be properly closed when
driving. One should therefore check that the lock has in fact engaged properly
after closing the bonnet.
Stop your vehicle immediately while driving if you notice that the lock is not
properly engaged and close the bonnet properly - risk of an accident!Caution
Never open the bonnet using the locking lever - danger of causing damage.
Fig. 160 Bonnet release lever
A1
A2
s43s.1.book Page 196 Thursday, May 13, 2010 1:21 PM
Page 198 of 275
Inspecting and replenishing197
Using the system
Safety
Driving Tips
General Maintenance
Breakdown assistance
Technical Data
Working in the engine compartment
Particular care is required when carrying out any work in the engine
compartment!There is a risk of injuries, scalding, acci dents and fire when working in the engine
compartment, e.g. inspecting and replenishing oil and other fluids. For this
reason, it is essential to comply with the warning instructions stated below and
with the general applicable rules of safe ty. The engine compartment of your car
is a hazardous area .
WARNING
Never open the bonnet if you see that steam or coolant is flowing out of the
engine compartment - risk of scalding! Wait long enough until the steam or
coolant has stopped escaping.
Switch off the engine and pull out the ignition key.
Apply the handbrake firmly.
If your vehicle is fitted with a manual gearbox, move the gearshift lever into
Neutral, or if it is fitted with automatic gearbox, move the selector lever into
position P.
Allow the engine to cool down.
Keep children clear of the engine compartment.
Never spill oil and other fluids over the hot engine. Such fluids (e.g. the anti-
freeze contained in the coolant) may ignite!
Avoid short circuits in the electrical system - particularly on the battery.
Never place your hand into the radiator fan as long as the engine is still
warm. The fan might su ddenly start running!
Never open the cap of the coolant expans ion bottle as long as the engine is
still warm. The cooling system is pressurized!
Cover over the cap of the coolant expansion reservoir with a large cloth
when opening it as protection for your face, hands and arms from hot steam or
hot coolant.
Do not let objects, such as e.g cleaning cloth or tools lie in the engine
compartment.
If you wish to work under the vehicl e, you must secure the vehicle from
rolling away and support it with suitable supporting blocks; the lifting jack* is
not sufficient for this - risk of injury!
In cases where it be necessary to carry out inspection work when the engine
is running there is an additional risk fr om rotating parts (e.g. the V-ribbed belt,
alternator, radiator fan) and from the high-voltage ignition system. Please
observe in addition the following:
Never touch the electrical cabl es of the ignition system.
Absolutely avoid any jewellery, loose it ems of clothing or long hair from
getting into the rotating parts of the engine - Hazard! Therefore remove any
jewellery beforehand, tie up your hair and wear tight fitting clothing.
Please also comply with the warnin g instructions stated below when
carrying out any essential work on the fu el system or on the electrical system:
Always separate the car battery from the electrical system.
Do not smoke.
Never carry out any work close to naked flames.
Always keep a working fire extinguisher at hand.Caution
When replenishing fluids in the engine, always ensure that the fluids are on no account
mixed up. This may result in major oper ating problems and also vehicle damage!
WARNING (continued)
s43s.1.book Page 197 Thursday, May 13, 2010 1:21 PM
Page 202 of 275
Inspecting and replenishing201
Using the system
Safety
Driving Tips
General Maintenance
Breakdown assistance
Technical Data
Note
On vehicles which are fitted with an indepe ndent auxiliary heating and ventilation, the
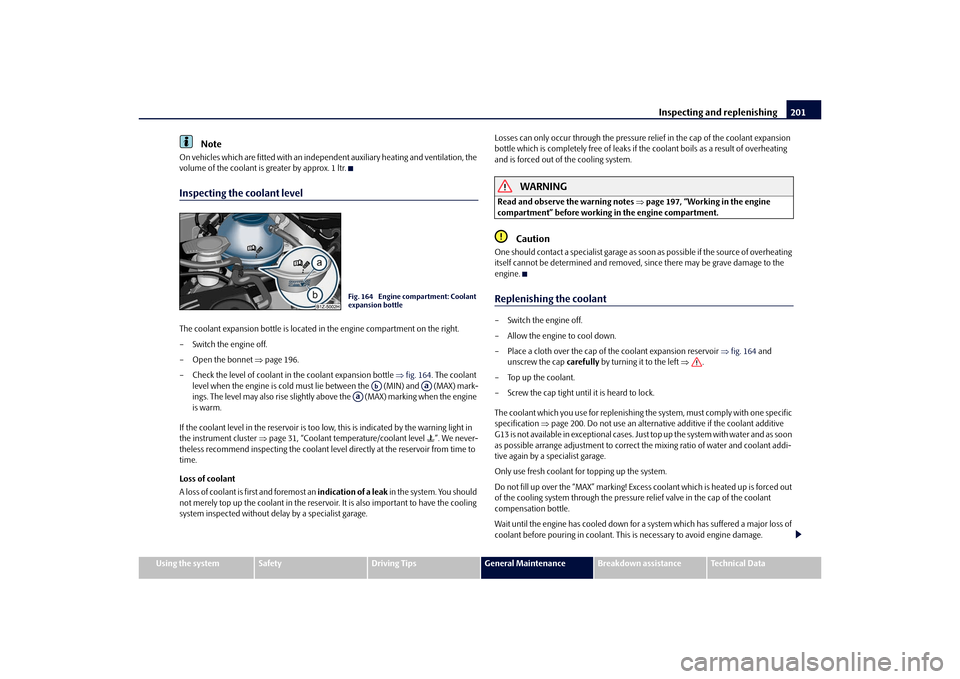
volume of the coolant is greater by approx. 1 ltr.Inspecting the coolant levelThe coolant expansion bottle is located in the engine compartment on the right.
– Switch the engine off.
– Open the bonnet page 196.
– Check the level of coolant in the coolant expansion bottle fig. 164 . The coolant
level when the engine is cold must lie between the (MIN) and (MAX) mark-
ings. The level may also rise slightly above the (MAX) marking when the engine
is warm.
If the coolant level in the reservoir is too lo w, this is indicated by the warning light in
the instrument cluster page 31, “Coolant temperature/coolant level ”. We never-
theless recommend inspecting the coolant leve l directly at the reservoir from time to
time.
Loss of coolant
A loss of coolant is first and foremost an indication of a leak in the system. You should
not merely top up the coolant in the reservoir. It is also important to have the cooling
system inspected without delay by a specialist garage. Losses can only occur through the pressure
relief in the cap of the coolant expansion
bottle which is completely free of leaks if the coolant boils as a result of overheating
and is forced out of the cooling system.
WARNING
Read and observe the warning notes page 197, “Working in the engine
compartment” before working in the engine compartment.
Caution
One should contact a specialist garage as s oon as possible if the source of overheating
itself cannot be determined and removed, since there may be grave damage to the
engine.Replenishing the coolant– Switch the engine off.
– Allow the engine to cool down.
– Place a cloth over the cap of the coolant expansion reservoir fig. 164 and
unscrew the cap carefully by turning it to the left .
–Top up the coolant.
– Screw the cap tight until it is heard to lock.
The coolant which you use for replenishing th e system, must comply with one specific
specification page 200. Do not use an alternative additive if the coolant additive
G13 is not available in exceptional cases. Just top up the system with water and as soon
as possible arrange adjustment to correct the mixing ratio of water and coolant addi-
tive again by a specialist garage.
Only use fresh coolant for topping up the system.
Do not fill up over the “MAX” marking! Excess coolant which is heated up is forced out
of the cooling system through the pressure relief valve in the cap of the coolant
compensation bottle.
Wait until the engine has cooled down for a system which has suffered a major loss of
coolant before pouring in coolant. This is necessary to avoid engine damage.
Fig. 164 Engine compartment: Coolant
expansion bottle
Ab
Aa
Aa
s43s.1.book Page 201 Thursday, May 13, 2010 1:21 PM
Page 204 of 275
Inspecting and replenishing203
Using the system
Safety
Driving Tips
General Maintenance
Breakdown assistance
Technical Data
WARNING
Read and observe the warning notes page 197, “Working in the engine
compartment” before working in the engine compartment.
If the fluid level has dropped below the MIN marking, do not drive any
further - risk of accident! Obtain professional assistance.
Replacing brake fluidBrake fluid absorbs moisture. This causes the fluid to absorb moisture from the
surrounding air over a period of time. Excessive water in the brake fluid may be the
cause of corrosion in the brake system. The water content also lowers the boiling point
of the brake fluid.
One may only use new genuine brake fluid from Škoda Auto. The brake fluid must
comply with one of the following standards or specifications:
VW 50114
FMVSS 116 DOT4
DIN ISO 4925 CLASS 4
We recommend that you have the brake fluid replaced by an authorised Škoda
Service Partner as part of an Inspection Service.
WARNING
Using old brake fluid can result in severe stress on the brakes because of the
formation of vapour bubbles in the br ake system. This greatly impairs the
braking efficiency and thus also the safety of your vehicle.
Caution
Brake fluid damages the paintwork of the vehicle.
For the sake of the environment
In view of the problems involved with proper disposal of brake fluid, the special tools
and the professional knowledge required, you should have the brake fluid replaced by
a Škoda Service Partner.
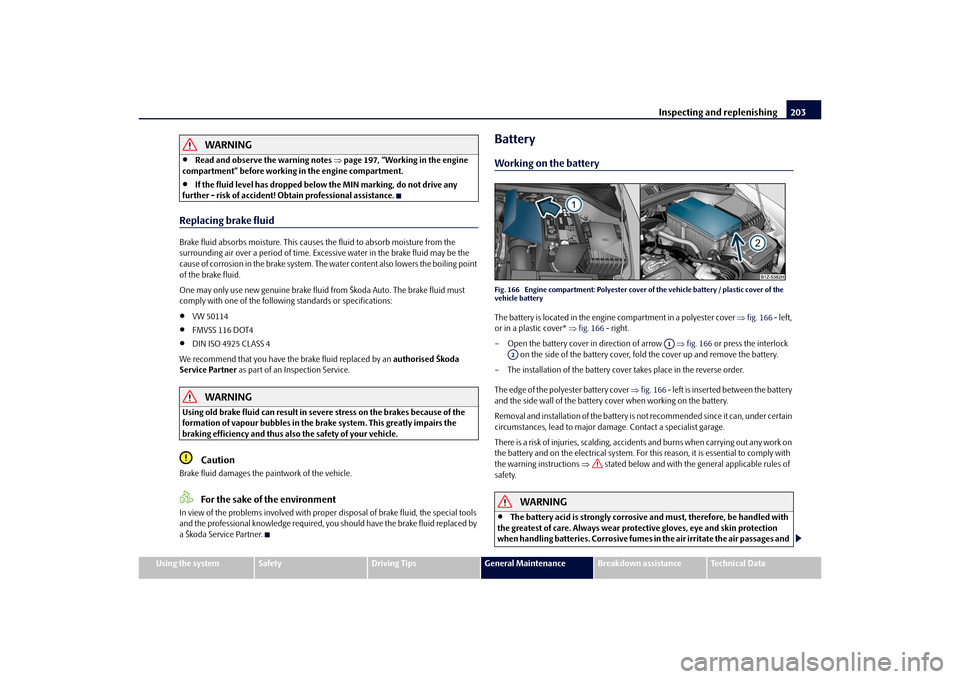
BatteryWorking on the batteryFig. 166 Engine compartment: Polyester cover of the vehicle battery / plastic cover of the
vehicle batteryThe battery is located in the engine compartment in a polyester cover fig. 166 - left,
or in a plastic cover* fig. 166 - right.
– Open the battery cover in direction of arrow fig. 166 or press the interlock
on the side of the battery cover, fold the cover up and remove the battery.
– The installation of the battery co ver takes place in the reverse order.
The edge of the polyester battery cover fig. 166 - left is inserted between the battery
and the side wall of the battery co ver when working on the battery.
Removal and installation of the battery is not recommended since it can, under certain
circumstances, lead to major dama ge. Contact a specialist garage.
There is a risk of injuries, scalding, accidents and burns when carrying out any work on
the battery and on the electrical system. For th is reason, it is essential to comply with
the warning instructions stated below and with the general applicable rules of
safety.
WARNING
The battery acid is strongly corrosive and must, therefore, be handled with
the greatest of care. Always wear prot ective gloves, eye and skin protection
when handling batteries. Corrosive fumes in the air irritate the air passages and
A1
A2
s43s.1.book Page 203 Thursday, May 13, 2010 1:21 PM