seat adjustment SKODA OCTAVIA 2010 2.G / (1Z) Owner's Manual
[x] Cancel search | Manufacturer: SKODA, Model Year: 2010, Model line: OCTAVIA, Model: SKODA OCTAVIA 2010 2.G / (1Z)Pages: 275, PDF Size: 16.43 MB
Page 10 of 275
Cockpit9
Using the system
Safety
Driving Tips
General Maintenance
Breakdown assistance
Technical Data
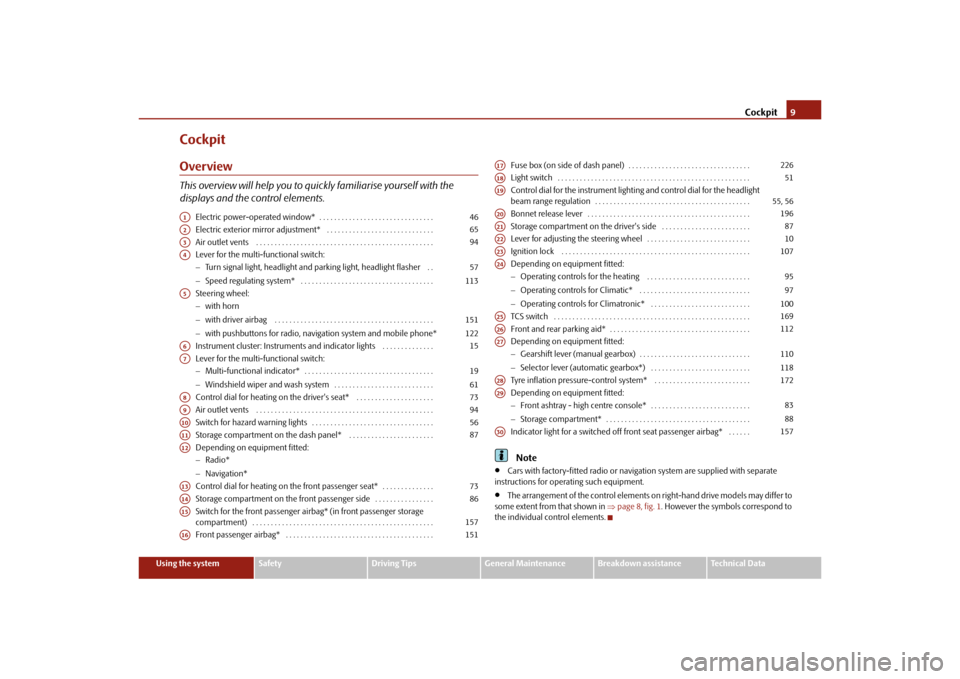
CockpitOverviewThis overview will help you to quic kly familiarise yourself with the
displays and the control elements.
Electric power-operated window* . . . . . . . . . . . . . . . . . . . . . . . . . . . . . . .
Electric exterior mirror adjustment* . . . . . . . . . . . . . . . . . . . . . . . . . . . . .
Air outlet vents . . . . . . . . . . . . . . . . . . . . . . . . . . . . . . . . . . . . . . . . . . . . . . . .
Lever for the multi-functional switch:
Turn signal light, headlight and parking light, headlight flasher . .
Speed regulating system* . . . . . . . . . . . . . . . . . . . . . . . . . . . . . . . . . . . .
Steering wheel:
with horn
with driver airbag . . . . . . . . . . . . . . . . . . . . . . . . . . . . . . . . . . . . . . . . . . .
with pushbuttons for radio, navi gation system and mobile phone*
Instrument cluster: Instruments and indicator lights . . . . . . . . . . . . . .
Lever for the multi-functional switch:
Multi-functional indicator* . . . . . . . . . . . . . . . . . . . . . . . . . . . . . . . . . . .
Windshield wiper and wash system . . . . . . . . . . . . . . . . . . . . . . . . . . .
Control dial for heating on the driver's seat* . . . . . . . . . . . . . . . . . . . . .
Air outlet vents . . . . . . . . . . . . . . . . . . . . . . . . . . . . . . . . . . . . . . . . . . . . . . . .
Switch for hazard warning lights . . . . . . . . . . . . . . . . . . . . . . . . . . . . . . . . .
Storage compartment on the dash panel* . . . . . . . . . . . . . . . . . . . . . . .
Depending on equipment fitted:
Radio*
Navigation*
Control dial for heating on the front passenger seat* . . . . . . . . . . . . . .
Storage compartment on the front passenger side . . . . . . . . . . . . . . . .
Switch for the front passenger ai rbag* (in front passenger storage
compartment) . . . . . . . . . . . . . . . . . . . . . . . . . . . . . . . . . . . . . . . . . . . . . . . . .
Front passenger airbag* . . . . . . . . . . . . . . . . . . . . . . . . . . . . . . . . . . . . . . . . Fuse box (on side of dash panel) . . . . . . . . . . . . . . . . . . . . . . . . . . . . . . . . .
Light switch . . . . . . . . . . . . . . . . . . . . . . . . . . . . . . . . . . . . . . . . . . . . . . . . . . . .
Control dial for the instrument lighting and control dial for the headlight
beam range regulation . . . . . . . . . . . . . . . . . . . . . . . . . . . . . . . . . . . . . . . . . .
Bonnet release lever . . . . . . . . . . . . . . . . . . . . . . . . . . . . . . . . . . . . . . . . . . . .
Storage compartment on the driver's side . . . . . . . . . . . . . . . . . . . . . . . .
Lever for adjusting the steering wheel . . . . . . . . . . . . . . . . . . . . . . . . . . . .
Ignition lock . . . . . . . . . . . . . . . . . . . . . . . . . . . . . . . . . . . . . . . . . . . . . . . . . . .
Depending on equipment fitted:
Operating controls for the heating . . . . . . . . . . . . . . . . . . . . . . . . . . . .
Operating controls for Climatic* . . . . . . . . . . . . . . . . . . . . . . . . . . . . . .
Operating controls for Climatronic* . . . . . . . . . . . . . . . . . . . . . . . . . . .
TCS switch . . . . . . . . . . . . . . . . . . . . . . . . . . . . . . . . . . . . . . . . . . . . . . . . . . . . .
Front and rear parking aid* . . . . . . . . . . . . . . . . . . . . . . . . . . . . . . . . . . . . . .
Depending on equipment fitted:
Gearshift lever (manual gearbox) . . . . . . . . . . . . . . . . . . . . . . . . . . . . . .
Selector lever (automatic gearbox*) . . . . . . . . . . . . . . . . . . . . . . . . . . .
Tyre inflation pressure-control system* . . . . . . . . . . . . . . . . . . . . . . . . . .
Depending on equipment fitted:
Front ashtray - high centre console* . . . . . . . . . . . . . . . . . . . . . . . . . . .
Storage compartment* . . . . . . . . . . . . . . . . . . . . . . . . . . . . . . . . . . . . . . .
Indicator light for a switched off front seat passenger airbag* . . . . . .
Note
Cars with factory-fitted radio or naviga tion system are supplied with separate
instructions for operating such equipment.
The arrangement of the control elements on right-hand drive models may differ to
some extent from that shown in page 8, fig. 1 . However the symbols correspond to
the individual control elements.
A1
46
A2
65
A3
94
A4
57113
A5
151122
A6
15
A7
1961
A8
73
A9
94
A10
56
A11
87
A12A13
73
A14
86
A15
157
A16
151
A17
226
A18
51
A19
55, 56
A20
196
A21
87
A22
10
A23
107
A24
9597100
A25
169
A26
112
A27
110118
A28
172
A29
8388
A30
157
s43s.1.book Page 9 Thursday, May 13, 2010 1:21 PM
Page 12 of 275
The brief instruction11
Using the system
Safety
Driving Tips
General Maintenance
Breakdown assistance
Technical Data
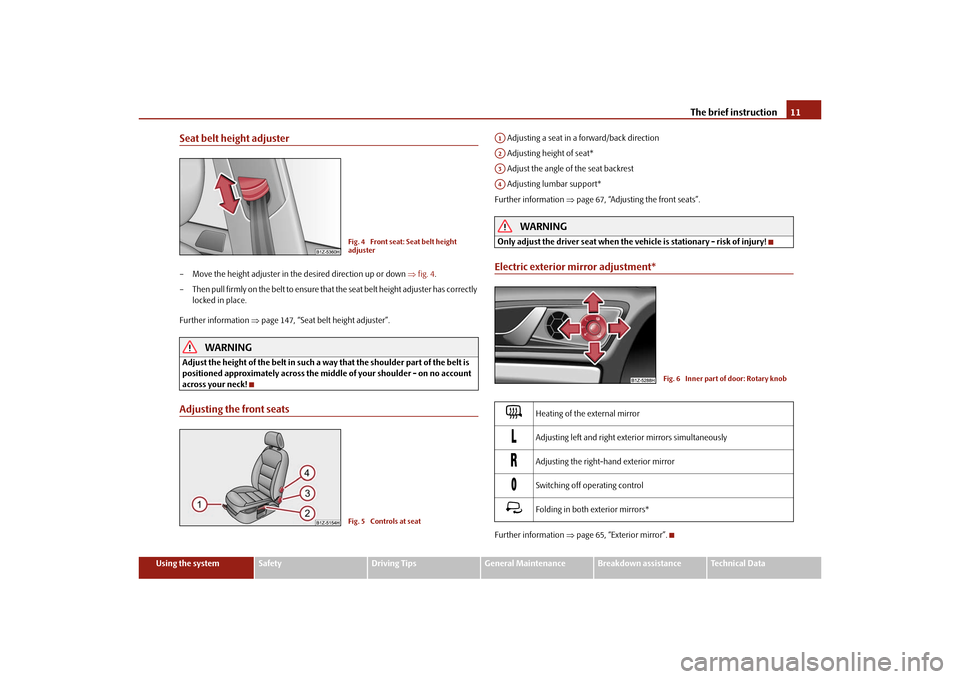
Seat belt height adjuster– Move the height adjuster in the desired direction up or down fig. 4 .
– Then pull firmly on the belt to ensure that the seat belt height adjuster has correctly
locked in place.
Further information page 147, “Seat belt height adjuster”.
WARNING
Adjust the height of the belt in such a way that the shoulder part of the belt is
positioned approximately across the middle of your shoulder - on no account
across your neck!Adjusting the front seats
Adjusting a seat in a forward/back direction
Adjusting height of seat*
Adjust the angle of the seat backrest
Adjusting lumbar support*
Further information page 67, “Adjusting the front seats”.
WARNING
Only adjust the driver seat when the ve hicle is stationary - risk of injury!Electric exterior mirror adjustment*Further information page 65, “Exterior mirror”.
Fig. 4 Front seat: Seat belt height
adjusterFig. 5 Controls at seat
Heating of the external mirror
Adjusting left and right exterior mirrors simultaneously
Adjusting the right-hand exterior mirror
Switching off operating control
Folding in both exterior mirrors*
A1A2A3A4
Fig. 6 Inner part of door: Rotary knob
s43s.1.book Page 11 Thursday, May 13, 2010 1:21 PM
Page 27 of 275
Instruments and warning lights
26
Lights and Visibility
Here you can set how long the light should stay on for the function Coming/Leaving
Home. Furthermore you can here switch on or off the functions daylight driving lights
and convenience turn signal.
After selecting the menu point Fa ct or y se t ting the factory setting of the lighting is
established again.
Time
Here you can set the time, the time format (12 or 24 hour indicator) and the time
change summer/winter time.
Winter tyres
Here you can set at which speed a warning si gnal should sound. This function is used
for e.g winter tyres with the permissibl e maximum speed less than the maximum
speed of the vehicle.
When exceeding the speed, the following is displayed on the information display*:
Winter tyres max. speed ... km/h
Measures
Here you can set the units for temperature, consumption and distance driven. Assistant
Here you can adjust the tones of the
acoustic signals of the parking aid*.
Second speed
Here you can switch on the display of the second speed in mph or in km/h
3).
Service
Here you can have the kilometers still to be driven and the days until the following
service interval shown and the Service Interval Display reset.
Factory Setting
After selecting the menu point Factory Setting the factory setting of the information
display is established again.
Mirror down
Here you can switch on or off the function for mirror low-
ering on the front passenger side when engaging the
reverse gear
a).
Mirror adjust.
Here you can switch on or off the function for left and right
exterior mirror adjustment simultaneously.
Fa cto r y se tt ing
After selecting this menu the convenience setting is reset
to factory setting. The following is displayed in the infor-
mation display:
Convenience factory settings restored
a)This function is only available on vehicles with an electrically adjustable driver seat.
3)Valid for countries where the values are indicated in British measuring units.
s43s.1.book Page 26 Thursday, May 13, 2010 1:21 PM
Page 57 of 275
Lights and Visibility
56
Headlamp range adjustment
Once the low beam is switched on you can then adapt the range of the
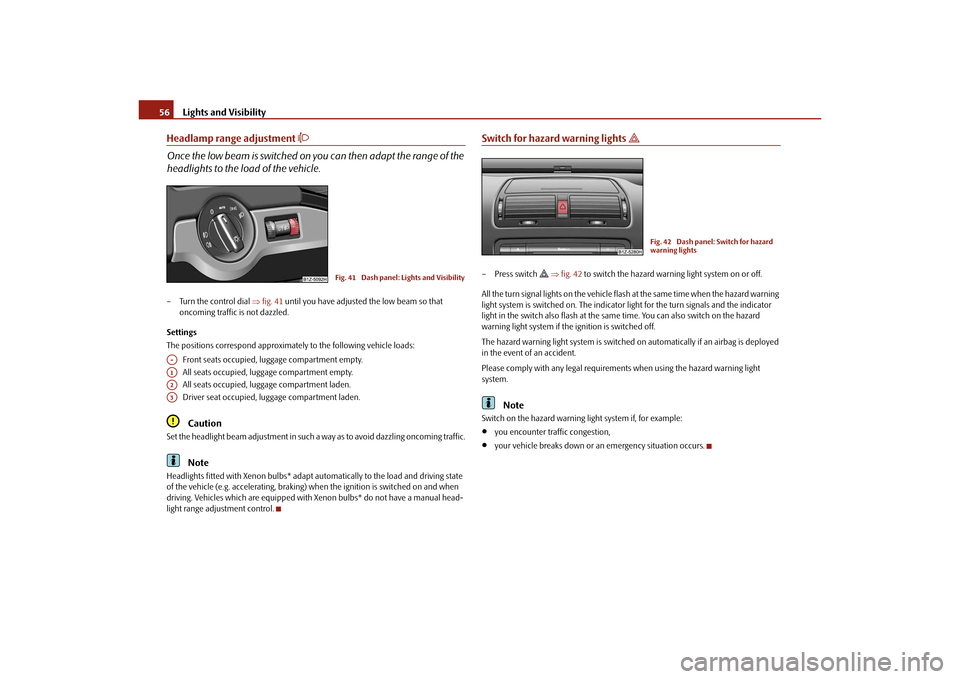
headlights to the lo ad of the vehicle.– Turn the control dial fig. 41 until you have adjusted the low beam so that
oncoming traffic is not dazzled.
Settings
The positions correspond approximately to the following vehicle loads:
Front seats occupied, luggage compartment empty.
All seats occupied, luggage compartment empty.
All seats occupied, luggage compartment laden.
Driver seat occupied, lu ggage compartment laden.
Caution
Set the headlight beam adjustment in such a way as to avoid dazzling oncoming traffic.
Note
Headlights fitted with Xenon bulbs* adapt automatically to the load and driving state
of the vehicle (e.g. accelerating, braking) wh en the ignition is switched on and when
driving. Vehicles which are equipped with Xenon bulbs* do not have a manual head-
light range adjustment control.
Switch for hazard warning lights
– Press switch
fig. 42 to switch the hazard warning light system on or off.
All the turn signal lights on the vehicle flas h at the same time when the hazard warning
light system is switched on. The indicator light for the turn signals and the indicator
light in the switch also flash at the same time. You can also switch on the hazard
warning light system if the ignition is switched off.
The hazard warning light system is switched on automatically if an airbag is deployed
in the event of an accident.
Please comply with any legal requirements when using the hazard warning light
system.
Note
Switch on the hazard warning light system if, for example:
you encounter traffic congestion,
your vehicle breaks down or an emergency situation occurs.
Fig. 41 Dash panel: Lights and Visibility
A-A1A2A3
Fig. 42 Dash panel: Switch for hazard
warning lights
s43s.1.book Page 56 Thursday, May 13, 2010 1:21 PM
Page 68 of 275
Seats and Stowage67
Using the system
Safety
Driving Tips
General Maintenance
Breakdown assistance
Technical Data
Seats and StowageFront seatsBasic informationThe front seats have a wide range of differ ent settings and can thus be matched to the
physical characteristics of the driver and front passenger. Correct adjustment of the
seats is particularly important for:
safely and quickly reaching the controls,
a relaxed, fatigue-free body position,
achieving the maximum protection offered by the seat belts and the airbag
system.
WARNING
Never transport more occupants than the maximum seating in the vehicle.
Each occupant must correctly fasten the seat belt belonging to the seat.
Children must be fastened page 159, “Transporting children safely” with a
suitable restraint system.
The front seats and the head restraints must always be adjusted to match
the body size of the seat occupant as well as the seat belts must always be
correctly fastened in order to provide an optimal protection for you and your
occupants.
Always keep your feet in the footwell when the vehicle is being driven -
never place your feet on the instrument panel, out of the window or on the
surfaces of the seats. This is particular ly important for the front seat passenger.
You will be exposed to increased risk of injury if it becomes necessary to apply
the brake or in the event of an accident. If an airbag is deployed, you may suffer
fatal injuries when adopting an incorrect seated position!
It is important for the driver and front passenger to maintain a distance of at
least 25 cm from the steering wheel or dash panel. Not maintaining this
minimum distance will mean that the airbag system will not be able to properly
protect you - hazard! The front seats and the head restraints must always also
be correctly adjusted to match the body size of the occupant.
Ensure that there are no objects in the footwell as any objects may get
behind the pedals during a driving or braking manoeuvre. You would then no
longer be able to operate the clutch, to brake or accelerate.
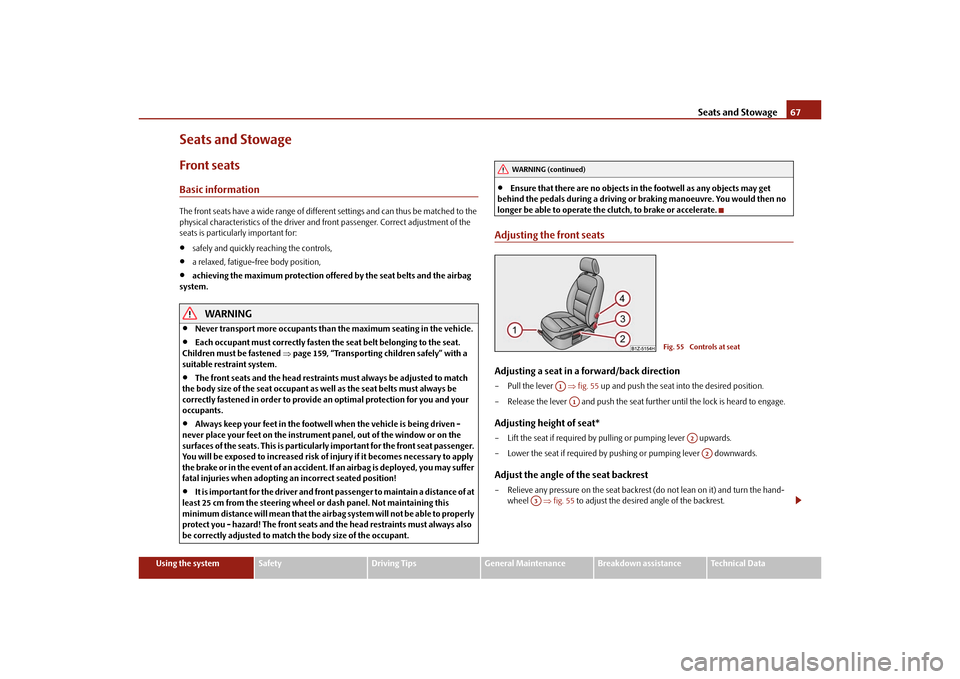
Adjusting the front seatsAdjusting a seat in a forward/back direction–Pull the lever fig. 55 up and push the seat into the desired position.
– Release the lever and push the seat further until the lock is heard to engage.Adjusting height of seat*– Lift the seat if required by pulling or pumping lever upwards.
– Lower the seat if required by pushing or pumping lever downwards.Adjust the angle of the seat backrest– Relieve any pressure on the seat backrest (do not lean on it) and turn the hand- wheel fig. 55 to adjust the desired angle of the backrest.
WARNING (continued)
Fig. 55 Controls at seat
A1A1
A2A2
A3
s43s.1.book Page 67 Thursday, May 13, 2010 1:21 PM
Page 70 of 275
Seats and Stowage69
Using the system
Safety
Driving Tips
General Maintenance
Breakdown assistance
Technical Data
The seat backrests must not be angled too far back when driving otherwise
this will affect proper operation of the se at belts and of the airbag system - risk
of injury!Note
If the movement of the seat is inadverten tly interrupted during an adjustment, once
again press the switch in the appropriate di rection and continue with the adjustment
of the seat to the end.Storing settingStoring seat and exterior mirror settings for driving forward– Switch on the ignition.
– Adjust the seat page 68.
– Adjust both exterior mirrors page 65.
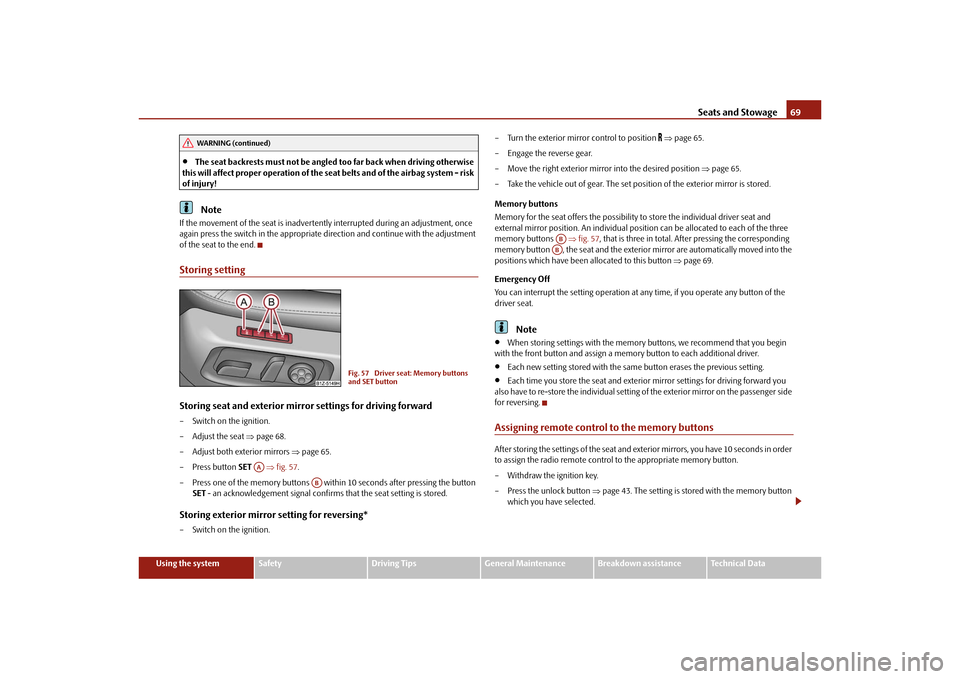
– Press button SET fig. 57 .
– Press one of the memory buttons with in 10 seconds after pressing the button
SET - an acknowledgement signal confirms that the seat setting is stored.Storing exterior mirror setting for reversing*– Switch on the ignition. – Turn the exterior mirror control to position
page 65.
– Engage the reverse gear.
– Move the right exterior mirror into the desired position page 65.
– Take the vehicle out of gear. The set posi tion of the exterior mirror is stored.
Memory buttons
Memory for the seat offers the possibility to store the individual driver seat and
external mirror position. An individual posi tion can be allocated to each of the three
memory buttons fig. 57 , that is three in total. Af ter pressing the corresponding
memory button , the seat and the exterior mirror are automatically moved into the
positions which have been allocated to this button page 69.
Emergency Off
You can interrupt the setting operation at any time, if you operate any button of the
driver seat.
Note
When storing settings with the memory buttons, we recommend that you begin
with the front button and assign a memory button to each additional driver.
Each new setting stored with the same button erases the previous setting.
Each time you store the seat and exterior mirror settings for driving forward you
also have to re-store the individual setting of the exterior mirror on the passenger side
for reversing.
Assigning remote control to the memory buttonsAfter storing the settings of the seat and exterior mirrors, you have 10 seconds in order
to assign the radio remote control to the appropriate memory button.
– Withdraw the ignition key.
– Press the unlock button page 43. The setting is stored with the memory button
which you have selected.
WARNING (continued)
Fig. 57 Driver seat: Memory buttons
and SET button
AA
AB
ABAB
s43s.1.book Page 69 Thursday, May 13, 2010 1:21 PM
Page 143 of 275
Passive Safety
142
Ensure that all the windows offer a good visibility to the outside.
Safely attach the items of luggage page 74, “Loading the luggage compartment”.
Ensure that no objects can obstruct the pedal.
Adjust the mirror, the front seat and the head restraint to match your body size.
Point out to your occupants that the head restraints must be adjusted to match
their body size.
Protect the children in suitable child seats with correctly fastened seat belts
page 159, “Transporting children safely”.
Adopt the correct seated position page 142, “Correct seated position”. Also
inform your occupants to adopt the correct seated position.
Fasten the seat belt correctly. Also inform your occupants to properly fasten the
seat belts page 147, “How are seat belts correctly fastened?”.
What influences the driving safety?
The driving safety is primarily determined by the style of driving and the
personal behaviour of all the occupants.The driver is fully responsible for himself an d his occupants. If your driving safety is
effected, you place yourself and the oncomi ng traffic at risk. Please refer to the
following guidelines.
Do not get distracted from concentrating on the traffic situation, e.g. by your occu-
pants or mobile phone calls.
Never drive when your driving ability is impaired, e.g. through medication, alcohol,
drugs.
Keep to the traffic regulations and the permissible speed limit.
Adjust the driving speed at all times to the road condition as well as to the traffic
and weather conditions.
Take regular breaks on long journe ys - at the latest every two hours.
Correct seated positionCorrect seated position for the driver
Correct seated position for the driver is important for safe and relaxed
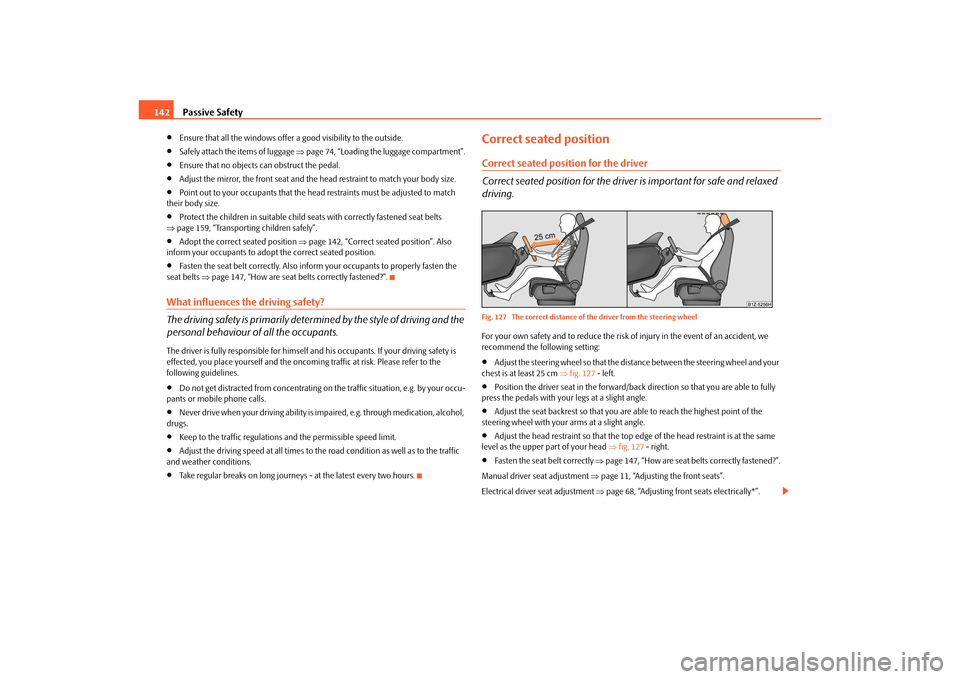
driving.Fig. 127 The correct distance of the driver from the steering wheelFor your own safety and to reduce the risk of injury in the event of an accident, we
recommend the following setting:
Adjust the steering wheel so that the distance between the steering wheel and your
chest is at least 25 cm fig. 127 - left.
Position the driver seat in the forward/back direction so that you are able to fully
press the pedals with your legs at a slight angle.
Adjust the seat backrest so that you are able to reach the highest point of the
steering wheel with your arms at a slight angle.
Adjust the head restraint so that the top edge of the head restraint is at the same
level as the upper part of your head fig. 127 - right.
Fasten the seat belt correctly page 147, “How are seat belts correctly fastened?”.
Manual driver se at adjustment page 11, “Adjusting the front seats”.
Electrical driver seat adjustment page 68, “Adjusting front seats electrically*”.
s43s.1.book Page 142 Thursday, May 13, 2010 1:21 PM
Page 144 of 275
Passive Safety143
Using the system
Safety
Driving Tips
General Maintenance
Breakdown assistance
Technical Data
WARNING
The front seats and the head restraints must always be adjusted to match
the body size of the seat occupant as well as the seat belts must always be
correctly fastened in order to provide an optimal protection for you and your
occupants.
The driver must maintain a distance of at least 25 cm to the steering wheel
page 142, fig. 127 left. Not maintaining this minimum distance will mean
that the airbag system will not be able to properly protect you - hazard!
When driving, hold the st eering wheel with both hands firmly on the outer
edge in the 9 o'clock and 3 o'clock po sition. Never hold the steering wheel
firmly in the 12 o'clock position or in another way (e.g. in the middle of the
steering wheel or at the inner steering wheel edge). In such cases, injuries to the
arms, the hands and the head can occur when the driver airbag is deployed.
The seat backrests must not be angled too far back when driving otherwise
this will affect proper operation of the se at belts and of the airbag system - risk
of injury!
Ensure that there are no objects in the footwell as any objects may get
behind the pedals during a driving or braking manoeuvre. You would then no
longer be able to operate the clutch, to brake or accelerate.
Correct seated position for the front passenger
The fro n t p assen ger must mai n tai n a d i stan ce of a t l ea st 25 c m from th e
dash panel so that the airbag offers him the greatest possible safety it is
deployed.For the safety of the front passenger and to reduce the risk of injury in the event of an
accident, we recommend the following setting:
Adjust the front passenger seat as far as possible to the rear.
Adjust the head restraint so that the top edge of the head restraint is at the same
level as the upper part of your head page 142, fig. 127 - right.
Fasten the seat belt correctly page 147, “How are seat belts correctly fastened?”.
In exceptional cases the front pass enger airbag can be deactivated page 157,
“Deactivating an airbag”. Manual front passenger adjustment
page 11, “Adjusting the front seats”.
Electrical front passenger seat adjustment page 68, “Adjusting front seats electri-
cally*”.
WARNING
The front seats and the head restraints must always be adjusted to match
the body size of the seat occupant as well as the seat belts must always be
correctly fastened in order to provide an optimal protection for you and your
occupants.
The front passenger must maintain a distance of at least 25 cm to the dash
panel. Not maintaining this minimum distance will mean that the airbag
system will not be able to properly protect you - hazard!
Always keep your feet in the footwel l when the vehicle is being driven -
never place your feet on the instrument panel, out of the window or on the
surfaces of the seats. You will be exposed to increased risk of injury if it becomes
necessary to apply the brake or in the ev ent of an accident. If an airbag is
deployed, you may suffer fatal injuries wh en adopting an incorrect seated posi-
tion!
The seat backrests must not be angled too far back when driving otherwise
this will affect proper operation of the se at belts and of the airbag system - risk
of injury!
Correct seated position for the occupants on the rear seats
Occupants on the rear seats must sit upright, keep the feet in the foot-
well and must have their se at belts correctly fastened.To reduce the risk of injury in the event of a sudden braking manoeuvre or an accident,
the occupants on the rear seats must observe the following:
Adjust the head restraints so that the top edge of the head restraints is at the same
level as the upper part of your head page 142, fig. 127 - on the right.
Fasten the seat belt correctly page 147, “How are seat belts correctly fastened?”.
If you are transporting page 159, “Transporting children safely” children in the
vehicle, please use a suitable child restraint system.
s43s.1.book Page 143 Thursday, May 13, 2010 1:21 PM
Page 155 of 275
Airbag system
154
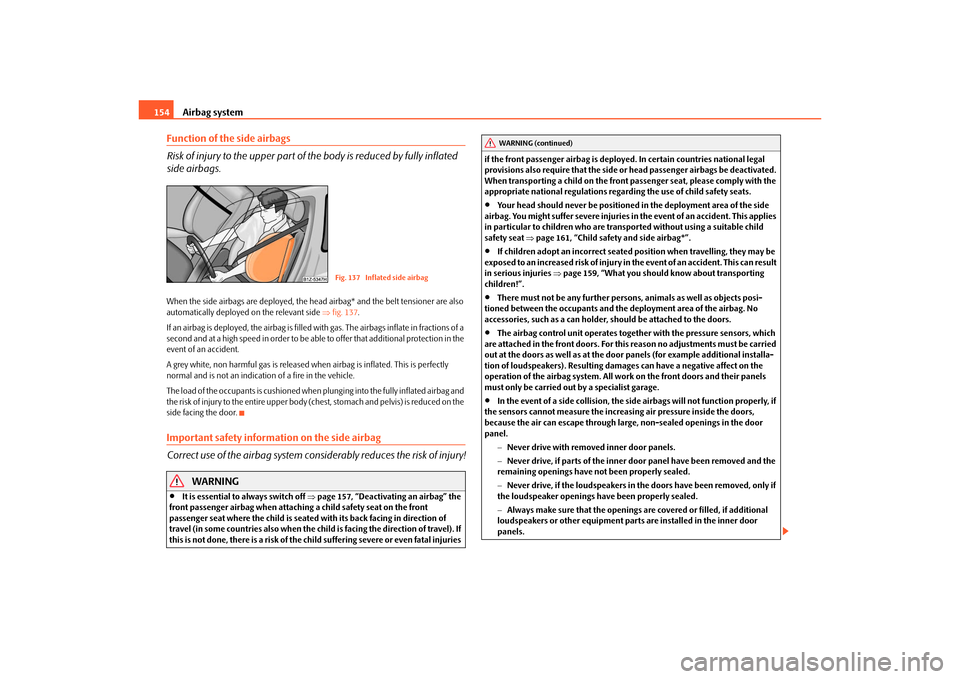
Function of the side airbags
Risk of injury to the upper part of the body is reduced by fully inflated
side airbags.When the side airbags are deployed, the head airbag* and the belt tensioner are also
automatically deployed on the relevant side fig. 137 .
If an airbag is deployed, the airbag is filled with gas. The airbags inflate in fractions of a
second and at a high speed in order to be able to offer that additional protection in the
event of an accident.
A grey white, non harmful gas is released when airbag is inflated. This is perfectly
normal and is not an indicati on of a fire in the vehicle.
The load of the occupants is cushioned when plunging into the fully inflated airbag and
the risk of injury to the entire upper body (chest, stomach and pelvis) is reduced on the
side facing the door.Important safety information on the side airbag
Correct use of the airbag system cons iderably reduces the risk of injury!
WARNING
It is essential to always switch off page 157, “Deactivating an airbag” the
front passenger airbag when attachin g a child safety seat on the front
passenger seat where the child is seated with its back facing in direction of
travel (in some countries also when the child is facing the direction of travel). If
this is not done, there is a risk of the ch ild suffering severe or even fatal injuries if the front passenger airbag is deploy
ed. In certain countries national legal
provisions also require that the side or head passenger airbags be deactivated.
When transporting a child on the front passenger seat, please comply with the
appropriate national regulations regarding the use of child safety seats.
Your head should never be positioned in the deployment area of the side
airbag. You might suffer severe injuries in the event of an accident. This applies
in particular to children who are transported without using a suitable child
safety seat page 161, “Child safety and side airbag*”.
If children adopt an incorrect seated position when travelling, they may be
exposed to an increased risk of injury in the event of an accident. This can result
in serious injuries page 159, “What you should know about transporting
children!”.
There must not be any further persons, animals as well as objects posi-
tioned between the occupants and the deployment area of the airbag. No
accessories, such as a can holder, should be attached to the doors.
The airbag control unit operates togeth er with the pressure sensors, which
are attached in the front doors. For this reason no adjustments must be carried
out at the doors as well as at the door panels (for example additional installa-
tion of loudspeakers). Resulting damage s can have a negative affect on the
operation of the airbag system. All work on the front doors and their panels
must only be carried out by a specialist garage.
In the event of a side collision, the side airbags will not function properly, if
the sensors cannot measure the increasi ng air pressure inside the doors,
because the air can escape through lar ge, non-sealed openings in the door
panel.
Never drive with removed inner door panels.
Never drive, if parts of the inner do or panel have been removed and the
remaining openings have not been properly sealed.
Never drive, if the loudspeakers in the doors have been removed, only if
the loudspeaker openings have been properly sealed.
Always make sure that the openings are covered or filled, if additional
loudspeakers or other equipment part s are installed in the inner door
panels.
Fig. 137 Inflated side airbag
WARNING (continued)
s43s.1.book Page 154 Thursday, May 13, 2010 1:21 PM
Page 157 of 275
Airbag system
156
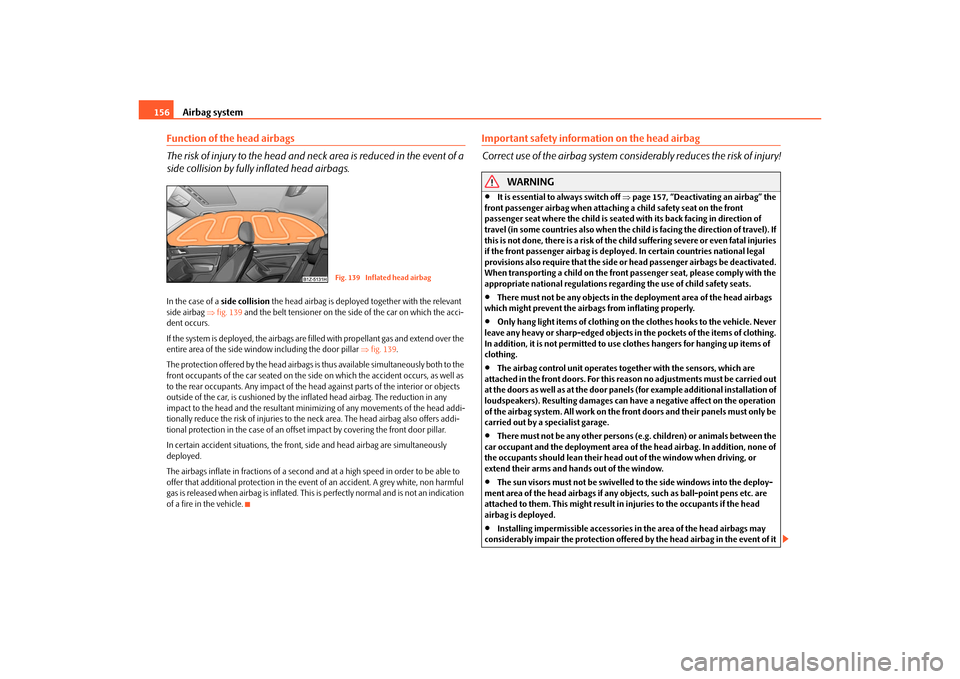
Function of the head airbags
The risk of injury to the head and neck area is reduced in the event of a
side collision by fully inflated head airbags.In the case of a side collision the head airbag is deployed together with the relevant
side airbag fig. 139 and the belt tensioner on the side of the car on which the acci-
dent occurs.
If the system is deployed, the airbags are filled with propellant gas and extend over the
entire area of the side wind ow including the door pillar fig. 139 .
The protection offered by the head airbags is thus available simultaneously both to the
front occupants of the car seated on the side on which the accident occurs, as well as
to the rear occupants. Any impact of the head against parts of the interior or objects
outside of the car, is cushioned by the in flated head airbag. The reduction in any
impact to the head and the resultant minimi zing of any movements of the head addi-
tionally reduce the risk of injuries to the neck area. The head airbag also offers addi-
tional protection in the case of an offset impact by covering the front door pillar.
In certain accident situations, the front, side and head airbag are simultaneously
deployed.
The airbags inflate in fractions of a second an d at a high speed in order to be able to
offer that additional protection in the even t of an accident. A grey white, non harmful
gas is released when airbag is inflated. This is perfectly normal and is not an indication
of a fire in the vehicle.
Important safety information on the head airbag
Correct use of the airbag system cons iderably reduces the risk of injury!
WARNING
It is essential to always switch off page 157, “Deactivating an airbag” the
front passenger airbag when attaching a child safety seat on the front
passenger seat where the child is seated with its back facing in direction of
travel (in some countries also when the chil d is facing the direction of travel). If
this is not done, there is a risk of the ch ild suffering severe or even fatal injuries
if the front passenger airbag is deploy ed. In certain countries national legal
provisions also require that the side or head passenger airbags be deactivated.
When transporting a child on the front passenger seat, please comply with the
appropriate national regulations regarding the use of child safety seats.
There must not be any objects in the deployment area of the head airbags
which might prevent the airbags from inflating properly.
Only hang light items of clothing on the clothes hooks to the vehicle. Never
leave any heavy or sharp-edged objects in the pockets of the items of clothing.
In addition, it is not permitted to use clothes hangers for hanging up items of
clothing.
The airbag control unit operates to gether with the sensors, which are
attached in the front doors. For this reason no adjustments must be carried out
at the doors as well as at the door panels (for example additional installation of
loudspeakers). Resulting damages can have a negative affect on the operation
of the airbag system. All work on the front doors and their panels must only be
carried out by a specialist garage.
There must not be any other persons (e.g. children) or animals between the
car occupant and the deployment area of the head airbag. In addition, none of
the occupants should lean their head out of the window when driving, or
extend their arms and hands out of the window.
The sun visors must not be swivelled to the side windows into the deploy-
ment area of the head airbags if any objects, such as ball-point pens etc. are
attached to them. This might result in injuries to the occupants if the head
airbag is deployed.
Installing impermissible accessories in the area of the head airbags may
considerably impair the protection offered by the head airbag in the event of it
Fig. 139 Inflated head airbag
s43s.1.book Page 156 Thursday, May 13, 2010 1:21 PM