low beam SKODA OCTAVIA 2011 2.G / (1Z) User Guide
[x] Cancel search | Manufacturer: SKODA, Model Year: 2011, Model line: OCTAVIA, Model: SKODA OCTAVIA 2011 2.G / (1Z)Pages: 248, PDF Size: 3.79 MB
Page 53 of 248
Reading lights
–
Press switch B to switch the reading light on/off.
If operating lights with the door contact switch is enabled (switch A is in position
), the light will come on when:
● the vehicle is unlocked,
● one of the doors is opened,
● or the ignition key is removed.
If operating lights with the door contact switch is enabled (switch A is in position
), the light will turn off when:
● the vehicle is locked,
● the ignition is switched on,
● about 30 seconds after all the doors have been closed.
If a door remains open, or if the switch A is in position
, the interior lighting
goes out after 10
minutes to prevent the battery from discharging. Note
We recommend having these bulbs replaced by a specialist garage.
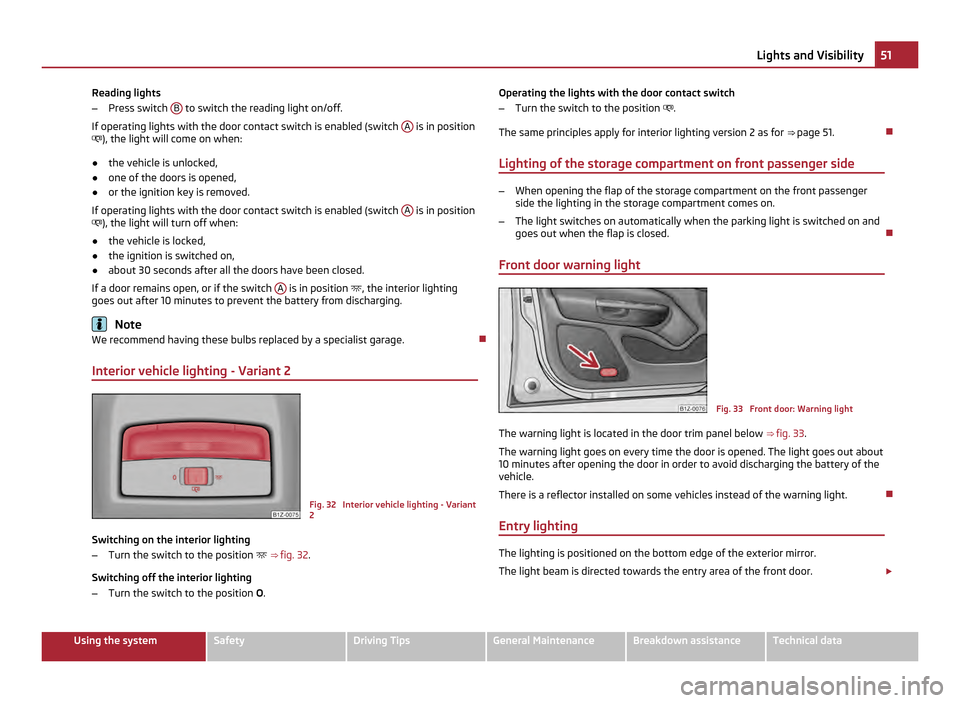
Interior vehicle lighting - Variant 2 Fig. 32 Interior vehicle lighting - Variant
2
Switching on the interior lighting
– Turn the switch to the position ⇒ fig. 32 .
Switching off the interior lighting
– Turn the switch to the position O. Operating the lights with the door contact switch
– Turn the switch to the position .
The same principles apply for interior lighting version 2 as for ⇒
page 51.
Lighting of the storage compartment on front passenger side –
When opening the flap of the storage compartment on the front passenger
side the lighting in the storage compartment comes on.
– The light switches on automatically when the parking light is switched on and
goes out when the flap is closed.
Front door warning light Fig. 33 Front door: Warning light
The warning light is located in the door trim panel below ⇒
fig. 33.
The warning light goes on every time the door is opened. The light goes out about
10 minutes after opening the door in order to avoid discharging the battery of the
vehicle.
There is a reflector installed on some vehicles instead of the warning light.
Entry lighting The lighting is positioned on the bottom edge of the exterior mirror.
The light beam is directed towards the entry area of the front door.
£ 51
Lights and Visibility Using the system Safety Driving Tips General Maintenance Breakdown assistance Technical data
Page 57 of 248
CAUTION
● In cold temperatures and in winter, check before the trip or before switching
on the ignition that the wiper blades are not frozen. Switching on windscreen
wipers when the blades are frozen to the windscreen may result in damage both
to the blades and the motor of the windscreen wipers!
● If you switch off the ignition while the windscreen wipers are on, the wipers
will sweep in the same mode the next time the ignition is switched on. At low
temperatures, the wipers may freeze to the window between switching off the ig-
nition and the next time you switch the ignition on again.
● Carefully detach frozen wiper blades from the front or rear window.
● Remove snow and ice from the window wipers before driving. Note
● If the slower 2 or the faster
3 wiper setting is switched on
⇒ fig. 37 and the
vehicle speed decreases to below 4 km/h, the lower wiper step is switched on au-
tomatically. At a speed increase of more than 8 km/h the previous wiper setting is
established again.
● If there is an obstacle on the windscreen, the wiper will try to push away the
obstacle. If the obstacle continues to block the wiper, the wiper stops automati-
cally after 5 attempts to eliminate the obstacle, in order to avoid a damage to the
wiper. Remove the obstacle and and switch on the wiper again.
● The windscreen washer nozzles for the windscreen are heated when the en-
gine is running and the outside temperature is less than +10
°C.
● The content of the windscreen wiper reservoir is 3 litres. On vehicles which are
equipped with a headlight cleaning system, the content of the reservoir is 5.5
li-
tres. On vehicles fitted with auxiliary heating, the content of the windscreen wiper
reservoir is 4.5 litres.
Automatic rear window wiper (Estate car) If the windshield wiper is in positions
2
⇒ fig. 37 or 3 the rear view window is
wiped every 30/10 seconds if the vehicle's speed exceeds 5 km/h.
When the rain sensor is active (the lever is in the position 1 ) the function is only
active if the front window wipers continue to operate (no break between each
wiping process). Activation/deactivation
The function of the automatic rear window wiper is activated/deactivated in the
information display in the menu:
■ Settings
■ Lights & Vision
■ Rear wiper Note
The function of the automatic rear window wiper is only valid for Estate car vehi-
cles which are equipped with an information display. The function is activated in
the factory.
Headlight cleaning system The headlights are being cleaned after the windscreen has been sprayed for the
first time and fifth time, the low beam or main beam are switched on and the
windscreen wiper lever was held in the position 5
⇒ fig. 37 for about 1 second.
The headlight washer nozzles are moved forward out of the bumper by the water
pressure for cleaning the headlights.
You should remove stubborn dirt (such as insect residues) from the headlight len-
ses at regular intervals, for example when refuelling. Please refer to the following
guidelines ⇒
page 172, The headlight lenses.
You should remove any snow from the fixtures of the washer nozzles and clear ice
in winter with a de-icing spray in order to ensure proper operation of the cleaning
system. CAUTION
Never remove the nozzles from the headlamp cleaning system by hand - risk of
damage! 55
Lights and Visibility Using the system Safety Driving Tips General Maintenance Breakdown assistance Technical data
Page 101 of 248
3
- start engine
Applies to all models:
Position 1 To
lock the steering , with the ignition key withdrawn, turn the steering wheel un-
til the steering locking pin is heard to engage. You should always lock the steering
as a general rule if you leave your vehicle. This acts as a deterrent against possible
theft of your vehicle ⇒ .
Position 2 Move the steering wheel back and forward a little if the ignition key cannot, or
cannot easily be turned into this position, in order to release the steering lock.
Position
3 The engine is started in this position. At the same time switched on low beam or
main beam or other electrical components with major power consumption are
briefly switched off. The ignition key moves back into position
2 when one relea-
ses the key.
The ignition key must be turned back into position 1 each time before starting
the engine again. The starter repeat lock in the ignition lock prevents the starter
being engaged when the engine is running and thus getting damaged.
Ignition key withdrawal lock (automatic gearbox)
You can only withdraw the ignition key after switching off the ignition if the selec-
tor lever is in position P.WARNING
● When driving, the ignition key must always be in the position 2 (ignition
switched on) without the engine running. This position is indicated by the
warning lights coming on. If this is not the case, it could result in unexpected
locking of the steering wheel - risk of accident!
● Only remove the ignition key from the ignition lock when the vehicle has
come to a standstill (by applying the handbrake or moving the selector lever
into the position
P). The steering lock can engage immediately - risk of acci-
dent!
● Always withdraw the ignition key if you are going to leave the vehicle,
even for a short time. This is particularly important if children are left in the
vehicle. The children might otherwise start the engine or switch on electrical
equipment (e.g. power windows) - risk of accident or injury! Starting the engine
General You can only start the engine only using an original ignition key.
Manual gearbox
– Place the gearshift lever into neutral and put on the handbrake firmly before
starting the engine.
– Engage the clutch pedal and keep it depressed until the engine starts.
If you start the engine without depressing the clutch pedal, the engine does not
start and the following message appears in the Information display Depress
clutch! or CLUTCH in the display of the instrument cluster.
– Let go of the key as soon as the engine starts otherwise there may be damage
to the starter.
Automatic gearbox
– Place the gearshift lever into P or N before starting the engine, and apply the
handbrake firmly.
– Let go of the key as soon as the engine starts otherwise there may be damage
to the starter.
The engine running noises may louder at first be louder for a short time after
starting the cold engine until oil pressure can be built up in the hydraulic valve
clearance compensation. This is quite normal and is not an operating problem.
If the engine does not start ...
You can use the battery of another vehicle as a jump-start aid ⇒
page 206. WARNING
● Never run the engine in non ventilated or enclosed areas. The exhaust
gases of the engine contain besides the odorless and colourless carbon mon-
oxide a poisonous gas - hazard! Carbon monoxide can cause unconsciousness
and death.
● Never leave your vehicle unattended with the engine running. £ 99
Starting-off and Driving Using the system Safety Driving Tips General Maintenance Breakdown assistance Technical data
Page 168 of 248
Trade-in and recycling of old cars
ŠKODA meets the requirements of the brand and its products regarding environ-
ment and resource protection. All new
ŠKODA vehicles can be utilized up to 95 %
and always 1)
be returned. In a lot of countries sufficient trade-in networks have
been created, where you can trade-in your vehicle. After you trade-in your vehicle,
you will receive a confirmation stating the recycling in accordance with environ-
mental regulations.
Vehicles with special built-on types
Technical documents regarding changes carried out on the vehicle must be kept
by the vehicle user, in order to hand over later to the old car user. This ensures the
recycling in accordance with environmental regulations. Note
Detailed information about the trade-in and recycling of old cars is available from
a ŠKODA Service Partner.
Motoring abroad General Other circumstances may exist abroad.
It is also possible, in certain countries, that the
ŠKODA Service Partner network is
limited or has not been established yet. This is the reason why obtaining certain
spare parts may be somewhat complicated and specialist garage personnel may
only be able to make limited repairs. ŠKODA in the Czech Republic and its foreign
importers are happy to provide information about technical aspects of the vehicle,
required maintenance work and possibilities for getting repairs done.
Unleaded petrol A vehicle fitted with a petrol engine must always be refuelled with unleaded pet-
rol
⇒ page 161
. The automobile associations can provide you with information re-
garding the locations of filling stations which offer unleaded petrol. Headlight The low beam of your headlights is set asymmetrically. It illuminates the side of
the road on which you are driving to a greater extent. If you drive abroad on the
other side of the road, you will dazzle oncoming traffic.
In order to prevent the dazzling of oncoming traffic, it is necessary that an adjust-
ment of the headlights is carried out by a specialist garage.
The adaptation of the headlights with Xenon lights (applies only to vehicles which
are designed for driving on the left and on the right) is performed in the menu
Settings Lights & Vision Travel mode in the main menu of the Information display
⇒ page 17
.
Avoiding damage to your vehicle When driving on poor roads and lanes or when driving over kerb stones, steep
ramps, etc., you must pay particular attention to ensuring that any low-slung parts
of the vehicle, such as spoiler and exhaust, do not touch the ground and get dam-
aged.
This particularly applies to models with a lowered suspension (sport suspension)
and also when your vehicle is fully laden.
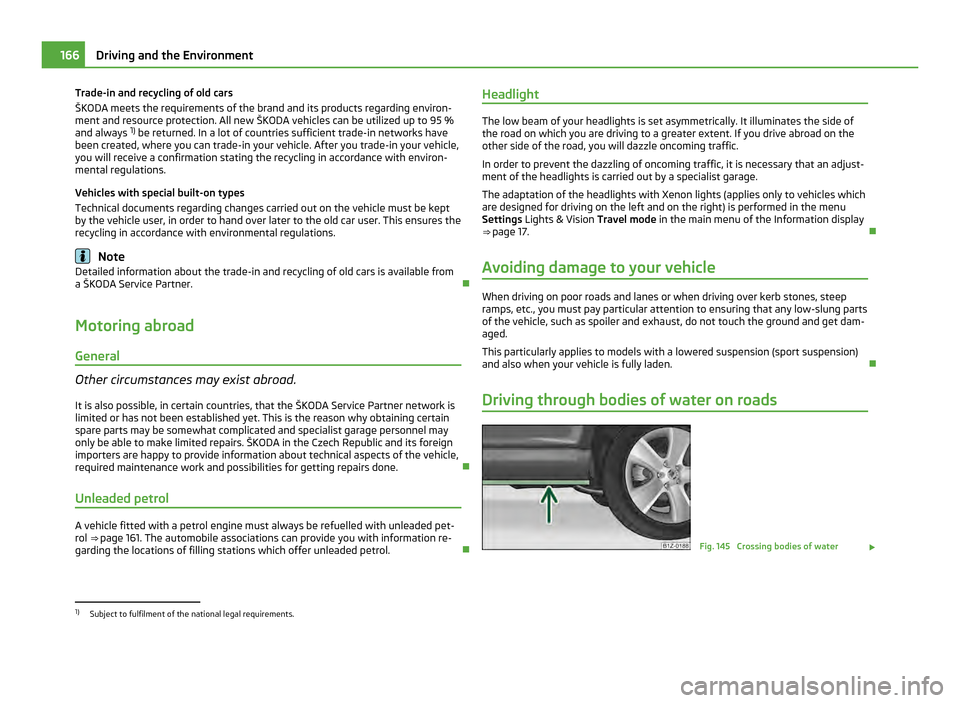
Driving through bodies of water on roads Fig. 145 Crossing bodies of water
£1)
Subject to fulfilment of the national legal requirements. 166
Driving and the Environment
Page 170 of 248
Towing a trailer
Technical requirements Your vehicle is designed primarily for transporting persons and luggage. It can,
however, also be used for towing a trailer - provided certain technical equipment
is fitted.
If your vehicle has been
factory-fitted with a towing device or has a towing device
from ŠKODA Original Accessories, then the towing device satisfies all technical
and legal requirements.
Your vehicle is fitted with a 13-pin power socket for the electrical connection be-
tween the vehicle and trailer. If the trailer which you wish to tow has a 7-pin con-
nector, you can use a suitable adapter from
ŠKODA Original Accessories.
This work must be carried out in accordance with the manufacturer's specifica-
tions if a towing device is retrofitted.
Authorised ŠKODA Service Partners can provide detailed information about retro-
fitting a towing device and for any necessary modifications to the cooling system. WARNING
We recommend that you have the towing device from ŠKODA Original Acces-
sories installed by an authorised
ŠKODA Service Partner. He is familiar with all
the relevant details relating to retrofitting such equipment. There is a risk of
an accident if the towing device is not properly fitted!
General Maintenance Trailer load
The permissible trailer load must on no account be exceeded.
You can negotiate appropriately steeper inclines and descents if you do not make
full use of the permissible trailer load.
The trailer loads specified only apply for
altitudes up to 1000 metres above mean
sea level. The fact that the engine power output drops with increasing height due
to a lowering of air pressure and thus the ability to climb, means that the towed
weight must be reduced by 10 % for every further increase of 1 000 metres in height above sea level. The towed weight is the weight of the (laden) vehicle and
the (laden) trailer together. One should take this into account before driving up to
higher altitudes.
The trailer and drawbar load information on the type plate of the towing device
are merely test data for the towing device The data relating to your vehicle,
which is often less than this test data, can be found in your vehicle registration
documents.
Distribution of the load
Distribute the load in the trailer in such a way that any heavy items are located as
close as possible to the axle. Secure the items to prevent them slipping.
Tyre pressure
Correct the tyre inflation pressure on your vehicle for that of
“fully laden”
⇒ page 192. The inflation pressure of the tyres fitted to the trailer adjust in ac-
cordance with the manufacturer's recommendation.
Exterior mirrors
You have to have additional exterior mirrors fitted if you are not able to see the
traffic behind the trailer with the standard rear-view mirrors. Both exterior mirrors
should be attached to folding arms. Adjust the mirrors so that they provide you
with an adequate field of view to the rear.
Headlights
Before starting off with a hitched trailer, also check the setting of the headlights.
Alter the setting as necessary with the aid of the headlight beam adjuster
⇒ page 49.
Detachable ball head
The ball head is detachable on vehicles with towing device and can be obtained
from ŠKODA Original Accessories. It is stowed together with separate fitting in-
structions in the spare wheel well in the luggage compartment of the vehicle. Note
● We recommend that you also have your vehicle inspected between service in-
tervals if you tow a trailer frequently.
● The handbrake on the towing vehicle must be put on when coupling and de-
coupling the trailer. 168
Towing a trailer
Page 215 of 248
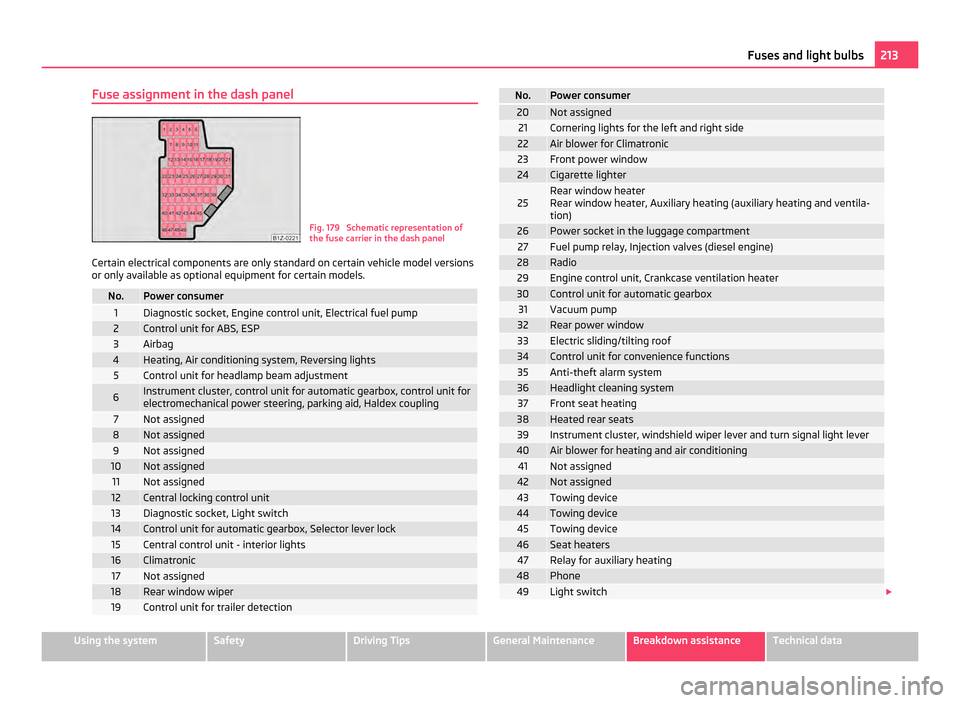
Fuse assignment in the dash panel
Fig. 179 Schematic representation of
the fuse carrier in the dash panel
Certain electrical components are only standard on certain vehicle model versions
or only available as optional equipment for certain models. No. Power consumer
1 Diagnostic socket, Engine control unit, Electrical fuel pump
2 Control unit for ABS, ESP
3 Airbag
4 Heating, Air conditioning system, Reversing lights
5 Control unit for headlamp beam adjustment
6 Instrument cluster, control unit for automatic gearbox, control unit for
electromechanical power steering, parking aid, Haldex coupling 7 Not assigned
8 Not assigned
9 Not assigned
10 Not assigned
11 Not assigned
12 Central locking control unit
13 Diagnostic socket, Light switch
14 Control unit for automatic gearbox, Selector lever lock
15 Central control unit - interior lights
16 Climatronic
17 Not assigned
18 Rear window wiper
19 Control unit for trailer detection No. Power consumer
20 Not assigned
21 Cornering lights for the left and right side
22 Air blower for Climatronic
23 Front power window
24 Cigarette lighter
25 Rear window heater
Rear window heater, Auxiliary heating (auxiliary heating and ventila-
tion)
26 Power socket in the luggage compartment
27 Fuel pump relay, Injection valves (diesel engine)
28 Radio
29 Engine control unit, Crankcase ventilation heater
30 Control unit for automatic gearbox
31 Vacuum pump
32 Rear power window
33 Electric sliding/tilting roof
34 Control unit for convenience functions
35 Anti-theft alarm system
36 Headlight cleaning system
37 Front seat heating
38 Heated rear seats
39 Instrument cluster, windshield wiper lever and turn signal light lever
40 Air blower for heating and air conditioning
41 Not assigned
42 Not assigned
43 Towing device
44 Towing device
45 Towing device
46 Seat heaters
47 Relay for auxiliary heating
48 Phone
49 Light switch
£ 213
Fuses and light bulbs Using the system Safety Driving Tips General Maintenance Breakdown assistance Technical data
Page 216 of 248
Electrically adjustable seats are protected by
automatic circuit breakers, which
switch on again automatically after a few seconds after the overload has been
eliminated.
Bulbs Changing bulbs The relevant lamp must always be switched off before a light bulb is replaced.
Defect light bulbs should only be replaced with light bulbs of the same type. The
designation is located on the light socket or the glass bulb.
Changing certain bulbs is not something which you can do yourself, but requires
to be done by a specialist. Other parts of the vehicle must be removed in order to
change the light bulbs. This applies, in particular, to bulbs which can only be
reached from the engine compartment.
We therefore recommend that you have any bulbs changed by an authorised
ŠKODA
Service Partner or, in exceptional cases, by calling on other professional
assistance.
Please note that the engine compartment is a hazardous area ⇒ page 181, Work-
ing in the engine compartment.
We recommend that you always have a small box of replacement bulbs in your ve-
hicle. You can obtain replacement bulbs from ŠKODA Original Accessories or from
a specialist garage.
A stowage place for the bulbs is located in the box in the spare wheel.
Fitted with a xenon headlight
Change of bulbs on vehicles with Xenon lights (low beam lights, parking lights and
main beam lights) should be undertaken by a specialist garage.
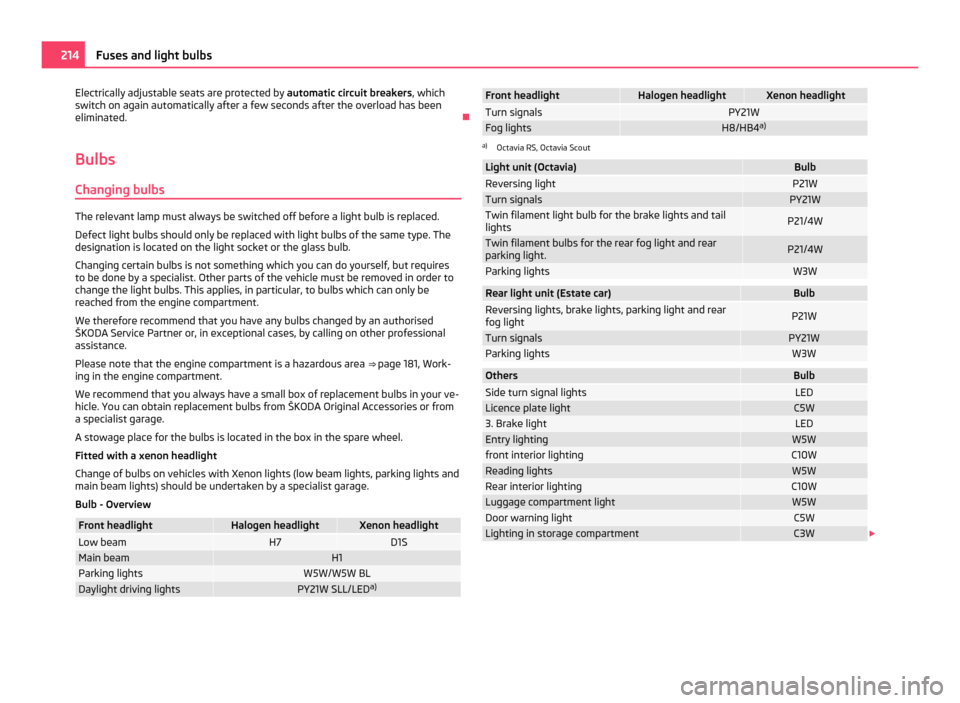
Bulb - Overview Front headlight Halogen headlight Xenon headlight
Low beam H7 D1S
Main beam H1
Parking lights W5W/W5W BL
Daylight driving lights PY21W SLL/LED
a) Front headlight Halogen headlight Xenon headlight
Turn signals PY21W
Fog lights H8/HB4
a) a)
Octavia RS, Octavia Scout Light unit (Octavia) Bulb
Reversing light P21W
Turn signals PY21W
Twin filament light bulb for the brake lights and tail
lights
P21/4W
Twin filament bulbs for the rear fog light and rear
parking light. P21/4W
Parking lights W3W
Rear light unit (Estate car) Bulb
Reversing lights, brake lights, parking light and rear
fog light
P21W
Turn signals PY21W
Parking lights W3W
Others Bulb
Side turn signal lights LED
Licence plate light C5W
3. Brake light LED
Entry lighting W5W
front interior lighting C10W
Reading lights W5W
Rear interior lighting C10W
Luggage compartment light W5W
Door warning light C5W
Lighting in storage compartment C3W
£214
Fuses and light bulbs
Page 217 of 248
WARNING
● Bulbs H7 and H1 are pressurised and may burst when changing the bulb -
risk of injury!
● It is recommended to wear gloves and safety glasses when changing a
bulb.
● Gas discharge bulbs (xenon bulbs) operate with a high voltage, professio-
nal knowledge is required - danger to life! CAUTION
Do not take hold of the glass bulb with naked fingers (even the smallest amount
of dirt reduces the working life of the light bulb). Use a clean cloth, serviette or
something similar. Note
This Owner's Manual only describes the replacement of bulbs where it is assumed
that no major complications will arise. Other light bulbs should be changed by your
specialist garage.
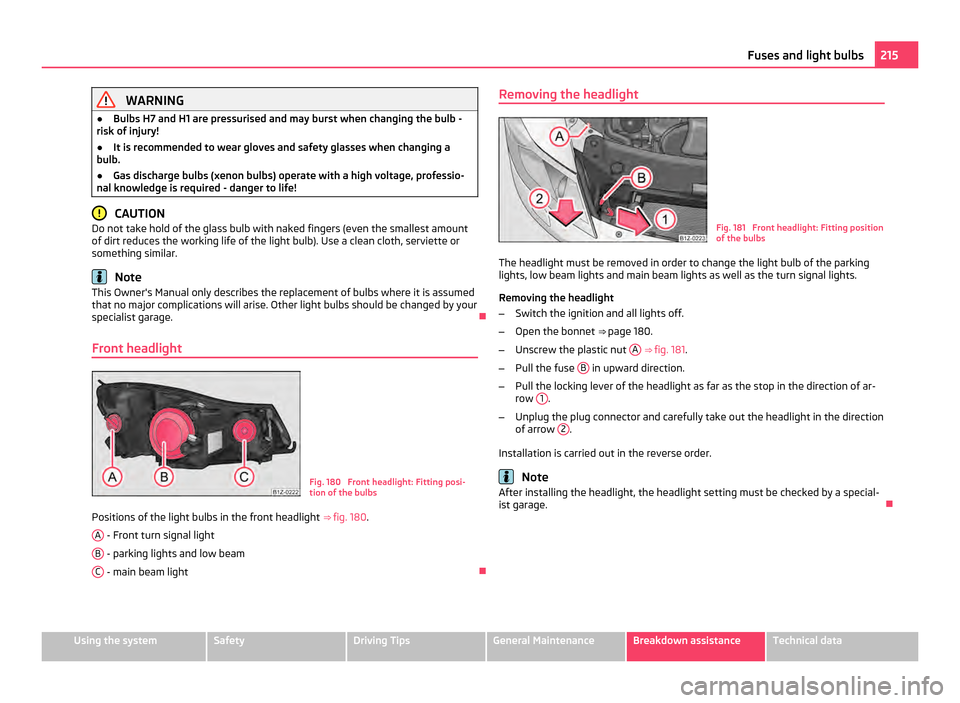
Front headlight Fig. 180 Front headlight: Fitting posi-
tion of the bulbs
Positions of the light bulbs in the front headlight ⇒ fig. 180 .
A - Front turn signal light
B - parking lights and low beam
C - main beam light
Removing the headlight
Fig. 181 Front headlight: Fitting position
of the bulbs
The headlight must be removed in order to change the light bulb of the parking
lights, low beam lights and main beam lights as well as the turn signal lights.
Removing the headlight
– Switch the ignition and all lights off.
– Open the bonnet ⇒ page 180 .
– Unscrew the plastic nut A
⇒ fig. 181 .
– Pull the fuse B in upward direction.
– Pull the locking lever of the headlight as far as the stop in the direction of ar-
row 1 .
– Unplug the plug connector and carefully take out the headlight in the direction
of arrow 2 .
Installation is carried out in the reverse order. Note
After installing the headlight, the headlight setting must be checked by a special-
ist garage. 215
Fuses and light bulbs Using the system Safety Driving Tips General Maintenance Breakdown assistance Technical data
Page 218 of 248
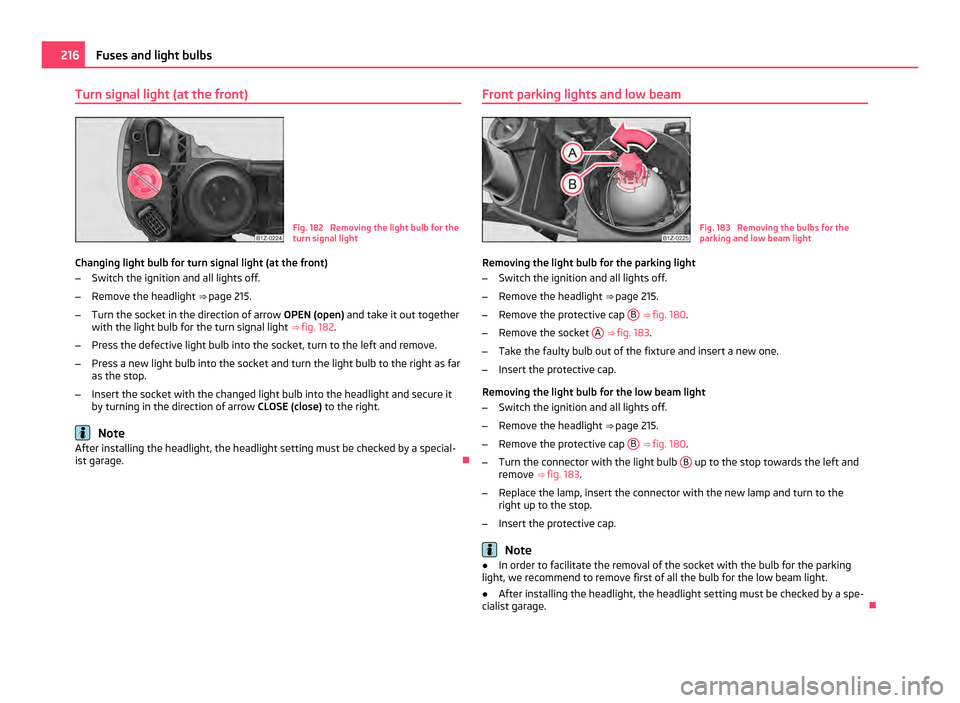
Turn signal light (at the front)
Fig. 182 Removing the light bulb for the
turn signal light
Changing light bulb for turn signal light (at the front)
– Switch the ignition and all lights off.
– Remove the headlight ⇒ page 215.
– Turn the socket in the direction of arrow OPEN (open) and take it out together
with the light bulb for the turn signal light ⇒ fig. 182 .
– Press the defective light bulb into the socket, turn to the left and remove.
– Press a new light bulb into the socket and turn the light bulb to the right as far
as the stop.
– Insert the socket with the changed light bulb into the headlight and secure it
by turning in the direction of arrow CLOSE (close) to the right.Note
After installing the headlight, the headlight setting must be checked by a special-
ist garage. Front parking lights and low beam Fig. 183 Removing the bulbs for the
parking and low beam light
Removing the light bulb for the parking light
– Switch the ignition and all lights off.
– Remove the headlight ⇒ page 215.
– Remove the protective cap B
⇒ fig. 180 .
– Remove the socket A
⇒ fig. 183 .
– Take the faulty bulb out of the fixture and insert a new one.
– Insert the protective cap.
Removing the light bulb for the low beam light
– Switch the ignition and all lights off.
– Remove the headlight ⇒ page 215.
– Remove the protective cap B
⇒
fig. 180 .
– Turn the connector with the light bulb B up to the stop towards the left and
remove ⇒ fig. 183 .
– Replace the lamp, insert the connector with the new lamp and turn to the
right up to the stop.
– Insert the protective cap. Note
● In order to facilitate the removal of the socket with the bulb for the parking
light, we recommend to remove first of all the bulb for the low beam light.
● After installing the headlight, the headlight setting must be checked by a spe-
cialist garage. 216
Fuses and light bulbs
Page 243 of 248
H
Handbrake . . . . . . . . . . . . . . . . . . . . . . . . . . . . . . . . . . . 101
Warning light . . . . . . . . . . . . . . . . . . . . . . . . . . . . . . . 29
Hazard warning light system . . . . . . . . . . . . . . . . . . . 49 Warning light . . . . . . . . . . . . . . . . . . . . . . . . . . . . . . . . 23
Head airbag . . . . . . . . . . . . . . . . . . . . . . . . . . . . . . . . . 144
Headlight cleaning system . . . . . . . . . . . . . . . . . . . . . 55
Headlight flasher . . . . . . . . . . . . . . . . . . . . . . . . . . . . . 50
Headlights Fog lights . . . . . . . . . . . . . . . . . . . . . . . . . . . . . . . . . . . . 47
Headlight cleaning system . . . . . . . . . . . . . . . . . . . . 55
Head restraint . . . . . . . . . . . . . . . . . . . . . . . . . . . . . . . . 63
Heated windscreen washer nozzles . . . . . . . . . . . . 53
Heating . . . . . . . . . . . . . . . . . . . . . . . . . . . . . . . . . . . . . . 87 Auxiliary heating (parking heating) . . . . . . . . . . . 94
Defrosting windows . . . . . . . . . . . . . . . . . . . . . . . . . . 87
Recirculated air mode . . . . . . . . . . . . . . . . . . . . . . . 88
Height adjustment . . . . . . . . . . . . . . . . . . . . . . . . . . . 137
Horn . . . . . . . . . . . . . . . . . . . . . . . . . . . . . . . . . . . . . . . . . . 9
I Ignition . . . . . . . . . . . . . . . . . . . . . . . . . . . . . . . . . . . . . . 98
Ignition lock . . . . . . . . . . . . . . . . . . . . . . . . . . . . . . . . . . 98
Immobiliser . . . . . . . . . . . . . . . . . . . . . . . . . . . . . . . . . . . 31
Information display . . . . . . . . . . . . . . . . . . . . . . . . . . . . 17
Instrument cluster . . . . . . . . . . . . . . . . . . . . . . . . . . . . 10
Instrument lighting . . . . . . . . . . . . . . . . . . . . . . . . . . . 48
Interior light Luggage compartment . . . . . . . . . . . . . . . . . . . . . . . 52
Interior lighting . . . . . . . . . . . . . . . . . . . . . . . . . . . . . . . 50
Interior mirror . . . . . . . . . . . . . . . . . . . . . . . . . . . . . . . . 57
Interior monitor . . . . . . . . . . . . . . . . . . . . . . . . . . . . . . . 38
Intermittent wiping . . . . . . . . . . . . . . . . . . . . . . . . . . . 53
Internet connection . . . . . . . . . . . . . . . . . . . . . . . . . . 129
ISOFIX . . . . . . . . . . . . . . . . . . . . . . . . . . . . . . . . . . . . . . 152
ISOFIX system . . . . . . . . . . . . . . . . . . . . . . . . . . . . . . . 152 J
Jacking points . . . . . . . . . . . . . . . . . . . . . . . . . . . . . . . 203
Jump-starting . . . . . . . . . . . . . . . . . . . . . . . . . . . 206, 207
L Lashing eyes . . . . . . . . . . . . . . . . . . . . . . . . . . . . . . . . . 67
Leather care . . . . . . . . . . . . . . . . . . . . . . . . . . . . . . . . . 174
Light automatic . . . . . . . . . . . . . . . . . . . . . . . . . . . . . . . . . . 45
Changing bulbs . . . . . . . . . . . . . . . . . . . . . . . . . . . . . 214
Lights converting/masking over . . . . . . . . . . . . . . . . . . . . 166
Range adjustment . . . . . . . . . . . . . . . . . . . . . . . . . . 49
switching on and off . . . . . . . . . . . . . . . . . . . . . . . . 44
Warning lights . . . . . . . . . . . . . . . . . . . . . . . . . . . . . . . 21
Lights and Visibility . . . . . . . . . . . . . . . . . . . . . . . . . . . 49
Liquid in reservoir for windscreen washer system Warning light . . . . . . . . . . . . . . . . . . . . . . . . . . . . . . . 28
Loading . . . . . . . . . . . . . . . . . . . . . . . . . . . . . . . . . . . . . . 66
Lock Central locking system . . . . . . . . . . . . . . . . . . . . . . . 33
Locking . . . . . . . . . . . . . . . . . . . . . . . . . . . . . . . . . . . . . . 32 Remote control . . . . . . . . . . . . . . . . . . . . . . . . . . . . . 36
Locking and unlocking from inside . . . . . . . . . . . . . . 34
Low beam . . . . . . . . . . . . . . . . . . . . . . . . . . . . . . . . . . . . 44 Warning light . . . . . . . . . . . . . . . . . . . . . . . . . . . . . . . . 23
Luggage . . . . . . . . . . . . . . . . . . . . . . . . . . . . . . . . . . . . . 35
Luggage compartment . . . . . . . . . . . . . . . . . . . . . 35, 66 Fixing of the floor covering . . . . . . . . . . . . . . . . . . 69
Folding double hooks . . . . . . . . . . . . . . . . . . . . . . . . 69
Folding hooks . . . . . . . . . . . . . . . . . . . . . . . . . . . . . . . 69
Lashing eyes . . . . . . . . . . . . . . . . . . . . . . . . . . . . . . . . . 67
Luggage compartment - variable loading floor . . . . 71
Luggage compartment cover . . . . . . . . . . . . . . . . . . . 70
Luggage rack . . . . . . . . . . . . . . . . . . . . . . . . . . . . . . . . . 73 M
Main beam . . . . . . . . . . . . . . . . . . . . . . . . . . . . . . . . 44, 50
Warning light . . . . . . . . . . . . . . . . . . . . . . . . . . . . . . . . 23
Manual gearbox . . . . . . . . . . . . . . . . . . . . . . . . . . . . . . . 101
Manual shifting of gears . . . . . . . . . . . . . . . . . . . . . . . 101
Memory for the on-board computer . . . . . . . . . . . . . 14
Mobile phone . . . . . . . . . . . . . . . . . . . . . . . . . 115, 116, 122 Connection to the hands-free system . . . . . . . . 123
Connection with the hands-free system . . . . . . 117
Voice control . . . . . . . . . . . . . . . . . . . . . . . . . . . . . . . . 128
Motoring abroad . . . . . . . . . . . . . . . . . . . . . . . . . . . . . 166
Multi-functional indicator . . . . . . . . . . . . . . . . . . . . . . 14
Multifunction steering wheel . . . . . . . . . . . . . . . . . . 114
Multimedia . . . . . . . . . . . . . . . . . . . . . . . . . . . . . . . . . . 129 AUX-IN . . . . . . . . . . . . . . . . . . . . . . . . . . . . . . . . . . . . . 129
CD changer . . . . . . . . . . . . . . . . . . . . . . . . . . . . . . . . . 130
MDI . . . . . . . . . . . . . . . . . . . . . . . . . . . . . . . . . . . . . . . . 129
N
Net partition (Estate car) . . . . . . . . . . . . . . . . . . . . . . . 71
Note holder . . . . . . . . . . . . . . . . . . . . . . . . . . . . . . . . . . 75
O Oil . . . . . . . . . . . . . . . . . . . . . . . . . . . . . . . . . . . . . . . . . . 182 Warning light . . . . . . . . . . . . . . . . . . . . . . . . . . . . . . . . 25
Oil change . . . . . . . . . . . . . . . . . . . . . . . . . . . . . . . . . . . 183
Oil dipstick . . . . . . . . . . . . . . . . . . . . . . . . . . . . . . . . . . 182
Onboard computer . . . . . . . . . . . . . . . . . . . . . . . . . . . . 14
Open door Warning light . . . . . . . . . . . . . . . . . . . . . . . . . . . . . . . 28
Opening a single door . . . . . . . . . . . . . . . . . . . . . . . . . 32
Opening for skis . . . . . . . . . . . . . . . . . . . . . . . . . . . . . . 82
Operation in winter Battery . . . . . . . . . . . . . . . . . . . . . . . . . . . . . . . . . . . . . 189
Biodiesel . . . . . . . . . . . . . . . . . . . . . . . . . . . . . . . . . . . 178
De-icing windows . . . . . . . . . . . . . . . . . . . . . . . . . . . 172
Outside temperature . . . . . . . . . . . . . . . . . . . . . . . . . . . 15 241
Index Using the system Safety Driving Tips General Maintenance Breakdown assistance Technical data