low beam SKODA OCTAVIA 2011 2.G / (1Z) Owner's Manual
[x] Cancel search | Manufacturer: SKODA, Model Year: 2011, Model line: OCTAVIA, Model: SKODA OCTAVIA 2011 2.G / (1Z)Pages: 248, PDF Size: 3.79 MB
Page 23 of 248
Second speed
Here you can switch on the display of the second speed in mph or in km/h
1)
.
Service
Here you can have the kilometres still to be driven and the days until the follow-
ing service interval shown and the Service Interval Display reset. Factory Setting
After selecting the menu
Factory Setting the factory setting of the information
display is established again.
Warning lights
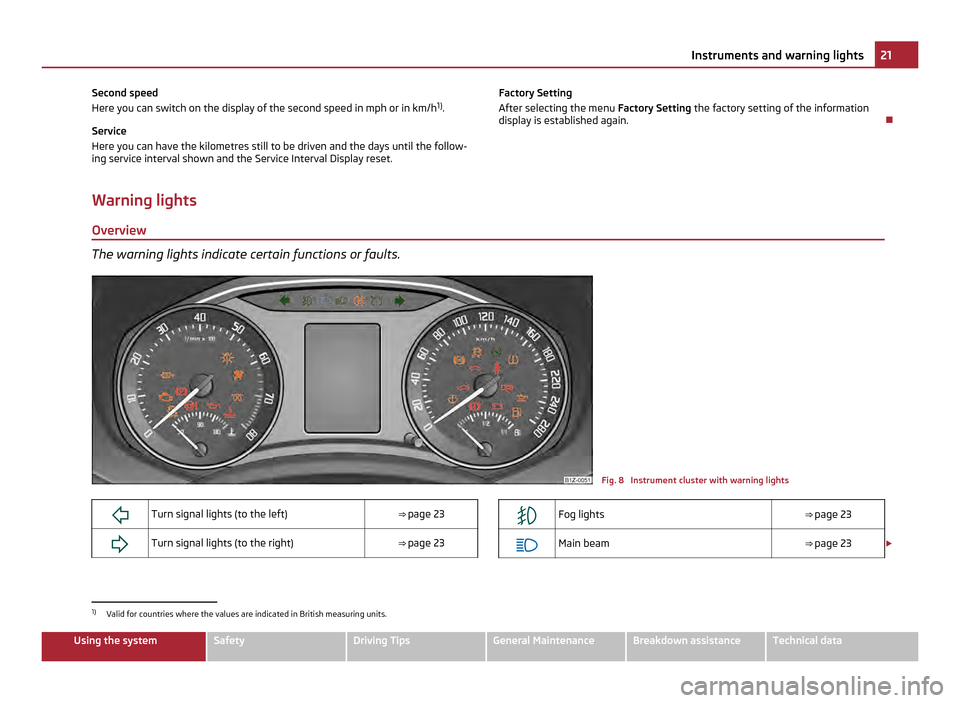
Overview The warning lights indicate certain functions or faults.
Fig. 8 Instrument cluster with warning lights
Turn signal lights (to the left)
⇒ page 23
Turn signal lights (to the right)
⇒ page 23
Fog lights
⇒ page 23
Main beam
⇒ page 23 £1)
Valid for countries where the values are indicated in British measuring units. 21
Instruments and warning lights Using the system Safety Driving Tips General Maintenance Breakdown assistance Technical data
Page 24 of 248
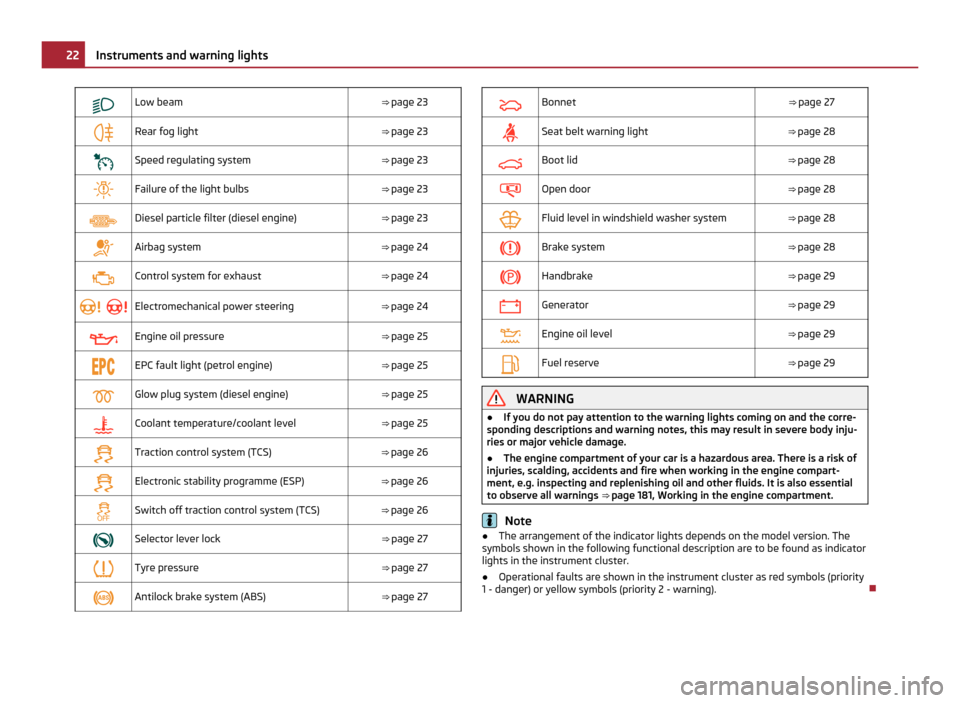
Low beam
⇒ page 23
Rear fog light
⇒ page 23
Speed regulating system
⇒ page 23
Failure of the light bulbs
⇒ page 23
Diesel particle filter (diesel engine)
⇒ page 23
Airbag system
⇒ page 24
Control system for exhaust
⇒ page 24
Electromechanical power steering
⇒ page 24
Engine oil pressure
⇒ page 25
EPC fault light (petrol engine)
⇒ page 25
Glow plug system (diesel engine)
⇒ page 25
Coolant temperature/coolant level
⇒ page 25
Traction control system (TCS)
⇒ page 26
Electronic stability programme (ESP)
⇒ page 26
Switch off traction control system (TCS)
⇒ page 26
Selector lever lock
⇒ page 27
Tyre pressure
⇒ page 27
Antilock brake system (ABS)
⇒ page 27
Bonnet
⇒ page 27
Seat belt warning light
⇒ page 28
Boot lid
⇒ page 28
Open door
⇒ page 28
Fluid level in windshield washer system
⇒ page 28
Brake system
⇒ page 28
Handbrake
⇒ page 29
Generator
⇒ page 29
Engine oil level
⇒ page 29
Fuel reserve
⇒ page 29 WARNING
● If you do not pay attention to the warning lights coming on and the corre-
sponding descriptions and warning notes, this may result in severe body inju-
ries or major vehicle damage.
● The engine compartment of your car is a hazardous area. There is a risk of
injuries, scalding, accidents and fire when working in the engine compart-
ment, e.g. inspecting and replenishing oil and other fluids. It is also essential
to observe all warnings ⇒
page 181, Working in the engine compartment. Note
● The arrangement of the indicator lights depends on the model version. The
symbols shown in the following functional description are to be found as indicator
lights in the instrument cluster.
● Operational faults are shown in the instrument cluster as red symbols (priority
1 - danger) or yellow symbols (priority 2 - warning). 22
Instruments and warning lights
Page 25 of 248
Turn signal lights
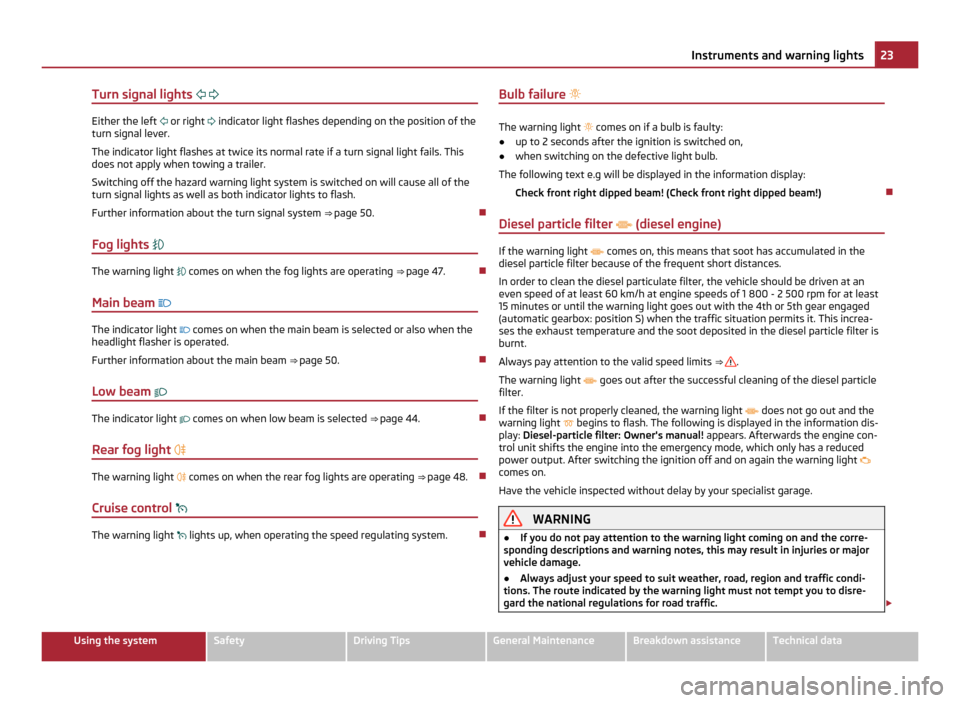
Either the left
or right indicator light flashes depending on the position of the
turn signal lever.
The indicator light flashes at twice its normal rate if a turn signal light fails. This
does not apply when towing a trailer.
Switching off the hazard warning light system is switched on will cause all of the
turn signal lights as well as both indicator lights to flash.
Further information about the turn signal system ⇒
page 50.
Fog lights The warning light
comes on when the fog lights are operating ⇒
page 47.
Main beam The indicator light
comes on when the main beam is selected or also when the
headlight flasher is operated.
Further information about the main beam ⇒
page 50.
Low beam The indicator light
comes on when low beam is selected ⇒ page 44.
Rear fog light The warning light
comes on when the rear fog lights are operating ⇒
page 48.
Cruise control The warning light
lights up, when operating the speed regulating system. Bulb failure
The warning light
comes on if a bulb is faulty:
● up to 2 seconds after the ignition is switched on,
● when switching on the defective light bulb.
The following text e.g will be displayed in the information display: Check front right dipped beam! (Check front right dipped beam!)
Diesel particle filter (diesel engine) If the warning light
comes on, this means that soot has accumulated in the
diesel particle filter because of the frequent short distances.
In order to clean the diesel particulate filter, the vehicle should be driven at an
even speed of at least 60 km/h at engine speeds of 1
800 - 2 500 rpm for at least
15 minutes or until the warning light goes out with the 4th or 5th gear engaged
(automatic gearbox: position S) when the traffic situation permits it. This increa-
ses the exhaust temperature and the soot deposited in the diesel particle filter is
burnt.
Always pay attention to the valid speed limits ⇒ .
The warning light goes out after the successful cleaning of the diesel particle
filter.
If the filter is not properly cleaned, the warning light does not go out and the
warning light begins to flash. The following is displayed in the information dis-
play: Diesel-particle filter: Owner's manual! appears. Afterwards the engine con-
trol unit shifts the engine into the emergency mode, which only has a reduced
power output. After switching the ignition off and on again the warning light
comes on.
Have the vehicle inspected without delay by your specialist garage. WARNING
● If you do not pay attention to the warning light coming on and the corre-
sponding descriptions and warning notes, this may result in injuries or major
vehicle damage.
● Always adjust your speed to suit weather, road, region and traffic condi-
tions. The route indicated by the warning light must not tempt you to disre-
gard the national regulations for road traffic. £ 23
Instruments and warning lights Using the system Safety Driving Tips General Maintenance Breakdown assistance Technical data
Page 46 of 248
Lights and Visibility
Lights
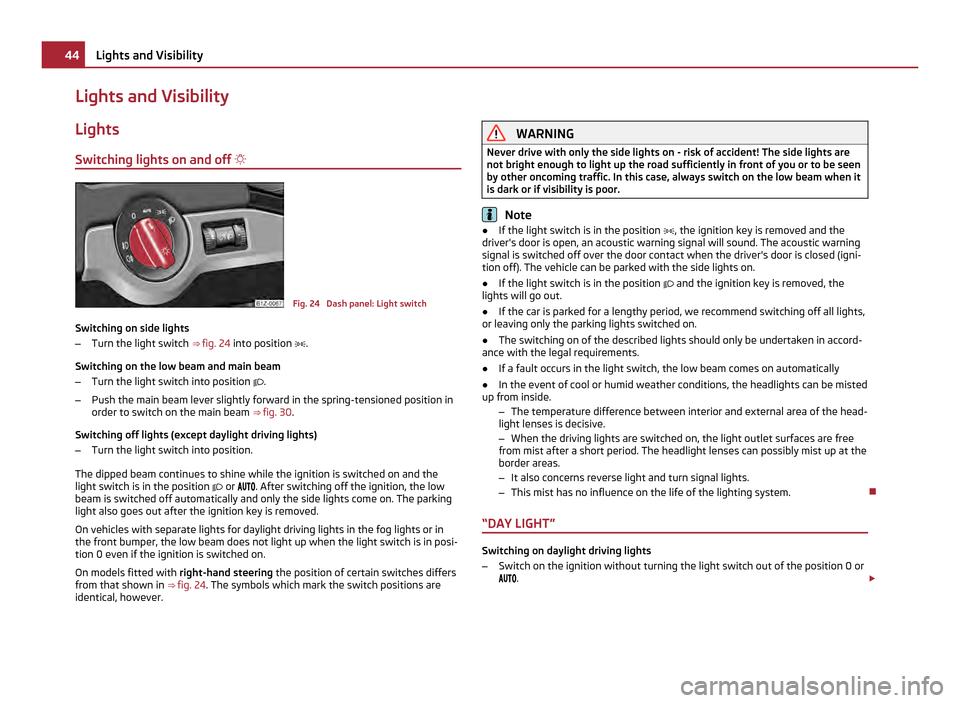
Switching lights on and off Fig. 24 Dash panel: Light switch
Switching on side lights
– Turn the light switch ⇒ fig. 24 into position .
Switching on the low beam and main beam
– Turn the light switch into position .
– Push the main beam lever slightly forward in the spring-tensioned position in
order to switch on the main beam ⇒ fig. 30 .
Switching off lights (except daylight driving lights)
– Turn the light switch into position.
The dipped beam continues to shine while the ignition is switched on and the
light switch is in the position or . After switching off the ignition, the low
beam is switched off automatically and only the side lights come on. The parking
light also goes out after the ignition key is removed.
On vehicles with separate lights for daylight driving lights in the fog lights or in
the front bumper, the low beam does not light up when the light switch is in posi-
tion 0 even if the ignition is switched on.
On models fitted with right-hand steering the position of certain switches differs
from that shown in ⇒
fig. 24. The symbols which mark the switch positions are
identical, however. WARNING
Never drive with only the side lights on - risk of accident! The side lights are
not bright enough to light up the road sufficiently in front of you or to be seen
by other oncoming traffic. In this case, always switch on the low beam when it
is dark or if visibility is poor. Note
● If the light switch is in the position , the ignition key is removed and the
driver's door is open, an acoustic warning signal will sound. The acoustic warning
signal is switched off over the door contact when the driver's door is closed (igni-
tion off). The vehicle can be parked with the side lights on.
● If the light switch is in the position and the ignition key is removed, the
lights will go out.
● If the car is parked for a lengthy period, we recommend switching off all lights,
or leaving only the parking lights switched on.
● The switching on of the described lights should only be undertaken in accord-
ance with the legal requirements.
● If a fault occurs in the light switch, the low beam comes on automatically
● In the event of cool or humid weather conditions, the headlights can be misted
up from inside.
–The temperature difference between interior and external area of the head-
light lenses is decisive.
– When the driving lights are switched on, the light outlet surfaces are free
from mist after a short period. The headlight lenses can possibly mist up at the
border areas.
– It also concerns reverse light and turn signal lights.
– This mist has no influence on the life of the lighting system.
“DAY LIGHT” Switching on daylight driving lights
–
Switch on the ignition without turning the light switch out of the position 0 or
. £44
Lights and Visibility
Page 47 of 248
Deactivating the function daylight driving lights
–
Pull the turn signal light lever towards the steering wheel within 3 seconds af-
ter switching on the ignition and at the same time, slide it to the bottom and
hold it in this position for at least 3 seconds.
Activating the function daylight driving lights
– Pull the turn signal light lever towards the steering wheel within 3 seconds af-
ter switching on the ignition and at the same time, slide it towards the top and
hold it in this position for at least 3
seconds.
On vehicles fitted with an information display, you can also activate or deactivate
in the menu the function daylight driving lights:
■ Settings
■ Lights & Vision
On vehicles with separate lights for daylight driving lights in the fog lights or in
the front bumper, the parking lights and the licence plate light do not come on
when activating the function daylight driving lights (neither front nor rear).
If the vehicle is not equipped with separate lights for daylight driving lights, the
combination of the low beam, the parking lights (front and rear) including the li-
cence plate light is used as daylight driving lights.
In some countries, the national legal provisions require that the rear parking lights
also come on together with the separate lights for daylight driving lights when ac-
tivating the function daylight driving lights.
When the daylight driving lights are switched on, the illumination of the instru-
ment cluster is switched off, however, it is switched on in the position when it
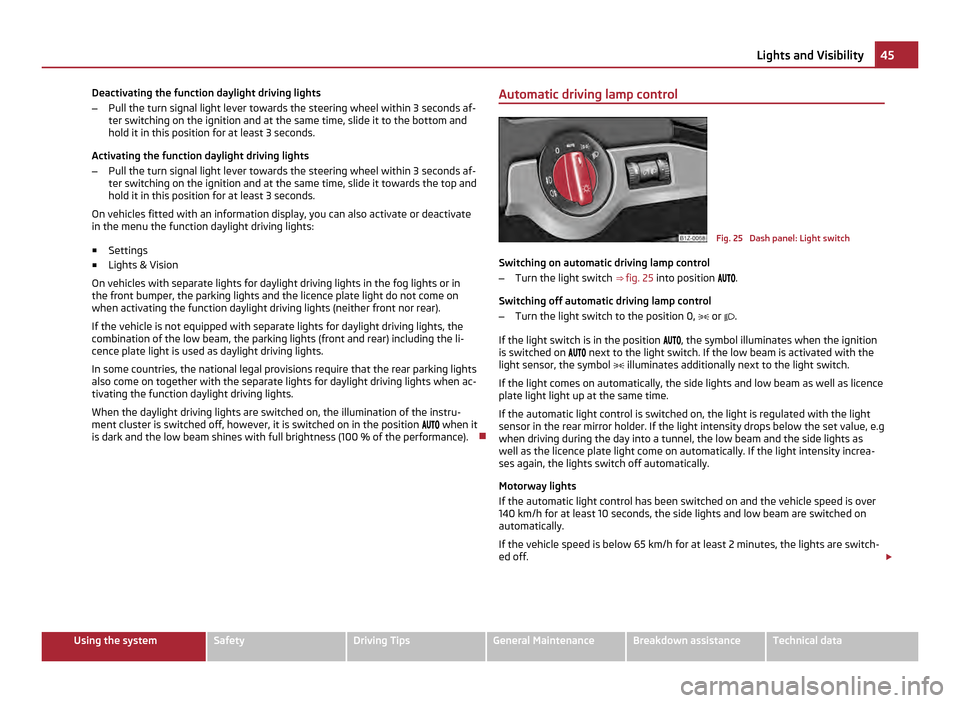
is dark and the low beam shines with full brightness (100 % of the performance). Automatic driving lamp control Fig. 25 Dash panel: Light switch
Switching on automatic driving lamp control
– Turn the light switch ⇒ fig. 25 into position .
Switching off automatic driving lamp control
– Turn the light switch to the position 0, or .
If the light switch is in the position , the symbol illuminates when the ignition
is switched on next to the light switch. If the low beam is activated with the
light sensor, the symbol illuminates additionally next to the light switch.
If the light comes on automatically, the side lights and low beam as well as licence
plate light light up at the same time.
If the automatic light control is switched on, the light is regulated with the light
sensor in the rear mirror holder. If the light intensity drops below the set value, e.g
when driving during the day into a tunnel, the low beam and the side lights as
well as the licence plate light come on automatically. If the light intensity increa-
ses again, the lights switch off automatically.
Motorway lights
If the automatic light control has been switched on and the vehicle speed is over
140 km/h for at least 10 seconds, the side lights and low beam are switched on
automatically.
If the vehicle speed is below 65
km/h for at least 2 minutes, the lights are switch-
ed off. £ 45
Lights and Visibility Using the system Safety Driving Tips General Maintenance Breakdown assistance Technical data
Page 48 of 248
Rain lights
If you switch on the windscreen wipe in the operation rain sensor for longer than
10 seconds or in the operation permanent wipe (position
2 or 3) ⇒ page 53
switching on for longer than 15 seconds, the side lights and low beam are switch-
ed on automatically. The light switches off if the windscreen wipe is in operation
rain sensor for more than around 4 minutes or is not switched on in the operation
permanent wipe. WARNING
The automatic light control only operates as a support. The driver is not re-
leased from his responsibility to inspect the light and if necessary to switch on
the light depending on the light conditions. The light sensor cannot detect for
example rain or snow. For these conditions we recommend to switch on the
low beam ! Note
● Do not affix any stickers in front of the light sensor, so that you do not impair
its function or put it out of operation.
● The same principles as for using the automatic light control also apply to the
light which is switched on manually ⇒
page 44.
Cornering lights The cornering lights are used to illuminate the curves by means of the cone of
light swivelling together with the front headlight with Xenon lights. This function
is active when the speed of the car increases to more than 10
km/h.
The swivelling function of the headlights can be switched off/on via the menu
point Assistants in the main menu of the information display ⇒ page 18.WARNING
If the cornering lights are defective, the headlights are automatically lowered
to the emergency position, which prevents a possible dazzling of oncoming
traffic. Thus the illuminated length of the road is shortened. Drive carefully
and have the car inspected immediately by a specialist garage. Parking light Parking light
– Switch off the ignition.
– Pull the turn signal light lever ⇒
fig. 30 upwards or downwards - the parking
light on the right and left side of the vehicle will be switched on respectively.
The parking light only operates if the ignition is switched off.
If you have switched on the right or left turn signal light and you switch off the
ignition, the parking light is not automatically switched on.
Parking light on both sides
– Turn the light switch into the position and lock the vehicle.
Coming Home Function The function makes it possible to switch on the lights in the darkness for a short
time after leaving the vehicle.
Switching on Coming Home Function
– The light switch is in the position automatic driving lamp control and the
low beam illuminates.
– Switch off the ignition.
– After opening the driver's door, the function Coming Home is switched on.
– Close all the doors and the boot lid and lock the vehicle. After a short time,
switch all lights off.
Depending on equipment fitted the function Coming Home switches on the fol-
lowing lights:
● Parking lights,
● Low beam,
● Entry lighting in the exterior mirrors,
● Licence plate light.
Coming Home Function
The lights go out 10 seconds after closing all the doors and the boot lid.
If a door or the boot lid remains open, the lights go out 60 seconds after switching
off the ignition. £46
Lights and Visibility
Page 49 of 248

The function Coming Home is controlled with the light sensor in the mount of the
interior rear mirror. If the light intensity is higher than the set value of the light
sensor, the Coming Home Function is not switched on after switching off the igni-
tion. Note
● If the Coming Home Function is switched on constantly, the battery will be
heavily discharged particularly in short-haul traffic.
● The switching on of the described lights should only be undertaken in accord-
ance with the legal requirements.
● You can change the illumination period for the Leaving Home Function by
means of the Information display.
Leaving Home Function This function makes it possible to switch on the lights when approaching the ve-
hicle.
Switching on Leaving Home Function
–
The light switch is in the position automatic driving lamp control .
– Unlock the vehicle with the radio remote control - the lights come on.
Depending on equipment fitted the function Leaving Home switches on the fol-
lowing lights:
● Parking lights,
● Low beam,
● Entry lighting in the exterior mirrors,
● Licence plate light.
Leaving Home Function
The function Leaving Home is controlled with the light sensor in the mount of the
interior rear mirror. If the light intensity is higher than the set value of the light
sensor, the Leaving Home Function is not switched on after unlocking the vehicle
with the radio remote control.
After unlocking the vehicle with the radio remote control, the lights come on for
10 seconds. The Leaving Home Function is also switched off after the ignition is
switched on and after locking the vehicle.
If no door is opened within 30 seconds, the lights go out and the vehicle is locked
automatically. Note
● If the Leaving Home Function is switched on constantly, the battery will be
heavily discharged particularly in short-haul traffic.
● The switching on of the described lights should only be undertaken in accord-
ance with the legal requirements.
● You can change the illumination period for the Leaving Home Function by
means of the Information display.
Tourist light This mode makes it possible to drive in countries with opposing traffic system,
driving on the left/right, without dazzling the oncoming vehicles. When the mode
“tourist light
” is active, the side to side swivel of the headlights is deactivated.
The mode “tourist light” is activated/deactivated via the Information display in the
menu:
■ Settings
■ Lights & Vision
■ Travel mode
■ Off
■ Switched on
Fog lights Fig. 26 Dash panel: Light switch
Switch on the front fog lamp
– First of all turn the light switch into position or ⇒
fig. 26 .
– Pull the light switch into position 1 .
£ 47
Lights and Visibility Using the system Safety Driving Tips General Maintenance Breakdown assistance Technical data
Page 50 of 248
The warning light
lights up in the instrument cluster when the fog lights are
switched on ⇒
page 21.
Fog lights with the function “CORNER” The fog lights with the function “CORNER” are designed for a bet-
ter illumination of the surrounding area near the vehicle when
corning, parking etc.
The fog lights with the function
“CORNER” are adjusted according to the steering
angle or after switching on the turn signal light 1)
in the following circumstances:
● the vehicle is stationary and the engine is running or it moves with a speed of
maximum 40 km/h;
● the daylight driving lights are not switched on;
● the low beam is switched on or the light switch is in the position
and the
intensity of the ambient light causes the low beam to be switched on;
● the fog lights are not switched on;
● no reverse gear is engaged. Note
If you engage the reverse gear during the active function “CORNER”, both fog
lights illuminate.
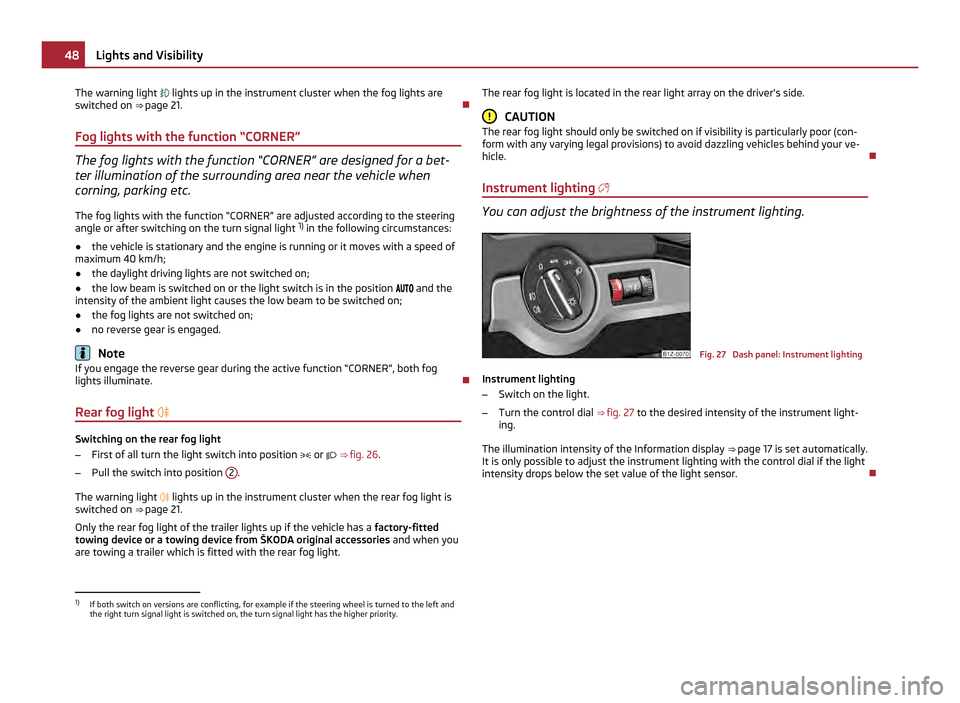
Rear fog light Switching on the rear fog light
–
First of all turn the light switch into position or ⇒
fig. 26 .
– Pull the switch into position 2 .
The warning light
lights up in the instrument cluster when the rear fog light is
switched on ⇒ page 21.
Only the rear fog light of the trailer lights up if the vehicle has a factory-fitted
towing device or a towing device from ŠKODA original accessories and when you
are towing a trailer which is fitted with the rear fog light. The rear fog light is located in the rear light array on the driver's side. CAUTION
The rear fog light should only be switched on if visibility is particularly poor (con-
form with any varying legal provisions) to avoid dazzling vehicles behind your ve-
hicle.
Instrument lighting You can adjust the brightness of the instrument lighting.
Fig. 27 Dash panel: Instrument lighting
Instrument lighting
– Switch on the light.
– Turn the control dial ⇒
fig. 27 to the desired intensity of the instrument light-
ing.
The illumination intensity of the Information display ⇒ page 17 is set automatically.
It is only possible to adjust the instrument lighting with the control dial if the light
intensity drops below the set value of the light sensor. 1)
If both switch on versions are conflicting, for example if the steering wheel is turned to the left and
the right turn signal light is switched on, the turn signal light has the higher priority. 48
Lights and Visibility
Page 51 of 248
Headlamp range adjustment
Once the low beam is switched on you can then adapt the range of
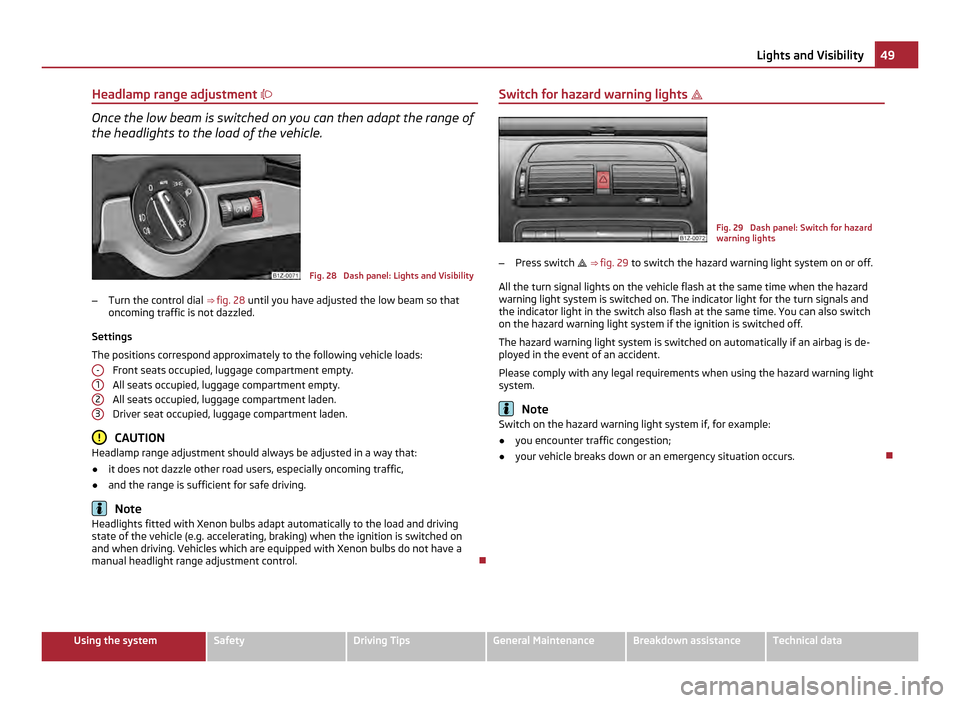
the headlights to the load of the vehicle. Fig. 28 Dash panel: Lights and Visibility
– Turn the control dial ⇒ fig. 28 until you have adjusted the low beam so that
oncoming traffic is not dazzled.
Settings
The positions correspond approximately to the following vehicle loads: Front seats occupied, luggage compartment empty.
All seats occupied, luggage compartment empty.
All seats occupied, luggage compartment laden.
Driver seat occupied, luggage compartment laden. CAUTION
Headlamp range adjustment should always be adjusted in a way that:
● it does not dazzle other road users, especially oncoming traffic,
● and the range is sufficient for safe driving. Note
Headlights fitted with Xenon bulbs adapt automatically to the load and driving
state of the vehicle (e.g. accelerating, braking) when the ignition is switched on
and when driving. Vehicles which are equipped with Xenon bulbs do not have a
manual headlight range adjustment control.
- 1
2
3 Switch for hazard warning lights
Fig. 29 Dash panel: Switch for hazard
warning lights
– Press switch ⇒ fig. 29 to switch the hazard warning light system on or off.
All the turn signal lights on the vehicle flash at the same time when the hazard
warning light system is switched on. The indicator light for the turn signals and
the indicator light in the switch also flash at the same time. You can also switch
on the hazard warning light system if the ignition is switched off.
The hazard warning light system is switched on automatically if an airbag is de-
ployed in the event of an accident.
Please comply with any legal requirements when using the hazard warning light
system. Note
Switch on the hazard warning light system if, for example:
● you encounter traffic congestion;
● your vehicle breaks down or an emergency situation occurs. 49
Lights and Visibility Using the system Safety Driving Tips General Maintenance Breakdown assistance Technical data
Page 52 of 248

The turn signal
and main beam lever The parking lights and headlight flasher are also switched on and
off using the turn signal and main beam lever.
Fig. 30 Turn signal and main beam lever
The turn signal and main beam lever perform the following functions:
Right and left turn signal light
– Push the lever upwards A or downwards
⇒ fig. 30 B .
– If you only wish to flash three times (the so-called convenience turn signal),
push the lever briefly up to the upper or lower pressure point and release it.
This function can be activated/deactivated in the Information display
⇒ page 17.
– Turn signal for changing lanes - in order to only flash briefly, move the lever up
or down to the pressure point and hold it in this position.
Main beam
– Switch on the low beam.
– Push the lever forwards in direction of arrow C (spring-tensioned position).
– If you push the lever towards the steering wheel in direction of arrow D(spring-tensioned position) the main beam is switched off.
Headlight flasher
– Pull the lever towards the steering wheel (spring-tensioned position) in direc-
tion of arrow D - the main beam and warning light
in the instrument clus-
ter come on.
Parking light
For a description of the operation, see ⇒ page 46
, Parking light. Information concerning the function of the lights.
● The turn signal system only operates when the ignition is switched on. The
corresponding warning light or in the instrument cluster also flashes.
● The turn signal is automatically cancelled after negotiating a curve.
● The indicator light flashes at twice its normal rate if a bulb of the turn signal
light fails. CAUTION
Use main beam or the headlight flasher only if this does not risk dazzling other
road users. Note
Use only in accordance with the legal requirements the described lighting and sig-
nal systems.
Interior lighting Interior vehicle lighting - Variant 1 Fig. 31 Interior vehicle lighting - Variant
1
Switching on the interior lighting
– Press switch A towards the edge of the light, the symbol
⇒
fig. 31 appears.
Switching off the interior lighting
– Press the switch A into the middle position
O.
Operating the lights with the door contact switch
– Press switch A towards the centre of the light, the symbol
appears. £50
Lights and Visibility