change wheel SKODA OCTAVIA 2011 2.G / (1Z) Owner's Manual
[x] Cancel search | Manufacturer: SKODA, Model Year: 2011, Model line: OCTAVIA, Model: SKODA OCTAVIA 2011 2.G / (1Z)Pages: 248, PDF Size: 3.79 MB
Page 6 of 248
Head airbags . . . . . . . . . . . . . . . . . . . . . . . . . . . . . . . . . . . . . . 144
Deactivating an airbag . . . . . . . . . . . . . . . . . . . . . . . . . . . . . 145
Transporting children safely . . . . . . . . . . . . . . . . . . . . . . 147
What you should know about transporting children! . 147
Child seat . . . . . . . . . . . . . . . . . . . . . . . . . . . . . . . . . . . . . . . . . 149
Attaching a child seat using the “ISOFIX” system . . . . 152
Attaching child seat using the “Top Tether” system . . 153
Driving Tips . . . . . . . . . . . . . . . . . . . . . . . . . . . . . . . . . . . 154
Intelligent Technology . . . . . . . . . . . . . . . . . . . . . . . . . . . . 154
General information . . . . . . . . . . . . . . . . . . . . . . . . . . . . . . . 154
Electronic stability programme (ESP) . . . . . . . . . . . . . . . . 154
Brakes . . . . . . . . . . . . . . . . . . . . . . . . . . . . . . . . . . . . . . . . . . . . 157
Brake booster . . . . . . . . . . . . . . . . . . . . . . . . . . . . . . . . . . . . . 158
Antilock brake system (ABS) . . . . . . . . . . . . . . . . . . . . . . . . 158
Brake Assist . . . . . . . . . . . . . . . . . . . . . . . . . . . . . . . . . . . . . . . 158
Uphill Start Assist . . . . . . . . . . . . . . . . . . . . . . . . . . . . . . . . . 159
Electromechanical power steering . . . . . . . . . . . . . . . . . . 159
Tyre pressure monitoring system . . . . . . . . . . . . . . . . . . . 159
Diesel particle filter (diesel engine) . . . . . . . . . . . . . . . . . 160
Driving and the Environment . . . . . . . . . . . . . . . . . . . . . 161
The first 1 500 kilometres and afterwards . . . . . . . . . . . 161
Catalytic converter . . . . . . . . . . . . . . . . . . . . . . . . . . . . . . . . . 161
Driving in an economical and environmentally
conscious manner . . . . . . . . . . . . . . . . . . . . . . . . . . . . . . . . . 162
Environmental compatibility . . . . . . . . . . . . . . . . . . . . . . . . 165
Motoring abroad . . . . . . . . . . . . . . . . . . . . . . . . . . . . . . . . . . . 166
Avoiding damage to your vehicle . . . . . . . . . . . . . . . . . . . 166
Driving through bodies of water on roads . . . . . . . . . . . 166
Towing a trailer . . . . . . . . . . . . . . . . . . . . . . . . . . . . . . . . . . . . 168
Technical requirements . . . . . . . . . . . . . . . . . . . . . . . . . . . . 168
General Maintenance . . . . . . . . . . . . . . . . . . . . . . . . . . . . . . 168
Driving Tips . . . . . . . . . . . . . . . . . . . . . . . . . . . . . . . . . . . . . . . 169 General Maintenance
. . . . . . . . . . . . . . . . . . . . . 170
Taking care of your vehicle and cleaning the
vehicle . . . . . . . . . . . . . . . . . . . . . . . . . . . . . . . . . . . . . . . . . . . . . . 170
General . . . . . . . . . . . . . . . . . . . . . . . . . . . . . . . . . . . . . . . . . . . 170
Care of the exterior of vehicle . . . . . . . . . . . . . . . . . . . . . . 170
Care of the interior of vehicle . . . . . . . . . . . . . . . . . . . . . . . 174
Fuel . . . . . . . . . . . . . . . . . . . . . . . . . . . . . . . . . . . . . . . . . . . . . . . . . 176
Petrol . . . . . . . . . . . . . . . . . . . . . . . . . . . . . . . . . . . . . . . . . . . . . 176
Biofuel Ethanol E85 . . . . . . . . . . . . . . . . . . . . . . . . . . . . . . . . 177
Diesel . . . . . . . . . . . . . . . . . . . . . . . . . . . . . . . . . . . . . . . . . . . . . 178
Refuelling . . . . . . . . . . . . . . . . . . . . . . . . . . . . . . . . . . . . . . . . . 178
Inspecting and Replenishing . . . . . . . . . . . . . . . . . . . . . . 180
Engine compartment . . . . . . . . . . . . . . . . . . . . . . . . . . . . . . 180
Engine oil . . . . . . . . . . . . . . . . . . . . . . . . . . . . . . . . . . . . . . . . . 182
Cooling system . . . . . . . . . . . . . . . . . . . . . . . . . . . . . . . . . . . . 184
Brake fluid . . . . . . . . . . . . . . . . . . . . . . . . . . . . . . . . . . . . . . . . 186
Battery . . . . . . . . . . . . . . . . . . . . . . . . . . . . . . . . . . . . . . . . . . . 187
Windshield washer system . . . . . . . . . . . . . . . . . . . . . . . . . 190
Wheels and Tyres . . . . . . . . . . . . . . . . . . . . . . . . . . . . . . . . . . 192
Wheels . . . . . . . . . . . . . . . . . . . . . . . . . . . . . . . . . . . . . . . . . . . 192
Accessories, changes and replacement of parts . 197
General . . . . . . . . . . . . . . . . . . . . . . . . . . . . . . . . . . . . . . . . . . . 197
Breakdown assistance . . . . . . . . . . . . . . . . . . . 198
Breakdown assistance . . . . . . . . . . . . . . . . . . . . . . . . . . . . 198
First-aid box and Warning triangle (Octavia) . . . . . . . . . 198
First-aid box and warning triangle (Estate car) . . . . . . . 198
Fire extinguisher . . . . . . . . . . . . . . . . . . . . . . . . . . . . . . . . . . 198
Vehicle tool kit . . . . . . . . . . . . . . . . . . . . . . . . . . . . . . . . . . . . 199
Spare wheel . . . . . . . . . . . . . . . . . . . . . . . . . . . . . . . . . . . . . . . 199
Changing a wheel . . . . . . . . . . . . . . . . . . . . . . . . . . . . . . . . . 200
Tyre repair kit . . . . . . . . . . . . . . . . . . . . . . . . . . . . . . . . . . . . . 204
Jump-starting . . . . . . . . . . . . . . . . . . . . . . . . . . . . . . . . . . . . . 206
Towing the vehicle . . . . . . . . . . . . . . . . . . . . . . . . . . . . . . . . 208
Fuses and light bulbs . . . . . . . . . . . . . . . . . . . . . . . . . . . . . . 211
Electric fuses . . . . . . . . . . . . . . . . . . . . . . . . . . . . . . . . . . . . . . 211
Bulbs . . . . . . . . . . . . . . . . . . . . . . . . . . . . . . . . . . . . . . . . . . . . . 214 Technical data
. . . . . . . . . . . . . . . . . . . . . . . . . . . . . . . 221
Technical data . . . . . . . . . . . . . . . . . . . . . . . . . . . . . . . . . . . . . 221
General information . . . . . . . . . . . . . . . . . . . . . . . . . . . . . . . 221
Used abbreviations . . . . . . . . . . . . . . . . . . . . . . . . . . . . . . . . 221
Performances . . . . . . . . . . . . . . . . . . . . . . . . . . . . . . . . . . . . . 221
Weight . . . . . . . . . . . . . . . . . . . . . . . . . . . . . . . . . . . . . . . . . . . . 221
Identification details . . . . . . . . . . . . . . . . . . . . . . . . . . . . . . . 222
Fuel consumption according to the ECE standards and
EU guidelines
. . . . . . . . . . . . . . . . . . . . . . . . . . . . . . . . . . . . . 222
Dimensions . . . . . . . . . . . . . . . . . . . . . . . . . . . . . . . . . . . . . . . 223
Engine oil specifications . . . . . . . . . . . . . . . . . . . . . . . . . . . 224
Engine 1.2 l/77 kW TSI - EU5 . . . . . . . . . . . . . . . . . . . . . . . . 226
Engine 1.4 l/59 kW - EU4, EU5 . . . . . . . . . . . . . . . . . . . . . . 227
Engine 1.4 l/90 kW TSI - EU5 . . . . . . . . . . . . . . . . . . . . . . . . 228
Engine 1.6 l/75 kW - EU2, EU4, EU5 . . . . . . . . . . . . . . . . . . 229
Engine 1.8 l/112 kW TSI - EU5, EU2 DDK . . . . . . . . . . . . . . 230
Engine 1.8 l/118 kW TSI - EU5, EU2 DDK . . . . . . . . . . . . . . 231
Engine 2.0 l/147 kW TSI - EU5, EU2 DDK . . . . . . . . . . . . . 232
Engine 1.6 l/77 kW TDI CR - EU5 . . . . . . . . . . . . . . . . . . . . . 233
Engine 1.9 l/77 kW TDI PD - EU4 . . . . . . . . . . . . . . . . . . . . 234
Engine 2.0 l/81 kW TDI CR - EU4, EU5 . . . . . . . . . . . . . . . 235
Engine 2.0 l/103 kW TDI CR - EU4, EU5 . . . . . . . . . . . . . . 236
Engine 2.0 l/125 kW TDI CR - EU5 . . . . . . . . . . . . . . . . . . . 237
Multi-purpose vehicles (AF) . . . . . . . . . . . . . . . . . . . . . . . . 238
Index . . . . . . . . . . . . . . . . . . . . . . . . . . . . . . . . . . . . . . . . . . . . . 2394
Table of Contents
Page 16 of 248
If the control unit recognises that it is appropriate to change the gear, an arrow
Bis shown in the display. The arrow points up or down, depending on whether it is
recommended to shift into a higher or lower gear.
At the same time, the recommended gear is indicated instead of the currently en-
gaged gear A .
Multi-functional indicator (onboard computer) Introduction The multi-functional indicator appears in the display
⇒ fig. 5 or in the information
display ⇒ page 17 depending on the equipment fitted to your vehicle.
The multi-functional indicator offers you a range of useful information. The outside temperature ⇒ page 15
Driving time ⇒ page 15
Current fuel consumption ⇒ page 16
Average fuel consumption ⇒ page 16
Range ⇒ page 16
Distance driven ⇒ page 16
Average speed ⇒ page 16
Current speed ⇒ page 16
Oil temperature ⇒ page 17
Warning against excessive speeds ⇒ page 17
On vehicles which are fitted out with information display, it is possible to switch
off the display of some information.
Note
● In certain national versions the displays appear in the Imperial system of
measures.
● If the display of the second speed is activated in mph, the current speed is not
indicated in km/h on the display. Memory
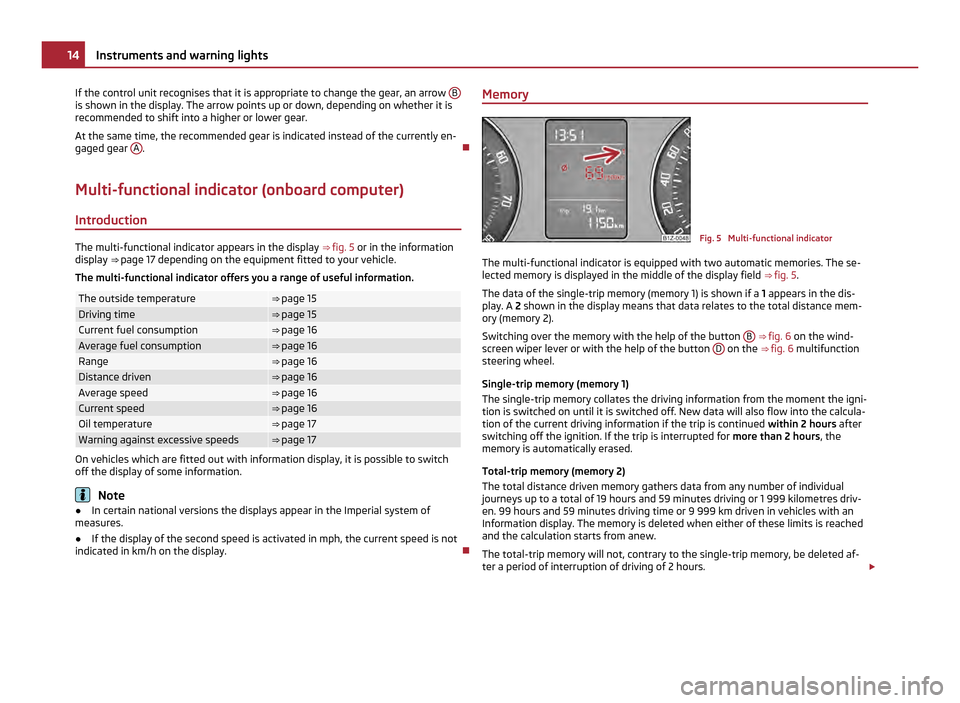
Fig. 5 Multi-functional indicator
The multi-functional indicator is equipped with two automatic memories. The se-
lected memory is displayed in the middle of the display field ⇒ fig. 5 .
The data of the single-trip memory (memory 1) is shown if a 1 appears in the dis-
play. A 2 shown in the display means that data relates to the total distance mem-
ory (memory
2).
Switching over the memory with the help of the button B
⇒
fig. 6 on the wind-
screen wiper lever or with the help of the button D on the
⇒ fig. 6 multifunction
steering wheel.
Single-trip memory (memory 1)
The single-trip memory collates the driving information from the moment the igni-
tion is switched on until it is switched off. New data will also flow into the calcula-
tion of the current driving information if the trip is continued within 2 hours after
switching off the ignition. If the trip is interrupted for more than 2 hours, the
memory is automatically erased.
Total-trip memory (memory 2)
The total distance driven memory gathers data from any number of individual
journeys up to a total of 19 hours and 59
minutes driving or 1 999 kilometres driv-
en. 99 hours and 59 minutes driving time or 9 999 km driven in vehicles with an
Information display. The memory is deleted when either of these limits is reached
and the calculation starts from anew.
The total-trip memory will not, contrary to the single-trip memory, be deleted af-
ter a period of interruption of driving of 2 hours. £14
Instruments and warning lights
Page 19 of 248
Oil temperature
If the oil temperature is lower than 50 °C or if a fault in the system for checking
the oil temperature is present, three lines are displayed instead of the oil temper-
ature.
Warning against excessive speeds Adjust the speed limit while the vehicle is stationary
– With the A button on the multi-function steering wheel
⇒ fig. 6 or the hand-
wheel D on the multi-function steering wheel
⇒ fig. 6 , choose the menu
point Warning against excessive speeds .
– Choose the B button on the multi-function steering wheel, or the handwheel
D on the multi-function steering wheel, the activate the option for setting
the speed limit (the value flashes).
– Use the A button on the windshield wiper lever or the handwheel
D on the
multi-function steering wheel to set the required speed limit., e.g. 50
km/h.
– Use the B button on the windshield wiper lever or the handwheel
D on the
multi-function steering wheel to confirm the required speed limit, or wait
around 5 seconds. The setting saves automatically (the value stops flashing).
This allows you to set the speed in 5 km/h intervals.
Adjust the speed limit while the vehicle is moving
– With the A button on the multi-function windshield wiper lever or the hand-
wheel D on the multi-function steering wheel, choose the menu point
Warn-
ing against excessive speeds .
– You can drive at the desired speed, e.g. 50 km/h.
– Use the B button on the multi-function steering wheel, or the handwheel
Don the multi-function steering wheel to accept the current speed as the speed
limit (the value flashes).
If you wish to change the speed limit that was set, it is changed in 5 km/h inter-
vals (e.g. the accepted speed of 47 km/h increases to 50 km/h or decreases to 45
km/h).
– Press the B button on the windshield wiper lever a second time or the hand-
wheel D on the multi-function steering wheel to confirm the required speed
limit, or wait around 5 seconds. The setting saves automatically (the value
stops flashing). Change or delete speed limit
–
With the A button on the multi-function windshield wiper lever or the hand-
wheel D on the multi-function steering wheel, choose the menu point
Warn-
ing against excessive speeds .
– Press the button B on the windshield wiper lever or the handwheel
D on the
multifunction steering wheel to delete the speed limit.
– Press the button B on the windshield wiper lever a second time or the hand-
wheel D on the multifunction steering wheel to activate the speed limit.
If you exceed the set speed limit, an acoustic warning signal will sound as a warn-
ing. At the same time the message Warning against excessive speeds appears
with the set limit value.
The set speed limit remains stored even after switching off the ignition. WARNING
Concentrate fully at all times on your steering! As the driver you are fully re-
sponsible for road safety.
MAXI DOT display (information display) Introduction The information display provides you with information in a convenient way con-
cerning the current operating state of your vehicle . The information system also
provides you with data (depending on the equipment installed in the vehicle) re-
lating to the radio, mobile phone, multi-functional indicator, radio navigation sys-
tem, the unit connected to the MDI input and the automatic gearbox.
Certain functions and operating conditions are always being checked on the vehi-
cle when the ignition is switched on and also while driving.
Functional faults, if required repair work and other information are indicated by
red symbols ⇒
page 19 and yellow symbols ⇒ page 19.
Lighting up of certain symbols is combined with an acoustic warning signal.
Information and texts giving warnings are also shown in the display ⇒ page 21.
The following information can be shown in the display (depending on the equip-
ment installed on the vehicle): £ 17
Instruments and warning lights Using the system Safety Driving Tips General Maintenance Breakdown assistance Technical data
Page 56 of 248
Automatic wipe/wash for windscreen
–
Pull the lever towards the steering wheel into sprung position 5 , the wash
system sprays immediately, the windscreen wiper starts wiping a little later.
The wash system and the windscreen wiper operate simultaneously at a
speed of more than 120 km/h.
– Release the lever. The windscreen wash system stops and the wiper contin-
ues for another 3 - 4 wiper strokes (depending on the period of spraying of the
windscreen). At a speed of more than 2 km/h, the wiper wipes once again 5
seconds after the last wiper stroke in order to wipe the last drops from the
windscreen. This function can be activated/deactivated by a specialist garage.
Rain sensor
– Move the lever into position 1 .
– You can set the sensitivity of the sensor individually with switch A .
Wiping the rear window pane
– Push the lever away from the steering wheel into position 6 - the windshield
wiper will operate every 6 seconds.
Automatic wipe/wash for the rear window pane
– Press the lever from the steering wheel forward into the sprung position 7 ,
the wash system sprays immediately, the windscreen wiper starts wiping a lit-
tle later. As long as you hold the lever in this position, the wiper operates as
well as the wash system.
– Letting go of the lever will cause the windscreen wash system to stop and the
wiper to continue for another 2 - 3 wiper strokes (depending on the period of
spraying of the windscreen). The lever will stay in position after releasing it
6 .
Switching windscreen wipers off
– Move the lever back into its home position 0 .
After the windscreen wiper switches off each time or the ignition switches off for
the third time, the position of the windscreen wiper changes, this counteracts an
early fatigue of the wiper rubbers.
The windscreen wipers and the wash system only operate if the ignition is switch-
ed on and the bonnet is closed 1)
. If the intermittent wipe is switched on, the intervals are also controlled depending
on speed.
The rain sensor automatically regulates the break between the individual wiper
strokes depending on the intensity of the rain.
The rear window will be wiped again if the front window wipers are on when re-
verse gear is selected.
Top up with wash liquid ⇒ page 190
.
Winter position
If the windscreen wipers are in rest position, they cannot be folded out from the
windscreen. For this reason we recommend adjusting the windscreen wipers in
winter so that they can be folded out from the windscreen easily.
You can set this rest position as follows:
● Switch on the windscreen wipers.
● Switch off the ignition. The windscreen wipers remain in the position in which
they were when switching off the ignition.
You can also use the service position ⇒
page 56 as a winter position. WARNING
● Properly maintained windscreen wiper blades are essential for clear visibil-
ity and safe driving ⇒
page 56.
● Do not use the windscreen washer system at low temperatures, without
heating the windscreen beforehand. Otherwise the window cleaner could
freeze on the windscreen and restrict the view to the front.
● The rain sensor only operates as a support. The driver is not released from
the responsibility to set the function of the windscreen wipers manually de-
pending on the visibility conditions. £1)
On vehicles which do not have a contact switch for the bonnet, the windshield wiper and wash sys-
tem operates also when the bonnet is opened. 54
Lights and Visibility
Page 88 of 248
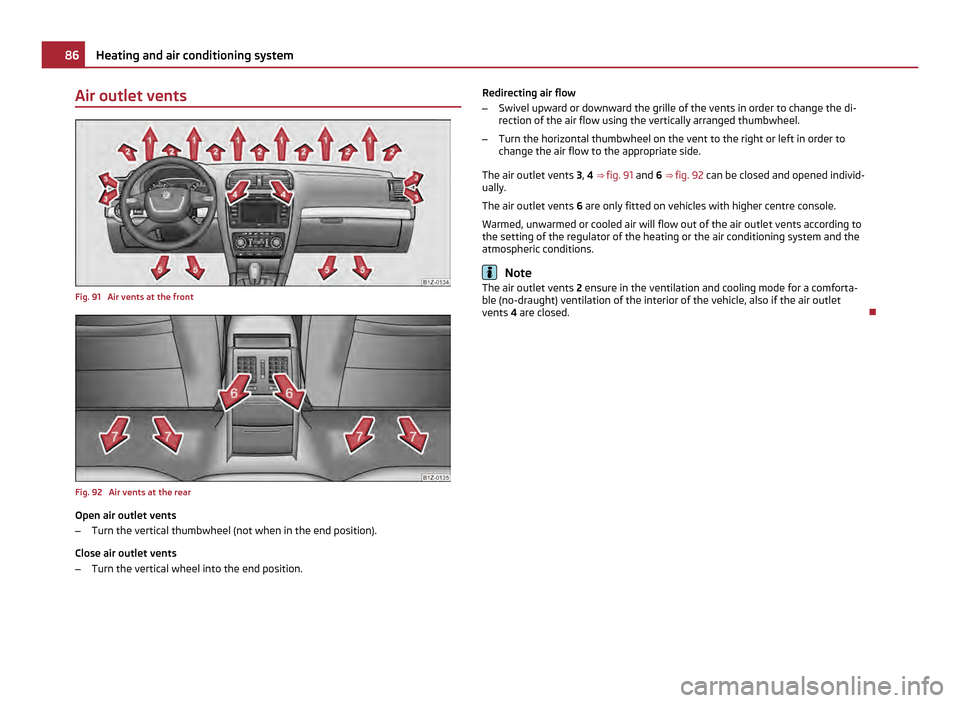
Air outlet vents
Fig. 91 Air vents at the front
Fig. 92 Air vents at the rear
Open air outlet vents
–
Turn the vertical thumbwheel (not when in the end position).
Close air outlet vents
– Turn the vertical wheel into the end position. Redirecting air flow
–
Swivel upward or downward the grille of the vents in order to change the di-
rection of the air flow using the vertically arranged thumbwheel.
– Turn the horizontal thumbwheel on the vent to the right or left in order to
change the air flow to the appropriate side.
The air outlet vents 3, 4 ⇒
fig. 91 and 6 ⇒ fig. 92 can be closed and opened individ-
ually.
The air outlet vents 6 are only fitted on vehicles with higher centre console.
Warmed, unwarmed or cooled air will flow out of the air outlet vents according to
the setting of the regulator of the heating or the air conditioning system and the
atmospheric conditions. Note
The air outlet vents 2 ensure in the ventilation and cooling mode for a comforta-
ble (no-draught) ventilation of the interior of the vehicle, also if the air outlet
vents 4 are closed. 86
Heating and air conditioning system
Page 113 of 248

WARNING (Continued)
● You must on no account unintentionally operate the throttle (e.g. by hand
from the engine compartment) if a drive position is engaged when the car is
stationary. The vehicle would otherwise immediately start off - also when the
handbrake is firmly applied - risk of an accident!
● You must move the selector lever into position P and firmly apply the
handbrake first before you or any other person opens the bonnet and starts
working on the engine when it is running - risk of accident! It is also essential
to observe all warnings ⇒ page 181, Working in the engine compartment
.
Selector lever lock Automatic selector lever lock
With the ignition on, the selector lever is locked when it is in the positions P and
N. You must first of all depress the brake pedal in order to move the selector lever
out of this position. The warning light ⇒
page 27 lights up in the instrument
cluster as a reminder for the driver when the selector lever is in the positions P
and N.
A time delay element ensures that the selector lever is not blocked when rapidly
switching over the position N (e.g. from R to D). This does, for example, allow one
to seesaw out a stuck vehicle. The selector lever lock will click into place if the lev-
er is in the N position for more than 2 seconds without the brake pedal being
pressed.
The selector lever lock is only active if the vehicle is stationary or moving at speed
of less than 5 km/hour. The lock is switched off automatically into position N
when the car is travelling at a higher speed.
Shiftlock button
The Shiftlock button in the handle of selector lever prevents certain selector lever
positions being engaged inadvertently. The selector lever lock is cancelled when
you press the Shiftlock button.
Keylock - Ignition key withdrawal lock
You can only withdraw the ignition key after switching off the ignition if the selec-
tor lever is in position P. If the ignition key is withdrawn, the selector lever is
blocked in position P . Kickdown function The kickdown function provides you with maximum acceleration
power.
Fully depressing the accelerator pedal allows the kickdown function to be activa-
ted in the desired driving program. This function has precedence over the driving
programme and serves for maximum acceleration of the vehicle when exploiting
the maximum power potential of the engine without taking into account the cur-
rent selector lever position ( D, S or Tiptronic ). The gearbox shifts down to one or
several gears in line with the driving state and the vehicle accelerates. The gear-
box does not shift up into the highest gear until the engine has reached its maxi-
mum revolutions for this gear range. WARNING
Please note that using the kickdown function can result in the driven wheels
spinning on a smooth or slippery road surface - risk of skidding!
Dynamic shift programme The automatic gearbox of your vehicle is controlled electronically. Shifting up and
down through the gears is performed automatically on the basis of pre-defined
driving programmes.
Adopting a moderate style of driving
will cause the gearbox to select the most
economical driving programme. Shifting up into a higher gear as soon as possible
and shifting down as late as possible will have a favourable effect on your fuel
consumption.
Adopting a sporty style of driving with rapid movements of the accelerator pedal
combined with sharp acceleration and frequent changes in speed, exploiting the
top speed of the car or depressing the accelerator pedal (kickdown function), will
cause the gearbox to switch over to this style of driving and shift down earlier
with frequent changes in gears in comparison to the moderate style of driving.
Selecting the most appropriate driving programme for the particular style of driv-
ing is a continuous process. Irrespective of this it is, however, possible to switch or
shift down into a dynamic shift programme by depressing the accelerator rapidly.
The gearbox shifts down into a lower gear matching the speed of the car and this
allows you to accelerate rapidly (e.g. when overtaking) without having to depress £ 111
Automatic gearbox Using the system Safety Driving Tips General Maintenance Breakdown assistance Technical data
Page 118 of 248
for your mobile phone, use your mobile phone exclusively in the adapter so that
the radiation in the vehicle drops to a minimum. This also improves the quality of
the connection.
Operation of mobile phones or two-way radio systems may interfere with func-
tioning of the electronic systems of your vehicle. The reasons for this may be:
● no external aerial,
● external aerial incorrectly installed,
● transmission power greater than 10 watts. WARNING
● If a mobile phone or a two-way radio system is operated in the vehicle
without using an external aerial or an external aerial which has been incor-
rectly installed, this can increase the strength of the electromagnetic field in
the interior of the vehicle.
● Please concentrate fully at all times on your driving!
● You must not install two-way radio systems, mobile phones or mounts on
the covers of the airbags or within the immediate deployment range of air-
bags. This might result in injuries to the occupants in the event of an accident.
● Never leave a mobile phone on a seat, on the dash panel or in another
area, from which it can be thrown during a sudden braking manoeuvre, an ac-
cident or a collision. In this case, the occupants of the vehicle might be injured. Note
Observe the country-specific regulations for the use of mobile phones in vehicles.
Universal telephone preinstallation GSM II Introduction The universal telephone preinstallation GSM II is a built-in “hands-free system”, it
provides a voice operated convenience mode via the multifunction steering wheel or the radio navigation system.
All communication between a telephone and the hands-free system of your vehi-
cle can only be established with the help of the Bluetooth ®
technology. The
adapter serves only for charging the telephone and for transmitting the signal to
the external aerial of the vehicle. To ensure an optimum signal transmission, always leave the telephone with the
adapter in the telephone mount.
Furthermore the volume can be changed individually during the call at any time
with the button for setting the radio or radio navigation system or with the but-
tons on the multifunction steering wheel.
WARNING
Concentrate fully at all times on your steering! As the driver you are fully re-
sponsible for road safety. Use the telephone system only to such an extent, so
that you are in full control of your vehicle at any time. Note
● Please refer to the following guidelines ⇒ page 115, Mobile phones and two-
way radio systems.
● Should you have any questions, please contact an authorised ŠKODA Service
Partner.
Phone Phonebook A phone phonebook is part of the mobile phone preinstallation with voice control.
In the phone phonebook there are 2500 free memory locations available. Each
contact can contain up to 4 numbers. This phone phonebook can be used in line
with the mobile telephone.
On vehicles fitted with the radio navigation system Columbus, a maximum of 1200
telephone contacts are shown in the display of this appliance.
After the first connection of the telephone, the system begins to load the phone
book from the phone and the SIM card into the memory of the control unit.
Each time the telephone has established a new connection with the hands-free
system, an update of the relevant phone book is performed. The updating can
take a few minutes. During this time the phone book, which was stored after the
last update was completed, is available. Newly stored telephone numbers are only
shown after the updating has ended.
If the number of contacts loaded exceeds 2 500, the phone book is not complete.
If a telephone event (e.g. incoming or outgoing call, dialogue of the voice control)
occurs during the updating procedure, the updating is interrupted. After the tele-
phone event has ended, the updating starts anew. 116
Communication
Page 122 of 248
The buttons operate the functions for the operating mode of the current tele-
phone.
Operate the telephone via the information display In the menu
Phone you can select the following menu points:
■ Phone book
■ Dial number 1)
■ Call register
■ Voice mailbox
■ Bluetooth 1)
■ Settings 2)
■ Back
Phone book
In the menu point Phone book is the list of the loaded contacts from the tele-
phone memory and the SIM card of the mobile phone.
Dial number
In the menu point Dial number, you can write any telephone number. Select in se-
quence the desired digits with the aid of the handwheel and confirm it by pressing
the handwheel. You can choose the numbers 0 - 9, symbols , , # and the func-
tions Cancel, Call, Delete .
Call register
In the menu point Call register, you can select the following menu points:
■ Missed calls
■ Dialled numbers
■ Received calls
Voice mailbox
In the menu Voice mailbox , it is possible to set the number of the voice mailbox 1)
and then dial the number. Bluetooth
In the menu
Bluetooth you can select the following menu points:
■ User - the overview of the stored users
■ New user - Search for new telephones which are in the reception range
■ Visibility - Switching on the visibility of the telephone unit for other devices
■ Media player
■ Active device
■ Paired devices
■ Search
■ Phone name - the possibility to change the name of the telephone unit (pre-
set SKODA UHV)
Settings
In the menu Settings you can select the following menu points:
■ Phone book
■ Update 1)
■ List
■ Surname
■ First name
■ Ring tone
Back
Return in the basic menu of the telephone. 1)
On vehicles fitted with the radio navigation system Amundsen+, this function can be accessed via
the menu of the radio navigation system, see the operating instructions for the Amundsen+.
2) This function is not available in vehicles fitted with the radio navigation system Amundsen+. 120
Communication
Page 125 of 248
rSAP - Remote SIM access profile
After connecting the telephone with the hands-free system via the
rSAP profile,
the telephone deregisters from the GSM network, the control unit ensures the
communication with the network via the internal antenna. In the telephone only
the interface for Bluetooth ®
remains active. In this case, you can only separate
from the control unit, switch off the Bluetooth ®
connection or select the number
of the emergency call 112 (only valid for some countries).
HFP - Hands Free Profile
After connecting the telephone with the hands-free system via the HFP profile,
the telephone continues to use its GMS module and internal antenna to communi-
cate with the GSM network. WARNING
Concentrate fully at all times on your steering! As the driver you are fully re-
sponsible for road safety. Use the telephone system only to such an extent, so
that you are in full control of your vehicle at any time. Note
● The volume can be changed individually during the call at any time with the
button for setting the radio or radio navigation system or with the buttons on the
multifunction steering wheel.
● Please refer to the following guidelines ⇒ page 115, Mobile phones and two-
way radio systems.
● Should you have any questions, please contact an authorised ŠKODA Service
Partner.
Phone Phonebook A phone phonebook is part of the mobile phone preinstallation with voice control.
In the phone phonebook there are 2000 free memory locations available. Each
contact can contain up to 5 numbers. This phone phonebook can be used in line
with the mobile telephone.
On vehicles fitted with the radio navigation system Columbus, a maximum of 1000
telephone contacts are shown in the display of this appliance.
After the first connection of the telephone, the system begins to load the phone
book from the phone and the SIM card into the memory of the control unit. If the telephone book of the mobile phone contains more than 2 000 entries, the
system announces Phone book not fully loaded .
Each time the telephone has established a new connection with the hands-free
system, an update of the relevant phone book is performed. The updating can
take a few minutes. During this time the phone book, which was stored after the
last update was completed, is available. Newly stored telephone numbers are only
shown after the updating has ended.
If a telephone event (e.g. incoming or outgoing call, dialogue of the voice control)
occurs during the updating procedure, the updating is interrupted. After the tele-
phone event has ended, the updating starts anew.
Connection of the telephone with the hands-free system In order to connect a mobile phone with the hands-free system, it is necessary to
connect the telephone to the hands-free system. Detailed information on this is
provided in the operating instructions of your mobile phone. The following steps
must be carried out for the connection.
Connecting the telephone with the hands-free system via the HFP profile
–
Activate the Bluetooth ®
in your telephone and the visibility of the mobile
phone.
– Switch on the ignition.
– Select the menu Phone - Phone search in the information display and wait un-
til the control unit has ended the search.
– Select your mobile phone in the menu of the units found.
– Within 30 seconds enter the 16 digit PIN of your control unit as indicated in the
information display and confirm it according to the instructions on the display
of your telephone.
– To store a new user or to download the telephone book and the identification
data of the SIM card into the control unit, follow the instructions in the infor-
mation display and on the mobile phone.
Connecting the telephone with the hands-free system via the rSAP profile
– Activate the Bluetooth ®
in your telephone and the visibility of the mobile
phone. For certain mobile phones it is necessary to switch on first the rSAP
function.
– Switch on the ignition. £ 123
Communication Using the system Safety Driving Tips General Maintenance Breakdown assistance Technical data
Page 138 of 248
The speed of the vehicle is, nevertheless, the most important factor. Doubling the
speed of the vehicle from 25 km/h up to 50 km/hour increases the kinetic energy
four times.
The common opinion that it is possible to support your body in a minor accident
with your hands, is incorrect. Even in a collision at only a low speed, the forces
acting on the body are such that it is no longer possible to support your body.
Even if you only drive at a speed within the range from 30 km/hour to 50 km/hour,
the forces which are produced on your body in the event of an accident can easily
exceed 10
000 N (Newton). This equals a weight of one tonne (1 000 kg).
In the event of a frontal collision, occupants of the vehicle not wearing a seat belt,
are thrown forward and strike in an uncontrolled way parts of the interior of the
vehicle, such as steering wheel, dash panel, windscreen, ⇒ fig. 118 - left. The occu-
pants of a vehicle who have not fastened their seat belts may even be thrown out
of the vehicle. This can result in fatal injuries.
It is also important that rear seat occupants fasten their seat belts as they will
otherwise be thrown through the vehicle in an uncontrolled manner in the event
of an accident A rear seat passenger who has not fastened the seat belt is a dan-
ger not only to himself but also for those seated at the front ⇒ fig. 118 - right.
Important safety information regarding the use of
seat belts The correct use of the seat belts considerably reduces the risk of
injury! WARNING
● The belt webbing must not be jammed in-between at any point or twisted,
or chafe against any sharp edges.
● It is important that the belt webbing is properly routed if the seat belts are
to offer their maximum protection ⇒ page 137, How are seat belts correctly
fastened?
.
● No two persons (also not children) should ever use a single seat belt to-
gether.
● The maximum protection which seat belts can offer is only achieved if you
are correctly seated ⇒
page 132, Correct seated position. WARNING (Continued)
● The belt webbing must not run across solid or fragile objects (e.g. specta-
cles, ball-point pens, keys etc.) as this may be a cause of injuries.
● Many layers of clothing and loose clothing (e. g. a winter coat over a jacket)
do not allow you to be correctly seated and impairs proper operation of the
seat belts.
● It is prohibited to use clamps or other objects to adjust seat belts (e. g. for
shortening the belts for smaller persons).
● The lock tongue should only be inserted into the lock which is the correct
one for your seat. Wrong use of the safety belt will reduce its capacity to pro-
tect and the risk of injury increases.
● The seat backrests of the front seats must not be tilted too far to the rear
otherwise the seatbelts can lose their effectiveness.
● The three-point seat belt for the rear middle seat can only fulfil its func-
tion reliably when the backrests are correctly locked into position ⇒ page 64
.
● The belt webbing must always be kept clean. Soiled belt webbing may im-
pair proper operation of the inertia reel ⇒
page 175, Seat belts.
● The slot of the belt tongue must not be blocked by paper or similar objects
otherwise the belt tongue will not lock in place properly.
● Inspect the seat belts regularly to ensure they are in good condition. If you
find seat belts which have damage to the belt, the seat belt connections, to
the inertia reel or to the lock, the relevant seat belt must be replaced by a
specialist garage.
● The seat belts must not be removed or changed in any way. Do not make
an attempt to repair the seat belts yourself.
● Damaged seat belts which have been subjected to stress in an accident
and were therefore stretched, must be replaced - this is best done by a spe-
cialist garage. The anchorage points of the belts must also be inspected. The
anchorage points for the belts should also be checked.
● In certain countries it is possible to use seat belts which differ in terms of
their operation from the seat belts which are described on the pages which
follow. 136
Seat belts