headlamp SKODA OCTAVIA 2011 2.G / (1Z) Owner's Manual
[x] Cancel search | Manufacturer: SKODA, Model Year: 2011, Model line: OCTAVIA, Model: SKODA OCTAVIA 2011 2.G / (1Z)Pages: 248, PDF Size: 3.79 MB
Page 51 of 248

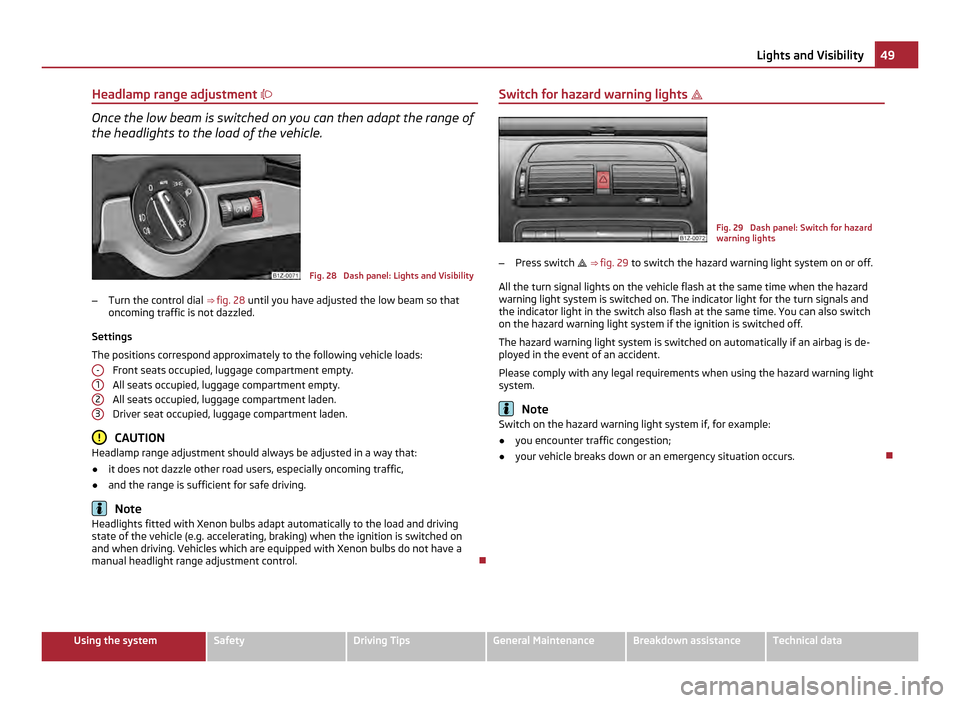
Headlamp range adjustment
Once the low beam is switched on you can then adapt the range of
the headlights to the load of the vehicle. Fig. 28 Dash panel: Lights and Visibility
– Turn the control dial ⇒ fig. 28 until you have adjusted the low beam so that
oncoming traffic is not dazzled.
Settings
The positions correspond approximately to the following vehicle loads: Front seats occupied, luggage compartment empty.
All seats occupied, luggage compartment empty.
All seats occupied, luggage compartment laden.
Driver seat occupied, luggage compartment laden. CAUTION
Headlamp range adjustment should always be adjusted in a way that:
● it does not dazzle other road users, especially oncoming traffic,
● and the range is sufficient for safe driving. Note
Headlights fitted with Xenon bulbs adapt automatically to the load and driving
state of the vehicle (e.g. accelerating, braking) when the ignition is switched on
and when driving. Vehicles which are equipped with Xenon bulbs do not have a
manual headlight range adjustment control.
- 1
2
3 Switch for hazard warning lights
Fig. 29 Dash panel: Switch for hazard
warning lights
– Press switch ⇒ fig. 29 to switch the hazard warning light system on or off.
All the turn signal lights on the vehicle flash at the same time when the hazard
warning light system is switched on. The indicator light for the turn signals and
the indicator light in the switch also flash at the same time. You can also switch
on the hazard warning light system if the ignition is switched off.
The hazard warning light system is switched on automatically if an airbag is de-
ployed in the event of an accident.
Please comply with any legal requirements when using the hazard warning light
system. Note
Switch on the hazard warning light system if, for example:
● you encounter traffic congestion;
● your vehicle breaks down or an emergency situation occurs. 49
Lights and Visibility Using the system Safety Driving Tips General Maintenance Breakdown assistance Technical data
Page 57 of 248

CAUTION
● In cold temperatures and in winter, check before the trip or before switching
on the ignition that the wiper blades are not frozen. Switching on windscreen
wipers when the blades are frozen to the windscreen may result in damage both
to the blades and the motor of the windscreen wipers!
● If you switch off the ignition while the windscreen wipers are on, the wipers
will sweep in the same mode the next time the ignition is switched on. At low
temperatures, the wipers may freeze to the window between switching off the ig-
nition and the next time you switch the ignition on again.
● Carefully detach frozen wiper blades from the front or rear window.
● Remove snow and ice from the window wipers before driving. Note
● If the slower 2 or the faster
3 wiper setting is switched on
⇒ fig. 37 and the
vehicle speed decreases to below 4 km/h, the lower wiper step is switched on au-
tomatically. At a speed increase of more than 8 km/h the previous wiper setting is
established again.
● If there is an obstacle on the windscreen, the wiper will try to push away the
obstacle. If the obstacle continues to block the wiper, the wiper stops automati-
cally after 5 attempts to eliminate the obstacle, in order to avoid a damage to the
wiper. Remove the obstacle and and switch on the wiper again.
● The windscreen washer nozzles for the windscreen are heated when the en-
gine is running and the outside temperature is less than +10
°C.
● The content of the windscreen wiper reservoir is 3 litres. On vehicles which are
equipped with a headlight cleaning system, the content of the reservoir is 5.5
li-
tres. On vehicles fitted with auxiliary heating, the content of the windscreen wiper
reservoir is 4.5 litres.
Automatic rear window wiper (Estate car) If the windshield wiper is in positions
2
⇒ fig. 37 or 3 the rear view window is
wiped every 30/10 seconds if the vehicle's speed exceeds 5 km/h.
When the rain sensor is active (the lever is in the position 1 ) the function is only
active if the front window wipers continue to operate (no break between each
wiping process). Activation/deactivation
The function of the automatic rear window wiper is activated/deactivated in the
information display in the menu:
■ Settings
■ Lights & Vision
■ Rear wiper Note
The function of the automatic rear window wiper is only valid for Estate car vehi-
cles which are equipped with an information display. The function is activated in
the factory.
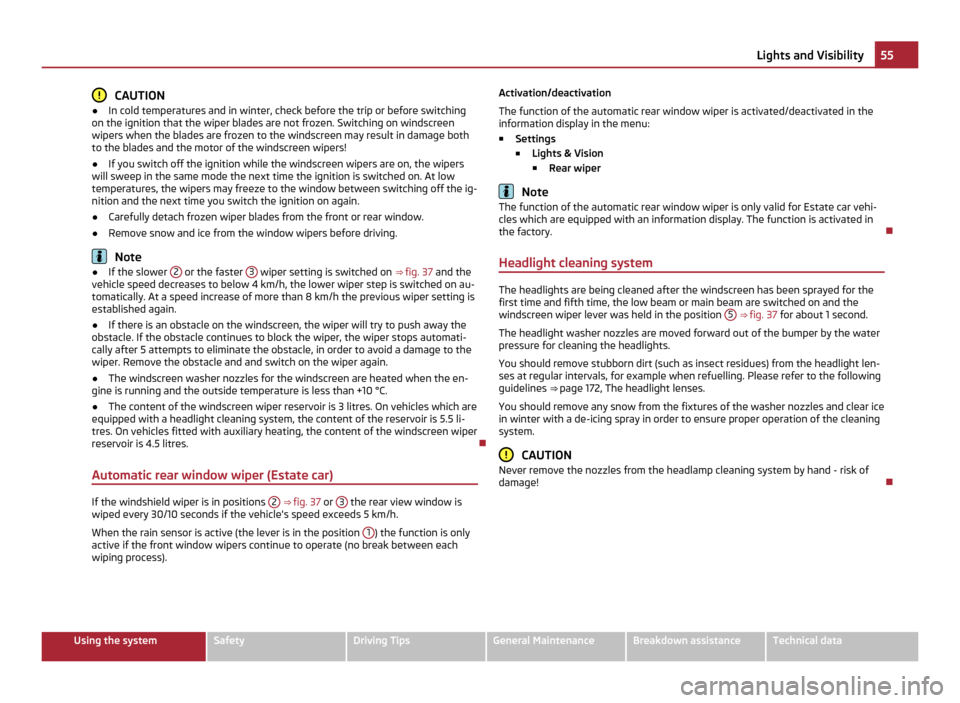
Headlight cleaning system The headlights are being cleaned after the windscreen has been sprayed for the
first time and fifth time, the low beam or main beam are switched on and the
windscreen wiper lever was held in the position 5
⇒ fig. 37 for about 1 second.
The headlight washer nozzles are moved forward out of the bumper by the water
pressure for cleaning the headlights.
You should remove stubborn dirt (such as insect residues) from the headlight len-
ses at regular intervals, for example when refuelling. Please refer to the following
guidelines ⇒
page 172, The headlight lenses.
You should remove any snow from the fixtures of the washer nozzles and clear ice
in winter with a de-icing spray in order to ensure proper operation of the cleaning
system. CAUTION
Never remove the nozzles from the headlamp cleaning system by hand - risk of
damage! 55
Lights and Visibility Using the system Safety Driving Tips General Maintenance Breakdown assistance Technical data
Page 193 of 248

The windshield washer reservoir contains the cleaning fluid for the windscreen or
rear window and for the headlamp cleaning system. The reservoir is located at the
front right of the engine compartment ⇒
fig. 156 .
The filling level of the container is about 3 litres and about 5.5 litres on vehicles
which have a headlight washing system.
Clear water is not sufficient to intensively clean the windscreen and headlights.
We therefore recommend using clean washing water together with the screen
cleaner from ŠKODA Original Accessories (in winter additionally with antifreeze)
which is capable of removing stubborn dirt. Follow the instructions for use on the
packaging when using screen cleaning products.
You should always add antifreeze to the cleaning water in winter even if your ve-
hicle is fitted with heated windscreen washer nozzles.
It is also possible in exceptional cases to use methylated spirits when no screen
cleaner with antifreeze is available. The concentration of methylated spirits must
not be more than 15 %. Please note, however, that the antifreeze protection at
this concentration is only adequate down to -5 °C. WARNING
Read and observe the warning notes ⇒ page 181, Working in the engine com-
partment
before working in the engine compartment. CAUTION
● On no account should you add radiator antifreeze or other additives to the
windscreen washer fluid.
● If the vehicle is fitted with a headlight cleaning system, you should only add
cleaning products which do not attack the polycarbonate coating of the head-
lights to the windscreen washer fluid. Please contact an authorised
ŠKODA Serv-
ice Partner who will help you select a suitable cleaning agent. 191
Inspecting and Replenishing Using the system Safety Driving Tips General Maintenance Breakdown assistance Technical data
Page 215 of 248

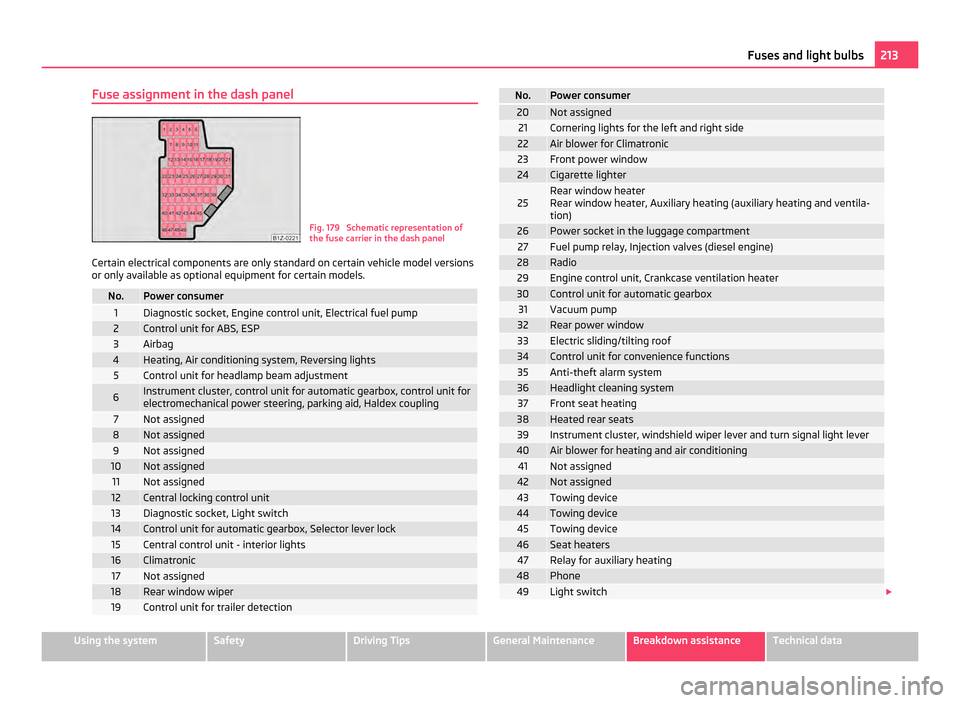
Fuse assignment in the dash panel
Fig. 179 Schematic representation of
the fuse carrier in the dash panel
Certain electrical components are only standard on certain vehicle model versions
or only available as optional equipment for certain models. No. Power consumer
1 Diagnostic socket, Engine control unit, Electrical fuel pump
2 Control unit for ABS, ESP
3 Airbag
4 Heating, Air conditioning system, Reversing lights
5 Control unit for headlamp beam adjustment
6 Instrument cluster, control unit for automatic gearbox, control unit for
electromechanical power steering, parking aid, Haldex coupling 7 Not assigned
8 Not assigned
9 Not assigned
10 Not assigned
11 Not assigned
12 Central locking control unit
13 Diagnostic socket, Light switch
14 Control unit for automatic gearbox, Selector lever lock
15 Central control unit - interior lights
16 Climatronic
17 Not assigned
18 Rear window wiper
19 Control unit for trailer detection No. Power consumer
20 Not assigned
21 Cornering lights for the left and right side
22 Air blower for Climatronic
23 Front power window
24 Cigarette lighter
25 Rear window heater
Rear window heater, Auxiliary heating (auxiliary heating and ventila-
tion)
26 Power socket in the luggage compartment
27 Fuel pump relay, Injection valves (diesel engine)
28 Radio
29 Engine control unit, Crankcase ventilation heater
30 Control unit for automatic gearbox
31 Vacuum pump
32 Rear power window
33 Electric sliding/tilting roof
34 Control unit for convenience functions
35 Anti-theft alarm system
36 Headlight cleaning system
37 Front seat heating
38 Heated rear seats
39 Instrument cluster, windshield wiper lever and turn signal light lever
40 Air blower for heating and air conditioning
41 Not assigned
42 Not assigned
43 Towing device
44 Towing device
45 Towing device
46 Seat heaters
47 Relay for auxiliary heating
48 Phone
49 Light switch
£ 213
Fuses and light bulbs Using the system Safety Driving Tips General Maintenance Breakdown assistance Technical data