navigation system SKODA OCTAVIA 2011 2.G / (1Z) Owner's Manual
[x] Cancel search | Manufacturer: SKODA, Model Year: 2011, Model line: OCTAVIA, Model: SKODA OCTAVIA 2011 2.G / (1Z)Pages: 248, PDF Size: 3.79 MB
Page 11 of 248
Using the system
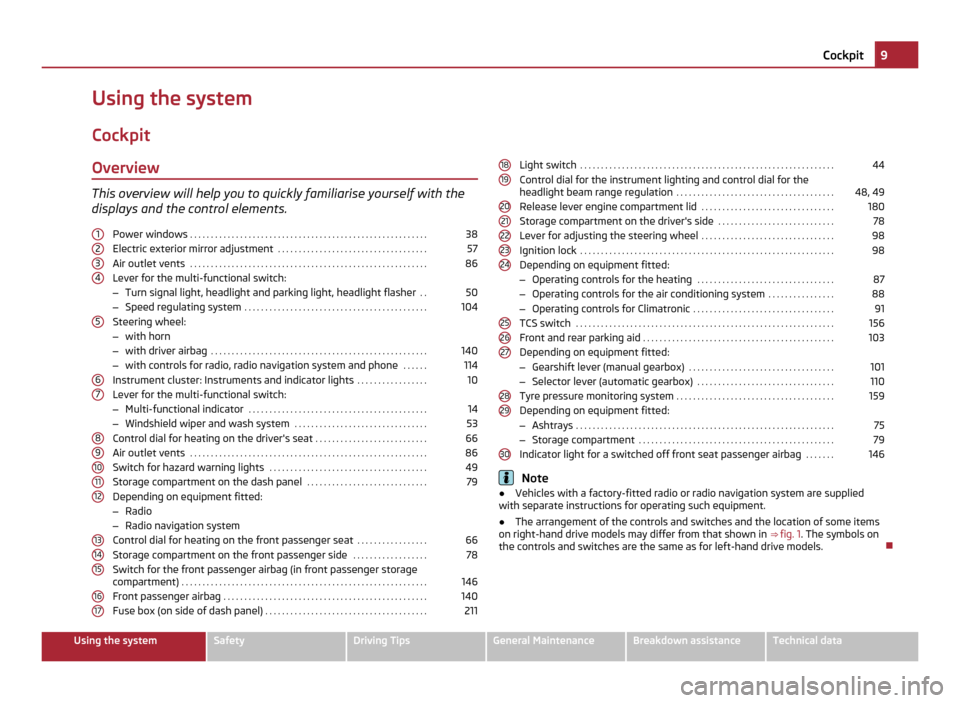
Cockpit Overview This overview will help you to quickly familiarise yourself with the
displays and the control elements.
Power windows . . . . . . . . . . . . . . . . . . . . . . . . . . . . . . . . . . . . . . . . . . . . . . . . . . . . . . . . . 38
Electric exterior mirror adjustment . . . . . . . . . . . . . . . . . . . . . . . . . . . . . . . . . . . . 57
Air outlet vents . . . . . . . . . . . . . . . . . . . . . . . . . . . . . . . . . . . . . . . . . . . . . . . . . . . . . . . . . 86
Lever for the multi-functional switch:
– Turn signal light, headlight and parking light, headlight flasher . .50
– Speed regulating system . . . . . . . . . . . . . . . . . . . . . . . . . . . . . . . . . . . . . . . . . . . . 104
Steering wheel:
– with horn
– with driver airbag . . . . . . . . . . . . . . . . . . . . . . . . . . . . . . . . . . . . . . . . . . . . . . . . . . . . 140
– with controls for radio, radio navigation system and phone . . . . . .114
Instrument cluster: Instruments and indicator lights . . . . . . . . . . . . . . . . .10
Lever for the multi-functional switch:
– Multi-functional indicator . . . . . . . . . . . . . . . . . . . . . . . . . . . . . . . . . . . . . . . . . . . 14
– Windshield wiper and wash system . . . . . . . . . . . . . . . . . . . . . . . . . . . . . . . . 53
Control dial for heating on the driver's seat . . . . . . . . . . . . . . . . . . . . . . . . . . .66
Air outlet vents . . . . . . . . . . . . . . . . . . . . . . . . . . . . . . . . . . . . . . . . . . . . . . . . . . . . . . . . . 86
Switch for hazard warning lights . . . . . . . . . . . . . . . . . . . . . . . . . . . . . . . . . . . . . . 49
Storage compartment on the dash panel . . . . . . . . . . . . . . . . . . . . . . . . . . . . .79
Depending on equipment fitted:
– Radio
– Radio navigation system
Control dial for heating on the front passenger seat . . . . . . . . . . . . . . . . .
66
Storage compartment on the front passenger side . . . . . . . . . . . . . . . . . .78
Switch for the front passenger airbag (in front passenger storage
compartment) . . . . . . . . . . . . . . . . . . . . . . . . . . . . . . . . . . . . . . . . . . . . . . . . . . . . . . . . . . . 146
Front passenger airbag . . . . . . . . . . . . . . . . . . . . . . . . . . . . . . . . . . . . . . . . . . . . . . . . . 140
Fuse box (on side of dash panel) . . . . . . . . . . . . . . . . . . . . . . . . . . . . . . . . . . . . . . . 211
1 2
3
4
5
6
7
8
9
10
11
12
13
14
15
16
17 Light switch
. . . . . . . . . . . . . . . . . . . . . . . . . . . . . . . . . . . . . . . . . . . . . . . . . . . . . . . . . . . . . 44
Control dial for the instrument lighting and control dial for the
headlight beam range regulation . . . . . . . . . . . . . . . . . . . . . . . . . . . . . . . . . . . . . . 48, 49
Release lever engine compartment lid . . . . . . . . . . . . . . . . . . . . . . . . . . . . . . . .180
Storage compartment on the driver's side . . . . . . . . . . . . . . . . . . . . . . . . . . . .78
Lever for adjusting the steering wheel . . . . . . . . . . . . . . . . . . . . . . . . . . . . . . . .98
Ignition lock . . . . . . . . . . . . . . . . . . . . . . . . . . . . . . . . . . . . . . . . . . . . . . . . . . . . . . . . . . . . . 98
Depending on equipment fitted:
– Operating controls for the heating . . . . . . . . . . . . . . . . . . . . . . . . . . . . . . . . . 87
– Operating controls for the air conditioning system . . . . . . . . . . . . . . . .88
– Operating controls for Climatronic . . . . . . . . . . . . . . . . . . . . . . . . . . . . . . . . . . 91
TCS switch . . . . . . . . . . . . . . . . . . . . . . . . . . . . . . . . . . . . . . . . . . . . . . . . . . . . . . . . . . . . . . 156
Front and rear parking aid . . . . . . . . . . . . . . . . . . . . . . . . . . . . . . . . . . . . . . . . . . . . . . 103
Depending on equipment fitted:
– Gearshift lever (manual gearbox) . . . . . . . . . . . . . . . . . . . . . . . . . . . . . . . . . . . 101
– Selector lever (automatic gearbox) . . . . . . . . . . . . . . . . . . . . . . . . . . . . . . . . . 110
Tyre pressure monitoring system . . . . . . . . . . . . . . . . . . . . . . . . . . . . . . . . . . . . . . 159
Depending on equipment fitted:
– Ashtrays . . . . . . . . . . . . . . . . . . . . . . . . . . . . . . . . . . . . . . . . . . . . . . . . . . . . . . . . . . . . . . 75
– Storage compartment . . . . . . . . . . . . . . . . . . . . . . . . . . . . . . . . . . . . . . . . . . . . . . . 79
Indicator light for a switched off front seat passenger airbag . . . . . . .146 Note
● Vehicles with a factory-fitted radio or radio navigation system are supplied
with separate instructions for operating such equipment.
● The arrangement of the controls and switches and the location of some items
on right-hand drive models may differ from that shown in ⇒
fig. 1. The symbols on
the controls and switches are the same as for left-hand drive models. 18
19
20
21
22
23
24
25
26
27
28
29
30 9
Cockpit Using the system Safety Driving Tips General Maintenance Breakdown assistance Technical data
Page 19 of 248
Oil temperature
If the oil temperature is lower than 50 °C or if a fault in the system for checking
the oil temperature is present, three lines are displayed instead of the oil temper-
ature.
Warning against excessive speeds Adjust the speed limit while the vehicle is stationary
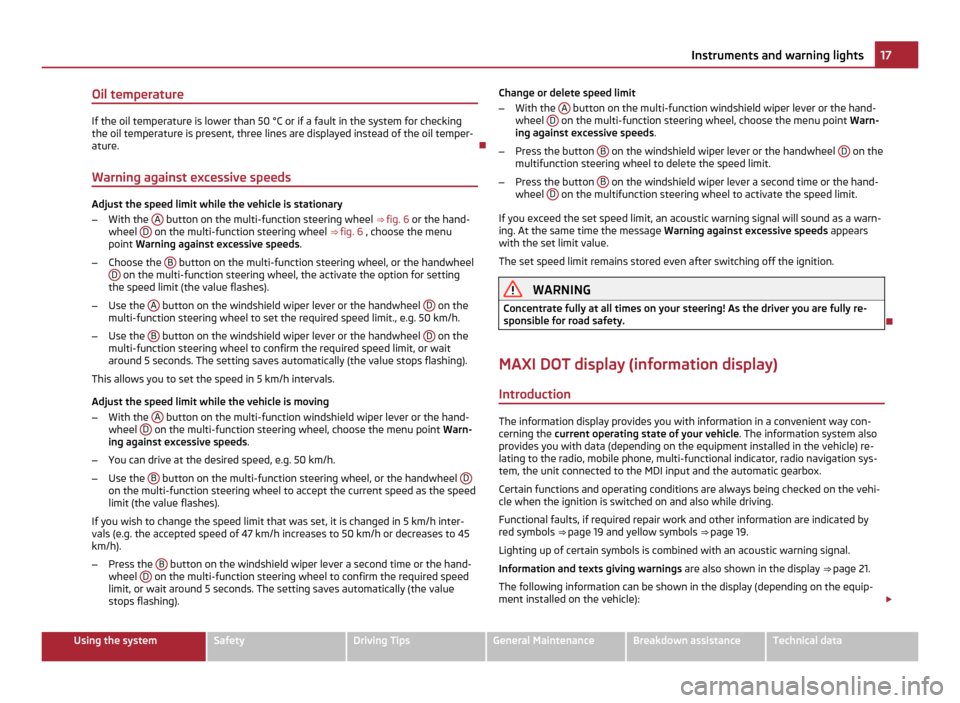
– With the A button on the multi-function steering wheel
⇒ fig. 6 or the hand-
wheel D on the multi-function steering wheel
⇒ fig. 6 , choose the menu
point Warning against excessive speeds .
– Choose the B button on the multi-function steering wheel, or the handwheel
D on the multi-function steering wheel, the activate the option for setting
the speed limit (the value flashes).
– Use the A button on the windshield wiper lever or the handwheel
D on the
multi-function steering wheel to set the required speed limit., e.g. 50
km/h.
– Use the B button on the windshield wiper lever or the handwheel
D on the
multi-function steering wheel to confirm the required speed limit, or wait
around 5 seconds. The setting saves automatically (the value stops flashing).
This allows you to set the speed in 5 km/h intervals.
Adjust the speed limit while the vehicle is moving
– With the A button on the multi-function windshield wiper lever or the hand-
wheel D on the multi-function steering wheel, choose the menu point
Warn-
ing against excessive speeds .
– You can drive at the desired speed, e.g. 50 km/h.
– Use the B button on the multi-function steering wheel, or the handwheel
Don the multi-function steering wheel to accept the current speed as the speed
limit (the value flashes).
If you wish to change the speed limit that was set, it is changed in 5 km/h inter-
vals (e.g. the accepted speed of 47 km/h increases to 50 km/h or decreases to 45
km/h).
– Press the B button on the windshield wiper lever a second time or the hand-
wheel D on the multi-function steering wheel to confirm the required speed
limit, or wait around 5 seconds. The setting saves automatically (the value
stops flashing). Change or delete speed limit
–
With the A button on the multi-function windshield wiper lever or the hand-
wheel D on the multi-function steering wheel, choose the menu point
Warn-
ing against excessive speeds .
– Press the button B on the windshield wiper lever or the handwheel
D on the
multifunction steering wheel to delete the speed limit.
– Press the button B on the windshield wiper lever a second time or the hand-
wheel D on the multifunction steering wheel to activate the speed limit.
If you exceed the set speed limit, an acoustic warning signal will sound as a warn-
ing. At the same time the message Warning against excessive speeds appears
with the set limit value.
The set speed limit remains stored even after switching off the ignition. WARNING
Concentrate fully at all times on your steering! As the driver you are fully re-
sponsible for road safety.
MAXI DOT display (information display) Introduction The information display provides you with information in a convenient way con-
cerning the current operating state of your vehicle . The information system also
provides you with data (depending on the equipment installed in the vehicle) re-
lating to the radio, mobile phone, multi-functional indicator, radio navigation sys-
tem, the unit connected to the MDI input and the automatic gearbox.
Certain functions and operating conditions are always being checked on the vehi-
cle when the ignition is switched on and also while driving.
Functional faults, if required repair work and other information are indicated by
red symbols ⇒
page 19 and yellow symbols ⇒ page 19.
Lighting up of certain symbols is combined with an acoustic warning signal.
Information and texts giving warnings are also shown in the display ⇒ page 21.
The following information can be shown in the display (depending on the equip-
ment installed on the vehicle): £ 17
Instruments and warning lights Using the system Safety Driving Tips General Maintenance Breakdown assistance Technical data
Page 20 of 248
Main menu ⇒ page 18
Door, luggage compartment door and bonnet ajar
warning ⇒ page 18
Service Interval Display ⇒
page 12 Selector lever position for an automatic gearbox ⇒
page 108
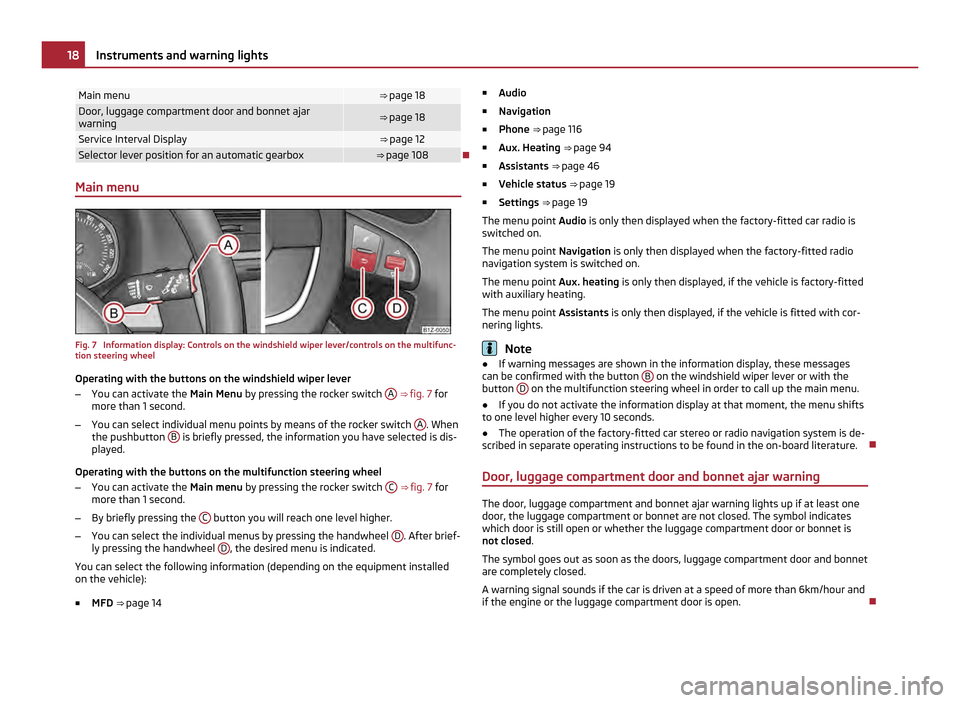
Main menu Fig. 7 Information display: Controls on the windshield wiper lever/controls on the multifunc-
tion steering wheel
Operating with the buttons on the windshield wiper lever
– You can activate the Main Menu by pressing the rocker switch A
⇒ fig. 7 for
more than 1
second.
– You can select individual menu points by means of the rocker switch A . When
the pushbutton B is briefly pressed, the information you have selected is dis-
played.
Operating with the buttons on the multifunction steering wheel
– You can activate the Main menu by pressing the rocker switch C
⇒ fig. 7
for
more than 1 second.
– By briefly pressing the C button you will reach one level higher.
– You can select the individual menus by pressing the handwheel D . After brief-
ly pressing the handwheel D , the desired menu is indicated.
You can select the following information (depending on the equipment installed
on the vehicle):
■ MFD ⇒
page 14 ■
Audio
■ Navigation
■ Phone ⇒ page 116
■ Aux.
Heating ⇒ page 94
■ Assistants ⇒ page 46
■ Vehicle status ⇒ page 19
■ Settings ⇒ page 19
The menu point Audio is only then displayed when the factory-fitted car radio is
switched on.
The menu point Navigation is only then displayed when the factory-fitted radio
navigation system is switched on.
The menu point Aux. heating is only then displayed, if the vehicle is factory-fitted
with auxiliary heating.
The menu point Assistants is only then displayed, if the vehicle is fitted with cor-
nering lights. Note
● If warning messages are shown in the information display, these messages
can be confirmed with the button B on the windshield wiper lever or with the
button D on the multifunction steering wheel in order to call up the main menu.
● If you do not activate the information display at that moment, the menu shifts
to one level higher every 10 seconds.
● The operation of the factory-fitted car stereo or radio navigation system is de-
scribed in separate operating instructions to be found in the on-board literature.
Door, luggage compartment door and bonnet ajar warning The door, luggage compartment and bonnet ajar warning lights up if at least one
door, the luggage compartment or bonnet are not closed. The symbol indicates
which door is still open or whether the luggage compartment door or bonnet is
not closed
.
The symbol goes out as soon as the doors, luggage compartment door and bonnet
are completely closed.
A warning signal sounds if the car is driven at a speed of more than 6km/hour and
if the engine or the luggage compartment door is open. 18
Instruments and warning lights
Page 59 of 248

Attaching the wiper blade
–
Position the wiper blade onto the wiper arm and lock the locking button A .
– Check whether the wiper blade is correctly attached.
– Fold the windscreen wiper arm back onto the windscreen.
The same remarks apply here as for ⇒ page 56
.
Rear-view mirror Manual dimming interior rear-view mirror Basic setting
–
Pull the lever on the bottom edge of the mirror forward.
Dimming mirror
– Pull the lever on the bottom edge of the mirror back.
Automatic dimming interior mirror Fig. 40 Automatic dimming interior mir-
ror
Switching on the automatic dimming
– Press the button B
⇒ fig. 40 , the warning light A lights up.
Switching off the automatic dimming
– Press again the button B - the warning light goes out
A .If the automatic dimming is switched on, the mirror dims
automatically depending
on the light striking the mirror from the rear. The mirror has no lever on the bot-
tom edge of the mirror. After the reverse gear is engaged, the mirror always
moves back into the normal position.
Do not attach external navigation devices on the windscreen or in the vicinity of
the automatic dimming interior mirror ⇒
.
WARNING
The display lighting of the external navigation device may cause malfunction
of the automatic dimming interior mirror – risk of accident. Note
● Automatic mirror dimming operates only properly if the sun screen for the rear
window in the housing on the luggage compartment cover is not in use or the
light striking the interior rear-view mirror is not affected by other objects.
● Do not affix any stickers in front of the light sensor, so that you do not impair
the automatic dimming function or put it out of operation.
● If you switch off the automatic dimming interior rear-view mirror, also the ex-
terior mirror dimming is switched off.
Exterior mirror You can adjust the exterior mirrors electrically.
Fig. 41 Inner part of door: Rotary knob
Adjust the rear mirror before commencing to drive so that there is a clear view to
the rear. £ 57
Lights and Visibility Using the system Safety Driving Tips General Maintenance Breakdown assistance Technical data
Page 93 of 248
WARNING
You should not leave recirculated air mode on over a longer period of time, as
“stale ” air may result in fatigue in the driver and occupants, divert your atten-
tion and also cause the windows to mist up. The risk of having an accident in-
creases. Switch recirculated air mode off as soon as the windows begin mist-
ing up.
Climatronic (automatic air conditioning) Description The Climatronic system is an automatic heating, fresh air and cool-
ing system which provides optimal comfort for the occupants of the
car.
The Climatronic maintains fully automatically a convenience temperature. This is
achieved by automatically varying the temperature of the outflowing air, the
blower stages and the air distribution. The system also takes into account sun-
light which eliminates the need to alter the settings manually. The automatic
mode
⇒
page 92 ensures maximum well-being of the occupants at all times of
the year.
Description of Climatronic system
The cooling operates only if the following conditions are met:
● engine running,
● outside temperature above approx. +2 °C,
● AC switched on.
The AC compressor is switched off at a high coolant temperature in order to pro-
vide cooling at a high load of the engine.
Recommended setting for all periods of the year:
● Set the desired temperature, we recommend 22 °C.
● Press the button AUTO
⇒ fig. 95 .
● Move the air outlet vents 3 and 4 so that the air flow is directed slightly up-
wards. Note
● We recommend that you have Climatronic cleaned by a specialist garage once
every year.
● On vehicles equipped with a factory-fitted radio or radio navigation system,
the information of the Climatronic is also shown on the display. This function can
be switched off, see operating instructions of the radio or the radio navigation
system.
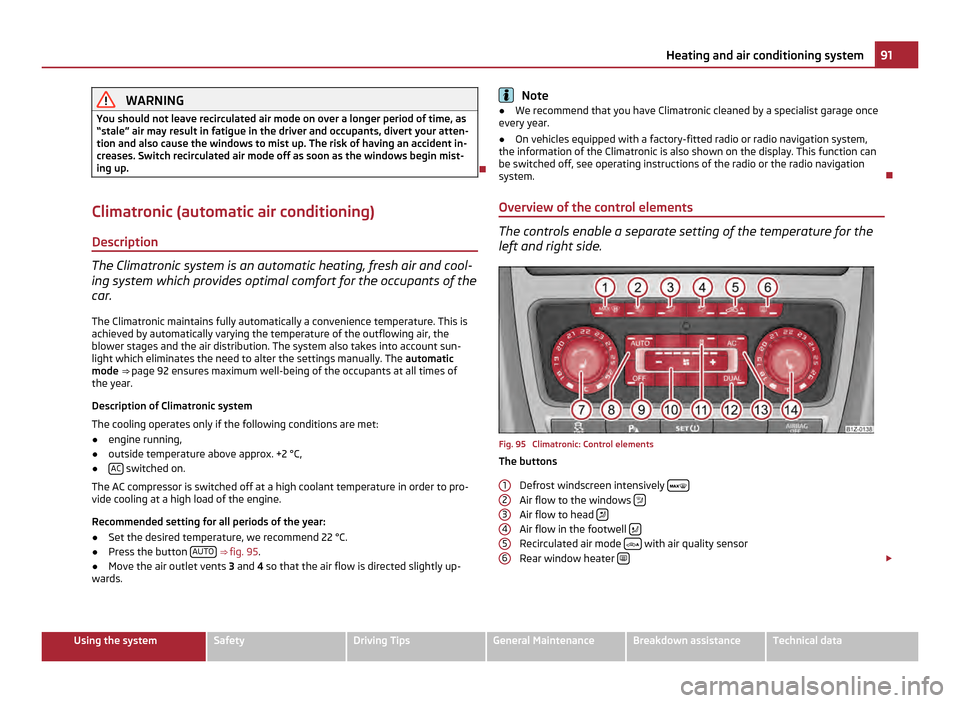
Overview of the control elements The controls enable a separate setting of the temperature for the
left and right side.
Fig. 95 Climatronic: Control elements
The buttons
Defrost windscreen intensively Air flow to the windows
Air flow to head
Air flow in the footwell
Recirculated air mode
with air quality sensor
Rear window heater £
1 2
3
4
5
6 91
Heating and air conditioning system Using the system Safety Driving Tips General Maintenance Breakdown assistance Technical data
Page 104 of 248
The handbrake warning light
lights up when the handbrake is applied, provided
the ignition is on.
A warning signal sounds and the following text appears in the Information display
if you have inadvertently driven off with the handbrake applied:
Release parking brake! (Release parking brake!)
The handbrake warning is activated if you drive at a speed of more than 6 km/h
for more than 3 seconds. WARNING
● Please note that the handbrake must be fully released. A handbrake which
is only partially released can result in the rear brakes overheating which will
have a negative effect on the operation of the brake system - risk of accident!
In addition this can result in premature wear of the rear brake pads.
● Never leave children unattended in the vehicle. The children might, for ex-
ample, release the handbrake or take the vehicle out of gear. The vehicle
might then move off - risk of accident! CAUTION
After the car has come to a stop, always first of all apply the handbrake firmly be-
fore then additionally engaging a gear (manual gearbox) or moving the selector
lever into position P (automatic gearbox).
Rear parking aid The parking aid provides a warning of obstacles behind the vehicle.
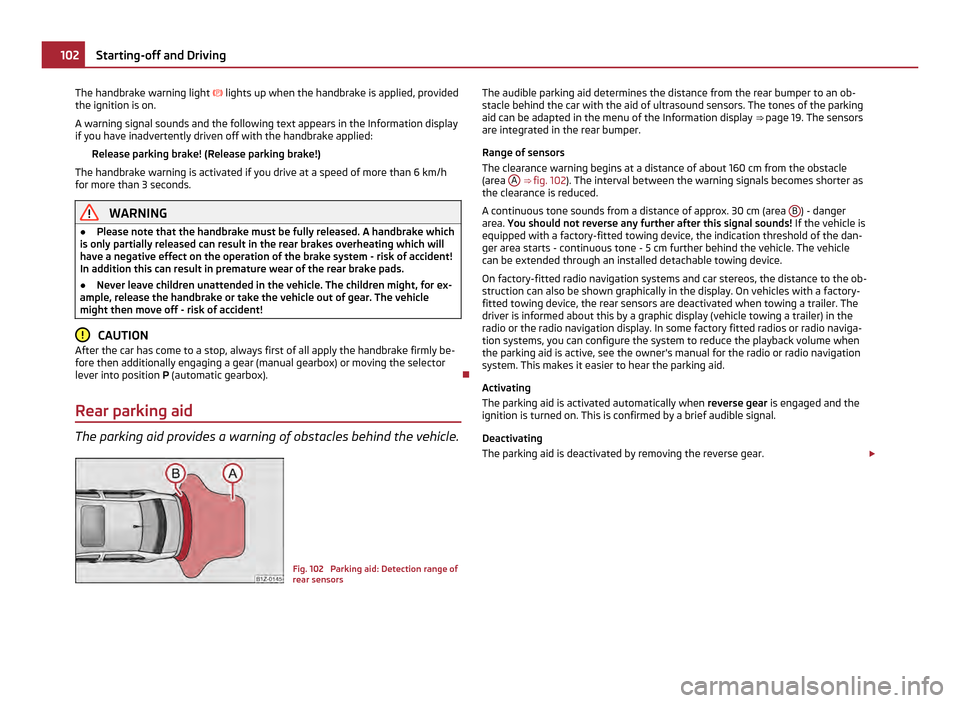
Fig. 102 Parking aid: Detection range of
rear sensorsThe audible parking aid determines the distance from the rear bumper to an ob-
stacle behind the car with the aid of ultrasound sensors. The tones of the parking
aid can be adapted in the menu of the Information display
⇒
page 19. The sensors
are integrated in the rear bumper.
Range of sensors
The clearance warning begins at a distance of about 160 cm from the obstacle
(area A ⇒
fig. 102). The interval between the warning signals becomes shorter as
the clearance is reduced.
A continuous tone sounds from a distance of approx. 30 cm (area B ) - danger
area. You should not reverse any further after this signal sounds! If the vehicle is
equipped with a factory-fitted towing device, the indication threshold of the dan-
ger area starts -
continuous tone - 5 cm further behind the vehicle. The vehicle
can be extended through an installed detachable towing device.
On factory-fitted radio navigation systems and car stereos, the distance to the ob-
struction can also be shown graphically in the display. On vehicles with a factory-
fitted towing device, the rear sensors are deactivated when towing a trailer. The
driver is informed about this by a graphic display (vehicle towing a trailer) in the
radio or the radio navigation display. In some factory fitted radios or radio naviga-
tion systems, you can configure the system to reduce the playback volume when
the parking aid is active, see the owner's manual for the radio or radio navigation
system. This makes it easier to hear the parking aid.
Activating
The parking aid is activated automatically when reverse gear is engaged and the
ignition is turned on. This is confirmed by a brief audible signal.
Deactivating
The parking aid is deactivated by removing the reverse gear. £102
Starting-off and Driving
Page 105 of 248

WARNING
● The parking aid is not a substitute for the driver paying proper attention
and it is always the driver's responsibility to take care when parking the vehi-
cle or carrying out similar manoeuvres.
● You should therefore satisfy yourself, before reversing, that there is no
small obstacle, such as a rock, thin post, trailer drawbar etc., behind your vehi-
cle. Such an obstacle might not be within the range detected by the sensors.
● Under certain circumstances, surfaces of certain objects and types of
clothing cannot reflect the signal of the parking aid. Thus, these objects or
people who wear such clothing are not recognised by the sensors of the park-
ing aid. Note
● The parking aid does not operate if you are towing a trailer (applies to models
which feature a factory-fitted towing device).
● If a warning signal sounds for about 3 seconds after switching the ignition on
and engaging reverse gear, and there is no obstacle close to your car, this indi-
cates a system fault. Have the fault rectified by a specialist workshop.
● The sensors must be kept clean and free of ice to enable the parking aid to
operate properly.
Front and rear parking aid The parking aid provides a warning of obstacles in front and behind
the vehicle. Fig. 103 Activating the parking aid/detection range of the front sensors The audible parking aid determines the distance between the front or rear bump-
er and an obstacle with the aid of ultrasound sensors. The sensors are integrated
in the front and rear bumper. The signal tones for the front parking aid sound
higher as standard than for the rear parking aid. The tones of the parking aid can
be adapted in the menu of the Information display ⇒ page 19.
Range of sensors
The distance warning begins at a distance of about 120 cm from the obstacle in
front of the vehicle (area A ⇒
fig. 103) and about 160 cm from the obstacle behind
the vehicle (area A ⇒ fig. 102
). The interval between the warning signals becomes
shorter as the clearance is reduced.
A continuous tone sounds from a distance of approx. 30 cm (area B ) - danger
area. From this moment on do not continue driving! If the vehicle is equipped with
a factory-fitted towing device, the border of the danger area starts -
continuous
tone - 5 cm further away from the vehicle. The vehicle can be extended through
an installed detachable towing device.
On factory-fitted radio navigation systems and car stereos, the distance to the ob-
struction can also be shown graphically in the display. On vehicles with a factory-
fitted towing device, the rear sensors are deactivated when towing a trailer. The
driver is informed about this by a graphic display (vehicle towing a trailer) in the
radio or the radio navigation display. In some factory fitted radios or radio naviga-
tion systems, you can configure the system to reduce the playback volume when
the parking aid is active, see the owner's manual for the radio or radio navigation
system. This makes it easier to hear the parking aid.
Activating
The parking aid is activated when the reverse gear is engaged and the ignition is
switched on or by pressing the button ⇒ fig. 103 - left, the symbol lights up in
the button. The activation is confirmed by a brief acknowledgement signal.
Deactivating
The parking aid is deactivated after pressing the button
⇒
fig. 103 - left, or at a
speed of more than 10 km/h - the symbol in the button is no longer illuminated. £ 103
Starting-off and Driving Using the system Safety Driving Tips General Maintenance Breakdown assistance Technical data
Page 116 of 248
Communication
Multifunction steering wheel
Operate radio and radio navigation system on the multifunction steering wheel Fig. 110 Multifunction steering wheel:
control buttons
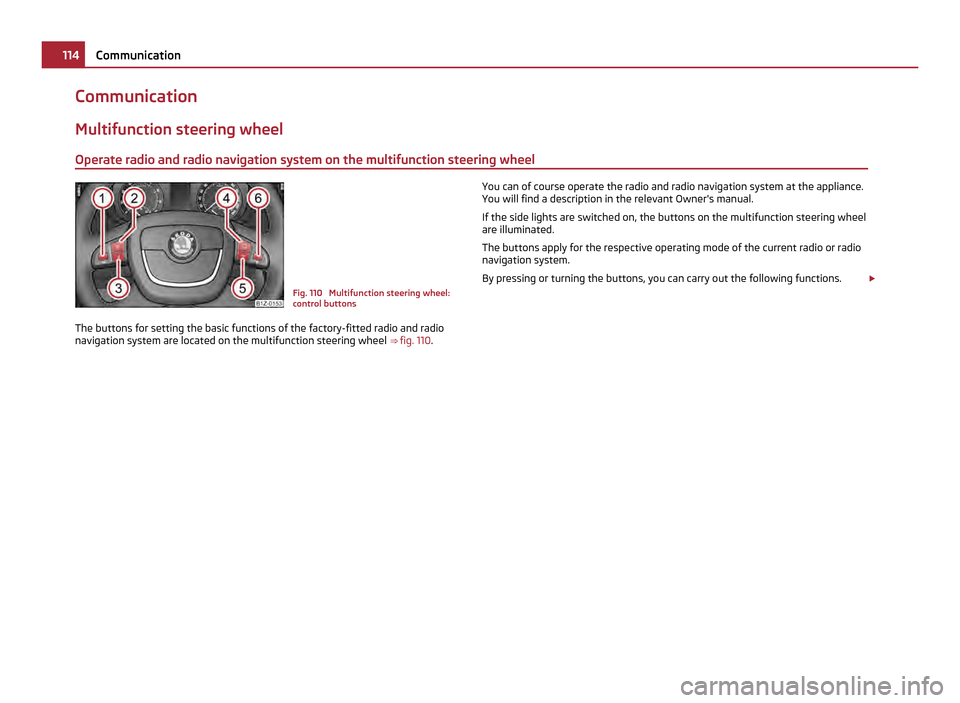
The buttons for setting the basic functions of the factory-fitted radio and radio
navigation system are located on the multifunction steering wheel ⇒ fig. 110 . You can of course operate the radio and radio navigation system at the appliance.
You will find a description in the relevant Owner's manual.
If the side lights are switched on, the buttons on the multifunction steering wheel
are illuminated.
The buttons apply for the respective operating mode of the current radio or radio
navigation system.
By pressing or turning the buttons, you can carry out the following functions. £114
Communication
Page 117 of 248

Button Action Radio, traffic information CD/CD changer/MP3 Navigation
1
press briefly
Switch off/on tone/activation and deactivation of the voice control
a)1 press button for a
long period of time switch off/on without
function 1
turn upwards Increase volume
1
turn downwards Decrease volume
2
press briefly Changing to the next stored radio station
Changing to the next stored traffic information Interrupting the traffic report Changing to the next title
2 press button for a
long time Interruption of the traffic report Fast forward
3
press briefly Changing to the previously stored radio station
Changing to the previously stored traffic information Interrupting the traffic report Changing to the previous title
3 press button for a
long time Interruption of the traffic report Fast rewind
4
press briefly Changing the audio source
5
press briefly Call up the main menu
6
press briefly Interruption of the traffic report without function
6
turn upwards Display of the stored/accessible stations
scroll upwards
Interruption of the traffic report Changing to the previous title
without
function 6
turn downwards Display of the stored/accessible stations
scroll downwards
Interruption of the traffic report Changing to the next title
a)
Valid for the radio navigation system Columbus. Note
● The loudspeakers in the vehicle are matched to a power output of the radio
and radio navigation system of 4x 20 W.
● For the equipment sound system, the loudspeakers are matched to a power
output of the amplifier of 4x40°W + 6x20
W.
Mobile phones and two-way radio systems The installation of a mobile phone and two-way radio system in a vehicle should
be carried out by a specialist garage. ŠKOSA permits the operation of mobile phones and two-way radio systems with a
professionally installed external aerial and a maximum transmission power of up
to 10 watts.
It is essential that you inform a specialist garage about the possibilities to assem-
ble and operate mobile phones and two-way radio sets which have a power out-
put of more than 10 W. They will inform you which technical possibilities exist for
retrofitting mobile phones.
When using a mobile phone inside the vehicle, which is not inserted into the
phone adapter, and thus has no connection to the external aerial, the electromag-
netic radiation can exceed the current limit value. If a suitable adapter is available £ 115
Communication Using the system Safety Driving Tips General Maintenance Breakdown assistance Technical data
Page 118 of 248
for your mobile phone, use your mobile phone exclusively in the adapter so that
the radiation in the vehicle drops to a minimum. This also improves the quality of
the connection.
Operation of mobile phones or two-way radio systems may interfere with func-
tioning of the electronic systems of your vehicle. The reasons for this may be:
● no external aerial,
● external aerial incorrectly installed,
● transmission power greater than 10 watts. WARNING
● If a mobile phone or a two-way radio system is operated in the vehicle
without using an external aerial or an external aerial which has been incor-
rectly installed, this can increase the strength of the electromagnetic field in
the interior of the vehicle.
● Please concentrate fully at all times on your driving!
● You must not install two-way radio systems, mobile phones or mounts on
the covers of the airbags or within the immediate deployment range of air-
bags. This might result in injuries to the occupants in the event of an accident.
● Never leave a mobile phone on a seat, on the dash panel or in another
area, from which it can be thrown during a sudden braking manoeuvre, an ac-
cident or a collision. In this case, the occupants of the vehicle might be injured. Note
Observe the country-specific regulations for the use of mobile phones in vehicles.
Universal telephone preinstallation GSM II Introduction The universal telephone preinstallation GSM II is a built-in “hands-free system”, it
provides a voice operated convenience mode via the multifunction steering wheel or the radio navigation system.
All communication between a telephone and the hands-free system of your vehi-
cle can only be established with the help of the Bluetooth ®
technology. The
adapter serves only for charging the telephone and for transmitting the signal to
the external aerial of the vehicle. To ensure an optimum signal transmission, always leave the telephone with the
adapter in the telephone mount.
Furthermore the volume can be changed individually during the call at any time
with the button for setting the radio or radio navigation system or with the but-
tons on the multifunction steering wheel.
WARNING
Concentrate fully at all times on your steering! As the driver you are fully re-
sponsible for road safety. Use the telephone system only to such an extent, so
that you are in full control of your vehicle at any time. Note
● Please refer to the following guidelines ⇒ page 115, Mobile phones and two-
way radio systems.
● Should you have any questions, please contact an authorised ŠKODA Service
Partner.
Phone Phonebook A phone phonebook is part of the mobile phone preinstallation with voice control.
In the phone phonebook there are 2500 free memory locations available. Each
contact can contain up to 4 numbers. This phone phonebook can be used in line
with the mobile telephone.
On vehicles fitted with the radio navigation system Columbus, a maximum of 1200
telephone contacts are shown in the display of this appliance.
After the first connection of the telephone, the system begins to load the phone
book from the phone and the SIM card into the memory of the control unit.
Each time the telephone has established a new connection with the hands-free
system, an update of the relevant phone book is performed. The updating can
take a few minutes. During this time the phone book, which was stored after the
last update was completed, is available. Newly stored telephone numbers are only
shown after the updating has ended.
If the number of contacts loaded exceeds 2 500, the phone book is not complete.
If a telephone event (e.g. incoming or outgoing call, dialogue of the voice control)
occurs during the updating procedure, the updating is interrupted. After the tele-
phone event has ended, the updating starts anew. 116
Communication