light SKODA OCTAVIA 2012 2.G / (1Z) Workshop Manual
[x] Cancel search | Manufacturer: SKODA, Model Year: 2012, Model line: OCTAVIA, Model: SKODA OCTAVIA 2012 2.G / (1Z)Pages: 222, PDF Size: 13.52 MB
Page 75 of 222
WARNING■Do not place anything on the dash panel. These objects might slide or fall
down when driving (when accelerating or cornering) and may distract you
from concentrating on the traffic - risk of accident!■
When driving, ensure that no objects from the centre console or from other
storage compartments can get into the driver's footwell. You would then no
longer be able to apply the brakes, operate the clutch or accelerator – risk of accident!
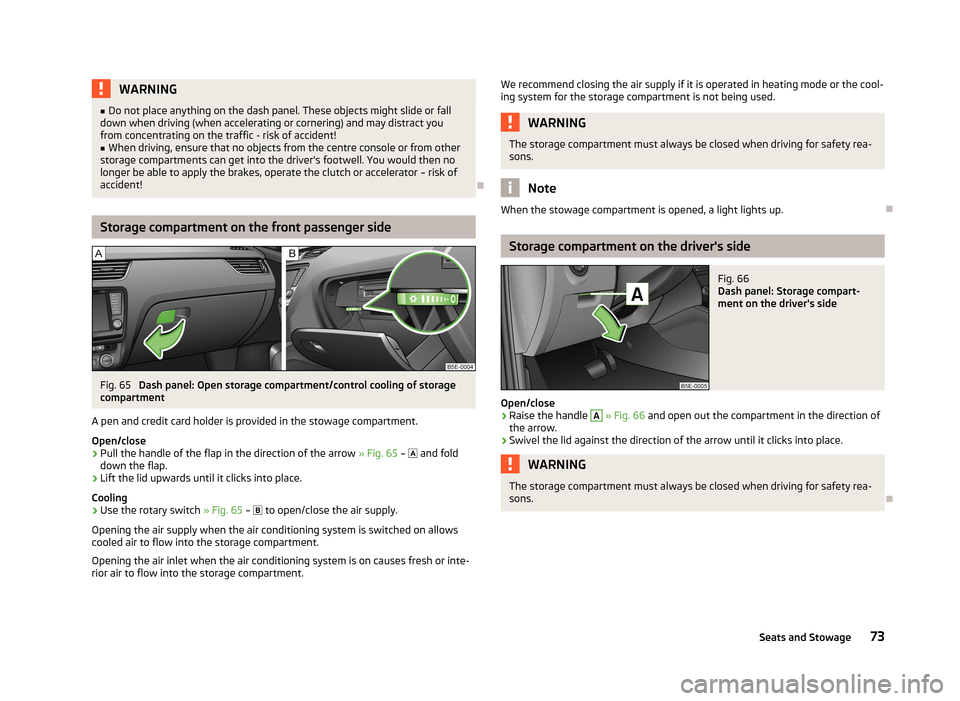
Storage compartment on the front passenger side
Fig. 65
Dash panel: Open storage compartment/control cooling of storage
compartment
A pen and credit card holder is provided in the stowage compartment. Open/close
›
Pull the handle of the flap in the direction of the arrow » Fig. 65 –
and fold
down the flap.
›
Lift the lid upwards until it clicks into place.
Cooling
›
Use the rotary switch » Fig. 65 –
to open/close the air supply.
Opening the air supply when the air conditioning system is switched on allows
cooled air to flow into the storage compartment.
Opening the air inlet when the air conditioning system is on causes fresh or inte-rior air to flow into the storage compartment.
We recommend closing the air supply if it is operated in heating mode or the cool-ing system for the storage compartment is not being used.WARNINGThe storage compartment must always be closed when driving for safety rea-
sons.
Note
When the stowage compartment is opened, a light lights up.
Storage compartment on the driver's side
Fig. 66
Dash panel: Storage compart-
ment on the driver's side
Open/close
›
Raise the handle
A
» Fig. 66 and open out the compartment in the direction of
the arrow.
›
Swivel the lid against the direction of the arrow until it clicks into place.
WARNINGThe storage compartment must always be closed when driving for safety rea-
sons.
73Seats and Stowage
Page 81 of 222
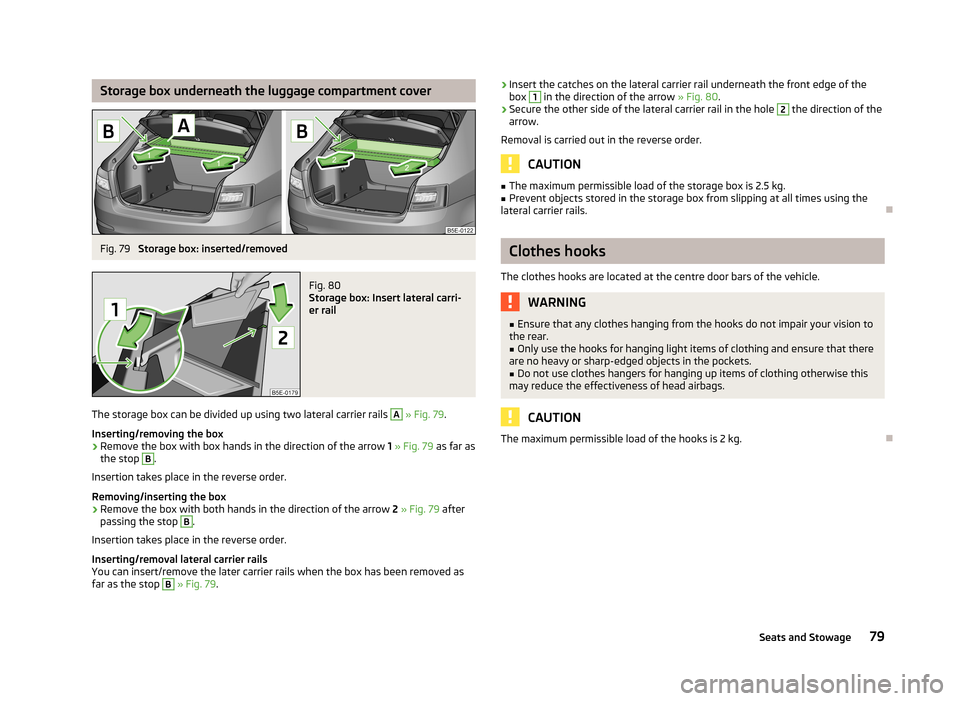
Storage box underneath the luggage compartment coverFig. 79
Storage box: inserted/removed
Fig. 80
Storage box: Insert lateral carri-
er rail
The storage box can be divided up using two lateral carrier rails
A
» Fig. 79 .
Inserting/removing the box
›
Remove the box with box hands in the direction of the arrow 1 » Fig. 79 as far as
the stop
B
.
Insertion takes place in the reverse order.
Removing/inserting the box
›
Remove the box with both hands in the direction of the arrow 2 » Fig. 79 after
passing the stop
B
.
Insertion takes place in the reverse order.
Inserting/removal lateral carrier rails
You can insert/remove the later carrier rails when the box has been removed as
far as the stop
B
» Fig. 79 .
›Insert the catches on the lateral carrier rail underneath the front edge of the
box 1 in the direction of the arrow » Fig. 80.›
Secure the other side of the lateral carrier rail in the hole
2
the direction of the
arrow.
Removal is carried out in the reverse order.
CAUTION
■ The maximum permissible load of the storage box is 2.5 kg.■Prevent objects stored in the storage box from slipping at all times using the
lateral carrier rails.
Clothes hooks
The clothes hooks are located at the centre door bars of the vehicle.
WARNING■ Ensure that any clothes hanging from the hooks do not impair your vision to
the rear.■
Only use the hooks for hanging light items of clothing and ensure that there
are no heavy or sharp-edged objects in the pockets.
■
Do not use clothes hangers for hanging up items of clothing otherwise this
may reduce the effectiveness of head airbags.
CAUTION
The maximum permissible load of the hooks is 2 kg.
79Seats and Stowage
Page 83 of 222
Heating and air conditioning system
Heating and air conditioning system
Introductory information
The heating effect is dependent upon the coolant temperature, thus full heat output only occurs when the engine has reached its operating temperature.
If the cooling system is switched on, the temperature and air humidity drops in
the vehicle. The well-being of the occupants of the car is enhanced as a result of
this particularly at high outside temperatures and a high air humidity. The system
prevents the windows misting up during the cold season of the year.
It is possible to briefly activate recirculated air mode to enhance the cooling ef-fect.
Please refer to the information regarding recirculated air mode for the air-condi- tioning system » page 85 or for Climatronic » page 87.
The air inlet in front of the windscreen must be free of e.g. ice, snow or leaves to ensure that the heating and cooling system operates properly.
After switching on the cooling Condensation from the evaporator of the air condi-
tioning may drip down and form a puddle below the vehicle. This is not a leak!
WARNINGFor your own safety and that of other road users, ensure that all the windows
are free of ice, snow and misting. Please familiarize yourself about how to cor-
rectly operate the heating and ventilation systems, how to demist and defrost
the windows, as well as with the cooling mode.
Note
■ The used air streams out through the vents in the luggage compartment.■We recommend that you do not smoke in the vehicle when the recirculating air
mode is operating since the smoke which is drawn at the evaporator from the in-
terior of the vehicle forms deposits in the evaporator of the air conditioning sys- tem. This produces a permanent odour when the air conditioning system is oper-ating which can only be eliminated through considerable effort and expense (re-
placement of compressor).
Using the air conditioning system economically
The compressor on the air conditioning system uses power from the engine when in cooling mode which will effect the fuel consumption.
It recommended to open the windows or the doors of a vehicle for which the inte- rior has been strongly heated through the effect of direct sunlight in order to al-low the heated air to escape.
The cooling system should not be switched on while travelling when the window is open.
For the sake of the environment
Pollutant emissions are also reduced when fuel is saved » page 101, Economical
and environmentally friendly driving .
Operational problems
If the cooling system does not operate at outside temperatures higher than +5 °C,
there is a problem in the system. The reasons for this may be.
› One of the fuses has blown. Check the fuse and replace if necessa-
ry » page 200 .
› The cooling system has switched off automatically for a short time because the
coolant temperature of the engine is too hot » page 10.
If you are not able to resolve the operational fault yourself, or if the cooler output has reduced, switch off the cooling system and get assistance from a ŠKODA Spe- cialist garage.
81Heating and air conditioning system
Page 86 of 222
We recommend that you leave the air outlet vents 3 » Fig. 82 on page 82 in the
opened position.
Recirculated air mode
Recirculated air mode prevents polluted air outside the vehicle from getting into the vehicle, for example when driving through a tunnel or when standing in a
traffic jam.
Switching on/off
›
Press the button and the warning light underneath the button illuminates.
›
Press the button again, the warning light underneath the button goes out.
Recirculated air mode is switched off automatically if the air distribution control
C
» Fig. 84 on page 83 is turned to position
. Recirculated air mode can be
switched on again from this setting by repeatedly pressing the button .
WARNINGDo not leave recirculated air mode on over a longer period of time, as “stale”
air can cause fatigue of the driver and passengers, reduce attention levels andalso cause the windows to mist up. The risk of having an accident increases.
Switch off recirculated air mode as soon as the windows start to mist up.
Air conditioning system (manual air conditioning
system)
Introductory information
The cooling system only operates if the button
» Fig. 85 on page 84 is press-
ed, and the following conditions are met:
› engine running;
› outside temperature above approx. 2
℃;
› blower switch switched on (positions 1-6).
Under certain circumstances, air at a temperature of about 5 °C can flow out of
the vents when the cooling system is switched on. Lengthy and uneven distribu-
tion of the air flow out of the vents and large differences in temperature, for ex-
ample when getting out of the vehicle, can result in chills in sensitive persons.
If the desired interior temperature can also be achieved without activating the
cooling system, fresh air mode should be selected.
Note
We recommend that you have the air conditioning system cleaned by a ŠKODA
specialist garage once every year.
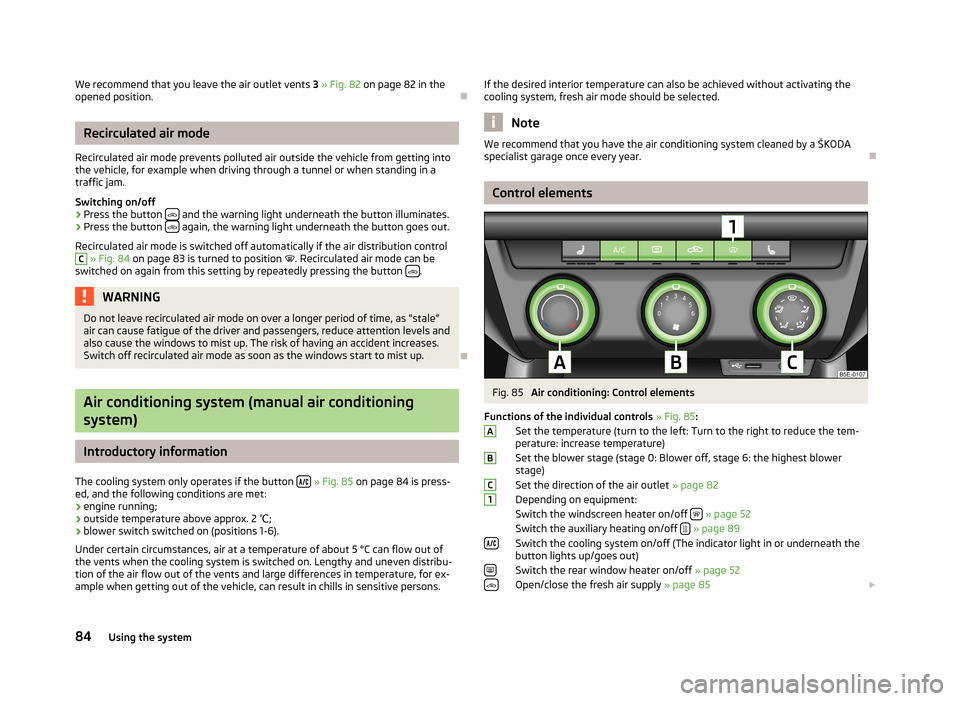
Control elements
Fig. 85
Air conditioning: Control elements
Functions of the individual controls » Fig. 85 :
Set the temperature (turn to the left: Turn to the right to reduce the tem-
perature: increase temperature)
Set the blower stage (stage 0: Blower off, stage 6: the highest blower stage)
Set the direction of the air outlet » page 82
Depending on equipment:
Switch the windscreen heater on/off
» page 52
Switch the auxiliary heating on/off
» page 89
Switch the cooling system on/off (The indicator light in or underneath the
button lights up/goes out)
Switch the rear window heater on/off » page 52
Open/close the fresh air supply » page 85
ABC184Using the system
Page 87 of 222
NoteThe warning light in the button lights after activation, even if not all of the
conditions for the function of the cooling system have been met » page 84, Intro-
ductory information . By lighting up of the warning light in the button, the opera-
tional readiness of the cooling system is signalled.
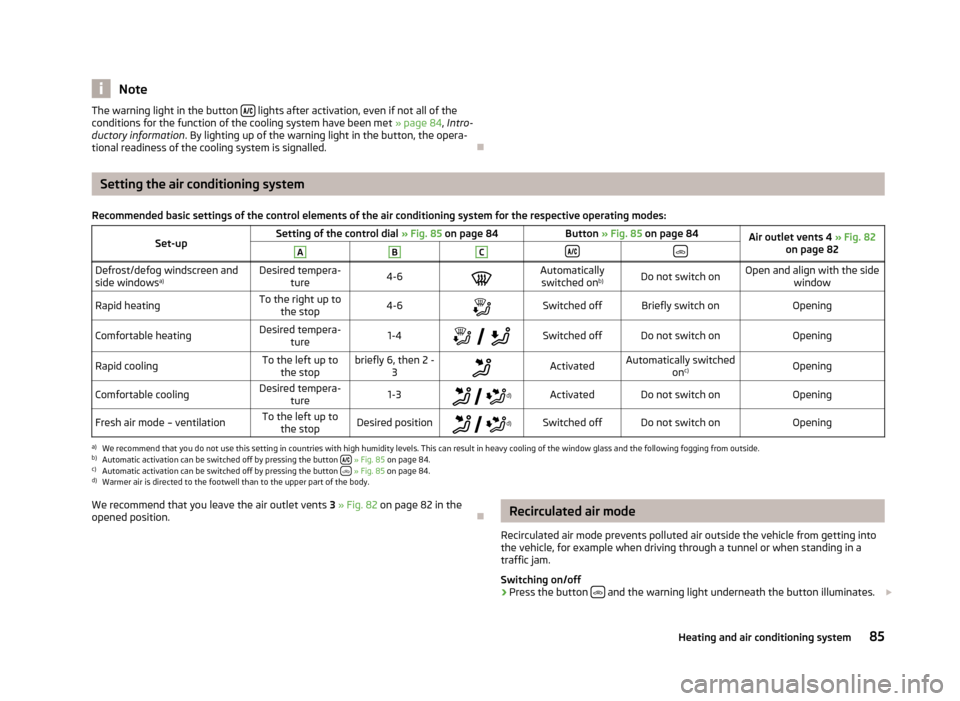
Setting the air conditioning system
Recommended basic settings of the control elements of the air conditioning system for the respective operating modes:Set-upSetting of the control dial » Fig. 85 on page 84Button » Fig. 85 on page 84Air outlet vents 4 » Fig. 82
on page 82ABCDefrost/defog windscreen and
side windows a)Desired tempera-
ture4-6Automatically
switched on b)Do not switch onOpen and align with the side
windowRapid heatingTo the right up tothe stop4-6Switched offBriefly switch onOpeningComfortable heatingDesired tempera-
ture1-4
Switched offDo not switch onOpeningRapid coolingTo the left up to
the stopbriefly 6, then 2 - 3ActivatedAutomatically switched
onc)OpeningComfortable coolingDesired tempera-
ture1-3
d)ActivatedDo not switch onOpeningFresh air mode – ventilationTo the left up to
the stopDesired position
d)Switched offDo not switch onOpeninga)
We recommend that you do not use this setting in countries with high humidity levels. This can result in heavy cooling of the window glass and the following fogging from outside.
b)
Automatic activation can be switched off by pressing the button
» Fig. 85 on page 84.
c)
Automatic activation can be switched off by pressing the button
» Fig. 85 on page 84.
d)
Warmer air is directed to the footwell than to the upper part of the body.
We recommend that you leave the air outlet vents 3 » Fig. 82 on page 82 in the
opened position.
Recirculated air mode
Recirculated air mode prevents polluted air outside the vehicle from getting into the vehicle, for example when driving through a tunnel or when standing in a
traffic jam.
Switching on/off›
Press the button and the warning light underneath the button illuminates.
85Heating and air conditioning system
Page 88 of 222
›Press the button
again, the warning light underneath the button goes out.
Recirculated air mode is switched off automatically if the air distribution controlC
» Fig. 85 on page 84 is turned to position . Recirculated air mode can be
switched on again from this setting by repeatedly pressing the button .
WARNINGDo not leave recirculated air mode on over a longer period of time, as “stale”
air can cause fatigue of the driver and passengers, reduce attention levels andalso cause the windows to mist up. The risk of having an accident increases.
Switch off recirculated air mode as soon as the windows start to mist up.
Climatronic (automatic air conditioning system)
Introductory information
The Climatronic in automatic mode ensures the best-possible setting of the tem-
perature of the outflowing air, the blower stage and air distribution.
The system also takes sunlight into account, which eliminates the need to alter
the settings manually.
Recommended setting for all periods of the year:
›
Set the desired temperature, we recommend 22 °C.
›
Press the button AUTO
» Fig. 86 on page 86.
›
Move the air outlet vents 3 and 4 » Fig. 82 on page 82 so that the air flow is
directed slightly upwards.
Cooling conditions
The cooling system only operates if the following conditions are met: › engine running;
› outside temperature above approx. +2 °C;
›
» Fig. 86 on page 86 switched on.
The AC compressor is switched off at a high coolant temperature in order to pro-
vide cooling at a high load of the engine.
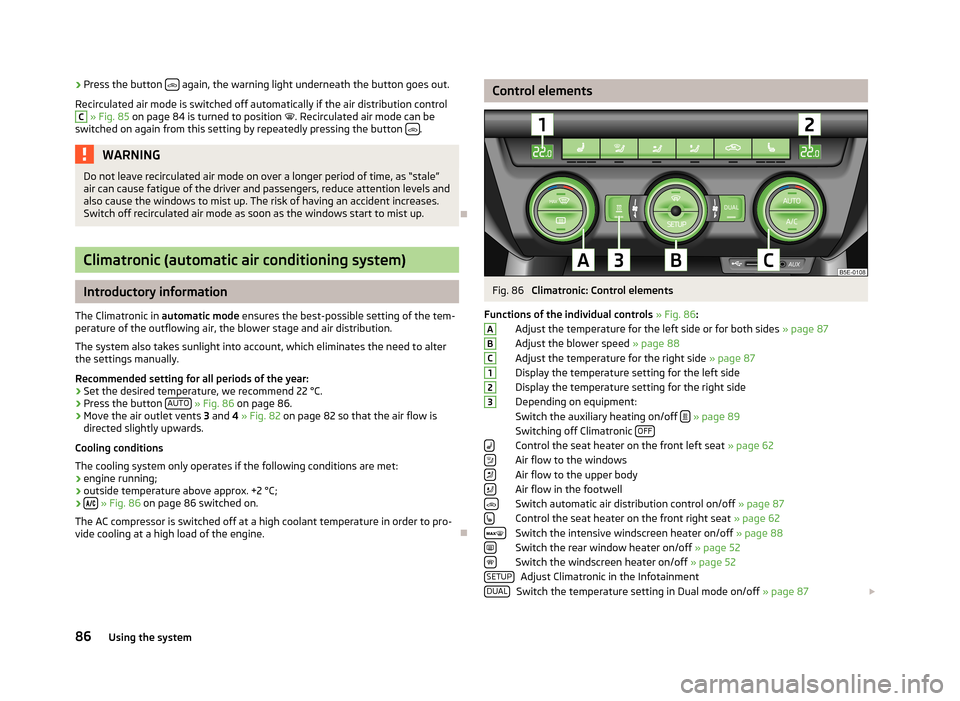
Control elementsFig. 86
Climatronic: Control elements
Functions of the individual controls » Fig. 86 :
Adjust the temperature for the left side or for both sides » page 87
Adjust the blower speed » page 88
Adjust the temperature for the right side » page 87
Display the temperature setting for the left side
Display the temperature setting for the right side
Depending on equipment:
Switch the auxiliary heating on/off
» page 89
Switching off Climatronic OFF
Control the seat heater on the front left seat
» page 62
Air flow to the windows
Air flow to the upper body
Air flow in the footwell Switch automatic air distribution control on/off » page 87
Control the seat heater on the front right seat » page 62
Switch the intensive windscreen heater on/off » page 88
Switch the rear window heater on/off » page 52
Switch the windscreen heater on/off » page 52
Adjust Climatronic in the Infotainment
Switch the temperature setting in Dual mode on/off » page 87
ABC123SETUPDUAL86Using the system
Page 89 of 222
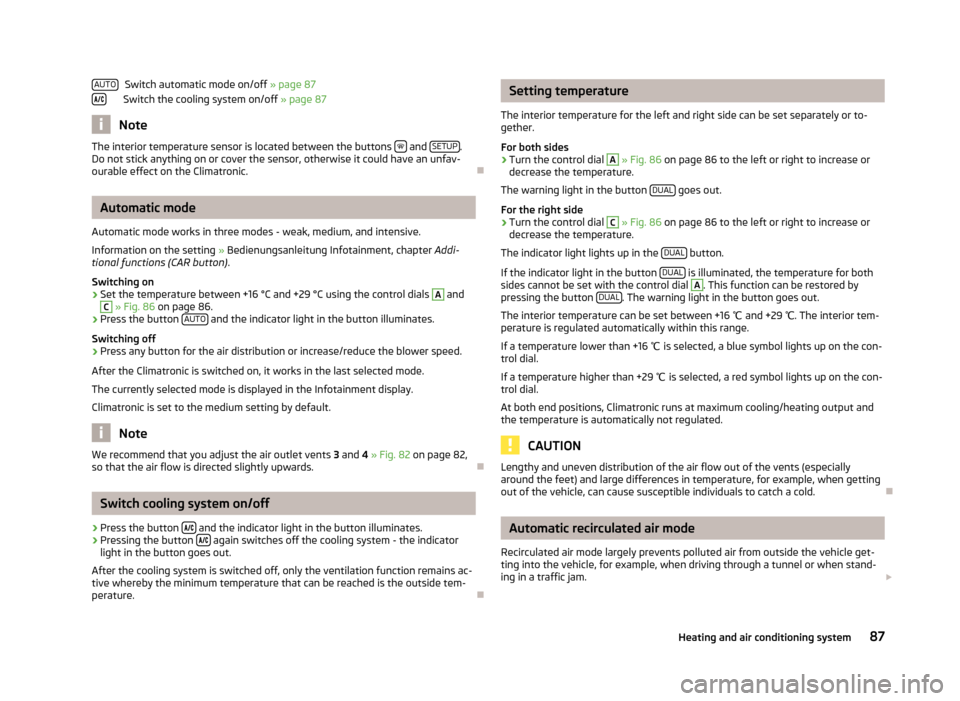
Switch automatic mode on/off » page 87
Switch the cooling system on/off » page 87
Note
The interior temperature sensor is located between the buttons and SETUP.
Do not stick anything on or cover the sensor, otherwise it could have an unfav-
ourable effect on the Climatronic.
Automatic mode
Automatic mode works in three modes - weak, medium, and intensive.
Information on the setting » Bedienungsanleitung Infotainment, chapter Addi-
tional functions (CAR button) .
Switching on
›
Set the temperature between +16 °C and +29 °C using the control dials
A
and
C
» Fig. 86 on page 86.
›
Press the button AUTO and the indicator light in the button illuminates.
Switching off
›
Press any button for the air distribution or increase/reduce the blower speed.
After the Climatronic is switched on, it works in the last selected mode. The currently selected mode is displayed in the Infotainment display.Climatronic is set to the medium setting by default.
Note
We recommend that you adjust the air outlet vents 3 and 4 » Fig. 82 on page 82,
so that the air flow is directed slightly upwards.
Switch cooling system on/off
›
Press the button and the indicator light in the button illuminates.
›
Pressing the button
again switches off the cooling system - the indicator
light in the button goes out.
After the cooling system is switched off, only the ventilation function remains ac-
tive whereby the minimum temperature that can be reached is the outside tem-
perature.
AUTOSetting temperature
The interior temperature for the left and right side can be set separately or to-
gether.
For both sides›
Turn the control dial
A
» Fig. 86 on page 86 to the left or right to increase or
decrease the temperature.
The warning light in the button DUAL
goes out.
For the right side
›
Turn the control dial
C
» Fig. 86 on page 86 to the left or right to increase or
decrease the temperature.
The indicator light lights up in the DUAL
button.
If the indicator light in the button DUAL
is illuminated, the temperature for both
sides cannot be set with the control dial
A
. This function can be restored by
pressing the button DUAL. The warning light in the button goes out.
The interior temperature can be set between +16 ℃ and +29 ℃. The interior tem-
perature is regulated automatically within this range.
If a temperature lower than +16 ℃ is selected, a blue symbol lights up on the con-
trol dial.
If a temperature higher than +29 ℃ is selected, a red symbol lights up on the con-
trol dial.
At both end positions, Climatronic runs at maximum cooling/heating output and
the temperature is automatically not regulated.
CAUTION
Lengthy and uneven distribution of the air flow out of the vents (especially
around the feet) and large differences in temperature, for example, when getting
out of the vehicle, can cause susceptible individuals to catch a cold.
Automatic recirculated air mode
Recirculated air mode largely prevents polluted air from outside the vehicle get- ting into the vehicle, for example, when driving through a tunnel or when stand-
ing in a traffic jam.
87Heating and air conditioning system
Page 90 of 222
If a considerable increase in concentration of pollutants is recognised by the air
quality sensor, recirculated air mode will temporarily be switched off.
If the concentration of pollutants decreases to the normal level, the air distribu-
tion control is automatically switched off so that fresh air can be guided into the
vehicle interior.
In recirculated air mode air is sucked out of the interior of the vehicle and then
fed back into the interior. When the automatic air distribution control is switched on, an air quality sensor measures the concentration of pollutants in the drawn inair.
If the air quality sensor does not switch on automatic recirculated air mode when there is an unpleasant smell, you can switch in on manually.
Switching on/off›
Press the button and the warning light underneath the button illuminates.
›
Press the button again, the warning light underneath the button goes out,
where necessary press the button AUTO.
You can also switch the system on/off in he Infotainment » Bedienungsanleitung
Infotainment, chapter Setting vehicle systems (CAR button) .
WARNINGDo not leave recirculated air mode on over a longer period of time, as “stale”
air can cause fatigue of the driver and passengers, reduce attention levels and
also cause the windows to mist up. The risk of having an accident increases.
Switch off recirculated air mode as soon as the windows start to mist up.
Note
■ If the windscreen mists up, press the button . Press the button AUTO when
the windscreen is demisted.■
The automatic air distribution control operates only if the outside temperature
is higher than approx. 2 °C.
Controlling blower
The blower stage can be manually adapted to suit your particular needs.
›
Turn the control dial
B
» Fig. 86 on page 86 to the left or right to increase or
decrease the blower speed.
If the blower speed is reduced to a minimum, Climatronic is switched off.
The set blower speed is displayed in the control dial B when the respective num-
ber of warning lights come on.WARNING■ “Stale air” may result in fatigue in the driver and occupants, reduce attention
levels and also cause the windows to mist up. The risk of having an accident
increases.■
Do not switch off the Climatronic system for longer than necessary.
■
Switch on the Climatronic system as soon as the windows mist up.
Defrosting windscreen
Switching on/off
›
Press the button
» Fig. 86 on page 86.
›
Press the button or the button
AUTO again.
More air flows out of the air outlet vents 1 » Fig. 82 on page 82. The temperature
control is controlled automatically.
Auxiliary heating (auxiliary heating and ventilation)
Introduction
This chapter contains information on the following subjects:
Switching on/off
89
setting
90
Remote control
90
Replacing the battery in the remote control
91
Function prerequisites when switching on:
› Comfort temperature has been set;
› The blower is switched on;
› the air outlet vents are opened;
› The air outlet is set to position
or
.
Auxiliary heating (parking heating) › It can be used when stationary, when the engine is switched off to preheat the
vehicle and while driving (e.g. during the heating phase of the engine);
› It works in tandem with the hearer, air-conditioning system or Climatronic;
88Using the system
Page 91 of 222
›The engine is also preheated when the vehicle is stationary and the engine is
not running;
› It warms up the coolant by burning fuel from the vehicle tank. The coolant
warms up the air, which (if the blower speed is not set to zero) flows into the passenger compartment.
Auxiliary ventilation
The auxiliary ventilation enables fresh air to flow into the vehicle interior by
switching off the engine, whereby the interior temperature is effectively de-
creased (e.g. with the vehicle parked in the sun).WARNING■ The auxiliary heating must never be operated in closed rooms - risk of poi-
soning!■
The auxiliary heating must not be running during refuelling - risk of fire.
■
The exhaust pipe of the auxiliary heating is located on the underside of the
vehicle. Therefore, if you wish to operate the auxiliary heating, do not park the vehicle in such a way that the exhaust gases can come into contact with high-
ly flammable materials (e.g. dry grass) or easily inflammable substances (e.g.
spilt fuel).
CAUTION
■ The running auxiliary heater consumes fuel from the vehicle tank and automati-
cally controls the filling level. If only a low quantity of fuel is present in the fuel
tank, the function of the auxiliary heating is blocked.■
The exhaust pipe of the auxiliary heating, which is located on the underside of
the vehicle, must not be clogged and the exhaust flow must not be blocked.
■
If the auxiliary heating and ventilation is running, the vehicle battery discharges.
If the auxiliary heating and ventilation has been operated several times over a
longer period, the vehicle must be driven a few kilometres in order to recharge
the vehicle battery.
Note
■ The auxiliary heating only switches the blower on, if it has achieved a coolant
temperature of approx. 50 °C.■
At low outside temperatures, this can result in a formation of water vapour in
the area of the engine compartment. This is quite normal and is not an operating problem.
■
The air inlet in front of the windscreen must be free of e.g. ice, snow or leaves
to ensure that the auxiliary heating and cooling system operates properly.
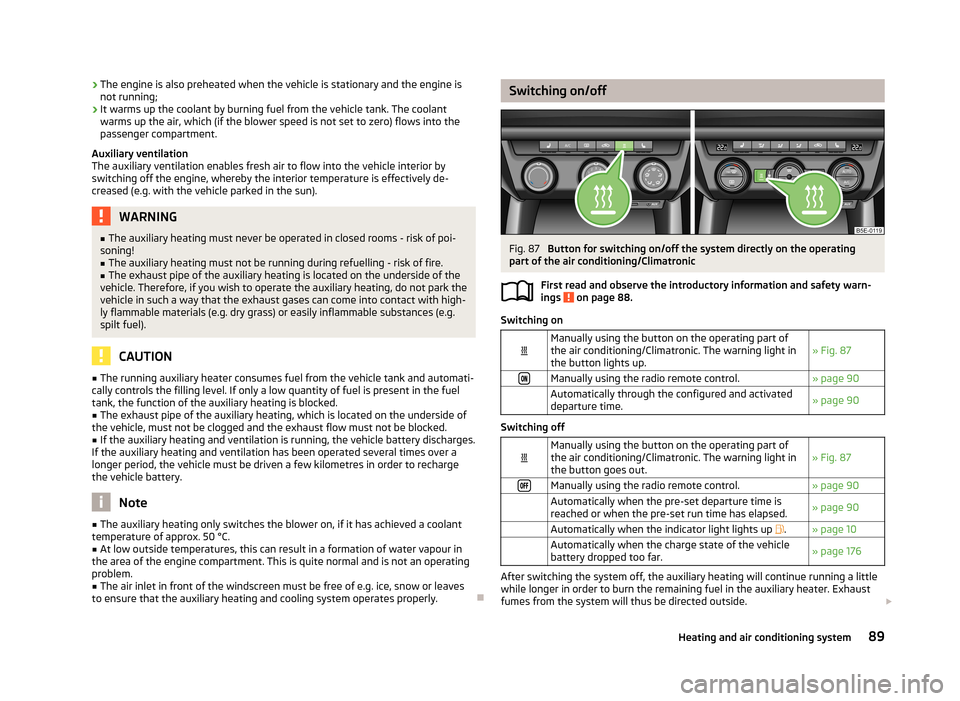
Switching on/offFig. 87
Button for switching on/off the system directly on the operating
part of the air conditioning/Climatronic
First read and observe the introductory information and safety warn-ings
on page 88.
Switching on
Manually using the button on the operating part of
the air conditioning/Climatronic. The warning light in the button lights up.» Fig. 87Manually using the radio remote control.» page 90 Automatically through the configured and activated
departure time.» page 90
Switching off
Manually using the button on the operating part of
the air conditioning/Climatronic. The warning light in the button goes out.» Fig. 87Manually using the radio remote control.» page 90 Automatically when the pre-set departure time is
reached or when the pre-set run time has elapsed.» page 90 Automatically when the indicator light lights up .» page 10 Automatically when the charge state of the vehicle
battery dropped too far.» page 176
After switching the system off, the auxiliary heating will continue running a little
while longer in order to burn the remaining fuel in the auxiliary heater. Exhaust
fumes from the system will thus be directed outside.
89Heating and air conditioning system
Page 92 of 222
After switching off the auxiliary heating, the coolant pump runs for a short period.
The auxiliary heater does not switch on: › when the following appears in the instrument cluster display, or the the follow-
ing was displayed before the ignition was turned off: Please refuel. Range: ...
km or PLEASE REFUEL ;
› when the charge state of the vehicle battery is too low;
› when no pre-set time is activated.
setting
First read and observe the introductory information and safety warn-
ings
on page 88.
Information on the setting » Bedienungsanleitung Infotainment, chapter Setting
vehicle systems (CAR button) .
Before the setting is started, check the correct time and date settings.
Checking the settings
When the departure time is activated, the indicator light in the button
lights up
for around 10 seconds after the ignition is turned off.
Remote control
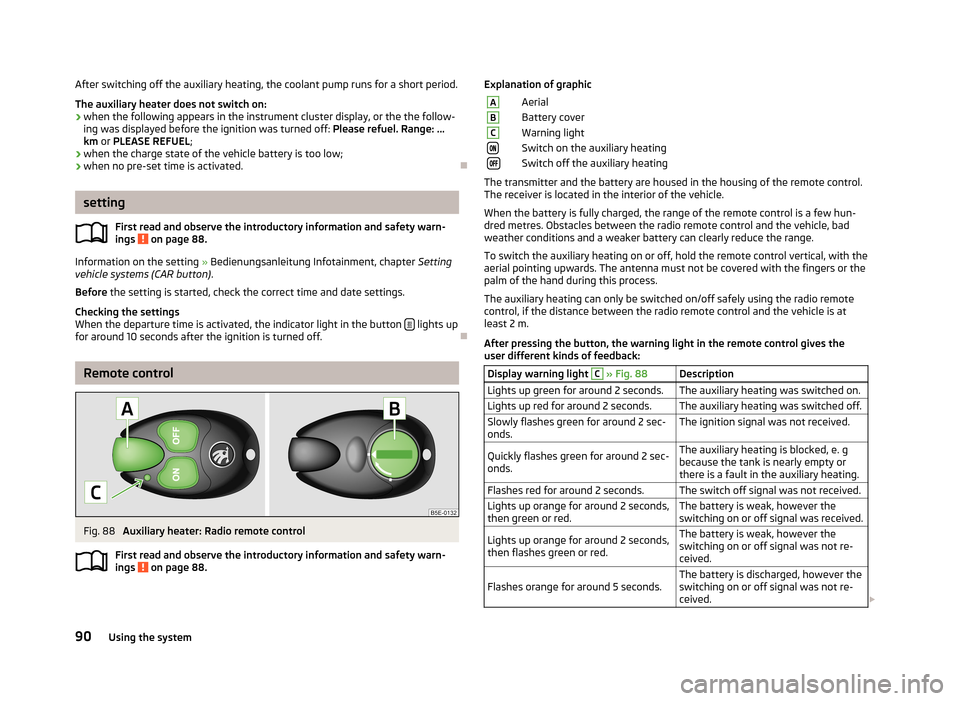
Fig. 88
Auxiliary heater: Radio remote control
First read and observe the introductory information and safety warn-
ings
on page 88.
Explanation of graphicAAerialBBattery coverCWarning lightSwitch on the auxiliary heatingSwitch off the auxiliary heating
The transmitter and the battery are housed in the housing of the remote control.
The receiver is located in the interior of the vehicle.
When the battery is fully charged, the range of the remote control is a few hun-
dred metres. Obstacles between the radio remote control and the vehicle, bad
weather conditions and a weaker battery can clearly reduce the range.
To switch the auxiliary heating on or off, hold the remote control vertical, with the
aerial pointing upwards. The antenna must not be covered with the fingers or the palm of the hand during this process.
The auxiliary heating can only be switched on/off safely using the radio remote control, if the distance between the radio remote control and the vehicle is at
least 2 m.
After pressing the button, the warning light in the remote control gives the
user different kinds of feedback:
Display warning light C » Fig. 88DescriptionLights up green for around 2 seconds.The auxiliary heating was switched on.Lights up red for around 2 seconds.The auxiliary heating was switched off.Slowly flashes green for around 2 sec-
onds.The ignition signal was not received.Quickly flashes green for around 2 sec-
onds.The auxiliary heating is blocked, e. g
because the tank is nearly empty or
there is a fault in the auxiliary heating.Flashes red for around 2 seconds.The switch off signal was not received.Lights up orange for around 2 seconds,
then green or red.The battery is weak, however the
switching on or off signal was received.Lights up orange for around 2 seconds,
then flashes green or red.The battery is weak, however the
switching on or off signal was not re-
ceived.Flashes orange for around 5 seconds.The battery is discharged, however the
switching on or off signal was not re-
ceived. 90Using the system