light SKODA OCTAVIA 2012 2.G / (1Z) Manual Online
[x] Cancel search | Manufacturer: SKODA, Model Year: 2012, Model line: OCTAVIA, Model: SKODA OCTAVIA 2012 2.G / (1Z)Pages: 222, PDF Size: 13.52 MB
Page 125 of 222
The automatic start procedure takes place again. The warning light goes out.
Further information on automatic transmission Engine shut down takes place when the selector lever is in positions P, D/S , N
and in Tiptronic mode.
When the selector lever is in position P the engine remains shut down after you
release the brake pedal. Start the engine by pressing the gas pedal or by choosing
a different gear and releasing the brake pedal.
If the selector lever is moved into position R during the STOP phase , the engine
will re-start.
To prevent the engine from starting unintentionally when selecting the position
R , switch rapidly from the position D/S to position P.
The system detects a movement of the vehicle due to the large steering angle or
when the selector lever is moved into position R (e.g. when parking) - no auto-
matic engine shutdown takes place.
The type of braking procedure can influence whether the STOP phase takes place
or not. No STOP phase takes place when the vehicle is moving at low speed (e.g.
during a traffic jam or when tuning) and remains stationary after pressing the
brake pedal lightly. Engine shutdown takes place if you press the brake pedal
down with more force.
Operational conditions of the system
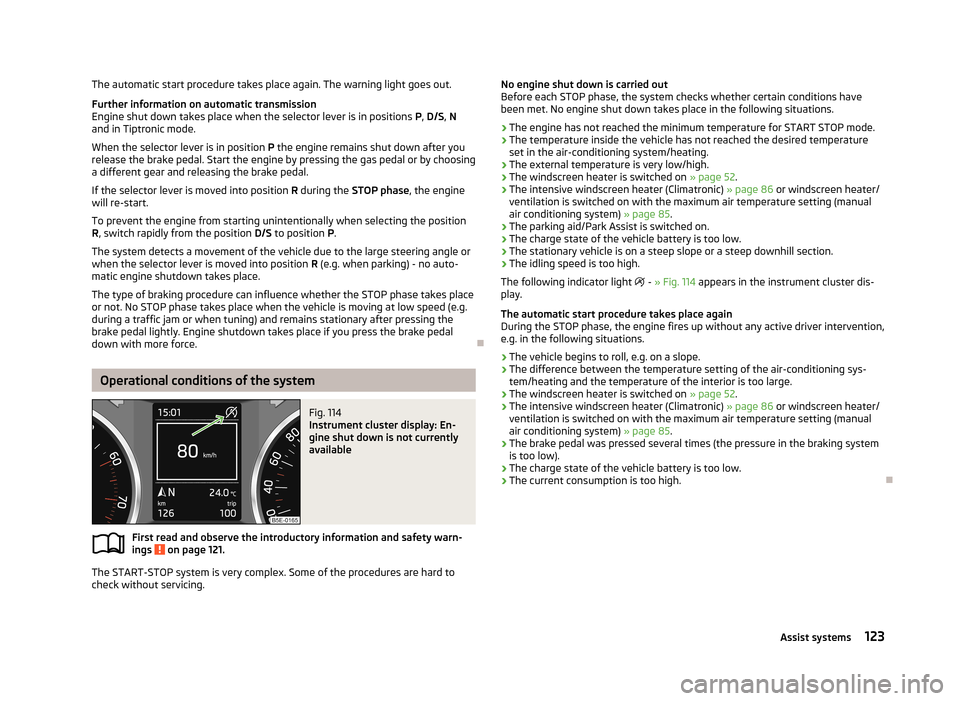
Fig. 114
Instrument cluster display: En-
gine shut down is not currently
available
First read and observe the introductory information and safety warn- ings on page 121.
The START-STOP system is very complex. Some of the procedures are hard to
check without servicing.
No engine shut down is carried out
Before each STOP phase, the system checks whether certain conditions have
been met. No engine shut down takes place in the following situations.
› The engine has not reached the minimum temperature for START STOP mode.
› The temperature inside the vehicle has not reached the desired temperature
set in the air-conditioning system/heating.
› The external temperature is very low/high.
› The windscreen heater is switched on
» page 52.
› The intensive windscreen heater (Climatronic)
» page 86 or windscreen heater/
ventilation is switched on with the maximum air temperature setting (manual
air conditioning system) » page 85.
› The parking aid/Park Assist is switched on.
› The charge state of the vehicle battery is too low.
› The stationary vehicle is on a steep slope or a steep downhill section.
› The idling speed is too high.
The following indicator light
- » Fig. 114 appears in the instrument cluster dis-
play.
The automatic start procedure takes place again
During the STOP phase, the engine fires up without any active driver intervention,
e.g. in the following situations.
› The vehicle begins to roll, e.g. on a slope.
› The difference between the temperature setting of the air-conditioning sys-
tem/heating and the temperature of the interior is too large.
› The windscreen heater is switched on
» page 52.
› The intensive windscreen heater (Climatronic)
» page 86 or windscreen heater/
ventilation is switched on with the maximum air temperature setting (manual
air conditioning system) » page 85.
› The brake pedal was pressed several times (the pressure in the braking system
is too low).
› The charge state of the vehicle battery is too low.
› The current consumption is too high.
123Assist systems
Page 126 of 222
Manually activating/deactivating the systemFig. 115
Button for the START-STOP sys-
tem
First read and observe the introductory information and safety warn-
ings on page 121.
Activation/deactivation
›
Press the button
» Fig. 115 .
When start-stop mode is deactivated, the warning light in the button lights up.
Note
■ If the system is deactivated during the STOP phase, the automatic start proce-
dure takes place.■
If the Eco » page 124 driving mode is selected, manual deactivation is not pos-
sible.
Information for the driver
First read and observe the introductory information and safety warn-ings
on page 121.
The information for the driver appears in the instrument cluster display.
Start the engine manually!
or
START MANUALLY
The driver sees this message when the conditions for the automatic start proce-
dure are not met during the STOP phase. The engine must be started manually
with the key or starter button KESSY » page 95.
Error: start-stop system
or
START STOP ERROR
Error in the START-STOP system. Seek help from a ŠKODA specialist garage.
Select driving mode
Fig. 116
Centre console: Button for se-
lecting the driving mode
Selecting the driving mode allows you to adjust a range of different driving pa-
rameters for the vehicle.
The driving mode can only be selected when the ignition is turned on. The menu for selecting the driving mode is called up by pressing the button
» Fig. 116 . More information about setting the driving mode » operating in-
structions for Infotainment , chapter Other functions .
When the Sport, Eco or Individual modes are activated, the symbol
» Fig. 116
lights up in the button.
The most recently selected driving mode (before the ignition was switched off) is
mapped to the vehicle key and is re-activated after the ignition is switched on.
Driving mode
› Normal
- this mode is suitable for a standard comfortable driving style
› Sport
- this mode is suitable for a sporty driving style
› Eco
- this mode is suitable for a economical driving style
› Individual
- this mode is provided for making custom settings to the vehicle sys-
tems (steering, engine, dynamic cornering lights, air conditioning)
124Using the system
Page 127 of 222
Steering
In the Sport driving mode, the steering force assistance » page 93 is reduced
somewhat. This helps keep the vehicle on the best possible track when driving in
a sporty driving style.
Engine (drive)
The engine and transmission respond more dynamically or more relaxed to move- ments of the gas pedal based on what driving mode was set. In the Eco driving
mode, automatic transmission allows you to drive in the Neutral posi- tion » page 130 . When the Cruise Control System is active, the selected driving
mode can have an influence on driving behaviour when accelerating.
Dynamic cornering lights
The headlights adjust to the more dynamic driving style in the Sport driving
mode. Dynamic cornering lights is deactivated in the Eco driving mode.
Air conditioning (Climatronic)
In the Eco driving mode, the air conditioning system works more efficiently whilst
still maintaining the desired interior temperature.WARNING■ Setting the driving mode while driving can distract you from other traffic -
risk of accident.■
Concentrate fully at all times on your driving! As the driver you are fully re-
sponsible for the operation of your vehicle.
■
Adjust the speed and driving style to the current visibility, weather, road and
traffic conditions.
Note
■ The Eco driving mode is not available when towing a trailer. When the vehicle is
connected electrically to a trailer and is in the Eco driving mode, the Normal driv-
ing mode is configured automatically.■
On vehicles with automatic transmission, the gear is automatically set to mode
S » page 129 when selecting driving mode Sport or, in Eco driving mode, to mode
E .
■
The driver can change some vehicle functions irrespective of the selected driv-
ing mode. For instance, in the driving mode Eco , the driver can switch the auto-
matic transmission to the mode S.
ProActive passenger protection
ProActive passenger protection increases the protection offered to passengers in situations which could lead to a collision or rollover.
The system is automatically activated each time the ignition is switched on and
works at speeds of over 30 km/h.
In critical driving situations (e.g. during an emergency brake or sudden change in direction), the following steps can be taken separately or combined in order to re-
duce the risk of serious injury:
› Front passenger seatbelt or front passenger and driver's seatbelts are automat-
ically tensioned strongly over the body;
› Door panels in the side doors and the sliding/tilting roof (if open) are automati-
cally closed up to a gap of around 5 cm from the edge.
Once the critical driving situation has passed, the tension on the seatbelts will be released again.
All functions of the system are available when:
› the system is activated in Infotainment
» operating instructions for Infotain-
ment , chapter Setting vehicle systems (CAR button) ;
› the TCS is switched on
» page 113;
› the
Sport driving mode is not selected » page 124.
If the system cannot function correctly, the following message will appear in the
instrument cluster display:
ProActive passenger protection not available.
or ProActive passenger protection: funct. restricted.
Seek help from a ŠKODA specialist garage.WARNING■ Adjust the speed and driving style to the current visibility, weather, road and
traffic conditions. The increased safety offered by ProActive passenger pro-
tection must not tempt you to take greater risks than otherwise – risk of an
accident! 125Assist systems
Page 128 of 222

NoteIf the front passenger front airbag is deactivated » page 151 the belt tensioning
function for the front passenger seat is switched off.
Lane Assist
Introduction
This chapter contains information on the following subjects:
Operating principle
126
Explanations of situations
127
Information for the driver
128WARNING■ Lane Assist only operates as a support- it does absolve the driver of the re-
sponsibility to maintain full control over the vehicle's steering.■
Lane Assist only makes the driver away that the vehicle is approaching the
line between two lanes by means of a steering intervention. The driver retains
responsibility at all times for keeping the vehicle within the lane.
■
Lane Assist can help you keep the vehicle within the lane. However, it does
not steer the vehicle for you. The driver retains full responsibility for steering at all times.
■
The camera need not be able to detect all lane lines. A steering intervention
can only be made when the vehicle approaches a detected line between lanes.
■
Some objects on the road may be incorrectly detected as lines. As a result,
an incorrect steering intervention may take place.
■
The function of adaptive lane guidance Assist system may be restricted
when driving e.g. over rutted roads, on a slope, or if there are lateral winds.
■
Do not use the Assist system in poor weather, e.g. black ice, fog, heavy rain -
risk of accident!
WARNINGThe camera's powers of detection may be limited by a range of external influ-
ences. In this case, the Assist system may not be able to detect the line cor-
rectly, if at all. The camera's powers of detection may be limited, e.g. in the fol- lowing:■
in poor visibility conditions, e.g. fog, heavy rain, thick snowfall;
■
when dazzled by the sun;
■
when dazzled by oncoming traffic;
■
by vehicles ahead;
■
when the camera viewing range is obstructed by an obstacle.
CAUTION
Do not attach any stickers or similar objects to the windscreen to avoid impairing
the functions of the Assist system.
Operating principle
Fig. 117
Windscreen: Camera viewing
window for Lane Assist
First read and observe the introductory information and safety warn- ings on page 126.
Lane Assist (in the following referred to as the system) detects the lines between
lanes using data obtained from the camera (continuous and interrupted) » Fig. 117.
When the vehicle approaches a detected line between lanes, the system makes a
light movement of the steering wheel in the opposite direction to the boundary
line. This corrective steering intervention can be overridden at any time.
The strength of the steering movement can be activated/deactivated in the Info-
tainment » operating instructions for Infotainment , chapter Setting vehicle sys-
tems (CAR button) .
126Using the system
Page 129 of 222
Where necessary, the system only performs a steering intervention when the
boundary line is detected on at least one side of the lane.
If the turn signal is switched on prior to driving over the boundary line (e.g. whenmaking a turn), no steering intervention takes place when the vehicle approaches
the boundary line. The system regards the situation as an intended lane change.
The system works above speeds of 65 km/h and is designed for driving on motor-ways and streets with high-quality markings (the boundary lines must have high
visibility).
Adaptive lane assist
Using steering intervention, the system helps to keep the selected distance from the boundary lines on both sides of the vehicle. A steering intervention is only
made when the boundary lines are detected on both sides of the vehicle.
If the position within the lane is changed, the system quickly adapts and holds
the newly-selected position.
Adaptive lane assist can be activated/deactivated in the Infotainment » operating
instructions for Infotainment , chapter Setting vehicle systems (CAR button) .
Explanations of situations
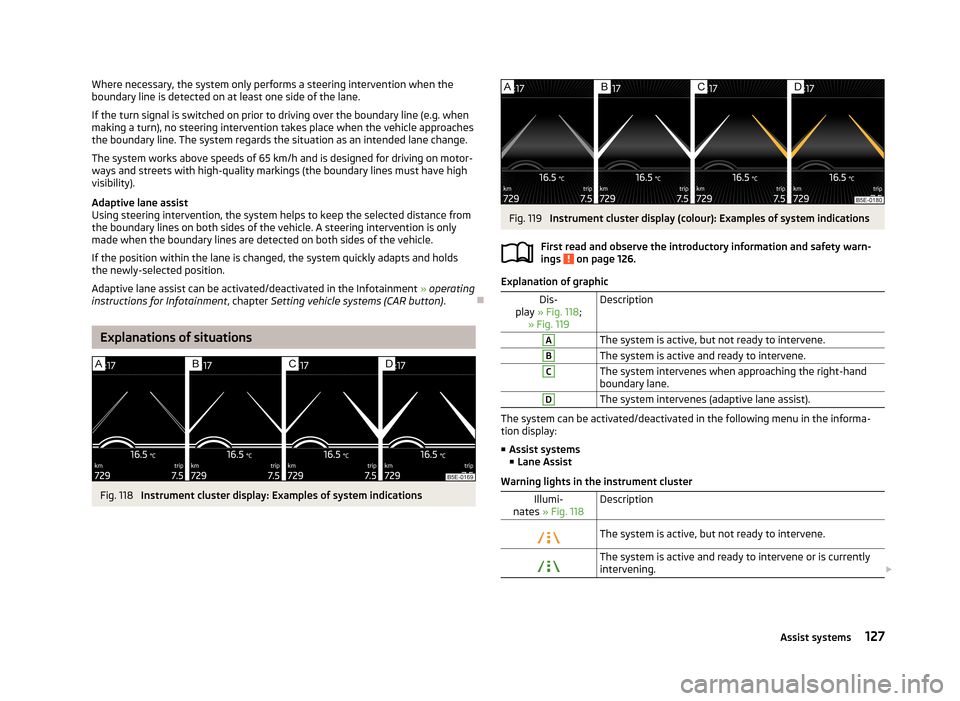
Fig. 118
Instrument cluster display: Examples of system indications
Fig. 119
Instrument cluster display (colour): Examples of system indications
First read and observe the introductory information and safety warn-
ings
on page 126.
Explanation of graphic
Dis-
play » Fig. 118 ;
» Fig. 119DescriptionAThe system is active, but not ready to intervene.BThe system is active and ready to intervene.CThe system intervenes when approaching the right-hand boundary lane.DThe system intervenes (adaptive lane assist).
The system can be activated/deactivated in the following menu in the informa-
tion display:
■ Assist systems
■ Lane Assist
Warning lights in the instrument cluster
Illumi-
nates » Fig. 118DescriptionThe system is active, but not ready to intervene.The system is active and ready to intervene or is currently
intervening. 127Assist systems
Page 130 of 222
The indicator light is lit. Possible causes:
› the vehicle is travelling at less than 65 km/h;
› no lane boundary exists;
› the lane boundary was not detected;
› the driver's hands are not on the steering wheel;
› the lane is less than 2.5 m in width;
› the radius of the curve is too small.
Information for the driver
First read and observe the introductory information and safety warn-ings
on page 126.
The information for the driver appears in the instrument cluster display.
Lane Assist not available. No sensor view.
The windscreen is dirty, iced over or misted up in the camera viewing range. Clean the windscreen or remove the obstacles.
Lane Assist currently not available.
The system has limited functionality due to a temporary error. Try to re-activate
the machine.
Error: Lane Assist
A system error is present. Seek help from a ŠKODA specialist garage.
Lane Assist: Take over steering!
The system has detected that there are no hands on the steering wheel. In this case, the Assist system is not ready to intervene. Place your hands on the steer-
ing wheel.
128Using the system
Page 132 of 222
When parking on a slope, the handbrake should be applied firmly before the park
position P is selected. This ensures that there is no excessive pressure on the
lock mechanism and that it is subsequently easier to move the selector lever out of position P.
Starting-off and driving
First read and observe the introductory information and safety warn-
ings
on page 129.
Starting off
›
Firmly depress and hold the brake pedal.
›
Press the Shiftlock button (button in the selector lever handle), move the selec-
tor lever into the desired position » page 130 and then release the Shiftlock
button.
›
Release the brake pedal and accelerate.
Stop
The selector lever position N does not have to be selected when stopping for a
short time, such as at a cross roads.
›
Fully depress and hold the brake pedal until driving is resumed.
Parking
›
Fully depress and hold the brake pedal and bring the vehicle to a stop.
›
Firmly apply the handbrake.
›
Press and Shiftlock button in the selector lever, move the selector lever to P
and then release the Shiftlock button.
Driving in Neutral
›
Select the Eco driving mode » page 124, Select driving mode .
›
Take the foot of the accelerator (selector lever in position D/S).
The vehicle moves without the braking effect of the engine.
Idling can be interrupted by briefly pressing down on the accelerator pedal or
pressing the rocker switch -
on the multifunction steering wheel
» page 131.
Selector lever positionsFig. 120
Selector lever/Instrument cluster display
First read and observe the introductory information and safety warn- ings
on page 129.
The current mode of the automatic gearbox is indicated in the instrument cluster display
1
» Fig. 120 .
P
– Parklock
The Parklock must only be engaged when the vehicle is stationary.
The driven wheels are locked mechanically in this position.
If you wish to move the selector lever into or out of this position, the Shiftlock
button in the selector lever handle and the brake pedal must be actuated at the
same time.
If the battery is empty, the selector lever cannot be moved out of the position
P » page 133 .
R
– Reverse gear
Reverse gear can only be engaged when the vehicle is stationary and the engine
is at idling speed.
The brake pedal must be depressed and at the same time the Shiftlock must be
pressed, if you wish to obtain the selector lever positions R, P or N.
When the ignition is switched on and the selector lever is in position R, the re-
verse lights will come on.
130Using the system
Page 133 of 222
N – Neutral
The brake pedal must be depressed to move the selector lever out of the position
N (if the lever is in this position for longer than 2 seconds) into the position D/S or
R when the vehicle is travelling at less than 5 km/h and the ignition is switched
on.D/S
- mode for driving forward (Normal program)/mode for driving forward
(Sport program)
The system switches from one mode to the other by moving the selector lever in- to the spring-tensioned position » Fig. 120 .
In the D or S mode, the forward gears are shifted up and down, depending on the
selected driving mode, engine load, driving speed and dynamic shifting program.
In the S mode, shifting up later into a higher gear makes it possible to fully exploit
the power potential of the engine. The gearbox also then shifts down at higher engine speeds as in the position D.
The brake pedal must be depressed to move the selector lever into position D/S
from Nwhen the vehicle is travelling at less than 5 km/h.
Manual shifting of gears (Tiptronic)
Fig. 121
Selector lever and multifunction steering wheel
First read and observe the introductory information and safety warn-
ings
on page 129.
Tiptronic mode makes it possible to manually shift gears with the selector lever or
multifunction steering wheel.
It may be of benefit, e.g. when towing a trailer or driving in mountains to adapt
the gearbox ratios manually to the driving situations.
Switching to manual shifting›Push the selector lever to the right out of position D/S. The selector lever posi-
tion you have engaged appears in the instrument cluster display.
Shifting up gears›
Press the selector lever forwards
+
» Fig. 121 .
›
Pull the right rocker switch +
» Fig. 121 towards the multifunction steering
wheel.
Shifting down gears
›
Press the selector lever backwards
-
» Fig. 121 .
›
Pull the left rocker switch -
» Fig. 121 towards the multifunction steering wheel.
Temporarily switching to manual shifting
›
If the selector lever is in position D/S, pull the left rocker switch -
» Fig. 121 or
the right rocker switch + towards the multifunction steering wheel.
›
Manual shifting switches off if the rocker switches
- or + are not actuated for 1
minute or more. You can also switch off the temporary switch-over to manual shifting by pressing the right rocker switch +
for more than 1 second.
It is possible to switch to manual shifting when the car is stationary and when
driving.
When accelerating, the gearbox automatically shifts up into the higher gear just before the maximum permissible engine speed is reached.
If a lower gear is selected, the gearbox does not shift down until there is no risk
of the engine overrevving.
Selector lever lock
First read and observe the introductory information and safety warn-ings
on page 129.
With the ignition on, the selector lever is locked when it is in the positions P and
N . The indicator light
» page 20 , Selector lever lock
illuminates in the instru-
ment cluster. The brake pedal must be depressed to move the selector lever out
of this position.
The selector lever is not locked when quickly moving across the position N (e.g.
from R to D/S ). This, for example, helps to rock out a vehicle that is stuck. The se-
lector lever lock will click into place if the lever is in the N position for more than 2
seconds without the brake pedal being pressed.
131Automatic gearbox
Page 138 of 222
Button/adjust- ment
wheel
ActionRadio, traffic report, TVAudio, Video, DVD, DVD menuNavigation
2Turn upwardsIncrease volume2Turn downwardsDecrease volume3
Press brieflyChanging to the next stored radio station
Changing to the next stored traffic information Interrupting the traffic reportChange to the next title a)
Change to the next chapter c)
Change to the first chapter d)Function based on the current audio
source3Press button for a
long period of timeInterruption of the traffic reportFast forward a)4
Press brieflyChanging to the previously stored radio station
Changing to the previously stored traffic information Interrupting the traffic reportChange to previous title a)
Change to previous chapter c)4Press button for a
long period of timeInterruption of the traffic reportFast rewind a)5Press brieflyInterruption of the traffic reportwithout functionRepeats the last navigation announce-
ment5
Turn upwardsDisplay of the stored/accessible stationsScroll upwards
Interruption of the traffic reportChange to previous title a)
Change to previous chapter c)
Displays list of last destinations
5
Turn downwardsDisplay of the stored/accessible stations
Scroll downwards
Interruption of the traffic reportChange to the next title a)
Change to the next chapter c)
Change to the first chapter d)6Press brieflyCall up main menu on information displaya)
Does not apply for AUX.
b)
The tone is switched on again by pressing one of the buttons
1
,
3
or
4
and the adjustment wheel
2
is rotated.
c)
Applies for DVD.
d)
Applies for the DVD menu.
Note■
If the ignition and the side lights are switched on, the buttons and dials on the
multifunction steering wheel are also illuminated.■
The set of loudspeakers in the vehicle is matched to a power output of the Info-
tainment of 4x20 W.
■
Vehicles with the CANTON sound system equipment are fitted with a loud-
speaker set including centre speaker and bass. The loudspeaker set is tuned with
a external 10 channel amp for a total output of 570 W.
136Using the system
Page 140 of 222
Safety
Passive Safety
General information
Introduction
This chapter contains information on the following subjects:
Safety equipment
138
Before setting off
138
What influences the driving safety?
139
In this section you will find important information, tips and notes on the subject
of passive safety in your vehicle. We have combined everything here which you
should be familiar with, for example, regarding seat belts, airbags, child seats and safety of children. It is therefore important, in particular, to comply with the notes
and warnings in this section for your own interest and in the interest of those
travelling with you.
WARNING■ This chapter contains important information on how to use the vehicle for
the driver and his occupants. You will find further information on safety, which concerns you and those travelling with you, in the following chapters of this
Owner's Manual.■
The complete on-board literature should always be in the vehicle. This ap-
plies in particular, if you rent out or sell the vehicle.
Safety equipment
First read and observe the introductory information and safety warn-ings
on page 138.
The following list contains part of the safety equipment in your vehicle:
› three-point seat belts for all the seats;
› belt force limiters for the front seats;
›
belt tensioners for front seats;
› seat belt height adjusters for front seats;
› Front airbag for the driver and the front seat passenger;
› driver’s knee airbag;
› front side airbags;
› rear side airbags;
› head airbags;
› anchoring points for child seat using the ISOFIX system;
› anchoring points for child seat using the TOP TETHER system;
› head restraints adjustable for height;
› adjustable steering column.
The specified safety equipment works together, in order to optimally protect you
and those travelling with you in accident situations. The safety equipment does
not protect you or the people travelling with you, if you or your occupants adopt
an incorrect seated position or the equipment is not correctly adjusted or used. If
the seat belt is not fastened properly, this may result in injuries during an acci-
dent caused by the deployed airbag.
Before setting off
First read and observe the introductory information and safety warn-
ings
on page 138.
For your own safety and the safety of the people travelling with you, please pay
attention to the following points before setting off.
› Ensure that the lighting and the turn signal system are functioning properly.
› Check the tyre inflation pressure.
› Ensure that all of the windows offer good visibility to the outside.
› Secure all items of luggage
» page 64, Boot .
› Ensure that no objects can obstruct the pedals.
› Adjust the mirrors, the front seat and head restraint to your body size.
› Advise your passengers to adjust the head restraints to their body size.
› Protect children in suitable child seats with correctly fastened seat
belts » page 154 , Transporting children safely .
› Adopt the correct seated position
» page 139, Correct seated position . Tell your
passengers to assume the correct seated position.
› Correctly fasten the seat belt. Also inform passengers to fasten the seat belt
correctly » page 142 , Seat belts .
138Safety