lock SKODA OCTAVIA 2012 2.G / (1Z) Manual PDF
[x] Cancel search | Manufacturer: SKODA, Model Year: 2012, Model line: OCTAVIA, Model: SKODA OCTAVIA 2012 2.G / (1Z)Pages: 222, PDF Size: 13.52 MB
Page 160 of 222
GroupSize category
of the child seat a)Front passenger seat b)Rear seats outsideRear seat middle
1
9-18 kg
D
XIL-SU IUFX
CBB1Aa)
The size category is shown on the label attached to the child seat.
b)
If the front passenger seat is fitted with fixing eyes for the ISOFIX system, this suits installation of an ISOFIX child seat with the “Semi-Universal” approval.
The seat is suited for installation of an ISOFIX child seat with the “Semi-
Universal” approval. The category “Semi-Universal” means that the child
seat with the ISOFIX system is approved for your vehicle. Observe the in-
formation in the list of vehicles which comes with the child seat.
The seat is suitable for the installation of an ISOFIX child seat with the ap- proval “Universal” and attachment with the TOP TETHER belt.
The seat is not fitted with fixing eyes for the ISOFIX system.
Locking eyes of the TOP TETHER system
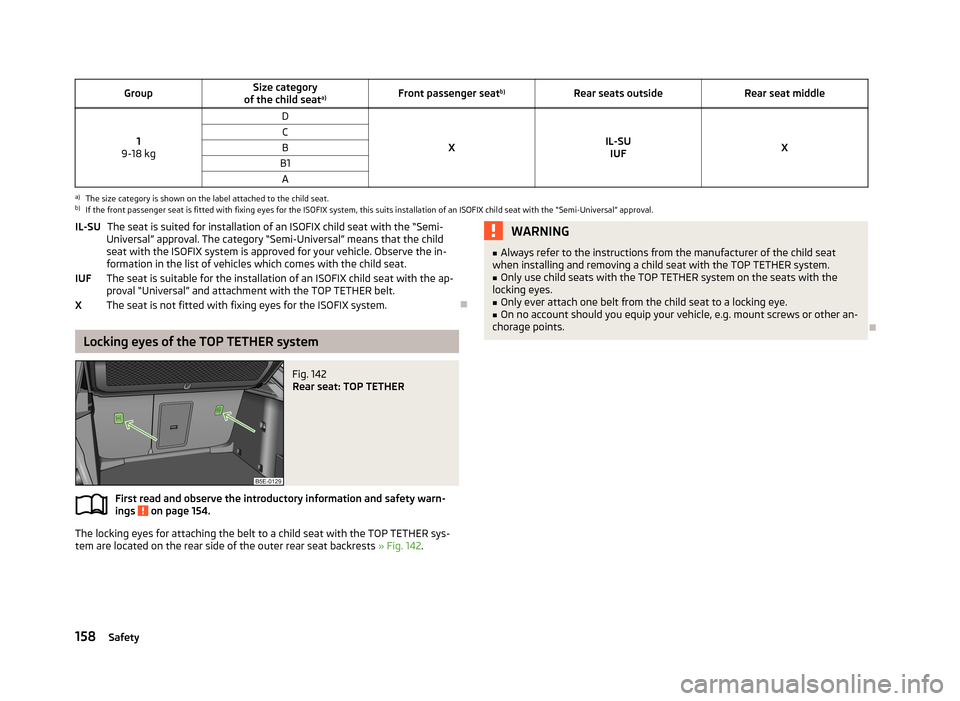
Fig. 142
Rear seat: TOP TETHER
First read and observe the introductory information and safety warn-ings on page 154.
The locking eyes for attaching the belt to a child seat with the TOP TETHER sys-
tem are located on the rear side of the outer rear seat backrests » Fig. 142.
IL-SU
IUFXWARNING■
Always refer to the instructions from the manufacturer of the child seat
when installing and removing a child seat with the TOP TETHER system.■
Only use child seats with the TOP TETHER system on the seats with the
locking eyes.
■
Only ever attach one belt from the child seat to a locking eye.
■
On no account should you equip your vehicle, e.g. mount screws or other an-
chorage points.
158Safety
Page 161 of 222
General Maintenance
Taking care of and cleaning the vehicle
Taking care of your vehicle
Introduction
This chapter contains information on the following subjects:
Washing the vehicle
160
Automatic car wash systems
160
Washing by hand
160
Washing with a high-pressure cleaner
161
Preserving and polishing the vehicle paintwork
161
Chrome parts
161
Paint damage
161
Plastic parts
162
De-icing windows and exterior mirrors
162
Radio reception and aerial
162
Headlight lenses
162
Rubber seals
163
Door lock cylinders
163
Wheels
163
Underbody protection
163
Protection of hollow spaces
164
Artificial leather, cloths and Alcantara ®
164
Fabric covers on electrically heated seats
164
Natural leather
164
Seat belts
165
Regular and proper care help to retain the efficiency and
value of your vehicle. It
may also be one of the requirements for the acceptance of warranty claims relat- ing to corrosion damage and paint defects on the bodywork.
We recommend using care products from ŠKODA Original Accessories that areavailable from ŠKODA Partners. The instructions for use on the package must be
observed.
WARNING■ Care products may be harmful to your health if not used according to the in-
structions.■
Always store care products in a safe place, out of the reach of children – risk
of poisoning!
■
Water and ice in the brake system when washing the vehicle in winter can
affect the braking efficiency – risk of accident!
■
Only wash the vehicle when the ignition is switched off – risk of accident!
■
When washing the car by hand, protect your hands and arms from sharp-
edged metal parts (e.g. when cleaning the underfloor, the inside of the wheel
housings or the wheel trims, etc) - risk of cuts!
■
Air fresheners and scents can be hazardous to heath when the temperature
inside the vehicle is high.
CAUTION
■ Be sure to check clothing for colourfastness to avoid any damage or visible
stains on the material (leather), panels and textiles.■
Cleaners containing solvents can damage the material being cleaned.
■
Do not wash your vehicle in bright sunlight – risk of paint damage.
■
If washing the vehicle in the winter using a hose or high-pressure cleaner, en-
sure that the jet of water is not aimed directly at the locking cylinders or the
door/panel joints – risk of freezing!
■
Do not use any insect sponges, rough kitchen sponges or similar cleaning prod-
ucts – risk of damaging the surface of paintwork.
■
Do not stick any stickers on the inside of the rear windows, the rear side win-
dows and in the vicinity of the heating elements on the windscreen or near the
window aerial. These may get damaged. With regard to the antenna, they may in-terfere with the radio or navigation.
■
Do not clean the inside of the windows with sharp-edged objects or corrosive
and acidic cleaning agents – risk of damaging the heating elements or window
aerial.
■
Do not attach scents and air fresheners to the dashboard – risk of damage to
the dashboard.
■
To avoid damaging the parking aid sensors while cleaning with high-pressure
cleaners or steam jets, the sensors must only be directly sprayed for short periods while a minimum distance of 10 cm must be observed.
■
Do not clean the roof trim with a brush – risk of damage to the trim surface.
■
Fold in the exterior mirrors to prevent damage before washing the vehicle in an
automatic car wash system. Never manually fold in electric exterior mirrors - al-
ways use the electric controls.
159Taking care of and cleaning the vehicle
Page 165 of 222

Rubber sealsFirst read and observe the introductory information and safety warn-
ings
on page 159.
The rubber seals on doors, door panels, and the sliding roof remain smoother and
last longer if the seals are treated regularly with a suitable rubber care product.
This helps to prevent leakages and premature wear of the seals. Rubber seals
which are well cared for also do not stick together in cold winter weather.
Door lock cylinders
First read and observe the introductory information and safety warn-
ings
on page 159.
Specific products must be used for de-icing door lock cylinders.
When washing your vehicle, ensure as little water as possible gets into the lock- ing cylinders.
Note
We recommend that suitable materials from ŠKODA Original Accessories are used for maintaining the door lock cylinders.
Wheels
First read and observe the introductory information and safety warn-
ings
on page 159.
Wheel rims
Also thoroughly wash the wheel rims when washing the vehicle on a regular ba- sis. Regularly remove salt and brake abrasion from the wheel rims otherwise the material will be affected. Damage to the paint layer on the wheel rims must be
touched up immediately.
Light alloy wheels
After washing thoroughly and treat the wheel rims with a protective product for
light alloy wheels. Products which cause abrasion must not be used to treat the
wheel rims.
WARNINGWater, ice and grit in the brake system can affect the braking efficiency – risk
of accident!
CAUTION
Severe layers of dirt on the wheels can also result in wheel imbalance. This may
show itself in the form of a wheel vibration which is transmitted to the steering
wheel which, in certain circumstances, can cause premature wear of the steering.
This means it is necessary to remove the dirt.
Note
We recommend that any repairs to damaged paintwork are carried out by a
ŠKODA Partner.
Underbody protection
First read and observe the introductory information and safety warn-ings
on page 159.
The underside of your vehicle is protected for life against chemical and mechani-
cal influences.
As damage to the protective layer when driving cannot be ruled out completely,
we recommend that you inspect the protective layer on the underside of your ve- hicle and on the chassis at specific intervals – preferably at the beginning and end
of the winter.
ŠKODA Partners have suitable spray products and the necessary equipment
available, and are familiar with the instructions for use. We therefore recommend
that touch-up work or additional corrosion protection measures are carried out by
a ŠKODA Partner.
WARNINGNever use additional underbody protection or anti-corrosion agents for ex-
haust pipes, catalytic converters, diesel particle filters or heat shields. When
the engine reaches its operating temperature, these substances might ignite
– risk of fire!
163Taking care of and cleaning the vehicle
Page 167 of 222
Leather care
Treat the leather roughly every six months with a suitable leather care product.
Apply only a small amount of the cleaning and care product.
Dry off the leather with a soft, dry cloth.
Use a care cream with light blocker and impregnation effect on a regular basis and each time after cleaning. The cream nourishes the leather, allows it to
breathe and keeps it supple and also provides moisture. It also creates surface
protection.
Clean the leather every 2 to 3 months, remove any fresh stains as they occur. Also look after the leather dye. Refresh any areas with a special coloured leather cream as required.
The leather is a natural material with specific properties. During the use of the ve- hicle, minor visible changes can occur on the leather parts of the covers (e. g wrin- kles or creases as a result of the stress of the covers).
CAUTION
■ Avoid leaving the vehicle for lengthy periods in bright sunlight to avoid the
leather from bleaching. If the vehicle is parked in the open for lengthy periods,
protect the leather from direct sunlight by covering it.■
Sharp-edged objects on items of clothing such as zip fasteners, rivets, sharp-
edged belts, jewellery and pendants may leave permanent scratches or signs of
rubbing on the surface.
■
The use of a mechanical steering wheel lock may damage the leather surface of
the steering wheel.
Seat belts
First read and observe the introductory information and safety warn-
ings
on page 159.
Keep the seat belts clean!
Clean dirty seat belts using a mild soapy solution and remove coarse dirt with a soft brush!
Check the condition of all the seat belts on a regular basis. Belt webbing which has become severely soiled may prevent the inertia reel from
reeling up the belt properly.
WARNING■ The seat belts must not be removed for cleaning.■Never clean the seat belts chemically as chemical cleaning products could
destroy the fabric. The seat belts must also not be allowed to come into con-
tact with corrosive liquids (such as acids etc.).■
Seat belts which have damage to the webbing, connections, inertia reel or
lock should be replaced by a ŠKODA specialist garage.
■
Inertia reel belts must be completely dried before being reeled up.
Accessories, changes and replacement of parts
Introduction
This chapter contains information on the following subjects:
Repairs and technical modifications
166
Changes and impairments of the airbag system
166
If you want to retrofit your vehicle with accessories, if a vehicle part is to be re-
placed with a new one, or when needing to make technical changes, the follow-
ing instructions must be observed.
› Always seek advice from a ŠKODA Partner
before purchasing any accessories or
parts and before making any technical changes »
.
› Technical modifications must satisfy the latest guidelines and advice issued by
ŠKODA.
› We recommend you have any modifications and adjustments on the vehicle car-
ried out by a ŠKODA Partner. Partners can provide more detailed information
and also carry out all the necessary work professionally and correctly.
› Only install such parts whose version and properties meet factory-installed
parts on the vehicle.
Adhering to the advice given will prevent any kind of damage to the vehicle, and
its travelling and operating safety will be maintained. The vehicle also complies
with German road transport regulations (StVZO).
165Taking care of and cleaning the vehicle
Page 169 of 222
Inspecting and replenishing
Fuel
Introduction
This chapter contains information on the following subjects:
Refuelling
167
Unleaded petrol
168
Diesel fuel
169
The correct grades of fuel for your vehicle are stated on a sticker affixed to the
inside of the fuel filler flap » Fig. 144 on page 167 -
.
WARNINGThe national legal requirements must be observed if carrying a spare canister
in the vehicle. We do not recommend carrying any fuel canisters in your vehi-
cle for safety reasons. in the event of an accident this can get damaged and fuel may escape - risk of fire!
CAUTION
■ Never drive until the fuel tank is completely empty! The irregular supply of fuel
can cause misfiring, which can result in considerable damage to parts of the en-
gine and exhaust system.■
Immediately remove any fuel that has spilled onto the vehicle's paintwork – risk
of paint damage!
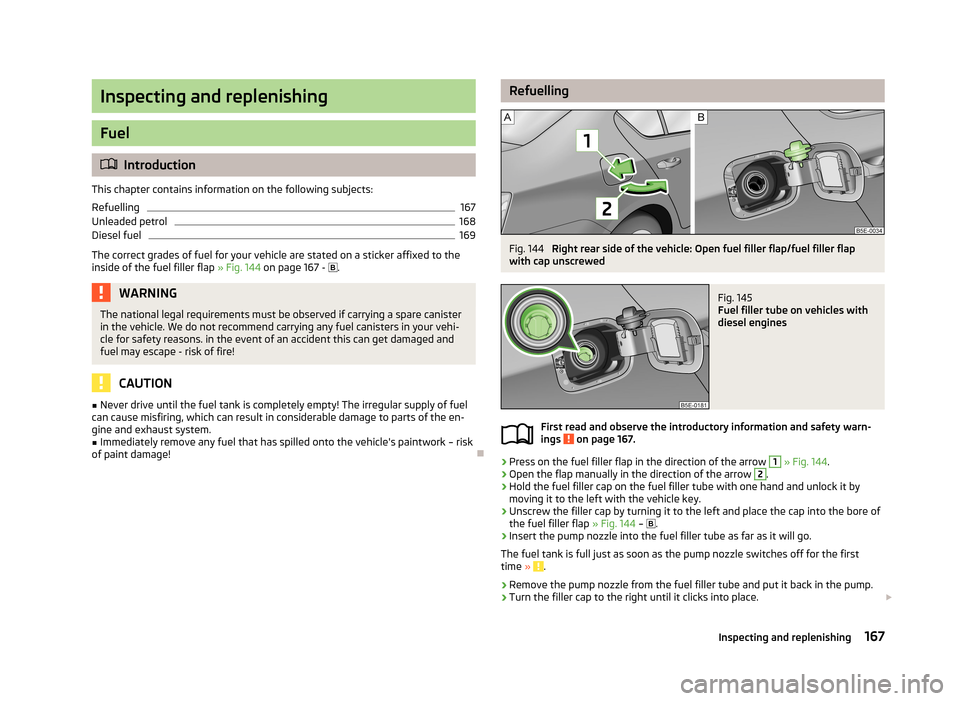
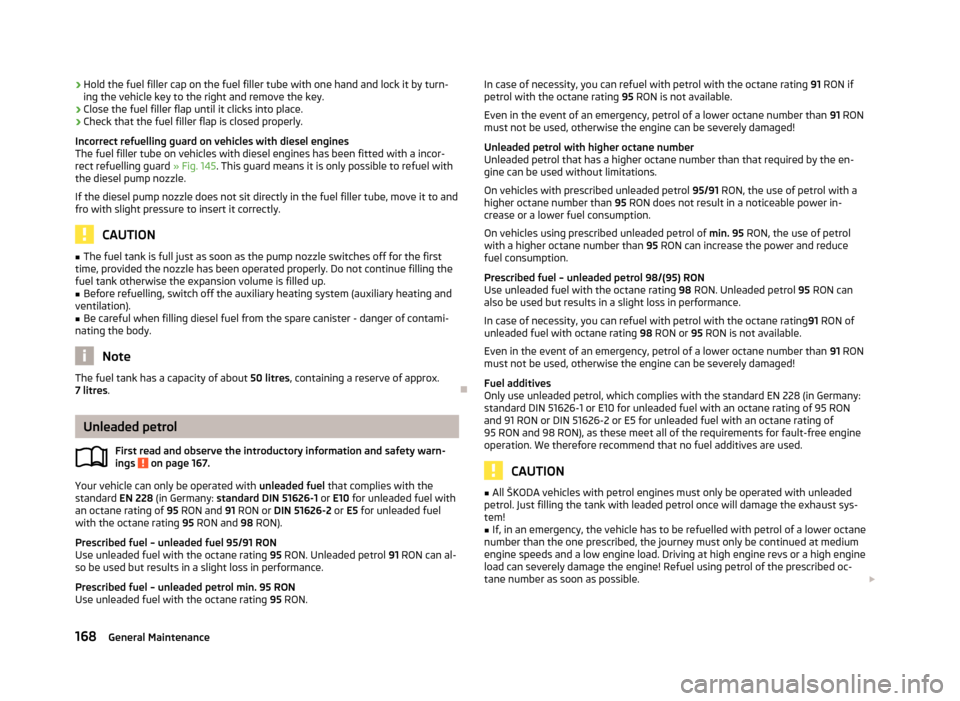
RefuellingFig. 144
Right rear side of the vehicle: Open fuel filler flap/fuel filler flap
with cap unscrewed
Fig. 145
Fuel filler tube on vehicles with
diesel engines
First read and observe the introductory information and safety warn-
ings on page 167.
›
Press on the fuel filler flap in the direction of the arrow
1
» Fig. 144 .
›
Open the flap manually in the direction of the arrow
2
.
›
Hold the fuel filler cap on the fuel filler tube with one hand and unlock it by
moving it to the left with the vehicle key.
›
Unscrew the filler cap by turning it to the left and place the cap into the bore of
the fuel filler flap » Fig. 144 –
.
›
Insert the pump nozzle into the fuel filler tube as far as it will go.
The fuel tank is full just as soon as the pump nozzle switches off for the first time »
.
›
Remove the pump nozzle from the fuel filler tube and put it back in the pump.
›
Turn the filler cap to the right until it clicks into place.
167Inspecting and replenishing
Page 170 of 222
›Hold the fuel filler cap on the fuel filler tube with one hand and lock it by turn-
ing the vehicle key to the right and remove the key.›
Close the fuel filler flap until it clicks into place.
›
Check that the fuel filler flap is closed properly.
Incorrect refuelling guard on vehicles with diesel engines The fuel filler tube on vehicles with diesel engines has been fitted with a incor-
rect refuelling guard » Fig. 145. This guard means it is only possible to refuel with
the diesel pump nozzle.
If the diesel pump nozzle does not sit directly in the fuel filler tube, move it to and fro with slight pressure to insert it correctly.
CAUTION
■ The fuel tank is full just as soon as the pump nozzle switches off for the first
time, provided the nozzle has been operated properly. Do not continue filling the fuel tank otherwise the expansion volume is filled up.■
Before refuelling, switch off the auxiliary heating system (auxiliary heating and
ventilation).
■
Be careful when filling diesel fuel from the spare canister - danger of contami-
nating the body.
Note
The fuel tank has a capacity of about 50 litres, containing a reserve of approx.
7 litres .
Unleaded petrol
First read and observe the introductory information and safety warn-
ings
on page 167.
Your vehicle can only be operated with unleaded fuel that complies with the
standard EN 228 (in Germany: standard DIN 51626-1 or E10 for unleaded fuel with
an octane rating of 95 RON and 91 RON or DIN 51626-2 or E5 for unleaded fuel
with the octane rating 95 RON and 98 RON).
Prescribed fuel – unleaded fuel 95/91 RON Use unleaded fuel with the octane rating 95 RON. Unleaded petrol 91 RON can al-
so be used but results in a slight loss in performance.
Prescribed fuel – unleaded petrol min. 95 RONUse unleaded fuel with the octane rating 95 RON.
In case of necessity, you can refuel with petrol with the octane rating 91 RON if
petrol with the octane rating 95 RON is not available.
Even in the event of an emergency, petrol of a lower octane number than 91 RON
must not be used, otherwise the engine can be severely damaged!
Unleaded petrol with higher octane number
Unleaded petrol that has a higher octane number than that required by the en-
gine can be used without limitations.
On vehicles with prescribed unleaded petrol 95/91 RON, the use of petrol with a
higher octane number than 95 RON does not result in a noticeable power in-
crease or a lower fuel consumption.
On vehicles using prescribed unleaded petrol of min. 95 RON, the use of petrol
with a higher octane number than 95 RON can increase the power and reduce
fuel consumption.
Prescribed fuel – unleaded petrol 98/(95) RON
Use unleaded fuel with the octane rating 98 RON. Unleaded petrol 95 RON can
also be used but results in a slight loss in performance.
In case of necessity, you can refuel with petrol with the octane rating 91 RON of
unleaded fuel with octane rating 98 RON or 95 RON is not available.
Even in the event of an emergency, petrol of a lower octane number than 91 RON
must not be used, otherwise the engine can be severely damaged!
Fuel additives
Only use unleaded petrol, which complies with the standard EN 228 (in Germany:
standard DIN 51626-1 or E10 for unleaded fuel with an octane rating of 95 RON and 91 RON or DIN 51626-2 or E5 for unleaded fuel with an octane rating of
95 RON and 98 RON), as these meet all of the requirements for fault-free engine operation. We therefore recommend that no fuel additives are used.
CAUTION
■ All ŠKODA vehicles with petrol engines must only be operated with unleaded
petrol. Just filling the tank with leaded petrol once will damage the exhaust sys-
tem!■
If, in an emergency, the vehicle has to be refuelled with petrol of a lower octane
number than the one prescribed, the journey must only be continued at medium
engine speeds and a low engine load. Driving at high engine revs or a high engine
load can severely damage the engine! Refuel using petrol of the prescribed oc-
tane number as soon as possible.
168General Maintenance
Page 172 of 222
WARNINGWhen working in the engine compartment, injuries, scolding, accident or fire
hazards may arise. For this reason, it is essential to comply with the warning
instructions stated below and with the general applicable rules of safety. The
engine compartment of your car is a hazardous area!■
Before beginning work in the engine compartment, please read the follow-
ing advice. ■ Turn off the engine and withdraw the ignition key.
■ Firmly apply the handbrake.
■ If the vehicle is fitted with a manual gearbox, move the gearshift lever into
Neutral, or if the vehicle is fitted with an automatic gearbox, move the se- lector lever into position P.
■ Allow the engine to cool.
■ Never open the bonnet if you can see steam or coolant flowing out of the
engine compartment – risk of scalding! Wait until the steam or coolant has stopped escaping.
■
While working in the engine compartment, please read the following advice.
■ Keep children clear of the engine compartment.
■ Never touch the radiator fan while the engine is still warm. The fan might
suddenly start running!
■ Do not touch any hot engine parts – risk of burns!
■ The coolant additive and thus all of the coolant is harmful to your health.
■ Avoid contact with the coolant.
■ Coolant vapours are harmful to health.
■ Never open the end cover of the coolant expansion reservoir while the en-
gine is still warm. The cooling system is pressurized!
■ When opening the end cover of the coolant expansion reservoir, cover it
with a cloth to protect your face, hands and arms from hot steam or hot coolant. ■ If any coolant splashes into your eyes, immediately rinse out your eyes
with clear water and contact a doctor as soon as possible.
■ Always safely store the coolant additive in its original container out of the
reach of children – risk of poisoning!
■ If coolant is swallowed - consult a doctor immediately.
■ Do not leave any items such as cloths or tools in the engine compartment.
■ Never spill fluids on the hot engine. Such fluids (e.g. the antifreeze con-
tained in the coolant) may ignite!
WARNING (Continued)■ Whenever working in the engine compartment while the engine is running,
you must pay heed to the following warning instructions. ■Pay particular attention to moving engine parts (e.g. V-ribbed belt, alterna-
tor, radiator fan) and the high-voltage ignition unit - danger to life! ■ Never touch the electric wiring on the ignition system.
■ Avoid short circuits in the electrical system – particularly on the vehicle's
battery. ■ Always make sure that no jewellery, loose clothing or long hair can get
caught in rotating engine parts – hazard! Always remove any jewellery, tie back long hair and wear tight fitting clothing before completing any work.■
The following warning instructions must be observed if work has to be car-
ried out on the fuel or electrical system. ■ Always disconnect the vehicle battery from the electrical system.
■ Do not smoke.
■ Never work near open flames.
■ Always have a functioning fire extinguisher nearby.
■
Read the information and warning instructions on the fluid containers.
■
Keep fluids in their original containers and keep out of reach of children!
■
If you wish to work under the vehicle, you must secure the vehicle from roll-
ing away and support it with suitable supporting blocks: the car jack is not
sufficient for this – risk of injury!
■
The bonnet must always be properly closed when driving. This is why after
closing the bonnet, the lock must always be checked to ensure it has engaged
properly.
■
If you notice that the lock is not properly engaged while driving, stop the ve-
hicle immediately and close the bonnet – risk of an accident!
CAUTION
■ Always top up using the correct specification of fluids. This may result in major
operating problems and also vehicle damage!■
Never open the bonnet using the locking lever.
For the sake of the environment
In view of the environmentally friendly disposal of fluids, the specials tools and
knowledge required for such work, we recommend that fluids are changed by a
Škoda Partner as part of the inspection service. 170General Maintenance
Page 173 of 222
Note■If there is anything you are not sure about concerning fluids, please consult a
ŠKODA Partner.■
Fluids with the correct specifications can be purchased from ŠKODA Original Ac-
cessories.
Opening and closing the bonnet
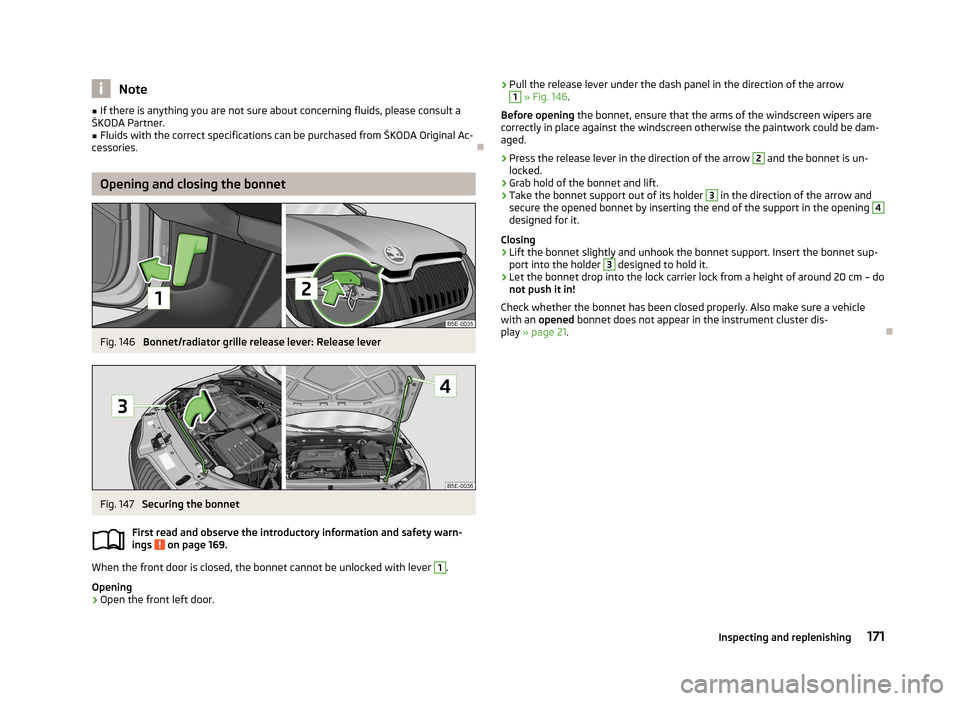
Fig. 146
Bonnet/radiator grille release lever: Release lever
Fig. 147
Securing the bonnet
First read and observe the introductory information and safety warn-
ings
on page 169.
When the front door is closed, the bonnet cannot be unlocked with lever
1
.
Opening
›
Open the front left door.
› Pull the release lever under the dash panel in the direction of the arrow1
» Fig. 146 .
Before opening the bonnet, ensure that the arms of the windscreen wipers are
correctly in place against the windscreen otherwise the paintwork could be dam- aged.›
Press the release lever in the direction of the arrow
2
and the bonnet is un-
locked.
›
Grab hold of the bonnet and lift.
›
Take the bonnet support out of its holder
3
in the direction of the arrow and
secure the opened bonnet by inserting the end of the support in the opening
4
designed for it.
Closing
›
Lift the bonnet slightly and unhook the bonnet support. Insert the bonnet sup-
port into the holder
3
designed to hold it.
›
Let the bonnet drop into the lock carrier lock from a height of around 20 cm – do not push it in!
Check whether the bonnet has been closed properly. Also make sure a vehicle
with an opened bonnet does not appear in the instrument cluster dis-
play » page 21 .
171Inspecting and replenishing
Page 182 of 222

WARNING“Quick-charging” the vehicle battery is dangerous and requires a special
charger and specialist knowledge.
CAUTION
On vehicles with the START/STOP system, the pole terminal of the charger must
not be connected directly to the negative terminal of the vehicle battery, but only
to the engine earth » page 196, Jump-starting in vehicles with the START-STOP
system .
Note
We recommend having the quick charging of vehicle batteries undertaken by a
ŠKODA specialist garage.
Disconnecting and reconnecting the vehicle battery
First read and observe the introductory information and safety warn-ings
on page 176.
On disconnecting and reconnecting the vehicle battery the following functionsare initially deactivated or are no longer able to operate fault-free:
OperationOperating measureElectrical power window (operational faults)» page 41Enter the radio/navigation system code num-
ber» operating instructions for Info-
tainment radio or » operating in-
structions for Infotainment Navi-
gationSetting the clock» page 11Data in the multifunction display are deleted» page 22
Note
We recommend having the vehicle checked by a ŠKODA Partner to ensure the full
functionality of all electrical systems.
Automatic load deactivation
First read and observe the introductory information and safety warn-ings
on page 176.
The vehicle voltage control unit automatically prevents the battery from discharg-
ing when the bettery is subjected to heavy loads. This manifests itself by the fol-
lowing:
› The idling speed is raised to allow the generator to deliver more electricity to
the electrical system.
› Where appropriate large convenience consumers, e.g. seat heaters, rear win-
dow heaters, have their power limited or in case of emergency shut off com-pletely.
CAUTION
■ Despite such intervention by the vehicle electric system management, the vehi-
cle battery may be drained. For example, when the ignition is switched on a long
time with the engine turned off or the side or parking lights are turned on during longer parking.■
Consumers which are supplied via a 12 V socket can cause the vehicle battery to
discharge when the ignition is switched off.
Note
Driving comfort is not disrupted by any shutting off of consumers. Often the driv-
er is not aware of it having taken place.
180General Maintenance
Page 187 of 222
Full wheel trimFirst read and observe the introductory information and safety warn-
ings
on page 181.
Pulling off
›
Hook the clamp found in the vehicle tool kit into the reinforced edge of the wheel trim.
›
Push the wheel wrench through the clamp, support on the tyre and pull off the
wheel trim.
Install
›
Press the wheel trim onto the wheel rim at the valve opening provided.
›
Then press the trim into the wheel rim until its entire circumference locks cor- rectly in place.
CAUTION
■ Use the pressure of your hand, do not knock the full wheel trim! Avoid heavy
knocks when the trim is not yet inserted in the wheel rim. This could cause dam-
age to the guide and centring elements of the trim.■
Ensure that the anti-theft wheel bolt has been installed correctly » page 192,
Securing wheels against theft .
■
If wheel trims are retrofitted it must be ensured that an adequate flow of air is
assured to cool the brake system.
Wheel bolts
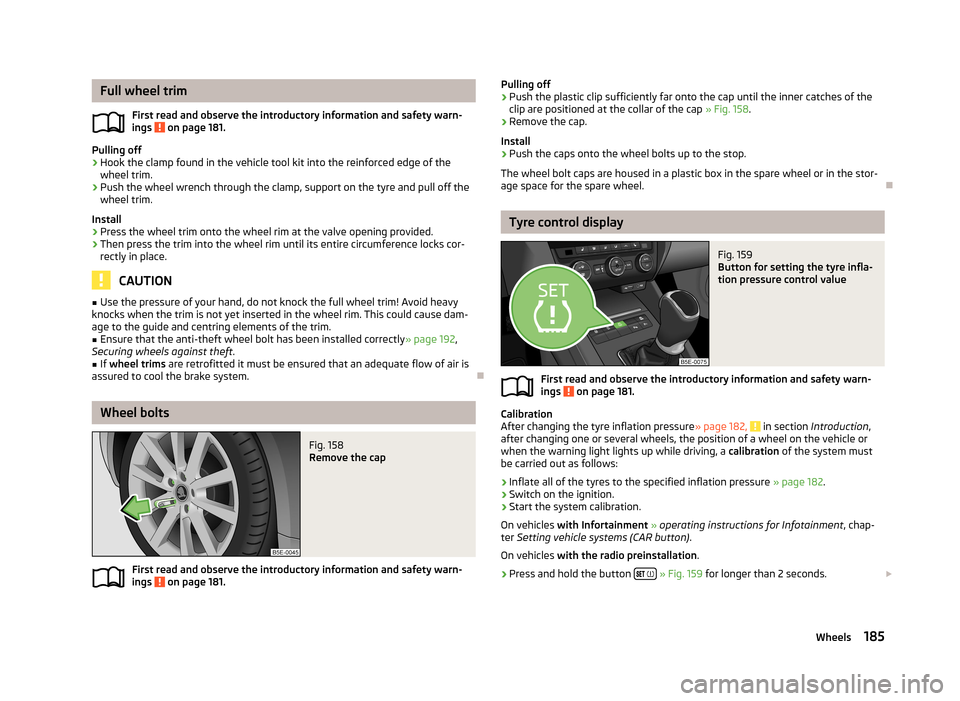
Fig. 158
Remove the cap
First read and observe the introductory information and safety warn- ings on page 181.
Pulling off›Push the plastic clip sufficiently far onto the cap until the inner catches of the
clip are positioned at the collar of the cap » Fig. 158.›
Remove the cap.
Install
›
Push the caps onto the wheel bolts up to the stop.
The wheel bolt caps are housed in a plastic box in the spare wheel or in the stor-
age space for the spare wheel.
Tyre control display
Fig. 159
Button for setting the tyre infla-
tion pressure control value
First read and observe the introductory information and safety warn-
ings on page 181.
Calibration
After changing the tyre inflation pressure » page 182, in section Introduction ,
after changing one or several wheels, the position of a wheel on the vehicle or
when the warning light lights up while driving, a calibration of the system must
be carried out as follows:
›
Inflate all of the tyres to the specified inflation pressure » page 182.
›
Switch on the ignition.
›
Start the system calibration.
On vehicles with Infortainment » operating instructions for Infotainment , chap-
ter Setting vehicle systems (CAR button) .
On vehicles with the radio preinstallation .
›
Press and hold the button
» Fig. 159 for longer than 2 seconds.
185Wheels