warning light SKODA OCTAVIA 2012 3.G / (5E) Owner's Guide
[x] Cancel search | Manufacturer: SKODA, Model Year: 2012, Model line: OCTAVIA, Model: SKODA OCTAVIA 2012 3.G / (5E)Pages: 222, PDF Size: 13.52 MB
Page 33 of 222
If the vehicle is locked and the safe securing system is switched off, the door can
be opened separately from the inside by a single pull on opening lever.
A message is shown after switching off the ignition.
Information message
In the instrument cluster display: CHECK SAFELOCK.
Vehicles with the information display: Check SAFELOCK! Owner's manual! Check
SAFELOCK! Owner's manual!)
Switching on
The safelock switches on automatically the next time the vehicle is locked and
unlocked.
Switching off
The safelock can be switched off by locking twice within 2 seconds.
Switch-on display
The warning light flashes for around 2 seconds in quick succession, afterwards it
begins to flash evenly at longer intervals.
Switch-off display
The indicator light in the driver door flashes for about 2 seconds fast, goes out
and starts to flash at longer intervals after about 30 seconds.
Locking/unlocking with the key
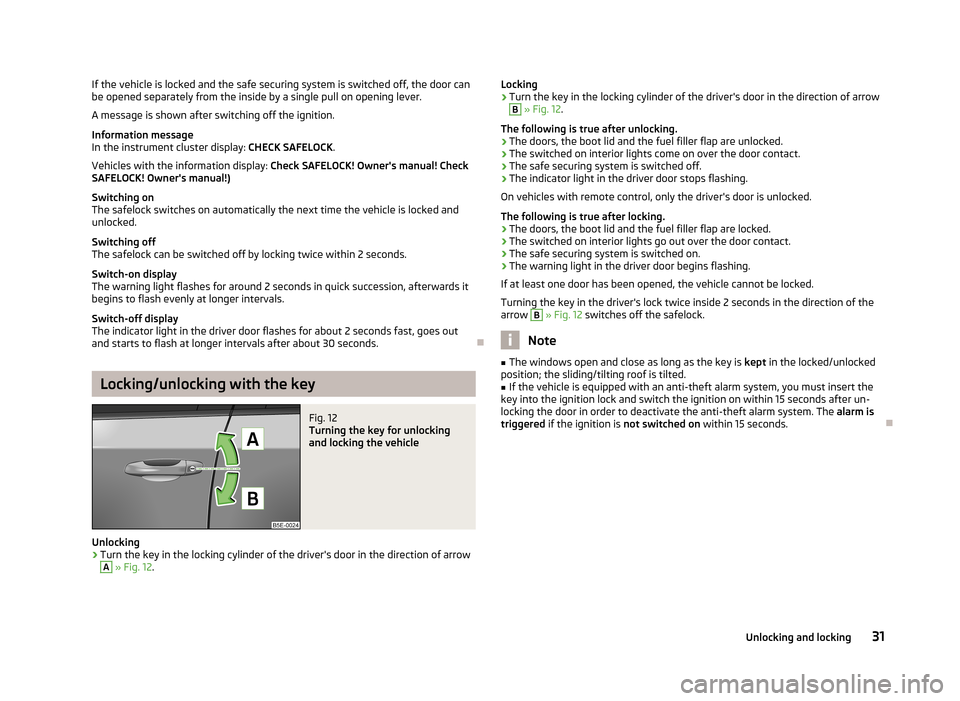
Fig. 12
Turning the key for unlocking
and locking the vehicle
Unlocking
›
Turn the key in the locking cylinder of the driver's door in the direction of arrow
A
» Fig. 12 .
Locking›Turn the key in the locking cylinder of the driver's door in the direction of arrowB
» Fig. 12 .
The following is true after unlocking.
› The doors, the boot lid and the fuel filler flap are unlocked.
› The switched on interior lights come on over the door contact.
› The safe securing system is switched off.
› The indicator light in the driver door stops flashing.
On vehicles with remote control, only the driver's door is unlocked.
The following is true after locking. › The doors, the boot lid and the fuel filler flap are locked.
› The switched on interior lights go out over the door contact.
› The safe securing system is switched on.
› The warning light in the driver door begins flashing.
If at least one door has been opened, the vehicle cannot be locked.
Turning the key in the driver's lock twice inside 2 seconds in the direction of the arrow
B
» Fig. 12 switches off the safelock.
Note
■
The windows open and close as long as the key is kept in the locked/unlocked
position; the sliding/tilting roof is tilted.■
If the vehicle is equipped with an anti-theft alarm system, you must insert the
key into the ignition lock and switch the ignition on within 15 seconds after un-
locking the door in order to deactivate the anti-theft alarm system. The alarm is
triggered if the ignition is not switched on within 15 seconds.
31Unlocking and locking
Page 34 of 222
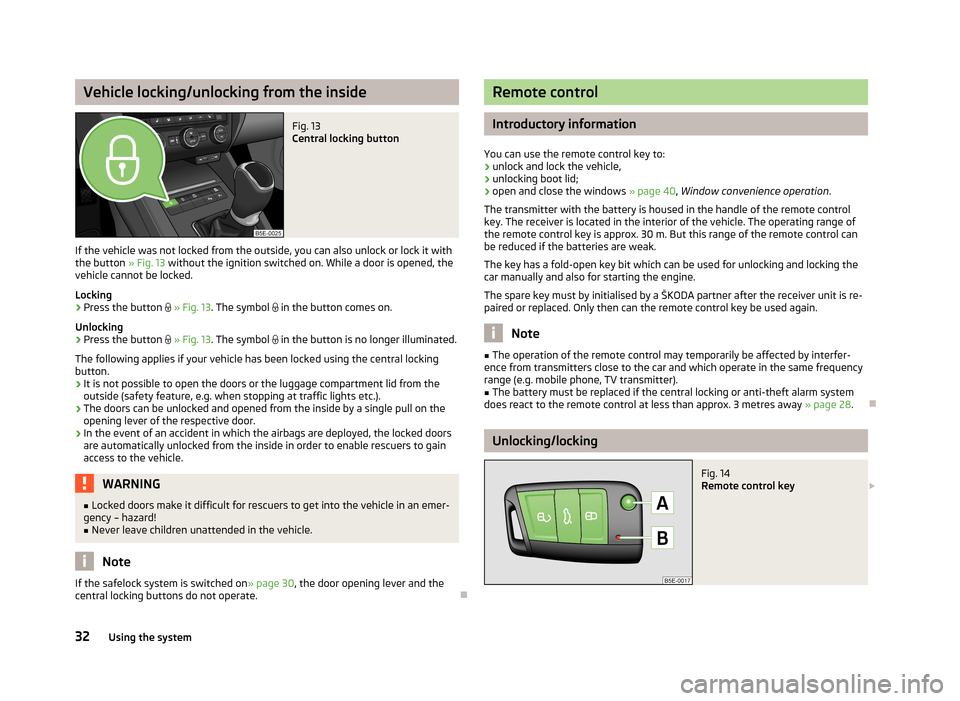
Vehicle locking/unlocking from the insideFig. 13
Central locking button
If the vehicle was not locked from the outside, you can also unlock or lock it with
the button » Fig. 13 without the ignition switched on. While a door is opened, the
vehicle cannot be locked.
Locking
›
Press the button
» Fig. 13 . The symbol
in the button comes on.
Unlocking
›
Press the button
» Fig. 13 . The symbol
in the button is no longer illuminated.
The following applies if your vehicle has been locked using the central locking button.
› It is not possible to open the doors or the luggage compartment lid from the
outside (safety feature, e.g. when stopping at traffic lights etc.).
› The doors can be unlocked and opened from the inside by a single pull on the
opening lever of the respective door.
› In the event of an accident in which the airbags are deployed, the locked doors
are automatically unlocked from the inside in order to enable rescuers to gain access to the vehicle.
WARNING■ Locked doors make it difficult for rescuers to get into the vehicle in an emer-
gency – hazard!■
Never leave children unattended in the vehicle.
Note
If the safelock system is switched on » page 30
, the door opening lever and the
central locking buttons do not operate.
Remote control
Introductory information
You can use the remote control key to:
› unlock and lock the vehicle,
› unlocking boot lid;
› open and close the windows
» page 40, Window convenience operation .
The transmitter with the battery is housed in the handle of the remote control
key. The receiver is located in the interior of the vehicle. The operating range of
the remote control key is approx. 30 m. But this range of the remote control can
be reduced if the batteries are weak.
The key has a fold-open key bit which can be used for unlocking and locking the
car manually and also for starting the engine.
The spare key must by initialised by a ŠKODA partner after the receiver unit is re-
paired or replaced. Only then can the remote control key be used again.
Note
■ The operation of the remote control may temporarily be affected by interfer-
ence from transmitters close to the car and which operate in the same frequency
range (e.g. mobile phone, TV transmitter).■
The battery must be replaced if the central locking or anti-theft alarm system
does react to the remote control at less than approx. 3 metres away » page 28.
Unlocking/locking
Fig. 14
Remote control key
32Using the system
Page 35 of 222
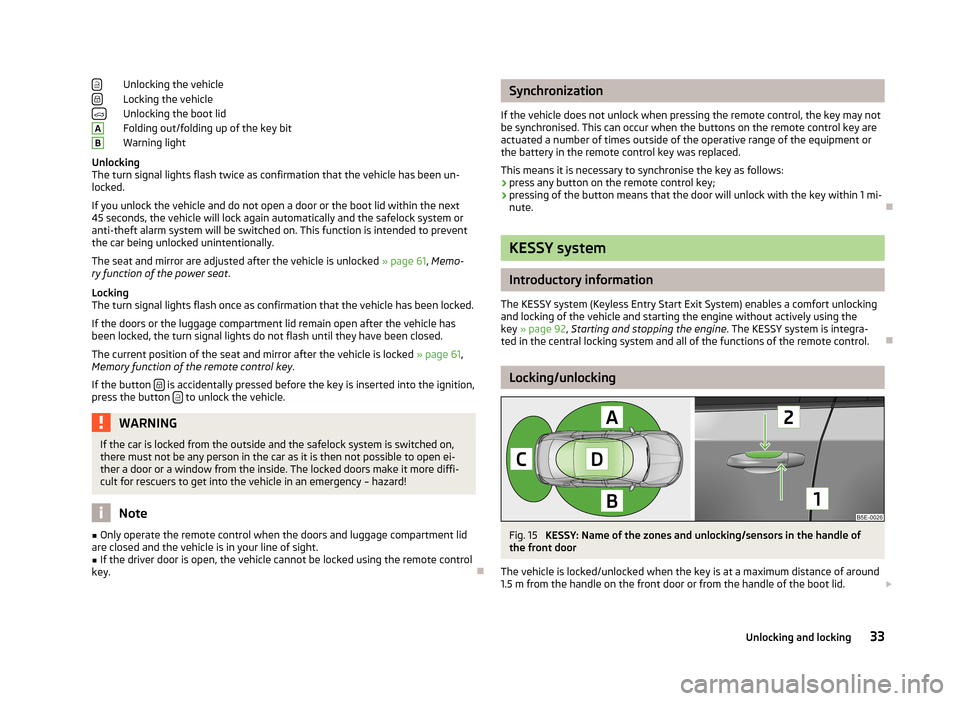
Unlocking the vehicle
Locking the vehicle
Unlocking the boot lid
Folding out/folding up of the key bit
Warning light
Unlocking
The turn signal lights flash twice as confirmation that the vehicle has been un-
locked.
If you unlock the vehicle and do not open a door or the boot lid within the next
45 seconds, the vehicle will lock again automatically and the safelock system or
anti-theft alarm system will be switched on. This function is intended to prevent
the car being unlocked unintentionally.
The seat and mirror are adjusted after the vehicle is unlocked » page 61, Memo-
ry function of the power seat .
Locking
The turn signal lights flash once as confirmation that the vehicle has been locked.
If the doors or the luggage compartment lid remain open after the vehicle has
been locked, the turn signal lights do not flash until they have been closed.
The current position of the seat and mirror after the vehicle is locked » page 61,
Memory function of the remote control key .
If the button
is accidentally pressed before the key is inserted into the ignition,
press the button to unlock the vehicle.
WARNINGIf the car is locked from the outside and the safelock system is switched on,
there must not be any person in the car as it is then not possible to open ei-
ther a door or a window from the inside. The locked doors make it more diffi-
cult for rescuers to get into the vehicle in an emergency – hazard!
Note
■ Only operate the remote control when the doors and luggage compartment lid
are closed and the vehicle is in your line of sight.■
If the driver door is open, the vehicle cannot be locked using the remote control
key.
ABSynchronization
If the vehicle does not unlock when pressing the remote control, the key may not be synchronised. This can occur when the buttons on the remote control key areactuated a number of times outside of the operative range of the equipment or
the battery in the remote control key was replaced.
This means it is necessary to synchronise the key as follows:
› press any button on the remote control key;
› pressing of the button means that the door will unlock with the key within 1 mi-
nute.
KESSY system
Introductory information
The KESSY system (Keyless Entry Start Exit System) enables a comfort unlocking
and locking of the vehicle and starting the engine without actively using the
key » page 92 , Starting and stopping the engine . The KESSY system is integra-
ted in the central locking system and all of the functions of the remote control.
Locking/unlocking
Fig. 15
KESSY: Name of the zones and unlocking/sensors in the handle of
the front door
The vehicle is locked/unlocked when the key is at a maximum distance of around
1.5 m from the handle on the front door or from the handle of the boot lid.
33Unlocking and locking
Page 39 of 222
An emergency locking mechanism is located on the face side of the doors which
have no locking cylinder, it is only visible after opening the door.›
Remove the panel
A
» Fig. 18 .
›
Insert the key into the slot
B
and turn it into the horizontal position in the di-
rection of the arrow (mirror-inverted on the right doors).
›
Replace the cover.
After closing the door, it cannot be opened from the outside. The door is unlocked by pulling on the door opening lever and is then opened from the outside.
Luggage compartment lid
Introduction
This chapter contains information on the following subjects:
Opening/closing
37
Automatic locking
38
Emergency unlocking
38WARNING■ Ensure that the lock is properly engaged after closing the luggage compart-
ment lid. Otherwise, the boot lid might open suddenly when driving even if it
was locked– risk of accident!■
Never drive with the luggage compartment lid fully opened or slightly ajar
otherwise exhaust gases may get into the interior of the vehicle – risk of poi-
soning!
■
Do not press on the rear window when closing the luggage compartment lid,
it could crack – risk of injury!
CAUTION
If the vehicle was locked before the boot lid was closed, the lid is automatically
locked right away as soon as it is closed.
Note
The function of the handle above the licence plate is deactivated when starting
off or at a speed of 5 km/hour or more for vehicles with central locking. The func-
tion is restored after the vehicle stops and the door is opened.
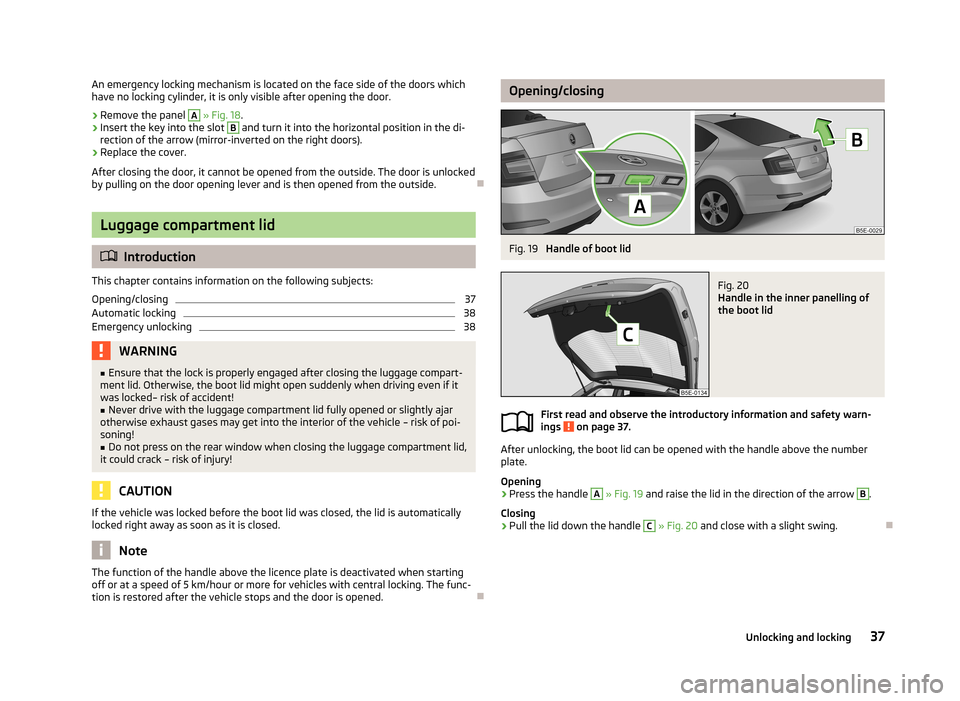
Opening/closingFig. 19
Handle of boot lid
Fig. 20
Handle in the inner panelling of
the boot lid
First read and observe the introductory information and safety warn-
ings on page 37.
After unlocking, the boot lid can be opened with the handle above the number
plate.
Opening
›
Press the handle
A
» Fig. 19 and raise the lid in the direction of the arrow
B
.
Closing
›
Pull the lid down the handle
C
» Fig. 20 and close with a slight swing.
37Unlocking and locking
Page 41 of 222
CAUTION■Keep the windows clean to ensure the correct functionality of the electric win-
dows.■
In the event that the windows are frozen, first of all eliminate the
ice » page 162 , De-icing windows and exterior mirrors and only then operate the
electrical power windows. Otherwise, the electrical power window mechanism
could be damaged.
■
When leaving the locked vehicle make sure that the windows are closed at all
times.
For the sake of the environment
At high speeds, you should keep the windows closed to prevent unnecessarily
high fuel consumption.
Note
The window lift system is equipped with protection against overheating. Repea-
ted opening and closing of the window can cause this mechanism to overheat. If
this happens, it will not be possible to operate the window for a short time. You
will be able to operate the window again as soon as the overheating protection
has cooled down.
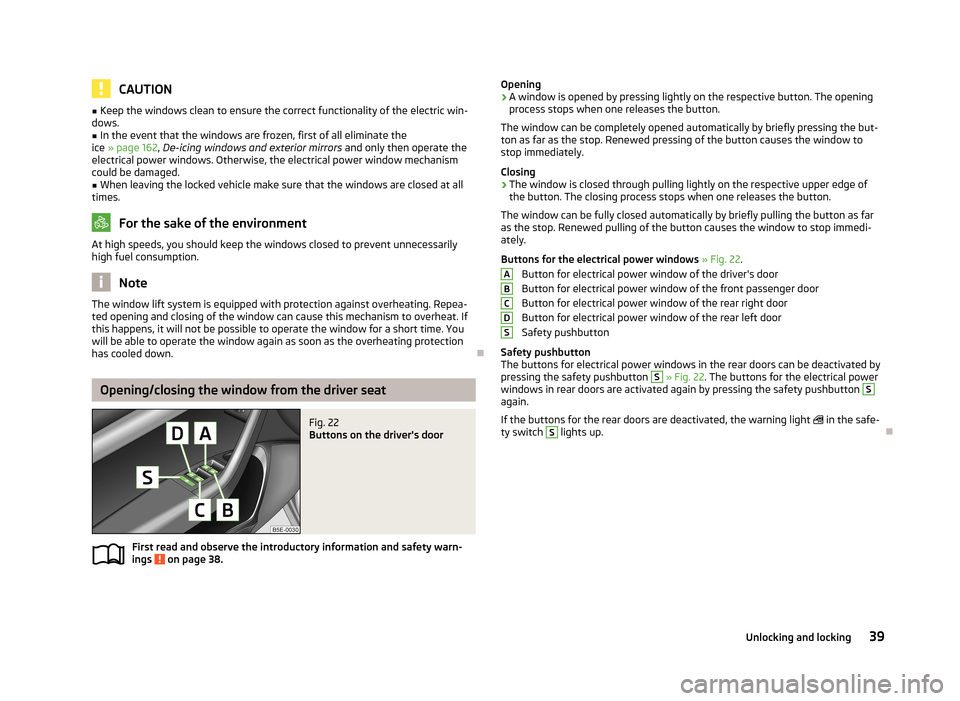
Opening/closing the window from the driver seat
Fig. 22
Buttons on the driver's door
First read and observe the introductory information and safety warn-
ings on page 38.
Opening›A window is opened by pressing lightly on the respective button. The opening
process stops when one releases the button.
The window can be completely opened automatically by briefly pressing the but- ton as far as the stop. Renewed pressing of the button causes the window tostop immediately.
Closing›
The window is closed through pulling lightly on the respective upper edge of the button. The closing process stops when one releases the button.
The window can be fully closed automatically by briefly pulling the button as far as the stop. Renewed pulling of the button causes the window to stop immedi-
ately.
Buttons for the electrical power windows » Fig. 22 .
Button for electrical power window of the driver's door
Button for electrical power window of the front passenger door
Button for electrical power window of the rear right door
Button for electrical power window of the rear left doorSafety pushbutton
Safety pushbutton
The buttons for electrical power windows in the rear doors can be deactivated by pressing the safety pushbutton
S
» Fig. 22 . The buttons for the electrical power
windows in rear doors are activated again by pressing the safety pushbutton
S
again.
If the buttons for the rear doors are deactivated, the warning light
in the safe-
ty switch
S
lights up.
ABCDS39Unlocking and locking
Page 45 of 222
Lights and visibility
Lights
Introduction
This chapter contains information on the following subjects:
Side lights and the low beam
44
Daylight driving light function (DAY LIGHT)
44
Turn signal and main beam light
45
Automatic driving lamp control
45
Adaptive headlights (AHL)
46
Headlight assist
47
Fog lights
48
Fog lights with the function CORNER
48
Rear fog light
48
COMING HOME/LEAVING HOME function
49
Hazard warning light system
49
The light only operates if the ignition is switched on.
On models fitted with right-hand steering the position of certain switches differs
from that shown in » Fig. 25 on page 44. The symbols which mark the switch
positions are identical, however.
The low beam continues to shine while the ignition is switched on and the light
switch is in the position
or
. After switching off the ignition, the low beam
is switched off automatically and only the side lights come on. The side light goes
out after the ignition key is removed.
Keep the headlights lenses clean. The following guidelines must be ob- served » page 162 , Headlight lenses .
WARNING■
The activation of the lights should only be undertaken in accordance with
national legal requirements.■
The driver is always responsible for the correct settings and use of the
lights.
■
The automatic driving lamp control only operates as a support and does
not release the driver from his responsibility to check the light and, if necessa-
ry, to switch on the light depending on the light conditions. The light sensor
cannot, for example, detect rain or snow. Under these conditions we recom- mend switching on the low beam or fog lights!
Note
■ If there is a fault in the light switch, the low beam comes on automatically.■The headlights may mist up temporarily. When the driving lights are switched
on, the light outlet surfaces are free from mist after a short period, although the
headlight lenses may still be misted up in the peripheral areas. This mist has no
influence on the life of the lighting system.■
The instruments are also illuminated when the side light, low or high beam light
is switched on. The brightness of the instrument lighting can be activated/deacti- vated in the Infotainment » operating instructions for Infotainment , chapter Set-
ting vehicle systems (CAR button) .
43Lights and visibility
Page 46 of 222
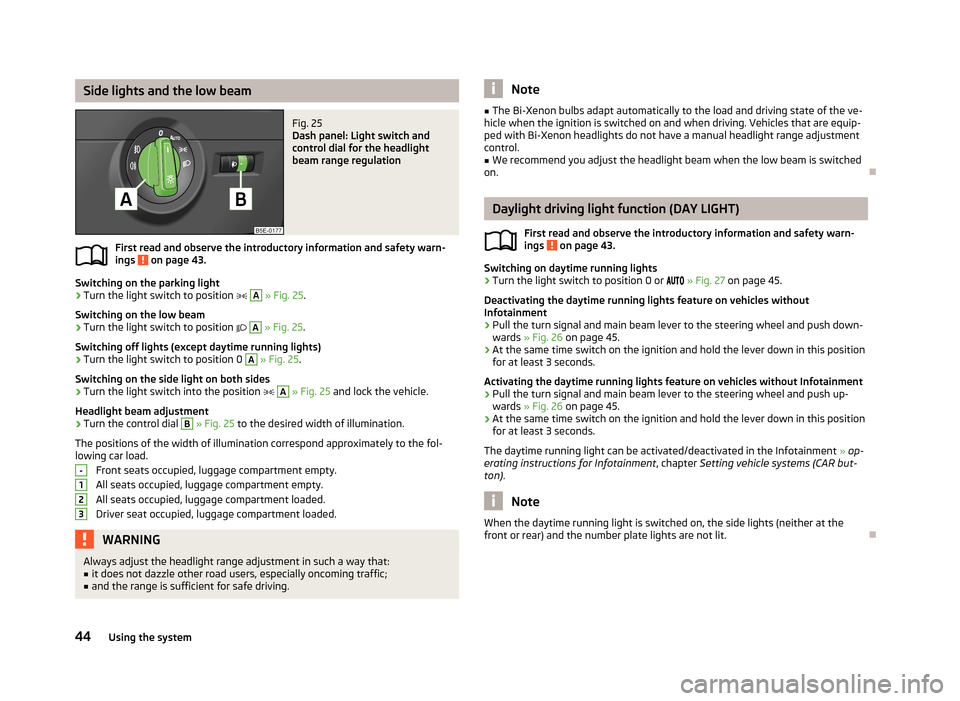
Side lights and the low beamFig. 25
Dash panel: Light switch and
control dial for the headlight
beam range regulation
First read and observe the introductory information and safety warn- ings on page 43.
Switching on the parking light
›
Turn the light switch to position
A
» Fig. 25 .
Switching on the low beam
›
Turn the light switch to position
A
» Fig. 25 .
Switching off lights (except daytime running lights)
›
Turn the light switch to position 0
A
» Fig. 25 .
Switching on the side light on both sides
›
Turn the light switch into the position
A
» Fig. 25 and lock the vehicle.
Headlight beam adjustment
›
Turn the control dial
B
» Fig. 25 to the desired width of illumination.
The positions of the width of illumination correspond approximately to the fol-
lowing car load.
Front seats occupied, luggage compartment empty.All seats occupied, luggage compartment empty.All seats occupied, luggage compartment loaded.
Driver seat occupied, luggage compartment loaded.
WARNINGAlways adjust the headlight range adjustment in such a way that:■it does not dazzle other road users, especially oncoming traffic;■
and the range is sufficient for safe driving.-123Note■ The Bi-Xenon bulbs adapt automatically to the load and driving state of the ve-
hicle when the ignition is switched on and when driving. Vehicles that are equip- ped with Bi-Xenon headlights do not have a manual headlight range adjustment
control.■
We recommend you adjust the headlight beam when the low beam is switched
on.
Daylight driving light function (DAY LIGHT)
First read and observe the introductory information and safety warn-ings
on page 43.
Switching on daytime running lights
›
Turn the light switch to position 0 or
» Fig. 27 on page 45.
Deactivating the daytime running lights feature on vehicles without
Infotainment
›
Pull the turn signal and main beam lever to the steering wheel and push down-
wards » Fig. 26 on page 45.
›
At the same time switch on the ignition and hold the lever down in this position
for at least 3 seconds.
Activating the daytime running lights feature on vehicles without Infotainment
›
Pull the turn signal and main beam lever to the steering wheel and push up- wards » Fig. 26 on page 45.
›
At the same time switch on the ignition and hold the lever down in this position
for at least 3 seconds.
The daytime running light can be activated/deactivated in the Infotainment » op-
erating instructions for Infotainment , chapter Setting vehicle systems (CAR but-
ton) .
Note
When the daytime running light is switched on, the side lights (neither at the
front or rear) and the number plate lights are not lit.
44Using the system
Page 47 of 222
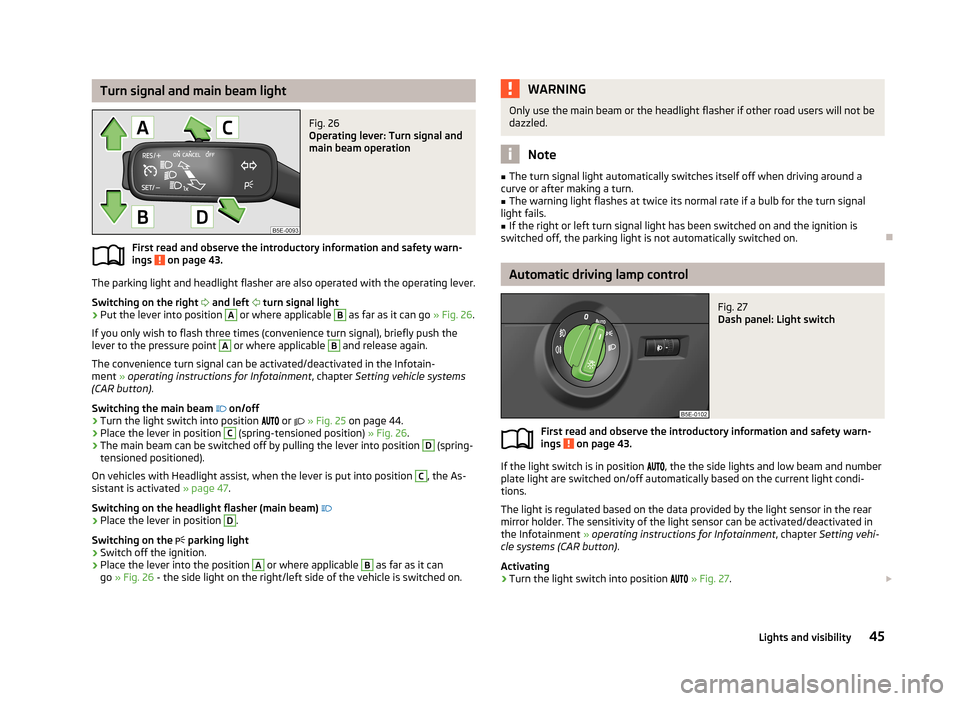
Turn signal and main beam lightFig. 26
Operating lever: Turn signal and
main beam operation
First read and observe the introductory information and safety warn-
ings on page 43.
The parking light and headlight flasher are also operated with the operating lever.
Switching on the right
and left
turn signal light
›
Put the lever into position
A
or where applicable
B
as far as it can go » Fig. 26.
If you only wish to flash three times (convenience turn signal), briefly push the
lever to the pressure point
A
or where applicable
B
and release again.
The convenience turn signal can be activated/deactivated in the Infotain-
ment » operating instructions for Infotainment , chapter Setting vehicle systems
(CAR button) .
Switching the main beam
on/off
›
Turn the light switch into position
or
» Fig. 25 on page 44.
›
Place the lever in position
C
(spring-tensioned position) » Fig. 26.
›
The main beam can be switched off by pulling the lever into position
D
(spring-
tensioned positioned).
On vehicles with Headlight assist, when the lever is put into position
C
, the As-
sistant is activated » page 47.
Switching on the headlight flasher (main beam)
›
Place the lever in position
D
.
Switching on the
parking light
›
Switch off the ignition.
›
Place the lever into the position
A
or where applicable
B
as far as it can
go » Fig. 26 - the side light on the right/left side of the vehicle is switched on.
WARNINGOnly use the main beam or the headlight flasher if other road users will not be
dazzled.
Note
■ The turn signal light automatically switches itself off when driving around a
curve or after making a turn.■
The warning light flashes at twice its normal rate if a bulb for the turn signal
light fails.
■
If the right or left turn signal light has been switched on and the ignition is
switched off, the parking light is not automatically switched on.
Automatic driving lamp control
Fig. 27
Dash panel: Light switch
First read and observe the introductory information and safety warn-
ings on page 43.
If the light switch is in position
, the the side lights and low beam and number
plate light are switched on/off automatically based on the current light condi- tions.
The light is regulated based on the data provided by the light sensor in the rear
mirror holder. The sensitivity of the light sensor can be activated/deactivated in the Infotainment » operating instructions for Infotainment , chapter Setting vehi-
cle systems (CAR button) .
Activating
›
Turn the light switch into position
» Fig. 27 .
45Lights and visibility
Page 49 of 222
WARNINGIf the AFS system is defective, the headlights are automatically lowered to the
emergency position, which prevents a possible dazzling of oncoming traffic. This reduces the cone of light in front of the vehicle. Drive carefully and visit aŠKODA specialist garage as soon as possible.
Note
■ When the “tourist light” mode is active, the warning light flashes for 10 sec-
onds each time the ignition is switched on.■
If the Eco driving mode is selected, dynamic cornering lights are deactiva-
ted » page 124 .
Headlight assist
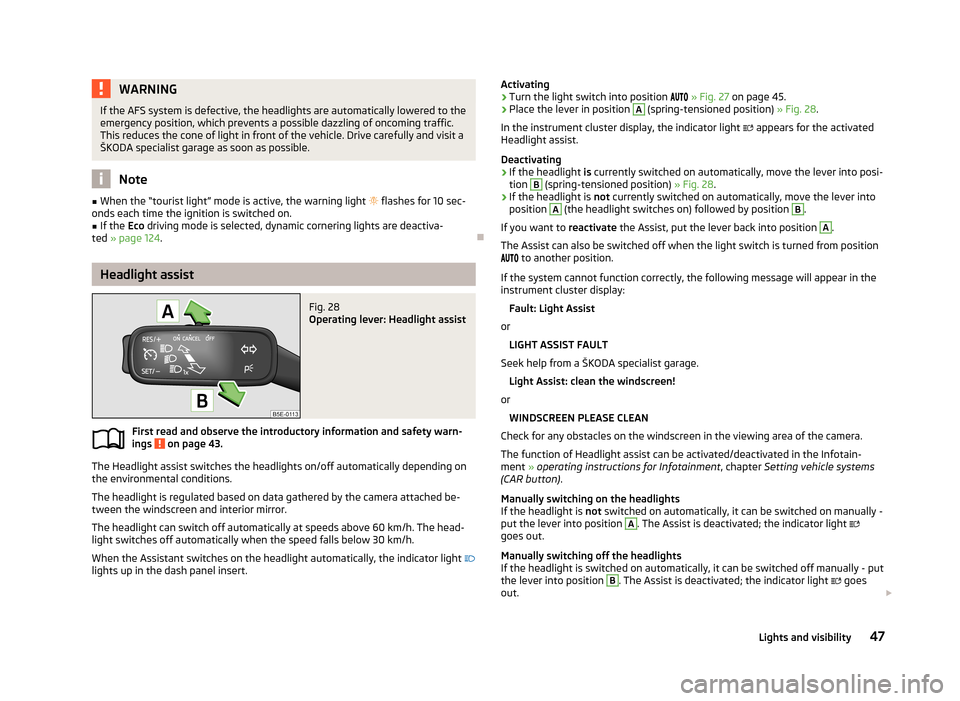
Fig. 28
Operating lever: Headlight assist
First read and observe the introductory information and safety warn-
ings on page 43.
The Headlight assist switches the headlights on/off automatically depending on
the environmental conditions.
The headlight is regulated based on data gathered by the camera attached be-
tween the windscreen and interior mirror.
The headlight can switch off automatically at speeds above 60 km/h. The head-light switches off automatically when the speed falls below 30 km/h.
When the Assistant switches on the headlight automatically, the indicator light
lights up in the dash panel insert.
Activating›Turn the light switch into position » Fig. 27 on page 45.›
Place the lever in position
A
(spring-tensioned position) » Fig. 28.
In the instrument cluster display, the indicator light appears for the activated
Headlight assist.
Deactivating
›
If the headlight is currently switched on automatically, move the lever into posi-
tion
B
(spring-tensioned position) » Fig. 28.
›
If the headlight is not currently switched on automatically, move the lever into
position
A
(the headlight switches on) followed by position
B
.
If you want to reactivate the Assist, put the lever back into position
A
.
The Assist can also be switched off when the light switch is turned from position to another position.
If the system cannot function correctly, the following message will appear in the
instrument cluster display:
Fault: Light Assist
or LIGHT ASSIST FAULT
Seek help from a ŠKODA specialist garage.
Light Assist: clean the windscreen!
or
WINDSCREEN PLEASE CLEAN
Check for any obstacles on the windscreen in the viewing area of the camera.
The function of Headlight assist can be activated/deactivated in the Infotain-
ment » operating instructions for Infotainment , chapter Setting vehicle systems
(CAR button) .
Manually switching on the headlights
If the headlight is not switched on automatically, it can be switched on manually -
put the lever into position
A
. The Assist is deactivated; the indicator light
goes out.
Manually switching off the headlights
If the headlight is switched on automatically, it can be switched off manually - put the lever into position
B
. The Assist is deactivated; the indicator light
goes
out.
47Lights and visibility
Page 50 of 222
WARNINGHeadlight assist only functions as a support and does not relieve the driver of
his responsibility to check the headlights and light beam and, if necessary, to
switch on the lights depending on the light conditions. Manual operation may be required in the following situations:■
in poor visibility conditions, e.g. fog, heavy rain, thick snowfall;
■
on A roads or motorways when oncoming traffic is partially obscured;
■
when passing poorly lit traffic, e.g. cyclists;
■
around sharp curves;
■
on sharp slopes up/down;
■
while driving through poorly-lit villages;
■
while driving over highly reflective surfaces;
■
when the windscreen around the camera is dirty, iced up, misted up, or cov-
ered up by stickers;
■
when an external navigation system is attached to the windscreen.
CAUTION
■ Do not attach any stickers or similar objects to the windscreen to avoid impair-
ing the functions of the Assist system.
Fog lights
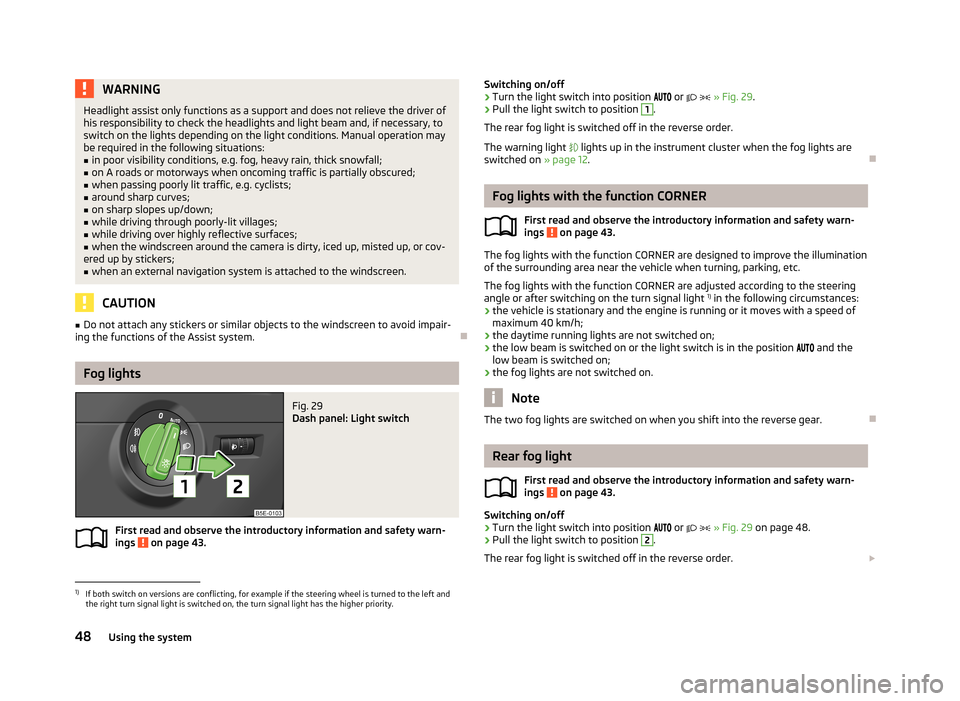
Fig. 29
Dash panel: Light switch
First read and observe the introductory information and safety warn- ings on page 43.
Switching on/off›Turn the light switch into position or » Fig. 29 .›
Pull the light switch to position
1
.
The rear fog light is switched off in the reverse order.
The warning light lights up in the instrument cluster when the fog lights are
switched on » page 12.
Fog lights with the function CORNER
First read and observe the introductory information and safety warn-
ings
on page 43.
The fog lights with the function CORNER are designed to improve the illumination
of the surrounding area near the vehicle when turning, parking, etc.
The fog lights with the function CORNER are adjusted according to the steeringangle or after switching on the turn signal light 1)
in the following circumstances:
› the vehicle is stationary and the engine is running or it moves with a speed of
maximum 40 km/h;
› the daytime running lights are not switched on;
› the low beam is switched on or the light switch is in the position
and the
low beam is switched on;
› the fog lights are not switched on.
Note
The two fog lights are switched on when you shift into the reverse gear.
Rear fog light
First read and observe the introductory information and safety warn-
ings
on page 43.
Switching on/off
›
Turn the light switch into position
or
» Fig. 29 on page 48.
›
Pull the light switch to position
2
.
The rear fog light is switched off in the reverse order.
1)
If both switch on versions are conflicting, for example if the steering wheel is turned to the left and
the right turn signal light is switched on, the turn signal light has the higher priority.
48Using the system